
10
Swiss Army Knife – Azure Cosmos DB
When it comes to storage, we often need to store multiple schemas of data using multiple databases. Due to the need to use multiple services, managing our solution becomes cumbersome, and it requires a lot of skill to do it in the right fashion. Thanks to Azure Cosmos DB, we can both store records using different database models (such as MongoDB, Table storage, and Gremlin) and pay only for what we agreed on – throughput, latency, availability, and consistency, all thanks to the serverless model.
The following topics will be covered in this chapter:
- What Azure Cosmos DB is and how it compares to other storage systems
- Partitioning, throughput, and consistency
- Different Azure Cosmos DB database models
- Security features
- Autoscaling, different methods of optimization, and managing capacity
- Using change feed to track changes
Technical requirements
To perform the exercises in this chapter, you will need access to an Azure subscription.
Understanding Cosmos DB
When working with storage, you have probably heard about different kinds: relational databases, NoSQL databases, graph databases, and document databases. There are plenty of different models available, with different characteristics when it comes to storing data. If you need to easily maintain relationships between tables, in most cases, you will choose something such as SQL Server. On the other hand, maybe you want to save each record in the JSON file format, where the best solution would be an instance of MongoDB. While the choice is all yours, the biggest problem is that you need to have a different kind of service to serve the same purpose – storing data. This is where Azure Cosmos DB comes into play. With its multi-model capabilities, flexibility, and scalability, it is a great choice for globally distributed and highly responsive applications. In this section, you will learn how to start working with this service and what its main functionalities are.
Creating a Cosmos DB instance in the portal
We will start our journey with Azure Cosmos DB by creating it in the Azure portal.
When you click on + Create a resource and search for Azure Cosmos DB, you will see a screen that allows you to select the API used for your instance of the database.
Azure Cosmos DB enables you to select a specific API during instance creation. Currently, there are five available APIs: SQL, MongoDB, Cassandra, Azure Table, and Gremlin. Depending on the API selected, you will have different capabilities available (and furthermore, different packages will be required for communicating with your database through the application's code).
Note
Remember that in Cosmos DB, the selected API only impacts the interface for communication with databases. It does not change the underlying infrastructure of the service or generic features.
When you click the Create button of a selected API, you will see a wizard, where you need to enter the rest of the service details, starting with some basic information:

Figure 10.1 – Basic information about Azure Cosmos DB
Besides Subscription and Resource Group, you need to enter the name of your Cosmos DB account (which, in fact, will be the name of your instance) and its location, and set Capacity mode. Currently, you have two options:
- Provisioned throughput – Best for workloads that require predictable performance, geo-distribution, and unlimited storage
- Serverless – Ideal for not-so-critical databases with lower performance and reliability requirements
When you have made sure that all the information you have entered in the form is correct, click on the Review + create button. We will cover the rest of the features later in the chapter. Once your service is created, you can access the Overview blade to see how it works initially:
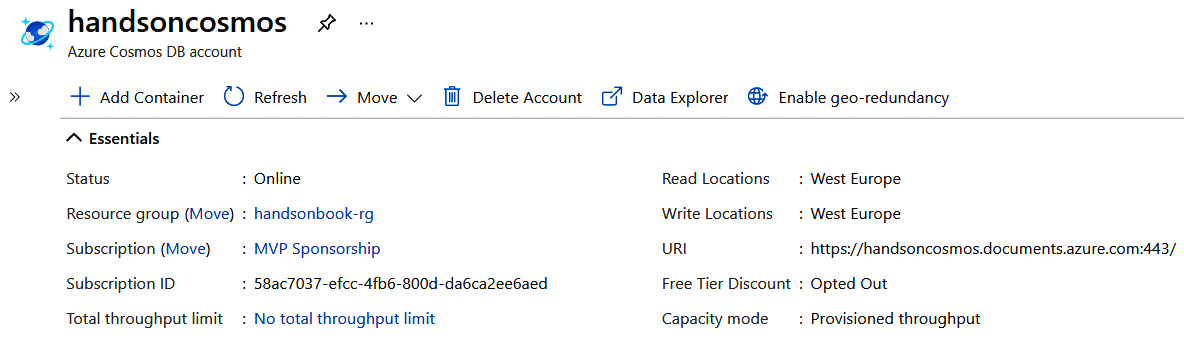
Figure 10.2 – The Overview blade of the Azure Cosmos DB instance
Azure Cosmos DB is different in many ways compared to other database solutions, as it implements some unique features:
- You can have multiple read/write locations, allowing you to improve the performance of your DB operations.
- It can be easily distributed to other regions with a single click or a single command.
- It offers a Service-Level Agreement (SLA), even for request latency.
- It has an autopilot feature implemented, meaning it can automatically tune depending on your traffic.
By clicking on the Replicate data globally menu item, you will see the available regions, which can be used for extending your Cosmos DB infrastructure and replicating data to the region of your choice:
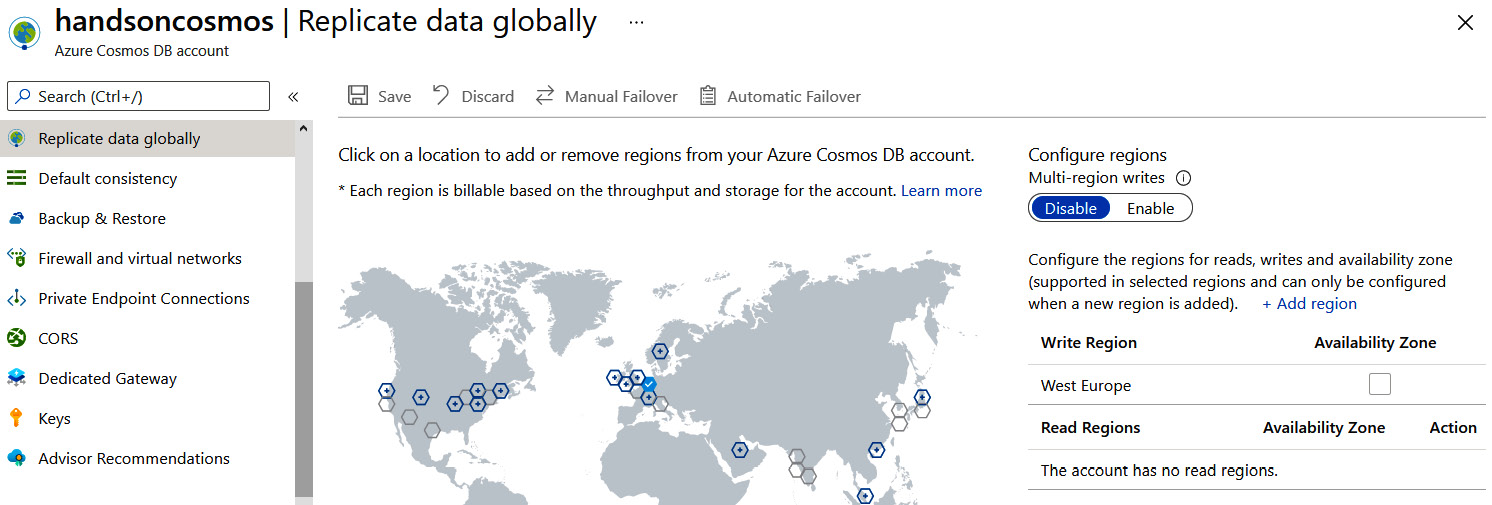
Figure 10.3 – The data replication feature in Azure Cosmos DB
Note
Geo-replication is available only for provisioned throughput. If you selected Serverless as the provisioning method, the preceding blade will not be available.

Figure 10.4 – Multiple read regions in Azure Cosmos DB
In the current setup, you are unable to add write regions. To be able to do so, you must enable Multi-region writes, as shown in Figure 10.4.
Note
Remember that enabling writes or reads in multiple regions will deploy additional instances of Azure Cosmos DB. This is not a free feature and will cost you additional money at the end of each month.
Once you save additional regions, both Manual Failover and Automatic Failover will become active. The concept for failover is simple – if your write region goes down and becomes unavailable, another available read region can take its place. The only difference is whether you want to perform this failover manually or automatically.
If you opt for automatic failover, you can decide on the order of switching between read and write regions. If you want, for example, to switch from North Europe to West Europe in the first place, West Europe must be the first item in the list.
Let's now check the pricing model of Azure Cosmos DB.
Pricing in Azure Cosmos DB
Azure Cosmos DB is part of the serverless services available in Azure, meaning there is no infrastructure to manage. As you have probably noticed, we were not able to define how many instances (or nodes or clusters) of a service we would like to run. Instead, we must define throughput for each collection individually.
You can verify that by using the Data Explorer feature in the portal. Go to Data Explorer and click on the New Container button:

Figure 10.5 – The Data Explorer feature
By clicking on the button, you will open a new window, where you can enter the details of both the database (whether it is created or not) and a container. As you will see later, containers are basically the equivalent of tables in relational databases:

Figure 10.6 – The configuration of a database and container in Azure Cosmos DB
As you can see, when creating a container, you can decide how many Request Units (RUs) you want for your database. In general, an RU represents the performance of a Cosmos DB collection and tells you how many operations can be performed in a unit of time.
Tip
An RU can be described as the cost of reading a single collection item and is often defined as 1 RU = the cost of reading a 1 KB collection item. The number of RUs needed for an operation differs, depending on the operation performed.
If you are unsure how many RUs you need, you can use the capacity calculator available directly in the configuration window, which is also available directly from its URL: https://cosmos.azure.com/capacitycalculator/.
In Cosmos DB, you are paying for both the amount of data stored ($0.25 GB a month), and reserved RUs ($.008 an hour per every 100 RUs). This means that the smallest bill possible for the service is close to $26. However, there is a very important caveat. You are paying per each collection/table/container. That means that if you have, for example, 20 different tables in your database, you will pay 20 x $26 = $520. In such a scenario, it is sometimes better to model your database in such a way that it will be possible to store all data within a single container.
While Azure Cosmos DB seems like quite an expensive service, please do remember that it does many things for you, such as geo-redundancy, multiple read regions, and multi-master models. You always must calculate the best options for you (and whether you are able to achieve similar results). To do so, look at the capacity planner described in the Further reading section.
Now that we have briefly described what Azure Cosmos DB is, let's learn more about its throughput, partitioning, and data consistency models.
Partitioning, throughput, and consistency
Now we have learned something about Azure Cosmos DB – how it works and its most common features – we can focus a little bit on three important topics in this service, namely partitioning, throughput, and consistency. These factors are crucial when selecting a database engine to power your application. They directly tell you how it will be performing, how many requests it will be able to handle, and what guarantees apply when it comes to your data integrity.
Partitions in Azure Cosmos DB
Partitioning is directly connected with scaling in Azure Cosmos DB, as it allows for load-balancing incoming requests. In fact, there are two different types of partition in this service:
- Physical: These are a combination of fixed storage and variable amounts of computing resources. This type of partition is fully managed by Cosmos DB – you cannot directly affect how your data is physically partitioned and how a service handles those partitions. In fact, you are also unaware of how many of those partitions are currently in use. Therefore, you should not design your containers based on that specific concept.
- Logical: This kind of partition holds data that has the same partition key. Because you can define that key (by specifying it in each entity), you are able to control how your data is partitioned.
Remember that a logical partition has a limit of 10 GB. Additionally, all data for a logical partition must be stored within one physical partition.
Now, you may wonder how partitioning works in Azure Cosmos DB. This can be described in a few steps:
- Each time a new container is provisioned (and you are providing several RUs), Cosmos DB must provision physical partitions, which will be able to serve the number of requests specified in the number of RUs.
- It may turn out that the specified number of RUs exceeds the maximum number of requests per second served by a partition. In that case, Cosmos DB will provision the number of partitions it needs to satisfy your requirements.
- The next thing to do is to allocate space for partition key hashes. All provisioned partitions must have the same space allocated (so it is distributed evenly).
- Now, if any partition reaches its storage limit after some time, it is split into two new partitions, and data is distributed evenly between them.
Of course, the partition key used for partitioning differs for each database model – for a table, it is a partition key; for SQL, it will be a custom path. In general, this operation is slightly different depending on the database type, yet the overall concept remains the same.
Remember that if your container has only one partition key for all the entities in it, then Cosmos DB will not be able to split a partition. That means that you could hit a maximum of 10 GB per partition and not be able to add any more data.
The best value for the partition key depends solely on your application data specification. In general, you must choose a value that is quite differential (so that partitioning can happen). On the other hand, you should not create a unique partition key for each record (while it is possible, it will be quite expensive). There is no single solution to that problem – you always must analyze each scenario and select what suits you the most.
In most cases, it is worth including a partition key while filtering data, as it allows for high concurrency.
Throughput in Azure Cosmos DB
In the Further reading section, you will find a capacity calculator – a tool that enables you to plan your Cosmos DB instance and estimate the required RUs. As mentioned previously, in this service you are not defining the number of instances or clusters. Instead, while creating a container, you must state your expected throughput for that specific collection (or a set of collections). Thanks to an SLA for Azure Cosmos DB, that value will be guaranteed for you. Additionally, even if you replicate a database to another region, you can expect that a problem in one region will not affect others.
There is one important definition of a RU – it is the processing capacity, which enables you to read a 1 KB entity using, for example, a simple GET request. The same is not true for operations such as inserting or deleting, as those require more computing power to be performed.
If you would like to know exactly how many RUs a specific operation consumes, you must consult the x-ms-request-charge header in a response from a Cosmos DB instance. This will tell you the cost of this operation – of course, you must remember that it can differ depending on the number of records returned. In the documentation, you can find the following table:

Those are values for executing an operation against an entity 1 KB in size. As you can see, the values are completely different depending on the operation type. You also can see that it is crucial to carefully check all the operations' requirements – if you fail to do so, you may face an HTTP 429 response, which tells you that you have exceeded the reserved throughput limits. In such a scenario, you should honor the x-ms-retry-after-ms header response, which allows for an easy retry policy.
Consistency in Azure Cosmos DB
Besides the different models of a database, Azure Cosmos DB also offers a different level of consistency. You may wonder what consistency is and how it affects your data. In fact, we can define it as follows:
So, basically, it tells you what the guarantees are that, if your data becomes affected by a set of operations, it will not be malformed, and you will be able to rely on it. The following are the available consistency models in Cosmos DB:
- STRONG
- BOUNDED STATELESS
- SESSION
- CONSISTENT PREFIX
- EVENTUAL
In the preceding list, each level below STRONG gives you less consistency. This is especially true for EVENTUAL, which might be familiar to you thanks to a topic known as eventual consistency. In general, Azure Cosmos DB allows you to set the default consistency level for your account – if needed, it is possible to override it per request. If you want to know how exactly each consistency level works, please refer to the Further reading section. To set a particular level in your Cosmos DB instance, click on the Default consistency blade:

Figure 10.7 – Various consistency models in Azure Cosmos DB
As you can see, it allows you to easily switch to another consistency level depending on your needs. What's more, it displays a nice animation that describes how reads/writes in multiple regions will work for a particular level. The following screenshot shows the animation for EVENTUAL consistency:

Figure 10.8 – Eventual consistency data replication
In the preceding screenshot, each individual note represents an individual read or write in a particular region. Note that some consistency models allow you to configure additional parameters, which allow you to adjust the chosen model. For example, selecting BOUNDED STALENESS will give you an option to enter a maximum lag time for the data replication operation:
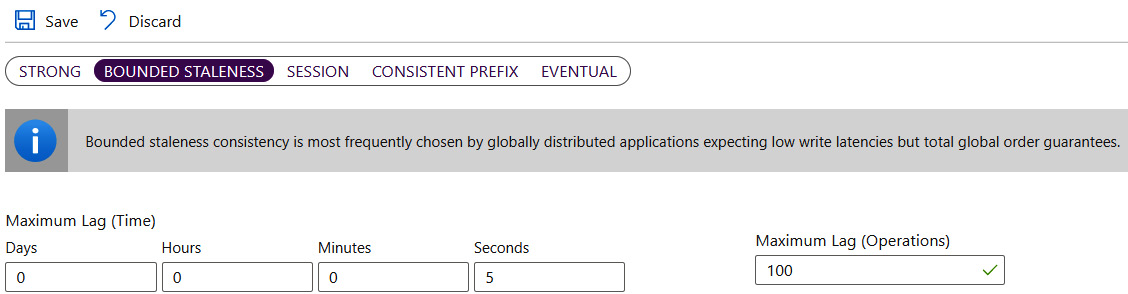
Figure 10.9 – Bounded staleness configuration
Selection of the data replication model is a direct choice of your application – some applications or features (such as tweets on Twitter or likes on Facebook) do not have the requirement of happening immediately – they need to happen eventually; thus, the EVENTUAL consistency model would suit in those cases. However, if you need your data to be replicated at once, you should select a more consistent model.
Note
Remember that with multi-region writes selected, you will be unable to select the Strict consistency model. Azure Cosmos DB is unable to guarantee that kind of consistency if it needs to geo-replicate each request linearly.
With the basic definitions of imports for Azure Cosmos DB discussed, we will now switch our focus to data models in detail.
Azure Cosmos DB models and APIs
As mentioned earlier, Azure Cosmos DB offers six different database models, all sharing the same infrastructure and concepts. This is a great feature that makes this service flexible and able to serve multiple different purposes. In this section, I will briefly describe each database model so that you will be able to select one that best serves your purposes.
SQL
If you think about SQL, you probably see a relational database with tables, relations, and stored procedures. When working with the SQL API in Cosmos DB, in fact, you will work with documents that can be queried using the SQL syntax. Let's assume you want to query documents using the following call:
SELECT * FROM dbo.Order O WHERE O.AccountNumber = "0000-12-223-12"
Here, you can find an example of a query written in C#:
// using Microsoft.Azure.Documents.Client;
// client is DocumentClient class
var order =
client.CreateDocumentQuery<Order>(collectionLink)
.Where(so => so.AccountNumber == "0000-12-223-12")
.AsEnumerable()
.FirstOrDefault();
As you can see, it is all about a simple LINQ query, which allows you to use a specific property to filter data. Because all records in Cosmos DB are stored as JSON documents, you can easily transform them from table to document representations (and possibly denormalize them).
Using document databases is completely different from storing data in relational databases. Always remember to model your data appropriately in line with database capabilities.
MongoDB
As Cosmos DB implements the MongoDB wire protocol, you can easily use all your applications that currently use that document database with new instances of Azure Cosmos DB, without changing anything (besides the connection string, of course). While it cannot mimic MongoDB completely yet (the full list of supported operations can be found in the Further reading section), in most cases, you will be able to use it seamlessly. As Cosmos DB has a strict requirement regarding security, you will have to use Secure Sockets Layer (SSL) when communicating with it:
mongodb://username:password@host:port/[database]?ssl=true
Here, you can see a template for a connection string, where ssl=true is present – it is required when communicating with this Azure service. What's more, you will not be able to set a communication without authenticating a request.
Graph
Azure Cosmos DB supports Gremlin as a graph database model. If you are not familiar with graph databases, you can think of them as a structure composed of vertices and edges. They can very easily show you relations between different elements of a graph, as you can quickly traverse the connections and see that element A knows something about element B indirectly, thanks to element C. To be more specific, Cosmos DB supports a more specific model of a graph database known as a property graph. The following is an example query for Gremlin:
:> g.V('thomas.1').out('knows').out('uses').out('runsos').group().by('name').by(count())
The preceding example is taken from the documentation and literally answers the question, what operating systems do relations of the user of the thomas.1 ID use? Graph databases are great for applications such as social media portals or Internet of Things (IoT) hubs.
Table
While you can use Azure Table storage for your applications (which will be covered in the upcoming chapters), it is possible to also take advantage of Cosmos DB's Table API and consider more advanced scenarios with that service. There are some differences between both services:
- While the current maximum limit for operations in Azure Table storage is 20,000 operations per second, with Cosmos DB, you can achieve millions of them.
- You cannot initiate failover for Table storage.
- In Cosmos DB, data is indexed on all properties, not only on the partition key and row key.
- Different pricing (storage versus throughput).
- Different consistency levels.
Developing against the Cosmos DB Table API is the same as working with Azure Table storage. The following is an example of code in C# retrieving entities from a table:
// NuGet: Microsoft.Azure.Cosmos.Table
CloudStorageAccount storageAccount = CloudStorageAccount.Parse(
CloudConfigurationManager.GetSetting("StorageConnectionString"));
CloudTableClient tableClient = storageAccount.CreateCloudTableClient();
CloudTable table = tableClient.GetTableReference("people");
TableQuery<CustomerEntity> query = new TableQuery<CustomerEntity>().Where(TableQuery.GenerateFilterCondition("PartitionKey", QueryComparisons.Equal, "Smith"));
foreach (CustomerEntity entity in table.ExecuteQuery(query))
{
Console.WriteLine("{0}, {1} {2} {3}", entity.PartitionKey, entity.RowKey,
entity.Email, entity.PhoneNumber);
}
Similar logic will be valid for other supported languages such as Java.
Cassandra
The last available model in Azure Cosmos DB is Cassandra. Cassandra is a scalable, durable, and decentralized database for storing massive amounts of data. Now, if you use it with Cosmos DB, you can focus on development rather than on operations or performance management, and have a choice of consistency. Under the hood, it uses the Cassandra API, so it is possible to use the Cassandra Query Language to communicate and interact with data. This model has the same feel as MongoDB – you can use the same tools that you used for your current Cassandra instances and should not notice any difference.
Capacity, autoscale, and optimization
Azure Cosmos DB has multiple different features that can be used to lower your bills, secure an instance, or integrate with other services. In this section, we will quickly look at most of them so that you will fully understand the basics of this service and will be able to progress on your own.
Container throughput
In Azure Cosmos DB, throughput can be set at multiple levels. One of those levels is the container throughput, which allows us to exclusively reserve capacity for an individual container. It is important to consider it for all cases where reliability is critical – as per the Azure Cosmos DB documentation, this operation is financially backed by the SLA of the service. This means that Microsoft is sure that throughput set at a container level is stable and can be relied on.
Container level throughput can be set using the Azure portal (as mentioned previously in this chapter) or by using one of the Software Development Kits (SDKs) or the Command Line Interface (CLI). Here is the example of setting up a container with a fixed throughput using the Azure CLI:
az cosmosdb sql container create -a <account-name> -g <resource-group-name> -d <database-name> -n <container-name> -p <partition-key> –throughput <throughput-value>
The same can be done using, for example, a .NET SDK:
// using Microsoft.Azure.Documents
DocumentCollection myCollection = new DocumentCollection();
myCollection.Id = "myContainerName";
myCollection.PartitionKey.Paths.Add("/partitionkey");
// client is DocumentClient class
await client.CreateDocumentCollectionAsync(
UriFactory.CreateDatabaseUri("databasename"),
myCollection,
new RequestOptions { OfferThroughput = 400 });
Specifically, once throughput is defined on a container level, it is distributed evenly amongst its partitions. This requires a good partition key selection – if you fail to select a partition key, which divides your data into similar parts, you may face an issue called a hot partition. More information related to partitioning good practices can be found in the Further reading section.
Database level throughput
In Azure Cosmos DB, it is also possible to provision throughput directly on a database. To do so, you need to select the Provision throughput checkbox during database creation:
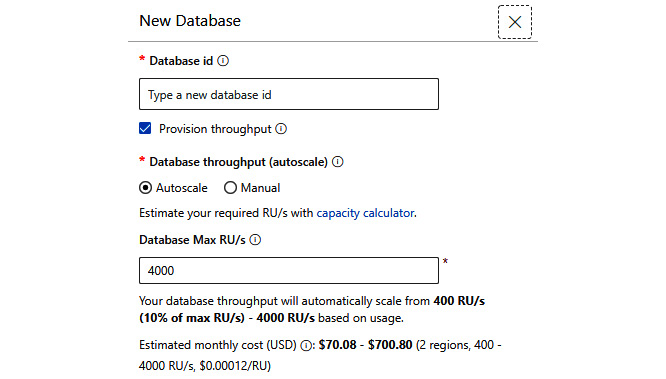
Figure 10.10 – Creating a database in the portal
With that feature on, all provisioned RUs will be shared across all the collections available for a database. The same can be done using, for example, a .NET SDK:
// Nuget: Microsoft.Azure.Cosmos
var databaseName = "MyDatabaseName";
await this.cosmosClient.CreateDatabaseIfNotExistsAsync(
id: databaseName,
throughput: 4000);
There are at least two use cases for the database-level throughput scenario:
- A multitenant application, where you do not wish to configure throughput on each container individually
- Migration scenarios from other NoSQL databases, where throughput was defined at a database level and you want to reuse a similar design in Azure
There is one important detail, however, when using throughput defined at a database level – there is a limitation on how many containers can be created for such a database. The current limit allows you to host only 25 containers inside a single database, which will leverage the shared throughput feature. After reaching that value, you will still be able to add more containers; however, they have to be provisioned with dedicated throughput.
Firewall and virtual networks
At any time, you can access the Firewall and virtual networks blade to configure networking features of your Azure Cosmos DB instance. As this database service is offered in a serverless model, your ability to configure low-level features of a virtual network will not be available. However, you can still define which networks can connect with your instance. Here, you can see how the functionality looks in the Azure portal:

Figure 10.11 – The Firewall and virtual networks feature in Azure Cosmos DB
As you can see, you can additionally configure a firewall, which limits access to Azure Cosmos DB by whitelisting specific IP addresses from the list. Note that both firewall rules and virtual network integration can be enabled on a single Cosmos DB account. What is important to remember though is that they are complementary – a firewall is designed to block public access from static IP addresses while network integration defines which VoiceNets (VNETs) and subnets can access the account.
Azure Functions
One of the interesting features of Azure Cosmos DB is the ability to easily integrate with Azure Functions by using the Add Azure Function blade:
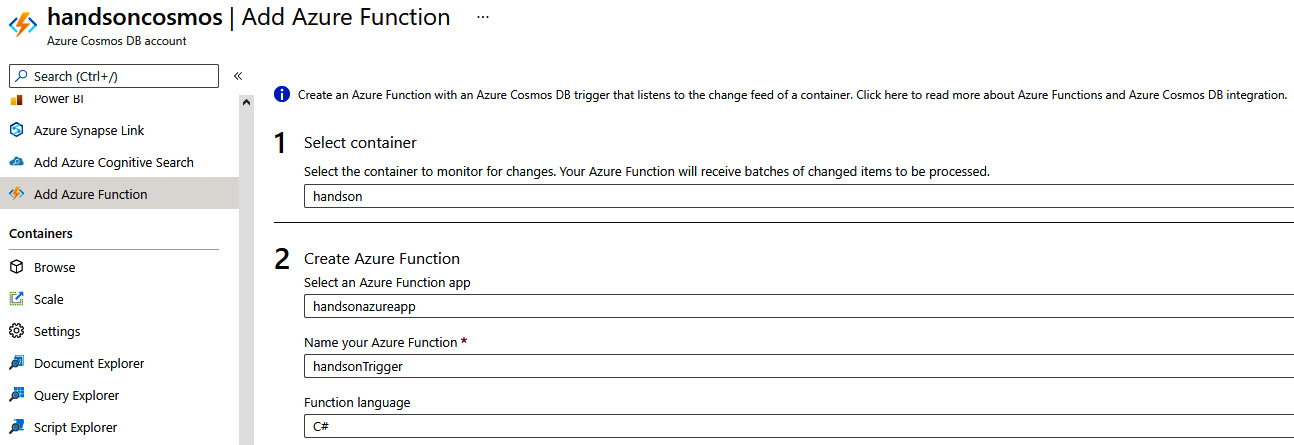
Figure 10.12 – Adding Azure Functions integration
In the Add Azure Function blade, you will need to select a container and your Azure function, which will handle incoming triggers. Enabling that feature creates a new function in your function app, which is triggered with each new document added to the container selected in the configuration selection. The created function will look like the following code snippet:
#r "Microsoft.Azure.Documents.Client"
using Microsoft.Azure.Documents;
using System.Collections.Generic;
using System;
public static async Task Run(IReadOnlyList<Document> input, TraceWriter log)
{
log.Verbose("Document count " + input.Count);
log.Verbose("First document Id " + input[0].Id);
}
This is CSX code, which we did not cover, and in fact, there was a reason for that – simply put, using CSX is far from an optimal solution. Personally, I recommend using C# or any of the other supported languages in Azure Functions, as they offer more predictable performance and easier management of your code. When using Azure Functions with the Cosmos DB trigger, the concepts of functions that you should already be familiar with are the same – as you can see in the following snippet, we are still using attributes. There are triggers and bindings, and the whole framework does most of the work for us:
[FunctionName("DocByIdFromJSON")]
public static void Run(
[QueueTrigger("inputqueue")] string message,
[CosmosDB(
databaseName: "somedb",
collectionName: "Items",
ConnectionStringSetting = "CosmosDBConnection",
Id = "{ItemId}",
PartitionKey = "{PartitionKeyValue}")] ContainerItem item,
ILogger log)
{
// Your code
}
Besides using the Cosmos DB trigger specifically, there is nothing different compared to integrating Azure Functions with other services.
Stored procedures
Azure Cosmos DB allows you to create stored procedures that can be executed individually and can hold extra logic, which you do not want to share.
If you go to your collection in Data Explorer, you will see the New Stored Procedure tab and the option to create one:

Figure 10.13 – Adding a new stored procedure
Stored procedures are written in JavaScript – this allows you to easily access a document's schema (as they are all JSON). What is more, they are registered per collection. Here, you can find an example of the stored procedure generated in the Azure portal:
function sample(prefix) {
var collection = getContext().getCollection();
// Query documents and take 1st item.
var isAccepted = collection.queryDocuments(
collection.getSelfLink(),
'SELECT * FROM root r',
function (err, feed, options) {
if (err) throw err;
// Check the feed and if empty, set the body to 'no docs found',
// else take 1st element from feed
if (!feed || !feed.length) {
var response = getContext().getResponse();
response.setBody('no docs found');
}
else {
var response = getContext().getResponse();
var body = { prefix: prefix, feed: feed[0] };
response.setBody(JSON.stringify(body));
}
});
if (!isAccepted) throw new Error('The query was not accepted by the server.');
}
Each stored procedure can create, update, delete, and read items when executed. Stored procedures can be executed using one of the supported SDKs (.NET, Java, Python, or JavaScript) by calling it in the context of the collection where the stored procedure is saved:
const newItem = [{
name: "John",
surname: "Doe
}];
const container = client.database("myDatabase").container("myContainer");
const sprocId = "spCreatePerson";
const {resource: result} = await container.scripts.storedProcedure(sprocId).execute(newItem, {partitionKey: newItem[0].category});
The main use case of stored procedures is to encapsulate logic and performance improvement of the database operations.
User-defined functions and triggers
To extend the query language, you can write your own User-Defined Function (UDF) in your queries. Note that you cannot use these in stored procedures. UDFs are used to extend the SQL query language in Azure Cosmos DB and can be only called from inside queries. Triggers, however, are divided into two categories:
- Pre-triggers
- Post-triggers
Additionally, you can select an operation that this trigger refers to:
- All
- Create
- Delete
- Replace
Here, you can find an example of a trigger that updates a timestamp in a document before it is created:
var context = getContext();
var request = context.getRequest();
var documentToCreate = request.getBody();
if (!("timestamp" in documentToCreate)) {
var ts = new Date();
documentToCreate["my timestamp"] = ts.getTime();
}
request.setBody(documentToCreate);
Triggers, of course, are also available from Data Explorer:
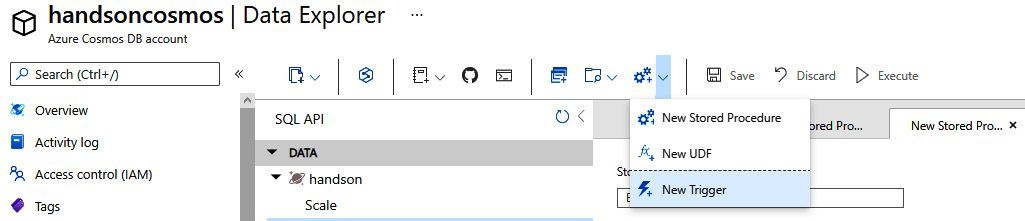
Figure 10.14 – Creating a trigger
When creating a trigger, you will need to specify its ID, type, and what kind of operations can be performed by it. Each trigger also has a body that defines the logic behind the trigger:
function validate () {
var context = getContext();
var request = context.getRequest();
var item = request.getBody();
if (!("date" in item)) {
var ts = new Date();
item ["date"] = ts.getTime();
}
request.setBody(item);
}
Depending on the type (pre- or post-), triggers can be used for validation of data, decorating with additional information, or modifying the contents of a record.
Autoscale in Azure Cosmos DB
When creating a database or a container, you can decide whether you want to use a fixed throughput or let Azure Cosmos DB decide how well it should perform at each moment in time. The choice is quite simple:
- If you are searching for predictable performance, fixed throughput should address your requirements.
- If you want to have a more cost-effective setup that offers flexible performance aligned with the current utilization of your database, the autoscale feature is something for you to consider.
Here, you can see where Autoscale is being defined during database creation:

Figure 10.15 – Creating a database with Autoscale enabled
While using the autoscale feature can help you in establishing a solution, which can easily scale its cost, it has some drawbacks to consider. Compared to fixed throughput, which will perform at a stable rate, autoscale always needs some time to adjust the capacity of a database or a container. This means that you may experience worse performance of your Cosmos DB collections during a time when autoscaling increments the available RUs.
On the other hand, autoscale will automatically scale down your instance of Cosmos DB if your application does not need as many RUs as currently defined. A similar functionality can be implemented using fixed throughput, but it will require a custom solution developed by you.
With the various features of Azure Cosmos DB described, let's now switch to the last topic of this chapter, where we will discuss a way to track changes that happen to the items stored in Cosmos DB collections.
Using change feed for change tracking
When processing high volumes of data in Azure Cosmos DB, you may want to react to all the documents that are inserted or updated. While it is possible to query each container at a certain time interval, such a solution has many downsides:
- It is difficult to determine the correct interval.
- You can query the data even if there are no changes to the dataset.
- You do not know what record was added or altered, so you often need to query the whole collection.
To address these issues, a feature called change feed was introduced to Azure Cosmos DB. It allows for the implementation of various business cases, including the following:
- Calling an HTTP endpoint passing information about an added or updated document
- Processing data in a streaming fashion
- Migrating data with no or limited downtime
Change feed can be easily integrated with multiple real-time processing tools such as Apache Spark or Apache Storm, giving you a powerful solution for extending the capabilities of your system.
When implementing functionalities based on change feed, you have two options to choose from – you can use the simplest option and leverage the capabilities of Azure Functions, which integrate seamlessly with that feature, or implement your own functionality with the change feed processor library.
Note
At the time of writing, the trigger for change feed can be implemented only for Cosmos DB accounts with the SQL API selected.
A function using change feed can look like this:
[FunctionName("CosmosTrigger")]
public static void Run([CosmosDBTrigger(
databaseName: "MyDatabase",
collectionName: "Items",
ConnectionStringSetting = "CosmosDBConnection",
LeaseCollectionName = "leases",
CreateLeaseCollectionIfNotExists = true)]IreadOnlyList<Document> documents,
Ilogger log)
{
if (documents != null && documents.Count > 0)
{
log.LogInformation($"Documents modified: {documents.Count}");
log.LogInformation($"First document Id: {documents[0].Id}");
}
}
The advantage of this approach is its ability to quickly focus on you implementing your own functionality – you do not need to fully understand the underlying concepts, leaving the implementation details to the trigger implementation. On the other hand, it forces you to use Azure Functions in your architecture, which is not always desired.
The alternative of using the change feed processor library will require a more sophisticated approach, as you will have to host the processor on your own and ensure it works constantly. The first thing needed will be acquiring an SDK that has the processor implemented. Currently, it is available in SDKs for C#, Java, and Python – all you need is to select an appropriate class to implement the necessary logic. For the change feed processor, you will need to divide your code into two sections:
- An entry point, which starts the process
- A handler, which executes the processor logic
In C#, the entry point is implemented using the ChangeFeedProcessor class:
ChangeFeedProcessor changeFeedProcessor = cosmosClient.GetContainer(databaseName, sourceContainerName)
.GetChangeFeedProcessorBuilder<YourCollectionClass>(processorName: "changeFeedProcessorName", onChangesDelegate: HandleChangesAsync)
.WithInstanceName("instanceName")
.WithLeaseContainer(leaseContainer)
.Build();
The handler is passed to the processor by the onChangesDelegate parameter, which needs to be implemented as an asynchronous delegate:
static async Task HandleChangesAsync(
ChangeFeedProcessorContext context,
IreadOnlyCollection<YourCollectionClass> changes,
CancellationToken cancellationToken)
{
// Processor logic…
}
A similar functionality needs to be implemented in each platform you want to use for your application. Here is one additional example covering the implementation in Python:
@staticmethod
def ReadFeed(client):
print(' Reading Change Feed ')
options = {}
options["startFromBeginning"] = True
response = client.QueryItemsChangeFeed(collection_link, options)
for doc in response:
print(doc)
In the preceding example, you are just passing an instance of the Azure Cosmos DB client for Python. You will also need a collection_link parameter value, which is a Cosmos DB-specific link for your collection and looks like this:
dbs/<your-db>/colls/<your-collection>
In general, using the change feed processor gives you more control over the process of fetching records delivered by this feature. Still, you will need to take into consideration additional aspects to ensure everything works smoothly:
- You must decide how to run your processor to ensure that the application runs continuously. It can be through a virtual machine, a Kubernetes cluster, an Azure WebJob, or a web service.
- Control RUs utilized on a lease container. A lease container is a special container created for the change feed functionality to allow different processors to work on your collections simultaneously.
- Implement a restart mechanism to start reading your feed from a point in time where processing was stopped previously.
- Implement life cycle notifications, which can help you understand the current state of your processor and decide how to recover from an error in lease operations.
The preceding considerations are the reason why, initially, the Azure Functions trigger was a much better option – it handled all those aspects natively, giving us more time to focus on our business logic. In the Further reading section, you will find more information related to the topic, as change feed is one of the most complex features of Azure Cosmos DB.
Summary
In this chapter, you have learned about another serverless Azure component, Azure Cosmos DB. You saw multiple database models that this service supports and different features, such as geo-redundancy and the ability to easily scale up and introduce new read regions, where data will be replicated. What's more, you are now aware of multiple consistency models and how to change them in the Azure portal.
In the next chapter, you will learn about another hot topic – reactive architecture with Azure Event Grid.
Questions
As we conclude, here is a list of questions for you to test your knowledge regarding this chapter's material. You will find the answers in the Assessments section of the Appendix:
- Which APIs does Azure Cosmos DB support currently?
- Are there any differences between the capabilities of Azure Table storage and the Table API in Cosmos DB?
- What are the available consistency models?
- Which consistency model is more consistent – bounded staleness or eventual?
- Is it possible to restrict access to Azure Cosmos DB to only a single IP address?
- Is the SQL API the same as the SQL Server?
- What is the reason for using stored procedures?
- Is it possible to provision throughput in Azure Cosmos DB for the whole account instead of per collection?
- What are the options to run change feed functionality?
Further reading
To learn more on the topics covered in this chapter, please visit the following links:
- Partitioning data in Azure Cosmos DB: https://docs.microsoft.com/en-us/azure/cosmos-db/partition-data
- Capacity planner: https://www.documentdb.com/capacityplanner
- Azure Cosmos DB RUs: https://docs.microsoft.com/en-us/azure/cosmos-db/request-units
- Consistency levels: https://docs.microsoft.com/en-us/azure/cosmos-db/consistency-levels
- Mongo DB support: https://docs.microsoft.com/en-us/azure/cosmos-db/mongodb-feature-support#mongodb-protocol-support
- Graph API and Gremlin: http://tinkerpop.apache.org/docs/current/reference/#intro
- The Azure Cosmos DB change feed: https://docs.microsoft.com/en-us/azure/cosmos-db/sql/read-change-feed