
7
Serverless and Azure Functions
Azure Functions is the main product of serverless architecture in Azure. It allows the execution of small pieces of code within a fully managed runtime, so we don't have to worry about performance and scalability. It is open source, open for extensions, and built on top of App Services, so it provides an experience that is similar to Azure WebJobs. Microsoft pays a lot of attention to the development of new features for Azure Functions, and with great support from the community, it's one of the best tools for quickly developing both simple and complex applications.
In this chapter, the following topics will be covered:
- Understanding Azure Functions
- Configuring the local environment for developing Azure Functions
- Creating a function
- The features of Azure Functions
- Integrating functions with other services
Technical requirements
To begin using Azure Functions and to perform the exercises in this chapter, you will need Visual Studio Code with Azure and the Azure Functions extensions installed.
Understanding Azure Functions
Azure Functions is a part of the so-called serverless components that are available in the Azure cloud. Before you start learning about this service, you will have to understand what serverless really means. Initially, you might think that this concept implies no servers at all, but you will quickly reevaluate your way of thinking (as we are still quite far away from not using any kind of machine for our applications and workloads).
Being "serverless"
You can easily find many different articles describing the term "serverless"—to be honest, I would like to avoid promoting a single correct definition. That's because this topic is currently so fuzzy that it is hard to find the best description. However, my goal is to give you some hints and best practices that will enable you to understand this term in a way that makes the most sense to you.
Note that this chapter refers to serverless as a Function-as-a-Service (FaaS) service. Later in this book, we will cover other Azure components that are also considered serverless, but not FaaS.
The responsibilities of cloud vendors
Let's start with the following screenshot:
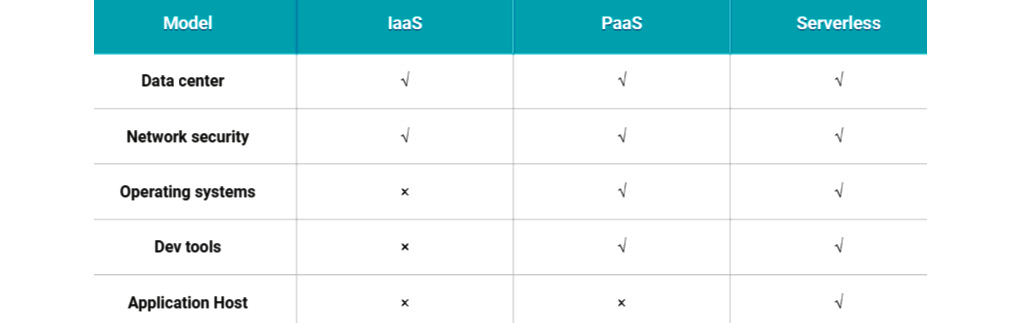
Figure 7.1 – A responsibilities matrix
In the preceding screenshot, you can see a comparison of two of the most popular cloud models with serverless architecture regarding vendor responsibility. I have compared them using five different fields:
- Data center: This includes the data center (DC) infrastructure, security, maintenance, and staff.
- Network security: This involves implementing correct and secure solutions regarding the network (such as firewalls, pen tests, and anti-DDoS solutions).
- Operating systems: This includes updates, maintenance, and configuration.
- Dev tools: This involves developing and delivering multiple features for programmers and administrators (such as extensions to the IDE, management portals, and appropriate tools for managing services).
- Application host: This refers to the specific runtime that hosts and runs our application (such as the App Service Plan model).
As you can see, the only difference (at least when using the described characteristics) is the application host. When it comes to serverless components, the only thing that you deliver to your solution is your code (or the configuration that is needed to set up the service)—the rest is delivered and handled by your cloud vendor. Of course, this is not the only way to define this concept.
The pricing model
One of the most popular features of serverless services and architectures is the option to pay for the number of executions and amount of computing power used. This pricing model is the exact opposite of the most common prepaid models, where you pay a fixed price depending on a set of configured fields, such as the number of VMs used or the size of a cluster. Here, you can find a table describing the pricing for Azure Functions (in the West Europe region):

Now, you might be wondering how to decipher this correctly so that you can calculate the estimated cost of your solution. There are two things you need to understand to make your calculation correct:
- Execution: This is a single function execution, which lasts N seconds.
- Consumption: This defines how many resources (CPU and memory) your function consumes within a fixed time.
Now, if you compare the preceding terms with the table, you will see that they differ slightly. This is because, in Azure Functions, pricing does not directly define the price of consumption, but rather it uses the execution time.
You have probably noticed the Free grant column in the pricing table. Remember that this only applies to the Consumption model—it will not work for the prepaid one.
Now, let's assume that you have estimated the following:
- You will need 10 million executions of your function per month.
- Each execution lasts ~80 ms.
- You are using 145 MB of memory per execution.
To calculate the whole price of using Azure Functions, you can use the following formula:
In the previous formula, the following is applicable:
- Rx: Here, resource consumption is defined as a product of memory consumed and execution time (in GB/s).
- Te: The total number of executions (in millions).
Now, if you enter the correct values and calculate the formula, you will get the following result:

This will give you the following cost: 6 USD. However, you might find the previous formula a bit confusing—for instance, why did I use 256 (instead of 128) as the amount of memory consumed and 1 ms (instead of 800 Ks) as the execution time? Well, there is one important thing to remember when using the Consumption plan: the minimum execution time is 100 ms. Additionally, when it comes to resource consumption, this is always rounded up to the nearest 128 MBs.
In fact, when it comes to function execution, you cannot go under 100 ms and 128 MBs of used memory. This is very important when calculating the possible cost of optimization, as often, you should not aim at optimizing functions and, instead, focus on the overall algorithm changes (such as batching or better serialization methods).
The concepts of Azure Functions
Now that you are slightly more familiar with what serverless architecture is, we can start learning about something else to do with Azure Functions. To proceed, you will need to have a clear understanding of the differences between the following topics:
- Function apps
- Functions
- Triggers and bindings
Function apps
The logical container for multiple functions is called a function app. A function app can host one or more functions that will share the configuration, settings, and runtime version. It is possible to run functions using multiple languages in the same function app.
Here, you can see what a single-function app looks like, with a few individual functions hosted within it:
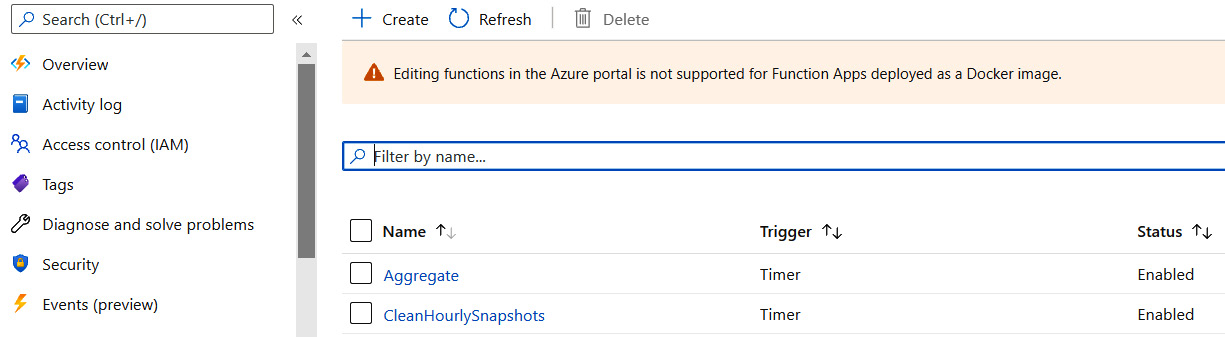
Figure 7.2 – A working function app
If you are required to use both pricing plans (that is, Consumption and App Service), you will need two different function apps, as one on its own does not support such a scenario.
Functions
A single executable part of Azure Functions that hosts your code is called a function. Each function can execute code written in different supported languages (for instance, one function can use C#, while another function can leverage Python features). The currently supported languages are as follows:
- C#
- Java
- JavaScript
- PowerShell
- Python
- TypeScript
- Go
- Rust
Here, you can find an example function with some boilerplate code written in C#:
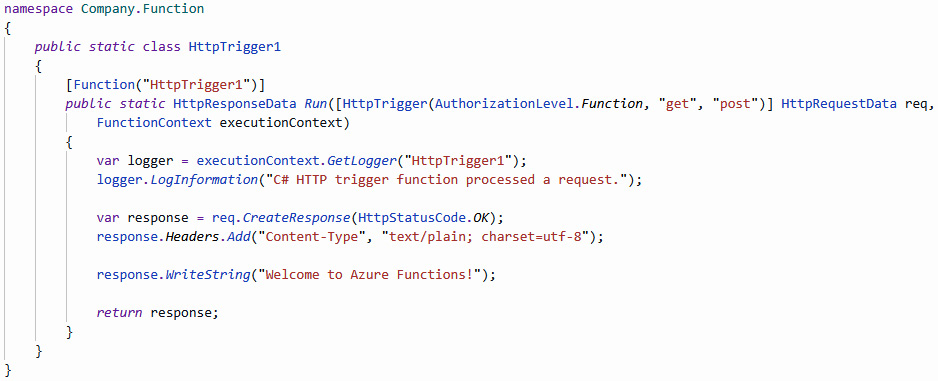
Figure 7.3 – The boilerplate Azure function triggered by an HTTP request
As you can see, a function consists of the following components:
- Function decorator: For example, [Function], which allows the runtime to find a function and delivers the required metadata.
- Trigger: For example, [HttpTrigger]—each function requires a trigger to be configured correctly.
- Trigger data: For example, HttpRequestData, which will be passed for each function invocation individually.
- Function code: This is the actual logic that will be executed each time the function is called.
Of course, some parts of a function will differ depending on the features you use. In the previous example, we used a trigger for a common HTTP call, but there are also other possibilities (such as Azure Storage Queue, Azure Service Bus, or Azure CosmosDB). Additionally, you can use other bindings and provide custom code each time. We will cover all of these topics in the upcoming sections of this chapter.
Triggers and bindings
The power of Azure Functions becomes evident when you consider all possible integrations that can be used seamlessly and without much additional effort. In fact, the list of available triggers and bindings is quite impressive:
- Blob storage
- Azure CosmosDB
- Dapr
- Azure Event Grid
- Azure Event Hub
- HTTP
- IoT Hub
- Microsoft Graph
- Azure Mobile Apps
- Azure Notification Hub
- Azure Service Bus
- Timer
- Twilio
- SendGrid
- SignalR
- Table storage
Additionally, you have access to some experimental triggers and bindings that might not be officially supported, but they can be used in your application if you decide to do so (such as external files and external tables). Remember that some experimental triggers and bindings will never reach General Availability (GA) status as there are specific recommendations that, in most cases, should be followed.
Of course, it is possible to introduce custom triggers and bindings since Azure Functions provides a full SDK that can be used to extend runtime. However, this is an advanced topic that will be not covered in this book—you can find a reference to the appropriate tutorials in the Further reading section. Custom solutions are especially helpful if you feel as though some native features lack the functionalities you expect, or for instance, you require better performance.
Pricing models
In Azure Functions, there are three pricing models available:
- The Consumption model: This was described in the earlier sections. Here, you pay for the number of executions of your functions and the computing power used.
- The App Service plan model: This is where you select an App Service plan version, which has a fixed price no matter how many times you execute your functions.
- The Premium plan: If you feel that the Consumption model for Azure Functions has many downsides (such as cold starts, a lack of VNet access, or not-so-great performance), you could leverage the Premium plan, where you can allocate CPU and memory specifically for your application.
All of these options serve a different purpose and offer a different experience when hosting your application. We will discuss them in more detail throughout this chapter.
Scaling
One of the most important features of serverless components and architectures is their ability to scale out as they are loaded more and more. While in traditional Platform-as-a-Service (PaaS) services, you often have to worry about available instances or scaling configuration, serverless allows for the seamless handling of incoming requests, even if a service is hit by unexpectedly high traffic. In this section, we will talk about the scaling capabilities of Azure Functions, with a focus on the differences between the Consumption and App Service models.
Scaling in the Consumption model
When you use the Consumption model in Azure Functions, you are not defining any available instances for your service and are unable to configure the autoscaling settings. In fact, in this model, you are completely unaware of the number of machines running your workloads (however, if you integrate your functions with Azure Application Insights, you will be able to see how many instances have been created by looking at the Live Stream blade).
In the Consumption model, you have a fixed limit when it comes to the amount of memory available for each execution of your function—this is 1.536 MB. Whether your functions will scale or not depends on the current utilization of both memory and CPU.
The advantage of this plan is the ability to easily scale to hundreds of functions while running the same code concurrently. Of course, this all depends on the actual trigger used in a function—while, with the HTTP trigger, you must scale out to be able to handle multiple requests at once, using the event hub trigger, for instance, will automatically increase the number of working instances for each partition used. On the other hand, you cannot always rely on the Consumption plan to ensure there are no expected delays in responses or temporary unavailability—immediate scaling out is not guaranteed by any means, so this pricing plan is not always the best solution when your application needs to be able to face quick peaks of traffic.
Remember that the current maximum for scaling a function app is limited to 200. It is also worth noting that the runtime will allocate new instances no more than every 10 seconds.
Scaling in the App Service model
Using the App Service model has its benefits, especially when it comes to covering some cases of scaling that are not covered in the Consumption plan. As mentioned in the previous section, if you need to be sure that you can handle the incoming load, it is often a better idea to use this particular model. This is because it ensures that some fixed resources will be available for your function app. Additionally, you can be 100% sure that the provided hardware is provisioned for your application—this is not always the case in the Consumption model since you have no guarantees when it comes to delivered machines and their characteristics. What's more, you can ensure that your runtime is always running since, in the consumption model, when a function is not used, its resources will be deallocated, so you can face quite common issues such as cold starts.
Scaling in the Premium plan
Premium plan scaling works in a similar way to the Consumption plan. Here, the difference is in how quickly a new instance can be made usable for your application. When configuring your Premium plan parameters, you can enter how many pre-warmed instances should be made available for your service. While the default value is 1, you can decide whether that is insufficient. Azure will take care of provisioning any additional compute power for you and keep it ready for the scaling operations. In contrast to the Consumption plan, the Premium functions do not charge you for execution. Instead, you are billed for the time the whole compute power was allocated to you. Therefore, the Premium plan is an optimal solution for these scenarios, whereas the Consumption plan seems like a wrong choice—a huge number of small executions, requiring a stable environment and good performance.
Now that we have covered the high-level details of Azure Functions, let's switch our focus to local development and more technical stuff.
Configuring the local environment for developing Azure Functions
Before we get started with Azure Functions, we will need an environment that will allow us to test our functions and start developing them quickly and seamlessly. Fortunately, this Azure service comes with multiple tools that help us during the programming and running of them locally. Additionally, I will describe some extra applications that should help you to analyze and debug possible problems and test triggers before deploying them to the cloud.
Starting with Azure Functions locally
If you have installed all of the required software mentioned at the beginning of this chapter, you should be able to start developing them without any additional configuration. To begin, we will create a simple function that we will try to run to ensure that everything is set up and ready.
When you open your Visual Studio Code instance, use the Ctrl + Shift + P keyboard combination to open the command palette. Search for Azure Functions: Create new project to start a creator. This will guide you through the process of creating a function app:
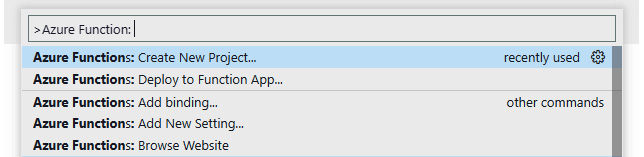
Figure 7.4 – The Azure Functions command in Visual Studio Code
Here, the first step that is needed will be the selection of a directory, where a new project will be created. It can be any folder you have access to, but make sure it is inside the working directory you have currently opened:

Figure 7.5 – Selecting a project directory
Next, select a language for your functions. Note, that the available options might rely on the version of the Azure Functions extension you have installed:
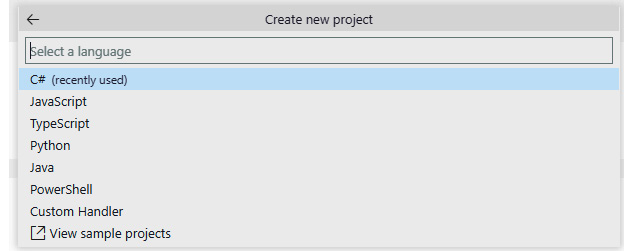
Figure 7.6 – Language selection
Additionally, depending on the language of your choice, it might be necessary to select the version that will be used to create your functions. The options that are available will solely depend on the platform you have selected. In my example, I chose the .NET 5 (isolated) option, as it offers better control over my environment compared to previous versions of the framework. The last step is to tell the creator what trigger should be used for the first function:

Figure 7.7 – The trigger selection
For the sake of this exercise, I have selected the HTTP trigger, as it does not require additional knowledge related to the Azure services. After providing the name of a function (and, optionally, its namespace), you will be probably asked for the method of authorization when calling the function:
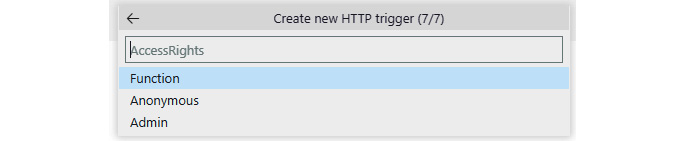
Figure 7.8 – Selecting the authorization method
Authorization methods are only available for triggers, which allows for interaction with a user. If you decide that you would like to go for a timer trigger or a queue trigger, you will not be asked for authorization as there is no such concept, at least from an Azure Functions point of view.
Note
Authorization does not affect your functions when you are working with them using a local environment. In other words, it does not matter what method is chosen for a function called locally—you will be able to call it anonymously nonetheless.
After completing the wizard, wait a few seconds for the files to be created. Once the creator has finished, you will see a project generated, with all the files ready:
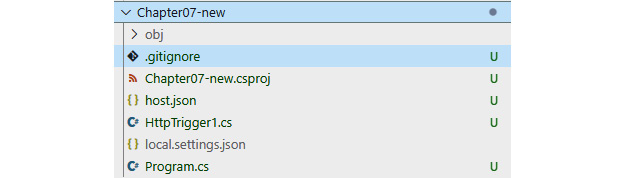
Figure 7.9 – The structure of the Azure Functions project in C#
Of course, the files created will be different for each platform you selected (for instance, there will be different elements for Java and different elements for Python). However, the overall structure should be the same. For now, look at the local.settings.json file—as you can see, it is ignored in Git by default because it will only contain the settings that have been designed on your machine. Let's open it and check one important setting.
The general structure of the local settings file will appear, more or less, as follows:
{
  "IsEncrypted": false,
  "Values": {
    "AzureWebJobsStorage": "",
    "FUNCTIONS_WORKER_RUNTIME": "dotnet-isolated"
  }
}
Here, in the Values object, you can enter any value in a key-value fashion. The important thing here is the AzureWebJobsStorage key. Apparently, it is empty — for now. This setting is one of the fundamental parameters required to run most Azure Functions triggers. The empty value is the outcome of us selecting an HTTP trigger for the first function. When deployed to Azure, it will be replaced with an Azure Storage connection string (or Managed Identity if you decide to work with the newer versions of the extensions). However, to run the functions in your own isolated environment, you can replace them with UseDevelopmentStorage=true, as follows:
{
  "IsEncrypted": false,
  "Values": {
    "AzureWebJobsStorage": "UseDevelopmentStorage=true",
    "FUNCTIONS_WORKER_RUNTIME": "dotnet-isolated"
  }
}
The preceding snippet will tell your local runtime to connect to Storage Emulator instead of a real cloud service.
Note
A new version of SDK for Azure should install Storage Emulator automatically. If, for some reason, you are missing it, navigate to https://docs.microsoft.com/en-us/azure/storage/common/storage-use-emulator#get-the-storage-emulator and install the missing component. Also, make sure it is running before starting your functions locally.
To ensure that everything is working correctly, press F5 and wait until the project has been compiled. In the terminal window, you should see how the project is initialized and how the runtime starts all the functions it could find:
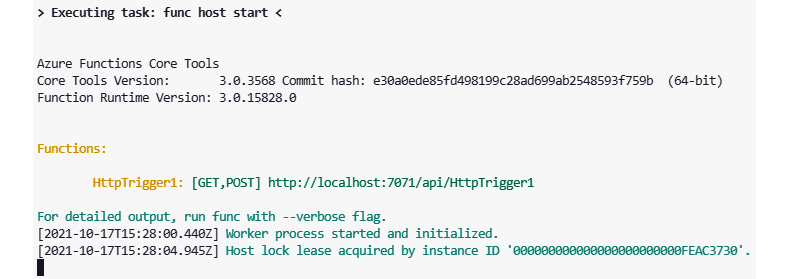
Figure 7.10 – The boilerplate project has been initialized and is running
As we are using an HTTP trigger, our function is exposed as a simple HTTP endpoint, which can be called by any client that knows it. In addition to the URL used, you can see that your endpoint has been exposed with an /api prefix, port 7071 will be used for connections, and both the GET and POST methods have been accepted.
Now, we will try to call it to see whether it works by simply going to any browser and accessing the endpoint:

Figure 7.11 – Working with the Azure Functions endpoint
As you can see, it returns a welcome message, which is a part of our recently created function. If you send the same request, you should be able to see the same result. If, for some reason, you are unable to do so, perform the following checks:
- Make sure that your function's host is still working and that it displays no error.
- Make sure that the port under which the runtime listens for incoming requests is open.
- Make sure that the Azure Functions CLI is not blocked by your firewall.
- Make sure that you are calling the correct endpoint.
In the next section, I will describe the function's structure in detail so that you will be able to proceed with more advanced scenarios and features.
Creating a function
We discussed the overall serverless approach and went through local configuration to make sure that we have some basic understandings of what Azure Functions is and how we can start working with it. In the remainder of this chapter, I will show you what exactly this service offers and how to work with it on daily basis. This will enable you to start developing full projects with Azure Functions—from the simplest to the most advanced ones.
Using Visual Studio Code
In the previous section, you created a function using a wizard in Visual Studio. If you go back to this project and open its file, you will see some common code, which is always created with this template:
using System.Collections.Generic;
using System.Net;
using Microsoft.Azure.Functions.Worker;
using Microsoft.Azure.Functions.Worker.Http;
using Microsoft.Extensions.Logging;
namespace Company.Function
{
    public static class HttpTrigger1
    {
        [Function("HttpTrigger1")]
        public static HttpResponseData Run([HttpTrigger(AuthorizationLevel.Function, "get", "post")] HttpRequestData req,
            FunctionContext executionContext)
        {
            // Here goes your function code…
        }
    }
}
Here, we can see some attributes that decorate both a C# method and its parameters—they all are a part of the runtime that runs your functions. Let's compare it with a function that is triggered by Azure Storage Queue:
using System;
using Microsoft.Azure.Functions.Worker;
using Microsoft.Extensions.Logging;
namespace Company.Function
{
    public static class QueueTrigger1
    {
        [Function("QueueTrigger1")]
        public static void Run([QueueTrigger("myqueue-items", Connection = "AzureWebJobsStorage")] string myQueueItem,
            FunctionContext context)
        {
        }
    }
}
Here, you can see that we still have the [FunctionName] attribute and the trigger attribute. What differs between those two functions is, in fact, the type of trigger parameter—in HTTP, we had HttpRequestData, while in Queue, we have a simple string parameter. This parameter (and its type) directly defines the type of message delivered to a function. In general, each HTTP request is deserialized and delivered as HttpRequestData, while each message in a queue is a string.
Note
Static types and attributes are only usable in languages that support them. If you go for a platform that is not typed (such as JavaScript), the function structure will be slightly different and will mostly rely on convention.
However, input parameter binding is not limited to a single type only. Depending on the trigger type, we might add additional parameters that are passed as a part of a trigger:
using System.Collections.Generic;
using System.Net;
using Microsoft.Azure.Functions.Worker;
using Microsoft.Azure.Functions.Worker.Http;
using Microsoft.Extensions.Logging;
namespace Company.Function
{
    public static class HttpTrigger1
    {
        [Function("HttpTrigger3")]
        public static HttpResponseData Run([HttpTrigger(AuthorizationLevel.Function, "get", "post", Route = "Function3/name/{name}")] HttpRequestData req, string name,
            FunctionContext executionContext)
        {
        }
    }
}
As you can see, the preceding example introduced one more parameter—name. This is a string, though the whole function is triggered by an HTTP request. This parameter will be used during the binding procedure. During this procedure, you will find that this function's route contains it in its URL template. This is the very same model that is used in traditional MVC/Web API frameworks, which provide the same feature.
The binding procedure itself is quite complicated and mostly depends on the type of trigger used. Unfortunately, this is beyond the scope of this book, so I will not cover it in detail—fortunately, Azure Functions are OSS, so you can check how the host works directly in the code.
If you want to quickly add a new function to your project, perform the following steps:
- Use Ctrl + Shift + P to open the command palette.
- Search for the Azure Functions: Create function menu item.
- Select a function template and follow the creation wizard.
This whole procedure is very similar to the creation of an Azure Functions project. Depending on the function template, you might need to answer slightly different questions. However, in the end, a function is added to the project you selected.
Using the Azure portal
As with all other Azure services, it is also possible to create a function app instance by creating it directly in the Azure portal:
- When you log in, click on + Create a resource and search for Function App.
- When you click on Create, you will see a common screen, which will guide you through the process of creating a new function app resource:

Figure 7.12 – The Azure Functions resource creation wizard
As you can see, the preceding form is familiar to the one we used when creating an App Service instance. This is because, under the hood, Azure Functions is powered by these services, and multiple available features are shared between them. In the Hosting tab, you can select whether you want to use the Consumption Plan, Premium Plan, or App Service models for pricing. What is more, you will have the ability to select the OS that is used and the storage account required to power up your functions (remember the AzureWebJobsStorage setting?):

Figure 7.13 – The Hosting tab
We discussed the differences between these models earlier in the chapter, so you should be able to decide which one to use by yourself. This wizard also gives you the option to enable the Application Insights integration. Since we have not discussed this service yet, I will skip it in this chapter. However, if you are interested in monitoring your functions, note that it is a much better option than the integrated Monitor feature—it gives you much more detail and is far more intuitive in daily work.
Enabling Application Insights for your function app can drastically change the overall price of the whole service, as initially, each function produces many different traces and logs. For production, it is always a good idea to lower the severity of logged messages—you can find more information about this configuration at https://docs.microsoft.com/en-us/azure/azure-functions/functions-monitoring.
When you are satisfied with your settings, you can click on Create. The Azure portal will validate all the fields and initiate the service provisioning procedure. After several seconds, your function app should be ready for work. When you navigate to it, you will see the dashboard, which is the starting point for accessing all the features of Azure Functions:
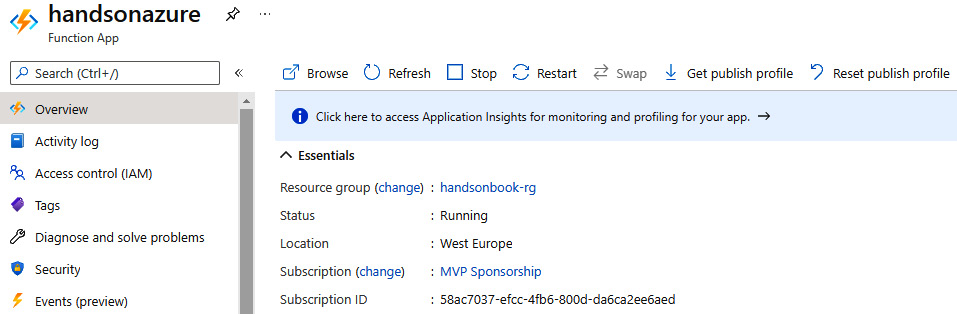
Figure 7.14 – The overview tab of Azure Functions
Now, if you want to create a function, navigate to the Functions blade. From there, you will be able to access the Create button to get started with a new template:
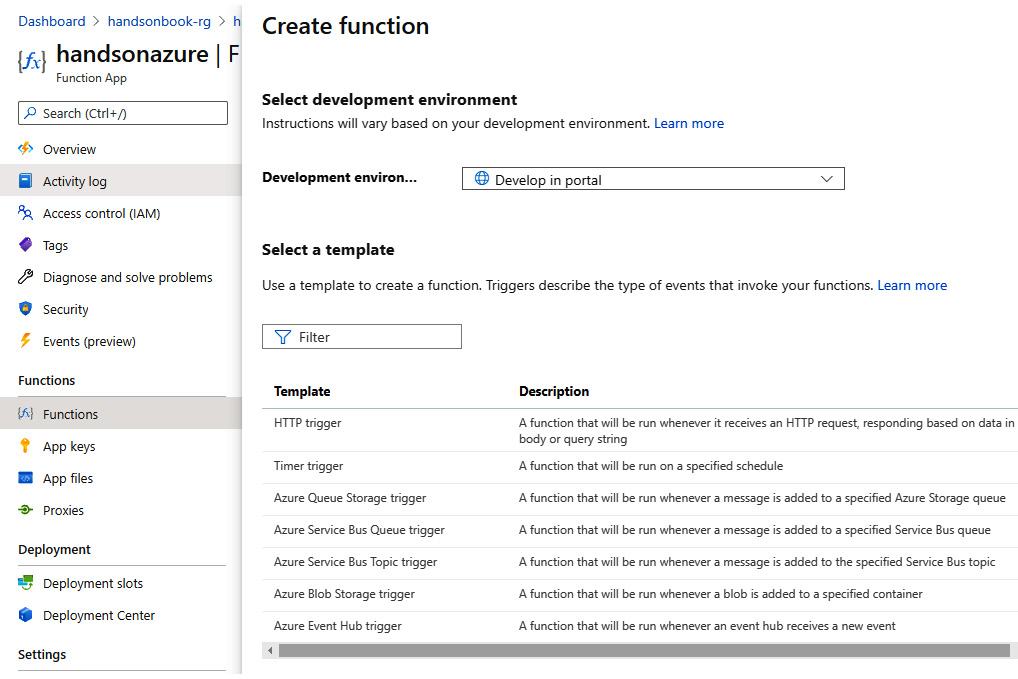
Figure 7.15 – Creating a function from the Azure portal
As you can see, from there, we can select our development environment (this depends on whether you would like to use the portal or one of the supported IDEs). For this exercise, I decided to go for the timer function:
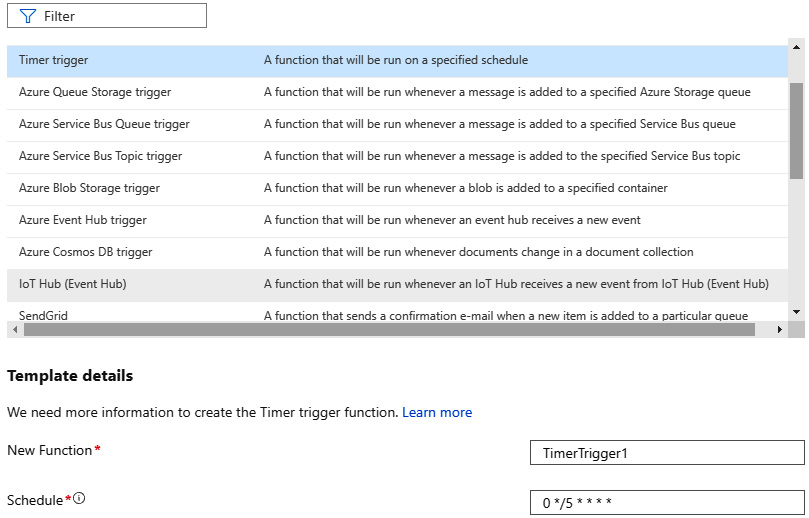
Figure 7.16 – Configuring a function triggered by a timer
Note
In the previous versions of Azure Functions, you could host multiple runtimes using the same function app. In that scenario, it was possible to start with a Java function and then add a JavaScript function to the same function app. Unfortunately, that is no longer possible.
After clicking on the Create button, you will see that a function code has been generated and can be altered directly in the portal. The portal also allows you to edit a function directly in your browser window, so if you want to try out some custom code, there is nothing preventing you from doing so:

Figure 7.17 – A function generated inside the portal
Additionally, you can click on Test/Run—this is the so-called manual trigger and enables you to start a function immediately. The result of running a function will be visible in the Logs window:
Connected!
2021-10-18T07:11:49Z   [Information]   Executing 'Functions.TimerTrigger1' (Reason='This function was programmatically called via the host APIs.', Id=7b4b5a29-e3fb-4d58-b668-2444c2210f72)
Congratulations—you have learned how to create a function using both Visual Studio Code and the Azure portal. In the next section, I will describe more advanced scenarios and focus on understanding the features of Azure Functions further.
The features of Azure Functions
Azure Functions is not only about providing executable code that can be handled by the runtime. It allows for even more advanced scenarios, which make this service an excellent choice when you want to start developing quickly and with minimal configuration required. In this section, I will show you how to leverage more advanced features of functions and how to enhance your skill in using this Azure component.
Platform features
As you might recall, Azure Functions is built on top of App Service, which allows you to use multiple features that you already know, such as Custom domains, Application settings, and Authentication/Authorization. To check what is available, navigate to your function app in the Azure portal and search for the Settings section:
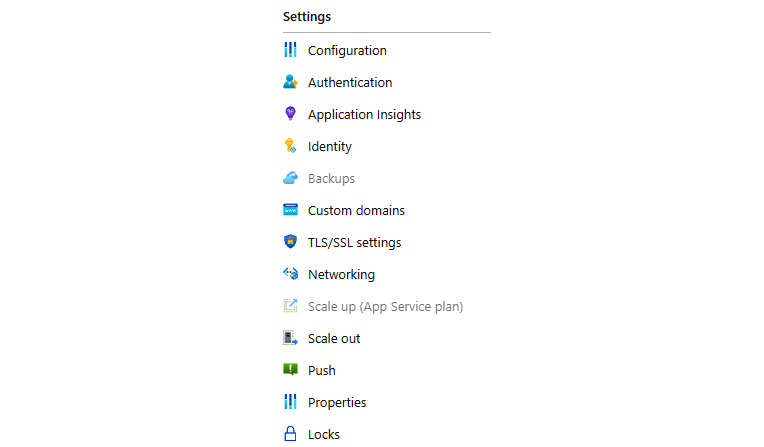
Figure 7.18 – The Settings section of Azure Functions
As you can see, we have a variety of different features available—what you are interested in depends solely on your specific requirements. However, there is one function-specific feature that I would like to describe: Configuration. This is where your Function App settings are stored and can be changed. Navigate to this blade to access the parameters:
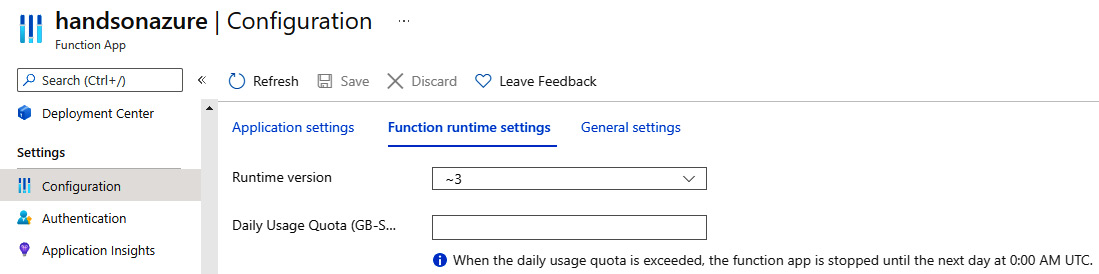
Figure 7.19 – Function runtime settings
The way that the function app configuration works is that it combines with Application settings, which is available in Azure App Services with some additional layers introduced by it. As you can see in Figure 7.19, you can change the runtime version of your functions' host and decide how much memory they can use on a daily basis. Here, you can find more details about those capabilities:
- Daily Usage Quota (GB-Sec): If you want to set a hard limit for function app usage, you can set it here. Thanks to this, you can ensure that it will not exceed the predefined quota you are aiming for.
- Runtime version: This setting defines the current runtime version that your function app uses. Note that it is not possible to change v1 to beta (in this case, v2), as it is possible that the newer version introduces some changes that could break your application.
While the Azure portal allows you to change the mentioned parameters, in most cases, you will rarely use them directly. In general, they should be managed via automation scripts and never modified manually, as they can easily break a running function.
Security
We have not covered another important topic yet—Azure Functions security. While it is possible to use, for example, Azure Active Directory or other social providers as identity sources (and, as a result, add authentication to a function app), by default, functions are secured by their keys. You can check the available keys when you click on the App keys blade in the portal:
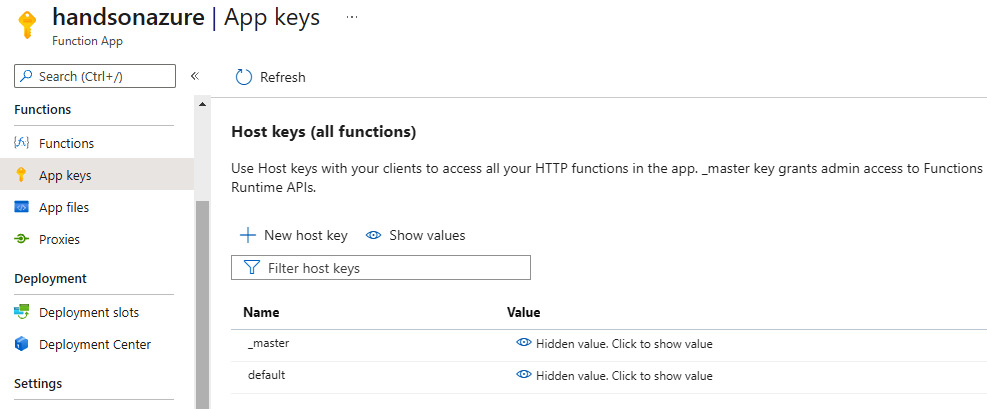
Figure 7.20 – The App keys blade containing host keys for the functions
However, we previously talked about different authorization levels. In Figure 7.20, you can see host keys, which give you admin access – if a user has them, they can call any function (which is, of course, callable). As this is not something you would like to use constantly, different options are available. To access function keys, go to your function and search for the Function Keys tab:
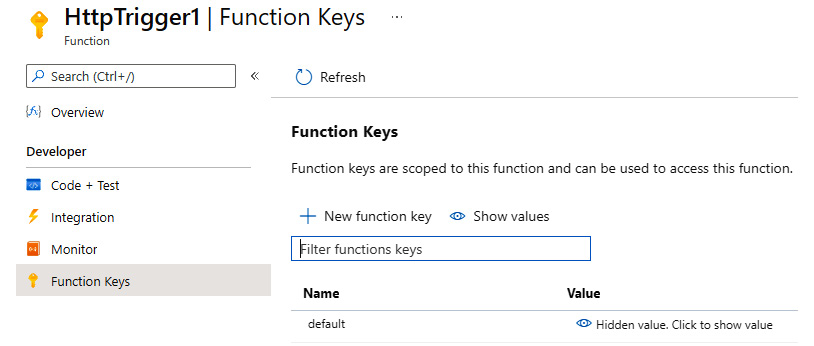
Figure 7.21 – Function Keys available for a function
In general, you can use keys as an easy way to implement authorization in your function app. You can generate a new one for each client, revoke them, and set a particular value.
Note that function keys are designed for functions that are triggered by HTTP requests—there is no possibility to use them for other kinds of triggers.
There are two ways of using function keys to authorize a request. First, you can put them inside the query string:
https://handsonazurefunctionapp.azurewebsites.net/api/HttpTriggerJS1?code=awKhkdPqyQvYUwzn6zle6V4hqk460YwOBs9RyaQUthX/AWGBMjtRIA==
Second, you can use headers and introduce the x-functions-key header, which will contain a key inside it:
GET /api/HttpTriggerJS1 HTTP/1.1
Host: handsonazurefunctionapp.azurewebsites.ne
Content-Type: application/json
x-functions-key: awKhkdPqyQvYUwzn6zle6V4hqk460YwOBs9RyaQUthX/AWGBMjtRIA==
Cache-Control: no-cache
The choice is yours here – both options offer the same functionality, and the only difference is whether you prefer passing a key over the URL or using headers.
Monitor
Each call and execution of a function is monitored and saved. When you click on the Monitor tab, you will see a screen that contains the next execution with some diagnostics data. Here, you can see the log of executions for my function, triggered by a timer:
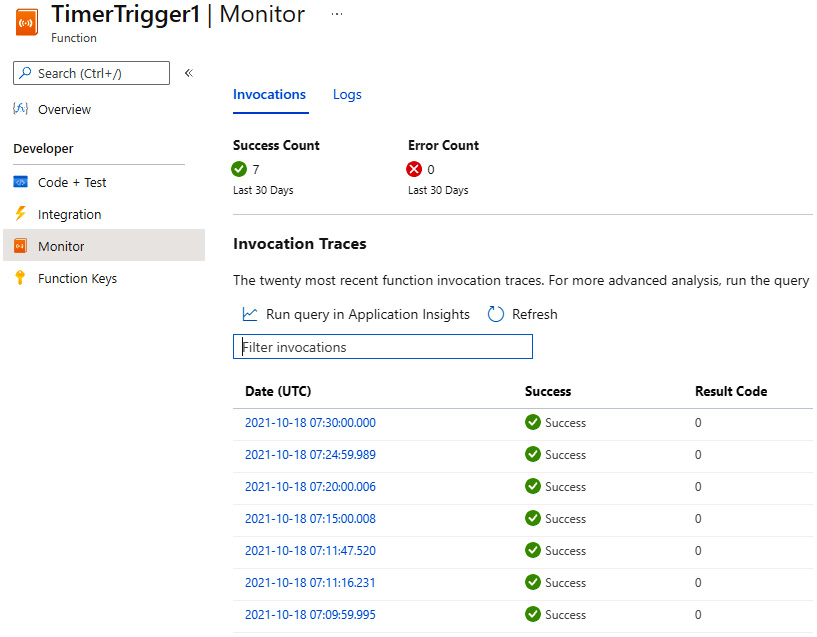
Figure 7.22 – The Monitor tab with results
As you can see, it contains information about each execution, the success and error count, and the invocation details. When you select a specific item, you will also see all the logs from a function. The Monitor feature is quite useful for quickly analyzing issues and seamlessly integrates with Application Insights for more advanced queries and filters. We will talk about that service in more detail later in the book.
host.json
When you create a function, you will see that a host.json file is automatically created. While initially empty, it is a global configuration file that defines how the triggers and functions will behave. Here, you can find an example file with most features, such as binding configurations and generic features, available:
{
    "version": "2.0",
    "aggregator": {
        "batchSize": 1000,
        "flushTimeout": "00:00:30"
    },
    "extensions": {
        "blobs": {},
        "cosmosDb": {},
        "durableTask": {},
        "eventHubs": {},
        "http": {},
        "queues": {},
        "sendGrid": {},
        "serviceBus": {}
    },
    "extensionBundle": {
        "id": "Microsoft.Azure.Functions.ExtensionBundle",
        "version": "[1.*, 2.0.0)"
    },
    "functions": [ "QueueProcessor", "GitHubWebHook" ],
    "functionTimeout": "00:05:00",
    "healthMonitor": {
        "enabled": true,
        "healthCheckInterval": "00:00:10",
        "healthCheckWindow": "00:02:00",
        "healthCheckThreshold": 6,
        "counterThreshold": 0.80
    },

    "managedDependency": {
        "enabled": true
    },
    "retry": {
      "strategy": "fixedDelay",
      "maxRetryCount": 5,
      "delayInterval": "00:00:05"
    },
    "singleton": {
      "lockPeriod": "00:00:15",
      "listenerLockPeriod": "00:01:00",
      "listenerLockRecoveryPollingInterval": "00:01:00",
      "lockAcquisitionTimeout": "00:01:00",
      "lockAcquisitionPollingInterval": "00:00:03"
    },
    "watchDirectories": [ "Shared", "Test" ],
    "watchFiles": [ "myFile.txt" ]
}
As you can see, it contains things such as the function timeout value and configuration of particular triggers. In the Further reading section, you will find a link where each section of the host.json file is described in detail.
Publish
Azure Functions publishes in the same way as App Service since they share many common parts. If you use the Ctrl + Shift + P combination in Visual Studio Code and select Azure Functions: Deploy to Function App option, you will see a wizard, which will guide you through the process of deployment:

Figure 7.23 – The publish wizard for Azure Functions in Visual Studio Code
Traditionally, you have the option to select whether you want to create a new function app or use an existing one. When you want to use the existing one, just click on it and confirm that you would like to overwrite the previous deployment:
Figure 7.24 – Overwrite confirmation
Now, when you click on Deploy, the process of deployment will start and, within a few seconds, a new version of your function app will be available. With the function deployed, let's learn how it can be integrated with different services.
Integrating functions with other services
In the last part of this chapter, we will focus a little bit on understanding how Azure Functions integrates with other Azure services. We will look at the available triggers and bindings and try to figure out the best use cases for them along with how they really work. This section is designed in a way that enables you to explore more by yourself—thanks to a common understanding of how Azure Functions works.
The Function file
The way in which the Azure Functions bindings work is that they are compiled into a metadata file, which is generated when your function app is built. This file can be found among your compilation artifacts (try searching for the functions.metadata file). The file structure can be a little bit different depending on the platform used and the actual triggers/outputs, but the generic structure can be presented as follows:
[
  {
    "name": "HttpTrigger1",
    "scriptFile": "Chapter07-new.dll",
    "entryPoint": "Company.Function.HttpTrigger1.Run",
    "language": "dotnet-isolated",
    "properties": {
      "IsCodeless": false
    },
    "bindings": [
      {
        "name": "req",
        "type": "HttpTrigger",
        "direction": "In",
        "authLevel": "Function",
        "methods": [
          "get",
          "post"
        ],
        "route": "Function3/name/{name}"
      },
      {
        "name": "$return",
        "type": "http",
        "direction": "Out"
      }
    ]
  },
  {
    "name": "QueueTrigger1",
    "scriptFile": "Chapter07-new.dll",
    "entryPoint": "Company.Function.QueueTrigger1.Run",
    "language": "dotnet-isolated",
    "properties": {
      "IsCodeless": false
    },
    "bindings": [
      {
        "name": "myQueueItem",
        "type": "QueueTrigger",
        "direction": "In",
        "dataType": "String",
        "queueName": "myqueue-items",
        "connection": "AzureWebJobsStorage"
      }
    ]
  }
]
As you can see, this contains the definition of each function along with the bindings used there. The schema for the metadata file is primarily designed for the function host to understand, and in general, you should not bother learning it. Of course, if you ever decide you need that kind of functionality, you can generate the metadata file on your own – from my perspective, it is rather a complex task and, in most cases, not worth the time invested.
The information stored in the metadata directly reflects the structure of each function. For example, the metadata stores information related to all the parameters used in a function definition:
[Function("HttpTrigger1")]
public static HttpResponseData Run([HttpTrigger(AuthorizationLevel.Function, "get", "post", Route = "Function3/name/{name}")] HttpRequestData req,
    FunctionContext executionContext)
{
}
When you compile your project, a compiler will add all the functions to the metadata file for each function defined in your code. Here, you can find the output for the event hub trigger:
{
    "name": "EventHubTrigger1",
    "scriptFile": "Chapter07-new.dll",
    "entryPoint": "Company.Function.EventHubTrigger1.Run",
    "language": "dotnet-isolated",
    "properties": {
      "IsCodeless": false
    },
    "bindings": [
      {
        "name": "input",
        "type": "EventHubTrigger",
        "direction": "In",
        "eventHubName": "samples-workitems",
        "connection": "AzureWebJobsStorage",
        "cardinality": "Many",
        "dataType": "String"
      }
    ]
  }
As you can see, it has the same structure and only the bindings field differs, so it reflects another trigger type.
Note that the content and structure of function.metadata might differ depending on the SDK version used. Do not use it in your application directly to avoid problems involving a lack of backward compatibility.
Input/output bindings
Some bindings are bidirectional, whereas some can only be used in one direction. What's more, not every binding can be used as a trigger. An example of both a bidirectional binding and a trigger binding is Azure Blob storage. Here, you can find an example of how it works as a trigger (note that this is written in Java):
@FunctionName("handsonblobprocessor")
public void run(
  @BlobTrigger(name = "file",
               dataType = "binary",
               path = "blob/{name}",
               connection = "Connection") byte[] content,
  @BindingName("name") String filename,
  final ExecutionContext context
) {
}
Compare this with the example of a function triggered by a queue but accepts a blob as input:
@FunctionName("copyBlobHttp")
  @StorageAccount("Storage_Account_Connection_String")
  public HttpResponseMessage receiveBlob(
    @HttpTrigger(name = "req",
      methods = {HttpMethod.GET},
      authLevel = AuthorizationLevel.ANONYMOUS)
    HttpRequestMessage<Optional<String>> request,
    @BlobOutput(
      name = "target",
      path = "blob/{Query.file} ")
    OutputBinding<String> outputItem,
    final ExecutionContext context) {
  }
As you can see, the syntax is still similar in both cases. However, instead of using BlobTrigger, I am using BlobOutput in the second example. The overall configuration and the way bindings are configured depend solely on the platform of your choice. While for C# or Java, you define most of the things directly in the code, others such as JavaScript or Python require a slightly more sophisticated approach. For example, if you would like to define a function that accepts a queue message as a trigger and a blob as both an input and an output, the following code can get the job done:
def main(msg: func.QueueMessage, input: bytes, output: func.Out[bytes]):
    logging.info(f'Python Queue trigger function processed {len(inputblob)} bytes')
    output.set(input)
However, in addition to this, you will need to set all the bindings inside a function.json file that is available for your function:
{
  "bindings": [
    {
      "queueName": "myqueue-items",
      "connection": "QueueConnection",
      "name": "msg",
      "type": "queueTrigger",
      "direction": "in"
    },
    {
      "name": "input",
      "type": "blob",
      "dataType": "binary",
      "path": "files/{queueTrigger}",
      "connection": "StorageConnection",
      "direction": "in"
    },
    {
      "name": "output",
      "type": "blob",
      "dataType": "binary",
      "path": "files/{queueTrigger}-Copy",
      "connection": "StorageConnection",
      "direction": "out"
    }
  ],
  "disabled": false,
  "scriptFile": "__init__.py"
}
This is the main difference when working with Azure Functions using various languages—some might require a little bit more work to achieve the same level of functionality.
Summary
In this chapter, you learned a lot about Azure Functions and how to work with this serverless component. You read about the differences between the pricing models, scalability concerns, and basic triggers and bindings. Additionally, we worked on some simple scenarios regarding monitoring, deploying, and developing this Azure service.
In the upcoming chapters of this book, you will learn even more about serverless services. Following that, we will resume working with functions even more, as this is one of the most popular Azure components that can be easily integrated with other tools and products. In the next chapter, we will learn how Azure Functions can be used for long-running operations. We will discuss Durable Functions, which is an extension to the standard set of functionalities available for Azure Functions.
Questions
- What is the difference between the App Service, Premium, and the consumption pricing models?
- What is GB/s?
- What is the name of the container that's used for functions?
- What languages can be used in Azure Functions?
- Can a binding act as both a trigger and an output? Can you provide an example?
- Can you use the Application Settings feature in the same way as in App Services?
Further reading
- An overview of Azure Functions: https://docs.microsoft.com/en-us/azure/azure-functions/functions-overview
- A description of the host.json file: https://docs.microsoft.com/en-us/azure/azure-functions/functions-host-json
- The schema of the functions.json file: http://json.schemastore.org/function
- Triggers and bindings for Azure Functions: https://docs.microsoft.com/en-us/azure/azure-functions/functions-triggers-bindings
- Durable Functions: https://docs.microsoft.com/en-us/azure/azure-functions/durable-functions-overview