When we're in a virtual world with all this cool stuff, it is in our nature to try to reach out and touch something. While the gaze-based selection that we used in the previous chapter is a good first step for interacting with virtual scenes, most people intuitively want to use their hands. Most VR devices provide a hand controller to select, grab, and interact with virtual objects in the scene.
In this chapter, we introduce practices for capturing user input in Unity, illustrating how to use them in a simple VR scene. Everyone loves balloons, so in this project, we will make balloons. We may even pop a few. We will continue with our work in the previous chapter, using C# programming for basic scripting, and exploring several software design patterns for user input. We will discuss the following topics:
- Polling for input device button presses
- Invoking and subscribing to Unity events
- Using the XR Interaction Toolkit and interactable components
For this project, we'll build a fun little balloon gun for creating and inflating balloons and releasing them to float up into the sky. And at the end, we will add a projectile ball that you can throw at a balloon to pop it! Let's begin by setting up a simple scene.
Technical requirements
To implement the projects and exercises in this chapter, you will need the following:
- PC or Mac with Unity 2019.4 LTS or later, XR Plugin for your device, and the XR Interaction Toolkit installed
- A VR headset supported by Unity XR platform
You can access or clone the GitHub repository for this book (https://github.com/PacktPublishing/Unity-2020-Virtual-Reality-Projects-3rd-Edition-) to optionally use assets and completed projects for this chapter as follows:
- Asset files for you to use in this chapter are located in UVRP3Files/Chapter-05-Files.zip.
- All completed projects in this book are in a single Unity project atUVRP3Projects.
- The completed assets and scenes for this chapter are in the UVRP3Projects/Assets/_UVRP3Assets/Chapter05/folder.
Setting up the scene
To begin our exploration of input mechanisms, let's set up our scene. The plan is to let players create balloons. Everyone loves balloons!
For this scene, you could start with a new scene (File|New Scene) and then add an XR Rig from the GameObject | XR menu. Instead, I've decided to start with the Diorama scene used in the previous chapter and remove all but the GroundPlane and PhotoPlane, as follows:
- Open the Diorama scene.
- Remove all the objects, except for XR Rig, XR Interaction Manager, Directional Light, GroundPlane and PhotoPlane.
- Position the XR Riga few feet from the scene origin, Position (0, 0, -1).
- Select File | Save Scene As and give it a name, such as Balloons.
Now that the scene stage is set, we are first going to define a balloon game object, make it a prefab, and add an empty controller object in the hierarchy and script that will instantiate the balloon prefab.
Defining a balloon game object
For the balloon, you can simply use a standard Unity sphere 3D primitive if you want, or you can find an object in the Unity Asset Store or elsewhere. We are using a low poly balloon object that I found on Google Poly (https://poly.google.com/view/a01Rp51l-L3) (created by Louis DeScioli), a copy of which is provided with the download files for this chapter under the name BalloonModel.fbx. Generally, I recommend using the FBX format version of a model when it's available, as Unity provides native support and it includes materials.
Import the model into your project. If you're using the one provided with this book, then please go through the following steps:
- Create an asset folder named Models (in the Project window, right-click Create | Folder and name it).
- By dragging and dropping, locate the BalloonModel.fbx file in Windows Explorer (or Finder on OSX), and drag it into the Models folder you just created. Alternatively, with the Models folder selected, navigate to Assets | Import New Asset from the main menu.
Now, when we add the model to the scene, we're going to parent the object (make it a child of another object) and adjust its position so that the bottom of the balloon model becomes its origin (pivot point), as follows:
- InHierarchy, create an empty object (+|Create Empty, as shown in the following screenshot) and name it Balloon.
- Reset its transform (Transform|3-dot-icon|Reset).
- Drag the balloon model into the Hierarchy as a child object of Balloon (for example, from the Assets/Models/folder).
- In the Scene window, use the Move Tool to adjust the position of the model so that it sits with its bottom aligned with the origin of its parent, such as (0, 0.5, 0). See the following screenshot to see what we're trying to accomplish. If you are using the original model downloaded from Google Poly, I found the Position(0.66, -0.54, 0.1) works well. If you have the version of BalloonModel included with this book, then it is already recentered (I used Blender, which you can get from https://www.blender.org/), so adjustment may not be necessary.
- If you do not have a balloon model, then use a sphere (Create|3D Object|Sphere) and add a material, like theRed Materialwe created in the previous chapter.
Note that to create the game object you can use the GameObject menu in the main menu bar or use the + create menu in the Hierarchy window:

The current scene and hierarchy are shown in the following image, with the Balloon game object at the origin. Note that the balloon's local origin (pivot point) is at the bottom of the balloon:

Let's continue to work on our balloon so we can instantiate multiple balloons in the scene by making it into a prefab.
Making the balloon prefab
Our intent is to instantiate new balloons from a prefab when our user presses a button on their controller. When the button is released, the balloon is released and floats away.
Let's scale and position the balloon in the scene at a starting size and workable distance. We're going to expect the balloon to float into the sky when you release it, so we'll also give it some physics properties by adding aRigidBodycomponent. But unlike heavy objects, we do not want it to fall to the ground because of gravity, so we are going to disable gravity. Instead, we'll make it float by applying an upward force with our own script later in this project.
Add a Rigidbody and make the object a prefab, as follows:
- Select your Balloon object inHierarchy.
- From the main menu,Component | Physics | Rigidbody.
- Uncheck the Rigidbody's Use Gravitycheckbox.
- Drag the Balloon object from the Hierarchy to the Project window into yourPrefabs/ folder to make it a prefab object.
- Delete the original Balloon object from the Hierarchy.
Next, we'll create a Balloon Controller for handling the user interaction with balloons in the scene.
Creating a Balloon Controller
The last step in our initial scene setup is to create an empty game object named balloon controller and attach a script correspondingly named BalloonController.cs. We'll work on this script over the next few sections:
- InHierarchy, create an empty game object (+ | Create Empty), reset its transform (Transform | 3dot-icon | Reset), and name itBalloon Controller.
- Create a new script on the object namedBalloonController (from the inspector, go to Add Component | New Script |BalloonController).
- Open it for editing (double-click the script file).
Okay, so far we've set up a scene environment, created a Balloon prefab with a model and rigid body, and created a Balloon Controller with a script that handles user input. Now let's play around with input buttons using the legacy Input Manager.
Using an Input Manager button
Unity's legacy input manager includes a standard Input Manager for accessing traditional game controllers, keyboard, mouse, and mobile touchscreen input. This includes specific button presses and joystick axes. It also supports input from VR and AR input controllers mapped to logical input axes.
The Input Manager provides an abstraction layer over the physical input devices. You can define logical inputs, such as the Fire1 button to fire a gun, which may be mapped to a physical finger trigger button. Unity has a collection of preset inputs that are available when you create a new project. You can review and edit these settings in your project in the Input Manager settings window (Edit|Project Settings|Input Manager). For a general overview and details of the Unity Input Manager, see https://docs.unity3d.com/Manual/ConventionalGameInput.html.
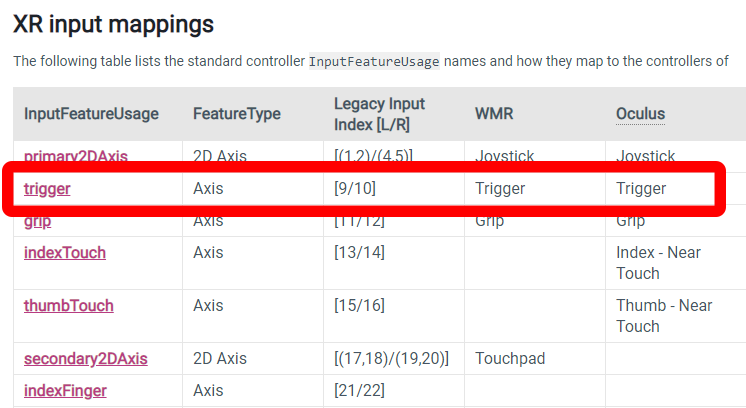
The hand controllers for VR often have a lot of different buttons and axes, and it can get pretty complex. For example, you may think of the (index finger) trigger as a binary button that's either pressed or not, but on some controllers, you may also be able to detect just a finger touch and the amount of pressure you're putting on the trigger (read as an axis value between 0.0 and 1.0). The following screen capture shows a portion of the table provided in the Unity documentation for XR Input Mappings. You can see that the trigger is defined as an Axis type input using input indexes 9 and 10, for left- and right-hand controllers respectively. For a complete reference, see https://docs.unity3d.com/Manual/xr_input.html:
Fortunately, the Unity XR Platform has simplified this by providing a rich set of input bindings. Let's add these bindings now to our project as follows:
- Open the Input Manager settings (Project Settings | Input Manager).
- From the main menu, select Assets | Seed XR Input Bindings.
- In Input Manager, if necessary, click to unfold the Axes settings.
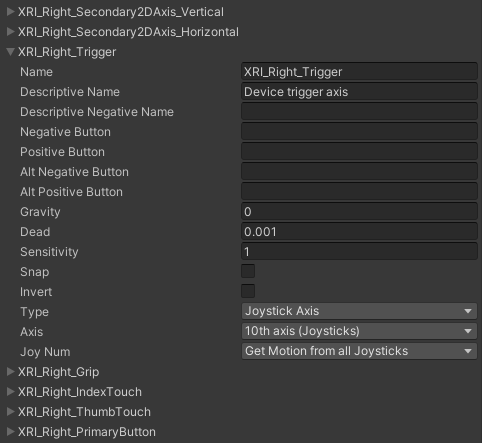
You can see that a long list of new bindings has been added, a portion of them shown in the following screenshot. In this screenshot, I have unfolded the binding definition for XRI_Right_Trigger; you can see that it maps to the 10th axis (Joysticks), which is the right-hand index finger trigger button on your hand controller, regardless of which device the user is using, whether Oculus, WMR, OpenVR, or any other:
Let's take a look at how this works. To start, we will get a specific button state and see how the Unity Input class works.
Polling the XRI_Right_Trigger button
The simplest way to obtain userinput is to justgetthe current state from the Input Manager. This process of polling the input state is shown in the following diagram:

You may recall that Unity calls the Update() function once every frame update. We can poll for button presses in each frame by checking the button state for each update. Open the BalloonController.cs file in your editor and edit the script as follows:
public class BalloonController : MonoBehaviour
{
  void Update()
  {
    if (Input.GetButtonDown("XRI_Right_TriggerButton"))
    {
      Debug.Log("Trigger down");
    }
    else if (Input.GetButtonUp("XRI_Right_TriggerButton"))
    {
      Debug.Log("Trigger up");
    }
  }
}
In this script, for each update, we first call Input.GetButtonDown
("XRI_Right_TriggerButton"), which returns a Boolean (true or false) value indicating whether the trigger button has just been pressed. If so, we print a message on the Console window; otherwise, we call Input.GetButtonUp
("XRI_Right_TriggerButton"), which says whether the trigger has just been released. If it has, then we print that message.
Let's try it out by going through the following steps:
- PressPlayin the Unity editor to run the scene.
- When you press the trigger on your input controller, you will see theInput: Trigger downmessage as output.
- When you release the trigger button, you will see theInput: Trigger upmessage.
Feel free to experiment with using other logical input names (Edit | Project Settings | Input Manager). For more on scripting the Input class, see https://docs.unity3d.com/ScriptReference/Input.html. Now we can use these input functions to control the creation and release of balloons in the game.
Controlling balloons with the input trigger
Now we're ready to implement the meat of our game. When the trigger is pressed, the controller script creates a new balloon by instantiating the Balloon prefab in the scene. When the trigger is released, the balloon object is permitted to float up into the sky. And while the button is held, we'll grow (inflate) the balloon's scale. Let's begin.
Creating balloons
The BalloonController.cs script should nowcreate a new balloon when the trigger button gets pressed. In your code editor, change theUpdatefunction to the following:
 void Update()
   {
     if (Input.GetButtonDown("XRI_Right_TriggerButton"))
       {
          CreateBalloon();
        }
    }
We need to write this CreateBalloon() function. It will reference the Balloon prefab that we created earlier in this chapter and create a new instance of it in the scene. So first, declare a public GameObject variable named balloonPrefab at the top of the BalloonController class and add a private variable to hold the current instance of the balloon, as follows:
public class BalloonController : MonoBehaviour
{
    public GameObject balloonPrefab;
    private GameObject balloon;
    ...
Now, add the CreateBalloon function that calls the Unity Instantiate function to create a new instance of the balloonPrefab and assign it to the balloon variable:
 public void CreateBalloon()
 {
     balloon = Instantiate(balloonPrefab);
 }
This CreateBalloon function will be called from Update when GetButtonDown is true. Next, we'll handle the trigger release case. (Note that we are declaring our functions as public for use later in the chapter).
Releasing balloons
The ReleaseBalloon function should be called when the player releases the trigger button. Let's add that to Update now, as follows:
 void Update()
   {
     if (Input.GetButtonDown("XRI_Right_TriggerButton"))
      {
        CreateBalloon();
      }
        else if (Input.GetButtonUp("XRI_Right_TriggerButton"))
         {
           ReleaseBalloon();
          }
       }
To release the balloon into the sky, we apply a gentle upward force on the balloon so that it floats skyward. For this, we'll define a floatStrength variable and apply it to the object's Rigidbody. (When a Rigidbody is on an object, Unity will include that object in its physics calculations). It's initially set to 20.0; you can later change this value in the Inspector. Add this variable with the others declared at the top of the BalloonController script:
    public GameObject balloonPrefab;
 public float floatStrength = 20f;
    private GameObject balloon;
Now, we can write the ReleaseBalloon function as follows:
public void ReleaseBalloon()
{
    Rigidbody rb = balloon.GetComponent<Rigidbody>();
    Vector3 force = Vector3.up * floatStrength;
    rb.AddForce(force);

    GameObject.Destroy(balloon, 10f);
    balloon = null;
}
The first few lines of the new function contain a chain of actions. First, we query the balloon object for its Rigidbody component (GetComponent<Rigidbody>()) and assign it to a local variable, rb. Then, we calculate the force that we want to add to the object as the floatStrength value in the up direction (Vector3.up * floatStrength). Then that force is applied to the balloon's Rigidbody (AddForce()) to give it some velocity
(see https://docs.unity3d.com/ScriptReference/Rigidbody.AddForce.html).
In the latter part of the function, we tell Unity to remove the balloon from the scene, after letting it float for 10 seconds. We also set the currently held balloon to null, clearing the variable for the next balloon.
Save the file. Go back into Unity and assign the Balloon prefab to the variable in our script as follows:
- In theHierarchywindow, make sure that the Balloon Controller is currently selected.
- In theProjectwindow, locate theBalloon Prefabthat we created earlier.
- Drag theBalloon prefab from the Project window to the Inspector window and onto the BalloonController'sBalloon Prefabslot.
The BalloonController now looks like this in the Inspector:

When you're ready, press Play. Then, inside the VR world, when you press the trigger button, a new balloon will be instantiated. When you release it, the balloon will float upward. In the following game window, I have pressed the button multiple times in succession, creating a series of balloons, haha! Not exactly what you'd expect, but it's what we have implemented so far. (The overlap will get fixed when we add Colliders to the balloon later in the project):

And here is the scene hierarchy of this, showing the cloned balloons in the Hierarchy window. There will be a new instance (clone) of the balloon prefab each time the button is pressed:

The next thing we want to do is inflate the balloon while the trigger is still pressed so that the user will press the trigger to create the balloon, hold to enlarge it, and release it to release it into the sky.
Inflating a balloon while pressing the trigger
The next thing we want to do is inflate the balloon while we hold down the button. The balloon should start out small and then grow. We can do this by checking whether there's a current balloon instance from a button press, and modify its scale each update by a specified grow rate—say, 1.5 times bigger per second.
First, let's create a small balloon at one-tenth of its original size. Modify the CreateBalloon function as follows. When a new balloon is instantiated, we set its local scale to 0.1f on all three axes:
    public void CreateBalloon()
    {
        balloon = Instantiate(balloonPrefab);
balloon.transform.localScale = new Vector3(0.1f, 0.1f, 0.1f);
    }
Next, we'll declare a growRate variable that will be used to change the balloon scale. We'll initialize it to 1.5, but you can adjust that value in the Inspector later. Add the following declaration at the top of the class, among the other variables:
public float growRate = 1.5f;
Now, modify the Update function with a third if condition as follows:
  else if (balloon != null)
  {
      GrowBalloon();
  }
Then add the GrowBalloon function like this:
 public void GrowBalloon()
 {
   float growThisFrame = growRate * Time.deltaTime;
   Vector3 changeScale = balloon.transform.localScale * growThisFrame;
   balloon.transform.localScale += changeScale;
 }
The GrowBalloon function modifies the balloon's size by a percentage based on the growRate and the time since the last update. First, we define a local variable, growThisFrame, which is the growth factor for this specific frame, calculated from our growRate per second by multiplying this figure by the number of seconds (or fractions of second) since the last frame update (Time.deltaTime). Next, we calculate by how much we should change the balloon's size in this frame by applying the growThisFrame factor to its current scale. Lastly, we actually change the balloon's scale by incrementing the current balloon size by this changeScale amount, using the += to modify the current local scale values.
Note that this GrowBalloon function could be refactored into a single line of code, as shown in the following code:
 public void GrowBalloon()
 {
    balloon.transform.localScale += balloon.transform.localScale
        * growRate * Time.deltaTime;
 }
Press Play in Unity. When you press the controller button, you'll create a balloon, which continues to inflate until you release the button. Then the balloon floats up. Wow, that's actually pretty fun!
In summary, we now have three functions in the BalloonController. The CreateBalloon function instantiates a new balloon from the Balloon prefab as a new game object in the scene. It starts out small, as if deflated. The GrowBalloon function modifies the scale of the balloon, making it appear to inflate over time at a given growth rate. The ReleaseBalloon function deploys the balloon, causing it to float up into the sky. The software pattern we used here is polling the input device for changes. During each frame update, we call the Input.GetButtonDown and GetButtonUp functions to see whether a specific button has changed. Next, let's look at a different software pattern for handling user input—events.
Using Unity events for input
Events allow the decoupling of the source of the event from the consumer of the event. Basically, events are a messaging system where one object triggers an event. Any other objects in the project can listen for the event. It can subscribe to a specific function to be called when the event occurs.
For this example, we'll create a separate input controller that reads the input button's state and invokes an event and then modify the BalloonController to subscribe to the events. The following diagram illustrates the relationship between our input controller, which invokes events, and the balloon controller, which subscribes to the events, as shown in the following illustration. As you'll see, you can set this up by dragging and dropping via the Unity Inspector, or you can subscribe listener functions to scripts:

To begin, create an empty Input Controller game object and add a corresponding new C# script:
- InHierarchy, create an empty game object (+ | Create Empty), reset its transform (Transform | 3dot-icon | Reset), and name itButton Input Controller.
- Create a new script on the object namedButtonInputController (Add Component | New Script).
- Open it for editing (double-click the script file).
Now, we can start editing the script.
Invoking our input action events
To implement our example using events, we'll first have theButtonInputController
trigger events when the trigger button is pressed and another event when the button is released.
First, at the top of the script, we need to declare that we are using the Unity event API. Then we declare the twoUnityEvents that we will invoke. The Update() function only needs to invoke one event or the other as they happen.
The entireButtonInputController.csis as follows:
using UnityEngine;
using UnityEngine.Events;

public class ButtonInputController : MonoBehaviour
{
    public UnityEvent ButtonDownEvent = new UnityEvent();
    public UnityEvent ButtonUpEvent = new UnityEvent();

    void Update()
    {
        if (Input.GetButtonDown("XRI_Right_TriggerButton"))
        {
            ButtonDownEvent.Invoke();
        }
        else if (Input.GetButtonUp("XRI_Right_TriggerButton"))
        {
            ButtonUpEvent.Invoke();
        }
    }
}
As you can see, we simply declare a couple of Unity events—ButtonDownEventand
ButtonUpEvent—and initialize them to a new Unity event object. Then, when the user presses the trigger button on their controller, we invoke thedown event, and when they release the button, we invoke theup event.
That's it for this side of the equation. Now theBalloonControllercan subscribe to these events.
Subscribing to input events
When using events,BalloonControllerdoes not need to check for input actions each update—all of that conditional logic can be bypassed. Instead, we'll drag and drop the components to subscribe them to events. TheUpdatefunction now only needs to grow the balloon if it's already instantiated (that is, when the balloon variable is not null). Modify itsUpdatefunction so it reads as follows:
 void Update()
 {
     if (balloon != null)
     {
         GrowBalloon();
     }
 }
Also, verify that you have declared its CreateBalloon and ReleaseBalloon functions aspublic, as I instructed earlier, so that we can reference them outside of this file. To wire up the input events to the Balloon Controller, go through the following steps:
- InHierarchy, selectButton Input Controller and look at itsInspectorwindow.
- You will see that the script component now has two event lists, as we declared them in its script.
- On theButton Down Eventlist, click the + in the lower-right corner to create a new item.
- Drag theBalloonControllerfromHierarchyinto the empty object slot.
- In the function select list, chooseBalloonController | CreateBalloon.
Repeat the process for the Button Up Event as follows:
- On theButton Up Eventlist, press the+ in the lower-right corner to create a new item.
- Drag theBalloonControllerfromHierarchyinto the empty object slot.
- In the function select list, chooseBalloonController | ReleaseBalloon.
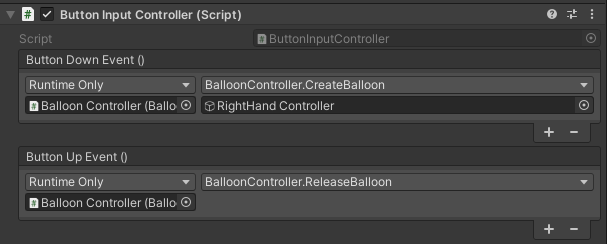
The component should now look like this:

Now, when you pressPlay and press the trigger, the input controller invokes theButton Down Event, and theCreateBalloonfunction that is listening for these events gets called (likewise for theButton Up Event). When the trigger is released, the input controller invokes the other event, andReleaseBalloongets called.
This mechanic can also be done entirely using scripting. The following is for explanation purposes only; don't add it to your code now. But if you wanted to subscribe to the button events in a script, you could write a Start() function that adds CreateBalloon and ReleaseBalloon as listeners on the corresponding ButtonController events as follows. In this way, instead of the ButtonController having to know what other objects should listen to its events, the BalloonController references the ButtonController directly to subscribe to its events:
    void Start()
    {
        buttonController.ButtonDownEvent.AddListener(CreateBalloon);
        buttonController.ButtonUpEvent.AddListener(ReleaseBalloon);
    }
So now we have a scene that lets you blow up balloons by pressing a button on the controller. We implemented two ways to handle button input: polling or events. When you press the trigger/button, a new balloon is instantiated and grows until you release the button. Then the balloon floats up into the sky. But the balloon starts out positioned at the center of the ground plane (origin 0,0,0), at ground level, so it appears to grow more like a flower than a balloon! The next step is to attach it to your hands.
Tracking your hands
To start taking advantage of the positional tracking of your hands, we simply need to parent the balloon prefab to the hand model. Our scene includes an XR Rig that contains not only the Main Camera that is positionally tracked with the player's head-mounted display, but it also contains a LeftHand Controller and RightHand Controller that are tracked with the player's hand controllers. Any game object that is a child of the hand controller object will be tracked along with it. To implement this, we will first modify the CreateBalloon function so that new balloons are attached to your hand controller and move with it as you move your hands. As we'll see, this introduces a new problem where the balloons are not necessarily positioned upright, so we'll fix that as well.
Parenting the balloon to your hand
The Balloon Controller will need to know which hand pressed the button and parent the balloon to that controller object. Specifically, we'll pass the hand GameObject to theCreateBalloonfunction and then pass its transform to the Instantiate function, as follows:
    public void CreateBalloon(GameObject parentHand)
    {
        balloon = Instantiate(balloonPrefab, parentHand.transform);
        balloon.transform.localScale = new Vector3(0.1f, 0.1f, 0.1f);
    }
Unity's Instantiate function has several variants. Originally, we passed just one parameter—the prefab to be used. This time, we're passing a second parameter, the parentHand transform. When a parent transform is given, the instantiated object will be made a child of it (see https://docs.unity3d.com/ScriptReference/Object.Instantiate.html ).
Likewise, ReleaseBalloon must detach the balloon from the hand before sending it on its way, as follows:
 public void ReleaseBalloon()
 {
     balloon.transform.parent = null;
     balloon.GetComponent<Rigidbody>().AddForce(Vector3.up
       * floatStrength);
     GameObject.Destroy(balloon, 10f);
     balloon = null;
 }
How do we pass the hand GameObject to CreateBalloon? Assuming that your project is presently using the Unity events that we set up in the previous topic, it's very easy. InInspector,we need to update theButton Down Eventfunction, since it now requires the game object argument:
- In the Unity editor, select the Button Input Controllerobject.
- In theButton Down Eventlist, the function may now say something like<Missing BalloonController.CreateBalloon>.
- Select theFunctiondropdown and chooseBalloonController | CreateBalloon(GameObject).
- Unfold the XR Rigobject in Hierarchy and look for the RightHand Controller object, then drag it onto the empty Game Object slot.
The Button Input Controller component now looks like this:
Press Play. Now, when you press the trigger button, the balloon is created attached to your hand, and when released, it is released into the scene from that hand location at the time.
But now we have a new problem. Not only is the balloon tracking the position of your hand, but it is also tracking its orientation, making it look and feel unnaturally sideways!
Forcing balloons to float upright
When we first instantiated the balloons at the ground plane, it was also oriented at its default vertical rotation. But now the balloons are instantiated as a child of the hand controller and oriented relative to its rotation (as well as position). We didn't notice this 'bug' earlier, but we need to fix it now:

Let's write a component script, KeepUpright, that orients the balloon to remain upright. This will also animate it into position gradually, more like a real balloon. To do this, we'll use a linear interpolation of the rotation of the balloon so that it incrementally changes to an upright position over time. Rotations in transforms are internally represented as a quaternion, and we can use Unity's Quaternion.Slerp() function to calculate a spherical linear interpolation between two angles—the balloon's current rotation and the preferred upright one.
Let's write this script now and add it to the Balloon prefab object:
- Select your Balloon prefab in the Project window (in the Assets/Prefabs/ folder).
- Create and add a new script named KeepUpright (by navigating to Add Component | New Script |KeepUpright| Create And Add).
- For tidiness, in the Project window, drag the new script into your scripts folder (Assets/Scripts/).
- Double-click the script to open it for editing.
Edit the script as follows:
public class KeepUpright : MonoBehaviour
{
 public float speed = 5f;

 void Update()
 {
 transform.rotation = Quaternion.Slerp(transform.rotation,
    Quaternion.identity, Time.deltaTime * speed);
 }
}
We declare a speed variable representing the rate it may take to upright the balloon. In each frame Update, we modify the balloon's world space rotation between the balloon's current rotation and an upright position.
Press Play. Here is a screenshot of me generating a bunch of balloons that appear to be flying over the Grand Canyon. Fun!

So far we have created a balloon prefab that can be inflated and float into the sky when released, uprighting itself. The balloon is created and tracked with your hand position. But presently, we are still using the default hand controller settings from XR Interaction Toolkit's XR Rig, including the laser interactors. To make this a more familiar VR experience, we should be holding something in our hands, like maybe a balloon gun that makes the balloons. We'll build that next.
Interacting with a balloon gun
For this part of the project, I'm going to show you how to grab and use interactable objects. Let's make a balloon gun. You'll pick up the gun, and when you pull the trigger, a balloon comes out! Haha!
The implementation uses a different approach to building interactions. Rather than a main central controller script that reads the user input and directs the actions, we are going to use a more object-oriented interactor/interactable paradigm provided by the XR Interaction (XRI) Toolkit. With our toolkit, we'll create a grabbable balloon gun by making it an interactable object, and then use the toolkit to respond to the interactor's Activate events (caused by pulling the trigger) to create, inflate, and release the balloons.
Introducing the XRI Interactor/Interactable architecture
The XR Interaction Toolkit implements an object-oriented interaction system that couples interactor objects, such as your hands, with interactable objects, such as a gun or a ball.
An Interactor is a component that handles the actions of hovering and selecting other objects. Typically, that'd be your left- and right-hand controllers. These are the Interactors in a VR scene. XRI provides several types of Interactors, including a Ray Interactor that casts a laser-beam-like ray for selecting objects (as we've seen in the default XR Rig). There's a Direct Interactor that expects you to directly touch the target object with your hand model to interact with it and a Socket Interactor that locks the object at a position in the world. Other features of Interactors include interaction events that you can hook into, haptics, and sounds. Interactors only interact with Interactable objects.
An Interactable is a component that is added to a game object to make it interactable. Interactables are objects that can respond to hover, select, and activate interactions from an Interactor. The Interactable object controls its own response to these interaction events, so each Interactable object can respond in its own way appropriate for that object.
In XRI, there are three interaction states: hover, select, and activate. These are described as follows:
- Hover: Hovering on an object indicates your intention to interact with it. Hovering usually doesn't change the behavior of an Interactable object, but it might change color or display another visual indicator for this state. To enter and exit the hover state triggers events, you can use OnFirstHoverEnter, OnHoverEnter, OnHoverExit, and OnLastHoverExit.
- Select: Selecting an Interactable object requires a user action such as a grip button or trigger press. A common response is to grab the object, and it becomes attached to your hand controller. Entering and exiting the select state triggers the OnSelectEnter and OnSelectExit events.
- Activate: Activating an Interactable object requires a user action, such as a trigger or button press, that typically affects the currently selected object. This lets you further interact with the object you've selected. Entering and exiting the activate state triggers the OnActivateEnter and OnActivateExit events.
Tying these together, the Interaction Manager associates sets of Interactors and Interactables. There can be multiple Interaction Managers, but every scene requires at least one. On Awake, both Interactors and Interactables register with the first Interaction Manager found in the Scene, unless you have already assigned them a specific Interaction Manager in the Inspector. Note that the interaction system also supports UI events, which we will be using in the next chapter.
When you add an XR Rig to your scene, as we've done earlier (using the GameObject | XR menu), it will automatically also create an XR Interaction Manager object containing an XR Interaction Manager component. Likewise, the XR Rig's child controllers (LeftHand Controller and RightHand Controller) contain an XR Ray Interactor, as well as line rendering helper components for drawing the ray. We'll use these defaults, but note that you can replace it with an XR Direct Interactor or another type of interactor.
We can now use the interaction system. In this project, we are going to create a gun in the scene, sitting atop a pedestal, that you can grab and trigger to make balloons! Let's get started.
Creating a grabbable balloon gun
First, we'll create a grabbable gun. If you have a gun model, you can use that. I don't, so I'm just going to make a white-box one from a few 3D primitives, using the following steps. The important things are to make this model into a prefab and make sure that it includes a Transform that we can use to define the tip of the gun where new balloons will be instantiated:
- In Hierarchy, create an empty game object named BalloonGun (+ | Create Empty), and reset its Transform (3-dot-icon | Reset).
- For its Body, create a child 3D Cube and Scale it to (0.04, 0.1, 0.2).
- For its Barrel, create a child 3D Cylinder, with Scale (0.02, 0.04, 0.02), Rotation (90, 0,0), and Position (0, 0.04, 0.14).
- Define the tip of the barrel where balloons will be instantiated and create an Empty GameObject named Tip at Position (0, 0.04, 0.18).
My gun looks as in the following screenshot (I also made it into a prefab). Your mileage may vary. You could also add some materials other than the default, for example. The Tip object is presently selected in the following screenshot:

Now that we have a gun model, let's make it an Interactable object as follows:
- Ensure that the rootBalloonGunobject is selected inHierarchy.
- Add a XR Grab Interactable component (from the main menu, select Components | XR | XR Grab Interactable).
- Change the Interactable Movement Type to Instantaneous.
Note that adding the Interactable also adds a Rigidbody to the object, if one is not already there. The BalloonGun's Inspector now looks as follows:

As you can see, the XR Grab Interactable component includes a lot of interesting parameters. The Movement Type refers to how the selected object is tracked with your hand; we're keeping it simple and using the Instantaneous option rather than physics. The component also provides the ability to throw the object when you let go, which also uses physics. We'll try that later on.
We're ready to add the gun to the scene. Let's build a pedestal to place our objects on:
- Create a cylinder at the root of your Hierarchy (+ | 3D Object | Cylinder) and rename it Pedestal.
- Set its Scale (0.5, 0.25, 0.5) and Position at the origin (0, 0.25, 0).
- Make it white by creating a new material or using an existing one (by dragging White Material from ProjectAssets/Materials/ onto the Pedestal).
- Place the gun on the pedestal by setting its Positionto (0, 0.55, 0).
If you look at the Pedestal cylinder object, you'll find it has a Capsule Collider with a rounded top (as the name implies, it is shaped like a pill capsule). We need to make sure that it has a flat top so we can put things on it without them rolling or sliding off. We can do this by replacing the capsule with a mesh that matches the cylinder's actual shape, as follows:
- Disable or remove the Pedestal's Capsule Collider component (3-dot-icon | Remove Component).
- Add the Mesh Collider (Component | Physics | Mesh Collider).
Press Play to try it out in VR now. Using the ray interactor with either hand, you can point the laser at the gun, then squeeze the grip button (middle finger) (as Select Usage designates) and it will fly into your hand. Release the grip button and it drops to the ground, or you can throw it. The following is a screen capture of the Scene view using the laser ray just before grabbing the gun:

Now let's activate the trigger button.
Handling Activate events
We now need to wire up the On Activate events to the BalloonController. The main thing that changes from our previous implementation is that we can remove the global Balloon Controller object and attach the BalloonController script directly to the gun. One way to do this is to copy the existing Balloon Controller (Script) component onto the BalloonGun GameObject by going through the following steps:
- In Hierarchy, select the Balloon Controller.
- In Inspector, select the 3-dot-icon for the Balloon Controller component and select Copy Component.
- In Hierarchy, select the BalloonGun.
- In Inspector, select the 3-dot-icon of the Transform (or any other) component, and select Paste Component As New.
- In Hierarchy, select the Balloon Controller and delete or disable it (right-click | Delete).
Now to wire up the interactable events. First, we'll define the On Activate event (which is invoked when the user pulls the trigger) to call the CreateBalloon function in BalloonController. If you recall, this function takes one parameter—the game object that will parent the new balloon. In this case, we want the balloon to be at the Tip of the gun. To do this, go through the following steps:
- Select the BalloonGun in Hierarchy.
- In Inspector, unfold the Interactable Events list on its XR Grab Interactable component.
- For the On Activate event, click the + button to add one.
- Drag this BalloonGun object from Hierarchy onto the Object slot.
- In its Function dropdown, select BalloonController | CreateBalloon.
- From Inspector, drag the Tip child object onto the Game Object parameter slot.
When the user releases the trigger, the On Deactivate event is invoked, and we want to release the balloon. Let's set this up by going through the following steps:
- For the On Deactivate event, click the + button.
- Drag this BalloonGun object from Hierarchy onto the Object slot.
- In its Function dropdown, select BalloonController | ReleaseBalloon.
The following screenshot of a portion of the BalloonGun's Inspector shows these two events defined along with the Balloon Controller component that we added:

When you Play the scene, you should now be able to grab the gun with either hand and use the trigger button to create, inflate, and release balloons. Now our interactable gun is not just a gun, but a balloon gun!
Using the XR Interaction Debugger
When you're developing for VR, it's sometimes difficult to understand what the device tracking, Interactors, and Interactables are doing. Unity provides an XR Interaction Debugger window to give you more insight. To open the debugger, select Window | Analysis | XR Interaction Debugger. This feature (presently) is only available when running in the Editor Play mode. In the following screenshot, I am running the scene. I have selected just the Interactables tab. It shows all the Interaction Managers (just one in this scene) and associated Interactables (just the BalloonGun in this scene). You can see that its state shows that it is presently selected:

Well, that's awesome, isn't it! We have a VR project that lets you grab and shoot a gun that makes floating balloons. But to be honest, it's really hard to think about creating balloons without also wanting to pop them!
Popping balloons
Do you want to pop some balloons? "No", said no one ever! Let's add that feature and make a little game out of this. First, we'll make the balloons poppable with collision detection and an explosion. Then we'll add a ball to the scene that you can throw at a balloon to pop it. And after the ball is thrown, we'll fetch it back by resetting it to its original position after a short delay.
Making the balloons poppable
The Unity physics engine can detect when two objects collide. To do this, each object must have aCollider component attached. You can then have the collision trigger an event. We can also subscribe to that event to make something else happen, like play an explosion effect. This is set up on the balloon prefab. Let's do that now:
- In the ProjectPrefabs/ folder, open your Balloon prefab for editing by double-clicking it.
- SelectComponent |Physics |Sphere Collider.
- To scale and center the Collider into position, click theEdit Collidericon in its component.
- In theScene window, the green Collider outline has small anchor points that you can click to edit. Note that theAltkey pins the center position and Shiftlocks the scale ratio.
- Or you can edit theCenterandRadiusvalues directly. I likeRadius0.22 andCenter(0, 0.36, 0) on my balloon.
Now, we will add a script to handle the collision events:
- Create a new C# script on the Balloon, named Poppable.
- Open it for editing.
ThePoppablescript will provide a callback function forOnCollisionEnterevents. When another object with a Collider enters this object's Collider, our function will get called. At that point, we'll callPopBalloon, which instantiates the explosion and destroys the balloon:
public class Poppable : MonoBehaviour
{
    public GameObject popEffectPrefab;

    void OnCollisionEnter(Collision collision)
    {
        if (transform.parent == null &&
          collision.gameObject.GetComponent<Poppable>() == null)
        {
            PopBalloon();
        }
    }

    private void PopBalloon()
    {
        if (popEffectPrefab != null)
        {
            GameObject effect = Instantiate(popEffectPrefab,
               transform.position, transform.rotation);
            Destroy(effect, 1f);
        }
        Destroy(gameObject);
    }
}
There are a lot of different ways that you can decide when it's appropriate to pop the balloon on collision. In this case, I've decided that the balloon must already have been released (transform.parent == null) and the object it collided with is not another balloon (assuming that only balloons have a poppable component, collision.
gameObject.GetComponent<Poppable>() == null). You can see that theOnCollisionEntergets aCollisionargument with information including what game object collided with it (see more at https://docs.unity3d.com/ScriptReference/Collision.html).
The PopBalloon function instantiates the pop effect object if one has been assigned (in the Inspector) and lets it play for one second before it is destroyed. It also destroys the balloon itself.
Save the script. Try it in Unity. Press Play. When you create a balloon and release it, whack it with your hand. It disappears. Now, let's make a little popping explosion effect.
Adding a popping explosion
If you recall, in Chapter 4, Using Gaze-Based Control, we used an explosion particle-effect prefab from Standard Assets. Let's reuse that here, with some modifications to make it smaller (and less like a hand grenade!):
- In the Project window, navigate to the StandardAssets/ParticleSystems
/Prefabs/ folder. - Select and duplicate the Explosion prefab (Edit | Duplicate).
- Rename the copy as BalloonPopEffect and move it into your own Prefabs/ folder.
Edit the BalloonPopEffect prefab by double-clicking it and going through the following steps:
- In the root BalloonPopEffect, set its Transform Scale to (0.01, 0.01, 0.01).
- Remove or disable the Explosion Physics Force component (right-click | Remove Component).
- Remove or disable the Light component.
- Change the Particle System Multiplier's Multiplier value to 0.01.
- In Hierarchy, delete or disable the child Fireball game object.
- Delete or disable the child Shockwave game object.
- Save the prefab and exit back to the scene hierarchy.
Now assign the effect to the Balloon:
- Open the Balloon prefab again by double-clicking on it.
- Drag the BalloonPopEffect prefab onto the Poppable's Pop Effect Prefab slot.
- Save and exit to the scene.
Press Play, create and release a balloon, and hit it with your hand. Pow! Okay, maybe it's too pyrotechnical for a balloon pop effect, but I like it. Next, we'll do some best practice housekeeping regarding the rigid physics of the balloon.
Disabling rigid physics while in hand
Now that we've added both a Rigidbody and a Collider to the balloon, it interacts with other physics objects in the scene. Oftentimes, you will want to disable this behavior while the object is being grabbed and enable it once the player releases the object. This is controlled using the Rigidbody's IsKinematic flag. When an object is kinematic, the Unity physics engine will not control its velocity and other behavior. To implement this, we just need to add a few things. First, at the top of the class, add a variable to hold the current balloon's Rigidbody, as follows:
private Rigidbody rb;
In the CreateBalloon function, add the following lines to get the balloon's Rigidbody and make it kinematic:
    public void CreateBalloon(GameObject parentHand)
    {
        balloon = Instantiate(balloonPrefab, parentHand.transform);
        balloon.transform.localScale = new Vector3(0.1f, 0.1f, 0.1f);
        rb = balloon.GetComponent<Rigidbody>();
        rb.isKinematic = true;
    }
Then, restore the physics in ReleaseBalloon, as follows:
    public void ReleaseBalloon()
    {
        rb.isKinematic = false;
        balloon.transform.parent = null;
        rb.AddForce(Vector3.up * floatStrength);
        GameObject.Destroy(balloon, 10f);
        balloon = null;
    }
Now, if the explosions created a physical force, for example, it would affect any free-floating balloons in the sky, but will not affect a balloon that is held in your hand with the balloon gun.
Lastly, we'll add a ball that you can grab with your other hand and try to throw at a balloon in the sky.
Throwing a ball projectile
Our final step is to add a ball to the scene that also has a Collider so that you can throw itat a balloon to pop it. We've done just about all of the steps before, so I'll just list them out as follows:
- In the scene Hierarchy root, create a new sphere (by going to + | 3D Object | Sphere) and name it Ball.
- Scale the ball to (0.1, 0.1, 0.1) and place it on the Pedestal at Position (-0.125, 0.55, 0).
- Make it red by adding new material or using the Red Material in your Materials/ folder (drag the material onto the Ball).
- Add a Grab Interactable component (Component | XR | XR Grab Interactable).
- On its Rigidbody component, change the Collision Detection to Continuous.
- On its XR Grab Interactable component, change the Throw Velocity Scale to 2.
Setting its Collision Detection to Continuous (versus Discrete) helps prevent the ball from accidentally falling through the Ground Plane by instructing Unity to more continuously check for collisions. Changing the Throw Velocity Scale helps accentuate the ball's velocity when you throw it; you can try other values to make it go faster.
The pedestal with the gun and ball are shown in the following scene view screenshot:

Press Play. Grab the gun with one hand and inflate a balloon. Grab the ball with the other hand and throw it at the balloon. Kaboom! This could actually be fun! After throwing the ball, I can grab it again using the hand controller ray cast. But wait: what if you throw it off the edge of our playground? Let's add a script to retrieve the ball and reset it to the start position after a delay.
Resetting the ball position
To reset the ball position back onto the pedestal after you've thrown it, we'll create one more script. Create a new C# script named ResetAfterDelay, attach it to the Ball, and edit it as follows:
public class ResetAfterDelay : MonoBehaviour
{
 public float delaySeconds = 5f;
 private Vector3 startPosition;

 private void Start()
 {
 startPosition = transform.position;
 }

 public void Reset()
 {
 StartCoroutine(AfterDelay());
 }

 IEnumerator AfterDelay()
 {
 yield return new WaitForSeconds(delaySeconds);
 transform.position = startPosition;

 Rigidbody rb = GetComponent<Rigidbody>();
 rb.velocity = Vector3.zero;
 rb.angularVelocity = Vector3.zero;
 }
}
On Start, the script will get the ball's starting position and save it into a startPosition variable.
The public function Reset will reset the object's Position after a delay. We implement the delay using a coroutine. This is not the first time we've used coroutines in this book, but to remind you, a coroutine is a function that runs separately from the function in which it was called. It must be declared as IEnumerator, it is started using the StartCoroutine function, and it must contain at least one yield return statement. In this case, we yield for five seconds (delaySeconds), and then it does its work.
The reset operation restores the ball's position to its starting position and stabilizes its physics by zeroing out its velocity and angular velocity. If we didn't reset theRigidbodyvalues, the ball would keep moving even after it's placed on the pedestal.
Save your script, and back in Unity, we can wire up the Reset function by calling the function when the player throws (or otherwise lets go of) the Ball. This is when the XR Grab Interactable's On Select Exit event is invoked:
- With the Ball selected in Inspector, unfold the Interactable Events list on its XR Grab Interactable component.
- At the On Select Exit event, add a new response by pressing its + button (in the lower-right corner).
- Drag the Ball from Hierarchy onto the event's Object slot.
- In the Function drop down, select ResetAfterDelay | Reset.
The Inspector is shown in the following screenshot:

When you press Play, grab the ball and throw it. Five seconds later, the ball will return to its original position.
You could continue improving this game, but I'm going to stop here. It certainly could use some sound effects when the balloon pops. The hand controllers could use some haptic feedback when an object is selected. Another thing you could do is not allow balloons to intersect one another (as you'd expect), even at their tip, by adding a small second Collider component near its base. Oh, and you could display a scoreboard, which requires a UI Canvas. We are actually going to learn about that in the next chapter.
Summary
In this chapter, we explored a variety of software patterns for handling user input for your VR projects. The player uses a controller button, the trigger, to create, inflate, and release balloons into the scene. First, we tried the standard Input class for detecting logical button clicks, like the XRI_Right_TriggerButton button, and implemented it using a polling design pattern. Then we replaced that with Unity events instead of polling, decoupling our BalloonController script from the input itself. Later, this was even more important when we used the XR Interaction Toolkit's Interactor events to implement the same mechanic.
We learned about the XR Interaction Toolkit and its Interactor/Interactable design pattern. We saw how the XR Rig's hand controllers are the Interactors in the scene. We also created Interactables, including the balloon gun and the ball projectile, that you can grab, activate, and throw. We learned how to wire into the Interaction events, including OnActivate, OnDeactivate, and OnSelect events, to call public functions that we wrote to make things work together.
Along the way, we gained more experience with game objects, prefabs, particles, Rigidbodies, and Colliders. We wrote several C# scripts, including BalloonController, KeepUpright, Poppable, and ResetAfterDelay, that instantiate, modify, and destroy game objects in the scene. We learned a little more about directly modifying components such as Transform and Rigidbody through API functions.
In the next chapter, we will further explore user interactions using the Unity UI (user interface) system for implementing information canvases, buttons, and other UI controls.