We've used Unity Physics and Rigidbodies already in some of the prior chapters. Here, we'll dive a little deeper.In this chapter, we will use physics and other Unity features to build variations of an interactive ball game, including headshots, paddleball, and a rhythm beat game. Along the way, we will explore managing object lifetimes, Rigidbody physics, particle effects, and adding sound effects and music to your projects. We'll also continue to gain experience with C# scripting, Unity's application programming interface (API), and events. In this chapter, you will learn about the following topics:
- The Unity Physics engine, Rigidbody components, and Physic Materials
- Using velocity and gravity to make bouncy balls
- Managing object lifetimes and object pooling to avoid Garbage Collection (GC)
- Hitting balls with your head and your hands
- Building a fireball using particle effects
- Synchronizing with music
By the end of this chapter, you will have learned to build several different ball games using Unity Physics, while managing the life cycle of game objects. You'll also learn about adding juice to your games, including visual effects, sound effects, and scene environments.
Technical requirements
To implement the projects and exercises in this chapter, you will need the following:
- A PC or Mac with Unity 2019.4 LTS or later, XR Plugin for your device, and the XR Interaction Toolkit installed
- A virtual reality (VR) headset supported by the Unity XR Platform
You can access or clone the GitHub repository for this book (https://github.com/PacktPublishing/Unity-2020-Virtual-Reality-Projects-3rd-Edition-) to optionally use assets and completed projects for this chapter, as follows:
- Asset files for you to use in this chapter are located in UVRP3Files/Chapter-09-Files.zip.
- All completed projects in this book are in a single Unity project atUVRP3Projects.
- The completed assets and scenes for this chapter are in theUVRP3Projects/Assets/_UVRP3Assets/Chapter09/folder.
Understanding Unity physics
In Unity, the physical behavior of an object is defined separately from its mesh (shape), rendering options, and materials (textures and shader). Unity's built-in physics is based on the NVIDIA Physxreal-time physics engine that implements classical Newtonian mechanics for games and 3D applications. The items that play into physics include the following:
- Rigidbody: A component that enables the object to act under the control of the physics engine, receiving forces and torque to move in a realistic way.
- Joints: Allows the connection one Rigidbody to another or a fixed point in space, thereby restricting its movement in space.
- Collider: A component that defines a simplified, approximated shape of the object used for calculating collisions with other objects.
- Physic Material: Defines the friction and bounce effects of colliding objects.
- Physics Manager: Applies global settings for 3D physics to your project.
Basically, physics (in this context) is defined by the positional and rotational forces that affect the transform of an object, such as gravity, friction, momentum, and collisions with other objects. It is not necessarily a perfect simulation of physics in the real world because it's optimized for performance and separation of concerns to facilitate animation.
A key to physics is the Rigidbody component that you add to objects. Rigidbodies have parameters for gravity, mass, and drag, among others. Rigidbodies can automatically react to gravity and collisions with other objects. No extra scripting is needed for this. During gameplay, the engine calculates each rigid object's momentum and updates its transform position and rotation.
Unity projects have a global Gravity setting, found in the project's Physics Manager by navigating to Edit|Project Settings|Physics. As you might expect, the default gravity setting is a Vector3 setting with values (0, -9.81, 0) that apply a downward force to all Rigidbodies, measured in meters-per-second-squared. The Physics settings window is shown in the following screenshot and explained in the Unity Manual (https://docs.unity3d.com/Manual/class-PhysicsManager.html):

In order to detect a collision, both of the colliding objects must have a Collider component. There are built-in colliders with basic geometric shapes such as a box, sphere, cylinder, and mesh. In order to react to a collision with physics, the object must have a Rigidbody component. When game objects that contain both Collider and Rigidbody collide, the forces of one are applied to the other. The values of the resulting forces are calculated based on the objects' current velocity and body mass. Gravity and drag (that is, resistance) factors are also taken into consideration. You also have options to add constraints to freeze the position or rotation of a given object in any of its x, y, and z axes. Since this calculation can be expensive, especially with many objects, you can constrain the engine—for example, to only consider collisions between objects on specific layers (as shown in the Layer Collision Matrix at the bottom of the previous screenshot).
The calculations can be further affected when a Physic Material is assigned to the object's collider, which adjusts the friction and the bounciness effects of the colliding objects. These properties will be applied only to the object that owns the Physic Material. (Note that it is spelled Physic Material rather than Physics Material, for historical reasons.)
So, let's say that Object A (ball) hits Object B (brick). If Object A has bounciness and Object B does not then, Object A will have an impulse applied in the collision, but Object B will not. However, you have options to determine how their friction and bounciness combine, as we'll see next. It's not necessarily an accurate simulation of real-world physics. It's a game engine, not a computer-aided engineering modeler.
From a scripting point of view, Unity will invoke events—for example, when objects collide (OnCollisionEnter) and when they've stopped colliding (OnCollisionExit).
If this sounds daunting, read on. The rest of this chapter breaks it down into understandable examples. We'll begin by demonstrating the use of Rigidbody and gravity by dropping bouncy balls.
Creating bouncy balls
For our first demonstration, we will implement a simple bouncing ball. When a ball drops from mid-air and hits the ground, we want it to bounce up, then fall down again, bounce up again and fall, with diminishing velocity and height over time. We are going to start simply with a new scene that consists of a ground plane and a sphere. Then, we'll add physics to it, a bit at a time, as follows:
- Create a new scene named 09-BallsFromHeaven by clicking File | New Scene and File | Save As
- Add anXR Rig by selecting GameObject | XR | Stationary XR RigorRoom-Scale XR Rig.
- Position it toward the back of the ground plane (setPosition0, 0, -4).
- Set theMain Camera | Camera | Clipping Planes | Nearto0.01
And set up the GameObjects, as follows:
- Create a plane named Ground Plane using GameObject | 3D Object | Plane, and reset its transform (Transform | right-click | Reset)
- Create a sphere named BouncyBall by clicking GameObject | 3D Object | Sphere
- Set its Scale to (0.25, 0.25, 0.25) and Position to (0, 5,0) so that it's above the center of the ground plane
- Add a Red Material (drag the Red Material from ProjectAssets created in Chapter 2, Understanding Unity, Content, and Scale onto the ball, or create a new material to use via Assets | Create | Material, and color it red)
Our sphere now looks like a ball, hanging in space. Click on the Play button. Nothing happens. The ball just sits in mid-air and doesn't move. Now, let's give it a Rigidbody, as follows:
- With BouncyBall selected, note that it has a Sphere Collider by default
- Add a Rigidbody (Component | Physics | Rigidbody)
- Set its Collision Detection to Continuous
- Click on the Playbutton—it drops like a lead brick
Let's make it bounce, as follows:
- Create a Physics folder for our new physic materials (in the Project window, select + | Folder)
- Create a Physic Material named Bouncy Physic Material (Assets | Create | Physic Material)
- Set its Bounciness value to 1
- With the BouncyBall sphere selected in Hierarchy, drag the Bouncy Physic Material asset from Project onto the ball's Sphere Collider |Material field in Inspector
Click on the Playbutton. OK, it bounces, but it doesn't go very high. We used the maximum value forBouncinessas1.0. What's slowing it down? It's not theFrictionsettings either. Rather, theBounce Combineis set toAverage, which determines how much of the bounciness of the ball (1) is mixed with that of the plane (0). So, it diminishes by half each bounce. If we want the ball to retain all its bounciness, have the material use the Maximum of the two colliders by following the steps given next:
- Change the Bouncy Physic Material object's Bounce Combine to Maximum.
- Click on the Play button. Much better. Actually, too much better. The ball keeps bouncing back up to its original height, never slowing down.
- Now, change the Bouncinessto0.8. The bounces diminish, and the ball will eventually come to a stop.
OK—let's have some more fun. Make it rain bouncy balls! To do this, we'll make the ball a prefab and write a script that instantiates new balls, dropping them from random positions above the ground, as follows:
- Drag the BouncyBall object from Hierarchy into the Project Prefabs folder, making it a prefab.
- Delete the BouncyBall object from the Hierarchy, since we'll be instantiating it with a script.
- Create an empty game object named Ball Controller to attach the script to (GameObject | Create Empty).
- Create a new C# script named BallsFromHeaven (Add Component | New Script) and open the script for editing, as follows:
public class BallsFromHeaven : MonoBehaviour
{
    public GameObject ballPrefab;
    public float startHeight = 10f;
    public float interval = 0.5f;

    private float nextBallTime = 0f;

    private void Start()
    {
        nextBallTime = Time.time + interval;
    }

    void Update()
    {
        if (Time.time > nextBallTime)
        {
            Vector3 position = new Vector3(
                Random.Range(-4f, 4f),
                startHeight,
                Random.Range(-4f, 4f));
            NewBall(position);

            nextBallTime = Time.time + interval;
        }
    }

    private void NewBall(Vector3 position)
    {
        Instantiate(ballPrefab, position, Quaternion.identity);
    }
}
In Update, when it's time, the script drops a new ball from a random position (X, Z between -4 and 4) and a given startHeight at the rate of every half-second ( interval ). The NewBall function calls Instantiate to add a new ball to the scene Hierarchy.
Save the script. We now need to populate the Ball field with the BouncyBall prefab, as follows:
- With Ball Controller selected in Hierarchy, drag the BouncyBall prefab from the ProjectPrefabs folder onto the Ball Prefab slot in the Balls From Heaven component in Inspector.
- Save the scene. Play it in VR.
I love how even the simplest things can be fun to watch in VR! This is what I get:

In summary, we created a sphere with a Rigidbody and added a Physic Material with aBouncinessproperty of0.8andBounce Combine set toMaximum. Then, we saved theBouncyBallas a prefab and wrote a script to instantiate new balls that drop from random positions above the ground plane. This scene also exposes a new issue we should address: the life cycle of game objects. As the scene plays, we keep making more and more balls, forever. Let's do something about that.
Managing the GameObject life cycle
Whenever you have a script that instantiates GameObjects, you must be aware of the life cycle of the object and possibly arrange to destroy it when it is no longer needed. In object-oriented programming (OOP), the life cycle of an object begins when a block of memory is allocated that is large enough to hold the object. When the object is destroyed, its memory is released and reclaimed by the system. In this section, we will examine different strategies on how to decide when to destroy GameObjects you have created, including destroying after they're no longer visible in the scene, or after a specific life duration. Then, we'll use a technique called object pooling to avoid problems caused by repeatedly instantiating and destroying objects at runtime.
Removing fallen objects
In our scene, we have a limited-size ground plane and as balls hit one another, some will fall off the plane into oblivion. At that point, we can discard the ball and remove it from the scene. In Play mode, watch the Hierarchy panel as new balls are instantiated. Note that some balls end up bouncing off the plane platform but remain in the Hierarchy panel. We need to clean this up by adding a script that removes the balls that are out of play. Use the following steps to create a new script named RemoveSelf to the BouncyBall prefab:
- Open the BouncyBall prefab for editing by double-clicking the prefab in your ProjectPrefabs folder
- Add a new script named RemoveSelf by clicking on Add Component|New Script, open it for editing, and add the following lines of code:
public class RemoveSelf : MonoBehaviour
{
    public bool checkOutOfBounds = true;
    public Vector3 minBounds = Vector3.negativeInfinity;
    public Vector3 maxBounds = Vector3.positiveInfinity;

    private void Update()
    {
        if (checkOutOfBounds)
        {
            Vector3 pos = transform.position;
            if (pos.x < minBounds.x || pos.x > maxBounds.x ||
                pos.y < minBounds.y || pos.y > maxBounds.y ||
                pos.z < minBounds.z || pos.z > maxBounds.z)
            {
                Remove();
            }
        }
    }

    private void Remove()
    {
        Destroy(gameObject);
    }
}
This script is reusable for any object you want to remove from the scene when it goes out of bounds. You'll see in a moment why I've decided to make the checkOutOfBounds test optional. The min and max boundaries define a cuboid space, initialized to infinity, so everything will be in bounds until we set an actual boundary value. In the Inspector, you can set the actual boundaries as you need.
Save the script and back in Unity, modify the Min Bounds Y value to -5, as shown in the following screenshot, so that when the ball falls more than 5 meters below ground level, it is destroyed:

Save the prefab changes and press Play. You can see that when balls fall off the edge of the ground plane, they'll be destroyed and removed from the scene. Another strategy is to set a time limit on an object.
Setting a limited lifetime
Another strategy for managing an object's life cycle is to limit its duration of existence. This is especially effective for things such as projectiles (bullets, arrows, bouncy balls) or other objects that the player cares about most when it's instantiated and then isn't paying attention as gameplay moves on. We first used this technique in Chapter 5, Interacting with Your Hands, when we set balloons to disappear after a time limit. Here, we'll extend our RemoveSelf script with the option for the object to remove itself when time runs out. Follow the steps given next:
- Update the RemoveSelf script, and at the top of the class, add the following:
       public bool checkTimeout = true;
       public float timeOut = 15f;
       private float timer;

       private void OnEnable()
       {
          if (checkTimeout)
         {
          timer = Time.time + timeOut;
         }
       }
The script now offers a second option, checkTimeout, and a timeOut duration (in seconds). In OnEnable, we initialize the timer, and then in Update, we check if the timer has run out and remove the object.
- Add to Update the following code:
        if (checkTimeout && Time.time > timer)
        {
            Remove();
        }
- Save the script, and in Unity, Save the prefab. The RemoveSelf component now offers the two options, as shown in the following screenshot:

When Check Timeout is checked, every ball will destroy itself after 15 seconds. When you press Play, after some time, notice that the ground plane remains substantially less crowded than before. With both options checked, each Bouncy Ball will be destroyed after 15 seconds or when it has fallen off the ground plane, whichever comes first.
Nonetheless, it's not a good idea to continuously create and destroy game objects at runtime, as this can cause memory fragmentation that requires GC (recovering unused memory fragments). We can manage this issue using an object pool.
Implementing an object pool
When you instantiate a game object, Unity allocates runtime memory for the object. When you destroy a game object, Unity frees its memory, but that memory is not immediately available for reuse. A separate GC process is periodically run in the background by the internal Unity system to recover it. GC is a time-consuming procedure that can affect frame rate and latency in VR applications and is best avoided whenever possible. Using object pooling can help avoid this issue.
Object pooling is when you create a list of reusable objects to be used in your game. Rather than continuously instantiating new ones, you activate and deactivate a pooled object instead. To implement this, we will write a generic reusable object pooler and add it to the Ball Controller in the scene.
For this, we are also introducing the concept of lists in C#. As the name indicates, a list is an ordered collection of objects, like an array, but lists can be easily searched, sorted, and otherwise manipulated (see https://docs.microsoft.com/en-us/dotnet/api/system.collections.generic.list-1?view=netframework-4.8). We'll use a list to hold our pre-instantiated objects. Let's name the script ObjectPooler. Proceed as follows:
- Select theBall Controller in Hierarchy
- Navigate toAdd Component |New Script and name itObjectPooler
- Open the ObjectPooler.cs for editing. Let's start by declaring several variables at the top of the ObjectPooler.cs file, as follows:
using System.Collections.Generic;
using UnityEngine;

public class ObjectPooler : MonoBehaviour
{
    public GameObject prefab;
    public int poolSize = 20;

    private List<GameObject> pooledObjects =
        new List<GameObject>();
}
The prefab public variable will get the prefab GameObject we want to instantiate—namely, BouncyBall—and poolSize says how many objects to initially instantiate. The actual list is held in pooledObjects. Now, when the scene starts, we initialize the list with the number of objects specified in poolSize, as follows:
        void Start()
        {
           for (int i = 0; i < poolSize; i++)
          {
            GameObject obj = (GameObject)Instantiate(prefab);
            obj.SetActive(false);
            pooledObjects.Add(obj);
          }
         }
The for loop repeats poolSize a number of times, instantiating a new GameObject from the prefab, setting it as inactive, and adding it to the list. Now, when we want a new object, we'll call GetPooledObject, which searches the list for one that is presently not active, sets it as active, and returns it to the caller. If none is available for reuse (all of them are active), we return null, as follows:
       public GameObject GetPooledObject()
        {
          for (int i = 0; i < pooledObjects.Count; i++)
        {
            if (!pooledObjects[i].activeInHierarchy)
            {
                pooledObjects[i].SetActive(true);
                return pooledObjects[i];
            }
        }

          return null;
        }
- We can also enhance the script to optionally grow the list so that it never returns null. Add the following option at the top:
public bool willGrow = true;
- Add the following statements to GetPooledObject after the for loop; if we haven't found one in the list, instantiate a new one anyway and add it to the list, like this:
        public GameObject GetPooledObject()
        {
           for (int i = 0; i < pooledObjects.Count; i++)
        {
            if (!pooledObjects[i].activeInHierarchy)
            {
                pooledObjects[i].SetActive(true);
                return pooledObjects[i];
            }
         }

         if (willGrow)
         {
            GameObject obj = (GameObject)Instantiate(prefab);
            pooledObjects.Add(obj);
            return obj;
        }

         return null;
      }
Save the script. In Unity, assign the BouncyBall prefab to the Object Pooler using the following steps:
- Select the Ball Controller in Hierarchy
- Drag theBouncyBallprefab to theObject Pooler | Prefabslot
Now, we need to modify our BallsFromHeaven script to call GetPooledObject from ObjectPooler instead of Instantiate, as follows. (Note that, in the GitHub project accompanying this book, the script is renamed BallsFromHeavenPooled.) At the top of the class, add a reference to the ObjectPooler and initialize it in Start. Editing the BallsFromHeaven.cs file, make the following changes:
   public float startHeight = 10f;
 public float interval = 0.5f;

 private float nextBallTime = 0f;
private ObjectPooler objectPooler;

 private void Start()
 {
 nextBallTime = Time.time + interval;
objectPooler = GetComponent<ObjectPooler>();
 }
- Then, change NewBall to use objectPooler.GetPooledObject instead of Instantiate.
Since we're not instantiating new objects but reusing them, we may need to reset any object properties to their starting values. In this case, we reset not just the Transform, but set the Rigidbody's velocity to zero, as illustrated in the following code snippet:
       private void NewBall(Vector3 position)
        {
           GameObject ball = objectPooler.GetPooledObject();
           if (ball != null)
         {
            ball.transform.position = position;
            ball.transform.rotation = Quaternion.identity;
            ball.GetComponent<Rigidbody>().velocity = Vector3.zero;
         }
        }
- The last part is to modify RemoveSelf to just disable the object rather than literally destroy it, as follows. Edit the RemoveSelf.cs file. (Note that, in the GitHub project for this book, the script is renamed RemoveSelfPooled.) Have a look at the following code snippet:
private void Remove()
    {
        gameObject.SetActive(false);
    }
Instead of calling Destroy, we changed it to gameObject.SetActive(false). The ObjectPooler will later see this object is not active and thus is available for reuse when searching for a GetPooledObject.
Now, when you press Play, you can see in Inspector that new BouncyBalls are instantiated at the start of the game to initialize the list. As time goes on, the objects are disabled as they are returned to the pool, and reactivated when reused, as shown in the following screenshot (deactivated BouncyBall(Clone) objects are dimmer than the activated ones):

In this section, we learned some best practices in managing game objects at runtime. We used a couple of different strategies for removing objects from the scene—when it goes out of bounds, and when it times out. However, continually instantiating and destroying objects will fragment memory and require the GC to run at the expense of your user experience. So, we replaced the use of Instantiate and Destroy with an ObjectPooler that instantiates a list of objects at the start of the game, and then recycles them as needed for the duration of the game, using the SetActive and isActiveInHierarchy properties to identify busy versus available objects in the pool.
Next, we'll add some more interactivity with our falling bouncy balls—let's build a headshot game!
Building a headshot game
Wouldn't it be fun to actually play with these bouncy balls? Let's make a game where you aim the ball at a target using your head as a paddle. For this game, balls drop one at a time from above and bounce off your forehead (face), while you try aiming for a target. To implement this, we will create a cube as a child of the camera object that provides a collider that tracks the player's head movement. I decided a cube-shaped collider would be better for this game than a sphere or capsule because it provides a flat surface that will make the bounce direction more predictable. For a target, we'll use a flattened cylinder. We'll also add sound-effect cues to indicate when a new ball has been released and when a ball has hit the target.
To begin, we can build on the previous scene, adding an XR Rig. To do that, follow the steps given next:
- Save the current scene named 09-2-BallGame by clicking File | Save As
- Position the XR Rig object toward the back of the ground plane (setPosition0, 0, -4)
- Delete theBall Controllerobject by right-clicking | Delete
To add a Box Collider that tracks with the head, which the player can use to deflect balls, we'll create a Cube and disable its Renderer, as follows:
- In Hierarchy, unfoldXR Rig, drilling down, and select the Main Cameraobject
- Create a child Cube by right-clicking Main Camera | 3D Object |Cube
- Disable the cube's Mesh Renderer (uncheck its enable checkbox)
Next, we'll write a Ball Game Controller that serves balls to the player and manages other game functions.
Serving a ball
We will add a controller script to the scene that serves a new ball, dropping it from above the player onto their head. The player will look up and try to deflect the ball toward a target. Create an empty GameObject with the object pooler and a new BallGame script, as follows:
- Create a new empty Ball Game Controller by clicking GameObject | Create Empty
- Drag the ObjectPooler script from the Project window Scripts folder onto the Ball Game Controller, as we'll use pooling
- Drag the BouncyBall prefab from the Project window Prefabs folder onto the Object Pooler | Prefab slot
- Create a script on it named BallGame (Add Component | New Script) and open it for editing, as follows:
The script is very similar to theBallsFromHeaven script we wrote earlier, with just a few changes. First, we'll add a public dropPoint position where we release new balls from, as follows:
public class BallGame : MonoBehaviour
{
    public Transform dropPoint;
    public float interval = 3f;

    private float nextBallTime = 0f;
    private ObjectPooler objectPooler;

    void Start()
    {
        objectPooler = GetComponent<ObjectPooler>();
    }
The Update function is also nearly identical to the BallsFromHeaven function, except we drop the ball from that dropPoint instead of a random one. We instantiate a new ball every 3 seconds (interval ) from the dropPoint position, as illustrated in the following code snippet:
       void Update()
        {
           if (Time.time > nextBallTime)
         {
            NewBall(dropPoint.position);
            nextBallTime = Time.time + interval;
         }
       }
And the NewBall function is identical to the earlier one, as illustrated in the following code snippet:
       private void NewBall(Vector3 position)
        {
           GameObject ball = objectPooler.GetPooledObject();
           if (ball != null)
        {
           ball.transform.position = position;
           ball.transform.rotation = Quaternion.identity;

           Rigidbody rb = ball.GetComponent<Rigidbody>();
           rb.velocity = Vector3.zero;
           rb.angularVelocity = Vector3.zero;

           ball.SetActive(true);
        }
      }
Save the script. Back in Unity, we need to specify the drop point. For now, let's place it at a height of 10 meters, above the center of the play space just slightly in front (0.2 meters). We'll mark this location with an empty GameObject and then assign it to the script's dropPoint, as follows:
- Create an empty child object of XR Rig named Drop Point by right-clicking XR Rig | Create Empty
- Reset its transform by clicking Transform | right-click | Reset)
- Set its Position to 0, 10, 0.2
- Drag this Drop Point onto the Ball Game Controller | Ball Game | Drop Point slot
Try it in VR. Press Play and look up. When a ball drops, let it hit your face and bounce off. Haha! It's a little hard to know when a new ball has been released, so let's add sound effects to indicate when a ball is dropped.
Adding sound effects
There are a lot of very good sound effect assets on the Unity Asset Store (https://assetstore.unity.com/?category=audio&orderBy=1) and elsewhere on the web, many of them free. I pretty much picked one randomly for this project:Free SFX Packby Olivier Girardot. Feel free to find and use your own favorites. If you want to use them, follow the steps given next:
- Click the link to open the asset in your browser (https://assetstore.unity.com/packages/audio/sound-fx/free-sound-effects-pack-155776)
- ClickAdd To My Assets, thenOpen In Unity; then, in Unity Package Manager, clickDownload, and thenImport
- And then, in theImport Unity Packagewindow, pressImportto add them to your project
To add an audio clip to the ball game controller, follow the steps given next:
- Add anAudio Sourceto the Ball Game Controller by selecting Component | Audio | Audio Source
- Uncheck its Play On Awake checkbox as we'll be playing it via a script
- Add theAudio Clip of a shooting sound namedCannon impact 9 (drag it onto theAudio Clipfield, or use thedoughnut-iconto find it)
When there's an Audio Source, you also must have an Audio Listener in the scene for it to play through the VR headset speakers. Ordinarily, this component is on the Main Camera. Use the following steps to add an Audio Listener to the camera and use it in the BallGame script, as follows:
- Select the Main Camera in Hierarchy (child of XR Rig)
- If there is no Audio Listener, add one by selecting Component | Audio | Audio Listener
- Now, in the BallGamescript, tell it to play the sound when the ball drops. Add a variable for theAudioSourceand initialize it inStart, as follows:
       private AudioSource soundEffect;

       void Start()
       {
          objectPooler = GetComponent<ObjectPooler>();
          soundEffect = GetComponent<AudioSource>();
       }
- Then, in NewBall, also play the sound when a new ball is served, as follows:
      private void NewBall(Vector3 position)
       {
          GameObject ball = objectPooler.GetPooledObject();
          if (ball != null)
         {
            ball.transform.position = position;
            ball.transform.rotation = Quaternion.identity;
            ball.GetComponent<Rigidbody>().velocity = Vector3.zero;
            ball.SetActive(true);
            soundEffect.Play();
         }
       }
- Ready? Press Play.
When you hear the ball, look up and aim the angle of your face to direct the bounce of the ball. COOOL! Next, we'll set up a target so that you can try your aim where the ball goes.
Hitting the target
For our target, we'll create a flattened cylinder out in front of the player on the ground. Perform the following steps:
- Create a Cylinder named Target by clicking Game Object | 3D Object | Cylinder
- Set its Scale to (3, 0.1, 3) and Position at (0, 0.2, 2.5)
- Make it blue, using an existing material (for example, Blue Material from Chapter 2, Understanding Unity, Content, and Scale) or create a new one by clicking Assets | Create | Material; set its Base Map | Color to a blue color, and then drag the material onto the Target
Note that, by default, a Cylinder has a capsule-shaped collider (hemispheres on the top and bottom) that would put a domed collider on the Target. Instead, we should use a mesh that conforms to the cylinder shape. Follow the steps given next:
- Remove the Capsule Collider; then, on the Capsule Collider, select its three-dot icon Remove Component
- Then, add a Mesh Collider instead by clicking Component Physics | Mesh Collider
While we're at it, we'll also add an audio clip for when the target is successfully hit, as follows:
- Add an Audio Source component to Target by clicking Component | Audio | Audio Source
- Assign an Audio Clip to the Audio Source (for example, use the doughnut-icon of the Audio Clip slot to open the Select AudioClip dialog box, and choose a clip—for example, the clip named Indiana Jones Punch
- Uncheck the Play On Awake checkbox
- Add a new script named CollisionSound (Add Component | New Script) and open it for editing
In the script, add the following code. As you can see, we include the OnColliderEnter function that will get called when another collider hits this Target object. The following function will play the hitSoundEffect audio clip:
      public class CollisionSound : MonoBehaviour
       {
          private AudioSource hitSoundEffect;

          private void Start()
         {
           hitSoundEffect = GetComponent<AudioSource>();
          }

         private void OnCollisionEnter(Collision collision)
        {
           hitSoundEffect.Play();
        }
      }
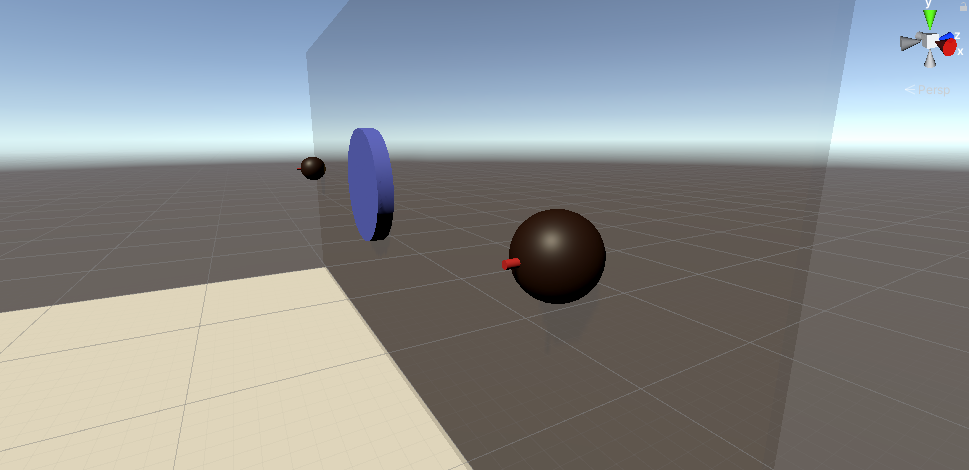
Try it in VR. It's a VR game! The following screenshot shows the scene with the first person's colliders and a ball bouncing off the cube-head toward the target:

That's our headshot game. To build this game, we added a box collider (Cube) as a child of the Main Camera so that it tracks with the player's head. We created a BallGame script that serves balls from a fixed position above the player and plays a sound effect when a new ball is dropped. The player tries to deflect the ball at the target. If the ball hits the target (OnColliderEnter), a different sound clip is played.
For the next iteration of the game, let's get our hands involved, hitting balls with a paddle instead of your head.
Building a Paddleball game
To build a paddle ball game that lets you use hand-controlled paddles for hitting the ball, we'll make simple game paddles from geometric primitives, parented by the hand controllers in your player rig. Let's serve the balls a little further out in front of you so that they're not dropping directly on top of your head, which is more reachable. To set up the scene, use the following steps to build upon the previous one, moving the drop point and limiting serves to one ball at a time:
- You can save the current scene with a new name, Scene-09-Paddleball , by clicking File | Save As
- Disable or delete the headCubewe previously added as a child of theMain Camera, if present
- Modify the Drop Point forward and to the side at Position (0.6, 10, 0.6)
- Modify the Ball Game Controllerto serve only one ball at a time. A quick way to do this is to limit theObject Poolerto size one. Set Ball Game Controller | Object Pooler | Pool Size |1
- Then, uncheck the Will Grow checkbox
Next, we will create a paddle prefab that attaches to the hand controller.
Creating a hand paddle
To create a paddle, we'll construct a very simple model using cylinders. First, let's create the handle by following the steps given next:
- Create an empty GameObject named Paddle (GameObject | Create Empty) and reset its Transform
- Create a child cylinder object (right-click |3D Object | Cylinder) and name it Handle
- Set the Scale of the Handle object to (0.02, 0.1, 0.02)
Next, create the paddle pad from another cylinder. Follow the steps given next:
- Create another Cylinder as a sibling of Handle, and name it Pad
- Set the Scale of the Pad cylinder to (0.2, 0.005, 0.2), Rotation (90, 0, 0), and Position (0, 0.2, 0)
- In your ProjectMaterials folder, create a new material named Paddle Material from Assets | Create | Material
- Give the material Base Mapa wooden color, such as (110, 85, 40)
- Then, drag the material onto theHandleandPadobjects
Now, modify the colliders to a flat collider on the pad only by following the steps given next:
- Select the Handle, and delete its Capsule Collider
- Select the Pad, and delete its Capsule Collider
- With Pad selected, add a Box Collider from Component | Physics | Box Collider
Save the paddle as a prefab, as follows:
- Drag the Paddle into your ProjectPrefabs folder
- Delete the Paddle from your Hierarchy
We want to parent the Paddle to your hands. Let's assume you want to use the right hand. In Chapter 5, Interacting with Your Hands, we learned how to grab an interactable object (in that case, it was a Balloon Gun). To simplify things here, we'll instead use the XR Controller | Model Prefab (and remove the default XR Ray Interactor). To do that, follow the steps given next:
- Select the RightHand Controller (child of XR Rig)
- Remove the following components: XR Ray Interactor, XR Interactor Line Visual, and Line Renderer via the three-dot-icon | Remove Component
- Drag the Paddle prefab from the Project window onto the RightHand Controller | XR Controller | Model Prefab slot
If you press Play now, you should have a paddle in your right hand. The position and orientation of the paddle may feel awkward in your hand. We can refine this by providing an attach point. An attach point is defined with an empty child GameObject whose Transform provides a relative position where the paddle is attached to the hand. Follow the steps given next:
- Add an empty GameObject child of RightHand Controller named Paddle Attach by right-clicking | Create Empty
- Set its Rotation to (20, 90, 90)
- Select the RightHand Controller in Hierarchy, and drag the Paddle Attach object onto the XR Controller | Model Transform slot
Now, when you press Play, if you examine the Hierarchy, you can see that the Paddle has been instantiated as a child of the Paddle Attach, as shown in the following screenshot:

With the current settings, I suggest trying to just deflect the ball like with a shield rather than quickly swatting at it. When the ball and/or paddle are moving "too" fast, no collisions may be detected. There are various things you can do to improve collision detection. One is to use Continuous detection (Rigidbody | Collision Detection) that we've set on the ball's Rigidbody earlier. Likewise, we're using a primitive (non-mesh) box collider on the paddle. Another is to modify the Fixed Timestep (Edit | Project Settings | Time | Fixed Timestep) to make the physics check for collisions more frequently. The default is 0.02 or 50 frames per second (FPS). Try changing to 0.01 or even 0.001 (1,000 FPS). Of course, this is a computationally expensive global project setting and should be used prudently.
In summary, in this paddle ball game, we have a paddle with a collider as our XR hand-controller model. We drop a ball from above the player and they try to hit it with the paddle, into the target. The following screenshot is of me playing the game:

For the next version of this project, we'll take the game to a new level and shoot balls toward the player instead of dropping them from above.
Building a shooter ball game
For the next iteration of the game, we'll shoot balls toward the player, and you have to hit them at a target on a wall. Not a lot of changes are required to make this version work. It shows how you can take an existing mechanic and turn it on its side (both literally and figuratively). Follow the steps given next:
- Save the current scene with a new name,Scene-09-Shooterball, by selecting File | Save As
- We're going to replace the control script, so remove the Ball Game component from the Ball Game Controller by right-clicking | Delete)
- Also, Delete the Drop Point object child of XR Rig
Next, we'll make a shooter wall with the target on it. Then, we'll change the controller script to shoot balls at the player rather than dropping them from above.
Making a shooter wall
To begin, let's make a wall and put the target on it, as follows:
- In the Hierarchy root, create an Empty game object named TargetWall from GameObject | Create Empty
- Position it at (0, 0, 5)
- Create a child Cube and name it Wall by right-clicking | 3D Object | Cube
- Set the Scale of the Wall object to (10, 5, 0.1) and Position to (0, 2.5, 0)
- Create a new Material named Wall Material from Assets | Create | Material and drag it onto the Wall object
- Set its Surface Type to Transparent, and its Base Mapcolor to (85, 60, 20, 75) so that it's a translucent glossy color
Put the target "onto" the wall, as follows:
- Move the Target to a child of TargetWall
- Modify the Target TransformScale to (1.5, 0.1, 1.5), Rotation (90, 0, 0), and Position (0, 2.5, -0.15) so that it's smaller and just in front of the wall itself
Next, instead of serving balls by dropping them out of the sky and relying on gravity, we'll shoot balls at you from a source on the wall, as follows:
- Create a Sphere object as a child of TargetWall, named Shooter, by right-clicking 3D Object | Sphere
- Set its Scale to (0.5, 0.5, 0.5) and Position to (4, 2.5, -0.25)
- Set its Rotation to (0, 180, 0)
- Remove its Sphere Collider component (three-dot-icon | Remove Component)
- Create a new Material named Shooter Material, with Base Mapcolor (45, 22, 12, 255), and drag it onto the Shooter object
I had you rotate the shooter 180 degrees so that it is "facing" the player. You can't necessarily see that now, so let's add a gun barrel to the shooter that sticks out its front, like this:
- Create a Cylinder object as a child of Shooter, named Barrel
- Set its Scale (0.1, 0.1, 0.1), Rotation (90, 0, 0), and Position (0, 0, 0.55)
- Remove itsCapsule Collidercomponent (three-dot-icon | Remove Component)
- Assign it a color material, such as Red Material
- Duplicate the Shooter and set the second one's PositionXto -4 so that there's one on both sides of the Target
Here is a screenshot of the Scene view of theTargetWallwith its shooters:
Now, we can fire the balls at the player.
Shooting balls toward the player
The game controller script is similar to the BallGame one we have, but sufficiently different that we should create a new script. It'll have Object Pooler and new Shooter Ball Game components, as follows:
- On the Ball Game Controller, remove the Ball Game component (three-dot-icon | Remove Component) if it's still present
- Create a new C# script namedShooterBallGame from Add Component | New Script on the Ball Game Controller, and open it for editing
- Write the ShooterBallGame script as follows. We give it two shooters, and the script alternates between them to shoot balls in the direction of a shootAt location. It plays a sound each time a ball is shot. First, let's define the public and private variables we will need, as follows:
public class ShooterBallGame : MonoBehaviour
{
    public Transform shootAt;
    public Transform shooter0;
    public Transform shooter1;
    public float speed = 5.0f;
    public float interval = 3.0f;

    private float nextBallTime = 0f;
    private ObjectPooler pool;
    private AudioSource soundEffect;
    private int shooterId;
}
The Start function initializes the variable we get at runtime. I've added some additional error checking this time around, as can be seen in the following code block:
      void Start()
        {
          if (shootAt == null)
            shootAt = Camera.main.transform;

        soundEffect = GetComponent<AudioSource>();
        if (soundEffect == null)
           Debug.LogError("Requires AudioSource component");

         pool = GetComponent<ObjectPooler>();
         if (pool == null)
            Debug.LogError("Requires ObjectPooler component");

         if (shooter0 == null || shooter1 == null)
         Debug.LogError("Requires shooter transforms");

         Time.fixedDeltaTime = 0.001f;
        }
Note that because this is a faster action game, I've modified the Project Time Fixed Timestep by setting Time.fixedDeltaTime = 0.001f. I've done this in a script so that it will not affect other scenes in the project, only when the ShooterBallGame is present. (If you've already modified the project setting, Edit | Project Settings | Time | Fixed Timestep, you can reset it back to the default 0.02 value now and let the script handle it.)
Now, write the Update function that shoots the balls at specified intervals, alternating between the two shooter locations. The shooterId variable has the value of either 0 or 1, indicating which shooter to use next, as illustrated in the following code block:
        void Update()
         {
            if (Time.time > nextBallTime)
            {
               if (shooterId == 0)
               {
                  ShootBall(shooter0);
                  shooterId = 1;
               }
               else
               {
                  ShootBall(shooter1);
                  shooterId = 0;
               }

               nextBallTime = Time.time + interval;
            }
          }
Finally, here's the ShootBall function, similar to the NewBall one we wrote earlier. We get a ball from the pool and set its starting position as the current shooter. We point the shooter to be aiming directly at the player (shooter.transform.LookAt(shootAt), where shootAt is the Main Camera transform). Then, we initialize the ball's Rigidbody velocity to the shooter's forward direction and ball speed (shooter.forward * speed), as illustrated in the following code block:
       private void ShootBall(Transform shooter)
       {
           GameObject ball = pool.GetPooledObject();
           if (ball != null)
           {
               ball.transform.position = shooter.position;
               ball.transform.rotation = Quaternion.identity;

               Rigidbody rb = ball.GetComponent<Rigidbody>();
               rb.angularVelocity = Vector3.zero;
               shooter.transform.LookAt(shootAt);
               rb.velocity = shooter.forward * speed;

               ball.SetActive(true);
               soundEffect.Play();
           }
        }
Back in Unity, we need to populate the public variable slots. To do that, follow the steps given next:
- With the Ball Game Controller game object selected in Hierarchy, drag the Shooter object (child of TargetWall) onto the Shooter Ball Game |Shooter 0 slot
- Drag the other Shooter (1) object onto the Shooter Ball Game |Shooter 1 slot
- In the previous game, we limited the Object Pooler to one ball; let's bump that back up to 20 by selecting Object Pooler | Pool Size |20
Leave the Shoot At slot empty for now so that it will default to the player's live head position. The game controller now looks like this in Inspector, including Object Pooler, Shooter Ball Game, and Audio Source components:

Press Play. Not bad. But the balls are too big and heavy. Let's create a new ball prefab with different properties.
Improving the ball
The falling bouncy ball feels kind of clunky now, being spat out of the shooter toward the player but dropping quickly to the ground. I think it's the gravity that's pulling it down. Let's fix this by making a new ball prefab with different properties. Follow the steps given next:
- Open the BouncyBall prefab for editing from your ProjectPrefabs folder, then double-click the prefab
- Save it with the name ShooterBall from File | Save As (note that this menu command is repurposed to save the currently open prefab rather than the scene Hierarchy)
- Set its Scale to (0.1, 0.1, 0.1)
- Uncheck the Use Gravity checkbox in its Rigidbody component
- Save your changes by using the < icon in the top-left of Hierarchy, and select Save, to exit Prefab edit mode
- Select Ball Game Controller in Hierarchy, and drag the ShooterBall onto its Object Pooler |Prefab slot
Now, the object pool will use the new ShooterBall game object. Press Play. Oh yeah! The game is now much more interesting.
We could have tried other things instead of just disabling gravity. Try adjusting the ball's RigidBody Mass property. Or, perhaps change the project's Gravity so that all falling objects are pulled down less as though you're on the Moon (Project Settings | Physics | Gravity value).
Of course, there's a lot of other things you can do to improve gameplay. For example, try modifying the Interval and Speed settings of the ball shooter. Some other gameplay ideas may come to mind. You could make a moving target, perhaps in a predictable oscillating motion, or completely random. You could keep score, using OnCollisionEnter on the Target. You could disqualify bank shots that bounce first on the floor (using OnCollisionEnter on the ground plane), and so on. You could also juice up the scene with a more enticing environment. Let's try that next.
Juicing the scene
Having the basic mechanics implemented, we can now juice it! First, we'll replace our red bouncy balls with hot fireballs. Then, we'll replace our ground plane and wall with a more graphic 3D artwork skull platform, and we can turn this into a rhythm beat game by synchronizing the balls to music!
Great balls of fire
Let's change the balls from being red bouncy balls to balls of fire! Instead of mesh geometry, we will use a Particle Systemto render it. There are a lot of ways to get particle effects into your Unity project. If you recall, inChapter 4,UsingGaze-Based Control we added a water hose, spark emitter, and explosion effects from theUnity Standard Assetspackage. Here, we'll build our own, but use one of the materialsprovided with theParticleFireCloud Standard Assets package. In the Unity Asset Store, you can find many offerings of particle effects and system enhancements too.
First, make a new prefab derived from ShooterBall, named FireBall, as follows:
- Duplicate the ShooterBall prefab and rename the copy to FireBall (in the ProjectPrefabs folder, select ShooterBall, and then Edit | Duplicate
- Open FireBall for editing (double-click)
- Disable its Mesh Renderer component (uncheck its Enable checkbox)—don't remove the component (yet), as we're going to use it for reference
- Create a child Particle System named Fire Particles (right-click | Effects | Particle System)
There are a lot of details in working with particles, many options, and configuration parameters. As we step through this quick implementation of fireballs, observe the effects of each change as we make them one at a time. Note that you can preview the particle effects in the Scene window. Feel free to experiment on your own.
As we saw earlier in the book, including in Chapter 2, Understanding Unity, Content, and Scale, where we first imported the Standard Assets, Unity is still in transition to the new Scriptable Render Pipeline (SRP) and other advancements, while there's a treasure trove of assets available that were developed for older versions of Unity. Some of these assets will automatically be converted when you import them into Unity. Others, such as Materials, can be upgraded to the current project's render pipeline using the Edit | Render Pipeline menu. In the case of particle materials (at the time of writing) using particle shaders, these do not automatically convert to URP. So, let's do this first ourselves. Follow the steps given next:
- Duplicate the ParticleFirecloud material (Edit | Duplicate) found in Assets/Standard Assets/Particle Systems/Materials/ folder, and name it ParticleFirecloud URP
- Drag the ParticleFirecloud URP material onto the Fire Particles | Particle System | Renderer | Material slot
- Change its Shader to Universal Render Pipeline / Particles / Unlit
- Drag the ParticleFilecloud.png texture (found in Assets/Standard Assets/Particle Systems/Textures/ folder) onto the Base Map texture chip (or use the Base Map | doughnut-icon to find it)
- Set its Surface Type to Transparent
- Set its Blending Mode to Additive
Next, modify its Shape and Emission parameters, as follows:
- Near the top of the Particle System Inspector, find the Shape panel, and check to enable it
- Select Shape | Sphere, and set its Radius to 0.1
- Find the Emissionpanel and check to enable it
- Then, setRate of Timeto15
- At the top of the Particle System Inspector is the main panel with uncategorized parameters—let's set some of these, as follows:
-
- Duration:2.00.
- Start Lifetime:1.
- Start Speed:0.
- Start Size:0.5.
Next, we'll animate the particles, as follows:
- In the particle system main panel, for Start Rotation, click the selector icon on the right and choose Random Between Two Constants. Then, fill in the values 180 and -180.
- Set the Start Color and then selectGradient(right-side selector), and then, pick a range of colors such as yellow to red, as shown here:

- Find theColor Over Lifetimepanel. Check to enable it. Click the slot to open itsGradient Editor. We want to adjust theAlphacurve so that it starts atAlpha0atLocation0%, then becomesAlpha255at10%, and then fades out over time back toAlpha0at100%. The editor is shown here:

- Next, set theVelocity Over Lifetime—find that panel and check to enable it, usingRandom Between Two Constants. For each Linear X, Y, Z value, set min and max values to-0.05and0.05, respectively.
At this point, we have a really nice-looking fireball, but it's much bigger than our red shooter ball. We should adjust the fireball so that it's about the same size. We can temporarily enable the FireBall's renderer for reference. Follow the steps given next:
- Re-enable the FireBall's Mesh Renderer
- Adjust the particle system scale—for example, by changing the Transform | Scale to (0.2, 0.2, 0.2)
- Once you have it right, disable the Mesh Renderer again
Complete the setup by telling the Ball Game Controller to use this prefab, as follows:
- Saveyouredits to prefab and return to the scene edit mode (press <)
- With Ball Game Controller selected, drag the FireBall prefab from the Project window onto the Object Pooler | Prefab slot
Now, when you press Play, the shooters will fire FireBalls. Oh wow! Here is a screenshot of the gameplay window paddling an incoming fireball:

Next, we'll work on our level design, using a cool skull platform asset I found on the Asset Store.
Skull environment
To spice up our game even more, we should find a more exciting environment. Searching the Asset Store, I found the Skull Platform free asset (https://assetstore.unity.com/packages/3d/props/skull-platform-105664). You can use it too, or find something different. Assuming you've found and installed the Skull Platform asset, we'll add it to our scene. (I won't walk you through the import steps, but don't forget to convert the materials to URP using Edit | Render Pipeline | Universal Render Pipeline | Upgrade Project Materials to UWP.) First, let's render our target as a skull, as follows:
- Drag Platform_Skull_01 (found in the Assets/Skull Platform/Prefabs/ folder) as a child of Target (under TargetWall)
- Set its Transform Rotation(0,0,180) andScale(0.3,0.3,0.3)
- Select the Targetand disable itsMesh Renderer
Let's illuminate the target more dramatically. Follow the steps given next:
- Create a new Spotlight as a child of Target by right-clicking |Light | Spotlight to shine on the skull.
- I used the following settings:Position(0,-12,1),Rotation(-40,180,180), Range:4,Color:#FFE5D4, and Intensity:3.
- Indirect Multiplier is not supported in URP, so set it to 0.
Next, let's add the big platform as a backdrop instead of the ground plane. The quickest way is to merge in the Demoscene they provide. We do this by temporarily having two scenes open, ours and theirs, so that we can move the things we want from theirs, then remove their scene. Use the following steps to move the objects we want from the Platform demo scene into our own game:
- Create an Empty game object in the Hierarchy root, name it SkullPlatform, and Reset its Transform.
- Drag a copy of the Skull Platform's demo scene named Platform(Assets/Skull Platform/Demo/folder) into theHierarchy. We now have two scenes open, ours and theirs.
- Select the Demo's Scene,Lighting, andParticlesobjects and drag them as children ofSkullPlatform.
- Now that we have the assets we want, we can remove their scene altogether. (Right-click the Platformscene in Hierarchy and chooseRemove Scene. When prompted, chooseDon't Save.)
- Set the SkullPlatformPositionto (0,-1.5,0) so that it's just below the ground plane.
- Select the GroundPlaneand disable itsMesh Renderer.
Now, we'll set up the scene environment lighting. Follow the steps given next:
- Delete the Directional Light from the scene Hierarchy.
- Open the Lightingwindow. If it's not already a tab in your editor, use theWindow | Rendering | Lighting | Environment tab and dock it next to the Inspector.
- Set its Skybox MaterialtoSky(provided in the Skull Platform package).
- Set Environmental Lighting to Color, then section, setAmbient Color to RGB(20, 20, 20).
- Go even further and check the Fogcheckbox (inOther Settings), with Color RGBto (20, 20, 20),Mode: Exponential, andDensityto 0.03.
Here is a screenshot of the scene with the skull platform environment and lighting. Sweet!

When you press Play, it's exactly the same game we had before but it feels a whole lot cooler, don't you think? Let's add one more feature to shoot the fireballs at you much faster and synchronize this to the beat of some heavy dance music.
Audio synchronization
Many popular VR rhythm games, such as Audio Shield and Beat Saber, synchronize the projectiles coming toward you to the beat of the music. How can we add that to our game? One method is to compose a timeline manually that maps the music timings to projectiles (and other artifacts) that you'll experience playing a specific song. Beat Saber, for example, has its own Beat Saber Level Editor that opens a music file (OGG or WAV) and lets you create a Beatmap and content within its graphical editor. Then, you save your composition to a data file. When you launch the song in Beat Saber, it uses the Beatmap file to play the game. You could also do this directly in Unity using the Timeline window (we work with Timelines in Chapter 12, Animation and VR Storytelling).
For this project, we'll do this procedurally, using code that "listens" to your music and detects beats in the song at runtime, triggering a new fireball on each beat. Unity provides an API for sampling audio source data, including AudioSource.GetSpectrumData and GetOutputData. Extracting actual beats in the music from this data is not trivial and requires a lot of math and some understanding of how music encoding works. Fortunately, we found an open source script that does this for us, called Unity-Beat-Detection (https://github.com/allanpichardo/Unity-Beat-Detection). It conveniently provides Unity Events for onBeat events, which we'll use. (It also provides onSpectrum events, with music frequency bands per frame, which you could use too—for example, to change the color of the fireball or other things based on frequency bands, such as a music visualizer.) Proceed as follows:
- Download the AudioProcessor.cs script from GitHub (https://raw.githubusercontent.com/allanpichardo/Unity-Beat-Detection/master/AudioProcessor.cs) or refer to the copy we've provided with the files for this book for your convenience.
- Drag the file into your ProjectAssets/Scriptsfolder.
- For your music, find any MP3 or WAV file that has a nice beat, and import it into your project.
We looked on SoundCloud NoCopyrightSounds track (https://soundcloud.com/nocopyrightsounds/tracks) to find one named Third Prototype - Dancefloor (http://ncs.io/DancefloorNS).
- In the Project window, create a folder named Audio.
- Import your music into Unity by dragging the audio file into the Project window Assets/Audio/ folder (or use Assets | Import New Asset).
To implement this feature, we'll make a MusicController and then modify the ShooterBallGame script to use its beats to fireballs. In Unity, do the following:
- In Hierarchy, create an Empty game object and name it MusicController.
- Add the AudioProcessor script as a component.
- Note that it automatically adds an Audio Source component too.
- Drag your imported music file onto the Audio Source | AudioClip slot.
- Drag MusicController itself onto the Audio Processor |Audio Source slot.
- Now, update the ShooterBallGame script on Ball Game Controller as follows. Add the following two lines to the Start function, which adds a listener to the processor.onBeat event:
        AudioProcessor processor = FindObjectOfType<AudioProcessor>();
        processor.onBeat.AddListener(OnBeatDetected);
- Then, we will replace the Update function with the OnBeatDetected function. That is, instead of using a timer to decide when to shoot a new fireball in Update, we shoot one based on the beat events. Also, we'll randomly decide to shoot from either the left or right shooter location. Delete (or comment out) the entire Update function. Then, add this code:
        void OnBeatDetected()
        {
            if (Random.value < 0.5f)
            {
               ShootBall(shooter0);
            }
            else
            {
               ShootBall(shooter1);
            }
         }
Press Play and go at it! Whoohoo, we have our own version of Audio Shield! A screenshot of active gameplay is shown here:

In this final version of the project in this chapter, we made some major improvements by focusing beyond the basic game mechanics (launch a ball, hit the ball, aim for the target). We first replaced the simple red bouncy ball with a fireball, using the Unity Particle System. Then, we replaced the simple level environment with an interesting 3D Skull Platform asset found on the Asset Store. Lastly, we improved the game mechanics by synchronizing the fireballs to rhythmic beats of music, using an open source script that analyzes the music source as it's playing at runtime.
Summary
In our journey through this chapter, we experienced software development as an iterative process, changing, reworking, and improving our game multiple times. Some changes were big, while others were small. We built games that use the Unity Physics Engine and other features.
First, we explained in layman's terms the relationship between Rigidbody, Colliders, and Physic Materials, and explored how the physics engine uses these to determine the velocity and collision of objects in the scene. Then, we considered the life cycle of game objects and implemented an object pooler that helps avoid memory fragmentation and GC, which can lead to performance problems and VR discomfort.
Using what we learned, we implemented several variations of a ball game, first aiming for a target with your head, and then using hand paddles. We modified the game so that, instead of serving balls from above, using gravity, we shoot them from in front and apply a velocity vector. Lastly, we juiced up our game, changing the bouncy balls into fireballs, adding a cool level environment, and synchronizing the fireballs to music beats. In the end, we have a good start to making our own version of a music rhythm-beat VR game.
In the next chapter, we will see another, more practical example of a virtual interactive space. We are going to build an interactive art gallery space that you can move through and query the artwork for information and details.