360-degree photos and videos are a different way of using Virtual Reality (VR) that is widely accessible to consumers today, both in terms of experiencing them as well as producing and publishing them. Viewing prerecorded images requires much less compute power than rendering full 3D scenes, and this works very well even on low-end mobile VR devices (such as Oculus Go) and mobile phone-based headsets such as Google Cardboard.
In this chapter, we will learn about using 360-degree media is Unity for VR projects. To begin, I will explain the difference between regular photos and spherical projections (equirectangular) and then demonstrate this in several cases, including crystal balls, globes, and inside-out magic orbs! Then, we'll create a new scene so that we can view 360-degree photos within VR and add a user interface to let the user switch between pictures. Likewise, we'll also learn how to use 360-degree videos in the scene. Skyboxes are a more traditional use of 360-degree media in computer graphics and Unity scenes, so we'll see how to apply 360-degree assets as a skybox. Lastly, we'll consider methods of capturing the 360-degree images of your Unity projects, in the Editor and possibly at runtime, so that your users can share them.
In this chapter, we will cover the following topics:
- Understanding 360-degree media and formats
- Using textures to view globes, photo spheres, and skyboxes
- Adding a 360-degree video to your Unity projects
- Capturing 360-degree images and video from within your Unity app
Let's get started!
Technical requirements
To implement the projects and exercises in this chapter, you will need the following:
- A PC or Mac with Unity 2019.4 LTS or later, the XR plugin for your device, and the XR Interaction Toolkit installed
- A VR headset supported by Unity XR Platform
You can access or clone the GitHub repository for this book (https://github.com/PacktPublishing/Unity-2020-Virtual-Reality-Projects-3rd-Edition-) to use the following assets and completed projects for this chapter:
- The asset files for you to use in this chapter are located in the UVRP3Files/Chapter-11-Files.zip folder.
- All the completed projects for this book can be found in a single Unity project atUVRP3Projects.
- The completed assets and scenes for this chapter are located in the UVRP3Projects/Assets/_UVRP3Assets/Chapter11/folder.
Exploring 360-degree media
The terms 360-degree media and virtual reality are being tossed around a lot lately, often in the same sentence. Consumers may be led to believe that it's all the same thing, it's all figured out, and it's all very easy to produce, when, in fact, it is not that simple. Generally, the term 360-degree media refers to viewing prerecorded photos or videos in a manner that allows you to rotate your view's direction to reveal content that was just outside your field of view.
Non-VR 360-degree media has become relatively common. For example, many real-estate listing sites provide panoramic previews with a web-based player that lets you interactively pan around to view the space. Similarly, Facebook and YouTube support uploading and playback of 360-degree videos and a player with interactive controls so that you can look around during the playback. Google Maps lets you upload 360-degree panoramic photos, much like their Street View, which you can create with an Android or iOS device or a consumer camera (for more information, visit https://www.google.com/maps/about/contribute/photosphere/). The internet is teeming with 360-degree media!
With a VR headset, viewing 360-degree media is surprisingly immersive, even still photos. You're standing at the center of a sphere with an image projected onto the inside surface, but you feel like you're really there in the captured scene. Simply turn your head to look around. It's one of those things that gets people interested in VR the first time they see it. Let's learn more about this media and its file formats before we use them in a Unity project. This will include understanding equirectangular (spherical) projections, seeing how VR works to make 360-degree media feel immersive, and issues concerning stereo 360-degree media.
Understanding equirectangular projections
Ever since it was discovered that the Earth is round, mapmakers and mariners have struggled with how to project the spherical globe onto a two-dimensional chart. The variations are plentiful and the history is fascinating (if you're fascinated by that sort of thing)! The result is an inevitable distortion of some areas of the globe. As a computer graphics designer, it's perhaps a little less mysterious than it was to ancient cartographers because we know aboutUV Texture mapping.
Three-dimensional object models in Unity are defined bymeshes– a set of Vector3 points connected with edges to form triangular-shaped facets. You can unwrap a mesh (in ProBuilder or Blender, for instance) into a flattened 2D configuration to define the mapping of texture pixels to the corresponding areas on the mesh surface (UV coordinates). A globe of the Earth, when unwrapped, will be distorted, as defined by the unwrapped mesh. In computer graphics, the resulting image is called a UV texture image.
This UV mapping of the texture to the geometry mesh can be arbitrary and depends on the artistic requirements at hand. However, for 360-degree media, this is typically done using anequirectangular(or a Meridian) projection (for more information, visit https://mathworld.wolfram.com/EquirectangularProjection.html), where the sphere is unraveled into a cylindrical projection, stretching the texture as you progress toward the north and south poles while keeping the meridians as equidistant vertical straight lines.
The following image (see Tissot's indicatrix for more information) shows a globe with strategically arranged identical circles (illustration by Stefan Kühn):

The following image shows the globe unwrapped with an equirectangular projection:

We will use an equirectangular mesh for our photospheres and an appropriately projected (warped) image for its texture map. Now, let's understand how these image projects are used in VR.
VR is hacking your field of view
OK, but why is 360-degree media in VR so compelling? There's a huge difference in how we experience viewing a 360-degree video on a flatscreen versus inside a VR headset. First of all, consider the field of view and peripheral vision. For example, an IMAX cinema theater with larger screens than those in conventional cinema theaters encompasses more of your peripheral vision and has a wider Field Of View (FOV). A mobile phone or computer monitor, at a natural viewing distance, is about a 26-degree FOV. A movie theater is 54 degrees, while IMAX is 70 degrees. Oculus Rift and HTC VIVE are about 120 degrees. In terms of human vision, one eye can see about 160 degrees, and both eyes combined provide about a 200-degree horizontal field of view.
But in VR, there's more! In VR, you're not so obviously limited by the FOV and physical dimensions of the screen because you can easily move your head to change your view direction at any time. This provides a fully immersive view, that is, horizontal 360 degrees as you look side to side and 180 degrees when you look up and down. With your head still in VR, the field of view is only significant with regard to the outer reaches of your peripheral vision and eyeball movement. But move your head (at the neck or full body) and the software detects the change in head pose (viewing direction) and updates the display. The result is that you believe to have an uninterrupted view of the 360-degree image. In addition, you probably have two eyes. We'll consider stereo views next.
Stereo 360-degree media
To capture monoscopic 360-degree media, you can use a consumer 360-degree camera. These cameras typically have a couple of back-to-back super-wide-angle lenses and corresponding image sensors. The resulting images are stitched together, using clever algorithms to avoid seams, and the result is processed in an equirectangular projection. When viewing it in VR, each eye sees the same 360-degree photo. For landscapes, such as mountain views or other large areas, where the subject is more than 20 meters from your viewing position, it is fine because there is no parallax; that is, each eye sees pretty much the same thing from the same viewing angle.But if the photo includes objects closer to you, it will look incorrect, or at least artificially flattened, because you expect parallax where each eye has a slightly different view.
What about a true 360-degree stereo? Shouldn't each eye have its own photosphere offset from the other eye's position? To capturestereo360-degree media, it cannot simply be photographed by two 360 cameras from two viewpoints; instead, it has to be constructed by stitching together images from a rotating stereo pair. The distance between camera images simulates a human's separation between their eyes (interpupillary distance, that is, IPD). There is a new generation of consumer cameras (such as Fuze Camera, https://vuze.camera/, with eight cameras), and high-end professional camera rigs that arrange as many as 16 separate cameras in a cylindrical array and can cost as much as $15,000. Advanced image processing software then constructs stereographic views.
Google introduced an advanced file format for stereo 360-degree video called omni-directional stereo, or ODS. It is a variant of conventional equirectangular projections with the advantages of avoiding bad seams or dead zones, it is pre-rendered for faster playback, and video uses conventional encoding so that you can edit using conventional tools.
Another technology that results in stereo 360-degree viewing is called Light Fields. Unlike conventional photographs that capture a single pixel of light reaching the plane of the camera's light sensor (or a set of pixels, in the case of multiple cameras for stereographic media), a light field camera (also known as a plenoptic camera) captures not only the intensity of light but also the direction that the light rays are traveling in space. Light field cameras are fascinating, even for still photography, as the photos possess a unique ability to modify the depth-of-field focus (for example, iOS portrait mode) after a picture has been taken, allowing the user to blur the background more or less in an existing photo. Light field technology is rumored to making its way into consumer devices, including Apple and Android mobile phones. Light field's applications for VR are just as impressive, potentially allowing you to view a captured scene from any viewpoint and direction. However, this isn't happening in today's world. Please stay tuned – at the time of writing, I don't know of any tools that support light field images in Unity.
So far, we have learned that spherical images become distorted when flattened into a two-dimensional image and that there are different ways to accomplish this, typically using 360-degree media and an equirectangular projection. You can view such images on a flatscreen such as on Facebook, YouTube, and web browsers. In VR, the 360-degree media become much more immersive because the field of view changes with view direction, tracking the user's head movement. Stereographic 360-degree media is more advanced, providing separate views of the captured scene for each of the user's eyes. Now that we have a better understanding of the nature of 360 images and videos, let's begin using them in a Unity project. We'll start with spherical photo globes.
Having fun with photo globes
To begin exploring these concepts, let's have a little fun and apply ordinary (rectangular) images to 3D spheres. First, let's take a regular photo and apply it as a texture to a sphere, just to see what it does and how bad it looks. Then, we'll use a properly distorted equirectangular photosphere texture. You'll see why that's required to make a globe look correct, but you'll also need a compatible mesh geometry for the project to look right. Lastly, we'll invert the shader we're using to view the globes so that the image projects onto the inside of the sphere instead of the outside. Then, we'll play with it as a magic orb in VR.
Seeing crystal balls
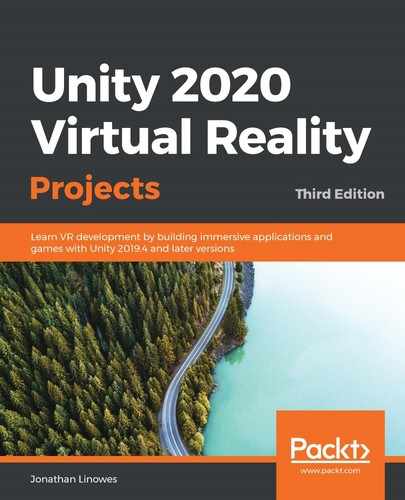
"Auntie Em! Auntie Em!" cried Dorothy in the Wizard of Oz 1939 movie as she gazed into a crystal ball, seeking help from the Wicked Witch. Let's consider making a crystal ball using Unity, my little pretty!In Chapter 8, Lighting, Rendering, Realism, we considered techniques we can use for custom materials, including simulating metal and glass surfaces. We'll apply similar settings in our semi-transparent crystal ball material. And to give an impression of thickness to the glass, we'll project the image onto a smaller sphere with a ball.
First, set up a new scene for this chapter by performing the following steps. We can use a stationary XR camera rig for this:
- Create a new scene by navigating toFile|New Scene. Then, navigate toFile|Save As...and name itPhotoGlobes.
- Add a stationary XR Camera Rig to the scene usingGameObject | XR | Stationary XR Rig.
- Set the XR Rig's Positionto (0,0,-1).
- For the Game window view, while in the Unity Editor, elevate Camera Offset above the ground and set itsPosition Yto1.4.
- For VR, I always like to set Main Camera | Clipping Planes | Near to zero (0.01).
Let's set up the scene environment with a ground plane and a skybox. If you've installed the Wispy Sky package, as suggested in previous chapters (https://assetstore.unity.com/packages/2d/textures-materials/sky/wispy-skybox-21737), add a skybox to the scene as follows:
- Open the scene's Lighting window via Window | Rendering | Lighting settings.
- Select theEnvironmenttab at the top of thewindow (Unity 2020+).
- At the top is a slot forSkybox Material. Press the doughnut-icon, which opens theSelect Materialdialog.
- Search using the wispy string.
- Select one of the skyboxes to use in the scene, such as WispySkyboxMat2.
While we're in the Lighting window, let's auto-generate the lighting for when we work on the crystal ball materials:
- In the Lighting window, select the Scene tab at the top.
- Uncheck the Mixed Lighting | Baked Global Illumination checkbox.
- Check the Auto Generate checkbox at the bottom of the window.
For a default environment, let's just create a simple ground plane, as follows:
- Create a new plane by navigating to GameObject | 3D Object | Plane and reset its transformation using the Transform component's three-dot icon | Reset. Rename it Ground Plane.
- Create a new material named Ground Material using Assets | Create | Material with a Base Map color such as #543C30.
I'm using the EthanSkull.png image that was provided with this book (drag and drop it into your ProjectAssets/Textures folder). Then, perform the following steps:
- Create a new sphere by navigating toGameObject|3D Object|Sphere and name itCrystalBall.
- Set itsPositionto (-0.5,1.25,0.2).
- Create a new material named CrystalBall Material using Assets | Create | Material and drag it onto the CrystalBall sphere.
- In the CrystalBall inspector window, unfold its CrystalBall Material settings.
- Set its Surface Type to Transparent.
- Set its Base Map color to white (#FFFFFF) with Alpha123.
- Set the Metalic Map factor to 0.9.
- Set the Smoothness factor to 0.9.
Now, for the inner image projection, we'll add another sphere, as follows:
- With CrystalBall selected in Hierarchy, right-click and select 3D Object | Sphere and name it CrystalBall Image.
- Reset its Position to (0, 0, 0) and Scale it to (0.95, 0.95, 0.95).
- Create a new material namedCrystalBall Image MaterialusingAssets | Create | Materialand drag it onto theCrystalBall Imagesphere.
- Set its Surface Type to Transparent.
- Drag the texture namedEthanSkull(you can use any photo you want) onto the Base Map texture slot (on its left, and set its Base Map color to white (#FFFFFF).
- Set the Base Map color's Alpha to 123 like the outer sphere.
- To make it brighter, we'll add an Emission. Check the Emission checkbox.
- Drag the same EthanSkull image onto its Emission Map texture slot and set its Emission color to white.
- Uncheck its Specular Highlights and Environment Reflections boxes; we'll let the outer sphere render those.
Not bad! For even better fidelity, we can add a Reflection Probe to the scene, as follows:
- Select GameObject | Light | Reflection Probe.
- Set its Position to the same as that of CrystalBall (-0.5, 1.25, 0.2).
- For this example, set its Type to Realtime and Refresh Mode to Every Frame (in real projects, you'll probably want to keep it Baked).
Now, press Play. The resulting scene will look like this:

Is that scary or what? No worries. The projected image may be distorted, but it looks wicked cool. For some applications, a little distortion is an artistic intent, and you don't need to worry about it. Just for fun, let's add a little rotation script while we're at it. Create a new script on the CrystalBall game object by navigatingtoAdd Component|New Scriptand name itRotator. Open the script and write the following inside it:
public class Rotator : MonoBehaviour
{
  [Tooltip("Rotation rate in degrees per second")]
  public Vector3 rate;

  void Update()
  {
    transform.Rotate(rate * Time.deltaTime);
  }
}
Note that I added a Tooltip attribute for the Unity Editor that gives the developer (your coworkers or you, in the future) more details regarding how to use the rate values. Then, set the rotation rate so that it spins around the y-axis 20 degrees per second by going to theRotator Scriptcomponent and settingRate forX,Y,Zas (0,20,0). Save the scene and try it in VR.
Note that transparency should be used sparingly in VR applications as it requires additional rendering passes per pixel, potentially slowing your frame generation and causing unwanted latency.
This spherical rendering of a regular rectangular image has clearly made it distorted. What if we want an image that's neatly mapped to the surface curvature of the sphere? That's what we'll do next to render a globe.
Rendering globes
To make the texture surface of the globe appear correct, we should use an equirectangular (photosphere) image projection. Let's make another sphere and add a texture, as we just did, but this time using a texture made for this purpose. Import theTissot_euirectangular.pngimage, which is included with this book (and available on Wikipedia at https://en.wikipedia.org/wiki/Tissot%27s_indicatrix#/media/File:Tissot_behrmann.png), into your Texture folder and perform the following steps:
- Create another new sphere and name itGlobe.
- Position it at (0.75, 1.25, 0.2).
- Create a new material named Globe Material and drag it onto the Globe sphere.
- Drag the texture named Tissot_equirectangular onto the Base Map texture slot (on its left) and set its Base Map color to white (#FFFFFF).
- Add the Rotator script if you want.
Try it in VR. Take a close look at the globe, as shown in the following screenshot:

Hmm, it's still not right. Note that, unfortunately, the Tissot circles are oval, not circular, except along the equator. It turns out that the default sphere provided in Unity does not mesh well for equirectangular texture maps. Instead, I have provided one designed specifically for this purpose,PhotoSphere.fbx(which happens to be the default sphere model in 3D Studio Max). Let's try it out:
- Import the PhotoSphere.fbx file by dragging it into your ProjectAssets/Models folder (or through the Assets | Import New Asset... menu).
- Create a new equirectangular sphere by dragging thePhotoSpheremodel fromProject AssetsintoScene.
- Set its positionand name it Globe2.
- Drag the same Globe Material we just created onto Globe2.
- Add the Rotator script if you want.
Now, try this in VR.Much better.You can see that the texture is correctly mapped now; the circles are round (and the underlying mesh grid is more regular):

Now, you can apply any 360-degree photo to the globe, thus creating your own photo-globes or virtual Christmas tree ornaments!
To expand on this topic, you could build a nice model of the Solar System, for example. Equirectangular texture maps of each of the planets and moons can be downloaded for free from Solar System Scope (https://www.solarsystemscope.com/). Data regarding the rate of rotation (day/night) and orbit (around the sun) can be found on the NASA site (https://nssdc.gsfc.nasa.gov/planetary/factsheet/index.html).A complete Unity tutorial project can be found in the book AugmentedReality for Developers (https://www.amazon.com/Augmented-Reality-Developers-Jonathan-Linowes/dp/1787286436).
Next, let's turn the globe inside-out and make a mini-world from what I like to call magic orbs.
Handling magic orbs
The inverse of a globe is a photosphere. Where a globe maps an equirectangular texture onto the outside surface of a sphere, a photosphere would map the texture onto the inside surface, and you view it from the inside so that it surrounds you.
For our examples, I'm using theFarmhouse.pngimage, which is provided with this book and looks as follows. Feel free to use your own 360-degree photo, whether you have a 360-degree camera such as the Ricoh Theta or another brand, a photo stitching app for Android or iOS, or you just download one from any number of photo sources on the web:

As we've seen, Unity ordinarily renders only the outward-facing surfaces of objects. This is determined, mathematically, as the normal direction vector of each facet of its surface mesh. A plane is the simplest example. Back in Chapter 2, Understanding Unity, Content, and Scale, we created a big-screen plane with an image of the Grand Canyon on it. When you are facing the plane, you see the image. I don't know if you realized this, but if you were to move around behind the plane, it is not rendered, as if it were not in the scene at all. Similarly, suppose there is a cube or sphere in front of you; you will see it rendered, lit, and shaded. But if you put your head inside the object, it seems to disappear, because you're now looking at the inside faces of the object's mesh. This is all handled by the shader. And since we want to change it, we need to modify our material to render the inside (back) faces.
Before we do full 360-photo viewing, for fun, let's first consider a special case: magic orbs. For this example, we'll look at the sphere from the inside, mapping a 360-degree image onto its inside surface. We'll put a solid colored shell around the outside. You have to stick your head into the sphere to see what's there, or grab the sphere and "put it on your eyes!"
To build it, follow these steps. First, we will create a translucent red outer shell:
- Create a sphere in the scene named MagicOrb using GameObject | 3D | Sphere.
- Set its Position somewhere within reach, such as (-1, 1.25, -1).
- Create a new material by navigating to Assets | Create|Materialand name itMagicOrb Shell Material.
- Drag MagicOrb Shell Material onto the MagicOrb game object.
- Set the material's Surface Type to Transparent and the Base Map color to a red (for example, #FF4242) with Alpha200.
The inward-facing photosphere will be concentric with the shell, so we'll make it a child and add the equirectangular texture image, as follows:
- Create a child photosphere by dragging a copy of the PhotoSphere model from the ProjectAssets/Models/ folder intoHierarchy as a child of MagicOrb. Rename it Farmhouse PhotoSphere.
- Create a new material by navigating to Assets | Create|Materialand name itFarmhouse Inward Material.
- Drag Farmhouse Inward Material onto Farmhouse PhotoSphere.
- On Farmhouse Inward Material, change Shader to Universal Render Pipeline/Unlit.
Now, here's the clincher. We will change the shader so that it renders the "back" (inside) faces instead of the front ones, as follows:
- Change its Render Face to Back so that it renders the inside of the sphere instead of the outside.
- Drag the Farmhouse texture from your ProjectAssets/Textures/ folder onto the Base Map texture slot (left of Base Map).
- Set the Base Map color to white (#FFFFFF).
- To ensure the texture appears as a mirror image on the inside of the sphere, set its Tiling X to -1.
The following screenshot shows the scene we built:
At this point, if you Play the scene and move your head so it's inside the orb, you'll see the farmhouse scene! (Or simply in the Editor, temporarily drag the MagicOrbgame object in theSceneview directly onto theMain Cameraposition). Let's make this interactive using the XRIGrab Interactablecomponent, as follows:
- On MagicOrb, make it interactable by selecting Component | XR | Grab Interactable.
- We don't want it to fall to the ground, so disable gravity by unchecking theRigidbody | Use Gravitycheckbox.
- Also, we don't want it to move from physics interactions, so disable Physics by checking theRigidbody | IsKinematiccheckbox.
- Because our intent is to place the orb on your face, change the camera's near clipping plane to almost zero using Main Camera | Clipping Planes | Near |0.01.
Now, when you play the scene in VR, use the hand controller to grab the orb and pull it to your face, as depicted in the following screenshot. It's like peering into an eggshell!

In VR games and experiences, photo globes and magic orbs have been used as a teleportation mechanism. As a player, you grab a globe depicting another scene, put it on your face, and you are teleported into that world. See the Capturing 360-degree media section for how to capture a 360-degree photo of your Unity scenes.
Well, that was fun. We made a 3D crystal ball with a projected image, a photo globe, and even magic orbs. For the crystal ball, we used a normal rectangular image as the texture and rendered it using a transparent shader for a glass-like effect. For globes, we learned how to use an equirectangular 360-degree photo wrapped on a photosphere mesh to make it look non-distorted, as expected. Then, for magic orbs, we rendered the image on the inside of a sphere and made it intractable, so that the player can pick up the ball and "put it on" their eyes to get an immersive 360-degree photo effect. Now, let's really put ourselves inside the 360 images, starting with writing a 360-degree photo viewing app.
Viewing 360-degree photos
Yes sir, it's all the rage these days. It's better than panoramas. It's better than selfies. It may even be better than Snapchat! We're finally getting to the moment that you've been waiting for! It's 360-degree photos! We covered a lot of topics in this chapter, which will now make it fairly easy for us to talk about a 360-degree photo viewer. To build one, we'll just make a very big sphere with shader back faces rendered as they were previously. Start with a new empty scene:
- Create a new scene by navigating toFile|New Scene. Then, navigate toFile|Save As...and name itPhotoSphere.
- Add a stationary XR Camera Rig to the scene usingGameObject | XR | Stationary XR Rig.
- Set the XR Rig's Positionto (0,0,0).
Now, to view a 360-degree photo, we simply make a giant sphere with the image on its inside, as follows:
- Create an equirectangular sphere by dragging the PhotoSphere model from the ProjectAssets/Models/ folder into the scene (as imported from PhotoSphere.fbx in the previous example).
- Reset its TransformPosition (0, 0, 0) and set its Scale to (10, 10, 10).
- Create a material using Assets | Create | Material and name it PhotoSphere Material.
- Drag PhotoSphere Material onto the PhotoSphere game object.
- Set the material's Shader to Universal Render Pipeline / Unlit.
- Set Render Face to Back.
- Set the Base Map color to white (#FFFFFF).
- To ensure the texture appears as a mirror-image on the inside of the sphere, set itsTiling Xto-1.
- Drag a 360-degree photo, such as the Farmhouse image we've been using, onto the Base Map texture slot (left of Base Map).
- On the Photosphere game object, disable its renderer lighting properties by setting Mesh Renderer | Lighting | Cast Shadows | Off, then Probes | Light Probes | Off, then Reflection Probes | Off, and then uncheck the Dynamic Occlusion checkbox.
Press Play. You should now see the photosphere surrounding you in the scene. The following screenshot shows a Scene view zoomed out of the photosphere so that you can see the Main Camera's location and its viewport FOV depicted with gray lines:

You may find that the default texture resolution and/or compression are not of a high enough quality for your taste. To modify the resolution, follow these steps:
- Select the texture image in the Project window (Farmhouse.png).
- In Inspector, change Max Size to a larger number, such as 8192.
- Set Compression to High Quality.
- PressApplyto reimport the texture.
Note that the actual file size (at the bottom ofInspector) can grow exponentially, thus affecting the final size of your app, load times, and runtime performance. You can configure these settings on a per-platform basis. Now, suppose you want to build a 360-degree photo viewer using images from the web. We'll consider that next.
Viewing 360 images from the web
We can now view 360 images, so let's develop the project into a 360-degree photo viewer that grabs images from the internet. Currently, if you build the Unity project with the current scene, the Farmhouse equirectangular image will be compiled into the assets of the built project. Instead, now, we'll provide URLs of images on the web and load them into the app on demand.
Let's start by making an ImageController object and write a script that loads images using the following steps:
- Select GameObject | Create Empty, name it ImageController, and reset its Transform.
- Create a new attached script by going to Add Component | New Script and name it WebImages.
- Open the script for editing.
Write the script as follows:
using UnityEngine;
using UnityEngine.Networking;

public class WebImages : MonoBehaviour
{
 public string imageURL;
 public Renderer imageRenderer;

 private void Start()
 {
     StartCoroutine(GetWebImage(imageURL));
 }

 IEnumerator GetWebImage(string url)
 {
     using (UnityWebRequest webRequest =
          UnityWebRequestTexture.GetTexture(url))
     {
         // request and wait for the result
         yield return webRequest.SendWebRequest();

         if (webRequest.isNetworkError || webRequest.isHttpError)
         {
             Debug.Log(webRequest.error);
         }
         else
         {
             Debug.Log("Got data " + webRequest.responseCode);
             var texture = DownloadHandlerTexture.GetContent
                                                     (webRequest);
             // use the following with Universal Render
                    Pipeline/Unlit shader
             imageRenderer.material.SetTexture("_BaseMap",
                                                      texture);
             // use the following with built-in shader
             //imageRenderer.material.mainTexture = texture;
         }
     }
}
Here, we declare two variables: the imageURL string is the web address of the image file, while the imageRenderer string is the photosphere GameObject's renderer. When the app starts, we call GetWebImage in a coroutine, which uses the UnityWebRequest networking API, which is configured to get texture files from a web server (see https://docs.unity3d.com/ScriptReference/Networking.UnityWebRequestTexture.GetTexture.html). It initiates a web request to the given URL and waits for a result to be returned from the web server. If the request fails, we report the error. If it's successful, we assign the received GetContent to the imageRenderer material texture. (Of course, you could add improved in-app error reporting if the web request fails).
Save the script. Now, find an equirectangular image on the web somewhere. Then, in Unity, paste its URL in the Image URL slot. For example, in photopin.com, search for the word equirectangular, select Get Photo for one of them, and then copy the download link for one of the image sizes, as shown in the following screenshot:

The following screenshot shows the URL pasted into the Web Images | Image URL slot:

When you Play the scene, your script will make a web request to the given URL, download the image, and assign it to the photosphere's material. Let's expand this feature so that it uses a list of images and provides a UI menu for switching between 360 images at runtime.
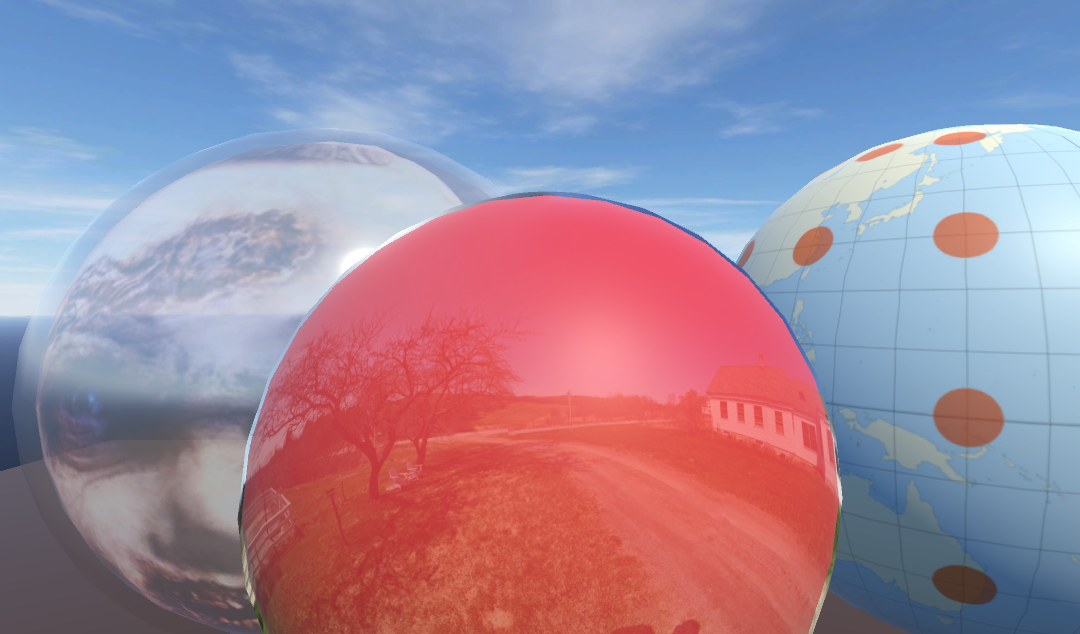
Adding an image viewer UI
For completeness, let's add a simple user interface so that we can select different images. In Chapter 6, Canvasing the World Space UI, we learned about using a world space XR canvas for UI. In this case, we'll add a button dashboard UI that follows the player. The buttons on the panel will be thumbnails of the images to load, and since we're loading these images from the web, we'll use a Raw Image component instead of the Unity UI sprite Image (this avoids having to convert the image texture into Unity's internal Sprite data).
In the previous chapter, Chapter 10, Exploring Interactive Spaces, we considered various ways of managing image data. In this case, we'll make an array of struct that includes links for a thumbnail image, a full 360-degree image, and an attribution string (which may be required by the image source website). First, let's modify ImageController in order to define an array of struct ImageData, as follows:
using UnityEngine.UI;

[System.Serializable]
public struct ImageData
{
    public RawImage buttonImage;
    public string thumbnailURL;
    public string imageURL;
    public string attribution;
}

 public class WebImages : MonoBehaviour
{
    public ImageData[] imageData;
    public Renderer imageRenderer;
We declare struct ImageData with a [System.Serializable] attribute so that it will appear in the Unity Inspector as the ImageData array.
When we make buttons in the scene, they'll call a LoadImage function with the image's index. Add that function now. It calls GetWebImage, which we wrote earlier, with imageURL for the given index:
    public void LoadImage(int index)
    {
        StartCoroutine(GetWebImage(imageData[index].imageURL));
    }
Also, let's load up the button's thumbnail images on Start, as follows. This calls a similar GetWebButton function that loads the thumbnail version of the image into the button's Raw Image texture:
    private void Start()
    {
        foreach (ImageData data in imageData)
        {
            StartCoroutine(GetWebButton(data.buttonImage,
                data.thumbnailURL));
        }
    }

    IEnumerator GetWebButton(RawImage rawImage, string url)
    {
        using (UnityWebRequest webRequest =
             UnityWebRequestTexture.GetTexture(url))
        {
            // request and wait for the result
            yield return webRequest.SendWebRequest();

            if (webRequest.isNetworkError || webRequest.isHttpError)
            {
                Debug.Log(webRequest.error);
            }
            else
            {
                Debug.Log("Got data " + webRequest.responseCode);
                rawImage.texture = DownloadHandlerTexture.GetContent
                                                         (webRequest);
            }
        }
    }
Save the script. Now, back in Unity, create a canvas with four buttons, as follows:
- Create an XR Canvas by selecting GameOjbect | XR | UI Canvas and rename it Button Canvas.
- In Hierarchy, unfold XR Rig / Camera Offset and drag Button Canvas to a child of Camera Offset.
- Set its Scale to (0.001, 0.001, 0.001). As we know, this is the scale of one canvas pixel in world coordinates.
- Set its Position to a comfortable distance, such as (0, -0.65, 1.6).
- Set its Width, Height to (1260, 200).
- Create a child Panel by right-clicking on Button Canvas and selecting UI | Panel.
- On the Panel, select Add Component | search for layout| Horizontal Layout Group.
- Uncheck the Child Force Expand checkboxes for Width and Height.
- Set its Spacing to 20.
Next, we can create four buttons on the panel by using Raw Image instead of Image, as follows:
- Create a child Button by right-clicking on Panel and selecting UI | Button.
- Set its Width, Height to 300, 200.
- Disable (or delete) its child Text object.
- Remove its Image component using the component's three-dot menu | Remove Component.
- Use Add Component | search for image| Raw Image.
- From Hierarchy, drag the same Button game object onto its own Button | Target Graphic slot.
- On its Button | On Click, press the + button to add a new event action.
- Drag the ImageController game object from Hierarchy onto the event's Object slot.
- In the Function selection list, choose WebImages | LoadImage.
The button will look as follows in the Inspector window:

We want four of these buttons. Follow these steps to do this easily:
- Select Button in Hierarchy.
- Make three duplicates using Ctrl + D.
The Scene and Hierarchy windows will now look as follows:
Now, we can wire up the buttons to load the corresponding images for each image index, 0 through 3:
- Select the first Button game object under Panel.
- Ensure the On Click | WebImages.LoadImage parameter is set to 0.
- Select the second Button (1) object and set its LoadImage parameter to 1.
- Select the second Button (2) object and set its LoadImage parameter to 2.
- Select the second Button (3) object and set its LoadImage parameter to 3.
Begin to populate Image Data in ImageController in order to reference the Button images. There will be four of them, one for each button, as follows:
- Select ImageController in Hierarchy.
- Set its Web Images | Image Data | Size value to 4.
- For Element 0, drag the Button game object from Hierarchy onto the Button Image slot.
- Repeat these steps for the other three buttons.
Finally, populate the Image Data Thumbnail URL, Image URL, and Attribution slots with real data from the web. Remember that you need to use the actual download URL for our web requests, not simply a web page (HTML) that contains the target image. I picked four interesting images at random from Photopin (http://photopin.com/free-photos/equirectangular). For example, the data for my first one, which can be found at https://www.flickr.com/photos/32884265@N00/49727861697, can be found at the following links:
- Thumbnail: http://photopin.com/download/aHR0cHM6Ly9mYXJtNjYuc3RhdGljZmxpY2tyLmNvbS82NTUzNS80OTcyNzg2%0AMTY5N182NzVlZWUzZjMxX3QuanBn%0A?photo_id=49727861697
- Large Image: http://photopin.com/download/aHR0cHM6Ly9mYXJtNjYuc3RhdGljZmxpY2tyLmNvbS82NTUzNS80OTcyNzg2%0AMTY5N182NzVlZWUzZjMxX2IuanBn%0A?photo_id=49727861697
- Photo credit: Wessex Archaeology
As shown in the following screenshot, the filled out Image Data array contains four elements, where each element references a Button Image component, links to the thumbnail and image files, and provides a text string with attribution details:

When you press Play, the menu buttons get filled with the thumbnail images. Clicking on one of the buttons by aiming the hand controller and pressing the select button will load the corresponding equirectangular image into the scene. The following is a screen capture of me viewing some 360-degree photos in the app, pointing to and selecting one of the images from the menu:

If you develop this into a full application, be sure to add a canvas panel to display the image attribution text and other metadata as needed. You will also probably want to add a "Loading" message/spinner to give the user feedback after a thumbnail button is clicked. Many image repository websites provide developer API and web services so that you can search, get, and even put (upload) photos from your application; for example:
- Flickr (https://www.flickr.com/services/api/)
- Unsplash (https://unsplash.com/developers)
- Google 360 Media (https://developers.google.com/vr/discover/360-degree-media)
In this project, we created a 360-degree photo viewer using a photosphere with a back face render. We added thumbnail-sized button images that the user can click, which then calls the LoadImage function we wrote to load the image from the corresponding URL from the web and show it in the scene. This works perfectly for still images. However, 360 videos are at least as popular as photos, so we'll learn how to view those next.
Playing 360-degree videos
The steps for playing a 360-degree video are pretty much the same as adding regular rectangular videos to a Unity project, that is, using a Video Player to render the video onto a Render Texture. In the case of 360 videos, we can render that Render Texture inside a photosphere, as we did in the previous section. Let's build that now.
If you do not have a 360-degree video handy, search for web-free downloads and pick one that's not too long and of a limited file size. (Try googling 360 videos download – https://www.google.com/search?q=360+videos+download). The example used here (licensed under Creative Commons) can be found at https://en.wikipedia.org/wiki/File:Hundra_knektars_marsch_p%C3%A5_Forum_Vulgaris.webm (the file download link is https://upload.wikimedia.org/wikipedia/commons/f/fb/Hundra_knektars_marsch_p%C3%A5_Forum_Vulgaris.webm). It's very low resolution (1,920 x 860) and is just being used for this demo. Usually, you'll want at least 4K (4,096 x 2,160) or greater.
Import a 360-degree video into your project by dragging the file into your ProjectAssets folder. You have the option of using Unity's built-in transcoder to ensure compatibility with your target platform. Follow these steps:
- Drag your video file from the Windows Explorer (or OSX Finder) into the Unity ProjectAssets/ folder.
- In its Inspector, you may want to use the built-in transcoder by checking the Transcode checkbox.
- In lieu of flipping the video mirror-image in Material | Tiling | X, you can check the Flip Horizontally checkbox.
- If you receive errors when running the conversion, you might want to try changing Codec from Auto. I have found success using Codec | VP8.
- Press Apply. It can take a while to run the conversion.
Note its pixel dimensions. If you're not sure, you can view it inInspector. At the bottom, choose Source Info from the preview select list, as shown in the following screenshot:

Start a new scene and include an XR Rig located at the origin, as follows:
- Create a new scene by navigating toFile|New Scene. Then, navigate toFile|Save As...and name itVideoSphere.
- Add a stationary XR Camera Rig to the scene usingGameObject | XR | Stationary XR Rig.
- Set the XR Rig Positionto (0,0,0).
The first step is to add a VideoPlayer component to your project, as follows:
- Create an empty object (GameObject | Create Empty) named VideoPlayer.
- Click Add Component |Video Player.
- Drag your video file onto the Video Player | Video Clip slot.
- Check the Play On Awake checkbox and the Loop checkbox.
- Ensure Render Mode is set to Render Texture.
- You may need to set Video Player | Aspect Ratio to Stretch.
Note that if your video contains an audio track, it will play automatically since Video Player | Audio Output Mode is set to Direct. If you prefer, you can add an Audio Source component to the player and then change Audio Output Mode to Audio Player. You will also notice other options in Video Player, including Source being set to Video Clip, which can be changed to URL if you want to play videos from the web.
Now, we will create a Render Texture, a special Unity texture that will be rendered at runtime by the video player:
- In your ProjectAssets folder, go to Create | Render Texture and name it Video Render Texture.
- Set Size to exactly the size of your video (my demo is 1920, 800).
- Setting Anti aliasing to 2 samples is recommended.
- You can set Depth Buffer to No Depth Buffer.
- In some cases, the video does not render correctly using the default Clamp Wrap Mode, so try setting Wrap Mode | Repeat.
- SelectVideoPlayerin Hierarchy and drag thisVideo Render Textureonto itsVideo Player | Target Textureslot.
The resulting VideoPlayer in the Inspector window can be seen in the following screenshot:

Now, create your photosphere, as we did previously in this chapter:
- Create an equirectangular sphere by dragging thePhotoSpheremodel from the ProjectAssets/Models/ folder into the scene (as imported fromPhotoSphere.fbxin the previous example). Rename it VideoSphere.
- Reset itsTransformPosition(0, 0, 0) and set itsScaleto (10,10,10).
- Create a material usingAssets | Create|Material and name it VideoSphere Material.
- Drag the VideoSphere material onto the VideoSpheregame object.
- Set the material'sShadertoUniversal Render Pipeline / Unlit.
- SetRender FacetoBack.
- Set theBase Mapcolor to white (#FFFFFF).
- Drag Video Render Texture from the Project window onto the Base Map texture slot (left of Base Map).
- To ensure the texture appears as a mirror image on the inside of the sphere, set itsTiling Xto-1.
- On theVideoSpheregame object, disable its renderer lighting properties by settingMesh Renderer | Lighting | Cast Shadows | Off, then Probes | Light Probes | Off, then Reflection Probes | Off, and then uncheck theDynamic Occlusioncheckbox.
Press Play. You now have a basic 360-degree video player built with Unity.
As with all Unity components, the video player has an API and can be controlled via scripting. For example, to pause the video with a button click, you could add a script to VideoPlayer. The following script, when attached to the Video Player game object, will pause and resume the video when the user presses the right trigger button on the hand controller:
using UnityEngine;
using UnityEngine.Video;

public class PlayPauseVideo : MonoBehaviour
{
    private VideoPlayer video;

    private void Start()
    {
        video = GetComponent<VideoPlayer>();
    }

    private void Update()
    {
        if (Input.GetButtonDown("XRI_Right_TriggerButton"))
        {
            if (video.isPlaying)
            {
                video.Pause();
            }
            else
            {
                video.Play();
            }
        }
    }
}
In this project, we built a 360-degree video player scene. Using the standard Video Player component and a Render Texture asset, as needed for playing any video in a Unity scene, we rendered an equirectangular 360-degree video inside a photosphere to experience it in VR.
Next, we'll consider how to view 360-degree photos and videos using Unity Scene skyboxes instead of photosphere game objects.
Using Unity skyboxes
Back in the old days, or at least before 360-degree photos, we simply referred to 360 images as skyboxesas the way to create background imagery in computer graphic landscapes. Skyboxes depict what's far on the horizon, may contribute to the ambient lighting of the scene, can be used for rendering reflections on object surfaces, and are not interactable. Unity supports skyboxes as part of the Lighting Environment for each scene. We used skyboxes already in a few of the previous chapters' projects (including Wispy Sky and Skull Platform). Common sources of skyboxes include cylindrical panoramas, spherical panoramas (360 images), and a six-sided cube. We won't consider the cylindrical one since it's less useful for VR. We'll look at cubemaps first.
Six-sided or cubemap skyboxes
A skybox can be represented by six sides of a cube, where each side is akin to a camera capturing its view pointing in each of the six directions, as illustrated here:

Given these six images as textures, you'd create a six-sided skybox material like the one shown in the following screenshot for the WispySky cubemap. Then, you would set it in the Lighting window as the Skybox Material for the scene. Alternatively, you could combine the six images into a single cubemap image, laid out in a similar fashion:

Cubemaps have an advantage because equirectangular textures waste pixels since the image is stretched at the top and bottom poles of the spherical projection. On the other hand, care must be taken to properly design images so that they'll smoothly stitch together and not cause seams or other visual artifacts.
However, most 360-degree media today, especially coming from consumer cameras, use equirectangular projections, also known as spherical panoramas. We'll examine this next.
Spherical panoramic skyboxes
Using a 360-degree photo for a skybox is referred to as a spherical panoramic. Earlier in this chapter, we used a spherical game object to render an equirectangular texture and placed the player camera centered inside it. Now, we'll use the same image in a skybox. (Note that this will also work for 180-degree content). Start with a new empty scene:
- Create a new scene by navigating toFile|New Scene. Then, navigate toFile|Save As...and name itSkybox.
- Add a stationary XR Camera Rig to the scene usingGameObject | XR | Stationary XR Rig.
- Set the XR Rig's Positionto (0,0,0).
Let's try using the Farmhouse.jpg file again that we used earlier, this time as a skybox:
- Create a new material via Assets | Create | Material and name itFarmhouse Skybox Material.
- For the material's Shader, choose Skybox | Panoramic.
- Drag your 360 image (Farmhouse.jpg) onto the Spherical texture area.
- Set MappingtoLatitude Longitude Layout.
- Set Image Type to 360 Degrees.
The Material settings are shown here:

Now, to use it in your scene, follow these steps:
- Open the Lighting window tab (if you're not in your Editor, navigate to Window | Rendering | Lighting).
- Choose the Environment tab.
- Drag your Farmhouse Skybox Material onto the Skybox Material slot.
The Lighting Environment settings are shown here:

Press Play. Voila! You should now see the photosphere surrounding you in the scene. That was almost too easy. Thank goodness!
One thing that's interesting is that since skyboxes are always rendered as if at a very far distance away, the camera will always be at the center of the photosphere. Thus, we don't need to set the camera rig at the origin, and we don't need to use a stationary XR Rig. Wherever you move, the skybox will surround you just the same. If your 360 image contains content (people or objects) that are relatively near, this may feel very unnatural, as if the objects have been projected or flattened against the spherical projection (which they are!). This is why skyboxes are generally used for landscapes and large open spaces.
At this point, you can add more content to your scene. After all, we're in Unity and not just making a generic 360-degree photo viewer. Enhance your lovely outdoor scene by adding falling snow or leaves (for example, see the Falling Leaves particle package at https://assetstore.unity.com/packages/3d/falling-leaves-54725). You can also use videos with skyboxes. We'll look at this in detail in the next section.
360-degree video skyboxes
Turning your skybox into a 360-degree video player is nearly identical to the steps outlined previously for the spherical game object version. We won't repeat everything again, but briefly, it goes as follows:
- Set up a Video Player to playback the video source to a Render Texture.
- Set up a Skybox Material that will receive a Render Texture.
- Set the scene to use Skybox Material.
Note that, according to Unity, equirectangular videos should have an aspect ratio of exactly 2:1 (or for 180-degree content, 1:1) for the skybox shader. Also, many desktop hardware video decoders are limited to 4K resolutions, while mobile hardware video decoders are often limited to 2K or less, limiting the resolution that can be played back in real-time on those platforms.
In this section, we considered how to use equirectangular, panoramic, and six-sided cubemap images in the Scene's skybox for viewing 360-degree media. Next, we'll address the question of how to capture a 360 image within your game, for sharing on the internet or for even using at an asset itself (such as teleporting via magic orbs).
Capturing 360-degrees in Unity
We've talked about using 360-degree media captured using 360 cameras. But what if you wanted to capture a 360 image or video from within your Unity app and share it on the internet? This could be useful for marketing and promoting your VR apps, or just simply using Unity as a content generation tool but using 360-degree video as the final distribution medium. First, I'll explain how to capture 360 images, including cubemaps and reflection probes, within Unity with a simple script. Then, I'll suggest some third-party tools you should consider that have more features.
Capturing cubemaps and reflection probes
Unity includes support for capturing scene views as part of its lighting engine. A call to camera.RenderToCubemap() will bake a static cubemap of your scene using the camera's current position and other settings.
The example script given in the Unity documentation, https://docs.unity3d.com/Documentation/ScriptReference/Camera.RenderToCubemap.html, implements an editor wizard for capturing a cubemap of your scene directly in the Editor, and is included here:
using UnityEngine;
using UnityEditor;
using System.Collections;

public class RenderCubemapWizard : ScriptableWizard
{
    public Transform renderFromPosition;
    public Cubemap cubemap;

    void OnWizardUpdate()
    {
        string helpString = "Select transform to render from
            and cubemap to render into";
        bool isValid = (renderFromPosition != null) &&
            (cubemap != null);
    }

    void OnWizardCreate()
    {
        // create temporary camera for rendering
        GameObject go = new GameObject("CubemapCamera");
        go.AddComponent<Camera>();
        // place it on the object
        go.transform.position = renderFromPosition.position;
        go.transform.rotation = Quaternion.identity;
        // render into cubemap
        go.GetComponent<Camera>().RenderToCubemap(cubemap);

        // destroy temporary camera
        DestroyImmediate(go);
    }

    [MenuItem("GameObject/Render into Cubemap")]
    static void RenderCubemap()
    {
        ScriptableWizard.DisplayWizard<RenderCubemapWizard>(
            "Render cubemap", "Render!");
    }
}
To run the wizard, follow these steps:
- Create an Empty game object for the camera position to capture from named Capture Position.
- Create a cubemap asset where we will render the captured image by selecting Assets | Create | Legacy | Cubemap.
- Set Face Size to a high resolution, such as 2048.
- Check the Readable checkbox.
- Now, run the wizard from the script we just wrote by selecting GameObject | Render into Cubemap.
- Drag the Capture Position object into the Render From Position slot.
- Drag Cubemap from the Project window into the Cubemap slot.
- Press Render!
This .cubemap file can now be used in a Skybox Cubemap material.
A similar but different approach is to use Reflection Probes. They're normally used by objects with reflective materials to render realistic surface reflections (see https://docs.unity3d.com/Manual/class-ReflectionProbe.html). A Reflection Probe captures a spherical view of its surroundings and is then stored as a cubemap. Scene designers will strategically place multiple reflection probes in a scene to provide more realistic rendering. You can repurpose a Reflection Probe as a 360 image capture of your scene! Since they're intended for reflection lighting, they're usually low-resolution.
Unity chooses where to store the Reflection Probe lightmap file (.exr), depending on your lighting settings. To save it under yourAssetsfolder (rather than the GI cache), go to theLightingtab, enable Baked Global Illumination, and disableAuto Generate. This will generate the refection probe .exr file in a folder with the same name as your scene.
Try adding one to your scene by navigating toGameObject | Light | Reflection Probe. Set Resolution to a high value, such as 2048. Then, press Bake. You can then assign this .exr file to a Skybox Cubemap material, making a quick and easy 360 scene-shot.
While interesting to consider, both these techniques may not be practical since the resulting image resolution is very low, especially for viewing in VR. In that case, you may need to consider a third-party tool from the Asset Store.
Using third-party capture tools
There are a number of packages that allow us to capture 360 images and video in Unity. These packages may support mono - and stereoscopic capture, sequenced captures for video encoding, and possibly other features for color conversion, anti-aliasing, camera image effects, and 3D spatialized audio.
The basic workflow of these packages is to capture an equirectangular image (or skybox) from a specific location in the scene, as we did in the previous section. To capture a stereo 3D view, you capture two images – one for each eye – separated by a given virtual interpupillary distance (IPD). To assemble a video, you repeat the captures once per update as the scene and/or camera animates, and then convert the hundreds of still frame photos into a single video. This creates a challenge for the software to capture and save the frame fast enough (for example, 30 fps).
Try and search for 360 capture (https://assetstore.unity.com/tools/camera?q=360%20capture) or something similar. I won't review these packages here. Some are free, while others are at a modest cost. Some packages only run in the Unity Editor. Others can also be built into your game, allowing your users to capture and share 360-degree media of their runtime gameplay.
Summary
360-degree media is compelling because VR tricks your FOV by updating the viewable area in real-time as you move your head around, making the screen of your HMD seem to have no edges. We started this chapter by describing what 360-degree images are, as well as how the surface of a sphere can be flattened (projected) into a 2D image by using equirectangular projections in particular. Stereo 3D media includes separate equirectangular views for the left and right eyes.
We began exploring this in Unity by simply mapping a regular image on the outside of a sphere, and were perhaps frightened by the distortions. Then, we saw how an equirectangular texture covers the sphere evenly for rendering a globe. Next, we inverted the sphere with an inverted shader, mapped the image inside the sphere, and made it a 360-degree photosphere viewer that can load photos from the web. After that, we added video.
Then, we looked at using skyboxes instead of a game object for rendering 360-degree media. We saw how Unity supports cubemaps, spherical panoramas, video skyboxes. Lastly, we explored capturing 360-degree media from within Unity scenes using Unity's built-in API and third-party packages.
As 360-degree media becomes more and more prevalent, you may find yourself increasingly needing to include it in your VR projects. In fact, it's becoming a medium in itself for storytelling, documentaries, and education. In the next chapter, we'll consider more ways to implement stories in VR using 3D animation and timelines by building a short VR cinematic experience in Unity.