The stories we tell, and how we tell them, say a lot about who we are and what we will become. Storytelling between humans is as primal as any human activity and the basis of interpersonal communications, mythology, religion, historical record, education, entertainment, and all of the arts. VR is emerging as one of the newest, and potentially most profound, storytelling media formats.
In the previous chapter, we looked at 360-degree media, which itself is becoming its own medium for VR storytelling, especially for non-fictional documentaries, which are capable of transmitting human experience and creating immersive empathy for humanitarian crises. Many of the tools and lessons we will cover in this chapter can also be used with 360-degree media, but we're going to focus on 3D computer graphics and animation here.
For this project, we are going to create a little VR experience – a simplistic story about a bird who gains its wings and learns to fly. We will start with an audio track to define the sequence and timeline for the animation. You will learn how to use Unity Timeline tracks to compose the animated story sequence. Then, you'll learn how to animate 3D assets by recording Animation Clips and using the third-party DOTween package. You'll also learn how to use the Animator for animated character sequences and transitions – in this case, a flying bird – and how to control it via C# script.
In this chapter, we are going to learn about the following topics:
- Importing and using external models and animations
- Using Unity Timelines to activate and animate objects
- Using the Animation editor window to edit property keyframes
- Controlling an Animator controller from C#
- Making a story interactive for VR
By the end of this chapter, you'll be able to create your own VR stories using the gamut of animation tools in Unity.
Technical requirements
To implement the projects and exercises in this chapter, you will need the following:
- A PC or Mac with Unity 2019.4 LTS or later, the XR plugin for your device, and the XR Interaction Toolkit installed
- A VR headset supported by the Unity XR platform
You can access or clone the GitHub repository for this book (https://github.com/PacktPublishing/Unity-2020-Virtual-Reality-Projects-3rd-Edition-) to optionally use the following assets and completed projects for this chapter:
- The asset files for you to use in this chapter are located in the UVRP3Files/Chapter-12-Files.zip folder.
- All the completed projects for this book can be found in a single Unity project atUVRP3Projects.
- The completed assets and scenes for this chapter can be found in the UVRP3Projects/Assets/_UVRP3Assets/Chapter12/folder.
Additional assets are required to run this project, as described in this chapter. Note that opening the completed project of Chapter12 from GitHub may generate errors until all the required assets have been imported.
Composing our story
OUR STORY: Music begins. You start in a dark scene and notice a small tree sapling in the ground in front of you. It starts to grow into a full-sized tree. As dawn breaks, a bird's nest appears, and we notice it has an egg in it. The egg begins to shake and then hatches. A baby bird emerges, hops around, grows, and tests its wings. Finally, in daylight, it flies away to freedom.
Our story is about birth, growth, spreading your wings (literally and figuratively), and moving on. We will start with a music soundtrack and animate our graphics based on its parts.
We will be using free, off-the-shelf assets. Of course, you can use your own music and graphics, but we'll assume you're following along using the ones we have selected, which are all available online for free (links will be provided where necessary). As an instructive project, it's minimalist and not embellished with effects that you might expect of a polished product, but if your 9-year old cousin or nephew made it, you'd be very proud of them!
The soundtrack we will use is a rendition of The Beatles and Paul McCartney song, "Blackbird." (A download link for this can be found in the next section, and a copy is included with the files for this chapter for convenience). Based on our mp3 recording of the song, we've sketched out a rough timeline plan of our VR experience on a chart, as shown here:

As indicated, the entire song is 165 seconds (2:45). It starts with a 35-second instrumental intro, then verses one and two (also 35 seconds each), a 25-second instrumental, and then verse three, which is 35 seconds long. We'll use this to divide our story into five segments.
Plenty of other features ought to be planned out as well. The scene lighting, for example, will start in the dark of night and gradually lighten the sky into dawn and then daytime. Now, we will collect the primary assets we plan to use in the project and create an initial starting scene.
Gathering the assets
As mentioned previously, we're going to build our story from a variety of sources, all of which contain free and simplistic assets. Some of these assets are included in the GitHub files for this book. Others, while free, require you to download them yourself from the Asset Store as we cannot redistribute the files.
The following assets are included in this book's GitHub repository, with permission from the authors:
- Music: The Beatles and Paul McCartney song, "Blackbird," performed by guitarist Salvatore Manalo:
- File: Audio/The Beatles (Paul McCartney) Blackbird cover.mp3
- Source: https://youtu.be/chSrubUUdwc
- Tree and Rocks:
- File: The NatureStarterKit/Models/ folder
- Source: Nature Starter Kit 1,https://assetstore.unity.com/packages/3d/environments/nature-starter-kit-1-49962
- Nest And Egg:
- Use the NestAndEgg prefab file provided with this book:
- File: The NestAndEgg/ folder, which contains prefab files and materials.
- Original source: Tutorial for using Cinema 4D: https://www.youtube.com/watch?v=jzoNZslTQfI.Our version has been modified and converted into FBX format.
The following assets are free from the Asset Store. Please download and install them now:
- Living Birds:https://assetstore.unity.com/packages/3d/characters/animals/living-birds-15649
- Wispy Skybox: https://assetstore.unity.com/packages/2d/textures-materials/sky/wispy-skybox-21737
- DOTween: https://assetstore.unity.com/packages/tools/animation/dotween-hotween-v2-27676
If and when you import DOTween, you'll also be prompted to go through an extra setup procedure. Press Setup DOTween... when prompted and then press Apply.
As we did when importing other assets in previous chapters, you may need to convert the imported materials into the current render pipeline, as follows:
- Select Edit | Render Pipeline | Universal Render Pipeline | Upgrade Project Materials to URP Materials.
- When prompted, click Proceed.
- You may see messages in the Console window, but they should disappear when you press Clear.
This project uses a tree model that was created using Unity's built-in Tree Creator tools (https://docs.unity3d.com/Manual/class-Tree.html). At the time of writing, the new Scriptable Render Pipelines (URP, HDRP) do not come with compatible versions of the Nature/Tree Creator shaders. (Tree Creator is rumored to become deprecated but is currently a normal Unity feature. Instead, Unity recommends developers use SpeedTree, https://docs.unity3d.com/Manual/SpeedTree.html, a superior third-party tool but with a significant monthly price tag). I have configured the tree with the URP versions of the SpeedTree8 shaders. Unfortunately, these generate errors in Console and do not support Wind Zones, but otherwise, the project still runs OK. Alternatively, you may find URP compatible shaders in the Asset Store, such as Lux URP/LWRP Essentials (needs to be purchased), which includes URP versions of the Nature/Tree Creator Bark Optimized and Nature/Tree Creator Leaf Optimized shaders (https://assetstore.unity.com/packages/vfx/shaders/lux-urp-lwrp-essentials-150355). This shader was used in the screenshots for this chapter.
Now, we can start to build the story scene.
Creating the initial scene
We're going to make a simple, cartoonish, minimalist scene using a plane for the ground and some rocks, a bird's nest with an egg, and a bird. Follow these steps to get started:
- Create a new scene by navigating toFile|New Scene. Then, navigate toFile|Save As...and name itBlackbird.
- Add a stationary XR Camera Rig to the scene usingGameObject | XR | Stationary XR Rig.
- Set the XR Rig's Positionto (0,0,-3).
- If not present, add an Audio Listener to the child Main Camera by selecting the camera. Then, go to Add Component | Audio Listener.
- Create a 3DPlane namedGroundPlane, reset itsTransform properties, and thenScaleit to (10, 10, 10).
- Create a new Material named GroundMaterial, set its Base Mapcolor to a dark earthy brown (such as #251906), and drag the material onto the plane.
- Uncheck the material's Specular Highlights and Environmental Reflections checkboxes.
Initialize the lighting settings and skybox as follows:
- Open the Lighting window with Window | Rendering | Lighting (Lighting Settings in Unity 2019).
- Select the Scene tab.
- In Unity 2020+, click New Lighting Settings to create the initial lighting parameters.
- For now, check the Auto Generate lightmaps checkbox (if updates get slow while working on the scene, uncheck this box but remember to periodically press Generate Lighting to update your lightmaps).
- Select the Environment tab.
- Set the skybox by pressing doughnut-icon to the right of Skybox Material, search for wispy, and select WispySkyboxMat2.
Now, add a tree and some rocks by following these steps:
- From the Assets/NatureStarterKit/Models/ folder in the Project window, drag Tree into Scene. Reset its Transform properties so that it's at the origin.
- If you've installed alternative Tree Creator shaders for URP, such as the Lux URP Essentials package, substitute them now. In Inspector, on Optimized Bark Material, set its Shader to Lux URP/Nature/Tree Creator Bark Optimized. Likewise, for Optimized Leaf Material, set its Shader to Lux URP/Nature/Tree Creator Leaf Optimized.
- Add a few rocks near the tree and move them so that they're partially buried below the ground. You might put these under an Empty game object named Environment. Assuming you've reset the Environment object's Transform, use the following table to arrange the rock positions.
- Then, add a WindZone using GameObject | 3D Object | WindZone so that the Tree object responds to wind and its leaves rustle. (Note that WindZone requires a compatible tree shader).
The rocks in my scene have been placed as follows (all at Scale100):
| Prefab | Position |
| rock03 | (2.9, -0.6, -0.26) |
| rock03 | (2.6, -0.7, -3.6) |
| rock04 | (2.1, -0.65, -3.1) |
| rock01 | (-6, -3.4, -0.6) |
| rock04 | (-5, -0.35, 3.8) |
My scene layout, including the tree and arrangement of rocks, is shown in the following screenshot:

Press Play to see how the scene looks so far in VR. The leaves of the tree will rustle because we added a Wind Zone to the scene. Next, we'll add the nest:
- Drag a copy of the NestAndEgg prefab into the scene from the Project window's Assets/NestAndEgg/ folder.
- Scale and Position it on the ground so it's easily in sight, near the tree, and not too small. We chose Position (0.5, 0.36, -1.2).
- Set its Scale (0.2, 0.2, 0.2).
Now, add a bird. The Living Birds package doesn't contain a blackbird, but it does have a Bluejay, which is close enough!
- From the Project window's Assets/living birds/resources/ folder, drag the lb_blueJayHQ prefab into the Hierarchy window.
- For convenience, rename it Bluejay.
- Scale and Position it so that it appears full-grown and perched on the edge of the nest. We chose Scale (8, 8, 8), Position (0.75, 0.4, -1.25), and Rotation (0, 135, 0).
The model we are using comes with animation clips that we'll control later in this project. Like most character animations, it runs an Idle animation initially when you press Play. Check how it looks in VR to validate it's what you expect. It's always much different within VR than the view you see on a flat-screen. Our scene and hierarchy can be seen in the following screenshot:

So far, we've started with a project plan. This included gathering a layout of the time sequence, collecting the assets we plan to use, and building an initial scene with the environment and main game objects that will be part of the story. Now, we can begin defining the Timeline sequence, first with the audio track.
Timelines and Audio tracks
Earlier, we planned out the movie using a graph paper timeline. Unity provides a Timeline tool for implementing this almost directly. Timelines consist of one or more tracks that play over time. Timelines can control many different objects and different types of tracks. As we'll see and explain as we build this project, Timelines can have Audio Tracks, Activation Tracks, Animation Tracks, Signal Tracks, and more. Timelines are a type of Unity Playable.Playables are runtime objects that "play" over time, updating each frame based on their prescribed behavior. Animations are playables too. For more details, see https://docs.unity3d.com/ScriptReference/Playables.Playable.html.
Confirm that the Timeline package has been installed with your project (ordinarily, it is installed by default) and add or upgrade it if necessary using the following steps:
- Open Package Manager using Window | Package Manager.
- Select Packages In Project from the filters list in the top-left of the window.
- If Timeline is present and it needs to be updated, select its Update button.
- If Timeline is not present, choose All from the filter list, type timeline into the search area to locate it, and Install the package.
For now, we'll add a Timeline to the project and add an Audio Track. To create the Timeline object and open it in the Timeline Editor window, follow these steps:
- In Hierarchy, create an Empty game object, reset its Transform properties, and name it Blackbird Director.
- Open Timeline Editor by selectingWindow | Sequencing | Timeline.
- In the window that opens, you will see a message stating, To begin a new timeline with Blackbird Director, create a Director component and a Timeline asset with a Create button.
- Press the Create button.
- You will be prompted to save a new Playable asset in your ProjectAssets/ folder (I like to use a Playables/ subfolder). Name it Blackbird Timeline. Then, press Save.
At this point, you may have noticed a few important things just happened:
- The Blackbird Timeline asset was created in the Assets folder you specified.
- A Playable Director component was added to the Blackbird Director game object, associating it with that Blackbird Timeline.
- The Timeline Editor window is open for Blackbird Timeline.
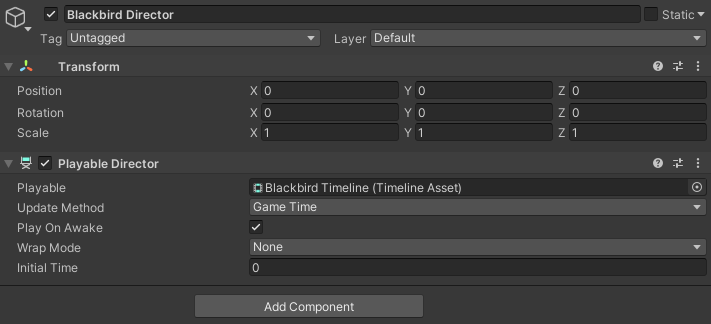
The following screenshot shows the Blackbird Director inspector with its Playable Director component. A Playable Director controls when and how a Timeline instance plays, including whether to Play On Awake, and Wrap Mode (what to do when the Timeline is done playing; that is, Hold, Loop, or None):
Now, let's add an Audio Track containing our Paul McCartney song to the timeline by following these steps:
- Locate the mp3 file (named The Beatles (Paul McCartney) Blackbird cover.mp3) in your ProjectAssets/Audio/ folder, and drag it directly onto the Timeline Editor.
- Press Play to play your scene as normal. The music should start playing.
Here is the Timeline Editor, which now contains the Paul McCartney Audio Track:

The white vertical cursor, or playhead, indicates the current time frame. The time scale is in Seconds (if yours is Frames, change it using the gear icon in the upper-right). The track's Audio Source remains empty (None) since we added the clip directly.
You may notice that, in the upper-left of Timeline Editor, there are preview control buttons, similar to a video player would. These let you play a preview of the Timeline itself, rather than the whole scene using the usual Editor Play button.
We just added an Audio Track to the Timeline. Another type of Timeline track is known as an Activation Track. Associated with a specific game object, an Activation Track will enable or disable that game object at the specified times. We'll look at this in more detail next.
Using a Timeline to activate objects
According to our plan, when the timeline starts, the bird's nest will be hidden (the NestAndEggobject). At the 35-second mark, it becomes enabled. Also, when the nest is first enabled, it should containWholeEgg. Then, at the 80-second mark, it is hidden theHatchedEggis enabled instead. The NestAndEgg game object hierarchy, as shown here, contains the Nest itself, a WholeEgg object, and a HatchedEgg object (which contains the two eggshell halves):

Now, let's add the activation sequence to the Timeline. You can view the results of these and the following steps in the screenshot further down:
- With Blackbird Director selected in Hierarchy, drag the NestAndEgg object from Hierarchy into the Timeline Editor window.
- A menu will pop up, asking you what type of track to add; choose Activation Track.
- Ensure the Timeline units are Seconds, not Frames. Use the gear icon in the upper-right of the Timeline window to select it.
- A small rectangular track marker will be added to the track. Click and drag it into place.
- Position and size the track so that it starts at about 35:00 and ends at the end of the track, that is, 165:00.
Now, for the eggs. Although the egg models are children of NestAndEgg, they can be activated separately from the parent (of course, only when the parent itself is already enabled) by following these steps:
- Drag the WholeEgg object from Hierarchy onto Timeline as an Activation Track.
- Position it so that it starts at the same start time as NestAndEgg (about 35:00 ) and ends at about 60:00.
- Drag the HatchedEgg object from Hierarchy onto Timeline as an Activation Track.
- Position it so that it starts at 60:00 and ends at 165:00.
Similarly, activate the bird when the egg hatches, at the 60-second mark:
- Drag theBluejay object fromHierarchyonto Timelineas anActivation Track.
- Position it so that it starts at60:00and ends at165:00.
The Timeline with Activate Tracks should now look as follows. On the left, you can see that each track has an object slot containing the game object being controlled by the track:

By using Preview Play (the control icons in the upper-left of the TimelineEditor), you can play and review these tracks. You can scrub through the time frames by dragging the white Playhead cursor. You will see the nest, eggs, and bird activate and deactivate as specified.
We now have a Timeline in the scene and laid down four Activation Tracks that specify when specific game objects in the scene become visible (Active) or not, including Bluejay, NestAndEgg, and its child objects WholeEgg and HatchedEgg. The timings have been synchronized with the audio music track we're using as the basis. Now, we can start to animate them. In particular, we're going to change the Transforms of several objects, including increasing the scale of the Tree and Bluejay objects over time to make them grow. Let's add that now.
Recording an Animation Track
As you would expect, in addition to audio and activation tracks, Timelines can include animation tracks. Unity's animation features have evolved over the years and Timeline greatly simplifies basic animation capabilities within Unity. You can create and edit animations directly within Timeline without having to create separate Animation Clips and Animator Controllers. We will look at these in more detail later in this chapter. For now, we will start simple by animating just a few Transform parameters on the tree and the bird, thus adding a growing tree and a growing bird to the scene.
A growing tree
We want to animate the tree so that it grows from being small (scale 0.1) to full size during the first 30 seconds of the Timeline. We'll do this by adding an Animation Track for the Tree object, and then recording the parameter values at each keyframe time:
- Ensure Blackbird Director is selected in Hierarchy and that the Timeline Editor window is open.
- Drag the Tree object from Hierarchy into the Timeline window.
- Select Animation Track as the type of track we are adding.
Now, we can begin recording the keyframes, as follows:
- Ensure the playhead cursor is set to 0:00.
- Press the red Record button on the Tree track in Timeline to begin recording.
- Select the Tree object in Hierarchy.
- Set its Scale to (0.1, 0.1, 0.1).
- Slide the playhead to the 30-second mark.
- With Tree still selected in Hierarchy, set its Scale to (1, 1, 1).
- Press the blinking red Record button again to stop recording.
- Click the small graph icon to reveal the animation curve, as shown here (using the lighter Unity Editor theme so that the curve will be more visible in the image):

As you can see, our Timeline now has an Animation Track that references the Tree game object. It has two keyframes, one starting at 0 and one ending at 30 seconds. Unity fits a gentle curve to ease in and ease out the transition between the polemic key values. When you grab and slide the playhead cursor across the timeline curve, you will see that the tree change size in your Scene window. If you press the Preview Play icon, you can play the animation. The following sequence of frames depicts this animation:

We've recorded an animation of the tree growing from a small scale to full size. Let's do a similar growth sequence for the bird.
A growing bird
Once the egg in the nest hatches, we want a tiny bird to pop out, and then let it grow (quickly) to full size. To do this, we can repeat the previous exercise, this time increasing the size of the Bluejay object. Scale it from a baby bird (Scale = 1) to full size (Scale = 8) for 10 seconds between the 60- and 70-second marks. Use the following steps to do so:
- Ensure Blackbird Director is selected inHierarchyand that theTimeline Editorwindow is open.
- Drag the Bluejay object from Hierarchy into the Timeline window.
- SelectAnimation Trackas the type of track we are adding.
- Ensure thePlayheadcursor is set to60:00 or exactly when HatchedEgg becomes visible.
- Press the redRecordbutton on the Bluejay track in Timeline to begin recording.
- Select theBluejay object inHierarchy.
- Set itsScaleto (1, 1, 1).
- Slide the playhead to the 70-second mark.
- With Bluejaystill selected in Hierarchy, set itsScaleto (8, 8, 8).
- Press the blinking redRecordbutton again to stop recording.
Now, if you scrub the Timeline between the 60- and 70-second marks, the bird will grow from small to full-sized.
In this section, we've learned how to use the Timeline recorder to create animation tracks that modify the Transform Scale of both the Tree and Bluejay objects with a simple curve between a start and end value. Naturally, animations can be more complex with many keyframes in-between, manipulating many object parameters over time. Next, we'll make a more involved animation depicting the nest falling gently from up in the tree.
Using the Animation editor
Next, we'll create another animation track in order to animate the nest so that it starts positioned in the grown tree and then drifts slowly to the ground, wafting like a falling leaf. We want it to exhibit a gentle rocking motion. This is a little more complicated than the simple two-keyframe animation we just did, so we'll do our work in a separate Animation Window instead of the narrow track band on Timeline Editor. It will animate from 0:35 to 0:45 seconds.
Animations are based on keyframes. To animate a property, you need to create a keyframe and define the property values for that frame in time. In the previous example, we had just two Keyframes, for the start and end Scale values. Unity fills in-between values with a nice curve. You can insert additional Keyframes and edit the curve's shape. We will use these for the wafting nest.
A wafting nest
We are going to make the nest fall gently from the tree. We already have a Timeline Activation track for the NestAndEgg object, which activates it (makes it visible) in the scene. We will now add another track to animate the NestAndEgg object's Transform. Let's assume your scene already has the nest positioned on the ground, which is where we want it to end up. Create the track with the following steps:
- Drag the NestAndEgg object from Hierarchy into the Timeline window.
- Select AnimationTrack as the type of track.
- Set the playhead cursor to 35:00, which is where the NestAndEgg game object becomes activated. (Note that the Record icon will be disabled when the object is inactive. The playhead must be within the object's Activation track's Active range.)
- Press the Record icon for the NestAndEgg animation track to begin recording.
- Select the NestAndEgg object in Hierarchy.
- Copy the current Transform values to the clipboard (in Inspector, select the three-dot icon on the Transform component and select Copy Component).
- In the Scene window, ensure Move gizmo is currently selected.
- Reposition the nest up in the Tree. object. Position Y = 5 worked for me.
- Slide Playhead to 45:00.
- In NestAndEggInspector, click the Transform's three-dot icon and select Paste Component Values.
- Press the blinking red Record button again to stop recording.
Having defined an initial Animation recording, we can now work on it in an Animation editor window:
- On the track, click the little menu's three-dot icon to its right.
- Select Edit in Animation Window, as shown here:

The goal is to animate a subtle floating action where the Nest object gently rocks from side to side (X and Z axes) and rotates lightly on each of the axes. To do this, first, we'll "anchor" the Nest object at the beginning, middle, and end of the fall. (We already have the begin and end positions.) Then, we'll add a couple more keyframes with arbitrary values to implement the gentle motion.
Animation Window has two view modes: Dopesheet and Curves. The Dopesheet view lets you focus on the keyframes for each property. The Curves view lets you focus on the transitions between Keyframes. These are shown in the screenshot further down. Using theDopesheetview, we're first going to ensure we have keyframes at the start and end times, and one in-between. Add keyframes at 35, 40, and 45 seconds, as follows:
- If not present, add Rotation properties too (Add Property | Transform | Rotation | "+").
- Position the Playhead at the start of our animation (35:00).
- Click Add Keyframe icon in the control bar, on top of the properties list (highlighted in the following screenshot).
- Move Playhead about halfway, to 40:00.
- Click Add Keyframe icon.
- Again, make sure there's Keyframe markers at the end (45:00).
Now, we'll add a Keyframe at 37:30:
- Move Playhead to 37:30.
- Click Add Keyframe icon.
- Click the red Record icon in the upper left to capture new values.
- Select the NestAndEgg object in Hierarchy.
- In the Scene view, using the Move Tool gizmo, move the Nest object a little bit along the X and Z axes (about 0.4 units).
- Using Rotate Tool, rotate the Nest object gently on any combination of axes (up to 10 degrees).
- Move Playhead to 42:30 and repeat steps 2-6.
- Press the red Record button again to stop recording.
The resulting Animation Window in the Dopesheet view, with its Position and Rotation property values, is shown here at Keyframe42:30. The Add Keyframe icon is highlighted for you:

The Curves view lets you focus on the transitions between Keyframes and allows you to adjust the values and shape the curve splines. My current Curves view is shown here:

Go back to the Timeline Editor window. You can slide the Playhead cursor to see animations in your Scene window or press the Preview Play icon to play them.
Here, we have seen that the Timeline Animation tracks are a fast way to record and adjust your animation clips. But if you want more control and detail, open that clip in an Animation window, where you can add new keyframes, add additional properties, and modify the curves. It's the same Animation Clip as in the Timeline track, but with just a more detailed editor window.
So far, we've been animating just the Transform properties of game objects. However, you can animate just about any object property that is visible in the Inspector window. We'll look at this in more detail next.
Animating other properties
Lighting is an important consideration in 3D animation and no less so for virtual reality storytelling. In our story, we want the lighting to start at night and progress through dawn to daylight. We'll do this by manipulating the Directional Light game object, a Point Light, and Skybox Material. The Directional Light game object has Intensity parameters we can animate directly. The skybox is defined with a material, so we are going to have to write a script to control its contribution to the lighting in the scene.
Animating lights
For dramatic effect, let's make the scene slowly fade from night to daytime. We will turn off Directional Light at the start and slowly increase its Intensity:
- SelectBlackbird Director inHierarchyand open theTimeline Editorwindow.
- Drag theDirectional Lightobject fromHierarchyonto the Timeline and select Animation Track.
- Press itsRecordbutton.
- Ensure Playheadis at0:00.
- Select Directional LightinHierarchy and change itsIntensityparameter to0.
- Move the Playhead to 40:00.
- Set Intensityto1.
- Press the blinking Record button to end the recording.
The Directional Light's animation track with the Intensity parameter curve is shown here:

The other parameters of the light can also be animated, including its Color and the Transform Rotation angles if we wanted to change the angle of the "sun" shadows and tint over time. Just imagine the possibilities!
Now, let's add a Point Light. For dramatic effect, position it near the Nest object's resting position. This will illuminate the baby tree at first, and focus the user's attention on the egg in the nest once the nest settles onto the ground:
- Select GameObject| Light | Point Light.
- In theSceneview, use theMove Toolgizmo to position it near the Nest object at Position (0.65, 0.75, -2.25).
- SelectBlackbird Directorand openTimeline Editor.
- Drag Point Lightonto Timeline Editor.
- ChooseActivation Track
- Enable the light from0 to about95 seconds, sometime after the egg hatches.
Things are looking pretty good!
Our Timeline is starting to get a little crowded. Let's move the lights into aTrack Group:
- InTimeline, choose"+" | Track Group.
- Click its label and name it Lights.
- Drag each of the light tracks into the group.
Fading in the Directional Light game object helps set the mood. But it's the skybox that is really going to make the difference between night, dawn, and daylight. We'll consider how to animate the skybox's light intensity next.
Animating a scripted component property
As you can see, you can animate just about any GameObject property that you can modify in the Inspector window. This includes your own C# script component's serialized properties. We want to fade the environmental lighting from night to day. There are several ways to achieve this. We've decided to do this by modifying the skybox material's Exposure value (0 is off, while 1 is all the way on). But Timeline can only animate GameObject properties, and this is a Scene property, not a GameObject. So, what we'll do is create an empty GameObject, named Lighting Controller, and write a script that controls the skybox material. At the beginning of this project, we added a skybox material to the scene (that is, WispySkyboxMat2).
Since we're going to dynamically modify the skybox, we do not want to bake the global illumination (that would defeat our objective). Uncheck theMixed Lighting Baked Global Illuminationcheckbox. Note that in a larger scene, this can have a serious impact on performance and should be avoided in lieu of finding another way of accomplishing the same visual effects, but it will be OK in this project.
To understand how this will work, select the WispySkyboxMat2 material and, in its Inspector, see what happens when you slide the Exposure value between 1 and 0. This fades the brightness of the skybox. We will animate this value to modify the ambient light in our scene. But Animations can only modify GameObject parameters, so we'll write a script:
- Create a new C# script and name it SkyboxExposure.
- Open the script and write the following:
public class SkyboxExposure : MonoBehaviour
{
    public Material skyboxMaterial;
    public float exp = 1.0f;

    private float previousExp = 0f;

    private void Update()
    {
        if (exp != previousExp)
        {
            skyboxMaterial.SetFloat("_Exposure", exp);
            previousExp = exp;
        }
    }
}
In Update, we check if the public exp value has been changed (for example, by the Timeline director) and send it to skyboxMaterial using SetFloat. (Material/Shader properties can be modified using the string reference to the property name). Save the file. In Unity, we'll make a Lighting Controller object that uses the script as follows:
- Create an Empty object in Hierarchy named Lighting Controller.
- Add the SkyboxExposure script to this object.
- Drag the WispySkyboxMat2 asset from the Project window onto its Skybox Material slot (or whichever material you currently have assigned in Lighting | Skybox Material).
Now, let's animate this parameter:
- Select Blackbird Director in Hierarchy and open the Timeline Editor window.
- Drag the Lighting Controller object from Hierarchy onto Timeline and select Animation Track.
- Press its Record button.
- Ensure Playhead is at 0:00.
- Select Lighting Controller in Hierarchy and change its Exp parameter to 0.
- Move Playhead to the 100:00.
- Set Exp to 1.
- Press the blinking Record button to end the recording.
The Timeline Editor window with a SkyboxExposure track is shown here:

Press Play. The scene lighting will fade from night to day as the skybox material's Exposure animates from 0.0 to 1.0. (Note that it's not available in the Timeline preview Play, just the Editor Play). Here is a sequence of screenshots showing the skybox's intensity as it animates:

With that, we've controlled the mood and lighting of the scene using Timeline tracks. Directional Light Intensity is faded in over time. A small Spot Light is activated and deactivated to draw the user's attention. Finally, the exposure of Skybox (lightness) is also animated by Timeline using a helper SkyboxExposure script attached to a GameObject that the Timeline track can reference.
You can also use separate animation clips as another Playable asset you can add and sequence in Timeline tracks. We'll look at that next.
Using Animation clips
For the next animation example, we'll get the egg to wobble and shake before it hatches. We will create a simple animation and make it loop for its duration. To illustrate, we'll make an Animation Clip of the WholeEgg object rattling and then add it to Timeline on an Animation Clip Track.
Shaking an egg
To create a new Animation Clip on the WholeEgg object, follow these steps:
- In Hierarchy, select the WholeEgg object (child of NestAndEgg).
- Open the Animation window (Window | Animation | Animation).
- You should see a message stating, To begin animating WholeEgg, create an Animation Clip, and a Create button.
- Press Create.
- When prompted for a filename, save it as EggShaker Animation.
We saw the Animation window earlier in this chapter. We're going to make a very short, 2-second animation that rotates the egg on the X and Z axes by manipulating the animation curves:
- Show the Curves view using the Curves button at the bottom of the window.
- Press Add Property and WholeEgg | Transform | Rotation | + to add the Rotation properties.
- Select the WholeEgg: Rotation property group on the left.
- Press A on the keyboard to zoom all; you should see three flat lines, one for each of the X, Y, and Z rotation axes.
- Click the Add Keyframe icon in the control bar.
- Move Playhead to 1:00 (60 seconds) and click Add Keyframe.
- Scroll out (using the middle scroll wheel on the mouse or using the horizontal scrollbar oval-end handles) so that you can see the 2:00-minute (120 seconds) marker.
- Move Playhead to 2 seconds and click Add Keyframe.
- Move Playhead back to the 1-second mark.
Now, we'll edit the animation spline curves. If you're familiar with spline editing, you'll know there is a line at each node representing the tangent of the curve at that point and handles at the ends of the line for editing the curve. (You also modify the operation of this gizmo by right-clicking the node). Follow these steps:
- Click the 1:00-second node for the Rotation.X property and grab one of the handles to make a smooth S-curve. Don't make it too steep; set it to something between 30 and 45 degrees.
- Repeat this for the Y and Z axes, but with some variation, as shown here:

For one or two of the axes, add an extra Keyframe to make the curves wobble the egg a little more randomly. My final curves are shown here:

With that done (the curves can be edited and refined later), select Blackbird Director, open the Timeline window, and perform the following steps:
- Select the + add button (at the top-left) and choose Animation Track.
- Drag the WholeEgg object from Hierarchy onto the Timeline track's Animator slot.
- If prompted to CreateAnimator on the GameObject, say yes to add an Animator component.
This time, instead of recording the track, we'll use the one we just created and make it animate back and forth, as follows:
- Using the menu icon on the track we just created, choose Add From Animation Clip.
- When prompted, choose the EggShaker animation from the Select Animation Clip window.
- A small rectangle will be added to the track. Slide it to about 50 seconds, which is when the nest is on the ground but the chick has not hatched yet.
- In Inspector, we now have more clip options. Under AnimationExtrapolation, choose Post-Extrapolate: Ping Pong, as shown in the following screenshot.
- Then, drag the right edge of the animation track to the 60-second mark, so that the animation plays for about 10 seconds:

This exercise was a lot like the other animations we created earlier, but this time, we created the animation clip first in Animation Window and then added it to a Timeline track afterward. Often, animation clips can be imported into your Unity project from asset packages from the Asset Store, for example, or created in other 3D packages such as Blender, Maya, and 3D Max.
Animation Clips with Timeline can be quite flexible. You can even add multiple Animation Clips to the same Animation Track, and blend between them. If you need even more control, you can use an Animator Controller instead, as we'll see in the next section.
Using Animator Controllers
While recording animations as Timeline tracks is very convenient, it does have its limitations. These animations "live" in Timeline. But sometimes, you want to treat animations as assets in their own right. For example, you would use Animation Clips if you want an animation to loop repeatedly or transition between movements, blend their actions, and then apply the same set of animation curves to many different objects.
Animators were the standard way of managing Animation Clips in Unity before Timeline. It uses an Animator Component, an Animator Controller, and an Animation Clip. Fortunately, if you create a new Animation Clip on an object, Unity creates each of these items for you. But it's important to understand how they fit together.
Briefly, from the Unity Manual (https://docs.unity3d.com/Manual/animeditor-CreatingANewAnimationClip.html):
These objects originate from the Mecanim animation system that was folded into Unity a few years ago (you may still see references to Mecanim in the Unity Manual and web searches). This animation system is specially tailored for humanoid character animations (see https://docs.unity3d.com/Manual/AnimationOverview.html). The terminology may seem redundant and confusing. The following definitions may help (or not!). Pay especially close attention to the use of "animator" versus "animation":
- Animation Clips: Describes how an object's properties change over time.
- Animator Controller: Organizes clips in a state machine flowchart, keeps track of which clip should currently be playing, and when animations should change or blend together. It references the clips it uses.
- Animator component:Brings together Animation Clips, the Animation Controller, and the Avatar if used.
- Do not uselegacy Animation components: The Animation component is legacy but the Animation window is not!
- Animation window: Used to create/edit individual Animation Clips and can animate any property you can edit in the inspector. Shows a timeline, but this is not the same as the Timeline window. Offers a Dopesheet versus Curves view.
- Animator window: Organizes existing animation clip assets into a flowchart-like state machine graph.
We will take a look at a couple of existing examples of Animators and then use the existing birds one to make our Bluejay fly. First, we'll review ThirdPersonController, which will be similar to the Ethan character we used in previous chapters. Next, we'll look at the Animator that's included in the Living Birds package we're using for our Bluejay object. We'll use it in our project to make the bird fly between locations in the scene.
ThirdPersonController Animator
The ThirdPersonController character prefab we used for Ethan in previous chapters uses an Animator Controller to manage humanoid animation clips on the rigged model. For curiosity, let's examine it now (although we will not use it in this scene):
- Temporarily drag a copy of the ThirdPersonController prefab from your ProjectAssets/Standard Assets/ Characters/ThirdPersonCharacter/Prefabs/ folder into the scene.
- Notice that, in Inspector, it has an Animator component and that the Controller slot references ThirdPersonAnimatorController.
- Open the Animator window using Window | Animation | Animator.
- You can pan or zoom into the graph using the mouse by clicking and dragging or by using the scroll-wheel, respectively.
The Animator graph for Ethan is shown in the following screenshot. You can see that when the character is activated (Entry), it initializes to the Grounded state. The rounded boxes are States; the lines between them are Transitions. On the left is the list of state Properties that the Animator can use. When Crouch is true (checked), for example, the animation transitions to Crouching, plays that animation clip, and then transitions back (and clears the Crouch state's boolean value):

If you open the Grounded state (double-click it), you will see a Blend Tree with an impressive collection of Animation Clips for standing idle, walking, turning, and so on. These can be activated and combined (blended) based on user input.
That was just for show and explanation. You can now delete the ThirdPersonController object from the scene. Next, we'll look at another Animator,BirdAnimatorController, which is used by ourBluejay object.
Living Birds Animator
The Living Birds package comes with a lot of animation clips. You can actually open the FBX models in Blender or another animation application and examine how the models and animations are defined. These have been combined into a BirdAnimationController. Examine the Animator using the following steps:
- Select the Bluejay object in Hierarchy.
- If the Animator window is open, you'll see the graph. If not, open it with Window | Animation | Animator.
The Animator graph is shown here:

You can see that almost all the animations readily transition to and from the Idle one, whether Preen, Peck, Sing, or HopLeft, HopRight, HopForward, and so on. Also, notice the Idle -> Fly -> Landing -> Idle loop, as we're going to use that. On the left of the graph is a properties box. The following screenshot shows its Parameters tab. We'll be using two of these –flying and landing. These are boolean values that can be set to true or false from a script to affect which animation clip to play at a given time:

The Bluejay game object also has a C# script, lb_Bird, which invokes these Animator states and transitions. Unfortunately, like a lot of code you'll find on the internet, the Living Birds lb_Bird code works for its own purposes but not necessarily ours. It's designed for generating a flock of many birds that fly and land randomly, avoid collisions, and can even be killed. In our project, we have just one bird and want control over the landing locations, so we'll use the nice models and animations from the package but write our own controller script and keep it simple.
Earlier, we animated the falling nest by defining Keyframe positions in the animation curves. We'll do things differently for the Bluejay object. We'll place empty GameObjects as markers in Scene Hierarchy that define the key positions for the bird to fly and land. (This is a lot like using aNavmesh agent target to direct Ethan's movement, as we did in Chapter 4, Using Gaze-Based Control, and when using teleportation pods in our other projects). Then we'll use Timeline to progress from one target position to the next, over time, using, as you'll see, a Signal Track. First, we'll create a list of locations where the bird should fly between.
Defining the fly-to targets
We are going to place a series of target locations in the scene that define where the bird will fly. To define these, we'll create a Location Marker prefab that also helps us visualize the position and rotation direction. Follow these steps:
- In Hierarchy, create an Empty game object named Bird Controller and reset its Transform properties.
- Create a child empty object child of Bird Controller (right-click | Create Empty), name it Location Marker, and reset its Transform properties.
- Use any graphic to visualize the marker's position and direction. I'll use directionArrow, which is included with the default Universal Project Template in the Assets/Models/ folder. Drag directionArrow into Hierarchy as a child of Location Marker.
- Set its Scale (0.25, 0.25, 0.25) and Rotation (0, 90, 0). (For some reason, this model is not pointing forward by default).
- Make it a prefab by dragging Location Marker from Hierarchy into the ProjectAssets/Prefabs/ folder.
- Set Location Marker | Transform | Position and Rotation to the same values as the Bluejay object.
- Duplicate Location Marker (Ctrl + D) six times, setting the bird's target landing sites. Use the values in the following table as a guide:
|
Name |
Position |
Rotation |
Description |
|
Location Marker |
(0.75, 0.4, -1.25) |
(0, 135, 0) |
The starting position of the Bluejay object |
|
Location Marker (1) |
(3, 0.65, 0) |
(0, 40, 0) |
Atop nearest rock |
|
Location Marker (2) |
(1.9, 0, -1.7) |
(0, -165, 0) |
Ground near Nest but not in it |
|
Location Marker (3) |
(2.5, 0.6, -3.4) |
(0, -200, 0) |
Atop next nearest rock |
|
Location Marker (4) |
(-5.85, 0.5, -0.3) |
(0, -70, 0) |
Next rock |
|
Location Marker (5) |
(-5, 0.53, 3.7) |
(0, 0, 0) |
Last rock |
|
Location Marker (6) |
(45, 11, 45) |
(0, 36, 0) |
In the distance |
The last location should be far away. The bird will head there at the end of the video. The following screenshot shows a top-down isometric view of the scene, along with the markers:
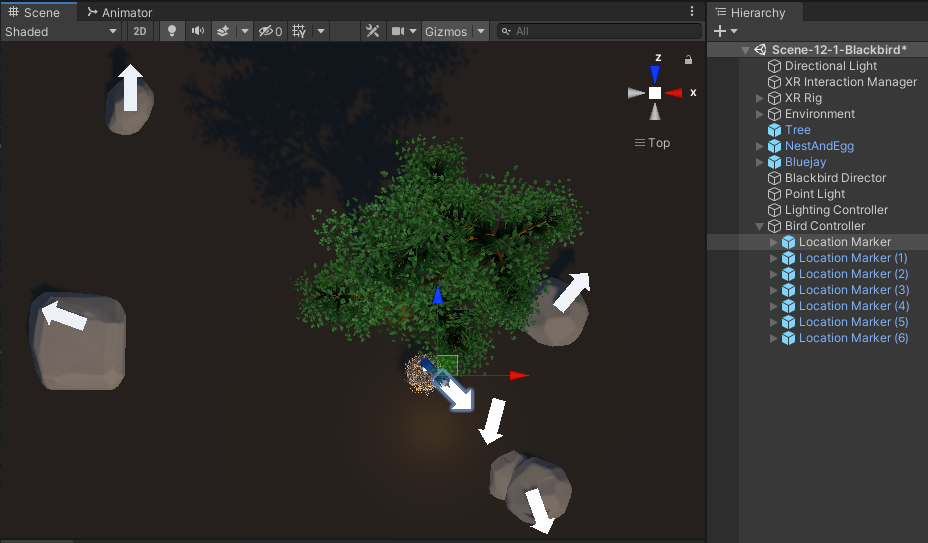
We've now defined seven location markers, beginning with the bird's initial starting location in the nest, then specifying how the bird will fly or hop from one rock to another across the scene, before it eventually flies away into the distance. Given these markers, we can now code the animations.
Using Animator hashes and DOTween to animate
To make the bird actually animate and move, we'll write a BirdController script containing the list of marker locations. These will move the bird from one landing site to another at the control of the Timeline. Create a new C# script on Bird Controller, (Add Component| New Script) named BirdController. To begin, declare some public and private variables at the top of the class and a Start function to initialize them, as follows:
using System.Collections.Generic;
using DG.Tweening;
using UnityEngine;

public class BirdController : MonoBehaviour
{
    public Transform bird;
    public float flightTime = 5f;
    public float turningTime = 2.5f;
    public float flyAwayTime = 20f;
    public List<Transform> targets = new List<Transform>();

    private Animator birdAnim;
    private int index;

    void Start()
    {
        // initialize references
        birdAnim = bird.GetComponent<Animator>();

        // start at first target marker
        bird.transform.position = targets[0].position;
        bird.transform.rotation = targets[0].rotation;
        index = 0;
    }
The bird variable, obviously, will reference the Bluejay GameObject in the scene. The flightTime, turningTime, and flyAwayTime variables are, respectively, the total duration in seconds for each hop from one target to the next, the time it takes to turn toward the target direction, and a separate total flight time for the last fly-away target. Then, we declare a list of targets transforms that we'll reference in the scene.
The Start function grabs a reference to the Bluejay's Animator component. Then, in Start, we initialize the bird's position and rotation to the first target transform.
Next, we write a public FlyToNextLocation function that will be called by Timeline when it's time for the bird to go to the next target location. It finds the next target transform in the list and animates the bird to that target by calling the FlyToTarget function, which we will write next. In the case of the final target, we'll call a different FlyAway function (where the bird does not hop nor land):
    public void FlyToNextLocation()
    {
        index++;

        if (index == targets.Count - 1)
        {
            FlyAway(targets[index].transform);
        }
        else
        {
            FlyToTarget(targets[index].transform);
        }
    }
Of the two fly functions, let's write the FlyAway one first, as follows:
    private void FlyAway(Transform target)
    {
        birdAnim.SetBool("flying", true);
        birdAnim.SetBool("landing", false);
        bird.transform.DORotate(target.eulerAngles, turningTime);
        bird.transform.DOMove(target.position, flyAwayTime);
    }
Here, we set the bird's Animator to begin the flying animation (calling birdAnim.SetBool("flying", true)). If the bird is playing its landing animation, we'll turn that off (birdAnim.SetBool("landing", false)). Now, the bird is flapping its wings like it's flying.
But we also need to move it within the scene from the current location to the target one. For this, we are going to use a handy third-party tool (that we installed at the start of this chapter) called DOTween. (See the DOTween documentation at http://dotween.demigiant.com/documentation.php). I love this asset. It's a very useful shortcut for many common animations you might otherwise have to write by hand using Update or a Coroutine. Here, we will rotate the bird for turningTime seconds to point in the given target direction (calling transform.DORotate). We will concurrently move its position to the target location (calling transform.DOMove) for the flyAwayTime duration.
The animation to fly from one place to another is a little more complicated as we want the bird to hop up in the air, turn toward the target, travel to the target, land at the target location, and then return to the Idle animations. The FlyToTarget function is written as follows:
    private void FlyToTarget(Transform target)
    {
        birdAnim.SetBool("flying", true);
        birdAnim.SetBool("landing", false);

        bird.transform
            .DORotate(target.eulerAngles, turningTime)
            .OnComplete(() =>
            {
                birdAnim.SetBool("flying", false);
                birdAnim.SetBool("landing", true);
            });

        bird.transform
            .DOJump(target.position, 1f, 1, flightTime)
            .OnComplete(() =>
            {
                birdAnim.SetBool("landing", false);
            });
    }
It starts the same as FlyAway, by running the flying animation clip (and stopping the landing one). Then, we also run the DORotate animation to turn the bird in the target direction. But when that sequence is complete, we switch the animation from flying to landing (where the bird flaps its wings in a rapid landing motion). For moving the bird to the new location, instead of a linear interpolation of the two positions, we use a handy DOJump function, which causes the object to appear to hop up (change in Y value) as it moves (changes in X and Z values).When the jump sequence is complete, we turn off the landing animation. Due to this, the bird will go back into its Idle animations.
Save the script. Back in Unity, let's populate its public parameters, as follows:
- If it's not already attached, drag the BirdController script onto the Bird Controller game object.
- Drag the Bluejay game object from Hierarchy onto the Bird Controller | Bird slot.
- We have seven location markers, so unfold the Targets parameter and set its Size to 7.
- One at a time, drag the Location Markers from Hierarchy into their corresponding slots in the Targets list.
- Now, or at any time, you can hide the directionArrow objects in the Location Marker prefab by opening the prefab for editing and disabling that child object.
The resulting component Inspector window looks as follows:

Awesome! Now, we just need to trigger the hops between targets from Timeline.
Using a Signal Track in Timeline
So far, we've already used several types of Timeline tracks, including Audio, Activation, and Animation tracks. Now, we'll introduce a Signal Track. As the name suggests, a signal is an event that triggers some action in your scene. Here, the signal will trigger a call to FlyToNextLocation in BirdController. We'll add the signal to the timeline starting at the 80-second mark and trigger it at 10-second intervals. Follow these steps:
- Open theTimeline Editorwindow for Blackbird Director.
- Drag theBird Controllerobject fromHierarchyonto Timeline and add a newSignal Track.
- Move Playhead to 80.
- Right-click the track (or use its three-dot menu) and select Add Signal Emitter.
- In its Inspector, select Emit Signal. Because we haven't created one yet, press the Create Signal... button and name the file Fly Next Signal.
- In its Signal Receiver component, add a new Reaction (if necessary, press the + button), drag Bird Controller onto the Object slot, and in the Function list, select Bird Controller | FlyToNextLocation.
Signal Emitter looks as follows:

Now, add the remaining signals to Timeline with the following steps:
- Slide Playhead to 90 seconds.
- On the track, select the three-dot icon | Add Signal Emitter.
- In Inspector, set Emit Signal to Fly Next Signal.
- You can actually duplicate the signal marker. Right-click and selectDuplicate and slide it to the 100-second mark (or type100into itsTimeparameter).
- Repeat step 4 for the remaining three signals (at 110, 120, and 130 seconds, respectively).
Timeline, along with the six signals we've defined, is shown in the following screenshot:

You just need to press Play now and you'll experience a wonderful short animated story. The following are a few frames of the Bluejay object flying from the initial target (Location Marker) and landing on the next one (Location Marker (1)):

Note that if you receive a NullExceptionError message in the lb_Bird.cs file, it's because our implementation is not using the original package's lb_BirdController but our own. You can fix this problem by modifying (near line 457) it so that it checks the controller variable is not null before trying to reference it, as follows:
 void FlyAway(){
    if(!dead){
      StopCoroutine("FlyToTarget");
      anim.SetBool(landingBoolHash, false);
      if (controller)
          controller.SendMessage ("BirdFindTarget",gameObject);
    }
  }
The following is one more dramatic view of our happy bird flying off toward the horizon to the song lyrics, "Blackbird singing in the dead of night; Take these broken winds and learn to fly... All your life; You were only waiting for this moment to be free":

There we have it! We started with a timeline storyboard, collected the assets we needed for the project, and assembled them into a Timeline sequence with multiple tracks. In this last part, the story really comes alive as we used an Animator Controller that's called from our own control script to make the bird flap its wings to fly and land. We also used DOTween animations to rotate, move, and jump the bird from one target location to the next. It may be nice to watch as a video, but play it in virtual reality for a real experience!
Currently, the user's participation in the story is entirely passive. It plays and the user watches. Let's add a little bit of interactivity to the scene.
Making the story interactive
So far, we've used Timeline to drive our entire VR story experience from start to finish. But in fact, Timelines are a playable asset like others in Unity. For example, if you select the Blackbird Director object and look in Inspector at its Playable Director component, you'll see it has a Play On Awake checkbox and that it's currently checked. What we're going to do now is not play on awake, but rather start playing on a user event, namely looking directly at the small tree for a few seconds. When the story ends, we'll make it reset itself.
Look to play
An interesting design pattern for VR application is to wait for the player to look at something before it starts animating or otherwise becomes active in the scene. After all, it'd be a shame for the user to not notice things and miss all the action! We'll demonstrate this idea in our project by waiting for the user to look at the small tree before beginning to play the Timeline. First, we'll add a LookAt Target that encases the small tree and then use that to trigger playing the timeline. We'll also display a countdown text. (In Chapter 6, Canvasing World Space UI, we used a World Space Canvas, but now, we'll simply use a 3D text object, assuming you already have TextMeshPro installed via Package Manager). Follow these steps:
- Select Blackbird Directorand uncheck thePlay On Awakecheckbox.
- For reference, set the Tree game object's Scale to its starting keyframe Scale (0.1, 0.1, 0.1).
- InHierarchy, create a cube (GameObject| 3D Object | Cube) and name it LookAt Target.
- Scale and place it to encase the small tree. UseScale(0.4, 0.5, 0.4) andPosition(0, 0.3, 0).
- Disable itsMesh Renderer but keep itsBox Collider.
- Add a 3D text object as a child by right-clicking | 3D Object | Text - TextMeshPro. Rename it Countdown Text.
- Set Text Mesh | Font Size to 72, Alignment | Center, and Transform | Scale to (0.2, 0.2, 0.2). Set its Position Z to -0.5.
- Create a new C# script on the cube (Add Component | New Script) named LookAtToStart and write it as follows:
using UnityEngine;
using UnityEngine.Playables;
using TMPro;

public class LookAtToStart : MonoBehaviour
{
    public PlayableDirector timeline;
    public float timeToSelect = 4f;

    private Transform camera;
    private TMP_Text countdownText;
    private float timer;

    void Start()
    {
        camera = Camera.main.transform;
        countdownText = GetComponentInChildren<TMP_Text>();
        timer = timeToSelect;
    }

    void Update()
    {
        // Do nothing if already playing
        if (timeline.state == PlayState.Playing)
            return;

        // Is user looking here?
        Ray ray = new Ray(camera.position,
             camera.rotation * Vector3.forward);
        RaycastHit hit;
        if (Physics.Raycast(ray, out hit) &&
             (hit.collider.gameObject == gameObject))
        {
            if (timer > 0f)
            {
                timer -= Time.deltaTime;
                countdownText.text = timer.ToString("F0");
                countdownText.gameObject.SetActive(true);
            }
            else
            {
                // go!
                timeline.Play();
                countdownText.gameObject.SetActive(false);
            }
        }
        else
        {
            // reset timer
            timer = timeToSelect;
            countdownText.gameObject.SetActive(false);
        }
    }
}
This script is similar to the ones we wrote in Chapter 4, Using Gaze-Based Control. We use the Main Camera and determine the direction the user is looking in. Using the physics engine, we call Physics.Raycast to cast a ray in the view direction and determine if it hit this object, that is, LookAt Target. If so, we start or continue a countdown timer and show the countdown text. When the counter reaches zero, we play the Timeline. Meanwhile, if we look away, we reset the timer.
Save the script. In Unity, drag the Blackbird Director game object onto the Look At to Start | Timeline slot. Try it out by pressing Play. Timeline will not start playing, instead waiting for you to look at the tree sapling for a few seconds and then calling timeline.Play to start the animations. The countdown text gives you feedback on this, as shown in the following screen capture:

We used the player's head pose (viewing direction) to make the scene more interactive. The story does not start until the player is paying attention.
Now, we have a new problem. When Timeline was set to Play On Awake, the user would immediately see the Timeline from the beginning. But now, the scene starts in the state that the developer (you) last saved. That is, the sky is not dark, the tree and bird are active and full-sized, and so on. Instead, the experience should start basically at the first frame of the Timeline while waiting for the user to start playing the story. Let's fix this.
Resetting the initial scene's setup
You could manually go through each and every game object in the scene and ensure it has been saved with the same initial state as the start of the Timeline. Not only is this tedious but it's error-prone since you or another developer could save the scene with an object in some unexpected state. Instead, we'll add a little hack that plays the timeline for a brief 0.1 seconds to reset the objects to their starting state. We will implement this using a coroutine. Follow these steps:
- Modify the LookAtToStart script as follows. Add a new variable, resetSetup, and initialize it to true, as follows:
private bool resetSetup = true;
- Add a PlayToSetup function, which will be run as a coroutine. As we know, coroutines are a way to run a function, let Unity do other stuff momentarily, and then resume where you left off (via the yield statement). Here, we start playing the Timeline, go away for 0.1 seconds, and then tell the Timeline to stop playing:
IEnumerator PlayToSetup()
{
    timeline.Play();
    yield return new WaitForSeconds(0.1f);
    timeline.Stop();
}
- Call the coroutine from Update when we want to reset the setup:
       void Update()
         {
            if (timeline.state == PlayState.Playing)
               return;

            if (resetSetup)
            {
               StartCoroutine(PlayToSetup());
               resetSetup = false;
             }
We also want the scene to reset after the Timeline plays all the way through, so we set resetSetup as soon as the timeline starts playing. It'll be recognized once timeline.state is no longer playing:
        ...
            // go!
            timeline.Play();
            resetSetup = true;
        }
- Press Play.
Look at the tree. Enjoy the experience. When it ends, you're reset to the beginning and can look at the tree again to replay the story.
We're going to stop developing now. Some suggestions regarding how to improve the interactivity and user experience include doing the following:
- Add a particle effect around the tree to indicate that it's a trigger.
- Highlight the tree as visual feedback when you're looking at it.
Here are other suggestions for interactable objects you could add to the story:
- Looking at the egg in the nest causes it to hatch sooner than its default timing.
- When you look at the bird while it's idle, it will turn to look back at you.
- If you poke the bird with your hand controller, it jumps out of the way.
- You can pick up a rock and throw it to kill the bird (nooo, just kidding!).
Now, let's recap this chapter.
Summary
In this chapter, we built an animated VR story. We began by deciding what we wanted to do by planning all the necessary details, including the timeline, music track, graphic assets, animation sequences, and lighting. We imported our assets and placed them in the scene. Then, we created a Timeline and roughly estimated when specific objects will be enabled and disabled using an Activation Track. Next, you learned how to animate several objects, including growing the tree and bird, floating the nest, and making the egg wobble. You also animated the lighting and learned how to animate game object parameters other than Transforms.
You also used Animation Clips and an Animator Controller in order to use animations imported from a third-party package, Living Birds. You wrote a control script that calls the Animator to tell the bird when to flap its wings for flying or landing. We then defined location markers to define where the bird will hop, fly, and land from one rock to another and then fly away into the distance. The control script animated this movement using the DOTween tools package. Lastly, you learned how to add interactions to the story and how to use gaze-based control to start and replay the experience.
In the next final chapter, we will dive into the technical details of optimizing your VR projects so that they run smoothly and comfortably in VR. We will consider the different areas that affect performance and latency, from model polygon count, to Unity scripting, to bottlenecks on the CPU and GPU.