
Yeah well, this is cool and everything, but where's my VR? I WANT MY VR! Hold on, kid, we're getting there.
In this chapter, we are going to set up our system and configure our project so that it can be run with a virtual reality head-mounted display (HMD). This chapter is very nuts and bolts. Although Unity aims to provide a unified platform for create once, build many, you are still going to need to do some system setup, project configuration, and maybe even include object components specifically for your target devices. After the first couple of topics in this chapter, you can jump to the section(s) that address your specific target devices.
In this chapter, we will cover the following topics:
- Using the Unity XR platform
- Managing virtual reality plugins for your platform
- Installing the XR Interaction Toolkit package
- Creating a VR-enabled camera rig
- Setting up your development machine to build and run VR projects from Unity
- Targeting desktop VR, including SteamVR, Oculus Rift, and Immersive Windows Mixed Reality
- Targeting mobile VR, including Oculus Quest, and Google Cardboard
Let's get started!
Technical requirements
To implement the projects and exercises in this chapter, you will need the following:
- A PC or Mac capable of running Unity 2019.4 LTS or later, along with an internet connection to download files.
- A VR headset supported by the Unity XR platform.
Introducing the Unity XR platform
Unity's XR platform aims to provide the tools necessary to achieve the core principle of the Unity engine – "Build once, deploy anywhere" – for VR and AR projects so that you can target any number of different platforms and devices with a single version of your content. In the past, VR developers have been plagued by incompatible device-specific, vendor-specific, platform-specific SDKs and toolkits. Various other "solutions," both open source and proprietary, have had serious shortcomings and limited support. The XR platform architecture has a technology stack that enables direct integrations of multi-platform deep integration, new features, and optimization. The XR tech stack is shown in the following diagram, which has been taken from the Unity Manual's XR Plug-in Framework page (https://docs.unity3d.com/Manual/XRPluginArchitecture.html):

At the bottom of the stack are device-specific XR plugins. Some are provided and directly supported by Unity. Others are provided and supported by third-party developers for their own devices. This XR plugin architecture itself is a very important design as it decouples device-specific updates from the core Unity release cycle, as well as allows device providers to independently add and update their own device support in Unity (using the Unity XR SDK).
Using these provider plugins, the XR subsystems deliver core capabilities in a modular design, organized and separated by feature category. This allows developers to choose which XR features they want to build into a project and allows Unity to update individual subsystem modules independently. As a developer, you can use these subsystem components and C# classes directly in your projects, keeping the project content relatively device-independent. This way, you can focus on your own project's features instead of fighting differences between specific device APIs.
On top of the XR plugin framework, Unity offers two toolkits. AR Foundation is for augmented reality projects and won't be considered in this book. The XR Interaction (XRI) Toolkit is for both VR and AR, and we are going to use it extensively in the projects in this book. As we'll see, XRI provides components for tracking camera rigs and hand controllers, as well as for interaction with objects in the scene such as grabbing and throwing, teleportation, and other interactions common in virtual reality.
To get started with your Unity project ready for VR, you should identify the VR platform(s) and device(s) you initially plan to target.
Choosing your target VR platforms and toolkits
While much of your development will focus on the artwork, behaviors of game objects, and interactive game mechanics of your application, from the very beginning of your project, you should also identifywhich platforms and devices you are targeting. In ordinary Unity projects, it's often sufficient to simply choose the Build Settings target platform (for example, Android or Windows) and then configure Player Settings for build runtime options. But for VR, there's more. You need to manage the VR plugins you will need and use additional toolkit(s) for developing the project. Generally, your Unity VR project will need to include the following:
- Select a Target Platform for your builds (for example, Android versus Standalone/Windows).
- Install an XR Plugin that drives the VR devices.
- Within your scene, you will include a VR-enabled camera rig for tracking head and hand locations in 3D space.
- Using other components provided with Unity's XR Interaction Toolkit for handling interaction with game objects and locomotion in your scenes.
- Alternatively, you may choose to include device-specific toolkits, often provided by device manufacturers that have been tuned to their specific devices and often include a suite of prefabs, components, and shaders. These higher-level add-ons help you create interactive, responsive, and comfortable VR experiences tailored to a specific platform.
Unity has a growing library of built-in classes and installable packages to support VR (or rather, XR including augmented reality devices), including stereo rendering, input tracking, user interactions, and audio spatializers. Some features are limited by specific platform capabilities, but generally, they're designed to be device-independent.
I will walk you through the details of installing and configuring your project in this chapter. If you are not sure which platform, XR plugin, and device toolkit to include in your project, consult the following table, which shows many of the major consumer VR devices available today and the options for the development platform, target device platform, VR runtime, XR plugin, and optional device toolkit. The first table identifies the plugins provided and supported directly by Unity:
| Device | Dev Platform | Target Platform | VR Runtime | Official XR Plugin | Optional Device Toolkit |
| Oculus Rift | Windows | Standalone/Windows | Oculus Desktop | Oculus | Oculus Integration (OVR) |
| Windows MR | Windows | Universal Windows Platform (UWP) or Standalone/Windows | Mixed Reality Portal | Windows MR | Mixed Reality Toolkit (MRTK) |
| Oculus Quest | Windows, macOS X |
Android | Oculus Quest | Oculus | OVR |
| Oculus Go | Windows, macOS X |
Android | Oculus Go | Oculus | OVR |
The following table includes plugins provided by third parties:
| Device | Dev Platform | Target Platform | VR Runtime | XR Plugin | Optional Device Toolkit |
|
HTC Vive |
Windows, macOS X |
Standalone/Windows, Mac | SteamVR | OpenVR | SteamVR Input System and Interaction Toolkit |
| Valve Index | Windows, macOS X |
Standalone/Windows, Mac | SteamVR | OpenVR | SteamVR Input System andInteraction Toolkit |
| Oculus Rift (OpenVR) | Windows | Standalone/Windows | SteamVR (via Oculus Desktop) | OpenVR | SteamVRInput System andInteraction Toolkit |
| Windows MR (OpenVR) | Windows | Standalone/Windows | SteamVR (via Mixed Reality Portal) | OpenVR | SteamVRInput System andInteraction Toolkit |
The following table shows plugins that have been announced but are not currently available (at the time this was written):
| Cardboard | Windows | Android | Android | Cardboard | Cardboard Unity |
| Cardboard | macOS X | iOS | Android | Cardboard | Cardboard Unity |
Note that Valve's OpenVR supports multiple VR devices, although OpenVR with Oculus or immersive Windows MR devices also require their corresponding runtime app be running in the background (Oculus Desktop or Mixed Reality Portal, respectively). Also note that, as of October 2019, Google discontinued Daydream and open-sourced the Cardboard SDK. As of December 2020, Oculus is sunsetting the Oculus Go and will stop accepting new applications in its store.
So, let's get started by enabling VR in the project's scene.
Enabling virtual reality for your platform
The Diorama scene we created in the previous chapter was a 3D scene using the Unity default Main Camera. As we saw, when you pressed Play in the Unity Editor, you had the scene running in the Game window on your 2D computer monitor. We will now enable the project and scene so that it runs in virtual reality. These first couple of tasks are similar, regardless of which device you are targeting:
- Setting the target platform for your project builds
- Installing the XR plugin for our device
- Installing the XRI package
- Creating a VR enabled XR Rig camera rig
We'll take care of these details now. After doing this, you'll need to set up your Unity project and development system software, depending on your specific target. This will include completing the following tasks, which we'll cover on a case-by-case basis in the rest of this chapter:
- Ensuring your VR device is connected and you're able to normally discover and use its home environment.
- Ensuring your device's development mode is enabled.
- Installing any system software on your development machine that's required for you to build your target platform.
- Optionally, importing the device toolkit for your target device into your Unity project and using the provided camera rig instead of the XR Rig.
Now, let's configure the project for your specific VR headset.
Setting your target platform
New Unity projects normally default to targeting standalone desktop platforms. If this works for you, you do not need to change anything. Let's take a look at this now:
- Open the Build Settings window (File | Build Settings…) and review the Platform list.
- Choose your target platform; such as one of the following, for example:
- If you're building for Oculus Rift or HTC Vive, for example, choose PC, Mac&Linux Standalone.
- If you're building for Windows MR, choose Universal Windows Platform.
- If you are building for Oculus Quest, or Google Cardboard on Android, choose Android.
- If you are building for Google Cardboard on iOS, choose iOS.
- Then, click Switch Platform.
Unity may need to reimport your assets for a different platform. This will happen automatically and may take a while, depending on the size of your project. The editor will be locked out until the process is completed.
If the platform you require is not present in the list, you may need to install the corresponding module. To do this, you need to go back into Unity Hub, as follows. These steps are similar to the ones described in the previous section, Installing the Unity Editor:
- Quit the current Unity session (File | Exit).
- Open Unity Hub on your computer desktop.
- From the left-hand side menu, choose Installs.
- Find the version of Unity that you're using in this project.
- Use the three-dot menu to choose Add Modules.
- Review the list and check the checkbox for each of the modules you require. The module may have additional tools. Be sure to unfold the module name and check any sub-options. In particular, the Android Build Support module has child Android SDK & NDK Tools and OpenJDK sub-modules, which should also be checked.
- Press DONE to install the additional modules.
- Reopen your Unity project. The added platform should now be included in the Build Settings' Platform list.
Next, we'll enable VR for the project.
Installing XR Plugin Management
When VR is enabled in your Unity project, it renders stereoscopic camera views and runs on a VR headset. Unity 20193 and later sports a new XR Plugin Management tool, which you'll use to install and manage VR device SDKs. You can do this using XR Plugin Management, as follows:
- Open the Project Settings window (Edit | Project Settings).
- SelectXR Plugin Managementfrom the left tab menu.
- If necessary, click Install XR Plugin Management, as shown in the following screenshot:

Next, you'll need to install the loaders for the specific device(s) you plan to target with this project. We'll go through the details in the device-specific topics later in this chapter. Meanwhile, you may see the following warning:

Then, once one or more of the desired plugins have been installed, the plugin will be added to the list in the left-hand menu, under XR Plug-in Management. In the following screenshot, for example, I've installed the Oculus plugin and you can see that the Oculus settings are now available:

When you install XR Plug-in Management, other dependency packages may also be installed. In fact, using the Install Plug-in Management button we used previously is a shortcut for doing the same through Package Manager (Window | Package Manager). In the following screenshot, you can see the package in Package Manager where I've selected Show Dependencies from the Advanced drop-down menu, so you can see that two additional (hidden) required packages are also installed: XR Legacy Input Helpers and Subsystem Registration:

Good. At this point, the project is VR-ready, since we've set the target platform and installed the XR plugins for the target device. If you want to develop a project directly using the native XR SDK, you could stop here. However, if you want to develop a project for one specific platform, you can use an optional device toolkit, such as Oculus Integration (OVR), SteamVR Interaction Toolkit, or Windows Mixed Reality Toolkit (MRTK). In this book, we will focus on the Unity XR Interaction Toolkit. We'll install this next.
Installing the XR Interaction Toolkit
We are going to be using Unity's new XRIToolkit in the projects throughout this book. XRI provides higher-level components for interaction in VR and AR projects, including cross-platform hand controller input for grabbing objects. It also provides components for setting up a VR camera rig that handles stationary and room-scale VR experiences.
The XR Interaction Toolkit can be installed using Package Manager. Follow these steps to install it in your project:
- Open Package Manager (Window | Package Manager).
- Filter the list toAll Packages(Use the drop-down list at the top-left of the window).
- At the time of writing, XRI is still in preview, so you may also need to select Show Preview Packages from the Advanced dropdown menu.
- Type xr interaction in the search area and, with the package selected, pressInstall.
The XR Interaction Toolkit package is shown in the following screenshot:

With XRI installed, you now have access to its components through the main menu bar, that is, Component | XR. As shown in the following screenshot of the menu, these include XR Rig, XR Controller, XR Interaction Manager, and XR Simple Interactable:
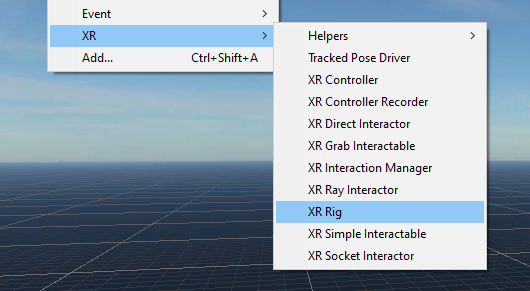
There are some pre-made game objects you can readily add to your scenes through the main GameObject | XR menu, as shown in the following screenshot:

For example, here, you can find the Room-Scale XR Rig and Stationary XR Rig game objects, both of which use the XR Rig component. We're going to add one of these to our scene next. At this point, you should have set up the target platform and installed an XR Plugin and the XRI Toolkit. Now, we'll replace the default main camera with the XR camera rig in the scene.
Adding the XR camera rig
The XR camera rig places a camera object in the scene that tracks the position and pose of the physical VR HMD. It also includes game objects that track the player's hands. There are two versions you can readily add to your project – one for room-scale VR and one for stationary VR. Room-scale mode enables the player to walk around within a configured play area (for example, Guardian on Oculus or Chaperone on SteamVR). In stationary mode, the player is assumed to be seated or standing in place; they can still move their head to look around the scene, but the player rig is stationary.
Please decide which mode you would like to use in your project. Don't worry if you change your mind; they both use the same XRI components, but with different default settings that you can change as needed later on.
To replace the default Main Camera with a pre-configured XR camera rig of your choice, use the following steps. We'll also adjust its initial position so that it's a few meters back from the center of our ground plane:
- From the main menu, selectGameObject | XR | Stationary XR Rig orRoom-Scale XR Rig.
- Position XR Rig at Z=-3 (select XR Rig in Hierarchy, then in Inspector setTransform Position Z=-3).
This adds two new objects to the root of your scene hierarchy: XR Interaction Manager and XR Rig. It also removes the default Main Camera from the Hierarchy, as XR Rig has its own Main Camera child object. At this point, if you have a VR device that's supported in Editor Play mode, when you press Play, you can enjoy your scene in VR!
Let's take a moment to explore what this XR Rig is made of.
Exploring the XR Rig objects and components
Using the GameObject | XR menu to add an XR Rig to the scene adds the XR Rig and XR Interaction Manager objects to the scene. Let's take a closer look.
Select the XR Interaction Manager object. In the Inspector window, you can see that it has a corresponding XR Interaction Manager component. XRI requires you have one XR Interaction Manager component in the scene so that you can manage communications between the interactors and interactables in the scene (we'll go into more depth about these and start using them in Chapter 5, Interacting with Your Hands).
The scene now also includes an XR Rig object, which has a child hierarchy of GameObjects. As shown in the following screenshot, it has an XR Rig component, which includes the option to set Tracking Origin Mode; for example, for room-scale (Floor) or stationary (Device). It also has aCamera Y Offset. This defines the camera's (player's head) default height above the floor and is needed when we're not using Floor as the tracking origin:

Camera Y Offset is pertinent for stationary tracking and will be applied to the rig's child Camera Offset transform. In stationary mode, the Y offset sets the child Camera Offset object to this fixed Y position. Conversely, in room-scale mode, the camera Y offset will be automatically set to zero and use the device's runtime tracking of the HMD to determine the eye level. The Camera Offset object is shown in the following screenshot:

The children of Camera Offset are the Main Camera, LeftHand Controller, and RightHand Controller objects. Like any camera in a Unity scene, the XR Rig's Main Camera has a Camera component, with default settings. But it also has a Tracked Pose Driver component configured as a Center Eye - HMD Reference pose source. Tracked Pose Driver, as its name suggests, tracks physical devices in 3D space, and in this case, it'll be tracking the head-mounted display device. The Main Camera's Tracked Pose Driver is shown in the following screenshot:

In the Hierarchy window, you can see siblings of Main Camera, which are the left- and right-hand controller objects. Each of these is a more complex combination of XR components, including the following:
- XR Controller: Interprets Input System events as XRI interactor position, rotation, and interaction states.
- XR Ray Interactor: Used for interacting with objects at a distance using raycasts.
- XR Interactor Line Visual: A helper component that gets line point and hit point information for rendering.
- Line Renderer: Renders the visual line that's cast from the controller when the user is in VR.
Aninteractor is an object in the scene that can select or move another object in the scene. This XR Rig uses a Ray Interactor by default that selects objects from a distance using a raycast in the direction the user is pointing. Another type is Direct Interactor, which selects objects when they're directly touching the target interactable object. An interactor requires an XR Controller component.
The XR Controller component converts physical device controller input, such as button presses, into interaction events, including Hover, Select, Activate, and UI button presses. You can also specify the model prefab for the hand to show in VR. Details of the XR Controller component are shown in the following screenshot, with the Model option highlighted:
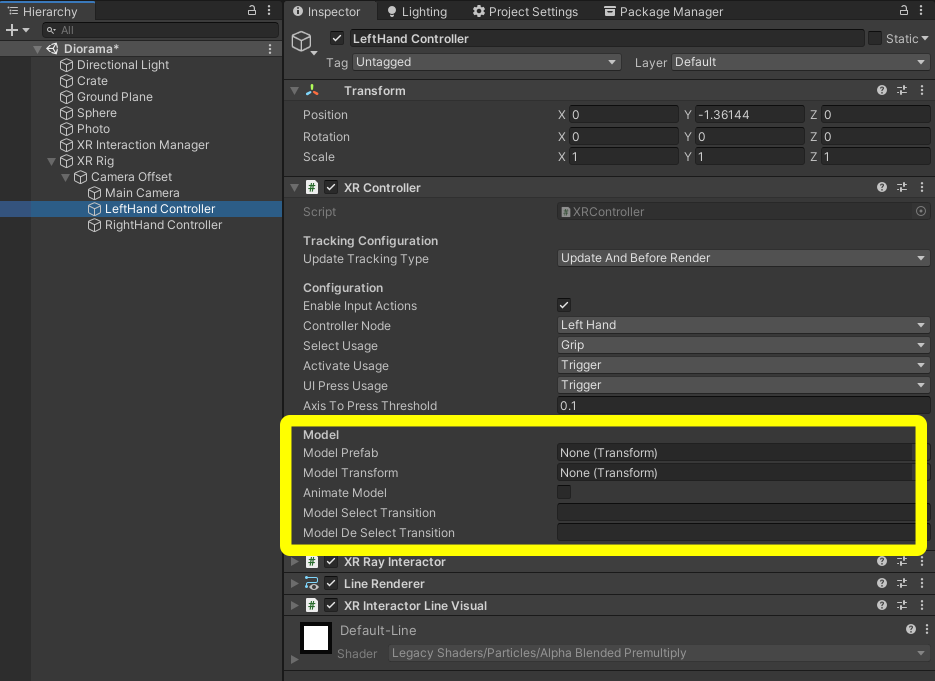
You also can see that, currently, the controller Grip button is used for selection, while the Trigger button will be used to activate an object or interact with UI elements.
The XR Interactor Line Visual and Line Renderer components are used in conjunction with Ray Interactor to display laser beam-like lines within VR so that the user knows where they're pointing. You may want to explore the many parameters that control the look of the rays.
Your scene is now set up with a camera rig that enables viewing in virtual reality. Depending on the VR headset you're using (for example, ones tethered to your PC), you may be able to press Play now and review the scene in VR. However, you should make sure you can build and run the project on your physical device too. Let's do that now.
Building and running your project
It's always a good idea to actually build and run your project as early as possible in your VR development projects. A good first time to try is once things are set up. Then, you can continue to iterate the develop, build, run, and test cycle frequently throughout development. I'll remind you of this as we develop our projects.
So far, you have set the target platform for your build, for example, as standalone Windows or Android. You've installed the XR packages and SDK required for your device. Finally, you've set up an XR camera rig in the scene using the XR Interaction Toolkit. Before you can build, you may also need to configure additional player settings.
Configuring the player settings
There are a wide variety of Player Settings you may need to configure, depending on your target platform.These control the runtime player that is deployed on the target platform and runs your Unity project. These settings include GPU rendering settings, scripting compiler configuration, and optimizations.
It is a good idea to get familiar with these settings as soon as possible. With each new project, for example, you should set Company Name (defaults to DefaultCompany) and Project Name (defaults to the name provided when you created the project in Unity Hub). Android projects require a Package Name (for example, com.[companyname].[projectname]).
I will provide the details of the settings required per platform/device in the corresponding topics later in this chapter. We will adjust them occasionally in the projects throughout this book. Some settings are required for any build to be run. Others are only needed to be configured when you're preparing to publish to a store. These settings are organized into panels, including Icons, Resolution And Presentation, and perhaps the most important catch-all (modestly named), Other Settings. Explanations can be found in the Unity Manual at https://docs.unity3d.com/Manual/class-PlayerSettings.html.
Building, running, and testing your VR project
Depending on your target device, you may have a few more things to set up before you can build and run. These will be addressed in the device-specific topics that follow in this chapter. Then, when you're ready, simply chooseFile | Build And Run(or use theBuild And Runbutton in theBuild Settingsbox).
The scene or scenes you can build are specified in the Build Setting dialog box's Scenes in Build list, as shown in the following screenshot. To add the current open scene, pressAdd Open Scenes. Alternatively, you can drag and drop a scene from theProjectAssets folder into the list. In multi-scene projects, the first one in the list will be the initial default scene that's loaded when your application starts; other scenes can be loaded via C# scripts by callingSceneManager.LoadScene (for scripting examples, see https://docs.unity3d.com/ScriptReference/SceneManagement.SceneManager.LoadScene.html):

When it's time to Build And Run, you'll be prompted to specify a folder for the build files. I recommend a folder namedBuilds/ in the root of your project.
The following screenshot shows the built app running in VR with the default laser raycast hands:

The rest of this chapter will continue to set up Unity and your development system software for the specific platform and device you plan to target. Please skip to the specific section that is relevant to you.
Building for SteamVR
This section describes how to set up and build your VR project so that it runs on a SteamVR supported VR device. VR applications that run on SteamVR are built using the OpenVR plugin. It can drive a variety of models of VR, including HTC Vive, Valve Index, Oculus Rift, and Windows MR devices; that is, basically all the major PC-based six degrees of freedom (6-DOF) VR rigs with trackable hand controllers.
Before you get started, ensure you have your VR device connected to the PC and that you're running the SteamVR runtime. This may include installing the Lighthouse base stations for the HTC and Valve devices that require it. If you're running SteamVR for an Oculus Rift, you also need to be running the Oculus desktop app. Likewise, if you're running SteamVR for immersive Windows Mixed Reality (WMR), you need to be running the Mixed Reality Portal. Test that you can see and interact with the SteamVR Home in the headset.
Setting up for OpenVR
TheOpenVR XR plugin is provided and maintained by Valve (not by Unity). At the time of writing, you must install the plugin usingPackage Manager using a GitHub URL. Please review the README instructions on the GitHub page at https://github.com/ValveSoftware/steamvr_unity_plugin before completing this section, as it may be more up to date than this book.
To target SteamVR, use the following Build Settings:
- Configure your UnityBuild Settingsso that they target the Standalone platform, if they aren't already (File | Build Settings... | PC, Mac & Linux Standalone | Switch Platform).
- SetTarget Platformto Windows andArchitecture to x86_64.
Use the following steps to install the OpenVR XR plugin:
- Open the Package Manager window usingWindow | Package Manager.
- Press the + button in the upper left of the window.
- Select Add Package from GIT URL.
- Paste in the following URL: https://github.com/ValveSoftware/steamvr_unity_plugin.git#UnityXRPlugin.
- Open XR Management Settings using Edit | Project Settings | XR Plug-in Management.
- If you see OpenVR in the Plug-in Providers list, check its checkbox.
- You will see that the OpenVR plugin is now listed under XR Plug-in Management. Click it to review its settings.
The OpenVR plugin has several options. Generally, you'll keep the default values, as shown in the following screenshot:

If you pressPlaynow, you should see the scene playing in your VR headset. At this point, it's also advised that youBuild And Runthe project to verify it will build correctly and run as expected in your VR device.
The SDK we've installed is sufficient for the projects in this book. We are going to use the XR Interaction Toolkit, including the Tracked Pose Driver, for the left- and right-hand controllers. However, Steam provides an alternative input system that uses the SteamVR input bindings and 3D controller models.
Installing the SteamVR Unity Plugin toolkit
As a SteamVR app, you have the option of using the SteamVR plugin for the Unity toolkit from Valve Software, which provides user rebindable inputs, skeletal inputs, 3D controller models, and more, including an example interaction system with useful scripts and assets and some pretty good example scenes that are fun and instructional. Details can be found at https://valvesoftware.github.io/steamvr_unity_plugin/articles/intro.html.
For the projects in this book, we do not depend on having this toolkit installed, and it is best to not try to mix the SteamVR Unity Plugin toolkit assets with the Unity XR ones in your project scenes, especially while you're learning the basics of VR development and following along with our project tutorials. I recommend that you do not install it here. For your own projects, however, you can decide to use the SteamVR Input System instead of the Unity one, especially if you plan to only target the Steam Store and target only the desktop VR devices supported by SteamVR.
To install the SteamVR Plugin version that is compatible with XR PluginManagement from GitHub, use the following steps (subject to change in the future):
- In your web browser, go to https://github.com/ValveSoftware/steamvr_unity_plugin/releases and choose the current Assets file link to begin the download.
- Import the package into Unity using Assets | Import Package | Custom Package or simply drag and drop the package file into the Project window.
- At the bottom of the Import Unity Package window, select Import.
- Since we're using the Universal Render Pipeline, you should convert the imported materials by selectingEdit | Render Pipeline | Universal Render Pipeline | Upgrade Project Materials.
The package installs several new folders in your ProjectAssets/, including SteamVR/, SteamVR_Resources/, and StreamingAssets/SteamVR/. If you drill down into the Assets/SteamVR_Resources/Resources/ folder and select the SteamVR_Settings, you will be able to see the current settings in the Inspector window, as shown in the following screenshot:

Please refer to the plugin documentation for details on the features and usage of the assets. For example, in your own projects, you can choose to replace our XR Rig camera rig with the [CameraRig] prefab provided with the SteamVR Plugin, which can be found in the Assets/SteamVR/Prefabs/ folder and is used in their various example scenes. The plugin includes the following:
- Render Models: The virtual 3D models of the hand controllers adapt to the actual physical VR device the player is using.
- SteamVR Input: Manage user input actions. Handles user rebindable input mappings that are controlled from a .JSON file and are accessible via the Window | SteamVR Input window.
- Skeleton Input: Hand animation with a full finger and joint estimates and range of motion.
- Interaction System: A set of scripts, prefabs, and other assets that serve as examples. These can be used in your own projects.
- Skeleton Poser: Tools you can use to design your own hand poses and finger constraints, used together with Skeleton Input.
If you don't need to set up an additional VR device, you can move onto the next chapter. We will consider the setup for Oculus Rift next.
Building for Oculus Rift
This section describes how to set up and build your VR project on an Oculus Rift desktop VR device. Using a Rift requires the Oculus Windows app to be running, and in Unity, you'll build with the Oculus SDK. (Alternatively, you can build for OpenVR and run your Oculus in SteamVR, in which case, follow the instructions in the previous section instead).
Using the Oculus SDK is required if you plan to publish on the Oculus Store or use any of the many advanced Oculus Integration platform features, including avatars, in-app-purchases (IAP), achievements, and more. See https://developer.oculus.com/platform/ for a list of features that are part of the Oculus platform solutions.
Before getting started, be sure you have your Rift connected to a PC (or a Quest connected with an Oculus Link cable) and that you're able to see and interact within the Oculus Home environment.
Setting up for Oculus desktop
To target the Oculus desktop, use the following Build Settings:
- Configure your Unity Build Settings so that they target the Standalone platform, if they're not already (File | Build Settings... | PC, Mac & Linux Standalone | Switch Platform).
- Set Target Platform to Windows and Architecture to x86_64.
Now, if you haven't already, add the Oculus XR plugin using the following steps:
- OpenXR Plugin Management in Project Settings using Edit | Project Settings | XR Plug-in Management.
- In the Plug-in Providers list, check the Oculus checkbox.
- You'll now see the Oculusoption in the left tab menu. Select it.
- Optionally, setStereo Rendering ModetoSingle Pass Instancedfor better performance.
Notice that the Oculus SDK has several options. By default,Shared Depth Buffer and Dash Support are enabled. These allow the Oculus system software to render into the same view while your app is running, for example, for popup Dash menus. The Oculus plugin options are shown in the following screenshot:

If you press Play now, you should see the scene playing in your VR headset. At this point, it's also advised that you Build And Run the project to verify it will build correctly and run as expected on your VR device.
The SDK we've installed is sufficient for the projects in this book. However, Oculus provides a rich collection of optional tools in the Oculus Integration toolkit.
Installing the Oculus Integration toolkit
As an Oculus app, you have the option of using the Oculus Integration toolkit for Unity, which is built on top of the native XR SDK. Oculus maintains this plugin, which provides advanced rending, social platform, audio, avatars, lipsync, and more. For the projects in this book, we do not depend on having this toolkit installed, but from time to time, we may give additional tips on using it to enhance a project. To install the Oculus Integration toolkit from the Asset Store, follow these steps:
- In your web browser, go to https://assetstore.unity.com/packages/tools/integration/oculus-integration-82022.
- Click Open In Unity and Install it into your project.
- If prompted, also allow updates to the OVRPlugin for the Unity Editor and/or other assets.
- Since we're using the Universal Render Pipeline, you should convert the imported materials (Edit | Render Pipeline | Universal Render Pipeline | Upgrade Project Materials).
The package installs a lot of stuff under the Project Assets/Oculus/ folder. I encourage you to explore the various subfolders, open example scenes, and even read through the scripts. A good place to start is StartScene in the Oculus/SampleFramework/Usage/ folder, as shown in the following screenshot:

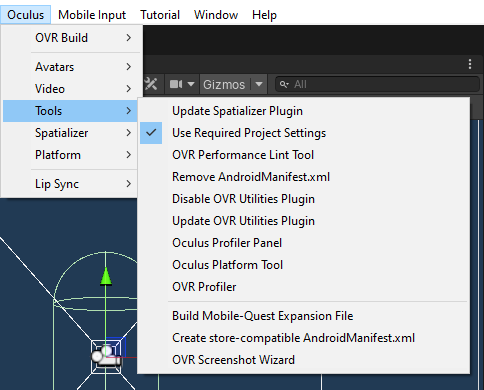
The Oculus package also installs helpful menu items on the Unity Editor menu bar's Oculus menu. We won't go into details here, and they are subject to change. We encourage you to explore the options and shortcuts they provide. For more information on the Oculus Integration toolkit for Unity, see https://developer.oculus.com/unity/:
In your own projects, you can choose to replace our XR Rig camera rig with the OVRCameraRig prefab provided in the Oculus Integration, which can be found in the Assets/Oculus/VR/Prefabs/ folder. It is used in their various example scenes.
If you do not need to set up an additional VR device, you can move on to the next chapter. Next, we will consider the Windows Immersive Mixed Reality setup.
Building for Immersive WindowsMR
This section describes how to set up and build your VR project so that it runs on a Windows Mixed Reality (WMR) immersive VR headset. This allows it to be run on Windows 10. You can choose to target Standalone / Windows in Build Settings or Universal Windows Platform for development. (Alternatively, you can build for OpenVR and run your WMR device in SteamVR, in which case, follow the instructions in that section instead). However, to publish to the Windows Store, you must build to target Universal Windows Platform.
Microsoft's 3D media Mixed Reality strategy is used to support a spectrum of devices and applications, from virtual reality to augmented reality. This book and our projects are about VR. At the other end of this spectrum is the Microsoft HoloLens wearable AR device. Developing for MR requires that you're using a Windows 10 PC and have Visual Studio installed. At the time of writing, the minimum requirement is Visual Studio 2019 (16.2 or higher). See https://docs.microsoft.com/en-us/windows/mixed-reality/install-the-tools for more details. Targeting the Universal Windows Platform and using the Windows Mixed Reality SDK are required if you plan to publish on the Windows Store. We'll set that up now.
Before getting started, be sure you have your WMR headset connected to the Windows 10 PC, that Mixed Reality Portal is running, and that you're able to see and interact with the home environment.
Setting up for Immersive WMR
To target Windows Mixed Reality VR devices, you can target the Standalone / Windows platform, as follows:
- Configure your UnityBuild Settingsso that they target the Standalone platform via File | Build Settings... | PC, Mac & Linux Standalone | Switch Platform.
- SetTarget Platformto Windows andArchitecture to x86_64.
If you plan to publish on the Windows Store, you need to target the Universal Windows Platform. In that case, I recommend that you develop and build for that target early in your development process by setting it up as follows:
- Configure your Unity Build Settings so that they target Universal Windows Platform via File | Build Settings... | Universal Windows Platform | Switch Platform.
- If you do not see Universal Windows Platform in the platforms list, or when you pick it if you see a message stating that the module is not loaded, you may need to go back to Unity Hub and install the module, as described earlier in this chapter.
- Set Target Device to Any Device.
- Set the Architecture to x64.
- Set Build Type to D3D.
If you see a warning about missing components in Visual Studio, don't worry – we'll address that soon. Next, add the Windows Mixed Reality plugin to your project using these steps:
- OpenXR Plug-in Management in Project Settings using Edit | Project Settings | XR Plugin Management.
- In the Plug-in Providers list, check the Windows Mixed Reality checkbox. This will install the SDK files.
- You'll now see the Windows Mixed Reality option in the left tab menu. Select it.
Examine the Windows Mixed Reality settings, as follows:

If you press Play now, you should see the scene playing in your VR headset. Before you can build and run your project, though, you need to ensure you have the necessary Visual Studio components installed.
Installing Visual Studio workloads
Visual Studio is a powerful integrated development environment (IDE) for all kinds of projects. When we build for UWP from Unity, we will actually build a Visual Studio-ready project (a .csproj file) that you can then open in Visual Studio to complete the compile, build, and deploy process, which will allow you to run the app on your device.
To build for UWP, ensure you have the required Visual Studio workloads, as follows:
- From Unity, open your C# project in Visual Studio (Assets | Open C# Project).
- In Visual Studio, select Tools | Get Tools and Features from the main menu.
- Select theWorkloadstab and choose the .NET Desktop Development andDesktop Development with C++ workloads, and then pressModifyto install it (if it's not already installed).
- Choose the Universal Windows Platform Development workload and then press Modify to install it (if it's not already installed).
- You may find that you'll need to download and install additional .NET targeting packs. If you see a message to that effect when you build, follow the instructions provided.
My Workloads section looks as follows. The ones with the checkboxes ticked have been installed:

In order to sideload unsigned UWP apps and debug them, including development projects built with Unity and Visual Studio, you need to enable Developer Mode in Windows on your PC. In your Windows 10 desktop, open the For Developer settings (in Windows, go to Start | Settings | Update & Security | For Developers) and select Developer Mode.
At this point, it's also advised that you Build And Run the project to verify it will build correctly and run as expected on your VR device. The SDK we've installed is sufficient for the projects in this book. However, Microsoft provides a rich collection of optional tools in the Mixed Reality Toolkit.
Installing the Mixed Reality Toolkit (MRTK)
As a Windows MR app, you have the option of using the Microsoft Mixed Reality Toolkit (MRTK) for Unity, which is built on top of the native XR SDK. Microsoft maintains this project, which provides high-level support for both immersive MR headsets, OpenVR headsets, and HoloLens. MRTK is a richly featured, well-designed, device-independent software toolkit. You can read more about its architecture at https://microsoft.github.io/MixedRealityToolkit-Unity/Documentation/Architecture/Overview.html. It is an open-source project and can be found on GitHub at https://github.com/microsoft/MixedRealityToolkit-Unity.
The projects in this book do not depend on you having this toolkit installed. If you would like to use it in your own projects, follow the latest getting started instructions at https://microsoft.github.io/MixedRealityToolkit-Unity/Documentation/GettingStartedWithTheMRTK.html. Note that some of the prerequisites and instructions that are given pertain to HoloLens development and are not necessary for VR devices. To install MRTK, follow these steps:
- Browse to the MRTK Releases downloads page at https://github.com/Microsoft/MixedRealityToolkit-Unity/releases.
- Click the specific packages to download; such as the following, for example:
- Required: Microsoft.MixedReality.Toolkit.Unity.Foundation.2.1.0.unitypackage
- Optional: Microsoft.MixedReality.Toolkit.Unity.Tools.2.1.0.unitypackage
- Optional:Microsoft.MixedReality.Toolkit.Unity.Extensions.2.1.0.unitypackage
- Other example packages may be fun and useful
- Once downloaded, drag each .unitypackage file into your Project window to install them (or use Assets | Import Package | Custom Package) and click Import.
- Note that the package adds a new Mixed Reality Toolkit menu to the main menu, as shown in the following screenshot. Convert the imported materials into Universal RP using Mixed Reality Toolkit | Utilities | Upgrade MRTK Standard Shader to Render Pipeline.
- Then, convert any example materials into URP using Edit | Render Pipeline | Universal Render Pipeline | Upgrade Project Materials:

The packages install several folders in your Project Assets, including ones named MixedRealityToolkit/, MixedRealityToolkit.Extensions/, MixedRealityToolkit.SDK/, MixedRealityToolkit.Tools/, and so on. I encourage you to explore the various subfolders, open example scenes, and even read through the scripts.
The toolkit includes a handy build tool that provides a shortcut to the build and player settings. For example, to build the project, follow these steps:
- Open the MRTK Build window, which can be opened using Mixed Reality Toolkit | Utilities | Build Window.
- Select Any Device in Quick Options.
- Click Build Unity Project.
In your own projects, you can choose to replace our XR Rig camera rig with the camera and input prefabs provided in the MRTK.
If you do not need to set up for an additional VR device, you can move onto the next chapter. Now, we will consider setting up Android-based mobile VR devices.
Building for Oculus Quest
This section describes how to set up and build your VR project on an Oculus mobile VR device, including Quest. Internally, these devices run Android, so developing from Unity has a lot in common with developing for any Android device. For VR, you set XR Plugin to Oculus and configure your project so that it builds and runs on the mobile VR device.
Before we begin, ensure your device is in Developer Mode, as follows:
- Open the Oculus companion app on the phone connected to the device.
- Go to the Settings menu (lower-right corner).
- Select the device (for example, Oculus Quest).
- Select More Settings | Developer Mode and switch it on, as shown in the following screenshot:

Next, we'll make sure you can build from Unity for a target Android platform.
Installing the Android tools
To develop VR apps that will run on Oculus Go and Oculus Quest (and other Android mobile VR devices such as Google Cardboard), you will need to set up your development machine for Android development. The requirements are not specific to virtual reality; they're the same for any Android app from Unity. The process is also well-documented elsewhere, including the Unity documentation athttps://docs.unity3d.com/Manual/android-sdksetup.html.
OK; let's get going. Developing for Android devices requires that you prepare your development system with the Android SDK, NDK, and JDK external tools (short for software development kit, native development kit, and Java development kit, respectively). Your current version of Unity may have been already installed with the Android Build Support module, including Android SDK & NDK Tools and OpenJDK. You can double-check this in Unity Hub by going to the Installs tab, clicking the three-dot button for your current release, and choosing Add Modules, as follows:

If necessary, install the missing tools. Your Unity configuration should then be automatically set up. You can check this by opening Unity and doing the following:
- Select Edit | Preferences… to view the configured external tools.
- Verify that JDK Installed with Unity is checked.
- Verify that Android SDK Tools Installed with Unity is checked.
- Verify that Android NDK Installed with Unity is checked.
This Preferences window can be seen in the following screenshot:

Now you can set up your project for Oculus mobile VR devices.
Setting up for Oculus mobile VR
To target Android-based Oculus mobile VR, configure your Unity Build Settings so that they target the Android platform viaFile | Build Settings... | Android | Switch Platform. Next, if it's not already installed, add the Oculus XR Plugin, as follows:
- Open XR Plug-in Management in Project Settings using Edit | Project Settings | XR Plugin Management.
- Click the Android tab.
- In the Plug-in Providers list, check the Oculus checkbox. The Oculus SDK will be installed.
- You'll now see anOculusoption in the left tab menu. Select it.
- PressCreateto create a serialized instance of the settings data in order to modify the default Oculus settings.
- Check the V2 Signing checkbox, especially if you're targeting Quest.
The Oculus settings for Android are shown in the following screenshot:

To preview the scene in your device, you could use OVR Scene Quick Preview, which is included with the Oculus Integration Toolkit. This will be described later in this chapter. If you have an Oculus Quest connected to your PC with an Oculus Link Cable and the Oculus Link settings are enabled, you can view your scenes in VR (for details, seehttps://support.oculus.com/525406631321134). Otherwise, if you pressPlaynow, you can run the scene in the editor's Game window but not remotely on the VR device. To see it in VR, you need to do a build.
Other Android and optimization settings
To build for an Android device, you also need to configure other PlayerSettings. Some settings are required for it to run, while others are recommended for it to run better:
- At the top, set Company Name and Product Name. The product defaults to the project name that was used when it was created via Unity Hub.
- In Other Settings | Package Name, set a unique app ID using a Java package name format. It defaults as a composite of the company and product names; for example, mine is com.UVRP3.VR_is_awesome.
- The minimum API level will vary, depending on your target device. Oculus Quest requires Minimum API Level: Android 6.0 Marshmellow (API Level 23). Oculus Go requires a minimum of Android 5.0 Lollipop (API Level 21).
There are many other options in Player Settings. Refer to the Oculus documentation for the current recommendations, including the following:
- https://developer.oculus.com/documentation/unity/unity-conf-settings/
- https://developer.oculus.com/blog/tech-note-unity-settings-for-mobile-vr/
- https://developer.oculus.com/documentation/unity/latest/concepts/unity-mobile-performance-intro/
Some of these current recommended settings include the following:
- Build Settings | Texture Compress: ASTC.
- Player | Other Settings | Color Space: Linear.
- Auto Graphics: Unchecked. OpenGLES3 should be the first in the list. Vulcan should be the second, if at all, but not on Go.
- Multithreaded Rendering: Checked.
- Also, review the recommended Graphics pipeline and Quality settings.
Give this a shot by clicking Build And Run.
The SDK we've installed is sufficient for the projects in this book. However, Oculus provides a rich collection of optional tools in the Oculus Integration toolkit.
Installing the Oculus Integration toolkit
As you're building an Oculus app, you have the option of using the Oculus Integration toolkit for Unity, which is built on top of the XR plugins. It provides support for advanced rendering, social platform interaction, audio, avatars, lipsync, and more. This is the same as what we had for Oculus Rift, which we mentioned earlier in the Building for Oculus Rift section. Look there for a discussion of this. In summary, to install the Oculus Integration toolkit from the Asset Store, follow these steps:
- In your web browser, go to https://assetstore.unity.com/packages/tools/integration/oculus-integration-82022.
- Click Open In Unityand Install it in your project.
- If prompted, also allow updates to the OVRPlugin for the Unity Editor or other packages.
- Since we're using the Universal Render Pipeline, you should convert the imported materials using Edit | Render Pipeline | Universal Render Pipeline | Upgrade Project Materials.
In addition to the collection of example scenes, frameworks, and Oculus platform support, it installs an Oculus menu in the main menu bar, which includes some shortcuts, especially for mobile VR development, as shown in the following screenshot:

Press the OVR Scene Quick Preview button to play the scene in your device. You may be prompted to install the OVR Transition APK. The Transition APK helps Unity launch your working scene in the device. After doing this, press Build And Deploy Scene to quick-build the scene for preview in the HMD. The dialog box is shown in the following screenshot:

To build and run this, press theOVR Build APK And Run option.
In your own projects, you may choose to replace our XR Rig camera rig with theOVRCameraRigprefab provided in the Oculus Integration package, which can found in the Assets/Oculus/VR/Prefabs/folder and is used in their various example scenes.
One more thing worth mentioning is that the Android Debug Bridge (adb) tool is something you should get to know sooner rather than later for installing Android APK builds and examining runtime logs. We'll take a look at this next.
Using adb
When you build a project from Unity, it creates an .apk file and installs it on the mobile device connected to your development machine. If you already have an .apk file, you can install it manually using the Android adb command-line tool.
The Android Debug Bridge (adb) is an important command-line tool that you should get to know so that you can communicate with an Android device for side-loading apps and debugging. It's included with the Android SDK. The full documentation can be found at https://developer.android.com/studio/command-line/adb. If you do not have the adb command on your system, you can install it as follows:
- Download Android Platform Tools from https://developer.android.com/studio/releases/platform-tools.
- Unzip the folder.
- Navigate to the folder containing adb.exe.
- Open the Terminal/Command Prompt at this folder. For example, in Windows Explorer, you can type cmd into the address bar.
I like to move the unzipped platform-tools/ folder into my /Program Files/ folder and add it to the Windows environment PATH.
Now, when you type adb devices at the Command Prompt, you should see the connected Android device. To install the APK file built from Unity, use the adb install [path to apk file] command. Other useful adb commands include the following:
- adb help: Lists the available adb commands
- adb devices: Lists the currently connected devices
- adb install [path to apk file]: Sideload installs an APK package on your device
- adb install -r [path to apk file]: Installs and replaces a package
- adb shell pm list packages -3: Lists the packages already installed on the device
- adb uninstall [packagename]: Removes a package from the device; for example, com.UVRP3.VR_is_Awesome
If you have trouble running adb install, you may need to add the Oculus ADB Drivers. Follow these steps to do so:
- Downloadthe zip file containing the driver from https://developer.oculus.com/downloads/package/oculus-adb-drivers/.
- Unzip the file.
- Right-click on the.inffile and selectInstall.
Adb can also be used to access the Android device logs, which are very useful when you're debugging:
- adb logcat -v time -s Unity >logs.txt: Streams the logs, filtered for Unity messages, and pipes them to the local logs.txt file. Run this command and then start your app.
- adb logcat -d -v time -s Unity >logs.txt: Dumps the most recent Unity log messages into logs.txt and exits.
- adb logcat -c: Clears the logs on the device.
Unity includes an Android Logcat package that adds support for displaying log messages coming from Android devices in the Unity Editor. Install the Android Logcat package via Package Manager (Window | Package Manager | All Packages | Android Logcat | Install). Then, open the window using Window | Analysis | Android Logcat. You can filter the message list; for example, using the Unity string.
If you do not need to set up an additional VR device, you can move onto the next chapter. Next, we'll consider setting up Google Cardboard for either Android or iOS.
Building for Google Cardboard
This section describes how to set up and build your VR project for Google Cardboard on a mobile phone, including Android smartphones and Apple iPhones (iOS). With this, you set up XR Plugin for Google Cardboard and configure your project so that it builds and runs on the mobile VR device.
Smartphone-based virtual reality is not as popular as it was when the previous editions of this book were written. Google no longer supports Daydream and has now open sourced the Cardboard SDK (https://github.com/googlevr/cardboard) as a baseline starter VR platform. Similarly, Oculus has dropped support for GearVR in its ecosystem. Nonetheless, Cardboard lives on, in both Android and iOS, as a fun and educational low-end VR display. The scene is displayed on the phone screen with separate left and right eye views that provide 3D stereographic viewing using a low-cost cardboard or plastic goggles with Fresnel lenses. Tracking is limited to three degrees of freedom (3DOF), which tracks your head's orientation in space but not its position.
Most of the projects in this book can run on smartphones with Cardboard, but maybe with some limitations. The only input device supported by Google Cardboard is a single button click. Unlike its next-level cousins (Daydream and GearVR), a Google Cardboard solution does not directly support Bluetooth hand controllers. However, a 3DOF handheld pointer controller can be bought for around $10 and used in your projects for pointing with a little extra work.
The following topics will review what it takes to set up your project for Google Cardboard with the Unity XR Platform on Android and iOS.
Setting up for Google Cardboard
The Google Cardboard XR plugin is an open source project supported by Google (not directly by Unity). At the time of writing, you must install the plugin usingPackage Manager using a GitHub URL. Please review the current Quickstart instructions on the Google page at https://developers.google.com/cardboard/develop/unity/quickstart before completing this section, as it may be more up to date than this book.
Use the following steps to install theGoogle Cardboard XR plugin:
- Open the Package Manager window usingWindow | Package Manager.
- Press the + button in the upper left of the window.
- SelectAdd Package from GIT URL.
- Paste the following URL: https://github.com/ValveSoftware/steamvr_unity_plugin.git#UnityXRPlugin.
- Open XR Management Settings usingEdit | Project Settings | XR Plug-in Management.
- Check the Cardboard XR Plugin checkbox in the Plug-in Providers list, as shown in the following screenshot:

Once the plugin has been installed, I recommend that you also install and review the "Hello Cardboard" sample package. In Package Manager | Google Cardboard Plugin for Unity, select the Samples | Hello Cardboard | Import button. In the installed assets is a sample scene called HelloCardboard you should open and try to Build And Run to verify your installation is complete and working, after finishing the following settings according to your platform.
The following Player Settings pertain to both Android and iOS projects. Open the Edit | Project Settings | Player window and do the following:
- In Player Settings | Resolution and Presentation, use the following setting:
- Default Orientation: Landscape Left
- In Player Settings | Splash Image, use the following setting:
- Show Splash Screen: Uncheck (Unity Plus and Pro only)
- In Player Settings | Other Settings, do the following:
- Specify the company domain under Package Name. Note that this defaults to the Company Name and Product Name fields at the top of the window.
Now, use these settings according to your target platform – Android or iOS.
Targeting Android for Cardboard
To target Android, configure your UnityBuild Settingsto target theAndroid platform, if it's not already (File | Build Settings... | Android | Switch Platform). Ensure your Unity install includes Android Build Support, along with the Android SDK and NDK tools and OpenJDK. See the Installing the Android tools section earlier in this chapter for more details.
Then, follow the instructions at https://developers.google.com/cardboard/develop/unity/quickstart for the specifics. I am not duplicating these instructions here because they are likely subject to change. Note that, currently, these instructions require you to create a Custom Main Gradle Template and edit the mainTemplate.gradle file in your project.
In the installed assets is a sample scene called HelloCardboard that you should open and try to Build And Run to verify your installation is complete and working.
Targeting iOS for Cardboard
This section will help you set up your Mac for iOS development from Unity for iPhones. The requirements are not specific to virtual reality; these are the same steps required for anyone building any iOS app from Unity. The process is also well-explained elsewhere, including the Unity documentation at https://docs.unity3d.com/Manual/iphone-GettingStarted.html. To participate in Apple's closed ecosystem, you must use a Mac as your development machine to develop for iOS. You will need to do/have the following:
- Have an Apple ID.
- Install Xcode.
- Set up a Provisioning Profile and Signing ID in Xcode.
- Configure the Unity Build Setting Target Platform.
- Configure the Unity Player Settings.
To target iOS, configure your UnityBuild Settingsso that they target theiOS platform, if it's not already (File | Build Settings... | iOS| Switch Platform). Ensure you have installed the iOS build modules using Unity Hub. Ensure your Unity install includes iOS Build Support. And, of course, you need to be developing on a Mac (OS X) and have Xcode installed (see https://docs.unity3d.com/Manual/iphone-GettingStarted.html).
Then, follow the instructions given at https://developers.google.com/cardboard/develop/unity/quickstart for the specifics. I am not duplicating the instructions here because they are likely subject to change.
In the installed assets is a sample scene called HelloCardboard that you should open and try to Build And Run to verify your installation is complete and working. Note that the iOS Cardboard companion app also needs to be installed on your phone so that you can run your Cardboard-based Unity project.
Summary
In this chapter, you set up your system for VR development and built your project for your target platform and devices using the Unity XR Platform features. We discussed the different levels of device integration software and then installed the plugins and packages that are appropriate for your target VR device. While we have summarized the steps, all of these details are well documented in the Unity Manual and on the device providers' sites, so I encourage you to look at the relevant up-to-date documentation as you get started. Be aware that things have changed as of Unity 2019.3+, so be sure you are looking at the documentation pertinent to the version of Unity you are using.
At this point, you should be able to preview your VR scene in Unity Editor's Play mode. You should also be able to Build And Run your project and install and run it as a binary directly on your device.
In the next chapter, we'll do more work on the Diorama scene and explore the techniques we can use to control objects in virtual reality. From a third-person perspective, we'll interact with objects in the scene (Ethan, the zombie) and implement gaze-based control.