3
EXPECTATIONS OF THE VIDEO EDITOR
The expectations referred to in the title of this chapter include the group of transfer functions and Soundtrack installation items that an editor would need to know to get their Final Cut sequence into Soundtrack. This chapter covers a variety of those types of topics, starting with installation of Soundtrack Pro, covering the transfer of files from Final Cut Pro to Soundtrack Pro, and then on to a more abstract discussion of the audio tasks that you, as a video editor, may need to accomplish. The assumption is that you are working on either all or part of your project’s audio in Soundtrack Pro and we are going to cover what needs to happen during the transfer of the files. After we cover the installation and transfer of files into Soundtrack Pro we’ll transition into the next chapter, which covers the interface and basic editing features of Soundtrack. This means that, if you want to move right into the interface of Soundtrack and its tools, you should skip ahead to Chapter 4.
Installation
If you are like a lot of Final Cut Pro users who have been on the platform since early versions, you might need to pull out the installation discs to install the additional audio content for Soundtrack Pro. Many editors get to the point where they simply don’t use the audio content often enough to justify a full installation. It will take some time and a sizeable chunk of space on the hard drive, but, if you need to work on audio for a project, it will likely be worth the investment. I’m not going to describe the installation process in detail here because I’m trusting that you know how to do it and that as a Final Cut Pro user you can find your way around a Mac. What I am going to do is explain what you’ll need to know about the installation and then explore some of the items that are actually installed.
Install Location
When you install Soundtrack, either with the original Final Cut installation or at a later time, you are able to choose to install the additional audio content or to leave it out. The primary reason it is sometimes left uninstalled is that it takes up over 22 gB of space. You can always install the extra content at a later time by using the Final Cut Studio installation disc and choosing only the Audio Content portion. Aside from the Soundtrack Pro application, the following content is optional:
- Surround Impulse Response files;
- Sound effects;
- Music beds;
- Music loops.
I prefer to install all items on a separate hard drive along with my sound effects library and Logic Pro Studio content. This keeps all extra files in the same place and I can take the content with me when I am on the road using my laptop. While laptops drives are constantly getting bigger, using up so much space with extra content can be an inconvenience. You will also get better performance when using a separate drive. To install the files on a separate drive, click the Folder icon in the Location column of the Installation dialog.

Figure 3-1 Installing audio content in a custom location.

In Figure 3-2 you can see what clicking on the Location drop-down menu looks like. If you want to place the files in a custom location, make sure the extra hard drive is connected and choose Other from the options. Navigate to the place you want to install the audio content and select it as the location. When you use Soundtrack with the drive attached you will have access to all of the content. When the drive is not connected, it will still show up in Soundtrack but will be highlighted in red to indicate that the files are not present. Simply hook in the drive and they will appear.
Next we will briefly cover what is in each installable option.
Surround Impulse Response Files
These files are part of the Space Designer reverb plug-in, which is used to create highly realistic acoustic space emulations such as the sound of a church, stage, or room. These are surround sound versions which can be used in the post process to create very realistic spaces in true surround. If you are working in surround, then these are a must have.
Sound Effects
The sound effects that ship with Soundtrack are pretty good. The collection includes everything from footsteps to gunshots, and explosions to ambient sound from various locations. While this collection is not enough to be a stand-alone sound effects library for large projects, it is enough to help out. I have used these sounds on numerous occasions when my 250 gB collection was lacking.
Music Beds
The music beds are a collection of music in varied styles and components. The collection houses fully completed pieces and also building block components that can be used to create new and original pieces of music. All music is royalty free; however, it is limited enough that some of the music will be easily recognizable to others that use the same library.
Music Loops
There is a smaller selection of music loops that is included primarily to provide access to ‘legacy’ content. These were used in earlier versions of Soundtrack and are probably the oldest set of music loops in the collection.
Dave’s Video Editor Perspective
Temp Music Tracks
Working with a music composer is a process that every filmmaker goes through at some point, and it can be a rich and fulfilling experience if you know how to communicate your ideas. By creating a temp track, or scratch track, that represents the mood you hope the music will evoke you will be better able to tell your composer what you are going for. And frankly, the music content in Soundtrack is loads of fun to play with and can give you pretty complex music tracks if you spend enough time. Be aware, though, that there are thousands of loops and the tendency is to hear them all before you decide on which to use. (If you live with someone, wear headphones if you want to get along.)
Often, when you are editing, you need to have music to fill the dead spaces to see how the video is cutting together, and these tracks can really augment and inspire your editing process. The problem I have encountered is that once I get used to hearing the track I created using Soundtrack loops, the music the composer writes never seems to live up to what I’ve become accustomed to.
Sending Sequences to Soundtrack
One of the really powerful features of Final Cut Pro is the ability to send files and sequences directly to Soundtrack. This integration is a promise of potential collaboration that could be truly amazing. I have had enough experience with this feature, however, to know that it is not yet a perfect system. In fact, I will make some specific recommendations on how to use it and how to avoid some terrible time-wasting situations. I will also make a plea for future functionality and explain what it would take to make this tool unbeatable.
Explanation of Send to Soundtrack Options
There are three different Send to Soundtrack options. The first, Send to Soundtrack Pro Audio File Project, allows you to send an isolated clip (or clips) into Soundtrack for editing. Each clip is opened in an audio file project, which is similar to opening a video clip in its own preview window. You can look and edit, but can’t layer it with other clips as you would in a sequence. When you save the file in Soundtrack, the clip is automatically updated on the originating sequence in Final Cut. If you resend the same clip back to Soundtrack, you can continue editing the file and have access to saved actions (rendered processing) that you may have previously completed in Soundtrack, which is similar to having access to the complete undo history. The clips are updated in Final Cut every time you save the project, thus providing a powerful way to edit clips in a dedicated audio editor without compromising sync and file locations. If you have your scratch and media locations set correctly in Soundtrack and in Final Cut, your files will remain in the desired locations. There is an explanation of the Soundtrack file locations below.
The second option, Send to Soundtrack Pro Multitrack Project, is to send an entire sequence into Soundtrack and edit/mix the sequence in a multitrack project. A multitrack project is very similar to the sequence functionality in Final Cut, but with a focus on audio editing and mixing. No matter what type of Send to Soundtrack you use, the video can be sent along, which makes the process of getting the files into Soundtrack very easy.
The third option, Send to Soundtrack Pro Script, uses Applescript technology to allow you to create presets that can then be efficiently applied to multiple clips on your Final Cut timeline. How to use the scripts will be introduced in this chapter even though some of the details of using Soundtrack won’t make sense until later chapters.
Send to Soundtrack Pro Audio File Project
If you want to take advantage of the power of Soundtrack without transferring your entire project, then Send to Soundtrack Pro Audio File Project is the best option. It allows you to send a clip, or group of clips, into Soundtrack for basic editing without compromising synchronization. To send a file to Soundtrack, right-click on a highlighted clip, select Send To, and then choose Soundtrack Pro Audio File Project from the submenu (see Figure 3-3).
Immediately, a dialog will appear asking you to name the file and choose the export location, and giving you the option to Send only referenced media, which means that only the clip portion visible on the Final Cut timeline would be sent with handles on either side. I recommend leaving this unchecked because you never know when you might need to pull a portion of the file that isn’t currently visible and it becomes hard to do once you send only the referenced media.

Figure 3-3 The Send to Audio File Project option.

Figure 3-4 The Send dialog.
The issue is that clips from the Final Cut timeline are converted to Soundtrack project files when they are sent to Soundtrack. They won’t look or sound any different, but they reference a completely different file. After you add effects or change levels, you will need to save the file before it will reflect the changes in Final Cut. When you press Save, a dialog will typically appear (see Figure 3-5) the first time to ask if you would like to either reference the same files that the Final Cut sequence does, or create a copy. The dialog warns that, if you reference the audio, you will need to have the Final Cut project available at any time you wish to edit the Soundtrack project. The reason I prefer not to reference the audio is because it is nice to edit a separate copy of the files and it acts as a guard against accidental deletion or permanent alteration.

Figure 3-5 Choose Include Source Audio.
Another strength of adding effects using the Send feature in Final Cut is that all clips that were sent to Soundtrack individually for processing retain editability when the whole sequence is sent to Soundtrack as a multitrack project. This means that even though you may have sent a few files into Soundtrack for noise reduction, you will be able to look at, alter, or delete the noise reduction processes at any time. This may not seem like a big deal, but all audio filters in Final Cut are removed from the audio clips when the sequence is sent to Soundtrack. In fact, there are no transfer protocols (OMF [open media framework], AAF [advanced authoring format], etc.) that allow the Final Cut filters to transfer to any audio software system. If you want your audio processing to remain in place when the project is sent for audio editing and mixing, then using Send to Soundtrack for individual clips is a huge time saver and means all work you do on the audio is preserved for the future. Also, just as importantly, anything that is processed through Soundtrack may be reversed in the audio editing and mixing phase.
File Management
Much like Final Cut, Soundtrack relies on scratch locations for capturing and editing audio. You will set these by navigating to Soundtrack Pro > Preferences > General. Near the bottom in the File Management section (see Figure 3-6) you will see two file management locations. The first, Scratch Location, is used when recording audio. The second, Edited Media Location, is used for storing files created through the editing process. I recommend choosing locations near your Final Cut project file locations.

Figure 3-6 General Preferences.
One other thing that is important is the Save Audio File Project option. This is discussed early in the chapter in regard to sending individual files to Soundtrack. For that task, it is recommended that this option be set to Includes Source Audio to prevent accidental tampering with Final Cut files. While working with multi-track projects in Soundtrack, I recommend setting it to Reference Source Audio. After you have sent your sequence to Soundtrack and completed the initial save (discussed below), switch this option to Reference Source Audio. Otherwise, each edit you make
Dave’s Video Editor Perspective
Setting Scratch Disks
In Final Cut it is essential that you set your scratch disks each time you start a project. If you are working on a computer that is shared with multiple users you should really check the scratch disk location each time to ensure that the settings are the same as previous sessions. It should become a habit that every time you launch Final Cut you check your scratch disk location. As you work on more and more projects you’ll see that the number of media files associated with your projects gets larger and larger, and it is good practice to keep associated media files in the same folders in case there is any reason to locate, move, or delete a file. If you have media scattered all over your system on various drives and then try to move to another system, you may not have all the media files required to see your entire timeline. You will get a red dialog saying Media Off-line, and this is usually not good. Later, when the project is completed, you will want to back up the media, and keeping everything in one place will save time and energy trying to locate all of the associated media files. I always put the Waveform files and Thumbnail files in the same folder as well. Final Cut calls every Waveform and Thumbnail folder the same thing, so it will be better if you keep them in the same place for simplicity’s sake.
It is also recommended that you set your capture scratch disk to be on a hard drive that does not also house the operating system (OS) and the Final Cut application. The computer will function more efficiently and you won’t fill up your OS hard drive, thus degrading its performance. I would also recommend setting your auto save location to a hard drive that is different from where you are saving the project file. If you lose your project file because your hard drive has malfunctioned, you can always restore the edit session if you can find the auto save file associated with your edit, but obviously, if it’s on the same hard drive, it too will be gone.
To complicate matters, Final Cut is set by default to open the last opened project when you launch the application. So, if someone else begins to edit on that computer and does not set the scratch disks, it will start putting media in the scratch disk folders you were using in your last edit. It then can get sticky if you, or the other person, decides to do some housecleaning and starts dumping files you don’t recognize. I would therefore recommend going to Final Cut Pro > User Preferences and in the General tab deselecting Open last project on application launch. This way no one will accidentally start using your project’s scratch folders.
Final Cut does have a Media Manage tool that is great for moving, copying, and consolidating all the media associated with your file, but if your project is very large this tool is not always flawless. It usually works pretty well, but you don’t want to have to use it to clean up your media when you could have easily organized it before you started capturing it. Again, this is especially true when you have a system where there is more than one user.
So, setting your scratch disk in Soundtrack is equally as important as setting it in Final Cut, but there are fewer settings to consider. I would recommend that you put this folder in with your Final Cut scratch disk folder and call it STP_ProjectName_Media, or something that clearly identifies its contents.
and file that you record will be saved in the Scratch and Edited Media Locations and also copied into the Soundtrack project file when you save the project. This redundancy can become quite confusing and is unnecessary. Also, it can be an efficiency killer because, after completing a large number of edits and file creations, Soundtrack will pause to copy all of the files and you will have to sit and wait. If you set this correctly, that will never happen.
Send to Soundtrack Pro Multitrack Project
Sending your sequence to Soundtrack is designed to be an easy process. The method of transferring is easy, the layouts are similar in both Final Cut and Soundtrack, the key commands are similar, and the overall feel is designed to be the same. If it weren’t for the fact that Soundtrack needs to be an autonomous software package to have a chance at competing in the world of audio post-production, it would make more sense to simply incorporate all of the plug-ins and effects directly into Final Cut, and remove the hassle of having a separate application. At the present time, there are few video/audio platforms that are more closely integrated. If you opt out of using Final Cut filters for the Send to Soundtrack functionality, then nearly all audio prep work in Final Cut will transfer into the Soundtrack timeline.
Transfer Process
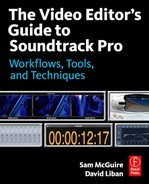
The easiest way to send your sequence to Soundtrack is to right-click on the sequence name in the Final Cut project Bin and choose Send To > Soundtrack Pro Multitrack Project (see Figure 3-7). A dialog appears that asks what to name the export, where to save it, whether or not you want to have it open immediately in Soundtrack, whether you would like a fully rendered video or just the base layer, and whether or not you want it saved with the latest clip metadata.
Aside from names and locations, the defaults for the options are usually perfect. The primary exception to this is when you want a different resolution video file from the sequence. In that case, you would turn off the video export and do it separately straight from the Final Cut sequence. This is a good idea when you want a smaller video for portability or simply because the original resolution is too big for your audio computer to handle. When you work on the same computer for audio and video, it will normally be able to handle the exact same video settings and you wouldn’t need to export a separate version. As for having it open immediately in Soundtrack, this depends on why you are exporting. If you want to

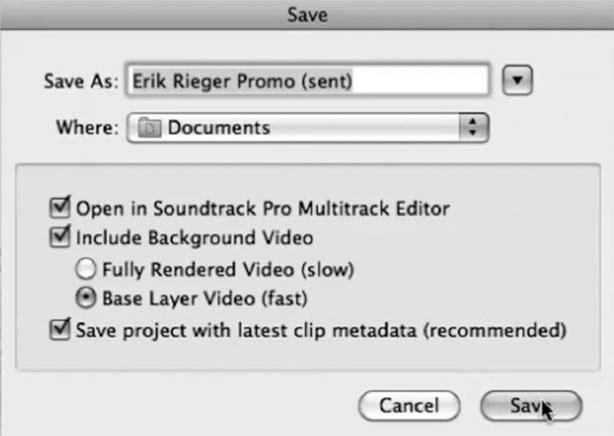
Figure 3-8 Send to Soundtrack dialog.
get right to work then have it open right away. If you are exporting an updated sequence to begin the Conform process with an older Soundtrack file, then you would turn this off because it is easier to begin the Conform process with it closed.

Figure 3-9 The sequence in Final Cut.
Once the Send function is complete and you have opened the project in Soundtrack, there are few things to remember.
- Opening a large project for the first time may take a few minutes because Soundtrack needs to build all of the graphic waveforms for the audio. Unlike Final Cut, Soundtrack cannot turn this feature off.
- Soundtrack and Final Cut handle audio playback in the same way using the system audio settings. If you hear sound in Final Cut, you shouldn’t have to change anything when Soundtrack is loaded.
- Double-check your Scratch and Edited Media Locations (see Figure 3-6). It is highly recommended that these be located near or in your Final Cut project folders for organizational purposes.
- Set the Save Audio File Project option in the Preferences to References Source Audio (see Figure 3-6). This is important in terms of file management.
- If you chose not to export a video layer during the send process you will have to manually import the separately exported video. Otherwise, the video will automatically show up.
If the transfer is all happening on one computer and the project will not be copied to another for audio work, you should not need to prepare the Final Cut sequence at all. If the project is quite large and you will be moving it to a new machine, performing a media manage might help out. The media manage will allow you to trim off excess files and create handles on the clips used in the timeline. This, combined with exporting a smaller video file outside the send process, will help keep the project sizes lower and more manageable. There are a few additional steps involved so it does take longer than the normal Send process; however, at least there is an option in such a situation.

Figure 3-10 The sequence from Figure 3-9 in Soundtrack.
Transfer Information
The Send to Soundtrack function is quite good at a number of things. The newly created Soundtrack multitrack session automatically matches the Final Cut sequence settings. The frame rate and audio sample rate will be identical and you should never have to worry about them. Of course, though, you should confirm that they are correct. Later in this chapter we will discuss the interface and you will see where this information is stored.
For all the audio information that is transferred, you should at least find your clips in the right place and at the correct time code locations. The Soundtrack project should be identical to the Final Cut sequence in almost every way. There are, however, a few things that do not transfer. This is important to know because it may change the way you work in Final Cut if you plan on moving into Soundtrack for the mix. The items that do not transfer are:
- Audio filters;
- Pan settings on stereo pairs;
- Audio fades (in and out) – this is not documented in the Final Cut manual;
- Exact audio levels (these are very close but not exact) – this is not documented in the Final Cut manual;
- Audio generators.
It would be nice if these items would all transfer correctly, but at least everything else does, though I would be hesitant to make any 100% assurances: all sessions should be examined after each transfer. With the latest versions of both Soundtrack and Final Cut, I have had very good experiences, far superior to using OMF or AAF. This is especially true when you consider some of the things that do transfer:
- Cross-fades;
- Nearly exact clip level (close enough to preserve the sound of the mix);
- All clips and clip histories processed using the Send to Soundtrack function;
- Video and sequence settings;
- Markers;
- Metadata;
- Enabled/disabled clip status.
Enough data transfers correctly that it is fine to use the Send to Soundtrack function. The issue of the levels being slightly different is a point of slight concern, but they are repeatable and in any case only slightly different to the original Final Cut levels. Part of the issue is in the graphic shape of the rubber banded levels. Final Cut draws with curves where Soundtrack draws with straight lines (see Figures 3-11 and 3-12).
Figure 3-11 Audio automation in Final Cut with curvy lines.

Figure 3-12 Audio automation in Soundtrack with straight lines.
While there is a slight difference in the levels, the majority of instances sound nearly identical. Normally, for an audio engineer, this would be a bust because the keyframes do not transfer exactly the same. However, the data transfers in the exact same way each time and this repeatability, even if slightly different to the original, is reassuring. It is the repeatability that makes it workable. Other clip levels that are adjustable in Final Cut without the use of keyframes are also a little off in Soundtrack. What should be a straight line in both programs often turns into a slight slope in Soundtrack. The difference is almost always inaudible because it ends up being less than a single decibel (a 3dB change is the normal minimum change required for the average listener to notice a difference). It is unnerving to look at the resulting project and see slopes in the audio level that weren’t there in Final Cut, but it is rarely a problem that goes beyond resolvable. As stated earlier, all Soundtrack projects need to be examined after the transfer process.
There is another quirk regarding fades in the transfer. Cross-fades transfer with frame-accurate edges, while fades in and out of audio files don’t transfer at all (see Figures 3-13 and 3-14). You might notice in Figure 3-13a and b that the cross-fades don’t look exactly the same. The original Final Cut cross-fade is a little lopsided while the Soundtrack cross-fade is symmetrical. This is another example of data moving from Final Cut to Soundtrack almost exactly but without actually being identical.
Send to Soundtrack Pro Script
This is one area that we are going to explain in principle, but which to fully understand you will need to read further in the next few chapters. The concept is straightforward: take a set of effects in Soundtrack, create a script file based on the effects, use the script on a clip or set of clips in Final Cut Pro, and let Soundtrack do the work.

Figure 3-13 (a) The original cross-fade in Final Cut. (b) The resulting fade in Soundtrack.
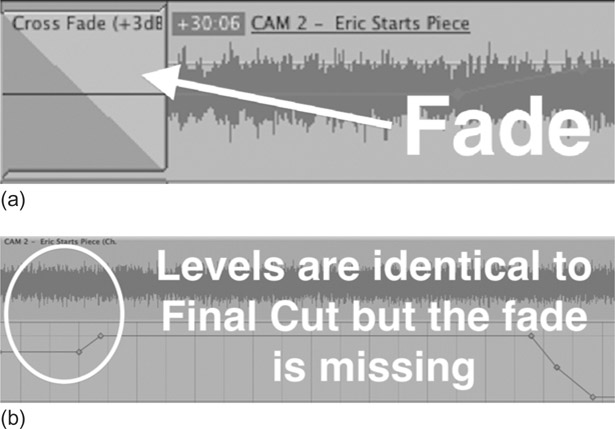

Figure 3-15 Right-click a clip in Final Cut to bring up the Send option.
The creation of a script typically begins in Final Cut and the process is as follows:
- Send a clip into Soundtrack as an audio file project, but not as a multitrack project.
- Process the clips with effects and processes.
- Save the file as an AppleScript in the File menu. Make sure to save it in the default location so that it will show up in both the Soundtrack Script menu and as a right-click option in Final Cut.
The script saves the effects and processes as a list of what you did to the file. This list can be applied to other clips and/or groups of clips. Once you send a group of clips to a Soundtrack Pro script, they are opened in Soundtrack, processed, and then closed. If the clips have already been sent to Soundtrack, this will happen without a dialog, but, if they haven’t been to Soundtrack yet, a dialog will appear warning you that the files will be altered permanently unless you permit them to be converted to Soundtrack project files. It is highly recommended that you say yes to this because if you don’t the script will permanently alter the files.

Figure 3-16 ‘Yes’ is the recommended answer.
The Conform Process
Once you have a Soundtrack multitrack project you can begin editing and mixing. All too often your worst fears will be realized by a change in picture. No matter what anybody says, picture is only locked once it is put on tape for broadcast or on a disc for distribution. Many independent filmmakers are too afraid to move the mix into Soundtrack because they want to keep changing the picture while polishing the audio. Even harder is the time constraint often put on projects that really need more time to edit the picture, let alone mix the audio. The Conform function makes a bold promise to, in part, fix this dilemma by allowing the audio mix to begin in Soundtrack while the picture is still being cut. I performed a lot of tests in Soundtrack Pro 2 to near-success; however, there were aspects of the process that just didn’t work correctly, for example files would end up missing or in the wrong place. Many times the cause of problems could be narrowed down to file types in Final Cut and not necessarily the Conform process itself. Either way, however, I made a number of project moves to compensate for picture changes by reading an EDL (edit decision list), cutting, sliding, and double-checking for mistakes, all without the help of the Conform tool because it wasn’t 100% reliable.
Things have tightened up in Soundtrack Pro 3, or at least they seem to have tightened up because complex changes are translating better in the Conform process. Nevertheless, no matter how good it is, I still recommend only using this tool for basic changes. I also don’t recommend working too much on audio until the final shots have been chosen because, if you do and things change, you will have wasted time and money. But when you have to work side by side with a picture edit, the Conform tool will help out.
The way it works is that you send a sequence to Soundtrack in the normal manner and work on the audio while the picture continues to be altered. Once the picture reaches another plateau, the updated sequence is also sent to Soundtrack. Soundtrack opens the projects together and compares the differences. It (with your help) merges the two and you get to keep working without losing a day’s work in manually conforming. In summary, the process is:
- Send the original sequence to Soundtrack.
- Edit the audio and video projects separately.
- Resend the updated Final Cut sequence to Soundtrack.
- While the active audio project is open, click on the Conform tab in the lower pane (see Figure 3-17).
- When you click on the Conform button, a dialog appears from where you can open the second project (see Figure 3-18).
- A third and unsaved/untitled project is created which represents the combination of the previous two projects. The Conform tab now contains a list of all files, changes, and deletions with a section on the right where you can approve or reject items (see Figure 3-19). You can always approve all by selecting Command + A and then pressing Approve. Once you are finished checking each item and feel confident that everything is correct, press the Finish button at the bottom right of the Conform tab. At this point you should save the untitled project.
The global project view at the top of the Soundtrack interface is very helpful in locating the files in the list. When you click on one, it shows as a yellow block instead of a green block. This helps in the troubleshooting process while conforming.

Figure 3-18 Choose Conform Project dialog.

Figure 3-19 A long list of items to approve for the newly combined project.
Dave’s Video Editor Perspective
The Conform Tool
Many filmmakers have small budgets and may not be able to hire the audio post personnel they’d really like to hire. But on occasion we will find the generous sound designer that will do your audio as a favor or for a small nominal fee. In those situations, you really have to provide picture lock and stick to it. If you don’t, and you keep asking to make changes after the Sound Designer has put a fair bit of work into the edit, you may find your luck has run out and friendships are strained. Personally, I feel that Soundtrack provides an opportunity for a filmmaker to do much of the sweetening themselves.
I love the notion of the Conform tool because it allows me to make changes as I work through the fine cut. More times than not, after I think I am done with the edit I will find something that I want to cut out, and that change will impact on the work on the audio mix. For example, when I am doing the final color correction and I work through the timeline shot-by-shot, I often find a breath or an ‘um’ which I wish I had cut out. The color correction and final audio mix often happens around the same time, and for this reason I always find something because of the ‘fine-tooth’ nature of this ‘combing.’ If I were doing the audio and video by myself, the Conform tool would allow me to cut those two frames from the Final Cut timeline and it would automatically adjust the Soundtrack timeline. This is really exciting for the DIY filmmaker. You are free to change the cut as much as you want without worrying about creating more work for the audio post personnel.
The Conform tool gives the independent filmmaker hope and a reason to get better acquainted with Soundtrack. Or, if you are going to work with an audio engineer, it will also allow you to really work on the audio without worrying about locked picture until you are ready to send it away.
Other Thoughts on the Video Editor Role
As a transition into the next chapter, in which you’ll have to put on the hat of audio editor, there are a few ideas I’d like to share. The first is that, as a video editor who will be working on audio, you’ll need to advocate for both sides. This is very important in keeping things organized and efficient. An advocate for video might press for the following items:
- Audio of high enough quality to ensure the picture edit is making sense;
- Special sound effects to help with the edit;
- Music beds and temp tracks;
- A listening environment that is adequate to hear while you are editing.
On the other hand, an advocate for audio might seek the following items:
- A locked picture cut before a transfer occurs;
- Organized tracks from the Final Cut sequence;
- Minimal editing beyond what is required for the picture edit;
- Easily undoable audio processing (if any at all);
- The use of processes and audio editing that will transfer from Final Cut.
The primary point is that it is easy to get carried away when you know that you will be both editing the picture and mixing the audio. Instead of letting the lines between the roles become gray, you should pretend that someone else is completing the audio. In the first place, you never know if it will be someone else. Secondly, once you mix the phases there is a greater chance that things will become disorganized and this will inevitably cause problems later, at the expense of time and likely money.
Another thing to think about is your listening environment. There is a whole section devoted to this later in the book, but in the transition process from video editing to audio mixing it needs to be considered. Working on audio in a less than ideal location will prevent you from doing the best job possible, just like adjusting the visual spectrum of a shot using color without the correct monitor. Read the chapter on acoustics and get things set up before you begin working on the audio mix.
The last thing I want to recommend to you is the use of reference projects to help your ears to have a point of departure. If you have access to projects that have been commercially released to the same format as the project you are working on, then have them ready to play back at various points in the mixing process. This is a way to make sure you are on track and that you are achieving appropriate end results. Ears work best in a comparative manner, and they are very good at distinguishing between the quality of two projects. Listening to the reference will tell you almost immediately if you are on or off track.