1
THE VIDEO EDITOR
What does it mean to be a video editor? It means finding order amongst the chaos. There are infinite possibilities to every edit you make and, while there are accepted practices, there is no right and wrong, just subjective interpretation. This is why editing is an art form most analogous to writing music mixed with writing fiction. The viewer knows if they like it or not, but it is up to the editor to guide them to a particular thought or emotion. Do you want them to be jolted into a perception or eased into a realization? Do you want them to feel uncomfortable or do you want them to feel content? The editor has this power to manipulate. Film as we know it is editing. The reason we love films and are engaged in the storytelling is because of the editing. A film that is not edited well and crafted with care is a film we may disregard or simply dislike.

Figure 1-1 The video editor (photograph by David Liban).
But to have this sort of control and awareness of your audience means you must have control and awareness of the media at hand. The editor is usually given the material they are editing, so they must work within this world. I believe those people who have edited projects with mediocre or poor footage will be better directors and better editors because they have seen the problems and hope not to have to revisit them.
Know Your Material
Not only do you need an awareness of your audience, but you must really know your footage. I don’t mean that you recall it when you see it, I mean you know your footage. The nuances of a moment; a meaningful glance; a train in the background. Having this sort of awareness is the difference between the good and bad editor. And, if you are like me, you don’t have a photographic memory, so you must find a way to organize your media so that you can instantly access it. Spending time scanning the same footage over and over is also the mark of an inexperienced editor. Some of this practice is hard to avoid, but if you sift through your media and segment it into small bits, and categorize those bits into ideas that you place in folders with appropriate labels, you are on your way to a thorough edit. Even the most creative of filmmakers cannot imagine what they might have missed by not going through this task. It’s this organization that provides for magical juxtapositions in the editing room. The script might have called for a particular edit from one shot to another, but because you know that one shot has the essence of a particular sound or image you can make connections far beyond what can be found in the script. This is why the edit is often called the ‘third rewrite,’ meaning the final delivery of the shooting script, then the result of what is actually shot, and finally the result when the editor has pieced together the story with those bits. This is what it means to be an editor.
Unfortunately, very little of the actual time an editor is working is pure creative work – there are loads of tedious and busy tasks to be carried out. The aforementioned organization, the client/director relationship, the cleaning of the image, and the sweetening of the sound are all aspects of the job. This is not a bad thing – it is just how it is, and I believe that it is all integral to obtaining the most effective final product. You need to know your footage and organize it; you need to know what the director/producer wants; you need to have the awareness of what constitutes a good image and a bad image, and what can be used or not; and of course you need good quality sound. The audience will forgive a poor quality picture before they forgive poor quality sound, so you as an editor must be able to identify these problems. Then you need to address them either by collaborating with an audio specialist or learning the tools and doing the work yourself. We as filmmakers are really quite fortunate to have these wonderful tools at our fingertips. Just 15 years ago it was unthinkable to have a full editing system in your home.
So in short, you, the editor, are an artist, a manipulator, a technician, and a magician. It’s all done with slight of hand, or a keyboard shortcut.
Workflow
The editor’s usual workflow may vary slightly according to whether they are acquiring footage on tape or a media card. You will need to refer to your camera’s manual in order to properly digitize and store its media on your computer’s hard drive. But, assuming that you have done that, the workflow is as follows. Capture; organize; reorganize; subclip; identify theme; identify easy scenes to work on and work on those first. I would always suggest avoiding starting at the beginning of your story, because that is always the first thing to change. Start with the easy things first because often we need to get into the flow of editing. If you start at the beginning, it seems like a monster that you simply cannot handle. Just think in little increments, and you’ll gain momentum and make natural transitions from scene to scene, given that you know your footage well. Do not get into trying to finish your film the first time around – that is not possible. Also, if you find yourself stuck on an edit for more than five minutes, move on. Come back to it with fresh eyes and you’ll see obvious answers reveal themselves. Just lay down shots at a reasonable pace knowing that you are going to clean the sequence up later. There may be times when you’ll have to focus on a cut to see if it will work, but most of the time make it quick and dirty. Do this with the notion of creating your ‘first assembly.’ This is not a cut you really want to show anyone, it’s just the framework or outline of the project. From here you can start to fine-tune and begin to make it slick.
The next milestone of your edit would be the rough cut. This means the edit’s more-or-less in place, but with little or no attention given yet to audio mix or color correction. It’s the cut you’ll show people for feedback. This is where you get ideas from others on what is working and what is not. Take notes and try to distinguish between what of the feedback is useful and what is not. I often find that the critiques that are the most painful are the ones that probably are the most valid. Try not to dismiss comments because they hurt. Put them aside and come back to them – perhaps there is something there.
Picture Lock
Next you begin the process of making your fine cut, with the idea of trying to reach ‘picture lock.’ This is when you are done with all your creative decision-making. It’s all about going through moment by moment to see if the edit is cutting together well and achieving the goals everyone has set. Fine-tune each edit and, when you are either out of time or at a place where it’s as good as it’s going to get, call it picture lock. This is normally when you hand over the media to your audio person and let them begin work on it. If you change the picture after you have done this, it could mean costly changes that will hurt your pocket and annoy your collaborators. So be sure you’re done when you say picture lock.
If you are using this book you may be doing the audio sweetening yourself, and that is a good thing. However, I would still try to reach picture lock and stay there. Although Final Cut Studio has great integration between Final Cut Pro and Soundtrack, changes can cause trouble. That said, the folks at Apple have tried to minimize the pain caused by changes to the picture after picture lock, but …
Aside from the audio, the point when you reach picture lock is also when you should start your color correction process. I’ve seen many students spend hours on color correction before they’ve reached the rough cut phase. This might end up being a complete waste of time if that portion ends up being cut out, so try to refrain from spending that time until you’ve reached picture lock. There may be times when you mess around with color correction to get inspired or to try ideas, or to see if a shot is usable, but mostly I’d recommend holding off until it’s time and your film is done.
When you’ve got your final audio mix and sweetening completed and your picture is color corrected, you will output to all the appropriate mediums. I am still a fan of mastering to the best quality tape format available to you. Should you lose your hard drive or your DVD back ups fail, you’ve always got your tape. Mastering out your product is an important step that you really must consider. How are you going to save your project and where will the film be screened and on what format? Ask yourself these questions to make sure you have a back up.
When editing, be organized on your timeline as much as possible. Keep your dialog on the same tracks (1,2), your nat-sound on (3,4), music on (5,6), and SFX on (7,8). This way you can make changes to individual stems if need be. I also see many students who have dozens of tracks of audio spread out all over the place. It’s sloppy and careless and can come back to hurt you if you make a change and don’t see that it affects audio on your timeline that is out of sight, often scrolled below the visible portion of your screen. Use as few tracks as you can get away with and as many as you must. Again, it’s a simple task to achieve if you begin your edit this way, but if you have to move your audio clips around later it is easy to make mistakes that will cost time to fix.
Steve Stamps – Editor Profile

‘I’m not what you would call a Final Cut Pro power user. I use it for making basic SD (standard definition) video cuts in my spare time. Last year I was hired by an organization to create a video that consisted mostly of talking head interviews. I have a two-camera setup and use a lavalier mic as the primary audio source. Normally, I use a special cable to put the mono audio signal on both channels. On one of the interviews I forgot the correct cable, so when it became time to edit, several of the clips had the audio in only the left channel. After stumbling around in Final Cut Pro for a while trying to get the audio on both channels with no success, I tried to solve the problem in Soundtrack. Within minutes, I was able to get the audio from one track to both and get the audio resource back into the video. I’m sure I could have accomplished the same thing in Final Cut, but it was just easier in Soundtrack Pro.’
Sound Editing with Final Cut Pro and Sound Editors
Video editors often work like me when it comes to manipulating audio. That is, unless I need something unusual, I might not ever use an application like Soundtrack Pro to do my audio editing.
You can actually accomplish a great deal within Final Cut with regards to audio. I think it goes without saying that your situation is always better if you have recorded good quality sound in the first place. That means a variety of things. For example, if you listened to your location on a location scout and heard many airplanes overhead, a train that goes by frequently, or an air conditioner in the space that cannot be turned off, you might want to choose another location. You really need to evaluate the sound before you commit to a location. Sometimes the problem audio can be handled by unplugging the device making the noise and other times you might be able to control the sound in question by using sound blankets. The point is that you need to have good ears when recording on location. If you do that, your sweetening process will be so much easier. (Oh, and turn off all phones!) Any audio post engineer will tell you there are no magic buttons to fix problem sounds, no matter how useful a piece of software may be.
So, you have a good, clean audio track. You capture your footage and make sure that you are using the track that has your good microphone, and not the camera mic. You do your video editing and right from the get-go it’s in your best interest to monitor the levels as you go along. Listen to the sound carefully and make notes of things that you will want to address later and clean up or remove. These could be a hum, a background noise that might be reduced, or simply bringing greater clarity to a portion of the sound that you want to improve. I do want to stress here that you will want to make notes. Even the best editor will forget to revisit a problem area when they start working on other portions of the film. Write it down!
There are many decent audio filters right in Final Cut, so, as a video editor, I can usually do some preliminary audio sweetening without ever opening Soundtrack Pro. For example, I use the Apple AUGraphicEQ all the time. It has 31 bands of frequency adjustments to mess with. And, as a video editor, I admit that I ‘mess’ with those adjustments most of the time. For example, I know a smidgeon about the physics of sound and, if I hear a rumble on my audio, I know I can go into this filter and reduce the low frequencies to get rid of that rumble or hum. On the other end of the spectrum, if there is a hiss or lots of ‘s’ sounds, I can reduce the high frequencies without hurting the voice quality too much. Somewhere in my travels, I learned that the human voice lives around the 2500 Hz frequency, so I try to not alter sounds near that. Sometimes I will try to bring a little richness to the voice by playing with the 250 or 300 Hz sliders, and I have helped the audio in this way on occasion. This is also a good tool for making the all too well-known ‘telephone voice.’ Just bring down the low frequencies and bring up the high frequencies to make it tinny.

Figure 1-2 Apple AUGraphicEQ.
Another thing I do is to listen carefully to the edit points. If I can hear the edit, I know it is likely a bad edit. I do what I can to make the transition from one cut to the next as seamless as possible. As a video editor, the easiest way to do this is to create a 1 to 3 frame audio dissolve. If you are hearing a ‘digital tick’ this dissolve will usually hide it. Then I make a ‘favorite’ of this dissolve setting so I don’t have to adjust the length of the dissolve each time I apply it. I quickly remember the shortcut for this favorite, because I use this all the time too. One other thing about cleaning at the early stage of your edit is that it is a good idea to do minimal cleaning until you know you are close to your fine cut. There’s no point in spending any time cleaning your audio if you still might be cutting out that clip.
Matt Myers and Tar Creek – Editor Profile

‘James Graves was the formation of my sound design. We shot James almost entirely while he was driving his truck. We put a lav mic on him, Director of Photography in the passenger’s seat, and me in the back. We had the camera mic on as well, but there was still loud truck noise in every frame. James said some important stuff, including a few lines that summed up the issue at hand in Tar Creek. All of his lines interlaced with the rumblings of the straight eight under the hood.
‘I am not a trained or educated filmmaker. My entry into filmmaking came about out of necessity, so I had to learn as I went along. I was thrust into the editing suite with the same gusto as the film itself, and when I tried to cut some things together with James Graves, I couldn’t stand the audio transition from one guy sitting in a quiet room to a roaring Chevy engine with James at the wheel. Luckily for me the way out of this mess was to use James in places where we cut from – and back to – the driving footage. I couldn’t pull this off in every instance but, for the most part, this allayed what I felt was a jarring experience from a studio sound to a big, honking, Oklahoma truck.
‘Tar Creek is an environmental documentary, if it’s anything, and being a writer I am constantly negotiating the relationship between form and content. They both need to live together peaceably and, given that, it made sense to bring the ‘environment’ into the interviews. Even when it was clear that the only noise in the interview setting should have been the hum of the camera and the A/C, I would bring in water, wind, birds, bugs, storms, sinkholes – whatever came from outside, I brought it in. As I’m writing this, I’m still not sure – or even aware – if that tack was breaking any fundamental filmmaking or audio rudiments. I didn’t know much, or even many people who did, so I just had to go with what made sense to me. This made sense for an environmental documentary. A better filmmaker probably would have shot people outside so that the ambient sounds were never a question, but at the time of shooting I knew even less than I do now, which is saying quite a lot.
‘Something interesting that I didn’t even recognize until I sat down with an audio editor was that, while I fiercely avoided dissolves and cross-fades with the picture, I blended audio tracks the whole way through. To this day I don’t have a justification for that. Being new to the process it just really bothered me jumping from one sound to another – as a straight cut – even when the correlative cut of the picture felt right. Something in the fluidity of the sound really kept the pace going for me in ways that were more congruent to the overall design than straight cuts or quick fades. Keeping the pace going was important because, one, we had a great deal of information to get through, and two, Oklahomans talk slow. So, if we were able to quicken the heart and mind a little bit by blending ambient and underlying sounds, then that tactic served the higher purpose of keeping the film going, which seemed a worthy sacrifice.
‘When I first opened Final Cut, it defaulted to two picture tracks and four audio tracks, which was sort of an omen I failed to recognize. Getting the sound locked took twice as long as the picture, if not more. Documentaries are seemingly less visual than narrative films in that if you take away the picture most of the time there is still a story left, but it’s usually not so the other way around. Perhaps the importance of the audio to me was only due to the fact that it was an environmental documentary, and that a different documentary with different circumstances would not require such heavy lifting and concentration on the audio. Perhaps. However, I don’t think so. Even though I’ve only made one film, it strikes me that audio will always be a challenge and also a weapon to be wielded in any film. The trick is to find out what the audio needs to do for the film – beyond being audible and understandable – and then to figure out how to deliver that around all the other obstacles that the footage, the story, and you put in the way.’
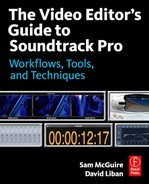
Another set of audio tools in Final Cut Pro that I use all the time are the buttons for −1 Gain dB, −3 Gain dB, +1 Gain dB, and +3 Gain dB, which you can add to your timeline window for immediate access. In the button list, which you can get to via Tools > Buttons > Audio, you can select these settings and then drag them to your accessible buttons on your timeline window. Again, I use this all the time. Let’s say you have a clip that just needs a little boost or reduction in volume. Select the clip in question and simply click these buttons and you’ve quickly made it louder or softer. While I edit, I watch my VU (Volume Unit) meter and try to keep my audio levels near −12 dB. Making this adjustment as I move along allows me to better listen to the quality of the sound in case I need to sweeten the clip later and, if not, I might have gotten the level to an acceptable place on the first go-round.
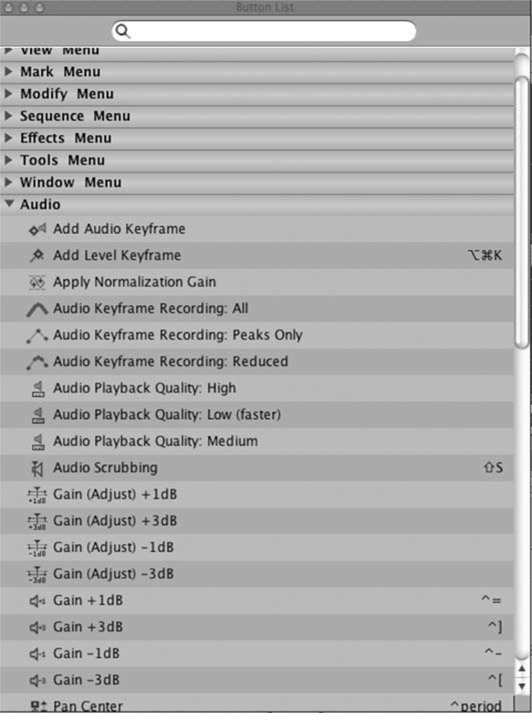
Figure 1-3 The button list.
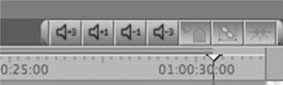
Figure 1-4 Audio buttons on the timeline.

When you want to focus your editing on the audio, go to Windows > Arrange > Audio Mixing and the Final Cut interface will bring up the tools to do some basic mixing. You can also access the audio mixer by going to Tools > Audio Mixer. This gives you the ability see big sliders for each track you are using. You can even automate the level adjustments for pan and volume
Figure 1-6 Rubber bands.
in this window. I often use this view when I am trying to finalize my mix in the fine cut stage of my edit.
Another audio tool I commonly use in Final Cut is the key-frame Rubber Band tool. At the bottom of the Final Cut timeline window is a button for Toggle Clip Overlays (Option + W). When you activate this you’ll see a red line appear on the clips in your timeline, both in audio and video. You can then activate the Pen tool (p) and add keyframes right on your timeline by clicking on the red line with the Pen tool. Each of these keyframes (or dots) you create will act as a way to add and reduce levels by simply dragging that dot up or down like a rubber band, so you can have audio levels fade up and down where you want. You might need to make your timeline tracks bigger to give you more space to work with. I am really careful with my edits in terms of thinking about what audio needs to be primary and what needs to be more in the background, and this aspect changes constantly. This ‘rubber banding’ technique is essential for my editing process.
There are other good audio effects that are useful in Final Cut, such as the shelf and pass filters. A not-so-good one is the de-esser. I cannot seem to make this one work that well. I have the same problem with the de-popper. I can’t hear the difference when it’s applied. I have better luck with the AUGraphicEQ.
The Audio Post Personnel
So, as you can see, I spend a lot of time working on the audio as I am editing, but all video professionals know that what the basic video editor can do on their own is limited when compared with what a post-audio editor can do to improve their sound. The thing to remember is that, as you are editing, you become accustomed to the sound and it becomes familiar and seems okay. But if you give that sound to an audio person and they use Soundtrack or some other audio program to improve the sound, you’ll hear that it can be improved even more. Because Final Cut Studio ships with Soundtrack, you have the tools at your disposal to do the work yourself, but it does require a bit of training on your ears as well as training with the software. Just like with color correction, where every shot can be improved no matter how well it was shot, every clip of audio can be improved as well. The trouble is that you may not be able to tell unless you play the clips with the improvement and then without, back-to-back. Often there is no budget to pay the audio person to do this work, so you may have to do it yourself, or do the best you can with the tools at hand. Be aware: this is an art form unto itself, so you really need to have good ears to do a good job.
I have made programs that have aired nationally on PBS for which I did all my own mixing and sweetening right in Final Cut. I may have opened Soundtrack to clean one or two clips using the Noise Reduction tool, but I had to do it myself since I did not have the budget to bring in an audio person. In the end, no one complained about how it sounded so I must have done something right.
There have been other films for which I did hire an audio post person to clean the audio and complete the mix. Again, unless I played the final mix back-to-back with my mix out of Final Cut Pro, even I couldn’t hear the difference, but I know that there is one, especially when I see the waveforms of the particular clips change as the audio is processed. There have been numerous instances when the audio seemed fine, but then the audio engineer would apply a variety of filters to the clip and I’d see the waveform strength increase instantly. I could have boosted the level in Final Cut to get that volume, but in doing so I would have also increased the room noise. The process as completed by the audio engineer brought up the voice and minimized the background sound. Once you see and hear this, you know that your cut can be improved. And once you know that, you can’t go back.
Now, when it comes to mixing sound, the outcome is very subjective. When my audio people have given me what they thought was a good mix, 90% of the time I have agreed with their decisions. At other times I felt the most important audio was too loud or soft, and I wanted to make adjustments. Because it costs so much to work with these professionals, what I like to do is to ask them to give me a set of audio tracks (stems) for dialog, another set for music and another for natural sounds and effects. This allows me to import the sweetened audio into a new Final Cut timeline, and then rubber band the audio to get the mix I prefer. It’s more work for me, but it means I don’t have to either bother the audio engineer and/or pay them more.
To help with this process, it is important to keep your tracks organized. Use the same two tracks for dialog, the same two for music, and the same tracks for sound effects and natural sounds. This way, when it becomes time to mix, you can easily adjust the sounds you want instead of hunting for the right track. If you are using more than ten tracks of audio for a video edit, the chances are that your timeline will be sloppy and may cause havoc when you are finishing. Be organized throughout!
An embarrassing anecdote I can share concerns my attempts to produce a 5.1 surround sound mix using just Final Cut and having only two speakers on the edit system. I had completed a 30-minute program that I was very excited about. I had been very organized with my audio tracks in the timeline window and was able to export the dialog, music, and effects tracks as separate AIFF files, with the mix levels as they were in Final Cut. I then brought those files into Compressor where I encoded a surround mix for the DVD I was authoring in DVD Studio Pro. Next, I burned the DVD and put it into my home system, in which I have a 5.1 surround sound amplifier, and watched the show taking notes. Based on those notes, I made adjustments in Final Cut, re-exported the various tracks, imported them back into Compressor, and then replaced the old tracks in DVD Studio Pro. I burned the new DVD and listened again on my home entertainment system. Long story short … it took me ten tries, and probably still is not as good as it could be if I had just hired an audio professional. I won’t ever be doing that again.