10
EXPORTING FEATURES OF SOUNDTRACK PRO 3
Exporting audio, sometimes referred to as ‘mixdown’ or ‘bouncing,’ is the process by which the audio and/or video in your session are consolidated into a single file, or batch of files, that is easily transferred or delivered. Many users gloss over the importance of understanding exporting features. There have been countless times when I have heard someone say, ‘It’s just exporting – it can’t be that difficult.’ That statement couldn’t be further from the truth. As a matter of fact, as today’s DAWs (digital audio workstation) become more and more integrated, and as audio and video formats and technologies become more sophisticated, the need to understand exporting functionality is greater than ever. In addition, efficiency is a crucial ingredient in today’s job marketplace. Understanding the different facets of exporting will help the user to get the job done right the first time, preventing embarrassment and undue added stress in the studio.
Overview
Typical DAWs, such as Digidesign’s Pro Tools, are somewhat deficient in the area of exporting when it comes to time management. DAWs like Pro Tools require that the user bounce the session in real time (for example, to export a seven-minute film you need seven minutes). This becomes extremely laborious when dealing with feature-length films at the independent level. Issues like hardware buffer size and memory are likely to cause a crash in the middle of bouncing. Apple has helped to bypass those issues by incorporating non-real-time processing into Soundtrack for many of the options in the exporting process.
Soundtrack Pro 3 performs exports of all types in a fraction of the actual runtime of the session. This, combined with the flexibility and number of options available at the exporting stage, means that Soundtrack Pro is becoming more useful in the world of post-production audio for film, especially for independent filmmakers and production houses.
Even those who are sound designers or mixers rarely deal solely with audio anymore. Video is nearly always part of the process. Being able to handle both audio and video formats/codecs (data compression algorithms) will make you invaluable in a post-production house. In order to put yourself in this position you should have a thorough understanding of how DAWs handle audio/video exporting. The sections below will help to put you on the right path to understanding both in Soundtrack Pro.
Interleaved Audio
![]() The term ‘interleaved’ refers to files that have multiple parts of audio/video tracks. Instead of being stored as separate files, they are all combined into a single file. In video this is sometimes called a ‘self-contained movie.’ A stereo audio file is interleaved, but an interleaved file may have many more than two audio tracks.
The term ‘interleaved’ refers to files that have multiple parts of audio/video tracks. Instead of being stored as separate files, they are all combined into a single file. In video this is sometimes called a ‘self-contained movie.’ A stereo audio file is interleaved, but an interleaved file may have many more than two audio tracks.
Soundtrack Pro sessions, with accompanying metadata, can be exported for continuation of work on another application or machine. The program is also capable of exporting master stereo and surround mixes, and selected tracks including sub-mixes and busses, video only, and audio/video interleaved masters. There are also several additional options for the exportation of surround sound mixes. Each of these exporting features contains several options for modification (some more than others), which are detailed further in the sections that follow. When installed as part of the Final Cut Studio package, the program also has expanded data compression and authoring exporting options. Step by step examples are included in the final sections of this chapter.
Exporting Multitrack Session Data
Dave’s Video Editor Perspective
Exporting OMF from Final Cut
You’ve been staying up late to edit, tweaking the video and audio, and finally you think the project is ready to be labeled ‘picture lock.’ You can now send the video and audio files on to your audio post person to do the final mix and sweetening. If you have done some audio work in Final Cut and you want the audio person to see that work, you have to export it in a format that they can use. The one that I use consistently is the OMF format. In your Browser window, Control + click or right-click the icon for your final sequence and select Export Audio to OMF. You then get a dialog box in which you can select the handle length. It is important to give at least one second so that the sound designer has enough media on either side of the edit to work with for various reasons. There are also check boxes for Include Crossfade Transitions, Include Levels, and include Pan.
It is always unclear whether these check boxes actually translate to the audio software you are using, but if you are exporting for a Pro Tools system these are the selections you’ll need to think about. Further, that Pro Tools system will also need a piece of software called ‘DigiTranslator’ in order to use the OMF files. Once you have finished, you can take the files to your audio engineer on a DVD or send them via FTP. I use a service called ‘Filemail.com,’ which allows transfer of large files. It’s free unless your files are larger than 2 gB.

Figure 10-1 Export OMF dialog.
There are two types of audio export: audio-packed files and data packages. Audio-packed files are play-able with just about any standard audio playback software, for example QuickTime, and can easily be burned to a compact disc or DVD. An audio-packed file results in a file with extension AIFF, WAV, or MP3 and others. In contrast, data packages include both session file exports and project data files. The session export files are based on an object model, allowing for session data to be read by various media editors. A session file export repackages all content and data information and some audio settings of a multitrack session into a single file that can be transferred to another program for editing (i.e. OMF or AAF).
It is very important to note that session file exports do not retain all settings and are not the same as Soundtrack Pro project files. Most session file exports will maintain volume and pan information when imported into another program. For example, sessions exported from Soundtrack Pro and imported into Pro Tools will retain volume and pan levels. However, real-time processing effects, or inserts, are not retained in the session file exports. Therefore, if you are looking to maintain an exact copy of all session data, including plug-ins, you should save as a Soundtrack project file.
Soundtrack Pro project data files have an STMP extension. However, session exports have a file extension of OMF or AAF. OMF stands for ‘open media framework’ and was created to standardize audio content for sharing between programs and between picture and sound editors. AAF stands for ‘advanced authoring format’ and is an updated standardization supported by more programs and built on a more efficient object-packing model. The AAF model also allows for the transfer of metadata, which provides information on the original files in the session including location, length, etc.
There is a major difference between the two formats. An OMF export is a single file with all settings and content packed together. The individual files are limited to 2 gB in size. However, programs are capable of dividing OMF files automatically if the project extends beyond the 2 gB limit. AAF, on the other hand, contains a data file with the metadata and content information as well as individual audio files. This makes exchanging projects back and forth much more difficult as all audio files must remain with the AAF file for the opening of the session file. Typically, audio editors will receive OMF files from picture editors. AAF packages are more commonly exchanged among sound editors.
In Soundtrack Pro both OMF and AAF data files can be imported. However, only an AAF session file can be exported. Pro Tools can import these AAF files. (Pro Tools requires the addition of DigiTranslator to import any OMF or AAF file). However, other programs often only handle the importing of OMF files and not AAF. For more exporting control of sessions, Apple’s Logic Studio has the ability to export and import both AAF and OMF. So, this is one area that Soundtrack Pro must work on in order to become more compatible with other audio and video editing programs.
So why are session file exports important? Well, these files allow for easy transfer via high-speed data lines to other post-production houses. Often projects will be farmed out to other houses for completion of specific portions. An OMF session export gives the other editing house a way to import the data without the need for folders full of original audio and video files. Everything necessary is contained in a single file. The same logic works in reverse. It is more efficient to receive a single file back than to wait for a DVD of files through snail mail. This is why it is important for audio programs to both import and export OMF files. If sharing a Soundtrack Pro session export, the recipient is going to have to battle with an AAF file and the associated plethora of audio files. While OMF is more limited in the metadata arena than AAF, the trade-off is that all necessary files are packed into a single OMF file so nothing will get lost in the transfer.
To export a multitrack session, go to File > Export AAF … There are no options other than the save destination. I recommend creating a new folder as the Export AAF function will create one AAF file and numerous audio files, one for each mono track and two for each stereo track in your session. Note: In OMF and AAF exports, session stereo tracks will reopen as two mono tracks and pans will be placed in the center.
Exporting Single Audio Files
Unlike many DAWs, Soundtrack Pro can function as a single-file editor. If trimming or processing is necessary on a single audio file, Soundtrack Pro will allow you to open the file in a new window. The good thing about this function is that it takes away from the confusion of a multitrack session. You only have to look at one piece of audio.

Figure 10-2 Several uncompressed audio formats are available for exporting a single audio file. The single audio file can also be exported as a QuickTime movie by selecting the option in the File Type dropdown.
When viewing a single audio file the Export option is not available. Instead, it is as simple as going to File > Save As … Below the window area in which you choose the save destination, there is a section allowing you to choose which format to save the audio as. The file can be saved as any of the five sound formats supported by Soundtrack Pro, which are AIFF, WAV, NeXT, SDII, and Core Audio; each shall be discussed in more detail in the next section. Another possibility is to save as an audio project file for continuing work on the single audio file at a later time without making all changes permanent (all items in the Actions List are preserved). Lastly, the single audio file can be exported as a QuickTime Movie with the extension .MOV (no video will be attached to the audio file in this situation).
Dither
![]() Dither is used to help with the conversion of audio files from one bit depth to another. A small amount of random noise (sometimes sculpted noise) is added to an audio file that is about to be converted to a lower bit resolution. The random noise helps prevent certain types of errors in the process and results in a better conversion. If you compare this with changing the resolution of a photograph, you would take a high resolution print and add some blur to the pixels before converting it to a lower resolution. While the results are not exactly the same, the process is similar.
Dither is used to help with the conversion of audio files from one bit depth to another. A small amount of random noise (sometimes sculpted noise) is added to an audio file that is about to be converted to a lower bit resolution. The random noise helps prevent certain types of errors in the process and results in a better conversion. If you compare this with changing the resolution of a photograph, you would take a high resolution print and add some blur to the pixels before converting it to a lower resolution. While the results are not exactly the same, the process is similar.
Selecting any option other than audio project file will also give you the option to choose a sample rate and bit depth. Dither can also be applied by selecting the check box underneath the Sample Rate pulldown.
Exporting Multitrack Session Mixes (Stereo)
This section demonstrates some of the different methods and uses for the main Export function in Soundtrack Pro. The main export feature of the program is much more flexible than other DAWs. It allows the user to export master mixes or individual portions of the multitrack section. Each of the export features contains various modifying options, which depend on the type of export selected.
The main export screen is accessed via the File menu or by using the shortcut Command + E. Note: The export function will be grayed out if you are currently using the single-file editor window.

Figure 10-3 The main window for the exporting of multitrack session mixes is available via the Command + E keystroke.
When viewing the export window there are several default parameters: Save Destination, Preset, Exported Items, File Type, Multiple Mono, Bit Depth, Sample Rate and After Export. The availability of all these items is dependent upon the selection made in the File Type and Exported Items pulldown menus.
The Exported Items Menu
The Exported Items pulldown menu allows the user to specify what content is to be exported from the multitrack session. By default the Master Mix option is selected. This option will export the entirety of the session, excluding those tracks that are muted or inactive. The Master Mix export is the overall output as defined by the Master Fader in the session. The Master Mix option is typically used when the final project is completed and ready for mastering. However, a Master Mix is also useful if the picture editor, director, etc. need audio that is a work-in-progress.

Figure 10-4 The Exported Items dropdown allows for the exportation of various mixes other than the Master Mix.
The next choice in the Exported Items pulldown menu is Selected Tracks, Busses, and Submixes. Selecting this option will export each of the selected tracks, busses, and submixes as separate files. Tracks are selected using the Command or Shift key while clicking individual tracks in the session prior to going to the export window. If no tracks are selected, this option will export all unmuted or inactive tracks, busses, and submixes as individual files. With most DAW systems the user must export each track, bus, or submix separately.
The third option in the pulldown menu is to export All Tracks, Busses, and Submixes. This option is virtually the same as the one above. It will export all unmuted sections of the multitrack session as individual files. Exporting everything as individual files is a good way to consolidate the project into an easier-to-manage session. This feature is useful for preparing a session for mixing as it makes it easier to group aspects such as sound effects and Foley.
The final three options in the Exported Items pulldown menu are All Tracks, All Busses, and All Submixes. Each of these options will export all tracks of the designated type to individual files. This is simply a variation on the above grouping of tracks, busses, and submixes. Depending on the needs of the audio editor and other members of the post-production team, these options could prove to be useful.
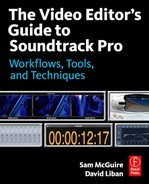
The File Type Menu
The File Type pulldown menu allows the user to choose the encoding scheme that the files should be outputted as. This is also the section where output can be set to video only, audio only, or video/audio masters. The pulldown menu contains the basic audio file formats for audio-only applications.
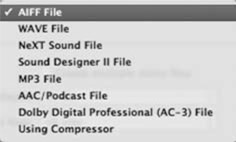
Figure 10-5 The File Type dropdown presents various options for compressed and uncompressed mixes.
AIFF and WAVE
The first options in the File Type pulldown menu are AIFF and WAVE. These two formats result in uncompressed data audio files and should be among the options used for creating a master file. By far, AIFF and WAVE are the two most common uncompressed audio file formats.
NeXT and Sound Designer II
Soundtrack Pro provides the user with two other uncompressed formats, NeXT and Sound Designer II. NeXT files appear with an .au extension. The file system is rarely used in today’s post-production facilities. In the early days of digital audio for the web, .AU files had the ability to be encoded in one of 27 formats, each based on a particular bit depth. Some of the formats were lossy, while others were the same as uncompressed PCM (pulse code modulation) encoded files. In the case of Soundtrack Pro, the NeXT files contain the same data rate as the more common uncompressed file formats. The reason why the format is included in Soundtrack Pro seems to be that the founder of the NeXT system (back in 1985), Steve Jobs, later returned to Apple and so, when Apple subsequently purchased NeXT, they were able to integrate the company’s DSP creations into their software such as Soundtrack Pro.
The other uncompressed audio file format is Sound Designer II. This format was extremely popular for a time, when Pro Tools was nearly exclusive to Apple computers. When Digidesign began building Pro Tools systems for PCs, the Sound Designer II file system was thrown out in favor of WAVE. Due to the manner in which WAVE files are written, they are compatible with both MAC and PC systems. Sound Designer II files, however, are not cross-platform compatible.
The AIFF, WAVE, NeXT and SDII options each contain three modifiers: Bit Depth, Sample Rate, and Multiple Mono. By default, 16-bit is the selected Bit Depth. The only other option is 24-bit. I highly recommend using the Bit Depth that corresponds with the multitrack session. Soundtrack Pro does not contain a Dither option, and thus it is not optimal to down-convert the Bit Depth of your session if using 24-bit.
The user may also change the Sample Rate to 32, 44.1, 48, 88.2, 96, 176.4, and 192 kHz. Once again, I would advise matching the exporting sample rate to that of the current multitrack session to avoid variations in the runtime of the audio file.
Dave’s Video Editor Perspective
Shooting at 32K
Many consumer cameras default the audio setting to shoot at 32K. This is usually acceptable for home video and even sometimes for professional use. However, you need to know what the setting is on your camera, so check. If you are shooting at 32K and your timeline in FCP is set at 48K, your audio will surely fall out of sync. So, try to be aware of what you are doing and be consistent.
The final modifier is the ability to choose whether or not to create multiple mono files. This option is only available during the selection of these four uncompressed audio formats. Checking the box for multiple mono will create two separate audio files for each stereo pair. So, if the user exports a stereo master mix with the box checked, the resulting export would contain one audio file for the right channel and one file for the left channel. This feature is mainly for when another program is used to create a specific or proprietary audio file for authoring to disc. For ex ample, using multiple mono files is a good idea if creating a DTSHD Master Audio package.
MP3
The next option in the File Type pulldown menu is MP3. Soundtrack Pro comes with the ability to create an MP3 directly from a multitrack session. When this option is selected, further modifiers appear below the File Type pulldown: Stereo Bit Rate, VBR (Variable Bit Rate), Channels, Joint Stereo, Smart Encoding Adjustments, and Filter Frequencies Below 10 Hz. As with the uncompressed exporting options, the user may also select the desired Sample Rate. By default Soundtrack Pro selects 160 kbps as the Stereo Bit Rate. This means that each of the channels in the stereo pair is allocated 80 kbps. Soundtrack Pro allows the user to select any of the popular bit rates from 32 to 320 kbps – the minimum and maximum MP3 encoding bit rates. Below the Bit Rates option is a check box that allows you to select whether or not to use VBR. By default it is unchecked. Due to the data loss incurred, use of the MP3 option should be limited to mixes that need to be sent via email, or for other uses that do not require a high quality version of the multitrack session.

Figure 10-6 Selecting the MP3 file type option expands the window with more modifiers including Variable Bit Rate, Joint Stereo, and Stereo Bit Rate.
Dave’s Video Editor Perspective
Problems with Using MP3 Audio in Final Cut
Because so many people walk around with all their music on their iPod or iPhone, they often think that the music they have can simply be included in their video edits. Copyright issues are beside the point and will not be talked about here; what we are talking about is a compatibility issue. Many people will try to include MP3 files in their 48K timelines with less than satisfactory results. You may hear pops and clicks and digital distortion if you import into Final Cut in that format. However, if you are ripping the music from a ‘legal’ CD source, you can use iTunes or QuickTime Pro to convert the audio file into a 48K AIFF file instead of an MP3. If you are using iTunes v.9, go to Preferences > General Settings > Import Using and select AIFF Encoder. Then select Custom under Settings and in the sample menu select 48K. This will make all the files that you import from that point on huge and in a useable format. However, be sure to change this back because you’ll see that not doing so will quickly fill up your iPod with your music. These files are significantly bigger, but they will now work fine in Final Cut.
The MP3 selection also contains other modifiers. The Channels pulldown menu allows the user to define whether the mix should be stereo or mono. Stereo is selected by default. There are three check boxes that follow underneath. By default all three are checked. The first is Joint Stereo. This tells the encoder to place all information that is common to both the left and right channels onto one track and put all the unique information onto another track. Based on the MP3 encoding algorithm, Joint Stereo should likely be reserved for lower bit rates, such as those below 224 kbps; above that bit rate it is best to use Normal Stereo. Normal Stereo keeps the left and right channel information on their own tracks. Smart Encoding Adjustments allows Soundtrack Pro to analyze the decisions you have made and alter them as the program sees fit. It is recommend that if you know what you are doing then this box should be unchecked. If you are questioning the settings you have chosen then you may want to leave it checked. Lastly, Filter Frequencies Below 10 Hz does exactly what it says. While human hearing extends at most down to 20 Hz, high-end equipment and properly acoustic-treated rooms will be able to recreate 10 Hz, which can be felt. However, since you are dealing with lossy MP3 data, it is likely that you are not concerned about recreating the 10 Hz range. Therefore, I would suggest leaving this box checked as it will slightly reduce file size and allow the bits to be used by more audible frequencies.
AAC/Podcast

Figure 10-7 The Audio pane of the AAC/Podcast File option allows for the modification of quality settings.
This option in the File Type pulldown menu allows the user to create a podcast for the Internet, an iPod, or iTunes. When this option is selected a window with three option panes – Audio, Streaming, and Podcast – appears below the File Type pulldown. The settings present in this section determine the type, quality, and compatibility of the podcast. In the Audio pane the user can select whether the podcast should be stereo or mono and the sample rate. The Quality pulldown contains three options – Low, Medium, and High. There is no scientific guideline as to which of these settings to use. The Low setting is the quickest to transcode but also results in the lowest audio quality, while the High setting takes longer and results in higher audio quality. The difference in speed of the trans-code is not gigantic and so I would recommend using either the Medium or High quality setting. The last option in the Audio pane is the Bit Rate. The Bit Rate can be set anywhere from 16 to 256 kbps either by using the slider or manually typing in a number.

Figure 10-8 The Streaming pane of the Podcast section provides advanced options that work fine in the default mode, but advanced users will want to modify these settings to work more efficiently with the remote hosting server.
The next pane is Streaming. It allows the user to modify the manner in which servers will handle the podcast. The settings are not straightforward, and unless you have an advanced knowledge of server communications I would recommend using the defaults. The box for QuickTime Streaming Server Compatibility should be checked if the user will be using a version of QuickTime that is earlier than 4.1. However, since most media applications require at least version 7, this setting is of little use. The options for Maximum Packet Size and Maximum Packet Duration determine the amount of data that can be transferred between a server and user in a given time interval and the amount of audio data that can be contained in that packet. These settings will work in their default modes but sometimes tweaking settings is half the fun, or perhaps half the frustration.
The last pane is Podcast. This area allows the user to define what type of podcast is to be created. There are three options: No Video, Enhanced, and Video Track. The first option will simply create an AAC-compliant audio file with a .M4A extension. The Enhanced option should be used if the podcast contains still images and/or web links. This option will create a .M4V file with an interleaved AAC-compliant audio track. The last option, Video Track, should be selected if the video track of the multitrack session should be used in the podcast. Once again, this will create a .M4V file with an AAC audio track.

Figure 10-9
The Podcast pane defines the type of Podcast that is to be created. Check the appropriate bubble depending on the use of video in the project.
The settings used by selecting the AAC/Podcast export option are pulled directly from the Compressor program. Compressor will be discussed in the following section on video exporting.
Dolby Digital and Compressor
The two final options in the File Type pulldown are Dolby Digital Professional and Compressor, which will be discussed further in the surround sound exporting sections.
Toward the top of the export window there is a pulldown menu labeled Preset. This allows the user to save any changed settings in the export window. If a lot of exporting is performed in the same way, this Preset utility is rather useful, especially when changing the default settings for the more advanced export options. Once all the changes have been made in the export window, choose Save Preset from the pulldown menu and give the preset a name that is easy to recall.
The export window also contains a pulldown menu called After Export. In this pulldown menu it is possible to choose actions to be completed once the exporting process has finished. This allows the user to perform an export that might take some time without having to wait around just to complete the next step. The After Export options include sending the files to a Final Cut sequence, importing them back into the Soundtrack Pro session as new tracks, or sending them to other Apple programs such as Logic, iTunes, Motion, or WaveBurner. These are really simple options that only remove a tiny step in the overall process; however, many editors have grown accustomed to the After Export options.
An important note in this section is that selecting only Master Mix allows the user to choose from any of the File Type settings. If anything other than Master Mix is selected, the only export options are the four uncompressed file types: AIFF, WAVE, NeXT, and SDII.
Exporting Video Only (Compressor)
Unlike many DAWs, Soundtrack Pro gives the user the ability to export just a video track from the multitrack session or from the single-file editor. So, in a way, on a basic level Soundtrack Pro functions like its sister program, Final Cut Pro. Exporting just the video file from the audio editing program is rare, but it has its advantages. Primarily, it allows the audio house to create a video file that is compliant with their authoring software. It is more than likely that the picture editor will supply video which is not DVD-compliant. In this case, it is not possible to create a temporary screening mix on a DVD for the client. Soundtrack Pro, however, lets the user export the video file independently from the audio track using Compressor. Compressor is a stand-alone program that is included in the Final Cut Studio package. When installed, it embeds itself into the Soundtrack Pro program, giving the user the ability to create numerous files of different audio and video encodings.
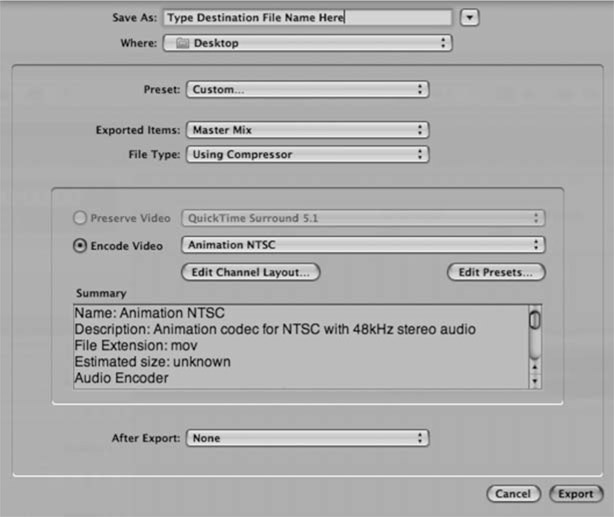
Figure 10-10 Selecting Using Compressor in the File Type dropdown expands the export window to provide a consolidated view of the actual Compressor program. Using Compressor is an efficient way of compressing audio and video without resorting to a stand-alone program.
Compressor has increased the number of its encoding presets over the years. It now comes complete with different quality encode settings for MPEG-4 files, DVD MPEG-2 files, Web-Ready files, High Definition HDV, and XDCAM files, among many others. The addition of high definition exporting comes with this latest version of Compressor (3.5). Several of the presets contain export options for both audio and video. In this section, however, we will concentrate on the video presets. The DVD and HD DVD (MPEG-2) presets, as well as the high definition (HDV and XDCAM) presets are the primary video-only encoding presets.
When Using Compressor is selected in the File Type pulldown menu of the export window, the window extends down, displaying options pulled from the Compressor software package. The first modifier is Preserve Video. Marking this bubble will keep the video track the same as the original video file. The pulldown menu that is located next to it provides options as to what format the audio should be rendered as. There is not much use for this function and it should only be used when there is a specific need for it.
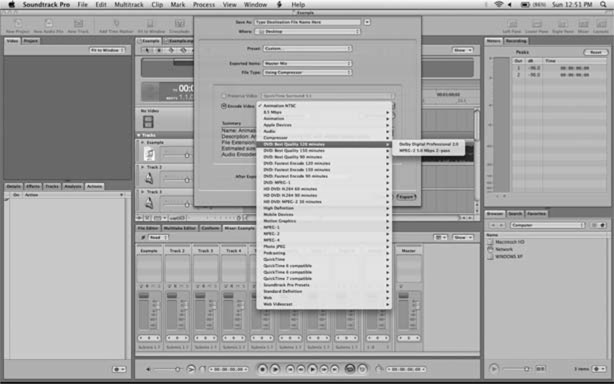
Figure 10-11 When exporting video only that is destined for a standard DVD, begin by using the DVD Quality presets in the Encode Video dropdown. This is a good way to export video to be burned to a standard DVD for client use.
Below this option is the primary pulldown menu, Encode Video. This menu displays all of the Compressor presets for both audio and video. In the middle of the list are the options for DVD, HD DVD, and high definition. When mousing over these options, the list extends to the right, revealing the available presets in each category. The DVD options are divided into two groups of three. The first group of options are named DVD Best Quality, followed by a length of time (120 minutes, 90 minutes, and 60 minutes). These presets indicate roughly how much video at the preset setting, along with uncompressed PCM stereo audio, can fit onto a standard single-layer DVD-5 disc. What changes between these three settings is the video bit rate. The more data the program says can be fitted onto a disc, the lower the video bit rate and thus the worse the video quality.
The second group options are named DVD Fastest Encode, followed by the same lengths of time as listed above. The difference between these two groups lies in the number of passes. The Best Quality group does two passes over the video for more accurate encoding and better image quality. However, this takes twice as long as one pass. The second group uses the one-pass function, making only one pass through the video during the encoding process. This generally yields less desirable image quality results; however, for a test disc it would be perfectly suitable. I would not use the one-pass setting if the export were going to be used as a master copy.
Compressor still provides the option to export video files compatible with the now defunct high definition format, HD DVD. The presets for HD DVD result in either an MPEG-2 encoded file with a video bit rate that is beyond the bit rate limit of a standard definition DVD, or a file encoded with the H.264 codec. Also, with this version of Compressor, high definition video at 720p, 1080i, and 1080p resolutions can be exported using the presets set forth. These settings should only be used when the situation calls for them as the encoding process of such large video bit rates takes quite some time.
While the presets are generally suitable for DVD authoring, some advanced editing of the presets can be done. Below the Encode Video pulldown menu there is a button, Edit Presets. Engaging this button will open the stand-alone version of Compressor. In the new window the user can choose to make changes to any of the existing video presets and save them as a new setting.

Figure 10-12 To edit the chosen preset simply highlight the initial template preset and click the third button from the left at the top of the Settings window. Make sure to give the new preset a unique name at the top of the Inspector window.
When Compressor opens there are multiple windows. To edit settings you only need to be concerned with the Settings and Inspector windows. The other three windows can be closed if they are distracting. In order to start editing settings a copy needs to be made of the existing preset that you have chosen to use as the template. To do this, click the preset in the Settings window and click the Duplicate Selected Setting button (third from the left at the top of the Settings window). This will create a copy under the Custom folder at the bottom of the Settings window. Click the duplicated setting and move it to the Inspector window. The first thing you should do is change the Name at the top of the Inspector window. This will be the name under which you will find the preset in the Soundtrack Pro pulldown. The modified preset can be found in the Encode Video pulldown under the Compressor tab. In the Inspector window there are six buttons underneath the Description that allow you to toggle through the different panes of video encoding. The first button is a summary of the settings, the second is the video encoder settings section, the third is the frame control section, the fourth and fifth are the video processing sections, and the sixth is an advanced tab for scripting. There are numerous options to modify in the Inspector window, much beyond the scope of this book. However, these are some of the more important ones to take a look at.
Video Format

Figure 10-13 Editable options for the format of the outputted video can be found under the Video Format tab of the Encoder pane on the Inspector window. Make sure to match these settings with the original video file to avoid a distorted video image.
This pane allows the user to control: the region encoding of the video, either NTSC or PAL; the frame rate, which defaults to 29.97 fps but other standard frame rates are available; the aspect ratio, which can be either 4 : 3 or 16 : 9; and field dominance, which allows the user to select whether the video material is progressive or interlaced. It is advised that these settings be left to match the original specifications of the video file to avoid distorted images and changes in the runtime of the video file. Note: There are buttons to the right of each of the pulldown menus that by default are pushed in, indicating that automatic settings are being used. To edit these fields, those buttons must be deselected.
Quality
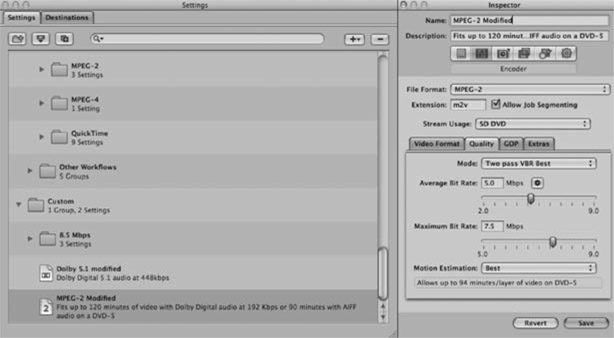
Figure 10-14 The Quality tab allows for different data rate settings. Using a two-pass setting will scan the entire video twice, causing it to take twice as long as a one-pass scan. Use the Bit Rate sliders to select the average and maximum bit rates of the video file. Remember: A standard DVD has a maximum bit rate of 9800 kbps for the audio and video combined so plan accordingly.
This pane allows the user to manually configure the video bit rate. The Mode pulldown menu allows the selection of various one-pass and two-pass modes. Remember, two-pass takes twice as long as one-pass, so make sure two-pass is absolutely necessary before it is selected. When a VBR (variable bit rate) is chosen, there are two sliders available for setting the video bit rate. The first is the Average Bit Rate and the second is the Maximum Bit Rate. The Maximum Bit Rate becomes extremely important when authoring video to a standard DVD. The overall bit rate (the addition of both the video and audio bit rates) of a standard DVD must never spike above 9800 kbps. Therefore, it is important to make sure enough room is left after the Maximum Bit Rate setting to accommodate for the audio track. If, for example, an uncompressed stereo PCM audio file is used for the audio track and its audio bit rate is 1411.2 kbps, the Maximum Bit Rate should not be higher than about 8.3 mbps, or 8300 kbps. When using the CBR (constant bit rate) mode, the Average Bit Rate slider functions as the Maximum Bit Rate. Following the previous example, the Average Bit Rate slider would be set to no higher than 8300 kbps.
Filters
In the Filters section it is possible to change some of the video attributes. There are options for changing the color balance, applying a de-noise filter, changing the video to a letterbox format, de-interlacing, gamma correction, watermarking, edge enhancement and fade-ins and -outs. These filters should not be applied without the approval of the picture editor or director. For personal use, this section offers an easy way to fix a video problem without resorting back to rendering the original video edit session.

Figure 10-15 The Filter pane of the Inspector window allows for the editing of the video on a basic level. Changes in the brightness, gamma, color, etc. can be made here.
Geometry
The Geometry section of the Inspector window is handy for trimming any edges of the video that contain distracting noise. Once again, this should not be applied without approval from the picture editor or director. Cropping can be done to any or all of the four sides of the video and happens in increments of one pixel. It does not change the dimensions of the video. Instead, cropping will simply overlay a black line of one pixel in width on the chosen side of the video, hence removing a portion of the picture. This function can also be used to change full frame 4 : 3 video content into letterboxed widescreen content, assuming that losing image content on the top and bottom of the video is not a concern.
Upon the completion of editing a preset, make sure to click the Save button at the bottom of the Inspector window. Back in Soundtrack Pro, find the edited preset in the Encode Video pulldown and check the settings in the summary box. As this is the main export window, the facility to save a preset of the entire export window, and the After Export options, is also available. Lastly, type in a name for the file to be saved as and click Export.

Figure 10-16 The Geometry pane provides options for changing the dimensions of the video file. Both padding and cropping can be done via the dropdown menus or by using the numerical boxes. Each numerical value corresponds to one pixel in cropping or padding.
Exporting Audio with Video (Compressor and Soundtrack Pro)
Perhaps more useful to an audio editor is the ability to export the current video and audio together as a completed mix. As with exporting the video only, Soundtrack Pro provides a great many options for audio/video exporting. Like most audio editing programs that support video import, Soundtrack Pro imports the attached audio with the video. While there is no way to edit the picture, there is a way to edit the audio attached to a video file, in either the multitrack session window or the single-file editor. This can prove to be useful to an audio editor who needs to apply a filter, volume level change, and so on to the entire audio track of the video file. Deletions and insertions can also be done to the audio track. After the changes have been applied the file is easily saved as a new movie file.
Exporting Audio/Video from the Single-file Editor
When working with an audio track attached to a video file in the single-file mode, the only way to export the video and audio is to choose Save As … from the File menu. In the File Type pulldown menu the user must select QuickTime Movie. There are no settings for this selection in terms of modifying the video. Soundtrack Pro will automatically choose the output format, which will be a .MOV file. Typically, the program will retain the video settings of the current file if already using a QuickTime movie format. For example, an H.264 encoded video file loaded into Soundtrack Pro with a frame size of 512 × 268 pixels will be saved with the same file structure. However, if the video settings are not recognized as QuickTime-compatible, the file may appear differently upon saving or may not load into the program in the first place.
When choosing the Save As … function, it is possible to change the Sample Rate and Bit Depth of the audio track associated with the video. The option to apply dither is also available if the user chooses to decrease the Bit Depth.
Exporting Audio/Video Using Compressor
Exporting audio/video projects using Compressor is much like using Compressor to export just the video file. This time, however, we will focus on the settings that interleave the audio with the video, creating one seamless multimedia file. One of the primary uses for creating an interleaved audio/video file is to be able to upload a work-in-progress file to a server for the client to view. Note that the section on Podcasts focuses on low quality audio/video compilations. Using Compressor affords higher audio and video quality along with more advanced options.
Back in the export window we once again choose Using Compressor in the File Type pulldown menu. The DVD and HD DVD settings discussed in the previous section do not allow for interleaved audio and video. This is because, with the audio attached to the video, the file would no longer be compliant for a DVD authoring program. Therefore, those options are out for this section. We will focus on the bottom half of the pulldown screen, primarily the QuickTime compatible, Standard Definition, and Apple Devices tabs.
The QuickTime Compatible Tab
The QuickTime Compatible and Apple Devices tabs provide presets for audio/video files for use on mobile devices, such as the iPod, and Internet streaming. The QuickTime Compatible tabs are divided among version 6 and 7. I recommend using the QuickTime 7 compatible tab to enable the Internet streaming capabilities which allows media to be streamed online. QuickTime 7 uses H.264 encoding, which is more efficient than previous QuickTime versions, which were based on MPEG-4 encoding. Under this QuickTime tab there are various presets, each with a different bit rate (i.e., 300 kbps, 400 kbps, 800 kbps, etc.). For each there is also a preset labeled ‘Streaming,’ indicating that the settings have been tweaked to be more web-efficient. The difference between the Streaming and Non-Streaming presets is the video frame size and the QuickTime hint. The Non-Streaming QuickTime 7 presets contain a frame size of 480 × 360 pixels. They are also marked for a fast start, meaning that the entire audio/video file should be played from a local hard drive. The Streaming presets have a video frame size of 320 × 240 pixels and are hinted for QuickTime streaming, meaning that there is meta-data included in the resulting file that indicates it is optimized for Internet streaming. Streaming is useful because the content is seen over the Internet without actually having it download first. The presence of both of these preset options makes exporting audio/video files for clients who are local, and clients who are away, simple and efficient. Note: Make sure your export settings for the video size match the original settings or the export may be stretched incorrectly.
While the video is encoded using H.264 technology, the audio that accompanies the video is encoded as AAC. This format was discussed in the section on Podcasts. AAC is more efficient than MP3 and provides intelligible quality at low bit rates. As AAC is a lossy compression scheme, the use of it is only recommended when creating a presentation for Internet streaming.
As discussed in the previous section, these presets can also be modified and saved using the Edit Preset button and following the path laid out above. In addition to being able to edit the video controls, you will now be able to edit the audio controls. It is in this section that you can modify the encoding scheme that should be used for the audio track. While the default may be AAC, it can readily be changed to AIFF for higher quality audio. However, AIFF is not advised if the media file is destined for the web.
The Apple Devices Tab
The Apple Devices tab contains presets that create video for Apple devices such as the AppleTV and iPod. It is important when choosing these presets that the fundamental aspects of the video and audio are not changed. These devices have specific requirements as to the video frame size, video codec, and bit rate, as well as for the audio codec. It is best to leave the presets alone for this tab. While experimentation is always welcome, do not be surprised to find the resulting audio/video file is no longer compliant with the selected mobile device.
The Standard Definition Tab
The final main Compressor preset for exporting audio/video files is the Standard Definition tab. Here there are several presets that correspond directly with those used by Final Cut Pro. DV NTSC is perhaps the most commonly used video codec on the MAC platform, along with the other presets in the tab: DV NTSC Anamorphic, DVCPRO50 NTSC, and DVCPRO50 NTSC Anamorphic. The primary difference between DV NTSC and DVCPRO50 NTSC is that the latter has twice the video bit rate. However, both codecs use higher than typical video compression codecs. DV NTSC uses a bit rate of 12.22 gbph while DVCPRO50 NTSC uses 24.28 gbph. Both are substantially more than the average standard MPEG-2 compressed files running at a max of 9.8 mbps for standard DVDs. Notice the latter is only megabits per second as compared with the former’s gigabits per hour, which translates into about 203 mbps for the DV NTSC codec. This gives you an idea of how much data compression is done to fit content onto a standard definition DVD.
The anamorphic preset should be used when the video file being exported is encoded at 720 × 480 pixels but is meant for 16 : 9 displays. A pixel aspect ratio correction flag is included in this preset that tells the playback engine to stretch the video’s image pixels horizontally to recover the true aspect ratio of the video. In order to know which preset to use, it is best to refer to the production notes given by the picture editor, which should have indicated the encoding of the file being used.
The audio track settings for these presets default to AIFF, 16-bit, 48 kHz, and stereo. Make sure the preset settings match those of the Soundtrack Pro multitrack session. These settings, along with the video control settings, can be edited by selecting the Edit Preset button in the Soundtrack Pro export window and following the guidelines set forth in the previous section. When using the main export window in Soundtrack Pro, all the settings may be saved as a preset using the Preset menu pulldown option above Exported Items.
Using Compressor to export audio/video files provides a great deal of flexibility. However, it does take time to encode the video to the specifications of the chosen preset. So, if you are unsure about the settings that you have chosen, it is best to try the export settings on a small piece of audio and video to make sure they are going to turn out properly. There is hardly anything worse than exporting an entire project only to find that the wrong sample rate was chosen so the audio is out of sync with the video, or that the video frame size was not proportionate with the origin al video and so the video is now distorted. Professional-quality work will take you a long way in the industry. While some issues will go unnoticed if they are done properly, almost all issues will be noticed if done improperly. So, make sure to check your work before sending it to clients.
Exporting Surround Sound Using Soundtrack Pro and Compressor
It is becoming more of the standard for DAWs to incorporate the ability to mix and export in multichannel formats, typically 5.1 or lower. However, some platforms allow for the mixing and exporting of 6.1 audio and greater. Pro Tools recently integrated 7.1 surround mixing into the LE version of their software, with the purchase of the Music Production Toolkit.
Soundtrack Pro is one of the DAWs that has full integrated multichannel audio exporting. This is a terrific feature for independent movie houses that need surround sound capabilities without the huge expense. As Soundtrack Pro is paired with the Compressor program, there are numerous options for exporting the 5.1 content from the multitrack session. Typically, programs will export six uncompressed audio tracks to a 5.1 audio file or six individual audio files. Separate software is then needed to create a Dolby Digital or other file that is compatible with standard DVDs. Soundtrack Pro goes one step further. The program incorporates the ability to go directly from the multitrack session to a compressed Dolby or AAC file.
In addition, due to the program’s ability to export different groups of tracks, it is easy to create stems of your work. Stems refer to the individual components of a film’s soundtrack. Typically there are stems for sound effects, music, and dialog. In order to set up these various stems in the multitrack, the outputs of the corresponding tracks can be assigned to different submixes. Then, by selecting these submix tracks, the stems can be exported in one easy step. Refer to the step-by-step example at the end of the chapter for more information.
Exporting Dolby Digital Multichannel Audio
In Soundtrack Pro there are two ways in which to export Dolby files from the program. Apple has simplified the process by making Dolby Digital Professional one of the built-in options in the export window. The other way is to select Compressor in the File Type pulldown menu.
By selecting Master Mix and Dolby Digital Professional, the export window expands to display the options for Dolby exporting. There are three panes: Audio, Bitstream, and Preprocessing. All three panes contain important settings to ensure correctly exported Dolby Digital files.

Figure 10-17 The Audio pane of the Dolby Digital Professional export option contains some of the most important metadata for Dolby encoded files. Choose the channel layout that corresponds with the Soundtrack Pro session. The dialog normalization setting should be - 31 dBFS for a zero gain reduction in the output Dolby file. For more information on Dolby metadata refer to the Dolby Metadata guide on Dolby’s official website.
In the Audio pane, the first pulldown is Target System. By default, DVD Video is chosen and this is likely the setting that should be used for all standard DVD authoring. You may also choose DVD Audio for when you are authoring music to the DVD-A format. The Audio Coding Mode is one of the most important fields. It is here that the selection of the number of channels in the multichannel audio stream is made. The default is 5.0. This includes Left, Center, Right, Left Surround, and Right Surround. In order to enable the .1 (LFE channel), the box below the field (Enable Low Frequency Effects) must be checked. There are other Dolby encoding modes, including simply Dolby 2.0 for stereo mixes. Make sure to choose the setting that correctly matches the number of channels used in the multitrack session.
Next in the Audio pane is the Sample Rate. The only choice here is 48 kHz when DVD Video or DVD Audio is selected in the Target System field. This is to ensure compatibility with standard DVD authoring and playback. The Data Rate is the amount of data per second that is allocated to all the channels combined, at any given time. The highest setting is 448 kbps while the lowest setting allowable is 224 kbps. Typically in high definition television broadcasts there will be a data rate of 224 to 384 kbps. If using Dolby Digital compression I recommend using the highest data rate possible. The next field is Bit Stream Mode. This setting allows you to select what this particular track will be used as, i.e. a commentary track, a track for the hearing impaired, and so on. Complete Main is what should be chosen for audio tracks that will be the main audio content. The last setting in the Audio pane is Dialog Normalization. This is perhaps the most crucial setting in the Dolby Digital metadata. At the risk of over simplifying, Dialog Normalization determines how much the overall volume of the Dolby file will be lowered. This setting is used in broadcast to try and balance the level between commercials and programming, and other functions. A - 31 dBFS value represents a change of zero in the volume level between the original mix in the session and the output level of the Dolby file. The default setting in this field is - 27 dBFS. This means that the output volume of the Dolby volume will be 4 dB lower than the original volume. The value of - 31 dBFS should be viewed as a zero level change and not as the reference volume level of - 18 dBFS. In short, the closer to zero that the value in the Dialog Normalization box reaches, the more gain reduction will be applied to the outputted Dolby file. For more detailed information on this topic, the Dolby Metadata Guide can be found on Dolby’s website.
The Bitstream pane contains settings regarding how the Dolby surround mix should be downmixed for playback on stereo systems. It is important to assign values to the center and surround downmix fields. By default, each field is set to downmix by 3 dB. Depending on the mix, these settings may need to be changed. If the surrounds should be left out of the stereo downmix, that can also be specified in this section. The last pane is Preprocessing. The Compression Preset is perhaps another important field to pay attention to. It defaults to Film Standard Compression; however, there are various other settings depending on the content of the audio track. Detailed information as to how to handle these presets can also be found in the Dolby Metadata Guide. However, in order to avoid any alteration to the original mix, the selection of No Compression is best. This pane also contains information on modifying individual channels in the Dolby stream including low pass filters, DC filtering, phase shifts, and digital de-emphasis.

Figure 10-18 The Bitstream pane defines how the multichannel surround sound Dolby file will be downmixed for stereo systems.
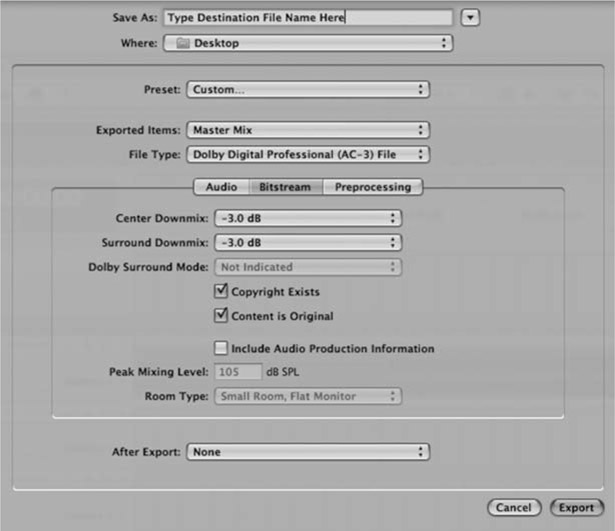
Figure 10-19 Audio filters and compression settings can be defined in the Preprocessing pane. Make sure to select the appropriate Compression Preset to avoid major alterations to the original mix in the resulting Dolby file.
The other way in which to export Dolby files is to select Using Compressor in the File Type field. Presets for Dolby Digital 5.1 and 2.0 can readily be found on the Audio tab under Encode Video. However, these are presets and only allow editing via the Compressor program. This is accomplished in the same manner as described in the section on editing video presets and contains the same metadata options as described above.
Exporting Uncompressed Multichannel Audio
While sometimes it is useful to export mixes directly to a Dolby compressed file, generally mixes should be exported as uncompressed audio files. This can be accomplished in a couple of ways. While it can be done through Compressor, in doing so it is much easier to make a mistake in assigning the channel order. By default, Soundtrack Pro uses the SMPTE/ITU standard for the channel order of the surround audio. This means that the order of the channels progresses as follows: left, right, center, LFE, left surround, and right surround. If you are trying to modify the presets to conform to a different standard, such as DTS (L, R, Ls, Rs, C, LFE) it is almost a guarantee that the channel order will be different than that desired. Therefore, I recommend simply using the export window for surround mixes.

Figure 10-20 When using Compressor to export surround sound in a different channel order than that defined by SMPTE/ITU (L, R, C, LFE, Ls, Rs), make sure to change the channel order by selecting the Edit Channel Layout button in the main export window.
Once the multitrack session has been set for using surround sound, exporting the final surround mix, individual surround tracks, or submixes for use as stems is quite easy. The export feature of Soundtrack Pro automatically knows when a surround session is being exported; therefore, getting uncompressed surround mixes out of Soundtrack Pro is as simple as exporting the master mix as an AIFF file. If the other settings in the export window are left at their default positions, the program will create one AIFF audio file with a channel order of L, R, C, LFE, Ls, Rs. However, authoring programs typically need mono audio files, with one file for each of the channels. Therefore, I recommend checking the box to create multiple mono files. This option creates a folder with the chosen target name and places six mono files inside it. The naming convention is as follows: Untitled. L.aiff, Untitled.R.aiff, and so on and so forth, where Untitled represented the name given in the Save As field. These mono files can now be dropped into an authoring program such as DTS-HD Master Audio Suite or combined in a custom channel order by using QuickTime.
The process of uncompressed exporting is less time-consuming than exporting directly to Dolby Digital. In addition, uncompressed audio files are the desired format for a master mix. While exporting directly to Dolby is a nice feature, it is perhaps less useful than it may initially seem.
Exporting Interleaved Video and Surround Sound Audio
Occasionally, clients and other recipients may request a QuickTime file with surround sound. While it is not common practice today, with the growing rise of ISDN connections in studios and FTP transfers, it is nice to see that Soundtrack Pro has included the ability to accomplish this interleaved task for the future. In order to perform this export, you will need to use Compressor; thus, it will only be possible to export the master mix along with the video.
As has already been seen, there are numerous presets under the Encode Video pulldown menu. The first that can be ruled out are all the presets dealing with DVD compliancy. This is because DVD compliancy mandates that the video be in the form of .M2V, which does not support the addition of audio. Instead, we want to export a QuickTime file with encoded audio. There is no available interleaved preset that will allow for video and surround audio. Therefore, we are going to have to create one. The best preset to start with is under the QuickTime tab. It is called H.264. When selected, the Summary window will show that the audio encoder is set for Linear PCM stereo. This needs to change. Using the steps outlined in the video section on editing presets, enter the Compressor program and make a duplicate copy of the preset. In the Inspector window click the Audio Settings button under the Encoder pane (second button from the left). This will bring up a new window that looks exactly like QuickTime’s encoding option window.
In this new window you will want to decide whether you want the audio to be compressed or uncompressed. For uncompressed audio, leave the format as Linear PCM. In the Channels pulldown you will find many options, both in terms of the number of channels and channel order. Make sure to select the channel configuration that matches your session. When selecting 5.1 channels, remember that Soundtrack Pro defaults to an SMPTE channel order. It is recommended that you use that setting in the pulldown (5.1 L, R, C, LFE, Ls, Rs). Note: The channel order is editable back in the main export window; however, it is recommended to avoid trying to change the channel order within Soundtrack Pro due to ease of error. Approving these new settings will make your session ready for export. The video is also editable by selecting the Video Settings button in the Inspector window.
Uncompressed Linear PCM audio does not have to be interleaved with the video. If you decide to use a compressed format, AAC is the best option. In the popup Sound Settings window, change the format from Linear PCM to AAC. This will limit the options present in the Channels pulldown menu. The AAC format uses a custom channel order, one not used by Dolby (Film), DTS, or SMPTE. AAC uses a C, L, R, Ls, Rs, LFE channel order. Once you save the preset and return to the export window you must click the Edit Channel Layout button. In the popup window you must assign the same channel order that AAC uses. So, the left should become channel 2, right channel 3, center channel 1, etc. However, please note that sometimes the channel still reverts back to the SMPTE standard. Make sure to check your channel order using QuickTime or by importing your saved file back into Soundtrack Pro.
Exporting uncompressed surround mixes is by far the easiest and most surefire way to export your multichannel project. However, if you must use Dolby or Compressor, make sure that you double-check all your settings and also that the export turns out correctly before handing the project over to the client.
Exporting Examples
Exporting a Compressed Stereo Mix Master From Soundtrack Pro
- Save the Soundtrack Pro project via File > Save or Command + S.
- Go to the export window via File > Export or Command + E.
- Choose Mix Master in Exported Items.
- Select 320 kbps as the Stereo Bit Rate and change the Sample Rate to 48 kHz.
- Un-check the Joint Stereo and Smart Encoding Adjustments boxes.
- Type a name in the Save As box and choose an export destination.
- Click the Export button.
Exporting Uncompressed Surround Sound Stems From Soundtrack Pro
Figure 10-21 In order to export surround sound stems (mixes that are a subset of the master mix), select the various submixes in the Mixer window of the multitrack session.
- Save the Soundtrack Pro project via File > Save or Command + S.
- In the Mixer pane at the bottom of the Soundtrack Pro window click once on the green bar above the first surround submix (either Submix 1 or the custom name used, such as SFX Stem).
- Hold the Command key down while clicking once on the green bar of each of the other stem submixes in the session (Music Stem, Dialogue Stem, etc.).
- Go to the export window via File > Export or Command + E.
- Choose Selected Tracks, Busses, and Submixes in Exported Items.
- Choose AIFF from the File Type menu.
- Check the box for Create Multiple Mono Files.
- Conform the Bit Depth and Sample Rate to that of the session (i.e. 16-bit, 48 kHz).
- Type a name in the Save As field and choose a destination.
- Click the Export button.
- Find the finished files in a folder with the same name as that entered in the Save As field at the corresponding destination.
Exporting a QuickTime Audio/Video Interleaved File with Surround Sound
- Save the Soundtrack Pro project via File > Save or Command + S.
- Go to the export window via File > Export or Command + E.
- Select Master Mix in Exported Items.
- Choose Using Compressor in File Type.
- Click the Edit Presets button.
- In the Compressor program’s Settings window find the H.264 preset (Apple > Formats > QuickTime).
- Select the H.264 preset and click the Duplicate Selected Setting button.
- In the Inspector window change the name from H.264 copy to a unique name.
- Switch to the Encoder pane of the Inspector window and click the Settings button next to Video.
- Make changes to the Quality settings if necessary (in this case: Medium; Faster Encode [Single-pass]) and click OK.
- Click the Settings button next to Audio.
- Change the Channels setting to 5.1 (L, R, C, LFE, Ls, Rs).
- Match the Sample Rate and Size with that of the Soundtrack Pro Session.
- Select OK.
- Make other changes as necessary in the Inspector window.
- Click the Save button at the bottom of the Inspector window and return to Soundtrack Pro.
- In the Encode Video pulldown navigate to Apple > [name of the edited preset].
- Review the Summary window.
- Type a name in the Save As field and select a destination.
- Click the Export button.
Things to Remember When Exporting
- You should utilize Soundtrack’s options for efficiency. Plan ahead and use the most sensible setting for exporting.
- The Master Mix setting is the only item that is capable of using all of the exporting options, so organize your mix session accordingly.
- While uncompressed formats export in quicker than real time, compressed audio such as MP3 takes longer.
- If routinely exporting items from a mix session, make use of the Custom Preset option in the export window.
- In most cases make sure to match the Sample Rate and Bit Depth of the export window with those of the mix session.
- Soundtrack Pro’s default multichannel export channel order is the SMPTE/ITU standard (L, R, C, LFE, Ls, RS). If you need a different channel order make sure to change the channel order of Soundtrack Pro using the Edit Channel Layout button.
- Finally and most importantly, be professional. Always double-check your exports to ensure proper playback and quality.
Special Thanks
Scott Selter, graduate student at the University of Colorado, Denver, is currently working on a thesis on the topic of audio and video codecs as part of a Master of Science in Recording Arts degree. Thanks to Scott for preparing the majority of the material in this chapter.