8
TIME EFFECTS
Time effects are an important part of the post-production process. The primary time-based effect is the reverb effect, which is used to mimic the sounds of various locations and rooms. Other effects, such as the Delay Designer, are sometimes used to create special effects and are powerful in their own right; however, they are used less in day-to-day post-production tasks.
Reverb
There are three reverbs available in Soundtrack Pro 3. The simplest is the Soundtrack Pro Reverb, which provides the simplest interface and also the lowest amount of flexibility. It works well in small doses and doesn’t require a lot of system resources. Next is the PlatinumVerb, which is similar to the Soundtrack Pro Reverb but with a lot more adjustable parameters and some really great tools. The last reverb is among a new trend of specialized reverbs that more accurately mimic real acoustic spaces and is called Space Designer. Before we jump into the specific plug-ins, let’s spend a few moments exploring the history of reverbs.
A Brief History of Reverbs
Even though the term ‘reverb’ has not necessarily been the primary term used throughout the history of the effect, I am going to use it in each case for consistency. Reverb refers to the reflections of sound off the various surfaces in a physical space. These reflections bounce around and then decay into silence over time. If you have ever been in a gymnasium or large church, you have experienced a location with a long reverb time. However, even your living room has reverb; it is just a very short and dry reverb so it is not as noticeable. That being said, if you were to close your eyes and walk around your house you would probably be able to identify the various rooms by how your voice sounds in each space.
Chambers
The first reverb emulators were actually specially designed echo chambers that had a speaker on one end and a microphone on the other. The sound was fed to the speaker and then recorded through the microphone. It was very simple in concept, yet it took up a lot of room. I wouldn’t really call this an emulator, though, because the reverb was very real and not simulated via an effects unit or computer.

Figure 8-1 Direct sound, early reflections, and reverb.
Plates
An early reverb emulator design was a large steel plate encased in a wooden box. These units were around four feet high, one foot wide, and 15 feet long. While smaller than a chamber, they were still large by today’s standards. The sound was sent to a device that worked like a speaker and was attached to the middle of the plate. Microphone-like devices were attached to each side and captured the sound after it moved through the plate. Both chamber and plates created reverb-like sounds but could not easily be changed to mimic a specific location; therefore, they didn’t really make good tools for matching looped dialog to production dialog. Spring reverbs, popular in guitar amps, work on the same principle as plate reverbs but on a much smaller, and lower quality, scale.
Digital Reverbs
Once digital audio started to become more commonplace, it became easier to create effects that used delays to create reverb. In an actual space, reverb unfolds in a semi-predictable manner.
The original sound reaches your ears, then early reflections arrive after bouncing off nearby objects and surfaces. Then, the sound fills the space and arrives at lower levels from all directions. Once that happens, it quickly begins to die out. A digital effect can mimic this by using a series of repeated delays at various levels to create a reverb-like sound. The more layers of delay, the denser the reverb. The more complex the delay system, the more realistic the result. The Soundtrack Pro Reverb and the PlatinumVerb work on this type of system. They are decent reverbs that work well in a variety of situations, which we’ll get to in a little bit.
Convolution Reverbs
This type of reverb is on the newer end of reverb history. It uses impulse responses (IRs) from actual places to create reverb. These IRs are usually created in one of two ways, the first being through an actual impulse in a particular space. Either a starter gun being fired or a balloon popping do the trick, but a full-range sound (covering all the frequencies from low to high) is needed to create an accurate impulse. This impulse can be used directly in a convolution reverb to simulate the reverb for the original acoustic space.
The second method is to broadcast a sweeping sine wave through the audible range of sound and record how it sounds in the physical space. The way to do this is to place a speaker in the room, attached to a computer that plays a sine wave sweeping through the audio range (this sounds like a tone that starts really low and slowly rises until it is higher than you can hear). To record the sine sweep, you’ll need a microphone that is also hooked up to your computer. You can subsequently take the original sine wave sweep and the recorded sine wave and use them to create an impulse using a deconvolver. The deconvolver analyzes the differences between the two signals and converts the results into an impulse that contains enough information to recreate the sound of the room. The good news is that Soundtrack comes with a convolution reverb plug-in and an impulse response utility that allows you to create impulses for use. The reverb is called Space Designer and is one of the more powerful tools in Soundtrack Pro.
Soundtrack Pro Reverb

Figure 8-2
The Soundtrack Pro Reverb interface.
As you can see from the interface, this reverb is very simple. You only have two sliders: one to adjust the mix of the reverb and one to adjust the decay of the reverb. While the interface is simple, these two sliders are important to master because they appear on all of the various reverb plug-ins. The dry/wet mix percentage refers to how much original (unprocessed signal) should be mixed with the reverb signal. Typical levels are usually around 30% or lower. The decay determines the length of the reverb signal. Again, smaller amounts are typical. In both cases, you may find reasons to use larger settings to create special effects, but then again you would probably be using a different plug-in to do so. One problem I have with this plug-in is that it uses percentages instead of specific values. I always like to know the actual length of the decay in milliseconds and seconds and not in percentages.
PlatinumVerb

With this reverb, we have a powerful tool with which to create a variety of reverb sounds. Let us look at the reasons we might be using a reverb in the first place. Often, it would be to create the sound of a specific location to match on-screen dialog. This effect can be achieved with the PlatinumVerb plug-in, but the plug-in is still more often used for music production. It is a rather pleasant-sounding reverb with a smooth decay. To the professional’s ears, it sounds like a nice digital reverb, but nothing extraordinary.
The Early Reflections Section
The Early Reflections section is used to set the predelay for the early reflections, which is a delay that pushes back the initial reverb sound. At high settings, this can easily separate the reverb completely from the dry original. The effect that this is good at creating is the bounce of sound, such as a gunshot or other loud sound, off a distant wall. The sheer distance is much easier for the ear to understand when the reverb follows the dry sound after a short pause. These settings only apply to the early reflections, which are the reflections that happen first as sound bounces off the surfaces which are nearest.

Figure 8-4
Early reflections.
The Room Shape setting allows you to change the general shape of the virtual room. You can see this reflected in the graphic in the center of the plug-in. The more complex the shape, the more complex the reverb. Sometimes, a nice simple shape creates a reverb that will remain in the background and not draw attention to itself.
The Stereo Base defines the wideness of the reverb, with higher settings creating a very wide sound and lower numbers creating a mono reverb. This is based on virtual microphone placements in the room, with higher settings representing microphones that are further apart. Since this reverb is not a perfect model of a virtual space, the concept is rather more hypothetical in nature.
The Room Size slider changes the size of the virtual room. In conjunction with the decay time, you can create some very interesting sounds. For instance, if you set a very short reverb decay but a very large room size, it will make the processed sound larger without placing it in a large room. This, as you might imagine, can be confusing for the ear and is typically done for specific reasons like making footsteps seem larger than life or creating a dark effect on someone’s voice.
The Reverb Section
Once we are past the early reflections, we enter the Reverb area, which is what describes the sound when it is no longer bouncing off nearby objects but has bounced in so many places that it begins to fill the space and comes from all directions. Just like in the Early Reflections section, there is a delay setting for this portion of the reverb which is used to put a brief pause between the early reflections and the reverb, but I rarely adjust this parameter beyond whichever preset I am using. However, if the predelay and reverb sounds are blending together too much, you might try extending this setting to help with separation.

Figure 8-5 The Reverb section.
The Spread setting is similar to the Stereo Base of the early reflections. Use it to widen the reverb or to make it narrower. Crossover is a parameter of the reverb that causes more confusion but offers more excitement. It allows you to split the reverb into two bands for slightly separate processing. The crossover determines the frequency split point and the Ratio slider immediately to its right determines what happens with each band. At 100% the bands are equal in length. With settings below 100%, the low frequency band (as determined by the Crossover slider) is shorter. When above 100%, the low frequencies are longer than the high frequencies. My first question was ‘why?’ This appeared to be a confusing set of parameters that would only make things harder. What I realized is that the parameters make a couple of specific things really easy to do. The first is to create reverb that sounds like it is coming from a distance. Think about any action movie in which you hear explosions from a distance. Most of what you hear is the low frequencies. With this Crossover slider, you can set the frequency to be somewhere around 200 Hz and then set the ratio to over 100%, and as a result the low frequencies will ring out longer than the high frequencies. This creates a very realistic effect of things happening further away.
The Low Frequency Level slider allows you to turn up or down the low frequency band as defined by the Crossover slider. If the reverb is too muddy, this would be a perfect slider to turn down. If you are looking for some good low frequency rumble, then feel free to turn it up.
The High Cut slider allows you to reduce the higher frequencies. It is a low pass filter which cuts all sound above the set frequency. If you want the reverb to sound like it is in a normal carpeted room, cutting some of the higher frequencies will help. Leaving all frequencies untouched gives an effect that sounds closer to a metal or stone room. If, following the example in the crossover section above, you would like to create the sound of distant rumbling, then cut more of the high frequencies.

Figure 8-6 Density, diffusion, and reverb time.
The last three sliders are very important because they do a lot to determine the sound of the overall reverb. Adjusting the density of the reverb increases the number of reflections. Typically, you will want to set this higher to create more realistic and complex reverbs, but sometimes you may want to lower it to create a simpler reverb. The diffusion is defaulted to 100% and I rarely change it. The diffusion affects the consistency of the reverb and low settings result in grainy and unusable reverb sounds. Turning the diffusion down to a low setting gives a great place to explore for special effects. The reverb time determines how long the reverb should last. This is an area that will require a good ear and a good monitoring system because too much reverb tail really affects how the reverb sounds and either makes it muddy (with too much) or unnoticeable (with too little). Finding a good balance is critical to achieving usable sounds. See the section after we explore Sound Designer (see page 162) for tips on getting good reverb settings for different applications.
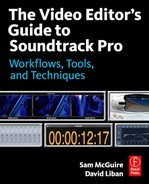
Master Controls
You can control the mix of early reflections and reverb using the slider at the top. The overall dry/wet signal can also be controlled by using the sliders on the right.
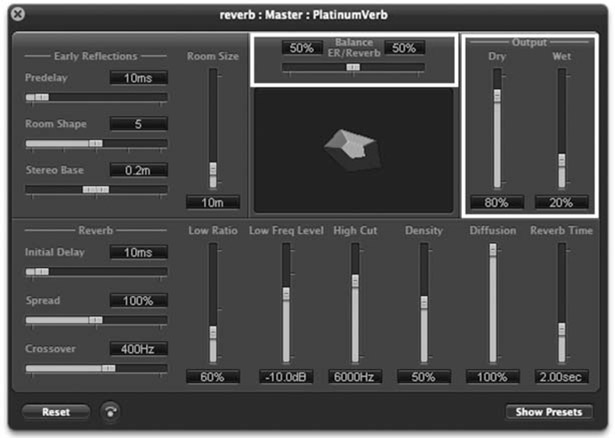
Figure 8-7 Master controls.
These two areas are important because they allow you to control what actually leaves the reverb effect. The first slider, which controls the balance between the early reflections and the reverb, allows you to create a space that is heavier on the early reflections. The end result would be a much smaller space that doesn’t sound as natural. If you want a reverb sound that is the most natural, leaving the slider in the middle is a good option.
The Output sliders control the wet and dry levels for the entire reverb. You will need to listen carefully to how it sounds while adjusting these sliders, because the results are very subjective. The best advice I can give is that it is common to set the reverb wet signal too high in comparison with the dry signal. If you are unsure, find a level that sounds good and then turn the wet signal down a little.
Space Designer
This next reverb tool is the real star of the collection. Space Designer is a very powerful convolution reverb. Its strength is in creating very realistic sound spaces, but unfortunately it is a very complex tool to use. I will explain a lot of the basic features, but some explanations are reserved for a more visual explanation on the DVD. Luckily, some of the features have already been covered in the equalization section (see Chapter 7) and so I will not repeat that material here.

Space Designer demo.
Interface

Figure 8-8 Space Designer.
The interface is deceptively simple. The primary area is a graphical representation of the impulse originally created either in a physical space or as a result of the Space Designer Synthesis tool. At the end of this chapter, I will explain about the Impulse Response Utility, which can be used to create presets, so see that section for more information on impulses. The center section of Space Designer is very useful because you can see what the different settings are doing to the sound of the reverb. This section has several different views: Volume Env, Filter Env, Density Env, and EQ. By clicking on each of these buttons, the overlay which is semi-transparent over the actual waveform of the impulse switches to represent the different sections. The Volume Env(elope) controls the volume level over time; the Filter Env controls the cutoff frequency of the filter section; the density represents the level and amount of synthesized reflections; and finally the EQ is a standard equalizer. Let’s cover the most important features first and then we’ll get to some of the fun stuff.
Level Adjustments
You can easily pick a preset from the list and use Space Designer without ever tweaking any settings. However, you will need to adjust its output level to make it fit in your mix. The interface is different in stereo/mono mode versus surround mode, so we’ll need to look at both. In stereo/mono mode, you will find two sliders on the upper right side: Dry and Rev. The Dry slider adjusts the level of the original signal being fed into Space Designer. The Rev slider adjusts the level of the reverb effect being generated by Space Designer (see Figure 8-9).

Figure 8-9
Output sliders.
Dave’s Video Editor Perspective
Using Tracks, Sends, and Busses
One of the biggest differences between Final Cut and Soundtrack is the mixer functionality. Everything in Final Cut is oriented around clips. If you want to put a filter on a clip, then that is all you have to do. In many situations your hardware will allow the filters to be processed in real time (no rendering necessary), but sometimes the filters will have to be rendered. While Soundtrack Pro has a powerful clip-based architecture, it also has a large amount of track-based functionality. I have spent time explaining this to video editors but with mixed results because it is a foreign concept that seems counterintuitive. Why, they ask, would you want a whole track in your sequence to be processed using the same effect? And if you do want to do it that way, why not just apply the same effect to each of the clips? That way, if you have a clip in the sequence that you want to be kept separate from the filter, you wouldn’t have to move it to a new track.
The main issue is that Soundtrack represents the merging of two worlds: music and post-production. In music, a track in a sequence typically holds a single musical instrument which is the same through a whole song, and might not even be split into smaller clips. Instead of applying effects to individual clips, the effects are placed on the tracks in which the clips reside and all clips that are on the track are processed. This is partially because in the pre-digital music production days audio was processed by separate effects units that processed all audio that passed through. Audio tracks in Soundtrack are like funnels. The clips on the tracks are fed through the track funnel and then out to the master. Each clip can be assigned effects, each track can be assigned filters, and so forth. This can be tricky because you have to remember to look in a lot of different places to see what effects are in place.
Sends and busses are where things get a little harder to understand. A send is like a patch cable on a patch bay. It connects an audio track with a bus. A bus is similar to an audio track but it can never hold audio clips; it simply acts as an effects channel that can process audio. The way to use a send and bus is to first create a bus and then tell an audio track to send a copy of its audio to the bus. Once that connection is made, the bus will receive a copy of the audio track’s audio and both audio track and bus will send that audio on to its assigned submix (see Chapter 13 for more on this).
There are two situations in which I use this functionality in post-production. The first is when I want to create a headphone mix for dialog replacement and voice over sessions. I send a little from each track that I want the artist to hear in their headphones and then I route the destination bus to a submix that is being sent out of separate outputs on the audio interface. This only works when you have an audio interface with multiple outputs. The second reason I use sends and busses arises when I am using reverb while mixing. This might be when I am creating a musical arrangement with Apple Loops, or matching dialog for a section to a specific location and I have multiple tracks using the same reverb preset. This way I can assign a bunch of audio tracks to the same destination bus by inserting sends on each audio track. Keep in mind that you can complete entire mixes without ever using sends and busses. These are just another option for those who understand them and prefer to work in a traditional audio-style workflow. The only weakness of using clip-based reverb filters that I can think of is that sometimes the tail of the reverb might be longer than the end of the clip and so Soundtrack will cut off the tail. Using a send/bus fixes this problem, but it means that everything being sent to that bus has to use the same reverb setting.
You can adjust the reverb level in several ways. If you are feeding the audio to a bus by using a send, simply turn the send level down using the Send Level slider in the Effects tab in the left pane. You will need to select the track that has the send on it and then expand the Send area in the Effects tab by clicking the arrow next to the Send check box (see Figure 8-10).

Figure 8-10
Send parameters.

Figure 8-11 Space Designer track fader.
You can also turn down the Rev slider (see Figure 8-9). Lastly, you can turn down the fader on the track which holds the Space Designer plug-in.
I prefer to send a full signal to the reverb (leaving the send at 0, which is the default), and then adjust the reverb level using the Rev slider or the track fader. If you are using a send then the Dry should be turned all of the way down to prevent having the dry signal on the original audio track and on the bus. If you are inserting Space Designer on the audio track itself, you will need to turn the Dry up so that you can hear the original audio. The other alternative is to have Space Designer plug-ins on every track or clip in your session, which can be complicated because you’ll need to create the same settings on each and it might hit you too heavy on the CPU usage.
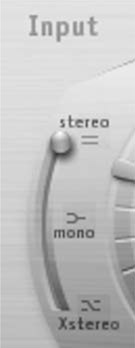
Figure 8-12 Input section.
On the left side of the interface you should see a slider that adjusts the stereo image of the reverb input. If you leave it up, all stereo information will be retained. Moving it to the middle combines the input into a mono file. Sliding it to the bottom will switch the left and right channels. I typically leave this in the default position.
In surround mode you will see a number of different sliders. The way to use Space Designer in surround mode is to insert it on a track or clip that is either a surround item or that is being sent to a surround submix. These sliders affect which channels the reverb will be heard in (see Figure 8-13). The first slider adjusts the level of reverb in the center channel. If you are placing reverb on a dialog track then you will want to leave this fairly high, but you have some flexibility with it.

Figure 8-13
Sliders in surround mode.

Figure 8-14 Surround Input slider.
The Bal slider adjusts the front to rear balance. Pushing this up places the reverb entirely in the front left and right speakers. The Rev slider sets the overall level of the reverb. Typically, you will set this quite low. If you set it high, it will overpower the dry signal and sound wrong. The Dry slider does the same here as in stereo/mono mode: it turns the unprocessed audio signal up and down. When Sound Designer is inserted on an audio track this should be set to the top, but if it is an insert on a bus track it will be set to the bottom. When Space Designer is in surround mode, the slider on the left side switches to an LFE slider (see Figure 8-14).
The LFE slider adjusts the level of the LFE in relation to the input of Space Designer. By default this is set to 0, which means the LFE passes through without actively creating additional reverb. I recommend leaving it this way to prevent the low frequencies of the source material from creating a lot of low frequency reverb. Instead of adding power, it would make things sound extra-muddy.

Figure 8-15 Impulse response length parameter.
Length
The next thing to adjust is the length of the impulse. If the reverb tail is too long then it will create a muddy mess. I tend to pick a preset that is slightly longer than I need and then shorten it to the perfect length. To shorten the impulse you can use the Length setting. When using an IR sample you can never make the length longer than the actual impulse file. When using a synthesized impulse (which is covered below), you can make it as long or as short as you like. The trick is in knowing how long or short to make it. Unfortunately there is no magic bullet for this issue.
Equalization (EQ)
The EQ panel is the next area of Sound Designer that it is important to understand. A preset may be good for what you are trying to do, but with a little EQ you can make it great. The approach to take is simple: if the reverb is sticking out too much, then turn down the high frequencies; if the reverb is not sticking out enough, then turn up the high frequencies. If there is too much bass sound coming through the reverb, then turn down the low frequencies. That is just about the extent of typical reverb equalization. Of course, you can always do more as the need arises. For more on equalization, see Chapter 7.

Figure 8-16 EQ view.
The remainder of the features of Space Designer are better understood with examples. So, instead of further outlines, I am going to push you to the DVD where the rest of the features for normal use are explained and demonstrated.

Additional Space Designer demo.
Synthesized Impulse Responses (IRs)
What I am going to do now is explain how to create a synthesized IR for use in creating custom reverb presets. Instead of loading an IR created in a physical space, Space Designer is able to create an IR based on settings input on the interface. It uses the Volume Env, Filter Env, Density Env, EQ, and Length settings to create an IR that matches those settings. When you make changes to these parameters and then press the Synthesized IR button, a new IR is created to match. This is an extremely powerful tool to have access to. To help you understand why this feature is powerful and how you might use it, let me describe an example situation.
Example
When trying to match the sound of a room used in a particular scene, the IR synthesizer can be used to replicate the room’s characteristics. First, you’ll need to find a part of the audio track that has a sharp impact. This, if in an isolated moment, really lets you hear the characteristics of the room. If the production team used a clapping slate this would provide a very clear idea of the natural reverb in the room. The clap is heard first followed by the natural decay of the sound in the space. If there is no clear impact in the production sound, then a more subtle approach will still provide enough sonic information – try and find something like the T at the end of a word or a footstep.
Next, find a sound similar to the one in the production sound that is very dry, without any sound tail at all. This is used as a sample for comparison with the impact sound in the production audio. At this point we have a portion of the production audio that contains an impact of some kind and a similar sound that is dry with no reverb tail at all. If you still need to find a good, dry comparison sound, look through the sound effects included with Soundtrack to find a similar sound and then trim the end of the file off until the sound has no tail. It doesn’t have to sound good, just similar and dry. Next insert Space Designer on the track with the dry sound. Finally, and this is not a perfect science, tweak the parameters of Sound Designer until the reverb matches the production location reverb. The method for doing this is as follows:
- Start with the Length parameter to match the length of the reverb. Listen to the production sound and make note of how long it takes for the tail to die out. Match the tail using the Length parameter.
- You can adjust the Volume Env to match the decay rate. If the reverb dies down quickly at first and then slowly ebbs into nothing, you can set the Volume Env to match this pattern using the graphic section. The shape will need to match the volume decay.
- After the decay matches, set the Filter Env. This is a little harder because you have to listen carefully to how the decay changes over time. Does it get darker or brighter as it decays? The higher the line in this envelope, the brighter it will typically be. Remember that the Filter Env controls the frequency of the filter located at the bottom of the interface. You can choose between high pass filters, low pass filters, and band pass filters. You can create a reverb tail that starts quite bright and then over time becomes much less so.
- Once you set the Filter Env, the resulting reverb is often very close. You may, however, want to tweak the Density Env, which is akin to changing the material the walls of the room are made of. The lower the line on this envelope, the more distinct the reflections. You may lower it when emulating a metal, brick, or glass room. Settings that are too low, especially towards the end, may cause quality issues because Sound Designer tries to break the reverb tail into individual reflections when in fact reverb is, in the advanced stages of its tail, naturally made up of completely indistinct reflections. Trying to go against this gives unpredictable results. A part of this density is the Reflection Shape slider, which also changes the smoothness of the reflective surfaces.
- Next you can adjust the EQ, which will change the overall frequency spectrum. You can make the reverb a little brighter or darker overall, or accentuate specific frequencies throughout the entire frequency range.
- One of the last things to consider is the stereo image. Sound Designer excels at creating big and beautiful reverbs. If you are trying a match dialog recorded with a single microphone then you probably don’t want a big and wide stereo reverb emulation. You can adjust this using the Spread knob. Using a pair of headphones will help when matching the stereo/mono imaging. Headphones act like a magnifying glass for imaging issues. If you listen to the production sound followed by the Sound Designer reverb and the latter sounds a lot wider, adjust the spread until they match better by turning it down.
- In the end, you may have to do some creative tweaking. I have randomly moved envelopes around to great, but accidental, success. You never know.
Dave’s Video Editor Perspective
The Impulse Response Process
As a filmmaker, the impulse response process is very promising and exciting. Many new filmmakers are quick to simply re-record audio and try to replace the audio in a scene. The problem is that, if you are recording in a large room, the audio sounds very different than audio recorded in a small dead room, like a sound booth. If you try to simply replace the audio untreated, the viewer will notice that the audio does not sound like it matches the space that it is in. Often the new filmmaker will also use a different microphone than the one they used on set, producing multiple reasons why the audio sounds ‘wrong.’ The impulse response process provides you with a tool that will help you to create a similar sound space to that of the original location. This could make ADR a less painful and less expensive experience.
Reverb Usage
I prefer to use reverb as little as possible. I think it has a tendency to muddy things up and it is very easy to overdo. The possible uses of reverb that are typical include:
- Matching ADR, Foley, and other sound effects to visually determined locations;
- As an effect for scary/ominous/intense/flashback scenes;
- When creating a music bed from individual Apple Loops.
When using reverb, err on the side of just enough or too little. Whatever you do, don’t think that putting reverb on replaced dialog will make it fit all by itself. Automated dialog replacement fits when there is a combination of dialog, Foley, other sound effects, and then reverb. Combine that with some surgical equalization and then the reverb will do its job.
Surround Reverb
Placing a surround reverb onto a dialog track is generally a bad idea. Dialog is typically panned to the center channel in a surround mix, and hearing dialog tails coming from the rear is often confusing for the ear unless done with a high level of subtlety. However, placing an exploding car into a surround field with an appropriate surround reverb might be just the ticket. Just don’t overuse the ‘surround’ reverb option.
Delay Effects
This is another set of plug-ins in Soundtrack that is aimed primarily at music production and is not as useful in post-production. A delay takes the input signal, saves it in memory for a period of time, and then releases it. This pushes the sound back in time from where it originally would have played. You can do a number of things with the delayed signal, such as mixing it in with the original sound, making it repeat more than once, change the panning of the repeats, making the repeats slowly fade out, and a lot of other really creative effects. Instead of explaining every feature of the three delay plug-ins that Soundtrack has, I’ve picked several post-production tasks that you might want to use them for and explained how to do enough to accomplish them. There is also extra material on the DVD showcasing additional music related tasks.

Delay plug-in demo.
Echo Effect
Creating an echo effect has several uses as a sound design tool. If you are working on a scene in which dialog takes place in a canyon or an alleyway, you might want to create an echo. For each of the following scenarios, we are going to use the Delay Designer. This has a very similar interface to the Space Designer, and is in many ways just as powerful.

Figure 8-17 The Delay Designer.
Dave’s Video Editor Perspective
Echo
Coming from a filmmaker who has shot in an echoey environment, you are better off adding echo in post-production than recording it on set. I once shot a scene in a stairwell for a film I was working on and that space was a bouncy, echoey location, so much so that some lines were hard to understand and the natural decay of the audio would bleed over the lines spoken by the other actors. What any sound designer will tell you is that there is no magic button to remove this sort of echo problem. Generally, if this is the location you shot in, you have two options: one, re-record the audio or two, live with the sound quality as you recorded it. In hindsight I would have chosen a better location, or perhaps I could have brought sound blankets to minimize some of the echo, but that may or may not have helped.
There have been times when I’ve wanted to create an echo effect and what I did, right in Final Cut, was to duplicate the audio track a few times and offset those audio clips with a bit of a reverb effect applied. Also, Final Cut has a pretty simple echo effect that can do this fairly well.
The center section of the Delay Designer is easy to use once you understand how it works. Each line is a delay of the original signal. You can click on each and then adjust the parameters at the bottom and on the line itself. Let’s start by creating a set of delays that sound like an echo. You can add delays by clicking in the lane below the graphic center or by using the Start/Last Tap feature on the left side of the interface.

Figure 8-18 Start tapping.
To begin using the Start button, also known as the Tap feature, click it once to activate. Then click the Start button again at the intervals at which you want to add delays. This is a real-time process, which means that from the moment you start the tap it will run like a clock, creating time-accurate delay markers when you click. To create an echo, think of the sound you wish to achieve and imagine the echo repeating in your head. Click Start, using the initial start click as the sound that creates the echoes, and then click again at the points in time when you imagine the echoes.
Figure 8-19 Adjusting the level of the delay.
Once you have done this, you may want to morph the delays to sound more realistic. As the echoes repeat, they will become softer and duller. Use the Level control to make each delay progressively lower. You might also want to adjust the Cutoff frequency by switching the view to Cutoff and pulling these sliders down as well.
The last settings you should adjust are the Dry/Wet sliders. The dry signal is the original non-delayed signal, which should be mixed in with the delayed wet signal. Set these based on the resulting sound.

Figure 8-20 The Dry and Wet sliders.
Special Warped Sound Effect
Whether the character is waking from a nightmare, in a chemically induced trance, or in a heightened state of frenzy because they are lost, the Delay Designer plug-in can add plenty of psychedelic sound to the scene. The best way to find the desired result is to explore the presets to find one that is similar in concept to what you are looking for. Especially useful for this type of effect are the Warped delays, available as presets in Delay Designer.
The preset I loaded in Figure 8-21 is a prime example of a Warped delay. Each delay point is transposed to the extreme using a trade-off pattern of one high and then one low. To accomplish this, all you would need to do is to set the pattern as described above, then switch the view to transpose mode, and finally drag each line in opposite directions. As you can see in Figure 8-22, there are many more drastic possibilities available.


Figure 8-22
Extreme delay setting.
Doubling
The last fairly standard use for delays is doubling. This effect requires that the sound be on a stereo or surround track, meaning that it won’t work in mono. If you have a file of general walla (unidentifiable background conversation), you could use Delay Designer to thicken it up. The same is true for traffic noise, avalanche sounds, water effects, and so on. Any time you want to subtly double sounds, a delay is an option. You could also copy and paste files onto different tracks with a similar result, but the Delay Designer allows you to change the repeated portions so that they sound different from the original.

Figure 8-23
Doubling sounds with various levels.

Figure 8-24
Doubling sounds with various pitch transpositions.

In Figures 8-23 through 8-25 you can see a doubling scenario that repeats the original sound three times. Each of these repeats has a different level (see Figure 8-23), each of these repeats has a different pitch setting (see Figure 8-24), and each of these repeats has a different pan location in the surround image (see Figure 8-25). All of the settings combine to create a unified texture that is hard to identify as a group of individual elements, and rather appears to be a complete wall of sound.
Other Delays
The other delays are useful but limited in comparison with the Delay Designer. As stated earlier, these other delays are introduced further on the companion DVD. You will probably never use them but you never know what will come up. If you are working on a lot of music tracks, you may find yourself using them all of the time. As we move into the next chapter we leave the discussion of effects behind and begin to look at the mixing process.