9
MIXING
In the type of projects you’ll probably be working on in Soundtrack, there are two normal experiences. The first is that you will edit and mix as you go along, ending up with a finished project. The second is split into more defined sections, starting with editing, passing through mixing, and ending with the final deliverables. You may have even done a lot of the work while still in Final Cut, only passing the audio into Soundtrack for finishing. No matter which process you follow, the mixing capabilities of Soundtrack are a huge asset towards creating a high quality final audio track in an efficient manner. What this chapter is not going to cover is the process of mixing full-length feature films in the ‘Hollywood’ tradition. Soundtrack is not the right tool for those types of projects, although it is getting closer with every version. The problem is that its set of functions is limited in two key areas: automation and surround sound implementation. While Soundtrack does have automation and surround sound capabilities, they are still less developed than the tools that a professional mix engineer requires. What this means is that, if you are a video editor working on audio, you will probably have plenty of power to complete the tasks you have in front of you. But, if you are an audio editor working on tight deadlines day in and day out, some of the features that would help you to perform your job efficiently are not available in Soundtrack. For instance, the automation in Nuendo is a highly complex system that has a great many features that take recording and editing automation to a whole new level. There is an entire control panel with options such as recording current automation level retroactively to the previous starting point. This means you can work on automation for a section and find the right level, and then have it added onto earlier portions of the track using a shortcut. In Soundtrack, you would have to either re-record the earlier section or use the mouse to change the part. The difference is one click versus an additional pass or manual changes. This is one example of how Soundtrack is still on its way to becoming a true competitor of the big post-audio tools. However, it can still accomplish the same tasks and it has a lot of other features that are unique.
Tools for Mixing
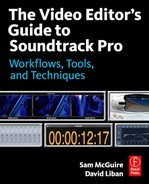
The two primary areas of Soundtrack that are used for mixing are the Mixer tab and the envelope lanes on the timeline. The mixer interface is based on hardware mixers that use a vertical track layout and vertical level faders (see Figure 9-1). Each track on the timeline is attached to a track on the mixer. You may already be used to this because Final Cut also has an audio mixer; however, there are some differences. The main divergence is that Soundtrack allows you to use both clip-based and track-based effects, while Final Cut only allows clip-based effects. Further, in Final Cut you can only add filters when a clip is selected and you cannot add effects to the sequence track itself. There are a few reasons why it is important to have these features in an audio mixer.

Figure 9-1
Audio mixer. Reproduced with permission of 42 Productions - Boulder, CO.
The first reason deals with the time-based effects covered in Chapter 8. When you place a reverb on a clip in Final Cut, the reverb ends when the clip ends. When the effect is track-based, in Soundtrack, it continues after the clip ends because the track continues. There are three places in Soundtrack in which to open track-based effects: the Mixer tab in the Insert area (see Figure 9-2), the Effects tab in the left pane (see Figure 9-3) and the Tracks tab in the left pane (see Figure 9-4).
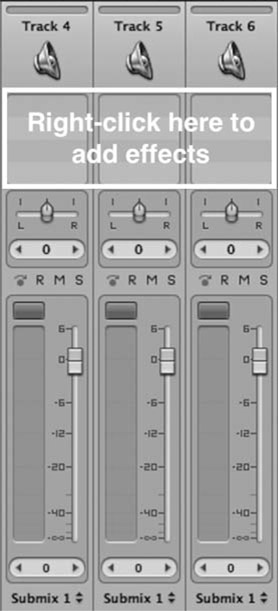
Figure 9-2
Mixer effects.

Figure 9-3
Effects tab.
The effects that you insert in these locations will affect everything that is on that track. Every clip on a track that has a reverb plug-in will be processed through the reverb. In a lot of ways this seems limiting to video editors who are moving to audio for the first time. ‘What happens if you want to put a single clip through a reverb – do you have to waste an entire track to do it?’ Since the beginning of moving pictures everything has been defined in frames of still images that have a distinct and tangible existence. Conversely, audio started as grooves on cylinders and later moved to magnetic tape. These formats had no distinct ‘frames’ and were continuous in nature. Until computers matured, audio processing was primarily implemented using real-time effects, while film has always been processed one frame at a time. This history is expressed in modern software design, although the dividing line has definitely grayed over the years. Soundtrack is capable of both clip-based (frame-by-frame and clip-by-clip) processing and real-time track-based processing (continuous, like a groove on a record). You can put a reverb on a track that contains a lot of files to process them all, or you can add reverb to individual clips. In fact, using the busses or submixes, you can add a single reverb to any or all of the tracks at the same time. In various places in this book I explain this system. In Chapter 13 there are a few ‘recipes’ that help demonstrate how the various tracks, busses, and sub-mixes work. Additionally, we’ll be spending some time in this chapter explaining how you will use the various tracks during the final mix.

Figure 9-4
Tracks tab.
Automation
Automation is a critical part of the mixing process. While Soundtrack does not have the most sophisticated system of automation, it has enough to do most work. Final Cut has similar automation nodes, which are commonly called keyframes. In Soundtrack the automation lives in envelope lanes on the timeline. This is one area that could use some further development by Apple because there should really be track-based automation and clip-based automation. In Soundtrack there is only track-based automation and in Final Cut there is only clip-based keyframing. When you adjust the level of a clip in Final Cut, it is attached to the clip. When sequences are sent to Soundtrack, the keyframes are converted to track-based automation and it becomes too easy to lose the link between clips and levels.
Automation Modes
Aside from drawing automation in manually using the Arrow tool, you can also record automation in real time using the controls on the mixer or on the plug-in interfaces. You can also attach a control surface which provides tactile control over the different effects and track levels. The modes are as follows:
- Read – allows the automation to be read by the tracks and plug-ins.
- Latch – sets the tracks into read mode until a parameter is touched and then the mode is switched to write mode.
- Touch – reads the automation unless a parameter is currently being held, in which case the mode switches to write until the parameter is let go.

Figure 9-5 Automation mode selection.
Each of these can be broken down even more by category.
Read Mode
Read mode is the default automation position. Unless you are actively recording automation, this should be set as the automation mode. The reason is that if you are in one of the other modes, you can easily mess up the automation by touching any parameter.
Latch Mode
Latch mode starts off in read mode until an automatable parameter is adjusted, which instantly switches the mode to write. Write mode is not a mode in and of itself, but is half of what latch mode does. It takes the current setting and writes automation at that level. If you move the automatable parameter, the change is recorded into the envelope lane. Even when the parameter is released the automation will continue to be recorded until playback stops. The write mode is the most dangerous of all modes because it will erase all of the previous data.
Touch Mode
Touch mode is the most used automation mode because it reads the current data and switches into write mode only when a parameter is in use. Once the parameter is released, everything switches back into read mode. Further, you can alter small portions of the envelope without having to worry about accidentally overwriting previous data.
Thinning
You can adjust the amount of thinning that takes place by moving the Automation Recording Sensitivity slider under the General tab in the Soundtrack Preferences. Thinning is the process of automatically reducing the number of keyframes used to represent the automation envelope. When recording automation, as many key-frames as needed are used to represent the automation envelope and the thinning takes place upon completion of the automation recording. The further to the right (Low) that you slide the parameter in the Preferences, the more of the data is removed during the thinning process (see Figure 9-6). When the slider is set all of the way to the left (High), no data is removed at all (see Figure 9-7).

Figure 9-6
More thinning.
The primary reason for thinning automation is processing power. The more automation nodes that are present in a project, the higher the processing hit. A long film with many tracks will require a lot of computer power to complete. Thinning also helps with editing automation nodes; the fewer you have, the easier it is to manipulate them. It is possible to thin too much and create a sound different from what you originally recorded and so the default is the recommended setting. If you are constantly having CPU problems, consider this as one way to reduce the load.

Figure 9-7
No thinning.
Control Surfaces
Control surfaces are a great way to efficiently mix projects. A control surface allows you to take control of multiple tracks, with fader controls to set the levels for each of the tracks. While control surfaces often look like audio mixers, they are rarely more than an extension of your computer’s mouse. This means that you can almost always do the same work with your mouse and it is only for efficiency purposes that you would use a control surface. Soundtrack works with several of the prominent control surface protocols, including Mackie Control, Logic Control, and Euphonix EuCon. These three cover most of the standard control surfaces you might typically use.
To set up a control surface, navigate to Soundtrack Pro > Pref erences > Control Surfaces. In order to install a device, you have to have it currently attached with all required software installed. In fact, you’ll need to carefully read the documentation that comes with the control surface. Once it is installed and attached, you’ll be able to choose the type of controller from the dialog in the Preferences (see Figure 9-8). You can also click the Control Surface Buttons button in the Preferences to open a window in which you can choose, in a limited way, what some of the buttons can control in Soundtrack (see Figure 9-9). Select an item from the list of commands and drag it onto the available list of controls.
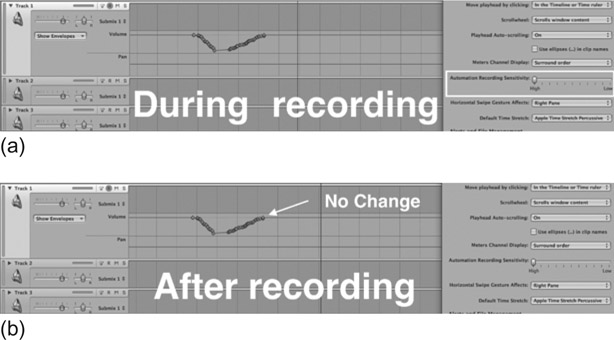
Figure 9-8
Euphonix controller not installed message.

Figure 9-9
Euphonix controller.
You have to be really good with the control surface to mix using the faders. It is very tricky to set audio levels in ‘real time’ because you have to remember how the levels sounded originally, have a clear concept of what you want them to sound like, and have the coordination to implement it on the fly. This takes practice! Most of the time control surfaces are used for their other key commands, which means you might as well avoid them and stick with your computer keyboard. One really nice thing about a control surface is that it lends credibility to your mixing environment with clients. A good-looking control surface can become the centerpiece of a room, even if you end up using your mouse most of the time; just don’t use that justification when proposing it to your accounting department!

Figure 9-10 Control Surface buttons.
Mixing
The process of mixing involves a number of different components. These include setting volume levels, panning items, applying effects, and creating the final audio files. By the time the project arrives at the final mix in a traditional setting, all of the sound effects, Foley, replaced dialog, music, and ambient tracks will have been put into a single session file. This allows you to have access to all of the parts of the project so that they can be balanced together. Of course, the other option is to put all the pieces together as you progress through the mix process. This only works for very simple projects that don’t have complex sound design and thousands of audio clips. If you are dealing with a complex project, it is recommended that you pass the project on to a post-audio facility because they can handle large projects in an efficient manner. If you have a decent sized budget, it will probably save you money to have the ‘professionals’ do it because if someone without the right experience works on the project it will take longer and most likely cost even more. Let’s go through each of the typical parts of a mix.
Dave’s video editor perspective
Interactions with the Audio Engineer
If you are able to hire a professional audio engineer, you are more likely to save a great deal of time and headaches. Once I’ve given the OMF files to that audio person, I will basically leave him or her to do what they do best. That is, clean and improve the existing audio. When that person has done the first pass of their cleaning and mixing, I will sit and listen to the film while they are present. As the director, I will make comments and suggestions and he or she will make notes and discuss what can and cannot be accomplished. After I leave they will make the adjustments and continue sweetening. Basically, I find it counterproductive to sit in the room with the sound designer. Most people do not work best when someone is watching (or listening) over their shoulder. So, let them be, and let them use their ears and training without worrying about what the director is thinking from moment to moment. When they are done with that pass I will get the call that the mix is ready for another listen. We’ll go through the film again, making notes, and hopefully will then be close to completion.
Levels
The process of setting levels does not necessarily have a ‘set in stone’ procedure. I have experienced many different work-flows for accomplishing this task. The primary considerations regarding how to do this begin with a discussion about what your project needs. The dialog is almost always the most important element and so I typically put that in place first. I mute all of the other tracks and then slowly un-mute them as I progress through the mix. My entire group of dialog is typically sent to a dedicated dialog submix. This means I can automate individual dialog tracks or automate the dialog submix. All of the ambient matching on the dialog should have already been completed, so you should be able to focus on the big picture of making sure that the dialog can be understood and that the music and sound effects don’t bury it. In light of this, you will set the overall levels using automation throughout each scene. I have seen a number of ‘audio engineers’ use compressors/limiters on all of the tracks to control the dynamic range so that they don’t have to create automation. Sometimes this works, but it often creates less desirable results because the audio has no room to breathe and is constantly squashed.
Instead, you can use automation to level each line of dialog as you match it to the other elements. You can accomplish this task by either using a control surface/mouse controlling the faders, or manually drawing in the automation on each track. Obviously, using a controller can save time, but only if you can master its use. If you are starting the mix with a clean slate (no previous leveling), then use the latch automation mode. This lets you record the automation as any previous automation points are deleted. You can set a level and then let go of the fader and it will continue as long as the project is playing. On the next pass (unless you messed up the first pass), you should use the touch mode and make changes as needed. The touch mode will only record new automation when the fader is held; when you are finished updating a section, let go of the fader and it will return to the previously recorded level. As you set the levels for each of the elements you will also set the panning and use processing to achieve a balanced mix.
Panning
Panning is the process of choosing which speakers the sound will be sent to. In a stereo setup, you only have two speakers and so you can pan between them. An interesting phenomenon that happens when you pan between two speakers is called a ‘phantom image.’ Any sound that is equal in two speakers will sound like it is coming from between them. This phantom image is what allows a stereo image to sound very realistic. The problem is that the image does not have a solid anchor and depends on the listener being exactly between the speakers. If the listener is closer to one speaker, the image will shift towards that speaker. So, if you are sitting near a speaker, the sound will come from the side instead of the center. If a movie in a theater is played in stereo, you should avoid sitting on an edge row near the front because all of the dialog will sound like it is coming from the side of the screen instead of the center. In surround, dialog is almost always set to come from the center speaker to avoid imaging problems. With the center channel, dialog will always be anchored in the center.

Figure 9-11 The panner.
As you move through the different elements in a mix, you may have to try a few different things to help the balance work. If you are working in surround, you can sometimes place sounds around the surround image to help prevent sounds from stepping on each other. However, sounds placed around the surround image have no place to hide if they are sub-par. If you are working in stereo, even more care will need to be taken to prevent sounds from stepping on each other sonically. One of the tools you will use to do this is the panner. The anchor of both the stereo and surround mixes is the dialog. Since the dialog is so important, you will often need to avoid placing anything else in the same location, opting instead to pan other sounds outside of the center location.
Think of panning in terms of sync items. The most important sync item is dialog, and it is panned in the center. Next are hard sound effects associated with the people or elements on screen and these will need to be panned either near the center or to match the location of the action they are associated with. If someone is walking across the screen, you can pan the footsteps to match the movement. Any dialog that is taking place will no longer be stepped on by the footstep sound effects. A red flag may have just popped up for some of you because there are two levels of project that typically exist. If you have to use mostly production dialog for all of your sound, then panning sound effects is often out of the question unless your audio person recorded stereo/surround sound on location. The reason for not being able to pan effects is that production audio typically uses a boom mic with various wireless lavs. If you are using the boom for the dialog, the footsteps may already be a part of that dialog track. Hollywood blockbusters use mostly replaced dialog and the effects are recreated by Foley artists and sound effects libraries. This means that they can be panned wherever you like, completely separately from the dialog track. Lower budget films often don’t have the luxury of replacing all of the production sounds, leaving them to coexist with the dialog.
Next in the order of sync items would be sounds that don’t have any hard sync with related visuals. Examples of this are ambient tracks of birds and nature sounds, city traffic, and walla (unintelligible dialog tracks representing crowds). These can be panned wide in the stereo image, leaving room in the middle for higher priority items. Most of these types of sounds come in stereo/surround formats and might work without panning, but some them will need to be panned away from the center.
Dave’s video editor perspective
Wild Sounds
It is always necessary to augment the soundscape of your film by adding sounds that may not have been present when you shot the film. As a filmmaker, you should be thinking about your sound before the shoot and imagining all the sounds that you’ll need to gather in order to better tell your story. Sometimes this happens in the editing phase, when you see what would improve the impact of the edit. Basically, you will make a list of the audio that needs to be gathered that is non-synchronous to the picture, for example car sounds, hitting sounds, footsteps, keys jingling, and so on. These are called ‘wild sounds’ because they are independent of the picture prior to you placing them in your edit. Often the sound designer will suggest and even gather this media for you, but it is really up to the director to decide what goes in. Remember, a good film is at least 51% audio. People will forgive a bad image, but not bad audio.
Last is the music, which is an important part of the process but often not directly related to the visuals in terms of sync. It is often a large amount of what is placed in the surround channels and furthest out in the stereo image.
One last thing about panning is that you will also want to check for consistency between the panning of various clips. This is kind of like having a continuity check on set. You need to make sure that the panning remains consistent from clip to clip. The best way to do this is to use headphones because they act as an audio microscope for imaging issues, allowing you to hear the slightest shift left or right of the audio files in the stereo field. Of course, this doesn’t work with surround because there are still very few surround headphone sets. Just make sure you listen very closely. You can also automate the panning settings to adjust various sounds in the mix. This works in exactly the same way as automating the volume levels.

Panning demonstration.
Dave’s video editor perspective
Panning
Since I tend to work on small projects for video and television and use only mono microphones, I generally choose not to mess with the pan settings. My thinking is that I really cannot anticipate where the film will be screened and what sort of listening environment might be available. So, I will generally try to have my audio set to left and right mono, with both channels equal in strength. This way, if the film is played in a theater, or on a television where one of the speakers might be inoperative, I know at least that all of the sound will be available to the listener. If the music I am using is in stereo, I may leave it as stereo, since as the filmmaker I am more concerned with the spoken word. For me, it’s about communication. If you are trying to make people sound like they are in separate parts of the room through speaker selection, you could be burned in a lesser venue. Case in point: I screened a film at a festival in Upstate New York. The venue had a problem and only one speaker was working, so many filmmakers were upset when they could not hear a portion of the sound. I would have preferred to hear from both left and right, but at least the viewers heard everything, even if it was just on one side of the theater. So, to summarize, if you don’t know where it will be played and you cannot make multiple versions of the audio, play it safe. Two-channel mono is a safe bet.
Processing
Once your levels are set and the panning completed, you may find that some of the items are still not sitting correctly in the mix, which might have one or more of the following symptoms:
- Some sounds are covered up by other sounds.
- Too much dynamic range – a sound may be soft one moment and then too loud the next; automation can help with this but not in every case.
- Some sounds might not sound natural and so stick out.
If you have a scene where there is dialog, music, and sound effects, then you might have to use a variety of processing tools to balance the elements. This is the hardest part to fully explain in text format because of the nature of audio mixing. The reason for a sound not fitting in the mix could be any one of a hundred different things. Instead of going in too deep, I am going to suggest a pragmatic approach. One, listen to all of the different elements together and figure out which is causing the problem. This usually involves deciding which of the elements is the most important and blaming the others for getting in the way. Two, figure out what the problem is with the element that is to blame. Is it a sound effect that is covering up the dialog? Is the music getting in the way because it is too rhythmic? Three, once you can put a label on the problem, you’ll need to find a tool that can help. Equalizers can help sculpt the sound. To make the music fit around the dialog you could reduce certain frequencies of the music. If a sound effect is really loud but it has a lot of soft portions as well, consider a compressor/limiter to control its dynamic range. If the sound effect sounds too close to you while the dialog sounds further away, placing reverb on the sound might help it fit better. Specialized effects like phasers or vocoders are not going to help in most cases. Four, process the problem clip(s) and/or the track on which the clip(s) reside(s). If the problem is small and on a single clip, process the individual clip. If the problem covers a much longer section, consider using a track-based effect.
Dave’s video editor perspective
Sergio Leone
Some of the great films of Sergio Leone (Once Upon a Time in the West, Hang ‘em High, Fistful of Dollars) are memorable for the characters created and their engaging stories of gunslingers, set in beautiful desert vistas. However, in the 1960s, the industry standard of post-production audio was basically one or two tracks of analog audio tape. Leone was known for recreating all of his audio in post and, on location, shot almost entirely MOS (without sound). Watching these films today, you’ll notice that the audio does not appear to be coming from the location seen on the screen. A noticeable example is the sound of the harmonica that Charles Bronson plays in Once Upon a Time in the West. There is reverb, yet he is playing in the open desert where reverb could not exist. There are no walls for the sound to bounce off. Further, the dialog in the film sounds like it was recorded indoors, when again the image is of people talking in the open landscape.
It is this sort of thing that makes the viewer notice a discrepancy, and it takes us out of the viewing experience. Many new filmmakers don’t take these issues into account and try to re-record audio in locations other than where the film was shot. More times than not, this is distracting to the viewer. Soundtrack can help to recreate the presence for audio that is not recorded on location, which is a great benefit to filmmakers who choose to work, as Leone did, MOS. I am sure if Leone had these tools 45 years ago he would have used them. Perhaps one day someone out there will re-edit the audio to fix the issues of the spaghetti western genre. Some will argue that doing so would take away from the feel of the film but, personally, I would love to see such improvements to these great films.
Master Levels – Submixes
Once you have all the elements for each category leveled in their own areas, you can mix using the submixes. For documentary-style projects, this might only include a music submix and a production audio track. Either way, at least you can focus on mixing two faders instead of four or five, depending on the project. Once you have automation in place for the submixes, you can always adjust the original tracks to make fine-tuned adjustments.
Surround Sound Options
If you are mixing for surround, I recommend a book by Tom Holman called 5.1 Surround Sound. This book covers more about surround sound than just about any other. I wish there was room here to really get under the hood with surround, but all we can do is to cover the basics, such as the surround panner (see Chapter 13, topic 16 for additional surround panner information). The most convenient thing is that the panner interface shows you where the sounds will end up in the surround image. It does this in two ways: through the blue, green, and red bubbles on the interface and through the little white dots outside the circle next to the speakers. The gray puck on the interface can be moved around to anywhere in the surround field. If you are mixing in surround, it might be temping to go crazy with surround panning, but subtlety is most often the best course of action.

Figure 9-12 The surround panner.
Surround Panner Parameters
The first parameter is Rotation. This takes the current surround output and spins the entire thing around. The relationships between sounds remain the same because all items are shifted equally.
The Width parameter spreads the sounds wider across the channels. This is useful for diffusing a sound’s location so that it is harder to identify the direction it is coming from. For example, a sound being sent to the left and right channels would be expanded so that it is also in the surrounds and the center channel.
The Collapse parameter is slightly more complex because it changes the fundamental way in which the panner works. When the puck is moved around the panner, the sound is sent to all outputs at varying levels depending on where the puck is located (Collapse at 0), or the sound actually moves between the outputs and the levels only appear to change (Collapse at 100). I recommend leaving this at the default because the implications rarely affect your mixes.

Surround demonstration.
On the other hand, the Center Bias slider is very useful. It is a way to either make the front speakers create a phantom image or to use the center speaker as an independent channel. At a setting of 0%, the center channel won’t be used, but you’ll still hear sound from the center because anything panned in the center will be sent to the left/right channels, which create a phantom image. If you use a surround sound effect, this could be one way to minimize the potential overlap with the dialog because you can turn off the use of the center channel by setting the Central Bias to 0%. You will see this change reflected in the white dots around the edge of the circle.
Use the LFE Balance to send portions of the audio into the sub-woofer channel. At - 100, nothing gets through; at 0, everything passes straight through; and at +100, a portion of all channels is combined and sent to the LFE channel. This is one way to take an effects track and add some super subwoofer power to it. I recommend using a dedicated LFE channel instead of sending things via the panner into the subwoofer.
You can also click on any of the white Speak icons to toggle the active/inactive states of the surround channels passing through the panner. Just as with any other parameters in Soundtrack, the panners can be automated. All you need to do is to put the project in latch or touch mode and then, while playing is active, you can move the panners around to record the movements. Once automation is recorded, the panner will move at the exact same time and place from then on.
Mixing Advice
Mixing is a funny thing because on some levels it is very subjective. Two people can listen to the same mix and hear completely different things. One of the major problems lies in how the ears work. They are comparative and adaptive. Not unlike a frog being placed in cold water as it slowly boils, ears get used to things slowly as well. Taking breaks and resetting your hearing experience is almost as important as enlisting the help of third parties who haven’t yet heard the mix a hundred times. Changing listening environments can help as well. In fact, you should be listening to most of your mixes on a variety of sound systems anyway. As discussed in Chapter 6, there are a variety of different level standards and so it is important to mix what is expected of the deliverables. If you are working on a theatrical mix, you will need to have a room specially calibrated to - 85 dB. If you are mixing for broadcast then the room matters less, but your metering tools matter more because you have to hit specific audio levels. If you are mixing for DVD, then you have a little more flexibility. If you are mixing for the web, then you will probably make it as loud as possible! With the exception of the theatrical mix, you should be listening on a variety of sound systems. For broadcast, I always have a television hooked up to make sure the mix translates well. For DVD, I will burn a disc and watch it on my home theater system – which I admit is a fairly poor comparison with the average setup because, as an audio geek, I have kind of a high-end system; so, I will also play the DVD on a smaller television in my family room. I know how the average television program sounds on the set and so I can gauge how close I am to the mix I am looking for. During this process I take copious notes and then return to the project and implement any changes to fix problems that really stuck out.
Summary
In most independent/small-scale/short format/low budget projects, I almost always have to get through a lot of work in a short amount of time. The bulk of the work in those situations takes place in the ‘audio editing’ phase. I try to make sure the dialog is level and consistent long before I enter the ‘mixing’ phase. I make sure things are panned consistently and that the overall levels are in the right pocket. The mixing process provides an opportunity to make sure all of the elements are working together. On big budget projects, the elements are often combined for the first time at the mix and so it really is a critical phase in the process. Assuming that you will not be using Soundtrack for that type of project, I encourage you to work on the ‘mix’ throughout your entire project. Use Final Cut to get things ready. If you need to process a clip with an equalizer, use the Send to Soundtrack feature to make sure all work will translate to Soundtrack in the later stages.