7
SPECTRAL TOOLS
Now that we have made it through dynamics, it is time to explore the spectral tools in Soundtrack Pro. ‘Spectral’ refers to the tools that affect the audio spectrum. If you need to make changes to a sound to make it ‘brighter’ or cut out some of the ‘mud,’ these are the tools that will make this possible. Additionally, you will be able to match production dialog with looped dialog and create special effects like the ‘telephone’ effect.
Equalizers
The evolution of the modern equalizer began at the dawn of the telephone. When running telephone lines over long distances, the audio signal would not be able to maintain full quality. An equalizer was used to restore the conversations to a more natural sound, or to ‘equalize’ the highs and lows of the sound. Modern equalizers are used as surgical tools to either drastically change the audio or to accomplish subtle clean-ups and improve the sound. Besides covering the basics of how an equalizer works in this chapter, we’ll also cover typical ways of using them.
Dave’s Video Editor Perspective
Equalizers
For those of you who have used the equalizers in Final Cut, there are several that might be a good introduction to those in Soundtrack. Their interfaces may be a bit less intimidating since they are only a series of sliders instead of the stylized interfaces you’ll usually find in Soundtrack. Getting familiar with what the various frequency adjustments do will make the transition easier, and it is in your best interest to do so. In Figure 7-1 you’ll see there are three simple sliders. By making adjustments you’ll hear the effect your adjustments are having.

If you have access to an audio device that has equalization adjustments, playing around with the settings will make you better able to transition to the software interfaces in Final Cut Studio. These adjustments are obvious to audio experts, but as a new video editor you will need to train your ear a bit to understand the frequencies you are working on and the impact your adjustments can make.
When working on the video edit and not really addressing the sound quality yet, I will sometimes make minor adjustments to the audio to see if they result in a decent enough quality to include in my edit. For example, if I am hearing a hum, I will see if I can reduce it easily, and in these instances the simple equalizers are quick and straightforward. If I know I might be working with an audio engineer later in the project, I might remove the equalizer filter that I applied, knowing that the tools in Soundtrack may provide better quality than what I can get in Final Cut.
Filters
The equalizers in Soundtrack Pro are called parametric equalizers. They have a variety of parameters that can be tweaked to control the available bands. A band is another term for a set of controls that affect one adjustable frequency. These bands can also be called filters, which can be confusing at first because all audio effects in Final Cut are called filters. In Soundtrack, what Final Cut calls filters are called effects, and the term filters refers only to individual bands on equalizers. I think this will all make more sense in the context of the primary equalizer available in Soundtrack Pro, called the Channel EQ. This equalizer has eight different bands. It has two pass filters, two shelf filters, and four peak filters. Each has a different role, but all allow you to control the levels of different frequencies.

Equalization demo.
High Pass/Low Pass Filters
We are going to spend a little extra time explaining the pass filters because, once you have a grasp on what they do, the rest will be more manageable. The high pass filter is the left most filter on the equalizer and in Figure 7-3 it is highlighted in the white rectangle.

Figure 7-2 The eight-band Channel EQ.

Figure 7-3
High pass filter.
As the name suggests, the higher frequencies of the sound pass through unaffected, while the lower frequencies are reduced. This is immediately useful as a means to remove unwanted low frequency rumble that might exist in your audio due to traffic, air-conditioning units, or noisy microphone handling. The low pass filter is the opposite and removes high frequencies while letting the lows pass. This is useful for removing high frequency hiss and noise from your audio.
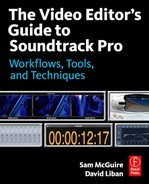
There are several settings available for tweaking on the pass filters. The first is the frequency setting. This parameter gives you control over how much of the high/low content is removed. The available range covers the entire range of the equalizer (20 – 20 000 Hz). The next adjustable parameter is the slope setting. This determines how steep the filter is. The slope is measured in decibels per octave, which makes sense if you know what decibels and octaves are. An octave is more widely understood because it is a musical term; it represents two pitches that have a 2 : 1 ratio. Each pitch, no matter the octave, has the same letter label: an A is an A in any octave. In terms of frequency, one pitch in an octave is either twice or half of the amount of the other. This is important only in the context of the pass filters because you will be making the slope either very steep by turning up the number of decibels that are pulled down per octave, or you will be making the slope gentle by turning the number of decibels down. Confused? I think the terms gentle slope or steep slope would be more practical than using a dB/octave label, but they would be less accurate. The slope parameter tells you exactly how much is being removed. However, what you need to know is that a gentle slope sounds more musical and has more transparent results. The steeper slopes remove more of the low frequencies and allow for higher-precision changes. The default setting works best in most cases and should only be changed if it is not doing an adequate job. The changes you should

Figure 7-4 Low pass filter.
make at that point will be based on trial and error because so much depends on the specific audio you are equalizing.
The last parameter that is adjustable is the Q setting. As a side note, the Q setting is deactivated when the slope is set to 6 dB/octave. The Q adjusts the bandwidth of the slope at lower values, but at higher values in the pass filters it introduces a resonant frequency. This frequency is represented graphically on the equalizer and at higher levels can be easily heard. This is a feature that carries over from the analog equalizers used before the computer age. I rarely suggest using a Q setting above 1.5 on a pass filter because it will draw attention to itself. The one example of where I use this is when I use a low pass filter to remove some high frequency noise but also want to boost a little right around the diction frequencies of the voice. I would use a relatively steep slope and higher Q setting to cut the high frequencies where the noise is but still boost some of the frequencies where the voice is. You might ask me to give you specific parameter settings, but I can’t because every sound is different and a specific number might not work in your individual case. The key is to slowly adjust the frequency parameter until it sounds right. In a little bit I am going to provide some tips on how to do this, so keep on reading.
High/Low Shelving Filters
Next are the shelving filters. They are similar to the pass filters but can boost or cut high/low frequencies through the range of audio. The Q setting on these filters sets the slope of the filter and there is a gain parameter that determines the overall boost or reduction of the shelf.
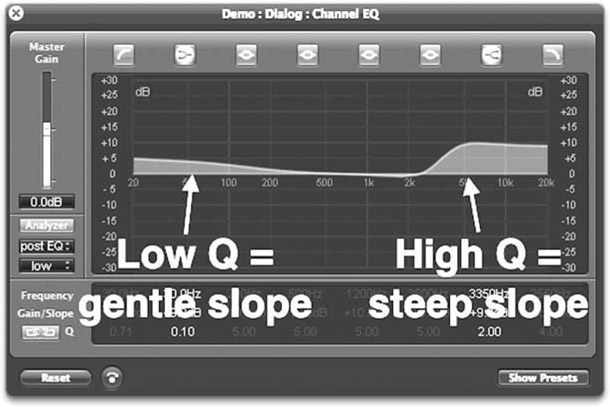
Figure 7-5 Shelving filters.
You might use a shelving filter to lower the low or high portions of the spectrum, from a specific frequency through the end of the range, instead of using a pass filter to completely remove it all.
Bell Filters
The four bell filters in the middle of the equalizer are perhaps the most surgical filters of all. You can set the frequency, the gain, and the Q just like with the previous filters, but the Q sets the width of the bell-like shape of the filter and can produce very wide or narrow results.

Figure 7-6 Bell filters.
The Analyzer
The channel equalizer and the linear phase equalizer use the same interface and both have a built-in analyzer. This is an invaluable tool especially for those who may be working in a non-ideal listening environment. It will show you your sound right underneath your equalizer curve. There are several items you can adjust that will help you to optimize the effectiveness of this tool.
Analyze Activate
To activate the analyzer, press the button labeled Analyze. This activates the analyzer and switches the scale on the right side of the equalizer to a 0 through - 60 dB scale instead of 0 through ±30 dB, which represents the boost or cut of the filters. You can click on the 0 to - 60 scale and drag vertically to change the range with maximum range bookends of +20 to -100, but only a total range of 60 dB can be visible at one time. When you are not using the analyzer I recommend turning it off or closing the plug-in window. Both will conserve CPU resources.

Figure 7-7 The analyzer in action.
Post/Pre EQ
The post/pre toggle option is a powerful metering tool. When set to Post, the analyzer waveform reflects the added boosts and cuts affected by the various filters. If you want to compare the source waveform with the newly equalized waveform, you can switch between Pre and Post. This is useful when troubleshooting filter changes.
Resolution
The option below the Pre/Post menu allows you to change the resolution of the waveform. For a very detailed representation use the higher resolution setting, but note that it uses a lot of CPU power to do this. If you need to have a number of equalizers open at the same time, all using the analyzer, you might have to use lower resolution settings.
Dave’s Video Editor Perspective
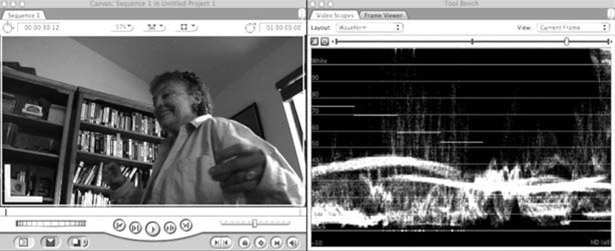
Figure 7-8
The waveform monitor.

Figure 7-9
The vectorscope.
Analysis Tools
The video editor may be familiar with tools like the waveform monitor and the vectorscope (see Figures 7-8 and 7-9). These tools allow you to see the brightness (waveform) and the color information (vectorscope) of the video image. The more you use these tools the better you will be able to identify the portions of the image and what levels those components might be at. You can then make adjustments to make the image more appealing and ‘broadcast-friendly.’ If you look at the waveform monitor, the portions of the scope that are near the top represent the brightest part of the frame. Seeing this information is useful when adjusting either on the set or during post-production. When using the vectorscope you are evaluating the saturation level of the colors in your shot. The further out the blob goes, the richer the color. If it is too far out, the colors might start to bleed and become ugly, and video noise may be introduced into your image. If the image is de-saturated, meaning all color information is removed or reduced, the blob will disappear or shrink (see Figure 7-10).

If we consider these tools in the video world, we have the aural equivalent of the analysis feature in the equalizers and the spectral viewer in the File Editor. It takes a degree of practice in each of these situations to recognize the visual components as well as the various frequencies, but it is worth the time investment to work with these tools so that you can see as well as hear the areas that may need adjusting.
The Interface
Besides the master gain, which allows the entire output to be raised or lowered, there are a few really efficient design features on the channel and linear phase equalizers. You can double-click on the parameter numbers to open a text entry window. This is the easiest way to enter specific numerical changes. You can also click-hold-and-drag on these numbers to change them. The easiest way to make changes, though, is to click on the curves in the graphical display and pull the different filter curves around. Each filter has a different color and when you hover over a specific filter it comes into focus and you can drag it around. The node point that exists on each line can be used to adjust the Q settings. In this way you can easily adjust all eight bands in a short period of time. The shapes at the top of the equalizer that represent each filter can be used to bypass each filter. Using them allows you to quickly hear the effect of each filter by turning it on and off in succession.

Figure 7-11 Making adjustments graphically.
Presets
Clicking on the Show Presets button at the bottom of the interface displays a number of useful equalizer presets. If you are using an equalizer for the first time it might be a good idea to start with a preset to give you some ideas. Then you can tweak it and make adjustments as needed for your specific situation.

Figure 7-12
Presets.
Channel Equalizer vs. Linear Phase Equalizer
The channel and linear phase equalizers look identical, and in fact their interfaces are the same. While there is a big difference between the two under the hood, it will take some time of using them to hear the difference. The channel equalizer is a traditional digital equalizer that works based on the same principles as analog equalizers. The linear phase equalizer is a relatively new digital equalizer that provides pristine results that are nearly transparent. There are two sides to the issue of which you should use: the channel equalizer uses less CPU resources yet adds a little more ‘character’ to the sound, whereas the linear phase equalizer taxes the CPU quite a bit more but the resulting sound is noticeably more natural when in use. The best part is that you can share presets between the two.
The Fat Equalizer
The other equalizer available in Soundtrack is called the Fat EQ. The filters and band options are all very similar to the equalizers listed above, without some of the handier interface options such as the analyzer and the graphical tweaking of parameters. The sound is different and so it is nice to have as a tool in the toolbox; however, I have never used this equalizer on a project.

Single Band Filters
There is a whole plug-in category devoted to single band equalizers. Think of these as the individual bands taken from the other equalizers. They are great when all you need is a simple fix. If all you need is a high pass filter then you might not need to use the full channel equalizer, but if you want to keep your options open then use the full channel equalizer.
Using the Equalizers
In this section we are going to focus on how to use the equalizers. By this point you should be beginning to put the pieces together and you should be chomping at the bit to apply all of this information. Equalizers are powerful tools, but don’t be fooled into thinking that they are simple. Mastering the art of equalization will take some time because it is your ears that need to develop. This section is designed to help propel you into proficiency a little early.
The three main uses of equalizers are:
- To remove parts of a sound. Highs = noise or hiss; Mids = ringing, boxiness or mud; Lows = rumble or boominess.
- To boost parts of a sound. Highs = brighten up or add clarity; Mids = character or thickness; Lows = accentuate bass.
- As an effect. High pass + low pass = telephone effect; Subtract with high shelf = add distance.

Figure 7-14 The telephone filter preset.
Following is a top ten list of uses with explanations.
Reducing Rumble
You can use a high pass filter to reduce rumble in your audio. Adjust the frequency until the rumble is no longer audible. If you reach that point but the other parts of the audio are affected, use a steeper slope to allow you to remove more of the rumble while isolating the audio you want to keep.
Figure 7-15 Reduce rumble.
Dave’s Video Editor Perspective
Dealing with Rumble
It happens more than we like, no matter how carefully we try to minimize sound unwelcome to the edit: an air-conditioner in the room or sounds of wind or traffic that exist on your audio track are distracting to the viewer. I’ve had shots that used a decent lavaliere microphone that had a windscreen, but which still had some wind noise that sounded like a consistent low frequency rumble. In this situation, I applied the AUGraphicEQ and minimized the low frequencies. I kept moving down the stack of frequencies until it sounded like I was depredating the sound of the voices. While I was in this tool I may have boosted some of the voice frequencies to make the voice brighter (see Figure 7-16).
Also, be sure when you are recording sound in the field that your audio cables do not cross over your power cables because this may introduce a 60-cycle hum into your audio. This can be reduced, but you’d be better off not having to do so. If you do have this hum, there is a tool to help remove it in Final Cut called ‘hum remover’. By default it comes up as 60 Hz since this is the most common problem. You can, however, use this tool to reduce any frequency of hum (see Figure 7-17).
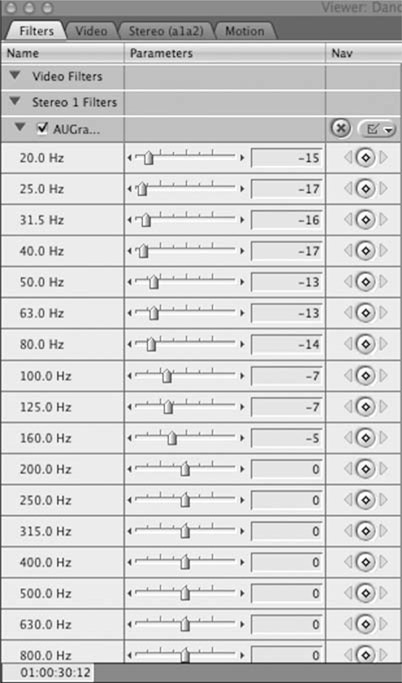
Figure 7-16
Adjusting for rumble.

Figure 7-17
Hum remover.
Reducing Hissing Noise
Using a low pass filter to help reduce hissing noise is very effective but, if overdone, could make the audio sound dull and lifeless. Adjust the frequency until the noise is removed. If the other parts of the audio are being affected then try a shelving filter to reduce the noise without pulling it out completely. If the low pass filter is close, then pull it in but turn up the resonant frequency to boost the sound immediately preceding the noise you are removing.
Boosting Diction
When there is dialog that is hard to hear, you can use a bell filter to accentuate the speaking voice. Each voice is a little different, but if you use a high Q setting and boost by about 20 dB you will be able to sweep through the different frequencies until you find the portion of the dialog that really adds to its clarity. Once you find a good spot, pull down the gain and widen the Q until it sounds more natural. Doing too much can make the dialog sound brittle or hollow, so be cautious and don’t overdo it.

Figure 7-18 Finding the right frequency.
Removing the Sound of a Room
Sometimes you are required to work with audio that was recorded in a small-sounding room. While it is very hard to make it sound different, one thing you can do is to filter out some of the sound of the room modes. A room mode is the resonance of a room caused by sound reflections in the room itself. Using the same technique outlined above, by boosting a narrow band of equalization (see Figure 7-12), you can find room modes by listening for uneven responses to a frequency sweep through the whole range. When you find a frequency that really pops out at you, remove it by pulling the band into the negative gain range and widening the Q setting. Do this for as many as you find, but be careful not to go too far overboard because doing so will eat into the sound you want to keep. The key is to take a few places in small doses while leaving the parts of the audio that you want to preserve in good condition.

Figure 7-19 Removing the sound of a small room.
Carving the Music to Make Room for Other Audio
If you have a music track that you are layering with dialog, it can help to cut some frequencies to make room for the frequencies of the dialog. The important frequencies involved with the speaking range are typically between 1000 and 4000 Hz. Make some cuts in that area with a low Q setting and a small amount of gain reduction to create the smallest of changes to the music track. This small change can make a big difference without affecting the music too much.
The Telephone Effect
I’m using one of the most clichéd of effects here to give you the principle upon which you can create a lot of different effects. Use a high pass and low pass filter to progressively narrow how much audio is passing through. Technically this is the same as what a lot of programs call a band pass filter. Instead of letting highs or low pass through, a band in the middle is created and passes through. The reason this works as a telephone effect is that traditional analog telephones have a limited frequency response that is void of highs and lows – just like a band pass. If you want to create the sound of a megaphone or cell phone, the principle is the same.
Adding Fullness
If you have a sound that sounds hollow, it may be possible to add some fullness. The only caveat is that an equalizer cannot boost any frequencies that do not exist in the original. If you boost in a certain area but nothing changes, then the chances are that the original sound just didn’t have any of that frequency; you can’t boost what isn’t there. Boosting frequencies is a terrific way to alter a sound because it can really help to make it larger than life. On the other hand, if you want to make something sound improved, it is usually better to cut away muddy or unwanted frequencies.
Matching Another Sound
We are almost at the point where we can talk about using the match EQ plug-in. However, you can reproduce its effects manually as well. All you need to do is listen closely to one file and then tweak the next until the sounds become more similar. This is useful for matching sound effects from different libraries, or dialog from different takes. It is tricky, but possible. When you are attempting this, you should do a lot of sweeping with high Q settings and high gain. This will help to inform your ear about the sound you are trying to match. Ultimately, there are a lot of things that go into matching the sound of two different files, but equalization is a huge part of it.
Helping a Sound Effect to Fit Properly
Here’s a crash course on sound properties. High frequencies do not travel as far in the air as low frequencies. Case and point: a subwoofer in a car as it approaches. What do you hear first? All of the low (and often annoying) sub-tones. If you want an effect to sit better in a mix, then this is one principle to keep in mind. Ask yourself how far away the sound is. If it is a little way off then turning down the high frequencies will help it to sound more natural. Another principle: sound bounces off hard surfaces (especially the high frequencies). If you are putting a sound effect into a cement room, there will be more high frequencies than if you are putting the sound into a closet full of clothes. In other words, pay close attention to the environment and try to make sense of which frequencies would really exist and which would be lost.
Using the Analyzer Tool
The Analyzer tool is a little bit of a crutch. It’s slightly akin to using audio to help you make picture edits (which I have seen done on occasion). However, if you are new to equalization, I think a crutch is the perfect solution. Use it to see what your audio is doing. If you see a spike on a certain frequency, then that is a good place to start looking for a problem. Using the analyzer will also help you to identify ranges that are common for different types of audio. Think of it as a training exercise. Once you have a better grasp on the overall range, turn it off and equalize things by ear alone. Eventually it will be second nature to fix a spectral issue with no problem at all.
Dave’s Video Editor Perspective
Matching Shots and ‘Sonic Fingerprinting’
When trying to match the sounds of shots cut together the video editor will have to do the audio equivalent of using the color correction tools available. For the sake of simplicity I will talk about the Three-Way Color Corrector tool instead of the powerful Color application that ships with Final Cut Studio. The Three-Way Color Corrector effect is a very useful tool that I use all the time. If you are cutting together several shots, they may have different color balances which can be distracting to your edit, so to make the transition from shot to shot invisible you need to make adjustments to the hues. In the Three-Way Color Corrector window you’ll see the Match Hue button (see Figure 7-20).

Figure 7-20
Matching hue.
You can select a color with the eyedropper and then apply that hue to subsequent shots. This often requires further tweaking and you must be looking at your external monitor as well as the scopes inside Final Cut (see Figure 7-21)

Figure 7-21
The scopes.
In Final Cut you can compare shots side by side to see how the color is matching up. This is analogous to sonic fingerprinting, which is used to make audio edits invisible. This process usually takes place near the completion phase of your edit. You shouldn’t waste too much time color correcting or audio matching until you have achieved picture lock because there is always the possibility that the shots you are working with may not make it to your final cut.
Matching the Sound of Audio Clips
The Match EQ concept is similar to the quest for the Holy Grail. The idea is to use a single plug-in to analyze the sound of one file, create a sonic mold from it, and then stamp it onto other audio files. Equalizers have existed for years, and there are third party tools that do this, but Soundtrack Pro is among a small group of programs that has attempted to integrate sonic fingerprinting into an easily usable and powerful audio editing tool. It is not perfect because equalization is highly subjective and what may seem good mathematically to a piece of software might not make sonic sense to a human editor.
There are two incarnations of sonic fingerprinting, which we will now explore. These are the Match EQ plug-in and the Sound Palette Lift Equalization Print. Both accomplish similar end goals, but the Lift Equalization Print is a much simpler iteration and therefore it will probably be the one you use most often. Match EQ is a much more complicated tool that provides similar results to the Lift tool but requires a lot more work to get there. It is more powerful and more flexible, but it is better suited to matching mixed music tracks and analyzing tracks that are playing in real time. The end results have strong similarities, so I am opting out of a written explanation of Match EQ in return for an explanation on the DVD. The Lift Equalization tool is explained here, along with a general idea of how you can and can’t use sonic fingerprinting.

Match EQ Demo.
The Lift Equalization Tool
The Lift Equalization tool is part of the Sound Palette system in Soundtrack Pro. The easiest way to access this window is to switch to the Lift tool from the toolbar.
The Lift tool is used to collect equalization prints from audio clips that you click on. When you switch to the Lift tool, the Sound Palette is automatically opened.
Figure 7-22
The Lift tool.

Figure 7-23 The Sound Palette.
The Sound Palette handles three tasks: Lift Equalization Print, Lift Voice Level, and Lift Process Effects. It can do all three simultaneously if you have each box checked. Be careful to deselect the items you do not want to copy because you can easily mess clips up by accidentally lifting and stamping process effects when all you wanted to lift and stamp was an equalization print. Once you have the Lift tool selected, you can click on any audio clip or any portion of an audio clip using the Timeslice tool. Once you select a clip, the Lift tool automatically switches to the Stamp tool. You can use this to stamp any clip with the selected items in the Enabled Item list in the Sound Palette. You can easily switch back to the Lift tool by pressing and holding the Option key.
What Can/Can’t the Matching Process Accomplish?
This is a specialized tool that you may not have a need for in everyday use. However, there may come a time when it would really help you and unless you understand it you probably won’t even know where to look to get started. The following is a short list of potential uses:
- Matching production dialog with re-recorded dialog (ADR);
- Matching sound effects with each other;
- Matching music tracks with each other;
- Creative sound design (matching a line of dialog to a thunder sound);
- Achieving a ‘dated’ sound by matching full quality sound to the sound from an old recording.
The equalization matching process changes the sonic characteristics of audio, but it’s important to remember a few things that it doesn’t do. It cannot change the volume levels of the clips so it may be best to match the levels of the clips in advance of matching the equalization. However, matching the levels of the clips may cause other problems such as messing up the ambient noise levels in the clips you are changing. The equalization matching process also doesn’t tailor itself to individual portions of the files. It takes an average equalization print from the entire clip and then applies that average reading to the stamped files. This means that if the low rumble of a sound that you really like only lasts for a short portion of the file, it may not transfer to the sound effect you are stamping. The low frequencies would have to be a substantial part of the file to affect the average equalization print. The last thing the equalization print isn’t able to do is to add what isn’t there. If you have a full-sounding source file that you want to transfer to a thin-sounding file, it may not be possible if the destination file doesn’t have frequencies to boost. The equalization matching tool will try, but it can only work with the frequencies that are there.
SubBass
Let’s look at one other important spectral tool in Soundtrack Pro. Unfortunately, this is an example of how Apple has great ideas but sometimes creates a complex and hard-to-understand system of implementation. They really should have taken the ‘Garageband’ approach with this and kept the controls simple to understand and use.

Figure 7-24 SubBass.
Explanation of SubBass
SubBass is a subharmonic synthesizer. It takes sound, analyzes it, and then creates additional low frequencies that match the original. You might be asking how this differs from boosting low frequencies with an equalizer, and the difference is that it can add low frequencies when they aren’t there. This has a number of great applications in the post-production realm because it can repair damaged audio and/or be used to create sub-woofer rocking sound effects. The main problem with this plug-in is that it has a complex set of controls. What I recommend instead of trying to use them, because they are so abysmal, is starting with a preset and then tweaking only a couple of the parameters. The primary issue is that SubBass is designed to be used primarily with musical material, which is why the various settings are designed as they are. Once you have chosen a preset, adjust the Dry and Wet parameters. The dry signal is the original audio, and the wet is the new low frequency sound. Err on the side of not using too much low frequency sound because too much is always distracting and possibly even dangerous. If you are not using speakers that can reproduce low frequencies, you may have a hard time hearing what the SubBass plug-in is doing. You will probably need a subwoofer.
SubBass Warning
There needs to be a warning included with this section because the SubBass plug-in can be dangerous to your equipment and ears. If your speakers cannot handle large amounts of low frequencies then turning up the Wet parameter has the potential to damage them. Do not push the Wet level too much. If you do have a speaker system that can handle large amounts of low frequencies, then turning up the SubBass can damage your ears. Either way, be very careful!
Using SubBass
SubBass would typically either be used as an effect on a track dedicated to the LFE (low frequency effects) channel or as a process effect for specific sound effects. It is a great tool to use to beef up explosion sounds and other loud sound effects. It can be used to add emphasis to more ordinary sounds like footsteps and door sounds. If you have a production sound that is hollow-sounding, you might try using this tool to add back some roundness. Unfortunately, the controls make achieving some of these results hard because they are very non-intuitive. Even though I have scoured the manual and used it many times, I have found that the center and bandwidth settings have no colloquial equivalents. Or rather, I could explain exactly what each does but it would only be even more confusing. The original instructions stand: use a preset and adjust the Dry/Wet parameters, don’t use too much, and be very careful not to damage anything!