13
SCENARIOS AND PRACTICAL TUTORIALS
This is a reference chapter covering 20 basic features of Soundtrack Pro. In addition to the descriptions, there are detailed illustrations that will help you to use the features in the most efficient way possible. Think of this chapter as a cookbook, with each feature as a recipe. Each illustration is labeled with numbers that correspond to a more detailed textual explanation. These ‘recipes’ cover everything from recording audio to more complex tasks like using those specialized tools that are useful but not necessarily intuitive. Along with an explanation of each number in the illustration, there is a short paragraph that explains why the function is important and how you would typically use it. Understanding why you might use a feature is probably just as important as understanding how to use it. As with cooking, the best way to understand and integrate the recipes into your workflow is to try them out, so have Soundtrack Pro open while reading this chapter.
The Functions
Below are the 20 topics covered, first in the order in which they appear and then in alphabetical order by function name. They are organized in such a way as to help you move from basic advanced tasks. Having an index of both actual order and alphabetical order will help you to find exactly what you are looking for; however, there are only 20 so I suggest looking through and discovering each recipe individually.
Chapter Order
- Recording audio.
- Sharing files between projects.
- The Actions List.
- Copy/paste clip effects.
- Leveling clean dialog.
- Leveling noisy dialog.
- Recording automated dialog replacement (ADR).
- The Multitake Editor.
- Placing sound effects.
- The Audio Stretch tool.
- Adding ambient noise.
- The Spectrum Selection tool.
- The restoration tools.
- Noise Reduction.
- Stem routing.
- Using the surround panner.
- Adding reverb on a bus.
- Automating effects plug-ins.
- Project music settings.
- Exploring music loops.
Alphabetical Order by Function Name
- 3. Actions List.
- 11. Add Ambient Noise.
- 13. Analysis tools.
- 10. Audio Stretch tool.
- 18. Automation (plug-ins).
- 2. Bin.
- 5. Lift Voice Level.
- 4. Lift Process Effects.
- 7. Loop recording.
- 9. Multipoint video.
- 8. Multitake Editor.
- 20. Music Loops.
- 19. Music Settings (project).
- 14. Noise Reduction.
- 6. Normalization.
- 1. Recording.
- 17. Reverb.
- 12. Spectrum Select tool.
- 15. Submixes.
- 16. Surround panner.
1. Recording Audio
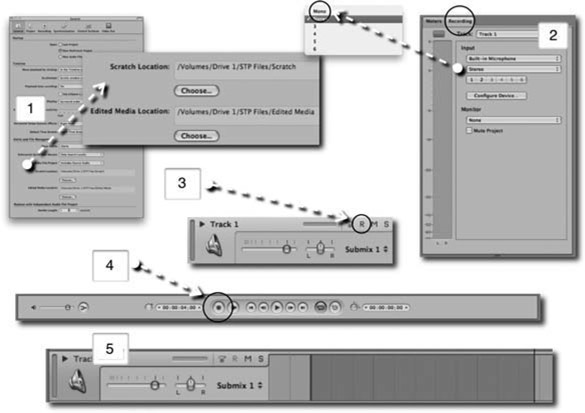
Figure 13-1
Introduction
Recording audio might seem pretty straightforward, but there are a couple of things that it is important to know about. While the basics of getting Soundtrack to record are here, the fundamentals of setting up your audio interface are not. You will need to look in your interface’s instruction manual for information detailing how to set up and use the interface. The good news is that Mac OS X is fairly easy to use and I have not run into any problems as long as the interface has driver software that is compatible with the current version of the operating system.
Steps
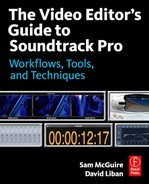
- In the Soundtrack Preferences under General, you need to set the Scratch Location to determine where the files will be recorded. Much like Final Cut, this needs to be set on a project-by-project basis. Soundtrack is one of the only audio programs that does not set this by default to the saved project location.
- In the Recording tab (right pane by default) you need to set the input device and channel information. The channel number should be set to mono when using a single microphone to record voiceover or ADR. If you want to configure the device, then choose the Configure option from the tab and the Core Audio application from the operating system will load. This is one place in which the microphone input can be turned up or down depending on the source material. You cannot adjust input levels in Soundtrack itself. If you need to hear what is being recorded by Soundtrack, you should select a Monitor output. Be careful not to place the microphone near the speakers when you turn this on or you might damage your speaker/ears because it will create a feedback loop.
- Select the r button in the track header to ‘arm’ the track for recording. Doing this allows that track to be recorded into. If no tracks are ‘armed,’ a new track will be created below all of the other tracks. If you are working in an audio file project and not a multitrack project, you will not need to arm any tracks.
- Push the Record button on the transport. This engages record and Soundtrack will begin to record.
- Note: The track will record what looks like an empty red clip. Only when the recording is stopped will the audio clip waveform appear.
2. Sharing Files Between Projects

Figure 13-2
Introduction
This is a super-powerful feature that allows you to have multiple projects open at the same time, consequently allowing you to drag files from any open project into another. This is an efficient way to work when editing sound effects because you can open a project that has files you would like to use in a different project and, instead of importing these files, you can drag them from your Bin tab. It’s as easy as that. The Bin is organized into projects, which makes it easier to find the files you are looking for. It has a number of different tools to help you find files, but perhaps the easiest way is to find the file on a track in the project and select it. This highlights the track in the Bin and makes it easy to find.
Steps
- After opening a project, open the Bin, which is located by default in the bottom pane.
- Open a second project containing a file or files that you would like to bring into the original project.
- You can also see a variety of details about each file in the Bin, including length, type of file, positional data for current project, and other things. The Bin is a great place to find out more information about the files in your projects.
- Click and drag the file you want to bring into a different project only after making sure the destination project is currently visible. You may drag it onto any track in the project. Once it is on a track the Bin will show the file as being in both projects and you may close the project that the file came from and not worry about the file losing its connection.
3. The Actions List

Figure 13-3
Introduction
The Actions List is an important area to master in Soundtrack because it plays a central role in the editing of audio files. Everything you do to each clip is stored in its own Actions List. The Actions List allows you to change these things, re-order them, or completely delete them. In a typical post-production project where there might be thousands of sound effects and many hours of dialog, it is refreshing to have an individualized history for each and every audio clip. Of course, Final Cut has been working this way for years, but only a handful of audio software tools provide this level of functionality. If you look at each item in the list you will see a bar below the name. Sometimes there is a wider section coupled with a skinny line. The wider section indicates how much of the file has been processed and how much has not. This helps to show you when only a portion of a file has been changed.
Steps
- The Actions List is in the Actions tab in the left pane. The top entry in the list represents the file itself and the items below represent different actions taken on the clip. In this example you can see that the audio clip has been through a time stretch, a compressor, and a channel EQ.
- In this example I am turning off the time stretch process to demonstrate what happens to the following items in the list. The compressor is automatically recalculated once the time stretch has been removed, and then the EQ is recalculated. This is an efficient way to make a comparison between how a clip sounds with a process turned on and off at any point in the Actions List.
- You can also change the order of the processes in the Actions List. This is useful to audition how the various things sound in different orders. Maybe it would sound better to time stretch the clip after you pass it through an EQ and a compressor. It is very easy to discover the answer to that question. Also, by double-clicking on each item in the list you can open the original process dialog screen and make adjustments that will then ripple through the Actions List.
4. Copy/Paste Clip Effects
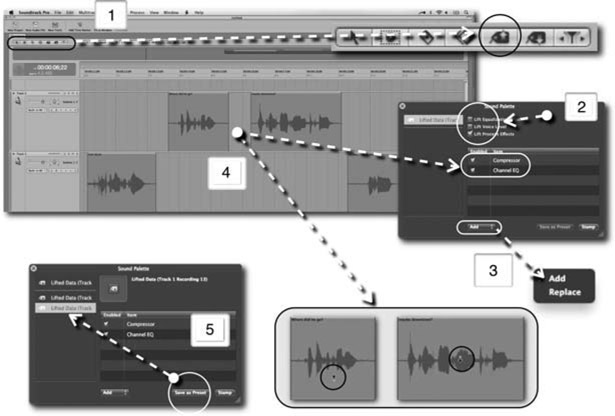
Figure 13-4
Introduction
While the Actions List (Tutorial 3) creates an individual effect history for each clip, the Lift Process Effects option in the Sound Palette provides a tool to copy a set of process effects off one clip and onto another. Not all items that are stored in the Actions List for a clip can be copied, but all effects initiated from the Process menu are available. The primary reason that this is a useful tool is that you can fine-tune a set of effects on one clip knowing that when it is complete you can use this tool to paste it onto a bunch of other clips. You can even customize what gets pasted.
Steps
- Select the Lift tool from the toolbar. This automatically opens the Sound Palette window.
- In the Sound Palette choose the lift Process Effects option while disabling the other lift options.
- Choose Add or Replace to determine what happens to any existing effects on the destination clip. If you want to retain the original effects, choose Add. If you want to delete any previous effects, choose Replace.
- Use the Lift tool on the clip that has the effects you want to copy. Immediately after the list of effects is copied, the tool switches to a Stamp tool which is ready for pasting on any other clips. At this point the Sound Palette will show you a list of effects that will be pasted. You can easily uncheck any of these to prevent them from being pasted.
- You can also save the lifted set of effects as a preset for use at a later time. This is useful for groups of effects that you use frequently.
5. Leveling Clean Dialog

Figure 13-5
Introduction
This is a new feature in Soundtrack Pro that is designed to make dialog leveling easier. It analyzes the average level of the dialog and can then be stamped onto other clips to bring them to the same average level. The primary limitation is that it doesn’t do anything with varying levels of ambient noise. This means that if you match the average level of dialog in a clip that has loud dialog and soft ambient noise to a clip that has soft dialog and more ambient noise, it will match the dialog but the ambient noise will jump from clip to clip. This creates an unusable match. You can use the Lift Voice Level tool to match dialog that is similar in level and has similar ambient noise. For leveling dialog with varying levels and ambient noise, see Tutorial 6 and possibly Tutorial 14 (Noise Reduction). In this example, I have also included putting limiters on each track and the submix, which helps in the leveling process by further controlling the dynamic range. Controlling dynamics is like cutting hair. The Lift Voice Level tool is like cutting off the longer portions of the hair with scissors. Once the levels are manageable, you use the electric razor to trim the edges. The limiters represent the electric razor: you use them to fine-tune the levels. The submix track acts like a funnel for any audio tracks that are assigned to it, and the limiter inserted on it will do another pass of fine-tuning as they all pass through.
Steps
- Choose the Lift tool from the toolbar. This automatically opens the Sound Palette window.
- In the Sound Palette choose the Lift Voice Level option while disabling the other lift options.
- Use the Lift tool on the clip that has the dialog you want to match. Immediately after the dialog level is copied, the tool switches to a Stamp tool which is ready for clicking on any other clips whose levels you want to match to the original.
- You can also place limiters on each track of dialog to help further level the dialog. Set the Output Level to the desired loudness and then turn up the Gain parameter until the Gain Reduction is showing consistent/constant reduction. You can also use another limiter on the dialog submix for an additional level of dynamics control. Often it is better to use two limiters working at reduced rates than one that is limiting a lot. You will have to try both to see which sounds better.
Introduction
When there is a lot of ambient noise coupled with dialog, using the Lift Voice Level tool (Tutorial 5) in the Sound Palette becomes unreliable. Instead, you will need to use a couple of other tools which require manual operation and critical listening. The process includes processing the clips, listening to see if you have achieved the right results, and then either re-processing or moving on to the next clip. What you are listening for is a consistent dialog level between clips and an ambient noise level that is not distracting. If you get the dialog perfect and the ambient noise is not working then you may have to either use a Noise Reduction tool or re-record the dialog and add in artificial ambient noise.
Steps
- Once you have selected a clip on a track, choose the Normalize or Adjust Amplitude options from the Process menu.
- Both the Normalize and Adjust Amplitude options work towards the same result of making your clip louder. The Normalize option lets you determine the Peak or Average level that you want the clip to end up at and Adjust Amplitude lets you turn the clip up or down by a specific amount. Listen to the clip and then make changes based on whether it needs to be louder or softer. The Normalize option is nice because you can change the level based on both Peak and Average levels. This is closer to the Lift Voice Level tool and so you can pick an average level you like and set other clips to the same amount. Listen carefully to the ambient noise and try to match that as well as the dialog level.
- You can also place limiters by right-clicking on the effects section of each track in the mixer. The reason for doing this is to help further level the dialog. Set the Output Level to the desired loudness and then turn up the Gain parameter until the Gain Reduction is showing consistent/constant reduction. You can also use another limiter on the dialog submix for an additional level of dynamics control. Often it is better to use two limiters working at reduced rates than one that is limiting a lot. You will have to try both to see which sounds better. Keep in mind that over limiting noisy clips might accentuate the noise differences and therefore hurt your attempt at leveling the dialog. Don’t overdo it.
7. Recording Automated Dialog Replacement (ADR)

Figure 13-7
Introduction
Recording ADR is a standard process in post-audio. When production dialog isn’t useable, it needs to be replaced. Soundtrack Pro, like many audio programs, does not have any specialized ADR tools. However, it is possible to use Soundtrack to record ADR and there are some great tools which can be used for editing. It is recommended that you read Tutorial 1 to help with the recording setup and then you can use Tutorial 8 to help you edit the various recordings. First, you’ll need to have the video in Soundtrack and then you can decide which lines need to be replaced. You can easily make markers to keep track of dialog that needs replacing. I use an audio file with three beeps to cue the actor. The three beeps play and then the line starts where a fourth beep would have been. You can download a beep file from www.practicalsampling.com although it is possible to make using Soundtrack. If you are trying to match ADR to production dialog, it is a good idea to use the same microphone that was used on location. If you are replacing everything, then this is less of an issue.
Steps
- Pick the line you want to replace and take note of where it starts.
- Import the beep file and line up the right edge of the clip with the beginning of the line you want to replace.
- Set the loop cycle (which is a Ruler selection that allows the recording to continuously loop from an In point to an Out point) so that it starts at the beginning of the beeps and continues until after the entire line of dialog. You may want to add a little extra time if the actor wants to have a pause between takes. You can set the In/Out points of the cycle using the I key for Ins and the O key for Outs. The C key activates/deactivates the loop cycle.
- ‘Arm’ the track for recording (see Tutorial 1).
- Push Record on the transport.
8. The Multitake Editor

Figure 13-8
Introduction
The Multitake Editor is a very powerful tool that makes editing ADR (see Tutorial 7) very easy. The typical way to use this begins with recording a looped section of audio into Soundtrack. When you loop record, each recording pass in the looped section automatically becomes a part of a multitake clip. Once the recording is complete, it looks like a single clip, but in fact is a collection of all of the clips recorded and can be accessed through the Multitake Editor. You can quickly edit these takes to create a compilation of all of the best parts. The top layer (the one that is heard when you press Play) is treated like an individual clip that can be copied, exported, and so on.
Steps
- Record using a loop selection to create a multitake clip.
- Once you have selected a mutitake clip, open the Multitake Editor in the bottom window pane.
- Use the Blade tool to cut the clip up into smaller chunks. Typically with dialog this will consist of words and/or phrases. Notice that the top layer is not cut using the Blade, only the other sections below the top layer.
- Once you have cut the clip into sections you can use the Arrow tool to select different portions of the file. The portions you choose are displayed in a different shade to the rest and these are the parts that are compiled into the top layer. The compiling happens automatically and all you need to do is choose portions of the lower layers.
- At the edge where you cut the files using the Blade tool, you will see a set of arrows. Click and drag these apart to create audio fades. Doing this smoothes out potentially glitchy transitions between sections.
- Double-click on the individual fade to open the Fade Editor. You can choose between four different fade options. The default works well in most situations and you would only need to try out other types if you aren’t achieving smooth results.
- Since you cannot cut the various files at different locations using the Blade tool, you might need to slip the audio horizontally to move a line of dialog into place. Use the Arrow tool in combination with the Option and Command keys to slip the audio inside the region. This moves the audio but not the clip borders.
9. Placing Sound Effects

Figure 13-9
Introduction
The key to efficient sound effects placement is an HUD (heads up display) in Soundtrack called the Multipoint Video HUD. This is a unique tool in the world of audio software. It allows three frames of video to be seen simultaneously. The first frame corresponds to the left edge of a selected audio clip; the right frame corresponds to the right frame of a selected audio clip; and the middle frame is blank when a clip is simply selected but shows the frame that corresponds to a click-and-hold selection, representing the frame that lines up with the current mouse location. The implication of this is that you can place a sound effect, such as a footstep, exactly where it should go by clicking the file on its initial transient and then activating the Multipoint Video display without letting go of the clip. The boundaries of the file determine the left and right frames of video displayed and the middle represents the beginning of the footstep. Move the clip until the middle frame of video matches the sound effect. One effective way to use this tool is to have it turned off when you make the initial clip selection. While the clip is held, press V on the keyboard, which opens the HUD. Once you are done positioning the clip and have let it go, the HUD disappears as well. It only remains while the clip is held.
Steps
- The Multipoint Video HUD is active with no currently held clip selection.
- The left frame corresponds to the left edge of the audio clip.
- The right frame corresponds to the right edge of the audio clip.
- The middle frame corresponds to the currently held mouse placement on the audio clip, in this example a footstep sound effect that is being matched to the man walking away from the camera position.
10. The Audio Stretch Tool
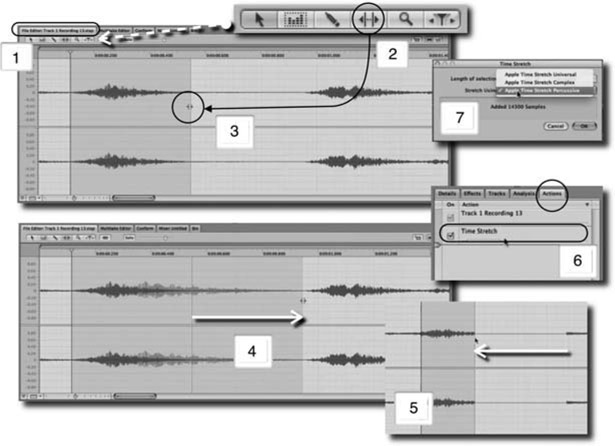
Figure 13-10
Introduction
The Audio Stretch tool is a powerful way to tweak the timing of audio to match picture needs or to simply alter the audio to increase/decrease the rate of speech. It is used to stretch the audio in time without changing the pitch of the file. I use this most often when matching recorded ADR (see Tutorial 7) to the actor’s original lip movements. While this is a powerful tool, it is not a golden bullet that can fix any and all problems. The more you have to stretch, the worse it sounds, so it is best used in moderation. There is a key modifier that provides an additional feature. If you hold Option while clicking-and-dragging, the audio immediately following will either be pulled to the left to fill the void created or pushed to the right to make room for the lengthened selection. If you don’t use this modifier there will either be a gap of silence created or a portion of the following audio will be deleted.
Steps
- Once you have a clip selected, open the File Editor tab in the lower pane.
- Choose the Audio Stretch tool from the File Editor toolbar.
- Make a selection of the audio you wish to stretch or condense.
- Click and hold the right edge of the selection and drag it either to the left or the right. You cannot adjust the left edge of the selection so, if you want to change the initial placement, you will have to do this by moving the entire clip or by cutting and pasting the selected area.
- When you drag the edge to the left to decrease the length of the selection, you are supposed to be able to fill the gap automatically with ambient noise (if you have created any using the Add Ambient Noise feature in Soundtrack). At the time of writing I have not gotten this to work and there is always a void of sound left when stretching the audio to the left. Of course, you can always fill the gap manually with the Add Ambient Noise feature (which does work – see Tutorial 11).
- If you want to change the stretched audio, double-click on the action in the Actions List and a dialog will appear with several options.
- The most important option that appears is the Stretch algorithm. You can choose between three different algorithms and when you press OK the stretched area will be updated with the new choice. These three can produce wildly varying results and so it is recommended that you experiment with them to find the best one for your material.
11. Adding Ambient Noise

Figure 13-11
Introduction
The Add Ambient Noise feature is a nice tool but I often wish it could work miracles. It seems like such a wonderful possibility to click a button and have ambient noise added to all of my audio tracks. Used in the right way, it can do great things, but you will have to be very careful and listen to all of the results. The key is finding a good piece of ambient noise to use as the noise print. The longer and more consistent the better, and a very short selection will not work at all. The location team should have captured a minute or more of consistent room tone, and this is the best option for the noise print. If you don’t have this, it is possible to achieve good results with other selections, but you’ll need to try a few out.
Steps
- Once you have a clip selected, open the File Editor tab in the lower pane.
- Make a selection of the audio if you are using the currently selected clip for the print source. You can also use the file currently in the clipboard if you have another file you want to take the print from. Make the selection as long as possible while selecting only consistent sections of the noise. If the ambient noise gets louder and louder, then the new ambient noise will also get louder and louder until it repeats, at which point you will have a large fall in volume.
- In the Process menu, select Set Ambient Noise Print. This is how you create the source for adding ambient noise to another part of a clip.
- In the File Editor, select the area where the ambient noise needs to be added. If the area is longer than the clip you have selected, it will repeat until it fills the whole selection.
- From the Process menu, you can choose either Add Ambient Noise or Replace With Ambient Noise. When you add the noise, it will be mixed into the existing audio. If you replace, it will delete the existing audio. Most of the time I like to have a separate audio track for ambient noise. This is useful when tweaking it to match and for creating fades at the edges where you have to repeat the noise to make a long section. However, creating an additional track and then having to adjust both when mixing means an additional thing to think about. If you have a good selection of ambient noise, I suggest adding it to the clip using the Add Ambient Noise feature first. If it works, then great. If not, you may have to create an additional track and do it that way instead.
12. The Spectrum Selection Tool

Figure 13-12
Introduction
The File Editor has two different views. The first is the Waveform view, which is the most common way to look at audio. The second is the Spectrum view, which is a very different way to look at audio. It shows additional information about the audio such as frequency content. The vertical axis represents frequency while the color intensity represents the amplitude of each frequency. This is very useful for troubleshooting audio problems. You can easily see low frequency rumble and high frequency noise. Additionally, you can use the Spectrum Selection tool to select trouble areas and either turn them down or completely delete them. Don’t be afraid of this view if you are new to it. It can be hard to get used to because it adds a number of different pieces of data to an already complex situation. Think of it as a visual equalizer (see Chapter 7, on spectrum effects, for more information). Instead of controlling frequencies using knobs and faders, you get to edit the frequencies themselves. The only way to get used to it is to use it and listen to the results. Experiment by deleting various sections, but try to guess what the result will sound like before you listen to it. I think you will get the hang of it rather quickly.
Steps
- Once you have a clip selected, open the File Editor tab in the lower pane.
- Change the File Editor view to Spectrum view.
- You can right-click on the Spectrum view to bring up a set of controls for the view. The most useful are the Minimum and Maximum Frequency selectors. These allow you to fine-tune what you are looking at. Otherwise, the low frequencies would be hard to work with since they encompass only a fraction of the overall Spectrum view.
- Choose the Spectrum Selection tool from the File Editor toolbar.
- Click and drag in the spectrum area to create a selection box. Next, either use the Adjust Level option from the Process menu to change the level of the selection or simply push Delete on the keyboard. Only the audio in the box will be affected. This is useful for removing rumble graphically, or removing unwanted sounds.
13. The Restoration Tools
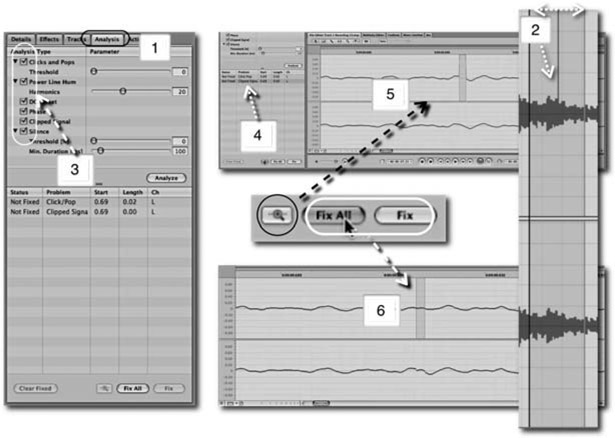
Figure 13-13
Introduction
Restoration tools are available in the Analysis tab. These tools include click and pop removal, power line hum removal, DC offset removal, phase tools, a de-clipper, and a tool that tells you where any silence exists. Together, they form a powerful set of restoration tools designed to help make your audio the best it can be. The good news is that Soundtrack can tell you when you have these problems. However, it’s not always 100% successful when fixing them. Noise reduction is covered separately in Tutorial 14.
Steps
- Once you have a clip selected, open the Analysis tab in the left pane.
- Select the area of audio you want to analyze. In this case I have selected an area that has a click/pop.
- Select the items you want to look for in the audio and then press Analyze.
- Any problems that are found will be listed in the list below the Analyze button.
- You can zoom in on each problem by selecting the item from the problem list and then pressing the Magnifying Glass icon next to the Fix buttons.
- You can Fix All, which attempts to remedy all problems in the problem list, or just Fix the problems that are selected. In this case, I fixed the clipped signal and it created a ‘best guess’ replacement. Unfortunately, I could still hear a little bump in the audio and I had to cut the whole section out. The other options typically work better when fixed.
14. Noise Reduction
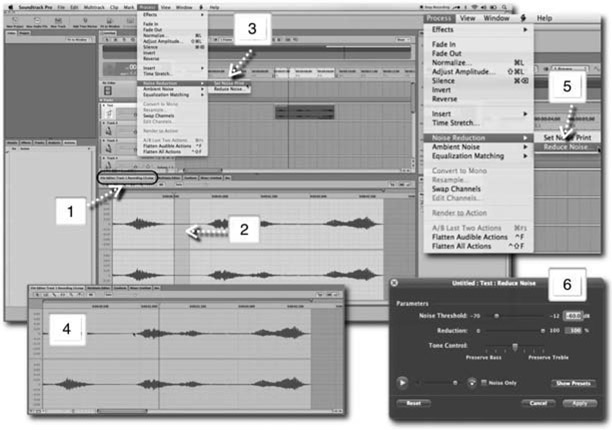
Figure 13-14
Introduction
The Noise Reduction option has been updated in Soundtrack Pro 3. It worked okay in previous versions, but the new High Resolution Noise Print feature produces even better results. I own several very expensive Noise Reduction tools and the Noise Reduction feature in Soundtrack is nothing to sneeze at. It has gotten better with each iteration.
Steps
- Once you have a clip selected, open the File Editor tab in the bottom pane.
- Select an area of representative noise. Avoid areas that have additional sounds that may be unwanted but aren’t representative of the general noise.
- In the Process menu, choose Set Noise Print from the Noise Reduction submenu.
- Select the entire portion of the clip that needs noise reduction.
- In the Process menu, choose Reduce Noise from the Noise Reduction submenu.
- The Reduce Noise window appears and you can proceed to reduce various levels of noise. Leave the Reduction slider at 100%. This helps you hear what is being removed based on the Noise Threshold slider. Start by adjusting the threshold until the noise is completely removed; do this even if it produces a lot of digital artifacts/distortion in the sound. Once you have set the threshold, lower the reduction amount until the digital artifacts/distortion go away. If the audio contains a lot of low frequencies, you might try adjusting the tone control to Preserve Bass frequencies. The opposite is true for high frequency content. Most of the time, leaving the slider in the middle will work fine. When adjusting the amount of noise reduction, you can also select the Noise Only check box to hear the noise signal that is being removed from the audio. If you hear a lot of the sound that you don’t want removed, you might have to lower the reduction percentage. You can also bypass the reduction at any time to hear the difference by clicking the Bypass button, which looks like a circle with a dot and a curved arrow inside. Once you are happy, click Apply.
15. Stem Routing

Introduction
This might be the most difficult concept to explain using pictures and paper, but I think it is critical to understand. Final Cut is almost exclusively clip-based, meaning that you place filters on the clips and not on video ‘tracks’ as we can in Soundtrack. Think of track effects as a funnel, and it doesn’t really make sense to set up a video funnel that changes everything that passes through it. The closest thing I can think of is a hardware converter box that changes the format of the video as it passes through. Most audio software works in a funnel-type system all of the time. Soundtrack is one of the first that has both excellent funnel effects (real-time track effects) and clip-based effects management (the Actions List); Nuendo from Steinberg is the best at doing both but at around $1500 for an audio-only application it is in a different league. The reason I need to explain this is because the mixer in Soundtrack reflects the funnel approach. Figure 13-15 shows a variety of tracks. The first two are dialog tracks; the next three are effects tracks; the next three are music tracks; and the final track of this group is a bus track that houses a Reverb plug-in. Think of bus tracks as effects tracks that only pass audio through but cannot contain audio clips like an audio track does. Following that are three submix tracks and the final track is the master.
Steps
- The dialog tracks are assigned to the dialog submix. The submix is funneled through to the master.
- The effect tracks are assigned to the effects submix. The submix is funneled through to the master.
- The music tracks are assigned to the music submix. The submix is funneled through to the master.
- All music tracks have sends which are attached to the reverb bus. A send is the departure point from the audio track and the bus is the destination for the send. The send is effectively a copy machine that sends out a copy of each music track into the reverb bus to be processed by the reverb effect. Right-click in the effects area of each track to add a send to the track. You will be able to choose from all available bus tracks, since that is the only place to which a send can be sent. The reverb bus is assigned to the music submix where it is mixed in with the other music tracks and then sent on to the master (see Tutorial 17 for more on this).
- Each of the submixes are mixed together at the final stage before leaving Soundtrack through the master.
16. Using the Surround Panner

Figure 13-16
Introduction
The surround capabilities of Soundtrack are integral to its overall design. Each track, submix, and master are surround-ready and can be switched to surround at any time. In other words, you don’t have to create specialized surround items to use surround; everything is already surround. This example is designed to help you switch a track’s panning tool from stereo to surround.
Steps
- First, you will need to have a surround submix if you want to take advantage of surround on the other tracks. All you need to do is click on the output number at the bottom of the submix track in the mixer and choose a surround output (1 – 6). This sets the submix to surround.
- Choose the surround submix you just set for the track you want to be surround. Everything is destination-based. If you set a track to go to a surround submix, its surround capabilities are enabled.
- Right-click the stereo panner in the track header and choose the Use Surround Panner option from the list.
- This changes the simple Stereo slider to a mini-surround panner. You can actually grab the panner dot (called a ‘puck’) and pan the sound around.
- Double-click on the mini-surround panner to bring up the full surround panner. This has level metering and a few specialized surround panner tools. If your source track contains audio files that are not surround (stereo or mono material), leaving the puck exactly in the center will let the audio pass through in its same configuration (l/r stereo will pass through on the l/r channels). If you move the puck, it will push the stereo audio into other parts of the surround field. Keep in mind that unless you create automation for the panner, none of the moves you make are recorded into Soundtrack Pro. Once you do create automation, you will no longer be able to move it freely. Have a little fun with this!
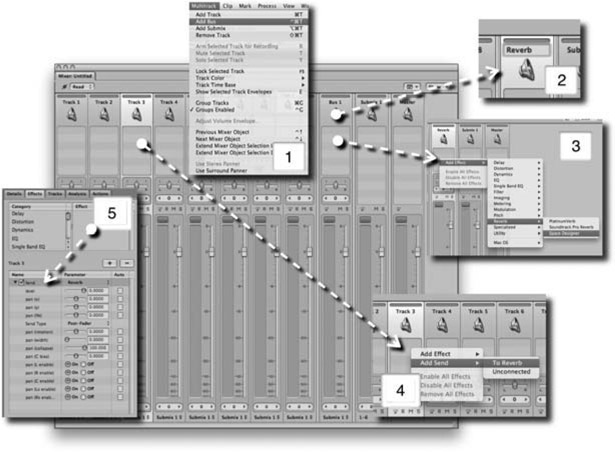
17. Adding Reverb on a Bus
Introduction
The use of reverb to mimic the sound of acoustic spaces is a powerful part of audio post-production. Instead of applying reverb to individual clips or on individual tracks, it often makes more sense to set up a single instance of reverb on a special track called a bus. The power of a bus is similar to that of a submix, because it can receive audio from a group of other tracks which are then mixed together and passed on. The bus is different because it can receive audio from other tracks at their send positions. Think of the send as a copy machine that resides on the audio track. The send copies the audio and pushes it to the bus track. The original audio still goes down the track and travels to the submix. If you have a send on a track that is being sent to a bus with no effect, you would end up with two of the audio signals at the destination submix. Placing an effect on the bus is the key, because it changes the audio. The send is located in the same area as plug-ins are inserted on the tracks. The reverb is placed on the bus track and all of the audio in that track is processed by the reverb. The audio is then passed to its selected submix. The strength of doing it in this way is that you can send a lot of different tracks though the same reverb, which helps to create consistency and conserves CPU resources.
Steps
- In the Multitrack menu, choose Add Bus. This creates a new bus track which is seen in the Mixer window. In Figure 13-17, the new bus is called ‘bus 1.’
- In the mixer, double-click on the name of the bus and give it a descriptive name like ‘reverb.’
- Right-click on the area just below the name and go to Add Effect > Reverb > Space Designer.
- Right-click on the area below the name of the track where you want to place a send to the bus. Choose Add Send ⊃ To [name you gave to the bus].
- In the Effects tab in the right pane, you can adjust the amount of signal passed through to the bus via the send. You must have the track with the send selected to view this information.
18. Automating Effects Plug-ins

Figure 13-18
Introduction
The ability to automate effects plug-ins is an important part of Soundtrack that was not nearly intuitive enough the first time I tried it. Think of automating as using keyframes or rubber banding in Final Cut. They are only used when you need an effect to change over time to adapt to the audio on the track or to create special effects. You can also record automation by moving parameters on the interfaces when Soundtrack is in an automation write mode. See Chapter 9, on mixing, for more information about recording automation in real time.
Steps
- Expand the envelope lane for the track you want to automate by clicking on the Expand arrow, located in the top left of the track header.
- Choose the Effects tab in the left pane to see the effect information.
- Expand the info area by clicking on the Expand arrow next to the effect’s name.
- The right column, listed as Auto, contains a check box that is used to enable and disable automation for the various effect parameters.
- The newly enabled parameters will appear in the envelope lane used by the track.
19. Project Music Settings

Figure 13-19
Introduction
While Soundtrack is primarily an audio editor, it also has a powerful set of music tools based around the Apple Music Loops file format. While it is not possible to create a completely original musical score using Apple Loops, it is possible to create an in-depth scratch track and sketch out musical ideas. I have used Apple Loops in final productions, but often mixed with original material. When using Loops there are few things to set up. There are also a few useful envelope lanes associated with the master track.
Steps
- Navigate to the Project tab in the left pane. Besides a lot of other project settings, there is a place to set musical preferences. It is below all of the metadata in the tab.
- The last parameters in the Project tab are the Tempo, Time Signature, and Key. The tempo default is 120 beats per minute. The default time signature is 4/4, which is what you will be using most often. 4/4 means four beats per measure with the beat on the quarter note. The majority of popular music uses this system. Another semi-common time signature is 3/4, which means that there are three beats per measure; the waltz falls into this category. Polkas have two beats per measure (typically a 2/4 time signature). The default key, which defines the root note of the music, is A. This is especially critical because the key information transposes the Apple Loops. The easiest way to use them is to pick an Apple Loop you want to use and, before dragging it into the project, set the project settings to match the loop. You will find the tempo and key information in the loop browser (introduced in Tutorial 20). The idea behind Apple Loops is that you really don’t need to know that much about music, and to a certain extent it is true. I know a lot of video editors who use Apple Loops by trial and error; they experiment until something works. In the end, you really only need to set a tempo that you like, because Soundtrack will transpose the files and that’s not the end of the world. But, if you want to match the key to the primary loop, it will sound better.
- The Show Envelopes dropdown menu on the master track is where you turn on the Transpose and the Tempo envelopes. Here you can tell the project to transpose Apple Loops and adjust the tempo of the music. You can have the Apple Loops speed up, slow down, and so on. You can create very powerful musical arrangements by using these features.
- I typically work with all three master envelopes visible.
- Drawing in tempo and transposition envelopes is as easy as rubber banding in Final Cut.
20. Exploring Music Loops

Figure 13-20
Introduction
See Tutorial 19 for more information about setting the project up for Apple Music Loops; this example builds on that information. Apple Loops have metadata that tells Soundtrack about their original key and tempo. When the project tempo and key do not match the Apple Loop’s information, Soundtrack speeds up or slows down the loop to fit into the tempo, and attempts to transpose the loop so that it fits the key. The tempo parts seem to work better than the transposition feature, so it is important when working with the loops that you set the project key to match the most important of the loops you will be using. This puts the Apple Loop into its un-transposed key and it will therefore sound the most natural. Of course, it helps to use the loop’s original tempo as well, but the project itself often dictates tempo. It would be a hard sell to use an up-tempo piano part during a dramatic death scene, although I’m sure it has been done before. Another useful feature in Soundtrack is the loop browser. This is an efficient way to search through the thousands of different musical files.
Steps
- Navigate to the Search tab in the right pane.
- Choose between List and Grid views. I prefer the grid because it provides more information than the list in the same size area.
- Choose a musical filter from the dropdown selector. Music beds are fully composed music tracks; instruments are individual instruments; descriptors include terms that might help you to find a specific mood; and the last choice, genre, covers the basic musical styles.
- The search area helps to refine the choices you make in the grid. You can filter by time signature, looping/non-looping files, and musical scale type (major, minor, etc.). You can also type in key words to help with the search. The final search filter is the Target button, which hides all loops except those that are within two semitones of the project key. A semitone is a twelfth of an octave (see Chapter 7) or, more simply, the interval between two adjacent keys on a piano. If the project key is A, you’ll be able to see the loops in the following keys: A, Bb/A#, B, Ab/G# and G. This is a great overtransposition of loops.