Lesson 15. Managing Your Account
In this lesson, you learn how to perform common account management tasks.
Understanding Account Management Options
On the Account page, shown in Figure 15.1, you can change your Basecamp URL, upgrade or downgrade account plans, change your credit card, change the account owner, or cancel your account. You must be the account owner to access this page and make these changes.
Figure 15.1. Manage your account options on the Account page.

To open the Account page, click the Account (Upgrade/Billing) tab. The remainder of this lesson covers the options that you’ll find on this page.
Changing Your Basecamp URL
To upgrade your Basecamp account, follow these steps:
- Click the Change URL link on the Account page to open the Change Your Account URL page (see Figure 15.2).
Figure 15.2. If your business needs change, you can change your Basecamp URL.

- Enter your new URL prefix in the text box. Basecamp prompts you with an error message if you try to enter a URL that’s already taken.
- Click the Change Our URL button to confirm the change.
Basecamp logs you out of the system and directs you to the login screen of your new URL.
Caution
Notify Users Well in Advance of a URL Change
Your previous URL is no longer active after you make this change. Be sure to inform all your Basecamp users to avoid problems or delays.
Changing Your Credit Card
If you have a paid Basecamp account and want to change the credit card that Basecamp charges every month, click the Change Card link in the upper-right corner of the Account page. This link doesn’t appear if you have a free account.
The Change or Update Your Credit Card page opens, where you can enter a new card number or update your expiration date. Be sure to click the Update My Credit Card button to save your changes. All credit card changes take effect immediately.
Viewing Your Invoices
The Invoices section of the Account page lists all your Basecamp invoices by date, including the plan type and fee you were charged. To view an invoice in detail, click its link. Basecamp opens the invoice in a separate window.
Note that the Invoices section doesn’t appear if you have no invoices yet or have a free account.
Upgrading Your Account
If you find that your existing Basecamp plan doesn’t offer all the features you need, you can upgrade to a more robust plan. See Lesson 1, “Getting Started with Basecamp,” for a reminder of what each Basecamp account plan includes.
Note
Not All Plans Include an Upgrade Option
Basecamp displays the Upgrade button only next to account plans that are viable upgrades based on your current plan level.
To upgrade your Basecamp account, follow these steps:
Tip
Review the Account page for news about special offers or discounts. Write down any coupon codes for entry on the next page.
- Review the upgrade options on the Account page and click the Upgrade button next to the plan you want. Basecamp displays a new page, asking you to confirm your upgrade (see Figure 15.3).
Figure 15.3. Easily upgrade to a new plan level if you outgrow your current plan.

- Enter a Coupon Code if one was listed on the previous page.
- Click the Upgrade My Account button. If you’re upgrading from a free account, this button is called Please Upgrade My Account.
Basecamp charges your new account rate as of your next billing cycle.
Note
Upgrading from a Free Account
If you’re upgrading from Basecamp’s free account plan, you need to enter credit card information to upgrade.
Downgrading Your Account
If you decide that your Basecamp account plan is more than you need, you can downgrade to a less-expensive plan. To do so, follow these steps:
- Click the Downgrade link below the account upgrade options on the Account page. The page expands to list the available downgrade options based on your current plan and number of active projects (see Figure 15.4).
Figure 15.4. Select from your available downgrade options.

- Click the Downgrade link next to the plan to which you want to downgrade. A new page opens, asking you to confirm your downgrade.
- Click the Downgrade My Account button to confirm your request.
Basecamp will charge you the new account rate as of your next billing cycle.
Paying in One Lump Sum
To pay for Basecamp in one lump sum rather than on a monthly basis, follow these steps:
- Scroll down to the Prefer to Pay in One Lump Sum Instead of Monthly? section on the Account page (about halfway down the page).
- Click the You Can Pay in One Lump Sum link. Basecamp opens the Make a Lump Sum Payment page, shown in Figure 15.5.
Figure 15.5. Avoid monthly payments by paying in one lump sum.

- Select one of the following payment amounts from the Please Charge My Card drop-down list: $50, $100, $250, $500, $1000, or $2000.
- Click the Process the Charge button.
When your balance runs low, Basecamp sends you a reminder email.
Caution
Lump Sum Payments Are Not Refundable
Although lump sum payments are convenient, be aware that they aren’t refundable. Be sure you really want to use Basecamp for the timeframe you’re paying for. Otherwise, the month-to-month plan is a better option.
Changing the Account Owner
You specified an account owner when you signed up for Basecamp, but you can change the account owner to another Basecamp user at your company. However, you can’t assign this role to a person at another company, such as a client, vendor, or partner. When you make this change, the existing account owner no longer has permission to perform tasks such as upgrading and downgrading plans, changing credit card information, or cancelling accounts.
See Lesson 3, “Managing People, Companies, and Permissions,” to learn more about account owners and other Basecamp roles.
To change the account owner, follow these steps:
- On the Account page, scroll down to the Want to Make Someone Else the Account Owner? section, shown in Figure 15.6.
Figure 15.6. Transfer account ownership to another Basecamp user.

Note
Why Can’t I Change the Account Owner?
Your Basecamp account must include more than one user for this section to appear. You can’t transfer ownership to anyone who isn’t entered into your Basecamp system. See Lesson 3 for more information on setting up additional users.
- Select the name of the new account owner from the drop-down list.
- Click the Make This Person the Account Owner button. Basecamp opens a warning box asking you to confirm this change.
- Click the OK button to confirm. Remember that you can have only one account owner. Once you transfer this right to another user, you relinquish your account owner privileges unless the new owner transfers this right back to you.
Canceling Your Account
If you decide that Basecamp isn’t the right project management tool for your business, you can cancel your account at any time. Be aware that if you cancel your account in the middle of a billing cycle, you’re still responsible for any outstanding invoices.
Caution
You Can’t Reverse a Cancellation
Be sure that you really want to cancel before proceeding. You can’t reverse a cancellation, and your Basecamp data is deleted permanently.
To cancel your account, follow these steps:
- On the Account page, scroll halfway down the page to the Need to Cancel Your Account? section.
- Click the Refund Policy link and verify that you understand the policy before proceeding.
- Click the Please Cancel My Account link. Basecamp opens a verification page, asking you to confirm your cancellation.
- Click the Cancel My Account button to confirm.
Before canceling your account, you might want to consider exporting your Basecamp data for future reference. See “Exporting Your Basecamp Data” later in this lesson for more information.
Enabling the Basecamp API
If you want to take advantage of some third-party applications that integrate with Basecamp, or you’re a developer and want to integrate with Basecamp data, you can enable the Basecamp API for your account.
Plain English
API
API stands for Application Programming Interface. It’s a software interface that lets one website communicate with another website or application. You can use the API to establish Basecamp integration with other products you create or use, such as one of the many third-party add-ons available at http://basecamphq.com/extras.
To enable the Basecamp API, scroll down the Account page to the Basecamp API section, read and agree to the terms of service, and click the Yes, Please Enable the Basecamp API for This Account box.
Learn more about the Basecamp API at http://developer.37signals.com/basecamp. There is also a Google Group dedicated to discussing the Basecamp API at http://groups.google.com/group/37signals-api.
Exporting Your Basecamp Data
Basecamp enables you to export your data once a day. Exports include messages, to-do lists, milestones, time entries, and people.
Tip
Export Time-Tracking Data
You can also export your time-tracking data from Basecamp. See Lesson 10, “Tracking and Managing Time,” for more information.
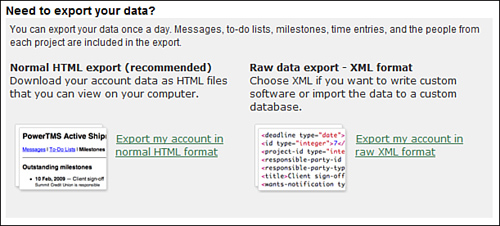
To perform an export, scroll down to the bottom of the Account page to the Need to Export Your Data? section (see Figure 15.7) and select one of the following options:
• Normal HTML Export. Exports your data as HTML files you can view with a browser. This is the format Basecamp recommends for most users.
• Raw Data Export—XML Format. Exports your data as raw XML that you can use to create custom software or import into a custom database.
Figure 15.7. Export your Basecamp data as HTML or XML.

The third-party application ThickToast (http://www.vb123.com/basecamp) enables you to easily import your XML data into Microsoft Access. See Lesson 16, “Integrating Basecamp with Add-ons and Other Applications,” for more information.
Plain English
XML
XML stands for Extensible Markup Language and is an open standard for structuring information. One sample use of your exported Basecamp XML is to import it into Microsoft Access or Excel.
Basecamp sends an email when your data is ready for download in a zipped (compressed) format.
Although Basecamp backs up your data nightly, an export is useful if you want to create your own backups, import your Basecamp data into your own database, or cancel your Basecamp account.
Tip
Consider External Backup for Added Security
If your Basecamp data is mission critical or irreplaceable, consider using a backup data service as well. Backupify (www.backupify.com) backs up online data from Basecamp, Twitter, Facebook, YouTube, Gmail, Flickr, Google Docs, and more.
Joining the Basecamp Affiliate Program
If you want to make some extra money referring new users to Basecamp, consider joining Basecamp’s affiliate program. To do so, click the Affiliate Program link in the upper-right corner of the Account page.
You can receive up to $75 for initial sign-up and up to $7.45 per month for the duration the person you refer continues to use Basecamp. Basecamp provides links, graphics, and other materials that you can post on your website or blog to help you profit as an affiliate. Basecamp makes all payments to your PayPal account.
Summary
In this lesson, you learned how to perform Basecamp account management tasks. Next, learn how to extend Basecamp with add-ons and other applications.
