Lesson 12. Working with Chat Functionality
In this lesson, you learn how to participate in group chats on Basecamp by integrating with the Campfire real-time chat application.
Understanding Basecamp’s Chat Functionality
Basecamp enables you to hold group chats with your project team members using Campfire (www.campfirenow.com), the real-time chat application developed by Basecamp’s parent company, 37signals.
Basecamp requires a Campfire account to use the chat feature, but only one person needs to sign up for Campfire, not each individual project team member. It’s recommended that this person is the account owner or administrator who has access to all your Basecamp projects.
Anyone who has access to your Basecamp system can participate in chats and upload files, but individuals from external companies aren’t able to view, search, or delete chat transcripts. You can also invite individuals who aren’t part of your Basecamp project team to participate in a specific chat. See “Providing Guest Access to Your Chat Room” later in this lesson for more details.
Tip
Choosing Between Messages, Chat, or Writeboards
Basecamp offers several ways to communicate and interact with project team members. It’s a judgment call on the part of the project manager to determine which communication method works best in which situation. In general, chats are good for informal discussions among team members, messages are designed for important communications you want to maintain as part of your project record, and writeboards work well for document collaboration.
Understanding Campfire Account Types
Campfire (www.campfirenow.com) offers several account plans based on how you plan to implement chat for your projects.
Table 12.1 shows the differences between the available Campfire account plans.
Table 12.1. Campfire Account Plans
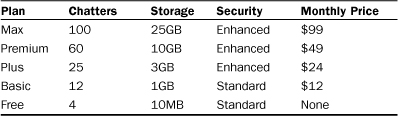
The plans vary based on the following features:
• Number of chatters. This refers to the number of people who can chat on your system at one time. This number includes people chatting in all your rooms across projects, not just in one room.
• Amount of storage. All Campfire plans enable you to upload and share files, with varying amounts of storage space available to you. Consider the size of the documents, pictures, audio, and video that you might upload to help determine which account plan is best for your needs.
• Security. Campfire accounts with enhanced security offer SSL 128-bit encryption for added privacy and protection. Accounts that offer standard security use passwords for your protection.
Plain English
SSL Encryption
SSL stands for Secure Socket Layer, a cryptographic protocol that offers security for data communications over the Internet. In other words, SSL encryption keeps your Campfire chats safe from security breaches. E-commerce sites and banks also use SSL encryption to ensure the safety and privacy of their customers’ credit cards and personal data.
Campfire’s Max, Premium, Plus, and Basic accounts also include email tech support, no advertising, and a custom lobby logo (your company logo displayed on your Campfire home page).
Note
Basecamp Max Plan Subscribers Receive Campfire Free
Remember that if you have Basecamp’s Max plan, you receive a free Campfire Premium plan (a $49 per month value). To receive this offer, sign up for a free Campfire account and then send your Basecamp and Campfire URLs to [email protected], requesting the upgrade.
Signing Up for a Campfire Account
Signing up for a Campfire account is a simple, straightforward task. If you choose a paid plan, you receive your first 30 days free as a trial.
Figure 12.1 shows the screen that greets you the first time you visit Campfire (www.campfirenow.com).
Figure 12.1. You can quickly sign up for a trial account from Campfire’s home page.

To sign up for a Campfire account, follow these steps:
- Click the Pricing & Sign Up link on the top navigation menu of Campfire’s home page.
- Click the Sign Up button for the plan you prefer: Max, Premium, Plus, or Basic (see Figure 12.2). Alternatively, click the Free Plan link to sign up for a plan with limited features at no cost. The Sign Up page opens, shown in Figure 12.3.
Figure 12.2. Choose the Campfire plan that best suits your business needs.

Figure 12.3. Enter Campfire account information that you’ll use to connect with Basecamp.

- If you already have a 37signals ID, click the Sign In link to sign up for Campfire using this ID. Otherwise, enter your name, email address, company, and time zone in the Create Your Campfire Account section.
- Choose and enter a Username and Password for your account. Be sure to choose a strong password, preferably one that contains both letters and numbers.
- Enter the URL of the Campfire site address you want to use. For example, if your company name is Mango Design, you might want to choose http://mangodesign.campfirenow.com. Your site address can include only letters and numbers. Spaces aren’t allowed. If you enter an address that’s already taken, Campfire prompts you to enter a new name.
- Enter your credit card data in the Enter Your Billing Information section. You can pay with a Visa, MasterCard, or American Express credit card. Remember that your card won’t be billed until your 30-day trial ends. If you cancel your account before the 30 days, you won’t be charged. The free account doesn’t require a credit card.
- If you have a coupon or discount code, click the Got a Coupon Code? link and enter your code.
- Review Campfire’s terms of service, privacy policy, and refund policy by clicking the appropriate links.
- Click the Create My Account button. Campfire transfers you to your login page.
From here, you can log in to Campfire and use it directly or you can return to Basecamp to set up Campfire to work within your Basecamp system.
Configuring Basecamp to Work with Campfire
Now that you have a Campfire account, you can set up Basecamp’s chat functionality. To do so, follow these steps:
- From the Basecamp Dashboard, click the Settings tab.
- Click the Chat Settings link to open the Chat Settings page, shown in Figure 12.4.
Figure 12.4. You must enable your Basecamp account to work with Campfire.
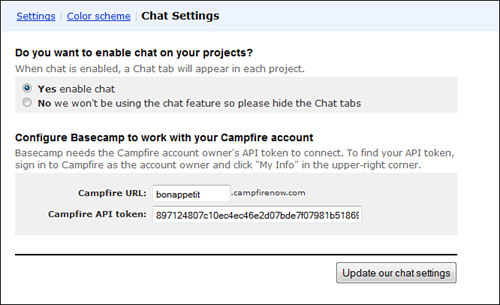
- Verify that the Yes option button is selected to enable chat. This should be selected by default.
- Enter the Campfire URL you specified when you signed up for Campfire, such as mangodesign.campfirenow.com.
- Enter your Campfire API Token. You can find this information by logging in to Campfire as an account owner and clicking the My Info link that appears in the upper-right corner of the screen.
- Click the Update Our Chat Settings button.
Basecamp is now configured to work with your Campfire account. The Chat tab appears for each project in your Basecamp system.
Participating in Group Chats
To access the chat room for a project, follow these steps:
- On the Basecamp Dashboard, select the project you want to open from the Your Projects list on the right side of the screen.
- Click the Chat tab to open the chat room, shown in Figure 12.5.
Figure 12.5. Set up a room the first time you enter chat for a project.

Note
Chat Room Prompts for New Users
If you haven’t already configured Basecamp to work with Campfire on the Chat Settings page, you’re prompted to do so. Click the setup link in the chat room, configure Campfire, and return to the chat room to begin your chat.
- Select a chat room to enter from the drop-down list. Basecamp lists Room 1 by default, but you can create a new room in the text box. You can attach only one room to a project, however. If you’ve already attached a room to your project, this screen doesn’t appear.
- Click the Choose This Room button to enter the chat room. Figure 12.6 shows the entry to the chat room. Basecamp lets you know whether any other chatters are currently in the room. If not, the room’s status is unoccupied.
Figure 12.6. See who else is already in the chat room.

- Click the link for the name of the room to open the chat room. Figure 12.7 shows a sample chat room the first time you enter it. Figure 12.8 shows a sample chat room that’s in progress.
Figure 12.7. It’s easy to start chatting with project team members.

Figure 12.8. In addition to text chats, you can upload files and add sound effects in your chat room.

In a chat room, you can do the following:
• Enter a message in the text box and click the Send Message button to post it.
• Turn sounds on and off in the room by clicking the Sound icon.
• Add a new discussion topic by clicking the Add a Topic link.
• Edit the room’s discussion topic by clicking the Edit link. To remove the topic, delete the content of the text box and click Save.
• View who is in the chat room in the Who’s Here? list.
• Search for words in chat text in the Search text box.
• Leave the chat room by clicking the Leave link.
• Upload a file by clicking the Upload a File link.
Tip
Have Some Fun with Sounds Effects
If you’d like to have some fun with your chatters, you can play sound effects in your chat room. Try entering one of the following: /play crickets, /play rimshot, or /play trombone. Remember, though: A little goes a long way with sound effects.
The remainder of this section focuses on common tasks you perform in the chat room.
Uploading a File
Although you can upload files in other parts of Basecamp, sometimes it’s more convenient to include files as part of your chat conversations.
To upload a file, follow these steps:
- Click the Upload a File link.
- Click the Browse button to select one or more files from your computer. Depending on your operating system, this button could be called the Choose File button instead. Each file must be less than 10MB and counts toward the file storage limit of your Campfire account plan.
- Click the Upload button to upload the file.
The link for the file you upload appears in your chat room, as well as on the right side of your screen (see Figure 12.9).
Figure 12.9. Upload files you’re discussing in your chat room.

Each file link is preceded by a file icon to make it easier to identify the file type. If you upload an image, the image previews directly in the chat window.
To open the file, click the link. Depending on the file type, Basecamp might open the file directly or prompt you to pick an associated application.
Viewing Files and Transcripts
Basecamp creates daily transcripts of your chats that you can review at a later date.
To view chat files and transcripts in one place, click the All link next to the list of uploaded files in the chat room. The Files, Transcripts & Search page opens, shown in Figure 12.10.
Figure 12.10. Select a transcript to view.

Basecamp displays a list of all transcripts by date and room name. Links to any files you uploaded appear below the transcript link.
Tip
Specify Which Room’s Transcripts to Display
If you have a lot of transcripts, narrow what appears on your screen by selecting a specific room from the Which Room? drop-down list.
To view a specific transcript, click its date link. Figure 12.11 shows a sample transcript.
Figure 12.11. View transcripts of previous chats.

Deleting a Transcript
To delete a chat transcript, follow these steps:
- In the main chat window, click the All link next to the list of uploaded files.
- Click the Delete Transcript link to the right of the transcript you want to delete.
- Click OK on the confirmation dialog box that opens.
Basecamp deletes the transcript permanently.
Deleting an Uploaded File
Because there is a limit to the number of files you store in Basecamp, there will be times that you want to delete files you no longer need. To delete a file you uploaded in chat, follow these steps:
- In the main chat window, click the All link next to the list of uploaded files.
- On the Files, Transcripts & Search page, mouse over the file you want to delete. The Trash icon appears (see Figure 12.12).
Figure 12.12. Mouse over the file name to view the Trash icon.

- Click the Trash icon.
- Click OK on the confirmation dialog box that opens.
Basecamp permanently deletes the file.
Searching Chat Transcripts
If you use chat frequently, it can become difficult to find the details of a specific conversation over time. For example, you might remember talking about a particular aspect of a client project several weeks ago, but you’re not sure exactly when the chat took place or who said what.
There are two ways to search for chat content—in the chat room or on the Files, Transcripts & Search page.
To search for chat content, follow these steps:
- Enter search text in the text box to the left of the Search button in either the chat room or on the Files, Transcripts & Search page.
- Click the Search button to open the Search results page, shown in Figure 12.13.
Figure 12.13. Search for specific chat room discussions.
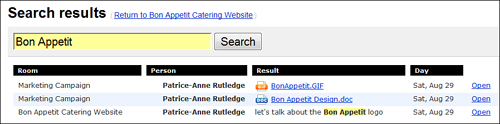
- Review the search results and click the Open link next to the result that best matches what you’re searching for. The transcript opens to the specific location where your search term is mentioned.
Providing Guest Access to Your Chat Room
At times, you might want to invite someone who isn’t part of your project team to participate in a chat. For example, not every person at a vendor, partner, or client might have, or need, an account on your Basecamp system. If it doesn’t make sense to create an account for this person, consider providing guest access to your chat room.
To do so, follow these steps:
- Log into your Campfire account (not Basecamp).
- Click the link of the chat room to which you want to invite your guest.
- Verify that guest access is on (see Figure 12.14). If it isn’t, click the Turn It On link.
Figure 12.14. Turn on guest access in Campfire.
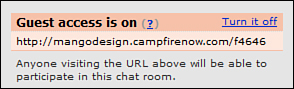
- Notify your guest of the URL to temporarily enter the chat room, such as http://mangodesign.campfirenow.com/76e46. This URL is unique to this room. If you turn off guest access and turn it back on again, Campfire gives your room a new URL.
Your guest just needs to enter a name and click the Sign In button to access your chat room. Like project team members at external companies, guests can’t view, search, or delete chat transcripts.
Guest URLs shouldn’t be shared with anyone other than invited guests. If an unauthorized person does enter your chat room, however, mouse over that person’s name in the Who’s Here? List and click the Kick link (see Figure 12.15).
Figure 12.15. Kick out anyone you don’t want in your room.

Basecamp notifies users you kick out of your chat room, so you probably want to kick out only those people who are accessing your chat room without your permission, rather than kicking out your vendors, or worse, your clients.
Summary
In this lesson, you learned how to hold group chats in Basecamp by integrating with the Campfire application. Next, learn how to view and analyze project activity on the Dashboard.