Lesson 8. Posting and Commenting on Messages
In this lesson, you learn how to collaborate on Basecamp using messages.
Posting a Message
Messages are a key collaboration tool in Basecamp. You can use them to communicate informally with project team members, or you can use them as a project approval tool. All users assigned to a project can post messages, leave comments, and upload files.
To create your first message for a project, follow these steps:
- On the Basecamp Dashboard, select the project you want to open from the Your Projects list on the right side of the screen.
- Click the Messages tab to open the Messages page, shown in Figure 8.1.
Figure 8.1. The Messages page helps you get started on entering your first project message.

- Optionally, view the video demo to take a visual tour of Basecamp’s message feature.
- Click the Post the First Message for This Project link. The Post a New Message page opens, shown in Figure 8.2.
Figure 8.2. Create a message and attach any related files.

Note
Where’s the Post the First Message for This Project Link?
The Post the First Message for This Project link appears on the Messages page only until you create your first message. After that, the initial content that appears on the page is replaced with details about actual message activity. Alternatively, you can also create a message by clicking the New Message link on the Overview page or the Post a New Message button on the Messages page.
- Enter a message Title in the text box. This field is required.
- Select a message Category from the drop-down list.
- If the category you want doesn’t appear in the list, select Add a New Category and enter the category name in the dialog box that opens. Click OK to add this new category to the drop-down list.
Note
Understanding Default Message Categories
The categories in this list come from the default message categories you set up on the Settings page. You can add another category specific to this project, but any default message categories you add or delete will only apply to future projects, not existing projects. See Lesson 2, “Customizing Your Basecamp Workspace,” for more information about setting up default message categories.
- Enter your message in the Message Body text box. See “Formatting Message and Comment Text,” later in this lesson, for more information about how to format the content in this field.
- To enter extended text, click the Show Extended Message Body link and enter additional text in the Extended Message text box. When you select Expanded View on the Messages page, you must click the Continued link to view the text you enter in this field.
- If you want to share this message only with users in your own company, click the Private Message checkbox. Users at external companies such as clients or vendors won’t be able to see your message. If you haven’t given any external companies permission to access your project, this checkbox isn’t available.
Note
Not All Plans Allow You to Attach Files
If you have a free Basecamp account, you receive an error message if you try to attach any files. See Lesson 1, “Getting Started with Basecamp,” for more information about which account plans include file sharing and your file storage limits.
- To attach one or more files, click the Browse button and select the files on your computer. Depending on your browser and operating system, this button could be named Choose File instead. Attaching a file is particularly useful if you want project team members to comment on it. Each file must be no larger than 100MB and counts toward the file storage limit of your Basecamp account plan.
Tip
Try the Basic Uploader if You Have Trouble Uploading Files
Basecamp uses the Advanced Uploader by default, which enables you to upload multiple files. The Advanced Uploader requires that you have Flash 9 or greater enabled on your computer and that you haven’t installed an ad-blocking plug-in on your browser. If you’re having trouble uploading, click the Basic Uploader link, which enables you to upload files one at a time. See Lesson 9, “Sharing Files,” for more information about file sharing and storage.
- If this message relates to a milestone, select the milestone from the Does This Message Relate to a Milestone drop-down list. A link to this message will appear below the related milestone on the Milestones page.
Note
Why Can’t I Relate My Message to a Milestone?
This field doesn’t appear if you haven’t entered any milestones yet. See Lesson 5, “Entering and Tracking Milestones,” for more information.
- If this message signifies the completion of the milestone, select the Complete the Milestone checkbox. The milestone will be marked as completed on the Milestones and Overview pages for the project and on the Basecamp Dashboard.
- Select the team members you want to send email notifications to in the Subscribe People to Receive Email Notifications section. You can notify individuals assigned to this project, both at your company as well as any external company. To save time, you can also choose to notify all people at a company. The people you select will receive email notification when you post your initial message and when any related comments are posted.
- Click the Preview button to preview what your message looks like.
- If you want to make additional changes, click the Edit button.
- When you’re finished with your message, click the Post This Message button to post to Basecamp and send any email notifications.
Your message appears on the Messages and Overview pages, as well as the Basecamp Dashboard. See “Viewing Messages and Comments” later in this lesson.
Leaving Message Comments
To comment on an existing message, follow these steps:
- Open the message on which you want to comment. You can find messages on the Basecamp Dashboard or on the Overview or Messages page for a specific project.
- Enter your comments in the Leave a Comment text box, shown in Figure 8.3. See “Formatting Message and Comment Text” later in this lesson for more information about text formatting options.
Figure 8.3. Enter a comment if you have something to add to the discussion.

Tip
View Attached Files
If you want to review a file attached to messages or other comments, click the file link to open it in another window. Image files appear as thumbnails. If more than one image is attached, you can click the View All These Images at Once link to preview them in another window.
- If you want to attach a file related to your comment, click the Attach Files to This Comment link. The page expands to include a Browse button, which functions the same way as the Browse button on the Post a New Message page.
- Click the Preview button to preview your comment.
- If you need to make changes to your comment, click the Edit button to return to the previous page.
- Click the Add This Comment button to post your comment. Comments appear on the Messages and Overview pages, as well as on the Basecamp Dashboard.
Caution
You Can Only Edit Comments for 15 Minutes
If you want to edit your comment, you can do so, but only for up to 15 minutes after posting. After 15 minutes, your only option is for an account owner or administrator to delete the comment. See “Editing Messages and Comments,” and “Deleting Messages and Comments,” later in this lesson.
Formatting Message and Comment Text
Basecamp provides several options for formatting your message and comment text. You can use the following:
• Plain text
• Textile formatting
• HTML, JavaScript, or PHP
Plain English
Textile
Textile is a simple text markup language that can be converted to HTML for web viewing. Visit http://textile.thresholdstate.com for more information about using Textile.
Plain text is obviously the easiest way to create a message. Just type what you want to say and post. Of course, there will be times when you want to use common formatting, such as bolding or italics. Using textile formatting, you can bold text by surrounding it with asterisks, such as *Basecamp*. To italicize, surround the text with underscores (_Basecamp_).
If you’re familiar with HTML, you could also use HTML tags to accomplish the same thing:
<b>Basecamp</b>
<i>Basecamp</i>
Tip
Keep Formatting Simple
Although Basecamp provides a lot of flexibility in formatting your messages, it’s a good idea to communicate anything complex in an attached file. For example, rather than trying to format a table in a message, attach a Word or Excel file instead. Another option is to use the writeboard feature to collaborate on a document. See Lesson 11, “Collaborating with Writeboards,” for more information.
If you plan to enter code for project team members to review, you need to be sure that it displays correctly. For example, let’s say that you enter the following in a message:
<b>This text is bolded.</b>
When it’s posted, it appears as bolded text, without the HTML tags. This is fine if you want bolded text, but what if you want your team members to comment on the actual HTML code? In that case, you can use the HTML tags <code> or <pre> to prevent the code from being rendered in the browser.
For example, you could enter the following:
<pre>
<b>This text is bolded.</b>
</pre>
For multiline code blocks, use <pre>. For inline code, use <code>.
Tip
Use Third-Party Add-Ons for Complex Code
If you plan to review a lot of code using Basecamp messages, you might want to consider third-party add-ons to simplify the process. Two options to try include Pastie (http://pastie.org), a code-pasting service, or Orbeon’s Markup to Basecamp tool (http://wiki.orbeon.com/forms/contributions/escaping-markup-for-basecamp-textile).
Sending a Comment by Email
If you’re subscribed to receive email notifications of message and comment activity on your Basecamp project, you can submit comments by replying to those emails.
To do so, open the email you want to comment on and send your comments in a reply. Be sure to enter your comments above the line that says: Reply ABOVE THIS LINE to post a comment to the project.
Figure 8.4 shows a sample email reply.
Figure 8.4. Submit comments to Basecamp by email.

Comment replies must be in plain text format only. You can, however, attach a file to your email that will be uploaded as an attachment to your comment.
When Basecamp receives your comment by email, it’s posted just like a comment you entered on the web.
Note
You Can’t Submit an Original Message by Email
Email submissions works only for comments. You can’t submit a message by email.
Viewing Messages and Comments
To view your project messages and comments, click the Messages tab.
On the Messages page, you can sort messages by category. To do so, click the category you want to view in the Categories list on the right side of the screen. The account owner and administrator can also rename, delete, or add another category by clicking the Edit link. See Lesson 2, “Customizing Your Basecamp Workspace,” for more information about setting up message categories.
Note
Other Ways to View Message Activity
You can also view message and comments activity on the Basecamp Dashboard and the Overview page for each project. See Lesson 13, “Viewing Project Activity on the Dashboard,” for more information.
Using Expanded View
Expanded View is the default view for the Messages page, shown in Figure 8.5.
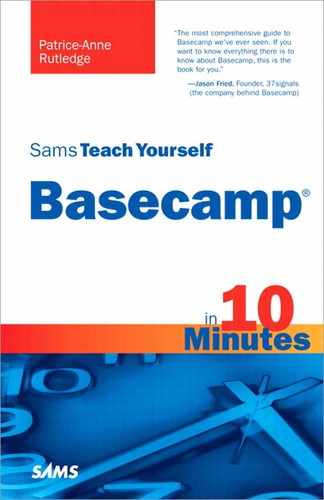
Figure 8.5. You can view details about attachments with the Expanded View.
Expanded View displays the text entered in the Message Body text on the Post a New Message page. You can view text entered in the Extended Message text box by clicking the Continued link to open the complete message. This view also provides additional details on any attachments and links to edit the message or post comments.
Using List View
Click the List View link on the Messages page to view a list of your messages (see Figure 8.6).
With List View, you can see:
• A list of all project messages in chronological order (the most recent messages appear at the top of the list).
• Which messages are new or have new comments, identified with the green icon.
• Which messages you’ve already read, identified with the gray icon.
• Who posted each message and when.
• Who posted the last comment and when.
• How many comments each message has received, identified by a number to the left of the message title. If no number appears, the message has no comments.
• Which messages are private, marked by the red Private icon.
• Which messages have attached files, identified with the Paperclip icon.
Figure 8.6. View a simple list of all message activity on your project.

Click a message link to open the individual message and read its contents and related comments. Figure 8.7 shows a sample message with comments.
Figure 8.7. View individual messages and reply to them.

If you log out of Basecamp with List View selected on the Messages page, this view becomes your default the next time you log in. You can change your default back to Expanded View by selecting it before you log out of Basecamp again.
Editing Messages and Comments
To edit a message, follow these steps:
- Open the message you want to edit and click the Edit This Message link. Alternatively, click the Edit link next to the message you want to edit on the Messages page with Expanded View selected. The Edit This Message page opens, where you can modify your message. This page is almost identical to the Post a New Message page, described in the “Posting a Message” section earlier in this lesson.
- Make any desired changes to your message.
- If you want to notify the people who are subscribed to the message that you’ve modified it, select the Yes, Notify the Subscribers Above of These Changes via Email checkbox.
- Click the Save Changes button.
You can also edit message comments, but only for up to 15 minutes after making them. To do so, open the message and click the Edit link next to the comment you want to edit. Basecamp lets you know how many minutes are left. Figure 8.8 shows a sample comment that can still be edited.
Figure 8.8. Basecamp tells you how much longer you can edit a message comment.

If time has elapsed on your comment, the Edit link is no longer available.
Note
Basecamp Editing Permissions
Basecamp users can edit only messages and comments that they posted. The account owner and administrators can edit their own messages and comments, as well as messages of project team members. Remember that the 15-minute time limit for editing comments applies to everyone.
Deleting Messages and Comments
The account owner and administrators can delete messages and comments posted by all members of their project teams, including themselves. Basecamp users can delete their own messages, but not comments.
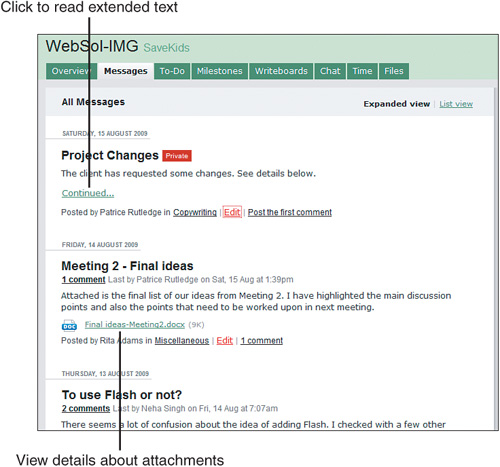
Open the message you want to delete or whose comments you want to delete, shown in Figure 8.9.
Figure 8.9. You can quickly delete messages and comments, but remember that your deletion is permanent.
On this message detail page, you can click the Delete link to delete the entire message and all related comments. Click OK on the warning dialog box that opens to confirm that you want to delete the message.
To delete an individual comment, click the Trash icon to the right of that comment. Again, Basecamp asks you to confirm the deletion.
Caution
You Can’t Undo a Deletion
Be sure that you really want to delete a message or comment before doing so. Basecamp deletions are permanent, and there is no undo.
Summary
In this lesson, you learned how to collaborate on Basecamp using messages and comments. Next, learn more about sharing files on Basecamp.