
Lesson 6. Entering and Tracking To-Dos
In this lesson, you learn how to enter and track project to-do lists and to-do items in Basecamp.
Understanding To-Do Lists
In addition to creating realistic and achievable milestones, you need to define clear and specific to-dos for your project to succeed.
Plain English
To-Do
A to-do is the Basecamp term for work to be performed. In other project management systems, this is often called a task. Basecamp to-do lists are similar to summary tasks, which include multiple related subtasks, referred to as to-do items in Basecamp.
Before you start entering to-dos in Basecamp, you should create a draft of your master to-do list somewhere you can easily edit its content. The Basecamp writeboard is a great place to do this because you can collaborate with other team members on your list. See Lesson 11, “Collaborating with Writeboards,” for more information.
Tip
Integrate Milestones and To-Do Lists
Creating milestones and to-do lists for your projects are part of your overall planning process, not two separate steps. It’s recommended that you review both Lessons 5 and 6, create your plan, and then enter milestones and to-do lists in Basecamp.
Defining Clear and Specific To-Dos
Here are several things to consider when creating your to-do lists:
• Review your estimated milestones for fixed dates and events.
• Define all the tasks that need to be performed, grouping them into to-do lists and related to-do items.
• Determine the sequence in which tasks need to be performed and modify your list if necessary.
• List the person responsible for each to-do list item.
• Estimate the time it should take to complete specific to-do items, if relevant.
• Group your to-do lists under each associated milestone.
• Review your list for missing or redundant to-dos.
• Analyze whether your list is feasible considering your project scope, available resources, and milestone dates.
• Adjust your list until you have a realistic plan.
Estimating To-Do Durations
Not every to-do item requires a time estimate, but in some cases, it’s important to give the person responsible an idea of how much time a task should take. This can also help your project from slipping past a deadline.
Here are three techniques for estimating the duration of to-do items:
• Expert judgment. This technique emphasizes the professional expertise of both the project manager and team members. In essence, it’s a judgment call based on past experience to determine how long a task should take.
• Analogous estimating. If you’ve completed similar projects in the past, use your prior project documentation to determine how long a task should take. This works well if your current project is very similar to a previous project.
• Three-point estimates. With this technique, you determine three possible duration scenarios (most likely, optimistic, and pessimistic) and average the three.
Tip
Expand on Basecamp’s To-Do Functionality with Add-ons
The numerous third-party add-ons that integrate with Basecamp enable you to create complex charts and graphs based on your milestones and to-do lists, create to-do estimates, and much more. See Lesson 16, “Integrating Basecamp with Add-ons and Other Applications,” for more information.
Understanding To-Do List Permissions
Access to Basecamp’s to-do features vary depending on the user’s role in the system (account owner, administrator, internal user, or external user).
Basecamp users from external companies who are assigned to a project can do the following:
• View to-dos on the Basecamp Dashboard and the project Overview and To-Do pages. The account owner or an administrator can block this access, however, by specifying that a to-do list is private. See “Creating To-Do Lists” later in this lesson for more information.
• Mark to-do items as complete.
• Comment on to-dos. They can edit their own comments within 15 minutes of posting, but they can’t delete comments.
• Add, edit, and delete to-dos, if the account owner or an administrator assigns permission on the Add People, Remove People, and Change Permissions page. See Lesson 3, “Managing People, Companies, and Permissions,” for more information.
Users at your company have full access to Basecamp’s to-do functionality, except for the ability to delete comments and assign permissions.
Account owners and administrators have full access to all to-do features, including the ability to delete comments and assign permissions.
Creating To-Do List Templates
Before you create a to-do list in Basecamp, consider whether you’ll need to create similar lists in the future for other projects. For example, if you design websites, develop software, plan weddings, cater events, or perform any type of regular service, your to-do lists might be very similar for numerous projects. Rather than type this same data over and over again, using a template can save you a lot of time.
Creating a to-do list from a template is an optional Basecamp feature. You can also create your to-do list from scratch if you prefer.
Caution
Create Templates Before You Create To-Do Lists
If you want to use to-do list templates, you must create them before creating a new to-do list. You can’t create a template from an existing to-do list.
Only the account owner or administrators can create to-do list templates. To do so, follow these steps:
- From the Basecamp Dashboard, click the Templates tab to open the Templates page, shown in Figure 6.1.
Figure 6.1. Save time and maintain consistency with to-do list templates.
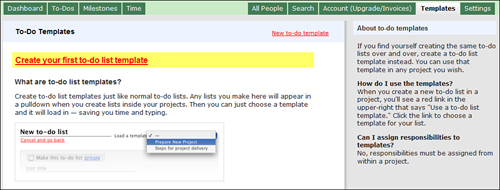
- Click the Create Your First To-Do List Template link. If you’ve already created a to-do list template, click the New To-Do Template link instead.
- Enter a title and optional description for your template (see Figure 6.2).
Figure 6.2. Enter a template title and description.

- Click the Create This List button.
- Enter the first to-do item for your list in the text box (see Figure 6.3).
Figure 6.3. Start entering to-do items.

- Click the Add This Item button. Basecamp adds the to-do item.
- Repeat steps 5 and 6 until you’re finished adding to-do items.
Tip
You can add more to-do items to your template at any time by clicking the Add an Item link on the Templates page.
The Templates page displays your to-do list template and its to-do items. Any time you create a to-do list, you can use this template to help you get a fast start on setting up your project. Because the same people might not work on all projects based on a specific template, you can’t specify an assigned person on a template. You also can’t assign a due date. Instead, you assign to-do items when you create your list.
Editing Templates
You can edit your template and its to-do items at any time. To do so, follow these steps:
- On the Templates page, mouse over the template or to-do item you want to edit. The Edit link appears to its left, shown in Figure 6.4.
Figure 6.4. Edit your templates as your needs change.

- Click the Edit link.
- If you’re editing a template, you can modify its title and description.
- If you’re editing a to-do item, Basecamp enables you to modify the to-do list text (refer to Figure 6.3).
- When you’re done editing, click the Save Changes button.
Basecamp updates the Templates page with your changes.
Reordering Templates and To-Do Items
Basecamp displays templates and their associated to-do items in the order you create them, but you can reorder these if you like.
To reorder the to-do items on a template, follow these steps:
- On the Templates page, click the Reorder link next to the template whose items you want to reorder.
- Drag the to-do items to the order you prefer using the Drag icons, shown in Figure 6.5.
Figure 6.5. Reorder to-do items if they aren’t in the right sequence.

- When you’re finished, click the Done Reordering link.
Tip
Reorder Templates on the Templates Page
To change the order of the templates on the Templates page, click the Reorder Lists link in the upper-right corner of the page. Drag the templates to the order you prefer and click the I’m Done Reordering Templates link when you finish.
Deleting Templates
To delete a template or to-do item, follow these steps:
- On the Templates page, mouse over the template or item you want to delete. The Trash icon appears to the left of its title (refer to Figure 6.4).
- Click the Trash icon to delete. Basecamp opens a dialog box asking you to confirm this permanent deletion.
- Click the OK button to confirm.
Basecamp removes the template or to-do item from the Templates page and your Basecamp system.
Creating To-Do Lists
To create your first to-do list for a project, follow these steps:
- On the Basecamp Dashboard, select the project you want to open from the Your Projects list on the right side of the screen.
- Click the To-Do tab to open the To-Do page, shown in Figure 6.6.
Figure 6.6. Basecamp offers assistance when you create your first to-do list.

- Optionally, view the video demo to take a visual tour of Basecamp’s to-do list feature.
- Click the Create the First To-Do List for This Project link. The New To-Do List page opens, shown in Figure 6.7.
Figure 6.7. Create a to-do list for your Basecamp project tasks.

Note
Where’s the Create the First To-Do List for This Project Link?
The Create the First To-Do List for This Project link appears on the To-Do page only until you create your first to-do list. After that, the initial content that appears on the page is replaced with details about actual to-do lists. Alternatively, you can also create a to-do list by clicking the New To-Do List button on the To-Do page or the New To-Do List link on the Overview page.
- If you want to create your to-do list based on a template you’ve already created, click the Use a To-Do List Template link and select a template from the drop-down list. See “Creating To-Do List Templates” earlier in this lesson for more information.
- If you want to create your to-do list from scratch, enter a title in the First Give the List a Name text box.
- If you want to share this to-do list only with team members in your own company, select the Private checkbox. People at external companies that you’ve given permission to access this project won’t be able to view this to-do list. If you haven’t given any external company project access, this option isn’t available.
- If you want to track time for this to-do list, select the Allow Us to Track Time Spent on This To-Do List checkbox. See Lesson 10, “Tracking and Managing Time,” for more information. If your Basecamp plan doesn’t support time tracking, this option isn’t available.
- Enter an optional description of the to-do list.
- If you want to associate this to-do list with a milestone, select the milestone from the drop-down list. Associating your to-do lists with milestones can help keep your project on track by defining to-dos by date. If you haven’t set up milestones yet, this option isn’t available.
- Click the Create This List button. Basecamp creates the to-do list and enables you to start adding to-do items to the list. Figure 6.8 shows a to-do list created from a template, which includes all the to-do items from the template you selected.
Figure 6.8. A to-do list created from a template.

- If you created your to-do list from a template and want to assign your to-dos to specific people or make any other changes, you need to edit them. See “Editing To-Do Lists” later in this lesson for more information. If you want to add more to-do items, follow steps 13 through 16. Otherwise, skip to step 17.
- If you created your to-do list from scratch or you want to enter more to-do items, enter a to-do item in the text box.
- Select the person responsible for this to-do item from the drop-down list. You can select anyone from your company or any external company that you’ve given permission to access this project. If there isn’t a specific person responsible, select Anyone.
- If you want to specify a due date for this to-do, click the When Is It Due? box. A pop-up calendar appears where you can select a due date. If there is no due date, click the No Due Date link. Due dates appear to the right of a to-do item on both the To-Do page and the To-Dos page.
- Click the Add This Item button. Basecamp adds the to-do item to the page.
- Repeat steps 13 through 16 until you finish adding to-do items to the list.
- Click the I’m Done Adding Items link to close the box.
Editing To-Do Lists
After you create a to-do list and its related to-do items, you might need to change them. For example, you could change the wording of a to-do item, assign or reassign an item to a project team member, or modify email notification settings.
To do so, follow these steps:
- On the Basecamp Dashboard, select the project you want to open from the Your Projects list on the right side of the screen.
- Click the To-Do tab to open the To-Do page.
- Mouse over the to-do list or to-do item you want to edit. The Edit link appears to its left, shown in Figure 6.9.
Figure 6.9. Easily make changes to your to-dos on the To-Do page.

- Click the Edit link.
- If you’re editing a to-do list, you can modify the to-do list title and its description, as well as change whether or not you want to enable time tracking or associate with a milestone.
- If you’re editing a to-do item, Basecamp enables you to modify the to-do list text, person responsible, due date, and email notification status. Figure 6.10 shows an example of editing a to-do item.
Figure 6.10. The To-Do page expands for you to edit your to-do item.

- When you’re done editing, click the Save Changes button or the Save This Item button. The button name varies depending on whether you’re editing a to-do list or to-do item.
Basecamp updates the To-Do page with your changes.
Commenting on To-Do Items
If you want to communicate with other team members about a particular to-do item, you can leave a comment. For example, you might want to remind others about important information relating to this to-do, post a status, and so forth.
To comment on a to-do item, follow these steps:
- On the Basecamp Dashboard, select the project you want to open from the Your Projects list on the right side of the screen.
- Click the To-Do tab to open the To-Do page.
- Mouse over the to-do item you want to comment on. The Comment icon appears to the right of the to-do title (refer to Figure 6.9).
- Click the Comment icon to open the Comments on This To-Do page, shown in Figure 6.11.
Figure 6.11. Add comments and attach related files.

- Enter your comments in the Leave a Comment text box.
Note
Comment Formatting Options
You can enter comments as plain text or format your text using HTML or textile codes. See the section “Formatting Message and Comment Text” in Lesson 8, “Posting and Commenting on Messages,” for more information.
- To attach one or more files, click the Attach Files to This Comment link. Click the Browse button (called the Choose Files button on some browsers) and select the files on your computer. Attaching a file is particularly useful if you want project team members to comment on it. Each file must be less than 100MB and counts toward the file storage limit of your Basecamp account plan.
Tip
Try the Basic Uploader if You Have Trouble Uploading Files
Basecamp uses the Advanced Uploader by default, which enables you to upload multiple files. The Advanced Uploader requires that you have Flash 9 or greater installed on your computer and that you haven’t installed an ad-blocking plug-in on your browser. If you’re having trouble uploading, click the Basic Uploader link, which enables you to upload files one at a time. See Lesson 9, “Sharing Files,” for more information about file sharing and storage.
- Select the team members you want to send email notifications to in the Subscribe People to Receive Email Notifications section. You can notify individuals assigned to this project, both at your company as well as any external company. To save time, you can also choose to notify all people at a company. The people you select will receive email notification when you post your comment and when any related comments are posted.
- Click the Preview button to preview your comment.
- If you need to make changes to your comment, click the Edit button to return to the previous page.
- Click the Add This Comment button to post your comment.
The To-Do page indicates that this to-do item has a comment and lists the number of comments. See “Viewing To-Do Lists” later in this lesson for more information.
Editing To-Do Item Comments
If you discover a mistake in your comment text or decide to change your comment, you can edit it only within 15 minutes of initial posting.
To do so, click the Comment icon on the To-Do page and click the Edit link next to the comment you want to edit. Basecamp lets you know how many minutes are left. Figure 6.12 shows a sample comment that can still be edited.
Figure 6.12. Basecamp tells you how much longer you can edit a comment.

If time has elapsed on your comment, the Edit link is no longer available.
Deleting To-Do Item Comments
The account owner and administrators can delete comments posted by all members of their project teams, including themselves. Basecamp users can’t delete their comments.
To delete a comment, click the Comment icon on the To-Do page and then click the Trash icon next to the comment you want to delete (refer to Figure 6.12).
Again, Basecamp asks you to confirm the deletion.
Completing To-Do Items
When you complete the work required for a specific to-do item, you should mark the item as complete in your Basecamp system. To do so, follow these steps:
- On the Basecamp Dashboard, select the project you want to open from the Your Projects list on the right side of the screen.
- Click the To-Do tab to open the To-Do page (refer to Figure 6.9).
- Select the checkbox before the to-do item you’ve completed. Basecamp marks the to-do item complete as of the current date and moves it below the other to-do items for that list.
The Overview page and the Basecamp Dashboard also show the to-do item as completed, with a strikethrough over the to-do title. See “Viewing To-Do Lists” later in this lesson for more information.
Tip
You Can Undo a Completed To-Do Item
If you make a mistake or discover that there is more work to be done on a completed to-do, you can undo the completion by removing the checkbox. Basecamp moves the to-do item back up to the active list.
Reordering To-Do Lists
Basecamp displays to-do lists and their associated to-do items in the order you create them, but you can reorder these if you like.
To reorder a to-do list, follow these steps:
- On the Basecamp Dashboard, select the project you want to open from the Your Projects list on the right side of the screen.
- Click the To-Do tab to open the To-Do page.
- Click the Reorder Lists link.
- Drag the lists to the order you prefer using the Move icon, shown in Figure 6.13.
Figure 6.13. Reorder to-do lists however you prefer.

- When you’re finished, click the Done Reordering Lists link.
To reorder to-do items on the To-Do page, mouse over the item you want to move and drag the Move icon to the location you prefer.
Tip
Move an Item from One To-Do List to Another
To move an item between to-do lists, drag it using the Move icon.
Viewing To-Do Lists
You can view your project to-do lists and to-do items in several places on Basecamp. The data you can view and the tasks you can perform depend on where you are at in the Basecamp system.
Viewing To-Dos on a Project’s To-Do Page
A project’s To-Do page is the primary location for viewing and managing to-do lists. Figure 6.14 shows a sample To-Do page of an in-progress project.
Figure 6.14. The To-Do page for a specific project offers detailed information about your to-do lists and items.

The To-Do page displays to-do lists and their associated to-do items, as well as any related milestones. If a project has existing comments, the Comment icon appears to the right of the milestone title with the number of comments. The Completion checkbox, to the left of the to-do item, is unchecked if the to-do item hasn’t been completed yet. If it’s been completed, there is a checkmark in this box.
Note
Entering and Viewing Times for a To-Do Item
The Clock icon also appears to the left of a to-do item if you enabled time tracking and your Basecamp account plan supports this feature. Click this icon to enter and view times. See Lesson 10, “Tracking and Managing Time,” for more information.
Mouse over the to-do title to display the Trash icon, Edit link, Comment icon, and Reorder icon. Note that the Comment and Reorder icons are available only for to-do items and not to-do lists.
In the right column, you can select the name of a specific project team member from the drop-down list to display only the to-dos for that person.
Viewing To-Dos on a Project’s Overview Page
The Overview page for a specific project displays the latest project information, including to-dos. Figure 6.15 shows an example of this page.
Figure 6.15. Get a quick overview of your project, including project to-dos.

Click the to-do link to open a specific to-do list. A strikethrough over the to-do title indicates a completed to-do item.
Viewing To-Dos on the Basecamp Dashboard
The Basecamp Dashboard displays recent activity across all projects, including project to-dos, as shown in Figure 6.16.
Click the to-do link to open a specific to-do list. A strikethrough over the to-do title indicates a completed to-do item. See Lesson 13, “Viewing Project Activity on the Dashboard,” for more information.
Figure 6.16. The Dashboard gives you an overview of your project activity such as to-do items.

Viewing To-Dos on the Dashboard To-Dos Page
From the Dashboard, you can click the To-Dos tab to view your assigned to-do items across all projects. To display to-dos for another user, select that person from the Show Items Assigned To drop-down list. Note that people at external companies can’t view this page—only people at your company can.
Figure 6.17 shows a sample of the To-Dos page.
Figure 6.17. View a specific users to-dos across projects.

Click a to-do link to open the project To-Do page for that specific to-do list.
You can also mark to-do items as complete on this page by selecting the checkbox to the left of the completed to-do item. The item disappears from the To-Dos page, but remains on the To-Do page as a completed item.
Note
The To-Dos Page and the To-Do Page Are Not the Same Page
Even though their names are similar, the To-Dos page you reach from the Dashboard and the To-Do page associated with each project serve a different purpose. The To-Dos page focuses on to-dos for all projects, whereas the To-Do page is specific to a particular project.
Deleting To-Do Lists
If you make a mistake when creating a to-do list or decide that you don’t need the list, you can delete it. When you delete a to-do list, you also delete any associated to-do items. You can also delete individual to-do items—both open and completed—without deleting the to-do list they belong to.
To delete a to-do list or to-do item, follow these steps:
- On the Basecamp Dashboard, select the project you want to open from the Your Projects list on the right side of the screen.
- Click the To-Do tab to open the To-Do page.
- Mouse over the list or item you want to delete. The Trash icon appears to the left of its title (see Figure 6.18).
Figure 6.18. Click the Trash icon to delete a to-do list or item.

- Click the Trash icon to delete. Basecamp opens a dialog box asking you to confirm this permanent deletion.
- Click the OK button to confirm.
Basecamp removes the to-do list or item from the To-Do page and your Basecamp system.
Summary
In this lesson, you learned how to enter and track to-do lists and associated to-do items in your Basecamp system. Next, learn how to view milestones and to-dos on external calendars using the iCalendar feed.