Lesson 11. Collaborating with Writeboards
In this lesson, you learn how to collaborate using Basecamp writeboards.
Getting Started with Basecamp Writeboards
In addition to collaborating through its message feature, Basecamp enables collaboration with writeboards. Writeboards are a good choice for brainstorming, getting feedback on drafts, and collaborating on any type of written document. You can create multiple writeboards for each project you manage in Basecamp.
Plain English
Writeboard
A writeboard is a web-based tool that enables collaboration on text documents. You can edit the content of a writeboard, maintain versions, compare changes, and comment on writeboard content.
Creating a Writeboard
To create your first writeboard for a project, follow these steps:
- On the Basecamp Dashboard, select the project you want to open from the Your Projects list on the right side of the screen.
- Click the Writeboards tab to open the Writeboards page, shown in Figure 11.1.
Figure 11.1. Basecamp offers assistance when you create your first writeboard.

- Optionally, view the video demo to take a visual tour of Basecamp’s message feature.
- If you want to give external companies access to your writeboards, select the checkbox in the right column of your screen.
- Click the Create the First Writeboard for This Project link. The Create a New Writeboard page opens, shown in Figure 11.2.
Figure 11.2. Enter a meaningful name for your writeboard.

Note
Where’s the Create the First Writeboard for This Project Link?
The Create the First Writeboard for This Project link appears on the Writeboards page only until you create your first writeboard. After that, the initial content that appears on the page is replaced with details about actual writeboards. Alternatively, you can also create a writeboard by clicking the Create a Writeboard button on the Writeboards page.
- Enter a writeboard title in the Name the Writeboard text box.
- If you want to share this writeboard only with users in your own company, click the Make This Writeboard Private checkbox. Users at external companies such as clients or vendors won’t be able to see your writeboard. If you haven’t given any external companies the permission to access your project, this checkbox isn’t available.
- Click the Create a New Writeboard button. Figure 11.3 shows a sample writeboard before you enter any text.
Figure 11.3. Your first writeboard is an empty canvas, ready for you to enter content.

- Enter your text in the large text box. See “Formatting Writeboard Text” later in this lesson for more information about formatting and content options.
- Select the checkbox of every person you want to notify by email about the writeboard content you entered. To save time, you can notify everyone at a particular company.
- Click the Save This Writeboard button.
Basecamp saves your content as the first version of your writeboard (see Figure 11.4).
Figure 11.4. The first version of a saved writeboard.

Caution
Be Sure to Save Your Writeboard
If you don’t plan to enter content in your writeboard right away, you still must click the Save This Writeboard button to save your writeboard for future use. If you don’t, your writeboard won’t be saved.
Tip
Import a Writeboard
If you’ve created a writeboard in one of 37signals’ other applications, such as Backpack (www.backpackit.com) or Writeboard (www.writeboard.com), you can import that writeboard into Basecamp rather than recreate it. To do so, click the Import a Writeboard link on the Writeboards page and enter your external writeboard’s URL and password.
Editing a Writeboard
After you enter content in a writeboard, its appearance and the way you access it changes slightly. To edit a writeboard with existing content, follow these steps:
- On the Basecamp Dashboard, select the project you want to open from the Your Projects list on the right side of the screen.
- Click the Writeboards tab to open the Writeboards page, shown in Figure 11.5.
Figure 11.5. The Writeboards page displays a list of writeboards for a particular project.

- Click the link of the writeboard you want to open. Figure 11.6 shows a sample writeboard with existing content.
Figure 11.6. You can view and edit the existing content of a writeboard.

- Click the Edit This Page button.
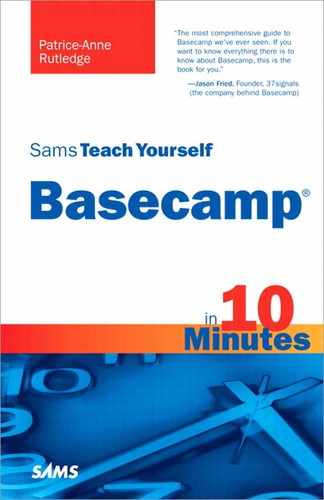
Caution
Don’t Edit the Writeboard at the Same Time as Another User
If another user is currently editing the writeboard, a warning dialog box opens (see Figure 11.7). To return to the previous page, click the Take Me Back, I’ll Try Again Later link. To move forward with editing, click the I Understand the Risk, Let Me Edit Anyway link. To avoid losing any data, it’s best not to edit a writeboard that’s already in use.
Figure 11.7. Basecamp warns you if you try to edit a writeboard at the same time as another user.
- Enter your changes to the writeboard, such as editing existing content or adding your own content. See “Formatting Writeboard Text” later in this lesson for more information about formatting and content options.
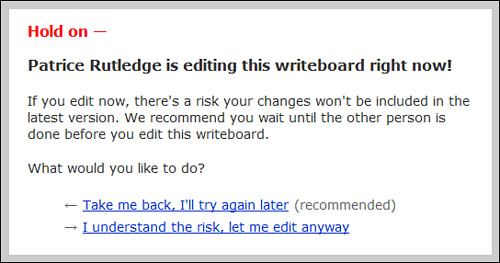
- If the edits you make are minor, select the Minor Edit, Don’t Save a New Version checkbox (see Figure 11.8). The text on the Save button changes to read: Save Over the Current Version. Basecamp overwrites the existing writeboard version with your current content.
- If the edits you make are major and you want to save them as a new version, don’t select the Minor Edit, Don’t Save a New Version checkbox. In this case, the Save button text reads: Save as the Newest Version.
Figure 11.8. Specify whether or not to save a new version.
Plain English
Version
A version refers to a copy of your writeboard content taken at any given point in time. A writeboard can have multiple versions. One of the biggest advantages of creating versions rather than traditional backups is that a version control system enables you to compare changes over time or by a particular user, as well as revert to a previous version if someone makes a mistake.
- Select the checkbox of every person you want to notify by email about the writeboard content you entered. To save time, you can notify everyone at a particular company.
- Click the Save button. The exact wording of this button varies depending on your actions in steps 6 and 7.
Tip
Create a New Version Only When Necessary
Creating a new version of your writeboard every time you edit makes it more difficult to track changes in your content, not easier. It’s best to save a new version when you make substantial changes or want to differentiate the feedback of multiple users rather than saving a new version every time you fix a typo or make minor edits.
Formatting Writeboard Text
You aren’t limited to plain text on your writeboard. You can also format text, insert hyperlinks, and display code and images using Textile just as you can with messages and comments throughout Basecamp. See the section “Formatting Message and Comment Text” in Lesson 8, “Posting and Commenting on Messages,” for more information.
Note
Learn More About Textile
Visit http://textile.thresholdstate.com to learn more about Textile formatting options.
Table 11.1 lists popular formatting options for writeboard content, as well as samples of how to achieve these effects.
Table 11.1. Writeboard Formatting Examples

Tip
Format Your Writeboard with HTML
If you’re familiar with HTML, you can use HTML tags to format your text. For example: <b>bold</b> or <i>italics</i>. Be aware that not all HTML tags work on the writeboard, so you’ll have to experiment if you want to use HTML formatting.
After you save the writeboard, your formatted text, links, and images appear on your writeboard. When you edit the writeboard, your formatting codes appear again.
Including Links to Basecamp Files
Although you can’t formally attach files to a writeboard, there is a workaround you can use to link to files in a writeboard discussion. To do so, follow these steps:
- On the Basecamp Dashboard, select the project you want to open from the Your Projects list on the right side of the screen.
- Click the Files tab to open the Files page.
- Right-click the file you want to link to on your writeboard (see Figure 11.9).
Figure 11.9. Copy the link location of your Basecamp file.

- Select Copy Link Location or Copy Shortcut. The exact text varies based on the browser you use.
- Click the Writeboards tab and open the writeboard where you want to include the file link.
- Click the Edit This Page button.
- Paste the link in the appropriate location by pressing Ctrl +V.
- Before the link, insert the name of the file surrounded by quotation marks. Follow this with a colon. For example: “Design document”:https://mangodesign.basecamphq.com/projects/3572524/file/34011594/DesignDoc.doc.
- Be sure to indicate whether or not you want to save this as a new version, and then click the Save button.
Your Basecamp writeboard displays a link to your file (see Figure 11.10). Other team members can click this link from within the writeboard to view the file.
Figure 11.10. Click the link to open the file.

Tip
Include Links to External Files
If you store files on your own site, you can also include links to these files. You must include the complete URL, not just the file name. For example, link to http://www.patricerutledge.com/basecamp.jpg, not basecamp.jpg.
Formatting Code
If you plan to enter software code for project team members to review, you need to be sure that it displays correctly. For example, let’s say that you enter the following in a message:
<b>This text is bolded.</b>
When it’s posted, it appears as bolded text, without the HTML tags. This is fine if you want bolded text, but what if you want your team members to comment on the actual HTML code? In that case, you can use the HTML tags <code> or <pre> to prevent the code from being rendered in the browser.
For example, you could enter the following:
<pre>
<b>This text is bolded.</b>
</pre>
For multiline code blocks, use <pre>. For inline code, use <code>.
Making Writeboard Comments
In addition to editing writeboard content itself, you can also attach a comment to a writeboard. This works well when you want to offer feedback or approval on writeboard content rather than edit it.
To make a writeboard comment, follow these steps:
- Open the writeboard on which you want to comment. You can find writeboard links on the Basecamp Dashboard or on the Overview or Writeboards page for a specific project.
- Click the Add a Comment link at the bottom of the screen. The page expands to display the Comment text box (see Figure 11.11).
Figure 11.11. Enter your feedback or approval on writeboard content as a comment.

- Enter your comment in the Comment text box. See “Formatting Writeboard Text” earlier in this lesson for more information about text formatting options.
- Select the checkbox before the names of any people you want to notify by email about your comment. To save time, you can choose to notify everyone at a particular company.
- Click the Add This Comment button.
Figure 11.12 shows a sample comment.
Figure 11.12. Comments appear at the end of your writeboard screen.

Basecamp indicates the date the comment was made, as well as the writeboard version the comment relates to. When a comment is new, Basecamp indicates how long ago it was made, such as < 1 min ago. By the next day, this is replaced with a date, such as 08 Sep 09.
Click the Trash icon to the left of a posted comment to delete it. Click View Comment History to view trashed comments. You can also restore comments from this page.
Viewing and Comparing Writeboard Versions
As soon as you make changes to the initial writeboard content and save it, Basecamp displays it as the first version on the main writeboard page (refer to Figure 11.4).
After you save more than one version of a writeboard, the right column changes to list your versions (see Figure 11.13).
Figure 11.13. Basecamp lists all your writeboard versions.

The Versions section lists every writeboard version you create, including the date it was created and the name of the person who edited that version.
To view a specific version, click its date link. Figure 11.14 shows a previous version of a writeboard, which is clearly marked to avoid confusion.
Figure 11.14. Viewing a previous version of the writeboard.

If you made a mistake in your latest writeboard version, you can click the Revert to This Version link to make the version you’re viewing the latest version. Basecamp asks you to confirm the reversion, which is permanent. Doing this will erase the content of your latest version.
To compare two writeboard versions, select their checkboxes in the right column and click the Compare button. Basecamp displays the compare screen (see Figure 11.15), highlighting the changes in color for easy viewing.
Figure 11.15. Compare writeboard versions to determine the changes made.

When you’re finished comparing versions, click the I’m Done Comparing link to return to the latest version.
You can quickly compare the two most recent versions by clicking the Quick Compare link in the right column.
Tip
Flag a Version for Easier Identification
If you have many versions of your writeboard, it can become difficult to distinguish between them. To make a specific version stand out, open it and click the Flag This Version button. This places a black box around the version number. Flagging is useful if you want someone to view a specific version or if a specific version contains extensive changes.
Exporting a Writeboard
You can export the content of your writeboard as a text file or HTML file.
To do so, follow these steps:
- On the Basecamp Dashboard, select the project you want to open from the Your Projects list on the right side of the screen.
- Click the Writeboards tab to open the Writeboards page.
- Click the link of the writeboard you want to open.
- Select the version you want to export, if not the latest version.
- Click the Export button. The writeboard expands to display the Export This Version to a File section, shown in Figure 11.16.
Figure 11.16. Choose to export to a text file or HTML file.

- Click the link of the file type you want to export, either the text file or the HTML file.
- In the dialog box that opens, indicate whether you want to open or save the file and click the OK button. The appearance of the dialog box varies based on your browser and operating system.
Deleting a Writeboard
If you no longer need a writeboard and want to save space, you can delete it. Exporting your writeboard content is a good idea if you want to retain the contents for any reason.
To delete a writeboard, follow these steps:
- On the Basecamp Dashboard, select the project you want to open from the Your Projects list on the right side of the screen.
- Click the Writeboards tab to open the Writeboards page, shown in Figure 11.17.
Figure 11.17. Delete writeboards you no longer need.

- Click the Trash icon to the right of the writeboard you want to delete.
- Click the OK button in the confirmation dialog box to confirm that you want to delete the writeboard.
Basecamp permanently deletes the writeboard.
Summary
In this lesson, you learned how to collaborate using Basecamp’s writeboard feature. Next, learn how to add chat functionality by integrating your Campfire account with Basecamp.