10. QuickBooks Tips and Tricks
This collection of miscellaneous tips and techniques contains something for every QuickBooks user. Here you’ll find tips for correcting errors, and you’ll learn how to customize a form. You’ll also learn how to check your spelling, and you’ll find out how to create mailing labels.
This chapter contains information about working with an outside accountant who can access your company information and help you make year-end journal entries to produce accurate financial statements. You’ll learn how to void checks without affecting a prior period balance.
In addition, you’ll explore budgets and how to produce budget reports. You’ll also learn some tips for using a budget effectively. The QuickBooks Class feature, a method of grouping transactions, is also covered in this chapter, with information on how to incorporate classes into your forms and reports.
Setting Spelling Preferences
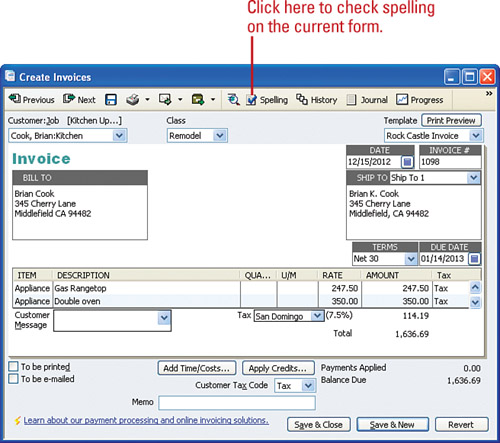
To spell correctly, or not to spel corectley—fortunately, there’s a bit more to setting your spelling preferences than that! Do you want QuickBooks to check your spelling on your forms? Are there certain types of words you want the spellchecker to ignore? The spelling preferences are personal settings, as opposed to companywide settings, so each QuickBooks user at your company can choose personalized spelling features.
![]() Select Edit, Preferences.
Select Edit, Preferences.
![]() Click the Spelling icon.
Click the Spelling icon.
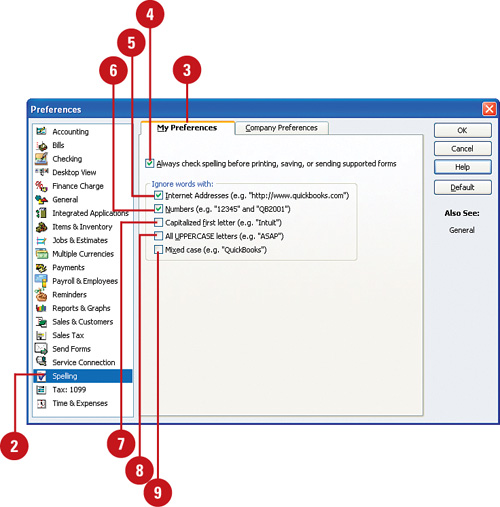
![]() Click the My Preferences tab.
Click the My Preferences tab.
![]() Check the Always Check Spelling box to require that QuickBooks spellcheck each of your forms before printing, saving, or sending them.
Check the Always Check Spelling box to require that QuickBooks spellcheck each of your forms before printing, saving, or sending them.
![]() Check Internet Addresses to eliminate URLs from spellcheck.
Check Internet Addresses to eliminate URLs from spellcheck.
![]() Check Numbers to eliminate spellchecker alerts on words containing numerals.
Check Numbers to eliminate spellchecker alerts on words containing numerals.
![]() Check Capitalized First Letter to eliminate proper nouns from spellcheck.
Check Capitalized First Letter to eliminate proper nouns from spellcheck.
![]() Check All UPPERCASE to eliminate from spellcheck words that contain all capital letters.
Check All UPPERCASE to eliminate from spellcheck words that contain all capital letters.
![]() Check Mixed Case to eliminate from spellcheck words that contain capital letters after the first letter.
Check Mixed Case to eliminate from spellcheck words that contain capital letters after the first letter.
Creating a Budget
You can set up a budget in QuickBooks that can be used to track your company’s financial progress throughout the year and to draw comparisons between actual and budgeted performances. The easiest way to begin budget creation is to use a year-end income statement from your company’s previous year. You can use the numbers on the financial statement to get started with your budget and then fine-tune the budget after all the prior year’s numbers have been entered. QuickBooks has created a wizard to walk you through the process of setting up your budget.
![]() Select Company, Planning & Budgeting; then select Set Up Budgets from the side menu that displays.
Select Company, Planning & Budgeting; then select Set Up Budgets from the side menu that displays.
Important
If the Set Up Budgets window displays, click Create New Budget to open the window shown here. If this is the first time you have created a budget, the Create New Budget window opens automatically.
![]() Enter the year (calendar year or fiscal year, depending on your company’s year-end) for which this budget will apply.
Enter the year (calendar year or fiscal year, depending on your company’s year-end) for which this budget will apply.
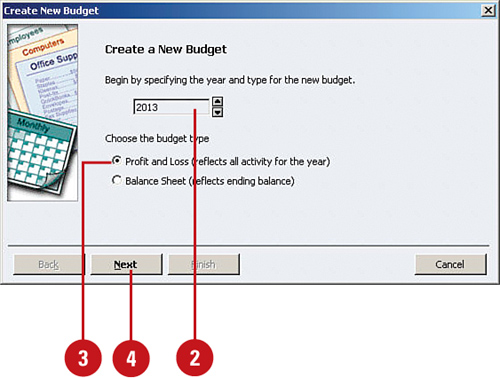
![]() Indicate whether this budget is to be based on profit and loss or balance sheet (for this example, we will use profit and loss).
Indicate whether this budget is to be based on profit and loss or balance sheet (for this example, we will use profit and loss).
![]() Click Next.
Click Next.
![]() If you want your budget to be organized by customer and job or by class, indicate that here. For this example, we will not organize the budget by these criteria. (Note: Class is not an option on this screen if your company does not use class tracking.)
If you want your budget to be organized by customer and job or by class, indicate that here. For this example, we will not organize the budget by these criteria. (Note: Class is not an option on this screen if your company does not use class tracking.)
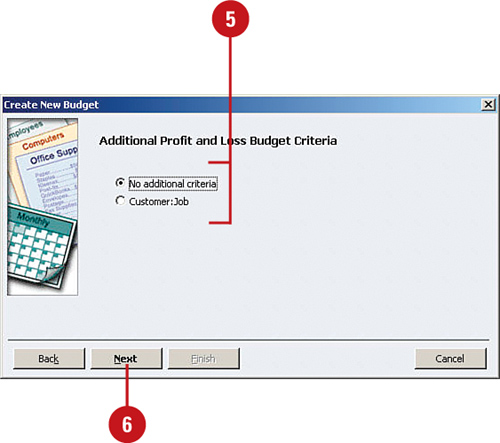
![]() Click Next.
Click Next.
![]() Select whether you want to create your budget from scratch or from prior year financial statement numbers. For this example, we will create the budget from prior year numbers.
Select whether you want to create your budget from scratch or from prior year financial statement numbers. For this example, we will create the budget from prior year numbers.

![]() Click Finish.
Click Finish.
![]() In the white areas, fill in the monthly amounts for your budget. QuickBooks automatically summarizes your monthly amounts in the Annual Total column (the first column).
In the white areas, fill in the monthly amounts for your budget. QuickBooks automatically summarizes your monthly amounts in the Annual Total column (the first column).

![]() Save time by entering an amount in the first month; then click the Copy Across button to insert that amount in every other month for the year.
Save time by entering an amount in the first month; then click the Copy Across button to insert that amount in every other month for the year.
![]() Automatically increment budgeted amounts by clicking the Adjust Row Amounts button. All amounts in the selected row will be increased or decreased by the amount or percentage that you indicate.
Automatically increment budgeted amounts by clicking the Adjust Row Amounts button. All amounts in the selected row will be increased or decreased by the amount or percentage that you indicate.
![]() In the window that displays after you click Adjust Row Amounts, choose whether you want to begin the increase or decrease with the first month or with the currently selected month.
In the window that displays after you click Adjust Row Amounts, choose whether you want to begin the increase or decrease with the first month or with the currently selected month.
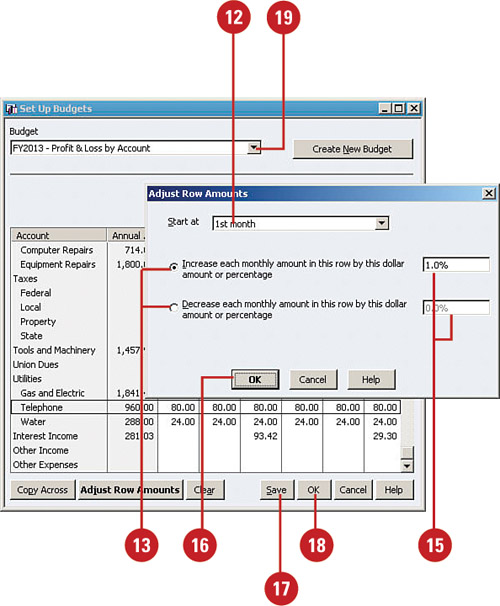
![]() Indicate if you want the budgeted amount to increase or decrease by the amount you enter.
Indicate if you want the budgeted amount to increase or decrease by the amount you enter.
![]() If you chose Currently Selected Month in Step 12, you have the option of checking the Enable Compounding box (not shown). This feature produces amounts that are incremented each month by the amount you enter in the next step.
If you chose Currently Selected Month in Step 12, you have the option of checking the Enable Compounding box (not shown). This feature produces amounts that are incremented each month by the amount you enter in the next step.
![]() Enter the amount or percent as a positive number in the field provided.
Enter the amount or percent as a positive number in the field provided.
![]() Click OK. All amounts that appeared on the budget line are increased or decreased based on your entries.
Click OK. All amounts that appeared on the budget line are increased or decreased based on your entries.
![]() When you have finished entering all the budgeted information, click Save to save your budget.
When you have finished entering all the budgeted information, click Save to save your budget.
![]() Click OK to close the budget window.
Click OK to close the budget window.
![]() To make changes to an existing budget, click the drop-down arrow and choose the budget you want to edit.
To make changes to an existing budget, click the drop-down arrow and choose the budget you want to edit.
Preparing Budget Reports
You can produce several budget reports in QuickBooks, comparing your actual performance to your budgeted performance. Income statements and balance sheets both utilize budgeted numbers. Use these reports to see how your company’s performance compares to your expectations.
![]() Select Reports, Budgets & Forecasts, and then select Budget Overview from the side menu that displays.
Select Reports, Budgets & Forecasts, and then select Budget Overview from the side menu that displays.
![]() Select the budget you want to view in your report.
Select the budget you want to view in your report.

![]() Click Next.
Click Next.
![]() Choose how you want the budget to be laid out on your screen.
Choose how you want the budget to be laid out on your screen.

![]() Click Next.
Click Next.
![]() Click Finish to produce the report.
Click Finish to produce the report.

Setting Up Classes
QuickBooks provides an additional level of organization called classes. Classes enable you to group transactions in ways that can help you better analyze your company’s performance. For example, you can use classes to track transactions by region, salesperson, or type of job.
![]() Select Edit, Preferences.
Select Edit, Preferences.
![]() Click the Accounting icon.
Click the Accounting icon.
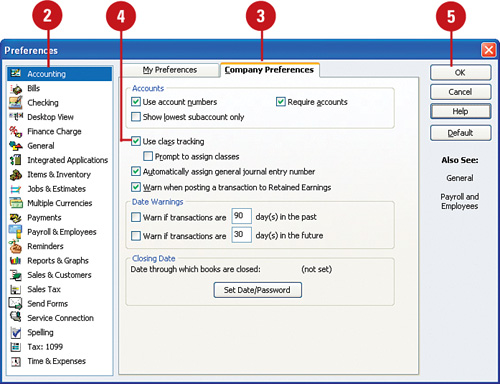
![]() Click the Company Preferences tab.
Click the Company Preferences tab.
![]() Check Use Class Tracking to turn on the class feature.
Check Use Class Tracking to turn on the class feature.
![]() Click OK.
Click OK.
![]() Select Lists, Class List. If this is the first time you’ve used classes, the list will be empty.
Select Lists, Class List. If this is the first time you’ve used classes, the list will be empty.
![]() Click the Class button and select New from the drop-down menu to set up a new class.
Click the Class button and select New from the drop-down menu to set up a new class.

Timesaver
You can also press Ctrl+N to open the New Class window.
![]() Enter a name for this class.
Enter a name for this class.

![]() If the class is a subclass of another class, indicate that by checking the Subclass Of box and selecting a class from the drop-down list.
If the class is a subclass of another class, indicate that by checking the Subclass Of box and selecting a class from the drop-down list.
![]() Click OK to save the class.
Click OK to save the class.
Using Classes on Sales and Purchase Forms
You might think that you can enter only one class per form. But what if the information on your form relates to more than one class? For example, you might need to order items from one vendor that relate to different classes. You can solve this problem by putting a separate class column on the form instead of using the Class box at the top of the form. Then you can designate a separate class next to each item you order.
Important
Turn on Classes! You must have the Class feature turned on before performing this task.
![]() Select Lists, Templates.
Select Lists, Templates.
![]() Double-click the form to which you want to add a class column.
Double-click the form to which you want to add a class column.

![]() Click the Additional Customization button in the Basic Customization window that displays (not shown).
Click the Additional Customization button in the Basic Customization window that displays (not shown).
![]() Click the Columns tab in the Additional Customization window.
Click the Columns tab in the Additional Customization window.

![]() Check the box next to Class in the Screen column and optionally the Print column.
Check the box next to Class in the Screen column and optionally the Print column.
![]() Click OK in the Additional Customization window.
Click OK in the Additional Customization window.
![]() Click OK in the Basic Customization window (not shown).
Click OK in the Basic Customization window (not shown).
Reporting on Classes
You can display several class-related reports right from the class list window. And don’t forget that you can customize many of the QuickBooks standard reports to include a column for your classes. See Chapter 18, “Working with Reports in QuickBooks,” for more information.
![]() Select Lists, Class List.
Select Lists, Class List.
![]() Click the Reports button.
Click the Reports button.
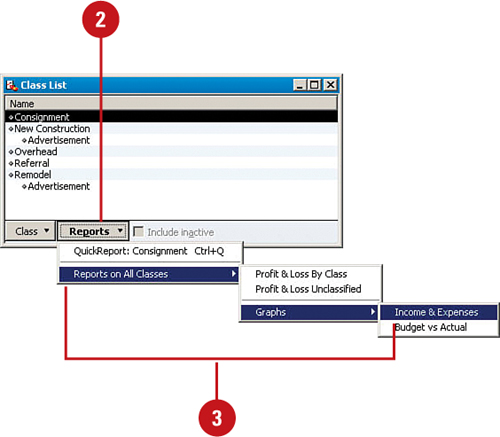
![]() Choose from these reports:
Choose from these reports:
• QuickReport (Ctrl+Q)—Displays a report of all the transactions that refer to the selected class.
• Profit and Loss by Class—Select Reports on All Classes, Profit and Loss by Class. This report shows you all income and expenses for the year to date, with a separate column for each class.
• Profit and Loss Unclassified—Select Reports on All Classes, Profit and Loss Unclassified to display the Profit and Loss without breaking out amounts by class.
• Graphs—Select Reports on All Classes, Graphs to select either graphs depicting Income and Expense Items by Class or Budget vs. Actual by Class.

Creating Payment Terms
When you send an invoice to a customer, it is common practice to indicate when you expect to receive payment. You might want to be paid the full amount in 30 days (net 30) or in 15 days (net 15). You might offer a small discount for early payment (2% 10 net 30 = 2% discount if the balance is paid in 10 days, but the full balance is due in any case in 30 days), or you might expect to be paid immediately (due on receipt). All these options are called terms, and QuickBooks starts you out with a sample list of frequently used payment terms. You can add your own favorite terms to this list.
![]() Select Lists, Customer & Vendor Profile List; then select Terms List from the side menu that displays.
Select Lists, Customer & Vendor Profile List; then select Terms List from the side menu that displays.
![]() Click the Terms button and select New from the drop-down menu to create a new term.
Click the Terms button and select New from the drop-down menu to create a new term.

Timesaver
You can also press Ctrl+N to open the New Terms window.
![]() Enter a name for this term.
Enter a name for this term.
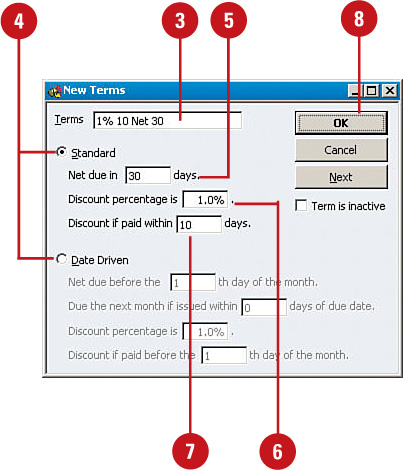
![]() Select Standard to base the term on the date an invoice is issued. Alternatively, select Date Driven if you want the term to be based on a particular day of the month.
Select Standard to base the term on the date an invoice is issued. Alternatively, select Date Driven if you want the term to be based on a particular day of the month.
![]() Enter the number of days until the full amount of the invoice is due.
Enter the number of days until the full amount of the invoice is due.
![]() Enter the discount percentage, if any, for early payment.
Enter the discount percentage, if any, for early payment.
![]() Enter the number of days during which the customer is eligible to claim the discount.
Enter the number of days during which the customer is eligible to claim the discount.
![]() Click OK.
Click OK.
Customizing Forms Design
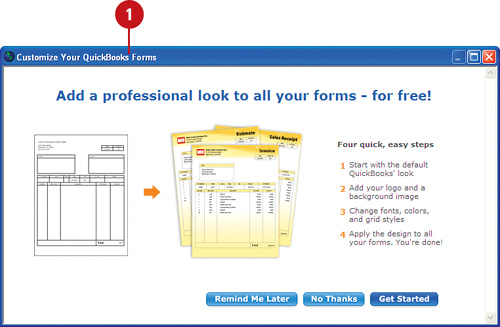
You no longer need to be a designer to create forms that will wow your customers or that will look more professional when communicating with your vendors. New for QuickBooks 2010 is a free form design service. Customize all your forms at once, add industry-specific designs, modify text font, and pick from several layout options.
![]() If you are new to QuickBooks 2010, click the Invoice icon from the Home page to open Customize Your QuickBooks Forms. Click Get Started.
If you are new to QuickBooks 2010, click the Invoice icon from the Home page to open Customize Your QuickBooks Forms. Click Get Started.
![]() Optionally, access the same feature from Lists, Templates. Choose Create Form Design from the Templates menu lower left.
Optionally, access the same feature from Lists, Templates. Choose Create Form Design from the Templates menu lower left.
![]() The QuickBooks Forms Customize dialog displays.
The QuickBooks Forms Customize dialog displays.
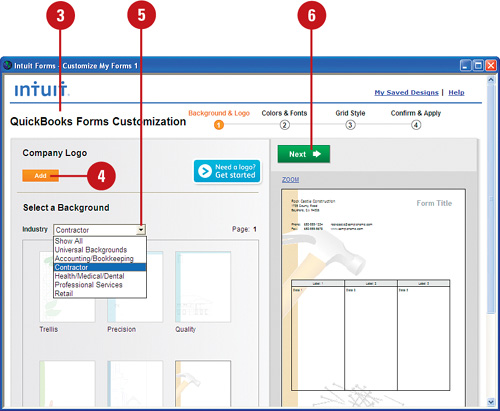
![]() To add your company logo, click Add and you will be able to browse to the location where you have stored your logo. Or select the “Need a logo? Get started” for information on having a logo designed for your business (fees apply).
To add your company logo, click Add and you will be able to browse to the location where you have stored your logo. Or select the “Need a logo? Get started” for information on having a logo designed for your business (fees apply).
![]() From the Industry drop-down menu, select your industry or show all industries. Click on a design to select a specific industry design.
From the Industry drop-down menu, select your industry or show all industries. Click on a design to select a specific industry design.
![]() Click Next to advance to the Colors and Fonts options in the wizard.
Click Next to advance to the Colors and Fonts options in the wizard.
![]() From the Font and Grid Colors options that are displayed, choose an overall font for the entire form, or customize with specific fonts for selected data. Also select the colors for your form’s grid.
From the Font and Grid Colors options that are displayed, choose an overall font for the entire form, or customize with specific fonts for selected data. Also select the colors for your form’s grid.
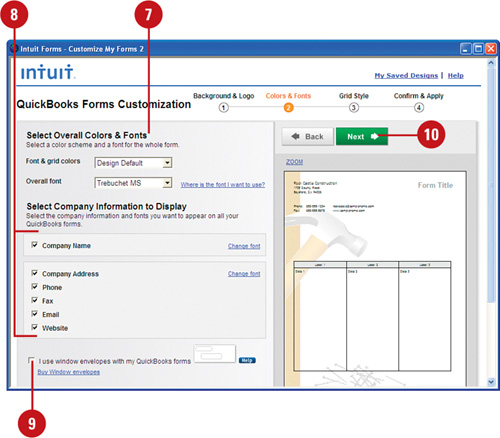
![]() Place a check mark next to the fields you want to include in your form. Grayed-out fields indicate missing information in your QuickBooks data file. (To update this information from the Company menu, select Company Information and enter the missing data).
Place a check mark next to the fields you want to include in your form. Grayed-out fields indicate missing information in your QuickBooks data file. (To update this information from the Company menu, select Company Information and enter the missing data).
![]() Optionally, select the I Use Window Envelopes option to help guide the placement of the data on the form.
Optionally, select the I Use Window Envelopes option to help guide the placement of the data on the form.
![]() Click Next to display the Grid Style options.
Click Next to display the Grid Style options.
![]() Select your preferred shading options for the grid. Note that the form previews are for selecting shading options and do not necessarily match your own form data layout.
Select your preferred shading options for the grid. Note that the form previews are for selecting shading options and do not necessarily match your own form data layout.
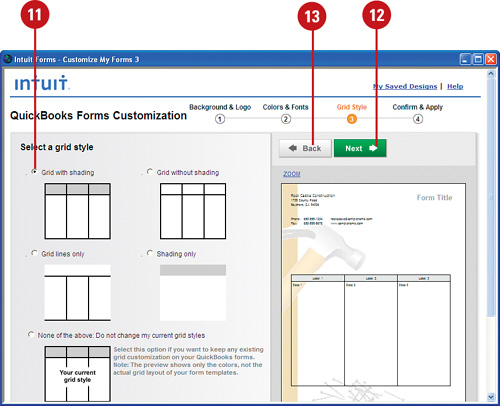
![]() Click Next to review your design.
Click Next to review your design.
![]() Click Back to return to previous choices and make changes (not shown).
Click Back to return to previous choices and make changes (not shown).
![]() Click Next on the Review Design dialog (not shown).
Click Next on the Review Design dialog (not shown).
![]() Place a check mark next to each form to which you want to apply the newly created design. What a timesaver! QuickBooks makes a copy of the original template, so you do not need to worry about overriding your previous design.
Place a check mark next to each form to which you want to apply the newly created design. What a timesaver! QuickBooks makes a copy of the original template, so you do not need to worry about overriding your previous design.
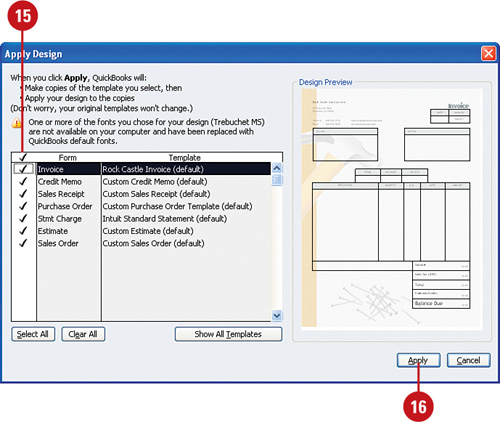
![]() Click Apply.
Click Apply.
![]() Read the information on the Design Applied dialog (not shown). Click OK to close.
Read the information on the Design Applied dialog (not shown). Click OK to close.
![]() Optionally, save your design online by providing a name for the design and clicking Save. If you choose the option to Save, follow the instructions to create an Intuit online account (not shown).
Optionally, save your design online by providing a name for the design and clicking Save. If you choose the option to Save, follow the instructions to create an Intuit online account (not shown).
Customizing Forms Data
The previous section provided steps to use the new QuickBooks 2010 forms designer to customize the professional look of your forms. The following steps will help you change the layout of the data on your forms. QuickBooks comes with a collection of standard forms that are ready for your use. You are welcome to use these forms as is, or you can determine what data is displayed or printed on the form.
![]() Select Lists, Templates.
Select Lists, Templates.
![]() Click a form you want to revise. For this example, the MyDesign Rock Castle Invoice has been selected.
Click a form you want to revise. For this example, the MyDesign Rock Castle Invoice has been selected.

![]() Choose Templates, Edit Template from the button at the bottom of the window, or double-click on the template name.
Choose Templates, Edit Template from the button at the bottom of the window, or double-click on the template name.
![]() In the Basic Customization window that displays, click the Manage Templates button.
In the Basic Customization window that displays, click the Manage Templates button.

![]() If you did not previously add a logo to your documents, place your logo image file in the images folder of your QuickBooks directory. Check the Use Logo box and navigate to the location of your logo image file. Your logo must be a JPG, GIF, or BMP file.
If you did not previously add a logo to your documents, place your logo image file in the images folder of your QuickBooks directory. Check the Use Logo box and navigate to the location of your logo image file. Your logo must be a JPG, GIF, or BMP file.
![]() Modify the selected detail as needed; most of this should already be selected from your work in customizing the form (see previous task).
Modify the selected detail as needed; most of this should already be selected from your work in customizing the form (see previous task).
![]() Click the Additional Customization button.
Click the Additional Customization button.
![]() Click the Header tab to customize the details that print at the top of the invoice form. Check boxes to choose or uncheck boxes to deselect the elements you want to include.
Click the Header tab to customize the details that print at the top of the invoice form. Check boxes to choose or uncheck boxes to deselect the elements you want to include.

![]() Click the Columns tab to choose which columns should appear in the print and screen versions of the item description area of your form, and indicate the order in which they should appear.
Click the Columns tab to choose which columns should appear in the print and screen versions of the item description area of your form, and indicate the order in which they should appear.

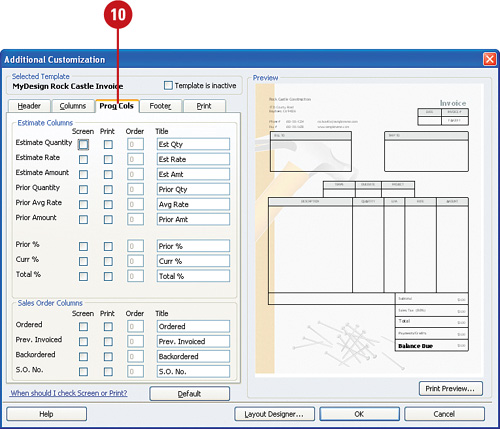
![]() Click the Prog Cols tab. (This tab displays only if you have chosen Invoice as your form type.) Choose which columns should appear on the print and screen versions of your progress invoice form, and indicate the order in which they should appear. Note: The Estimate Columns portion of this screen only displays if you have turned on the preference for progressive billing.
Click the Prog Cols tab. (This tab displays only if you have chosen Invoice as your form type.) Choose which columns should appear on the print and screen versions of your progress invoice form, and indicate the order in which they should appear. Note: The Estimate Columns portion of this screen only displays if you have turned on the preference for progressive billing.
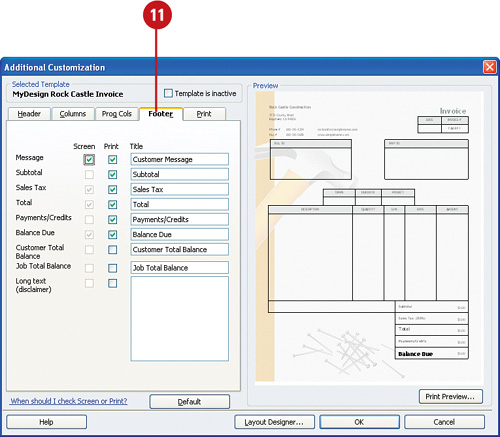
![]() Click the Footer tab. Check boxes to add features to the bottom of the print and screen versions of your form; uncheck boxes to remove features.
Click the Footer tab. Check boxes to add features to the bottom of the print and screen versions of your form; uncheck boxes to remove features.
![]() Click the Print tab. Choose whether you want to use the default printer settings from your QuickBooks Printer Setup, or you can choose to set specific printer settings for this form.
Click the Print tab. Choose whether you want to use the default printer settings from your QuickBooks Printer Setup, or you can choose to set specific printer settings for this form.
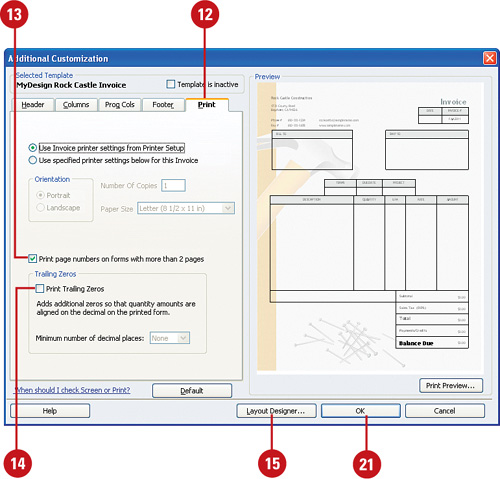
![]() Check the box Print Page Numbers if you want page numbers to appear on multipage forms.
Check the box Print Page Numbers if you want page numbers to appear on multipage forms.
![]() Check the Print Trailing Zeros box if you want QuickBooks to display insignificant, or trailing, zeros so that numbers will be aligned on the form. If you choose to display the zeros, you can indicate how many decimal places you want to display.
Check the Print Trailing Zeros box if you want QuickBooks to display insignificant, or trailing, zeros so that numbers will be aligned on the form. If you choose to display the zeros, you can indicate how many decimal places you want to display.
![]() Click the Layout Designer button to view your masterpiece.
Click the Layout Designer button to view your masterpiece.
![]() In the Layout Designer, click the Margins button to designate the size of your form.
In the Layout Designer, click the Margins button to designate the size of your form.

![]() Click the Grid button to display a nonprinting grid that can help you line up various elements on your form.
Click the Grid button to display a nonprinting grid that can help you line up various elements on your form.
![]() Click specific elements and drag to move them to new locations (not shown).
Click specific elements and drag to move them to new locations (not shown).
![]() Click the handles on the corners of form elements to resize them (not shown).
Click the handles on the corners of form elements to resize them (not shown).
![]() Click OK when you have completed working with the Layout Designer.
Click OK when you have completed working with the Layout Designer.
![]() Click OK to close the Additional Customization window.
Click OK to close the Additional Customization window.
![]() Click OK to close the Basic Customization window (not shown).
Click OK to close the Basic Customization window (not shown).
Making Journal Entries
For some transactions, no QuickBooks standard form is available. For these transactions, you use the General Journal. The General Journal is the place where you adjust the balances in your accounts without the use of forms such as invoices, bills, and checks. In this journal, you can reclassify balance sheet information, void a prior period check (as in Chapter 5, “Making Purchases and Recording Payments”), record depreciation and amortization expenses, and reclassify amounts charged to the wrong account. General Journal entries are made to accommodate these changes. For this example, we create a General Journal entry to record depreciation expenses.
![]() Select Company, Make General Journal Entries.
Select Company, Make General Journal Entries.
![]() Verify the date and entry number for this journal entry.
Verify the date and entry number for this journal entry.

![]() Enter the first account name.
Enter the first account name.
![]() Enter the amount in the Debit or Credit field.
Enter the amount in the Debit or Credit field.
![]() Enter a description in the Memo field (optional, but recommended).
Enter a description in the Memo field (optional, but recommended).
![]() Enter a customer name in the Name field if this amount is to be associated with a specific customer. QuickBooks adds a check mark in the Billable field, indicating that the amount is to be transferred to a customer’s invoice.
Enter a customer name in the Name field if this amount is to be associated with a specific customer. QuickBooks adds a check mark in the Billable field, indicating that the amount is to be transferred to a customer’s invoice.
![]() Click the Billable field if you want to uncheck the box and not have this amount transferred to a customer’s invoice.
Click the Billable field if you want to uncheck the box and not have this amount transferred to a customer’s invoice.
![]() Enter a class if you are using the Classes feature.
Enter a class if you are using the Classes feature.
![]() Enter the next account name.
Enter the next account name.
![]() Verify the amount.
Verify the amount.
![]() Repeat these steps until you have entered all the accounts required of this journal entry.
Repeat these steps until you have entered all the accounts required of this journal entry.
![]() Click a save option.
Click a save option.
Using the QuickBooks Remote Access Feature
If you travel or work out of the office and want to access your QuickBooks file from a remote location, the Intuit Remote Access feature is the tool you need. If you own the QuickBooks Premier Edition, this service is free for a year. Otherwise, depending on the level of service you choose, there is a $3.95 to $29.95 monthly fee to use the remote service.
![]() Go to http://quickbooks.intuit.com/product/add_ons/remote_access.jsp to read about the remote access feature.
Go to http://quickbooks.intuit.com/product/add_ons/remote_access.jsp to read about the remote access feature.

![]() After the remote access feature is activated, you are given a Web address, login name, and password. Depending on the level of service you purchase, you can perform the following tasks from any location 24 hours a day with remote access:
After the remote access feature is activated, you are given a Web address, login name, and password. Depending on the level of service you purchase, you can perform the following tasks from any location 24 hours a day with remote access:
• Log in and open your company file.
• Enter transactions in your company file.
• Transfer files from one computer to another (depending on the level of service purchased).
• Meet clients in an online remote location, with video, record, and playback capabilities.
• Access files and applications on other remote computers. (Depending on the level of service purchased).
• Print information from your company file. (Depending on the level of service purchased).
Creating Mailing Labels
Sending an announcement to all your customers, vendors, or employees is easy when you use the address information already stored in your QuickBooks file to create mailing labels. QuickBooks lets you select the group and then produce labels based on your specifications.
![]() Select File, Print Forms; then select Labels from the side menu that displays.
Select File, Print Forms; then select Labels from the side menu that displays.
![]() Select which group of labels you want to print. For this example, the customer list has been selected.
Select which group of labels you want to print. For this example, the customer list has been selected.
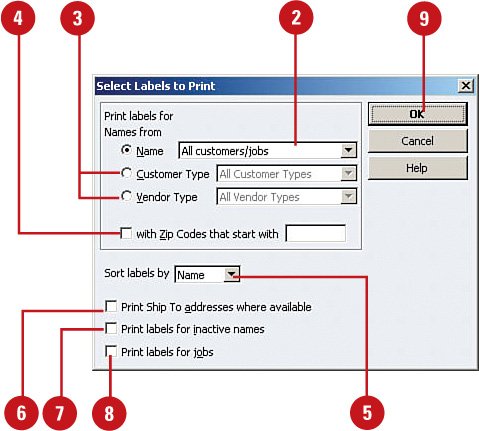
![]() Indicate whether you want to narrow the mailing list to particular types.
Indicate whether you want to narrow the mailing list to particular types.
![]() Indicate whether you want to specify ZIP codes that begin with a particular number.
Indicate whether you want to specify ZIP codes that begin with a particular number.
![]() In the Sort Labels By drop-down list, indicate how you want the list to be sorted.
In the Sort Labels By drop-down list, indicate how you want the list to be sorted.
![]() Check Print Ship To Addresses Where Available to use ship to addresses instead of mailing addresses.
Check Print Ship To Addresses Where Available to use ship to addresses instead of mailing addresses.
![]() Check Print Labels for Inactive Names if you want to print labels for names that are inactive.
Check Print Labels for Inactive Names if you want to print labels for names that are inactive.
![]() Check whether you want to print labels for individual jobs (only applicable if you are printing labels for customers).
Check whether you want to print labels for individual jobs (only applicable if you are printing labels for customers).
![]() Click OK.
Click OK.
![]() Select from the Label Format list to choose the style of label to print.
Select from the Label Format list to choose the style of label to print.
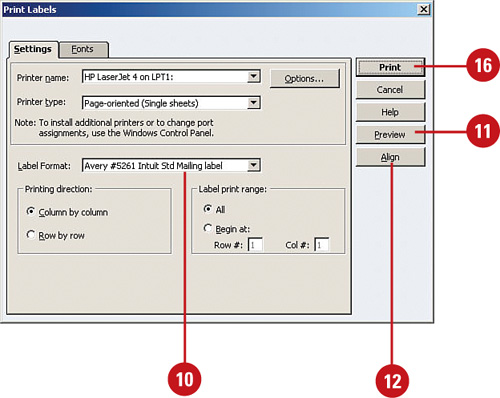
![]() Click Preview to see whether the labels you are about to print are what you expect.
Click Preview to see whether the labels you are about to print are what you expect.
![]() Click Align if you need to adjust the alignment of the text that will appear on your labels.
Click Align if you need to adjust the alignment of the text that will appear on your labels.
![]() Enter any horizontal or vertical adjustments that you need to make to align your printed material with your labels.
Enter any horizontal or vertical adjustments that you need to make to align your printed material with your labels.

![]() Click Print Sample and print a test version on plain paper to see how the labels will look without wasting label paper.
Click Print Sample and print a test version on plain paper to see how the labels will look without wasting label paper.
![]() Click OK to close the Fine Alignment window after making any necessary adjustments.
Click OK to close the Fine Alignment window after making any necessary adjustments.
![]() Click Print.
Click Print.