C H A P T E R 9
Rendering Reports from .NET Applications
Report rendering is the process of outputting the results of a report into a specific format. You pass the appropriate parameters to SSRS, telling it what report you want to run and optionally what format you want the output in, any user credentials, and the actual report parameters. SSRS 2012 then renders the report and returns the results.
The manner in which you pass these parameters and how the results are returned depends on the SSRS 2012 method you’re using to render the report. Once SSRS has the information it needs, based on the particular report you’re running, it queries the appropriate data sources. SSRS 2012 uses the passed credentials and parameters if appropriate, renders the report into an intermediate format, and then renders and filters this intermediate format into the final display format requested.
With SSRS 2012, you can render reports in three ways from a .NET application:
Using a URL: You can build a URL that allows the client to access the report on the report server and supply any appropriate parameters, including rendering format, login information, report criteria, and report filters. This method is one of the most flexible because it will work with almost any language and platform that can host or use a Web browser or a Web browser control. In fact, it works with any language that can create a properly formatted URL and that can launch a Web browser using that URL. We can use the built-in WebBrowser control in .NET with formatted URLs to render a report.
Using the SOAP API: You can use the SOAP API, also known as the Report Server Web service, to render the report. This returns the rendered data as a stream that you then display. This is a more difficult method of rendering because the information you get back from the server is essentially a binary stream of data, and you don’t have the benefit of having the server-browser combination do the actual work of displaying the data. However, you can use the Report Server Web service for more than just rendering: you can use it to access the report server’s complete functionality. We’ll show how you can use the Report Server Web service in your solution to provide information about the reports you’re rendering, such as the report parameters that the reports use.
Using the Report Viewer control3.0: You can use the Report Viewer control. This option for SSRS 2012 provides a simple-to-use Windows Forms application or ASP.NET user control that allows you to simply drag and drop the control onto a Windows or Web Form, set some properties, and render a report. One of the main benefits of the Report Viewer control is that it allows you to render reports that are on an SSRS 2012 report server as well as render reports locally, without the need for a report server.
![]() Note The Report Viewer controls are included with current versions of SQL Server and Visual Studio. You can also download the redistributable package for machines that will be running the application and that do not have Visual Studio/SQL Server installed.
Note The Report Viewer controls are included with current versions of SQL Server and Visual Studio. You can also download the redistributable package for machines that will be running the application and that do not have Visual Studio/SQL Server installed.
While the Report Viewer controls are the method that most Visual Studio users will probably employ to render reports, the most universally usable rendering method is via URL access. In this case, SSRS 2012 provides some defaults for most reporting options. For example, SSRS provides a default user interface for entering parameter and filter information. It prompts you for login information if necessary, and it defaults to rendering in HTML format. You get all this simply by passing the URL of the report from the browser. This is most useful if you’re rendering your reports using just your Web browser, with no other controlling application.
You can optionally pass parameters along with the URL to change these default behaviors, provide login information, change the rendering format, hide the parameter toolbar, and much more. This is useful if you have a custom application and want to control these options yourself, rather than provide the default user interface.
You can perform many of the same actions using the Report Server Web service, but there are no real defaults and the actual display of the returned data to the user is left up to the application developer. By using the Web browser in an ASP.NET application, or embedded in a Windows Forms application, you get the benefits of the URL rendering method, but you can exercise control over it. This provides users with a more integrated experience. The methods covered in this chapter apply largely to both Windows Forms and Web Forms applications. For one of the projects, we’ll show how to build a Windows Forms-based report viewer that allows you to use SSRS 2012 as the reporting solution for your application.
In this chapter, you’ll do the following:
URL rendering access: Learn how to build a URL through which a client application can access a report on the report server. You’ll use the Employee Service Cost report in the example (available with the code download for this chapter in the Source Code/Download section of the Apress Web site at
www.apress.com).URL reporting parameters: Explore the reporting parameters that, when specified in the URL, control how the report is rendered. You can specify the actual format (for example, HTML or PDF). You can specify that a specific page in a report be rendered, or you can search for a particular word and start rendering on that page.
URL viewer application: Build a simple .NET Windows Forms application that accesses and renders a report via a WebBrowser control that you’ll embed in a form.
Report Server Web service calls: Use calls to the Report Server Web service to query for the report criteria and filter parameters. This allows you to display these on your Windows Forms application. You’ll then use the SOAP API again to see whether the parameters have a list of values from which the user can select. If so, you’ll use those values to populate combo boxes for each parameter. You’ll also give the user a combo box to select a rendering format. You’ll then display all the selections to the users and use their selected values to create a URL that contains all the information necessary to run the report. Finally, you’ll use this URL with the embedded Web browser to render the report with user-entered report parameters and rendering commands.
Report Viewer control, server-side mode: Use the Report Viewer control to render the same report using the control’s server-side mode.
Report Viewer control, local rendering: Use the Report Viewer control and a locally populated dataset to render a report locally without an SSRS report server.
Report Viewer control in an ASP.NET application: Use the Report Viewer control and render a server-side report. We will make use of the Web service to retrieve a list of reports to choose from.
Before you run the included examples, make sure to read the ReadMe.htm. It is located in a file in the samples root folder. If you have the code open in Visual Studio, it will be under the Solution Items folder. It contains setup and configuration steps that are required before running the examples.
Implementing URL Access
In this section, we’ll show you how to build a URL that accesses the desired reports on the report server and passes the appropriate parameters to the report.
The syntax for the entire URL breaks down into two parts. The first part specifies the path to the report file, and the second specifies the parameters. The full URL syntax is as follows:
http://server/virtualroot?[/pathinfo]&prefix:param=value[&prefix:param=value]...n]
The syntax for an SSRS installation in SharePoint integration mode will resemble:
http://server/subSiteName/_vti_bin/reportserver?[/pathinfo]&prefix:param=value.
[&lprefix:param=value]...n]

We’ll now walk you through the steps of building a URL to access the Employee Service Cost report.
URL Report Access Path Format
As indicated in the previous section, the path to access the appropriate report starts with the name of the report server itself; in this case, we will use http://localhost and use an SSRS installation that is in native mode. Following that is the name of the SSRS 2012 virtual root folder (such as /reportserver, which is the default folder during installation).
![]() Note The /reports virtual root folder is mapped to the Report Manager application that ships with SSRS 2012. If you navigate to this URL, you’ll find that it lists the folders and the reports within the folders that are on your report server through Report Manager.
Note The /reports virtual root folder is mapped to the Report Manager application that ships with SSRS 2012. If you navigate to this URL, you’ll find that it lists the folders and the reports within the folders that are on your report server through Report Manager.
You then add ? to the path to let SSRS 2012 know that everything following the URL is a parameter. Next is the optional path information, where you can specify any subfolder within the base folder that you use to organize your reports, such as /Pro_SSRS/Chapter_9. Finally, you have the name of the actual report, such as EmployeeServiceCost.
So, in this example, the full path to access the Employee Service Cost report is as follows:
http://localhost/reportserver?/Pro_SSRS/Chapter_9/EmployeeServiceCost
We’ll now cover the section of the URL where you specify any necessary parameters.
URL Parameters and Prefixes
You now need to pass the appropriate parameters to the report. You’re interested in several categories of parameters:
Report parameters (no prefix): These parameters are supplied to the report’s underlying queries and are used as filters for the information as it’s rendered. Thus, they control exactly which data the report displays.
HTML Viewer parameters (
rc:): These parameters control which features of the Web-based report viewer are active and at which page the report viewer starts displaying the report. For example, you can use the FindString parameter to have the viewer start displaying a report on the first page on which a specific word is found.Report Server command parameters (
rs:): These parameters control the type of request being made and the format of the returned report. For example, we’ll show how to use thers:Command=Render&rs:Format=HTML4.0parameter to render your report in HTML format in your report viewer.Report Viewer Web Part command parameters (
rv:): These parameters control the SharePoint integrated web part. These are very similar to the html viewer parameters since they will control the portal where you view reports on a SharePoint site. For example, you can use the AsynchRender parameter to control whether the report is rendered asynchronously or synchronously. Web parts can also accept thers:ParameterLanguageparameter in addition to the rv: group.
Report Parameters
Report parameters are the actual parameters passed to the underlying report, instead of instructions being sent to the report server. That is, you use them to pass criteria to your report, such as start and end dates, employee IDs, and so on. You can pass these parameters to the report’s query, and they’re created when you specify parameters for the data source. You can also use parameters as variables in the report and as values for filters.
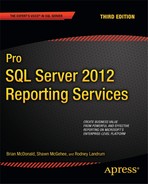
HTML Viewer Commands
You use HTML Viewer commands to tell SSRS 2012 how to render the report. You can use the commands in Table 9-2 to control how the viewer appears to the user, as well as to control certain aspects of how the report appears in the viewer.
Report Server Command Parameters
Report server command parameters, which are prefixed with rs:, tell the report server the type of request being made (see Table 9-3). You use them to retrieve report and data source information in XML and HTML format and to retrieve child elements such as the current folder’s report names. You also use command parameters to tell the server you want to render a report and in what format and whether you want to render that report based on a preexisting snapshot.

Credential Parameters
If, in previous versions of Reporting Services, you were using credential parameters to pass datasource connection information, you will have to modify these reports to upgrade them to a SSRS 2012 server. The credential parameters that passed username and password information to a report server for rendering were stored in plain text in the browser cache. This was very insecure and this set of parameters has been removed from SSRS 2012.
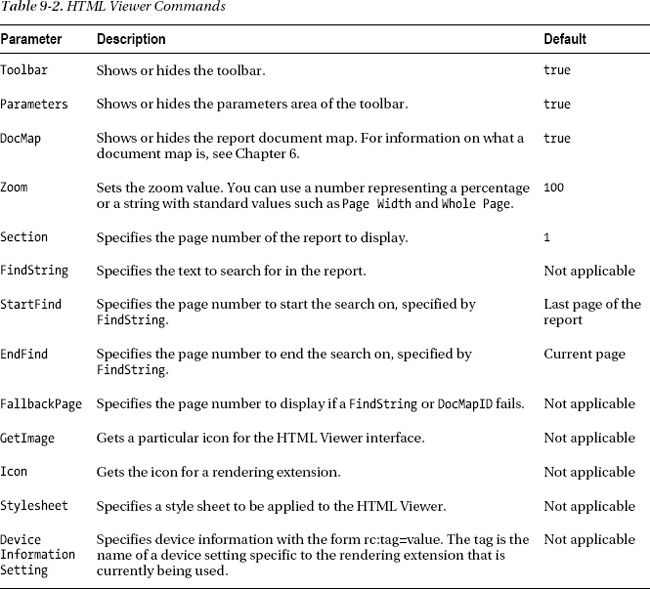
Report Viewer Web Part Commands
Report web part viewer commands are prefixed with rv: and are used to target the web part used to view reports in SharePoint mode. You can use these parameters to control how the report and its controls are displayed from the web part. You can also use these parameters to control how the report will be rendered. You can see these parameters in Table 9.4.
Example URLs
Now that you’ve examined every component part of the URL, it’s useful to look at a few complete sample URLs. You will need to have the report setup correctly from the readme.html file included from the chapter download examples. The following URL renders the report in HTML 4 and hides the HTML Viewer toolbar by setting the rc:Toolbar parameter value to false while also setting the Service Year parameter to 2009:
http://localhost/reportserver?/Pro_SSRS/Chapter_9/EmployeeServiceCost&rs:Command=

 Render&rs:Format=HTML4.0&rc:Toolbar=false&ServiceYear=2009
The next example passes a report parameter for ServiceYear of 2009 and hides the input display of user-supplied parameters:
http://localhost/reportserver?/Pro_SSRS/Chapter_9/EmployeeServiceCost&rs:Command=

 Render&rs:Format=HTML4.0&rc:Parameters=false&ServiceYear=2009
The next one uses the rs:Format parameter to set the default output format to PDF for the service year 2009:
http://localhost/reportserver?/Pro_SSRS/Chapter_9/EmployeeServiceCost&rs:Command=

 Render&rs:Format=PDF&serviceyear=2009
This example hides the report document map:
http://localhost/reportserver?/Pro_SSRS/Chapter_9/EmployeeServiceCost&rs:Command=

 Render&rc:DocMap=false&ServiceYear=2009
This final example – in SharePoint integrated mode which you may not have set up – will hide the toolbar:
http://localhost/_layouts/ReportServer/RSViewerPage.aspx?rv:RelativeReportUrl=/Chapter

 9/EmployeeServiceCost.rdl&rv:Toolbar=None
You’ve taken a brief look at the commands you need to render a report through a URL in both native and SharePoint mode. In the remainder of this chapter, we’ll show how to create your own report viewer as well as use the report viewer control. The custom viewer will use URL commands to integrate an SSRS 2012 report into a .NET Windows Forms–based application and the report viewer control will be used in an ASP.NET web page.
Integrating SSRS 2012 with .NET Applications
Now that you have some understanding of how URL access works, you’ll learn how you can render reports. You’ll start by looking at how to render a report by building a Windows Forms SSRS 2008 viewer application that uses the .NET 2.0 WebBrowser control and URL access to render reports for your application.
Building a custom Report Viewer Using the WebBrowser Control
We’ll show how to create a simple Windows Forms application that contains the embedded browser, which you’ll use to view a report.
Creating the Viewer Form
In this example, you will use C# to create the viewer application. We will also include the same application written in VB.NET in the extra downloadable content. Follow these steps:
- Open Visual Studio 2010.
- Create a new project.
- On the New Project dialog box, select Visual C#
Windows
Now that you have created the project, you’ll work with the form you will use to create the report viewer:
- Visual Studio 2010 will add a single form to the project called Form1.cs. Rename the form to ViewerWBC.cs.
- Resize the blank form to 800×600.
- Add the WebBrowser control from the Toolbox’s Common Controls section to the form. Name it WebBrowser, and anchor the control to the form’s top, bottom, left, and right. Size the WebBrowser control to extend from both sides of the form to the bottom of the form.
- Now add a textbox, and name it reportURL. Just after the textbox, add a button named reportRun, and set the button text to Run.
You should now have a form that looks like Figure 9-1.

Figure 9-1. The ViewerWBC.cs form
Coding the Viewer Form
To code the viewer form, you’ll add the code necessary to use this custom report viewer to render the SSRS 2012 reports. You need to add some code to the button’s click event to make sure you can browse to and view an existing report. Make sure the ViewerWBC.cs form is open in design view, and double-click the Run button. This will create an empty method to handle the button’s click event. Add the code in Listing 9-1 inside the reportRun_Click method to your method.
Listing 9-1. reportRun click Event: Browsing to URL
private void reportRun_Click(object sender, EventArgs e)

{

webBrowser.Navigate(reportURL.Text);

}
Now run the project in debug mode. When the form displays, enter the following URL into the textbox:
http://localhost/reportserver/?/Pro_SSRS/Chapter_9/EmployeeServiceCost&rs:Command=Render
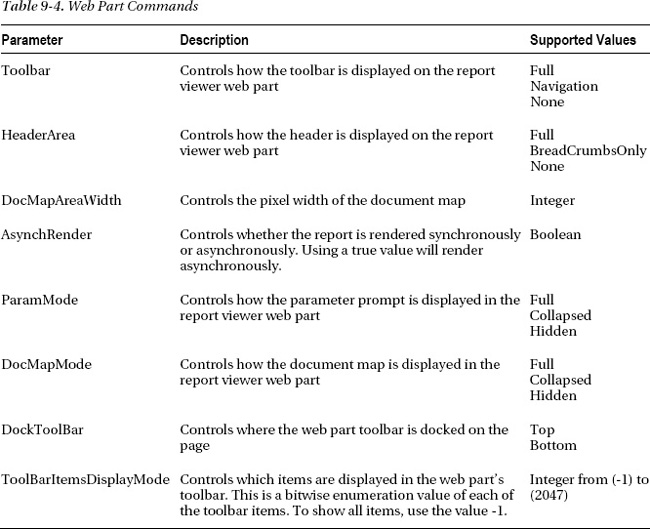
Now click Run. This renders the Employee Service Cost report. You will be prompted to supply parameters once the report begins to render in the web browser object. You may also need to use the name of your report server where you see localhost in the preceding URL. At this point, you should see something like Figure 9-2.
Figure 9-2. SSRS Viewer WBC application running the Employee Service Cost report
Next, we will add some code so that when the program is started it will set up a default string in the URL textbox with a path to the report, so you don’t have to type it in each time. Right click on your ViewerWBC.cs file and select view code to pull up the section where you need to add this code.
public ViewerWBC()

{

InitializeComponent();

// Setting the initial URL for convenience in the example

reportURL.Text = "http://localhost/reportserver/?

/Pro_SSRS/Chapter_9/EmployeeServiceCost&rs:Command=Render";
This is a very simple application and uses simple controls that every user should have available on their client. You can use the combination of this type of viewer with the URL commands we have discussed to include a custom report viewer in any application that you might build. Next, we will use a less common – but more powerful – control to integrate our SSRS reports into a Windows form or ASP.NET project.
Building the Report Viewer Using a Report Viewer Control
Now, you’ll learn how you can use the Report Viewer control to render the same Employee Service Cost report. Not only is it likely to be the most popular method for rendering server-based reports, but it also includes the ability to render reports based on the RDL locally without a report server.
You can use the two Report Viewer controls: one for Windows Forms applications and one for ASP.NET applications. These controls allow you to add rich reporting features to your Windows or ASP.NET applications more easily than is possible using any other method. The controls offer the power of the URL rendering method but make it easier to implement in your code because most options are now set as properties on the Report Viewer control. In other words, you don’t need to include them in the string that you pass in as the URL. Another main advantage of working with the controls is that you get full IntelliSense support for all the options within the Visual Studio 2010 IDE.
Table 9-5 lists some of the key properties and methods of the Report Viewer controls.

![]() Note See the Visual Studio 2010 help for more information about the members of the Report Viewer control as well as for information about a number of other properties, methods, and events that come with the Report Viewer controls.
Note See the Visual Studio 2010 help for more information about the members of the Report Viewer control as well as for information about a number of other properties, methods, and events that come with the Report Viewer controls.
In this example, we will cover how to use the Windows Forms version of the Report Viewer control.
![]() Note In the “Using the Report Server Web Service” section, we will show how to extend the application so that it uses Report Server Web service calls to query the report server for the parameters the report can accept and the values that are possible for each. We’ll show how to use these parameters to create dropdown lists for the users of the Windows Forms application and then render the report.
Note In the “Using the Report Server Web Service” section, we will show how to extend the application so that it uses Report Server Web service calls to query the report server for the parameters the report can accept and the values that are possible for each. We’ll show how to use these parameters to create dropdown lists for the users of the Windows Forms application and then render the report.
Creating the Viewer Form
To create the viewer form in C#, you’ll start by adding a new project to your solution by taking the following steps:
- Select File
- In the New Project dialog box, select Visual C#
- Now that you have created the project, you’ll work with the form that will create your report viewer:
- Name the default form that was just created to ViewerRVC.cs.
- Open the ViewerRVC.cs file in design mode by double clicking the file in Solution Explorer
- Resize the blank form to around 800×600 pixels and change the text of the form to SSRS Viewer RVC in the properties section.
- Add the Report Viewer control from the Toolbox’s Reporting section to the form. Name the control reportViewer in the properties, and anchor it to the form’s top, bottom, left, and right. Resize the control to fill the form but leave room at the top for a few more components.(If you do not have the report viewer control, you may need to down load it from: www.microsoft.com/download/en/details.aspx?id=6610)
- Now add a textbox, name it reportURL, and just after the textbox add three buttons named runServer, runLocal, and getParameters. Set their Text properties to Run Server, Run Local, and Parameters, respectively.
You should now have a form that looks like Figure 9-3.
![]() Note In Visual Studio 2010 you will need to use a .NET framework of 3.5 or higher to get the ReportViewer controls in the IDE. If you use anything older than this, you will not get the option of adding a viewer to your project from the toolbox.
Note In Visual Studio 2010 you will need to use a .NET framework of 3.5 or higher to get the ReportViewer controls in the IDE. If you use anything older than this, you will not get the option of adding a viewer to your project from the toolbox.
You’ll now start adding the code necessary to use the new Report Viewer control to render the SSRS 2012 reports.
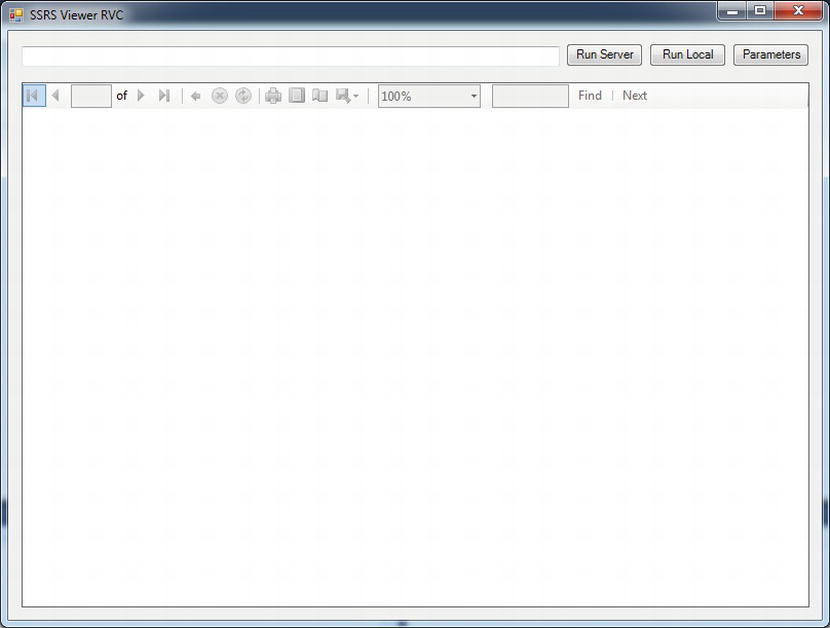
Figure 9-3. The ViewerRVC.cs form
Coding the Viewer Form
First, add a using statement for the new namespace, Microsoft.Reporting.WinForms, to the top of the class with the other namespace declarations. Doing this will allow you to access the members of the namespace without typing the full namespace each time you use a method or property from that namespace. Right click on the ViewerRVC.cs file and select view code to add this using statement to the file.
using Microsoft.Reporting.WinForms;
Second, add the code shown in Listing 9-2 to the Run Server button’s click event. Make sure the ViewerRVC.cs form is open in design view, and double-click the Run Server button. This will create an empty method to handle the button’s click event.
Listing 9-2. The runServer Click Event: Running Report in Remote Mode
private void runServer_Click(object sender, EventArgs e) {

reportURL.Text = "/Pro_SSRS/Chapter_9/EmployeeServiceCost";

reportViewer.ProcessingMode =

sProcessingMode.Remote;

reportViewer.ServerReport.ReportServerUrl = new Uri(@"http://localhost/reportserver/");

reportViewer.ServerReport.ReportPath = reportURL.Text;

reportViewer.RefreshReport(); }
Now run the project in debug mode. Then click Run Server. This renders the Employee Service Cost report where you can input parameters for your report. Of course, you need to use the name of your report server where you see localhost in Listing 9-2. At this point, you should see something that looks like Figure 9-4.

Figure 9-4. SSRS Viewer RVC running a server rendered report
That’s all there is to rendering a report on an SSRS 2012 server using the Report Viewer control.
Rendering the Report Locally
We’ll now cover how to render the report locally without using an SSRS 2012 server. It is a bit more complicated because you’re responsible for filling the data sources with the data that your reports require. However, it does provide tremendous flexibility to the developer because you can use SSRS 2012 reporting features without a server.
![]() Caution The server and local report definition files are not 100 percent compatible. This means it is not possible to use the same RDL source file for both local and remote use. In fact, you will note that by default reports for server-side or remote processing are created with the .rdl extension and reports for client-side or local processing are created with the .rdlc extension. While they are not 100 percent interchangeable, you can use one for the other with some changes to the underlying RDL.
Caution The server and local report definition files are not 100 percent compatible. This means it is not possible to use the same RDL source file for both local and remote use. In fact, you will note that by default reports for server-side or remote processing are created with the .rdl extension and reports for client-side or local processing are created with the .rdlc extension. While they are not 100 percent interchangeable, you can use one for the other with some changes to the underlying RDL.
Creating the Report’s Data Source
First, you will add a data source to your project by adding the dataset you created previously. To add the data source, follow these steps:
- In the Project Explorer, right-click the project name SSRS Viewer RVC, point to Add, and select Existing Item.
- Navigate to the folder containing the Chapter 9 examples, and select EmployeePay.xsd in the SRSS Viewer RVC folder. This is the XML schema file you’ll use to define your data source for the report. When you add the .xsd file to your project, it will also appear under the Data Sources window. If you don’t see the Data Sources window, select Data
![]() Note Alternatively, you could have used the Data Source Configuration Wizard found by selecting Data
Note Alternatively, you could have used the Data Source Configuration Wizard found by selecting Data ![]() Add New Data Source. With it you can create several types of data sources including those sourcing from a database, a Web service, or even an object. Just remember that, much like this example, it is up to you to retrieve the data and populate the data source with it.
Add New Data Source. With it you can create several types of data sources including those sourcing from a database, a Web service, or even an object. Just remember that, much like this example, it is up to you to retrieve the data and populate the data source with it.
Next you’ll create a local RDL (.rdlc) that you’ll render using the Report Viewer control in local processing mode.
Designing the Report
To design the report, follow these steps:
- To add a report to the project, right-click the project name—SSRS Viewer RVC—in the Solution Explorer.
- On the shortcut menu, select Add
- Select the Reporting section on the list to the left, then click the Report icon, enter EmployeePay.rdlc for the file name, and then click Add. This launches the Report Designer functionality in Visual Studio. The .rdlc extension signifies that it is a report for client or local rendering.
- Make sure the report is selected. Open the Toolbox. From the Toolbox, drag a Table report item onto the report.
- You should now be presented with the Dataset Properties window. From this window, select the Employees option in the Data Source drop down list. You will see the fields from this data source populated in the Fields data grid to the right. Name this dataset Employees_EmployeePay and click OK.
- You should now see the table in your report designer. In the Data row of the first column, click the field icon in the top right hand corner to select a field. In the first column select the Employee ID field.
- Perform this task again for the second and third columns. Choose StartDate and Amount for the second and third column, respectively.
- Add a textbox to the top of the report and use the text “Employee Pay Report” for the value.
You should now have a report that looks like Figure 9-5.

Figure 9-5. Local report in the designer
Now you have a report that uses the dataset you created as a data source. Add the code shown in Listing 9-3 to the runLocal button’s click event to populate the dataset and display the values in the Report Viewer control using the .rdlc file you have created. Make sure the ViewerRVC.cs form is open in design view, and double-click the Run Local button. This will create an empty method to handle the button’s click event.
Listing 9-3. runLocal click Event: Running Report in Local Mode
private void runLocal_Click(object sender, EventArgs e)

{

Employees empDS = new Employees();

empDS.ReadXml(@"C:TempEmployeePay.xml");

reportViewer.ProcessingMode = ProcessingMode.Local;

reportViewer.LocalReport.ReportEmbeddedResource = "SSRS_Viewer_RVC.EmployeePay.rdlc";

reportViewer.LocalReport.DataSources.Add(new ReportDataSource("Employees_EmployeePay", empDS.Tables["EmployeePay"]));

reportViewer.RefreshReport();

}
![]() Note The ReportEmbeddedResource value must include the namespace of your project. If you entered spaces for the name of your project when you created it, the namespace will use underscores in place of each space.
Note The ReportEmbeddedResource value must include the namespace of your project. If you entered spaces for the name of your project when you created it, the namespace will use underscores in place of each space.
Now run the project, not the whole solution, in debug mode. Remember you can do this by right clicking the specific project and selecting Debug -> Start new instance. When the form displays, click Run Local. This renders the localEmployee Pay report. At this point, you should see something like Figure 9-6. You’ve now created a report viewer in a Windows Forms application by using the WebBrowser control with URL rendering and by using the new Report Viewer control. You could stop at this point and just use these methods to render the reports and to display the report parameters, toolbar, and report. However, in this example, you want to use the SSRS 2012 Report Server Web service to get a list of parameters for the selected report and to display them to the user in a Windows Form. To get this list of parameters, you need to call the GetReportParameters method on the SSRS 2012 Report Server Web service.
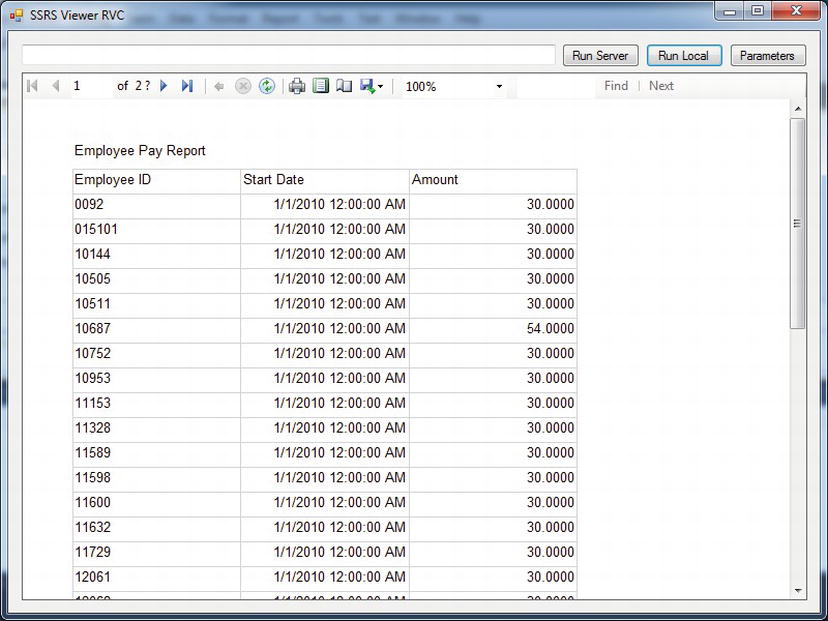
Figure 9-6. SSRS Viewer RVC running a locally rendered report
Using the Report Server Web Service
The SSRS 2012 Web service uses the SOAP API to allow you to call a variety of methods on the report server and interact with them using a rich set of objects provided by the service.
There are two services that you should be concerned with in SSRS 2012. The first, ReportingService2010, handles the management of the report server and the reports within. We will be using this service for the remainder of the chapter. The second service, ReportExecutionService, handles the programmatical rendering of reports without the use of a browser or report viewer.
Web Services Method Categories
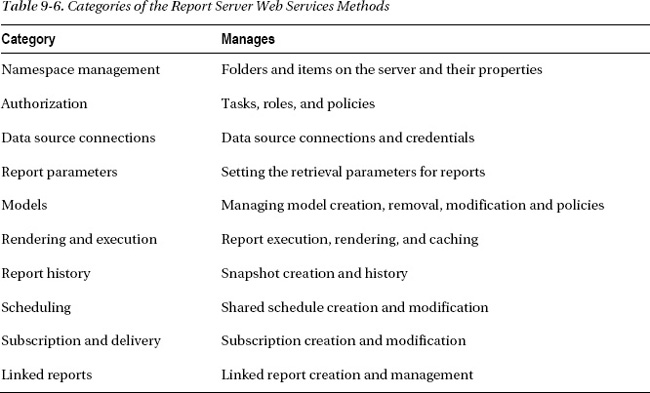
The Report Server Web services can control every aspect of the report server and consists of several categories of methods, as listed in Table 9-6.
The Report Server Web services uses many of these methods to control aspects of SSRS 2012 that aren’t directly related to controlling reports, so we won’t cover them in this chapter. However, you should be aware of the level of control your custom application can have over SSRS 2012 and the types of functions that can be performed, because you might want to provide a user interface to them from your application. Keep in mind that Microsoft built the main SSRS 2012 report manager application using ASP.NET and these Web services.
For the SSRS Viewer RVC, you are using the Report Viewer control to render the report, but you want to provide a custom Windows Forms–based user interface to allow users to enter their report parameters. The rest of this chapter concentrates on using methods from the report parameters category listed in Table 9-6. You’ll use these methods to obtain a list of the parameters that the report expects and also to find the possible values for those parameters.
You’ll use this information to create and populate combo boxes that allow the users to enter their choices from a Windows Forms dialog box.
Creating the GetParameters Form
You already have a form (ViewerRVC.cs) to render and display the report in the embedded Report Viewer control. You’ll now add a second form to the project that you’ll use to display the report and rendering parameters and to allow the users to make their selections.
So, add a GetParameters form to your project by selecting Project ![]() Add Windows Form. Name the form GetParameters.cs and modify the title text of the form to Parameters. Onto this form, add two controls from the Toolbox; add a FlowLayoutPanel control named parameterPanel from the Containers section, and add one button control named buttonOK in the button properties window. Then set the text property for the button to OK in the button properties window. When you’re done, the form should look like Figure 9-7.
Add Windows Form. Name the form GetParameters.cs and modify the title text of the form to Parameters. Onto this form, add two controls from the Toolbox; add a FlowLayoutPanel control named parameterPanel from the Containers section, and add one button control named buttonOK in the button properties window. Then set the text property for the button to OK in the button properties window. When you’re done, the form should look like Figure 9-7.
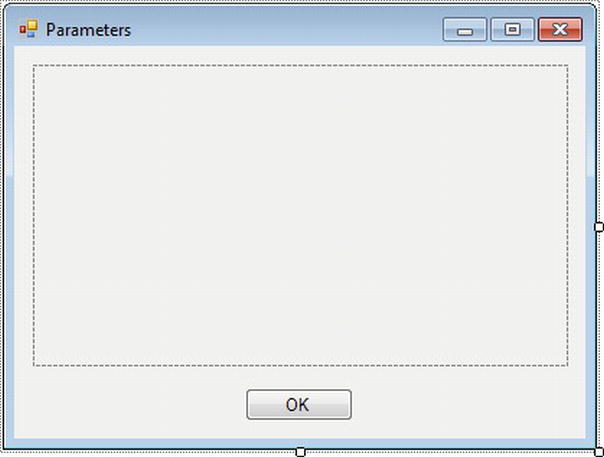
Figure 9-7. SSRS Viewer RVC GetParameters form
You now need to add a reference to the SSRS 2012 Web service to your project. You do this by selecting Project ![]() Add Service Reference or by right clicking the Service References in the Solution Explorer and selecting Add Service Reference. When the dialog box appears click the Advanced button at the bottom of the form. On this next form, click the Add Web Reference button. From here, enter the following URL:
Add Service Reference or by right clicking the Service References in the Solution Explorer and selecting Add Service Reference. When the dialog box appears click the Advanced button at the bottom of the form. On this next form, click the Add Web Reference button. From here, enter the following URL:
http://localhost/reportserver/reportservice2010.asmx
Substitute the name of your server for localhost, if need be. Then click the Go button, which is the right arrow icon. You’ll see a dialog box similar to Figure 9-8.

Figure 9-8. Adding an SSRS 2008 Web service reference
In the Web Reference Name textbox, enter SSRSWebService, which is the name by which you’ll refer to your Web service in your code. From here, click the Add Reference button to finalize the reference addition.
Once this dialog box is closed, you will add the following using statement to the top of your code in the GetParameters class file. Note that if your project name is different from SSRS Viewer RVC, you should change the reference to reflect the name of your project.
using SSRS_Viewer_RVC.SSRSWebService;
Now you can reference the methods and properties exposed by the Web service much more easily because you won’t have to enter the fully qualified namespace. Also, add the following other directives underneath the one you just added:
using System.Web.Services.Protocols;

using System.Collections;
Doing this will allow you to access the members of these namespaces without needing to type the full namespace each time you use a method or property from that namespace.
Because you’ll use this form as a dialog box to display the report parameters and their possible values, and allow the user to select them, you need a way to communicate between the main form and this newly created GetParameters form. We will set that communication up in the next section.
Coding the Report Parameters Form
When you instantiate the report parameters form (GetParameters.cs), you do so by passing in the URL of the report the user has entered in the viewer form (ViewerRVC.cs). You use this URL to determine the report server name and the specific report the user wants to run. You need to know both of these for the calls to the Report Server Web service. Because you’ll use this information throughout the rest of the code, in your GetParameter class you will store them in some class-level private variables, as shown in Listing 9-4. Add the list of private variables to your GetParameter.cs class code directly after the class start.
Listing 9-4. Class-Level Private Variables
public partial class GetParameters : Form

{

private string url;

private string server;

private string report;

private Microsoft.Reporting.WinForms.ReportParameter[] parameters;

ReportingService2010 rs;
In the form constructor, which will take the URL string as the only parameter, we will break the report server and report name into two separate fields. To break down the URL into the server and report name, use the string split method and create a constructor that looks like Listing 9-5. Add this constructor code, the code that is first run when and object of a class type is created, directly below the private variables. You will need to add the string parameter called URL to the constructor as well.
Listing 9-5. Report Parameters Form Constructor
public GetParameters (string URL)

{

InitializeComponent();

url = URL;

string[] reportInfo = url.Split('?'),

server = reportInfo[0];

report = reportInfo[1]; }
The GetParameters_Load Event
Now you get to where the real work for this dialog box takes place: the Form_Load event. To create this method automatically, open your GetParameters form in display mode and double click your form where there are no components, such as the top bar. This will open your form in code view and already have the GetParameters_Load method created and link it to the form’s load event.
Next, create a ReportingService object so that you can access SSRS 2012 through the Web service that you added as a reference earlier. Then, set your Windows credentials as the credentials to be used for calling the Web service, like so:
rs = new ReportingService2005();

rs.Credentials = System.Net.CredentialCache.DefaultCredentials;
![]() Note You can also use Basic authentication using
Note You can also use Basic authentication using rs.Credentials = new System.Net. Network-Credential("username", "password", "domain");. The method you use depends on the security settings for the report server virtual directory. By default, it’s configured to use Windows authentication.
Calling the Web Services GetItemParameters Method
The GetItemParameters method takes five parameters:
- Item: The full path name of the report/item.
- ForRendering: A Boolean value that indicates how the parameter values should be used. You must set it to true to get a list of the possible values for each parameter.
- HistorylD: The ID of the report history snapshot. You set it to null because you aren’t running the report from a snapshot.
- ParameterValues: The parameter values (ParameterValue[ ] objects) that can be validated against the parameters of the report that are managed by the report server. Set this to null for this example.Credentials: The data source credentials (DataSourceCredential[] objects) that can be used to validate query parameters.
The GetItemParameters method returns an array of ItemParameter[] objects that contain the parameters for the report. You use this information to render combo boxes that allow the users to select the parameter values they want to use when running the report.
The following code sets up the variables you need to use and then calls the GetItemParameters method to retrieve a list of parameters that the report expects, as shown in Listing 9-6.
Listing 9-6. Call to GetReportParameters
bool forRendering = true;

string historyID = null;

ParameterValue[] values = new ParameterValue[1];

DataSourceCredentials[] credentials = null;

ItemParameter[] parametersSSRS = null;

parametersSSRS = rs.GetItemParameters(report, historyID,

    forRendering, values, credentials);
Once you have the list of parameters from SSRS 2012, you loop through them using the values to create labels as you create your combo box for each parameter, like so:
foreach (ItemParameter rp in parametersSSRS)
Each ItemParameter object has a read-only property called ValidValues. You can use the ValidValues property, which returns an array of ValidValue objects to populate the items in each combo box, as shown in Listing 9-7.
Listing 9-7. Iterating Through the ValidValue Objects
if (rp.ValidValues != null) {

//Build list items
ArrayList aList = new ArrayList();
pvs = rp.ValidValues;
foreach (ValidValue pv in pvs)
{
aList.Add(new ComboItem(pv.Label,pv.Value));
}
//Bind list items to combo box
a.DataSource = aList;
a.DisplayMember="Display";
a.ValueMember="Value"; }
So, for each ReportParameter, you see whether any ValidValues properties exist. If they do exist, you loop through them, adding each item to the combo box. Because you want to retrieve the display name and the actual value for each item in the combo box, you have to create a combo box item class and bind the objects to the combo box. Listing 9-8 shows the full GetParameters_Load event method, and Listing 9-9 shows the ComboItem class.
Knowing something about our report, we already know that some of the parameters are dependent on other parameter values. If we simply run through the list of ValidValues for each parameter, some of them will include no values because of this dependency. We can use this previous knowledge to pass in a bit of information to the getItemParameters method. We will place one ParameterValue item in the values array so we can retrieve some valid values for all of our other parameters.
We also need to retrieve the display name and the value selected of each item in the combo boxes. We are also going to create a combo box item class to handle this by binding each combo item to the combo box. Listing 9-8 shows the GetParameters_Load event and Listing 9-9 shows the ComboItem class.
![]() Note We are populating the rest of the parameters based on just one possible Service Year value. Since, in some reports, the other parameter valid values might change, you could include an overridden event method that would refresh each of the other parameter values anytime the year was changed.
Note We are populating the rest of the parameters based on just one possible Service Year value. Since, in some reports, the other parameter valid values might change, you could include an overridden event method that would refresh each of the other parameter values anytime the year was changed.
Listing 9-8. Get Report Parameters and Possible Values and Display Them in Combo Boxes
private void GetParameters_Load(object sender, EventArgs e)

                {

                        rs = new ReportingService2010();

                        rs.Credentials = System.Net.CredentialCache.DefaultCredentials;


                        bool forRendering = true;

                        string historyID = null;

                        ParameterValue[] values = new ParameterValue[1];

                        DataSourceCredentials[] credentials = null;

                        ItemParameter[] parametersSSRS = null;

                        ValidValue[] pvs = null;


                        int x = 5;

                        int y = 30;
try
{
values[0] = new ParameterValue();
values[0].Label = "ServiceYear";
values[0].Name = "ServiceYear";
values[0].Value = "2009";
parametersSSRS = rs.GetItemParameters(report, historyID,
forRendering, values, credentials);
if (parametersSSRS != null)
{
foreach (ItemParameter rp in parametersSSRS)
{
this.SuspendLayout();
this.parameterPanel.SuspendLayout();
this.parameterPanel.SendToBack();
// now create a label for the combo box below
Label lbl = new Label();
lbl.Anchor = (System.Windows.Forms
.AnchorStyles.Top | System.Windows.Forms.AnchorStyles.Left);
lbl.Location = new System.Drawing.Point(x, y);
lbl.Name = rp.Name;
lbl.Text = rp.Name;
lbl.Size = new System.Drawing.Size(150, 20);
this.parameterPanel.Controls.Add(lbl);
x = x + 150;
// now make a combo box and fill it
ComboBox a = new ComboBox();
a.Anchor = (System.Windows.Forms
.AnchorStyles.Top | System.Windows.Forms.AnchorStyles.Right);
a.Location = new System.Drawing.Point(x, y);
a.Name = rp.Name;
a.Size = new System.Drawing.Size(200, 20);
x = 5;
y = y + 30;
this.parameterPanel.Controls.Add(a);
this.parameterPanel.ResumeLayout(false);
this.ResumeLayout(false);
if (rp.ValidValues != null)
{
//Build listitems
ArrayList aList = new ArrayList();
pvs = rp.ValidValues;
foreach (ValidValue pv in pvs)
{
aList.Add(new ComboItem(pv.Label, pv.Value));
}
//Bind listitmes to combobox
a.DataSource = aList;
a.DisplayMember = "Display";
a.ValueMember = "Value";
}
}
}
}
catch (SoapException ex)
{
MessageBox.Show(ex.Detail.InnerXml.ToString());
}
}
Listing 9-9. Combo Item Class
public class ComboItem

        {

                public ComboItem(string disp, string myvalue)

                {

                        if (disp != null)

                                display = disp;

                        else

                                display = "";

                        if (myvalue != null)

                                val = myvalue;

                        else

                                val = "";

                }


                private string val;

                public string Value

                {

                        get { return val; }

                        set { val = value; }

                }


                private string display;

                public string Display

                {

                        get { return display; }

                        set { display = value; }

                }


                public override string ToString()

                {

                        return display;

                }

        }
Upon loading, you’ll see a form like Figure 9-9, which displays a series of combo boxes, each containing the valid values for the report parameters. You won’t be able to see this in full view until we add the code to open this parameter form from the main form. We will be performing that step shortly in the chapter.

Figure 9-9. The Parameters dialog box
Rendering the Final Report
To finish your SSRS 2012 Windows Forms viewer application, you need to set the parameters’ local variables to the parameter values the user has selected so that you can retrieve them from the ViewerRVC.cs form, using a property you will create in the GetParameters class called Parameters. You will populate the parameters variable by creating a method called ViewerParameters.
Make sure the GetParameters form is displayed in design mode, and double-click the OK button. This will create a new event handler method called buttonOK_Click automatically and set it up to be run anytime the OK button on our form is pressed. To the buttonOK click event handler, add the code shown in Listing 9-10.
Listing 9-10. The buttonOK click Event Handler for the OK Button
private void buttonOK_Click(object sender, EventArgs e) {

parameters = ViewerParameters();

this.DialogResult = DialogResult.OK;

Close(); }
The method that it calls, ViewerParameters, simply iterates through the combo boxes and creates an array of ReportParameters, which are essentially name-value pairs used by the Report Viewer control, as shown in Listing 9-11. You will need to add this entire method to your GetParameters class manually. Let’s discuss what this method does before as well.
Our ViewerParemeter method first counts the number of controls that hold values and then initializes an array of report parameters to be used as the return value. It then looks through each control inside of the parameter panel we set up and tests if that control is a combo box, which is the type we want to get the values out of to return. If the control is a combo box, the code then casts that control as a combo box so that we can grab the name and value of the selected item to add to our array of report parameters. If the value isn’t null or a blank string, we grab the selected value and populate the array. If it is null or blank, we use a null value in our parameter array.
Listing 9-11. Get Parameters Entered by User
private Microsoft.Reporting.WinForms.ReportParameter[] ViewerParameters() {

int numCtrls = (this.parameterPanel.Controls.Count / 2);

Microsoft.Reporting.WinForms.ReportParameter[] rp =

New Microsoft.Reporting.WinForms.ReportParameter[numCtrls];

int i = 0;

foreach (Control ctrl in this.parameterPanel.Controls) {

if (ctrl.GetType() == typeof(ComboBox)) {

ComboBox a = (ComboBox)ctrl; rp[i] =

new Microsoft.Reporting.WinForms.ReportParameter(); rp[i].Name = a.Name; if (a.SelectedValue

 != null &&

a.SelectedValue.ToString() != String.Empty) {

rp[i].Values.Add(a.SelectedValue.ToString()); }

else {

rp[i].Values.Add(null); }

i++; } } return rp; }
To finish your GetParameters form, you need to add some code to allow you to pass the report parameters and their values to the viewer form (ViewerRVC.cs), as shown in Listing 9-12. This allows the parent ViewRVC form to gather the parameters once they have been populated from the web service and chosen by you through the form. You will also manually add this code to your GetParameters class.
Listing 9-12. Property Used to Get Parameters from the ViewerRVC.cs Form
public Microsoft.Reporting.WinForms.ReportParameter[] Parameters {

get

{

return parameters;

} }
To finally bring it all together, you need to add a button and related code to its click event in the ViewerRVC.cs form, the main form, to use the new Parameters dialog box, passing in the URL of the report you want to run. Then, you read the ReportParameter array through the GetParameters form’s Parameters property and use it to set the report parameters for the Report Viewer control, as shown in Listing 9-13.
First, open your ViewerRVC class in design mode by simply double clicking the file in the Solution Explorer. From here, you can just double click the Parameters button that you created when we first designed this form earlier in the chapter. This will create a new getParameters_Click event method for you and link it automatically to the click event for that button. Now you can add the code to pull up the new GetParameters form and return the parameters generated from that form.
Listing 9-13. The getParameters click Event: Retrieving the Parameters and Running the Report
private void getParameters_Click(object sender, EventArgs e)

{

reportURL.Text = "http://localhost/reportserver?
/Pro_SSRS/Chapter_9/EmployeeServiceCost";
GetParameters reportParameters = new GetParameters(reportURL.Text);
if (reportParameters.ShowDialog() == DialogResult.OK) {
reportViewer.ProcessingMode =
Microsoft.Reporting.WinForms.ProcessingMode.Remote;
reportViewer.ServerReport.ReportServerUrl =
new Uri(@"http://localhost/reportserver/");
reportViewer.ServerReport.ReportPath =
"/Pro_SSRS/Chapter_9/EmployeeServiceCost";
reportViewer.ServerReport.SetParameters(reportParameters.Parameters); reportViewer.ShowParameterPrompts = false; reportViewer.RefreshReport(); } }
Now run the project in debug mode. When the form displays, click the button labeled Parameters. The Parameters dialog form will be displayed. Select some parameters from the available drop down values, and click OK. This renders the Employee Service Cost report, which is located on the SSRS 2012 server, using the parameters you have supplied and it won’t prompt you to supply any additional parameters. At this point, you should see something that looks like Figure 9-10.
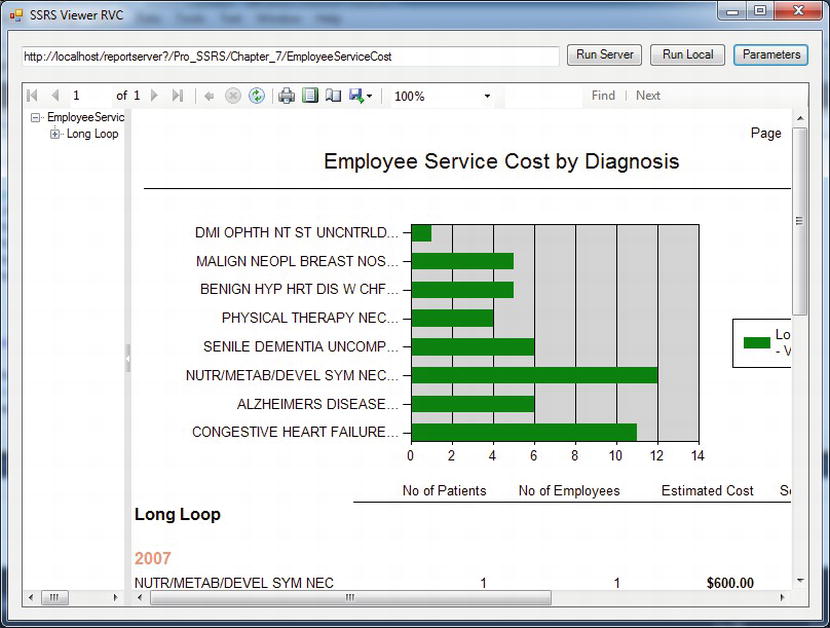
Figure 9-10. The finished report using your parameters
Now you have a foundation for using the report viewer control with Windows Forms applications. This chapter's examples have implemented URL access in a web browser control as well as the Report Viewer control for rendering the reports, providing you with multiple choices for integrating reporting into your Windows Forms applications. You’ve made your viewer a lot more user friendly by using SSRS 2012’s SOAP-based API to access the rich functionality of SSRS to retrieve the available report parameters and possible values. This allows you to create a more familiar and responsive Windows-based user interface for your users.
You can also render reports using the Report Server Web service directly. However, you lose the functionality of features such as the report toolbar with its built-in navigation and export functionality. This means you have to create these on your own if you use the other web service for rendering.
Building the Report Viewer in ASP.NET
With Visual Studio, you are also given the option to use the Report Viewer control in an ASP.NET application. This can give you the flexibility to develop custom reporting applications that do not have to be distributed to users or updated on an end user’s machine each time a patch is deployed. Users can access your custom application through any standard Web browser, and any modifications can be transparent to your end users.
You will use many of the same concepts and methods in this project that were used in the forms application that we have previously built. Start by creating a new ASP.NET Web Application project. Name this project SSRS_WebViewer and choose a location for your source files.
![]() Tip Don’t worry if you do not have IIS available on your development machine. Using the debugging features of Visual Studio will allow you to see your ASP.NET application in a Web browser.
Tip Don’t worry if you do not have IIS available on your development machine. Using the debugging features of Visual Studio will allow you to see your ASP.NET application in a Web browser.
You will now have a new Web application project with a Default.aspx file created for you. Open this Web page and add five controls to the layout of the page:
- DropDownList: You will use this drop-down list to hold the names of the reports returned from the SSRS 2012 Web service. Name it reportList.
- Button: This will be used to trigger the rendering of a report in the Report Viewer. Name it renderReport and change the display text to Render.
- Horizontal Rule: You will use a horizontal rule in the form just to separate the top controls from the Report Viewer.
- Report Viewer: You will render the reports stored on the SSRS 2012 server with this control. Name it reportViewerWeb.
- ScriptManager: It is a requirement of using the ReportViewer control that you include a ScriptManager control on your page. It makes sure that all the required prerequisite code is included in the page that is needed by the ReportViewer.
Once you have the controls on the page and sized to fit your layout, add an on-click action to the button that was just created. You can do this by viewing the page in design mode and double-clicking the button, just like a Windows form button. Don’t worry about the contents of the function that gets created; you will populate the code later. Once you are finished, your code should look similar to Listing 9-14.
Listing 9-14. Default.aspx Partial Code Listing
<html xmlns="http://www.w3.org/1999/xhtml">

<head runat="server">

    <title></title>

</head>

<body>

    <form id="form1" runat="server">

    <div>


        <asp:DropDownList ID="reportList" runat="server">

        </asp:DropDownList>

        <asp:Button ID="renderReport" runat="server" onclick="renderReport_Click"

            Text="Render" />

        <hr />

        <rsweb:ReportViewer ID="reportViewerWeb" runat="server" Width="841px">

        </rsweb:ReportViewer>


    </div>

    <asp:ScriptManager ID="ScriptManager1" runat="server">

    </asp:ScriptManager>

    </form>

</body>

</html>
Now that you have the page design finalized, you will add a reference to the SSRS 2010 management Web service. Right-click the parent folder for this project in the Solution Explorer and choose Add Web Reference. From this screen, input the address of the Web service we are going to use. In this case, you will be adding http://localhost/reportserver/reportservice2010.asmx. You may need to change the server name in this URL if you are not developing directly on your SSRS server. Name this Web service reference SSRS_WebService. You can see what this should look like in Figure 9-11.
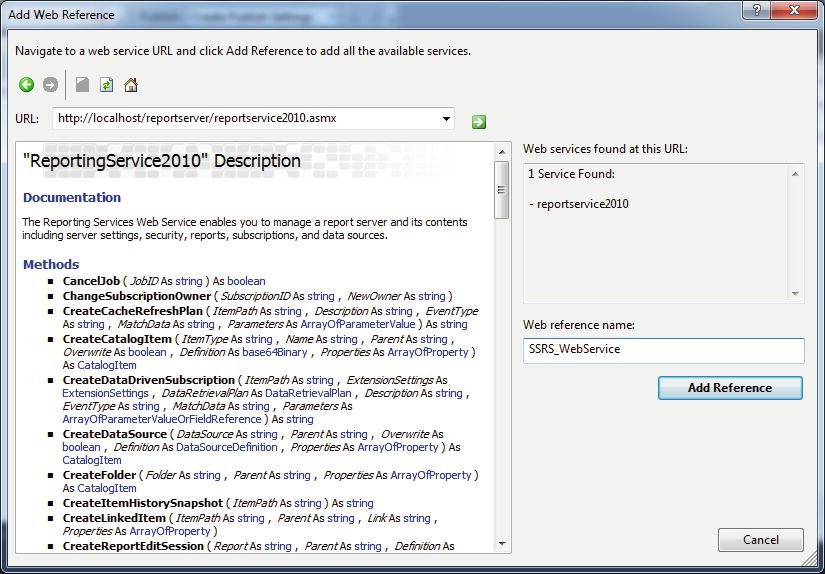
Figure 9-11. Adding a Web service reference
Now that you have the Web service ready to reference, you can populate the drop-down list with report items from the Chapter_9 directory of your SSRS instance. You should already have at least one report in that folder from the setup of this chapter.
You will use the Web service you have just registered to retrieve all of the report items from the Chapter_9 directory. The Web service method you will use to do this is ListChildren. This function takes two parameters: the path from where to gather the list from and a Boolean value to determine whether the search should be recursive. Since you want to get the reports from the Chapter_9 folder and nothing else, you want to pass only that path and a false value to get only the reports in this one directory.
You want to populate the drop-down list with only report items. However, ListChildren will return all the items in this folder, not just the reports. You will use the TypeName property to determine the type of the returned object and only list reports. Once you have tested whether the item is a report or not, you will populate the drop-down list with the names of the reports. The code to perform all of this exists in the Page_load method of the page, so that you start with a full drop-down list as soon as the page is done loading. Listing 9-15 shows the code used to populate the drop-down list from the Web service.
Listing 9-15. Using the SSRS Web Service to Populate the Report List
SSRS_WebService.ReportingService2010 rs = null;


        protected void Page_Load(object sender, EventArgs e)
{
try
{
rs = new SSRS_WebService.ReportingService2010();
rs.Credentials = System.Net.CredentialCache.DefaultCredentials;
SSRS_WebService.CatalogItem[] listItems = rs.ListChildren
("/Pro_SSRS/Chapter_9", false);
foreach (SSRS_WebService.CatalogItem thisItem in listItems)
{
if (thisItem.TypeName == "Report")
{
reportList.Items.Add(thisItem.Name);
}
}
}
catch (Exception ex)
{
Response.Write(ex.Message);
}
}
Now that you have the form built and the drop down list populated with data from the SSRS Web service, you can finalize the application by allowing the user to render the reports from the list. You will now go back to the generated code for the Click event of the button you added to the Web page. In this section, you will set the processing mode, the report server URL, and the path to the report you want to render. Finally, the code will render the report and it will be displayed in the Report Viewer control. Listing 9-16 shows the populated on click event in the code view of the web page.
Listing 9-16. Populating the RenderReport Button Click Method
protected void renderReport_Click(object sender, EventArgs e)

        {

            reportViewerWeb.ProcessingMode = Microsoft.Reporting.WebForms.ProcessingMode

.Remote;

            reportViewerWeb.ServerReport.ReportServerUrl = new Uri

(@"http://localhost/reportserver/");

            reportViewerWeb.ServerReport.ReportPath = "/Pro_SSRS/Chapter_9/" +

 reportList.SelectedItem.Value;

            reportViewerWeb.ServerReport.Refresh();

        }
To test the application, right click the project in the solution explorer and select Debug -> Start New Instance. Visual Studio will start a stand-alone Web server on a random port and launch the project for debugging. Choose the report that you put in the directory and click the Render button. If everything is set up correctly, after you select some parameters on the report, you should get an Internet Explorer window that resembles Figure 9-12.

Figure 9-12. Finalized Web report application
Summary
In this chapter, we showed how to use the URL access capabilities of SSRS 2012 and the Report Viewer controls to embed reports quickly into applications. Beyond the WebBrowser and Report Viewer controls used in this chapter, you can use other applications to render reports. For example, you can integrate SSRS 2012 with Microsoft SharePoint Server. We’ll discuss using this integration in greater detail in Chapter 12. By combining SharePoint and SSRS, you can quickly build a portal that displays your reports without much code at all.
In this chapter, you also learned how to make Report Server Web service calls to augment your Windows Forms viewer application. The application you created allows you to type the URL of a server-based report you want to view. It then uses SSRS 2012’s GetItemParameters method to retrieve a list of report parameters and the ValidValues property to retrieve possible values. It then reads the values selected by the user and populates an array of ReportParameters which is then used by the Report Viewer control to render your report with the selected parameters already in place. In Chapter 10, we’ll expand on this example by using the Report Server Web service to allow the user to set the report to run on a schedule with the supplied parameters instead of rendering it immediately.