C H A P T E R 8
Deploying Reports
Throughout the lifecycle of a report—from creation to maintenance—administrators, developers, and now even end users using Report Builder need to continually deploy reports to the SSRS 2012 server. Deploying a report simply means uploading the RDL file onto the SSRS 2012 server so that your users can use it (for more information on the specifics of the RDL format of these reports, see Chapter 3).
Fortunately, SSRS 2012 provides several means for deploying reports:
Using the Report Manager interface through your Web browser: This simple method allows anyone with an RDL file and the proper SSRS permissions to upload it to the SSRS 2012 server. This can be especially useful if you’re developing your report’s RDL files in an application that doesn’t provide you with a method to upload them to the server. It’s also useful if you want to make a quick edit of the RDL file—say to change a misspelled word—using an application such as Notepad, which doesn’t offer a built-in way to upload the report. We cover this scenario in Chapter 8, where Notepad is used to modify a report.
Using Report Builder 3.0: The Report Builder 3.0 utility was a new feature to SSRS 2008 R2 and it is still used in SSRS 2012. It provides the user who is unfamiliar with the Visual Studio IDE with a simple interface by which to create and edit data sources and reports.
Using the Deploy option in BIDS/Visual Studio: This method allows you to deploy your reports to the SSRS 2012 server from directly within your development environment. If you’re using BIDS/Visual Studio and have direct access to the report server to which you want to deploy your reports, this is one of the easiest options.
Using the rs.exe command-line utility: The rs.exe command-line utility is a runtime environment that is used to execute VB .NET code in the form of specially formatted script files. You deploy the report in the same way as the method in the next item of this list. Later in the section “Using the rs.exe Utility,” we will cover how to deploy reports and create data sources programmatically using rs.exe.
Programmatically, using the SSRS Webservice: This method gives you complete control over the deployment process with the added advantage of creating any type of UI you want. Unlike the rs command-line utility, you have your choice of languages and the full power of Visual Studio 2012 to help you develop your custom interface. In Chapter 6, we used the SOAP API, otherwise known as the Report Server Web service, to retrieve report parameter information about reports from the SSRS 2012 server, and then used that information to generate a Windows Forms UI for parameter selection. In this chapter, you’ll use the Report Server Web service to publish reports to the SSRS 2012 server. This type of interface is useful when you need to integrate the deployment of reports into your setup, installation, or runtime environment of your custom application.
Using Report Manager
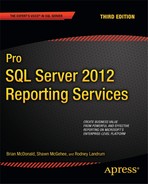
To deploy reports using the Report Manager interface, simply open your browser and navigate to your SSRS 2012 server using an address such as http://localhost/reports/. You’ll see a screen similar to the one shown in Figure 8-1.
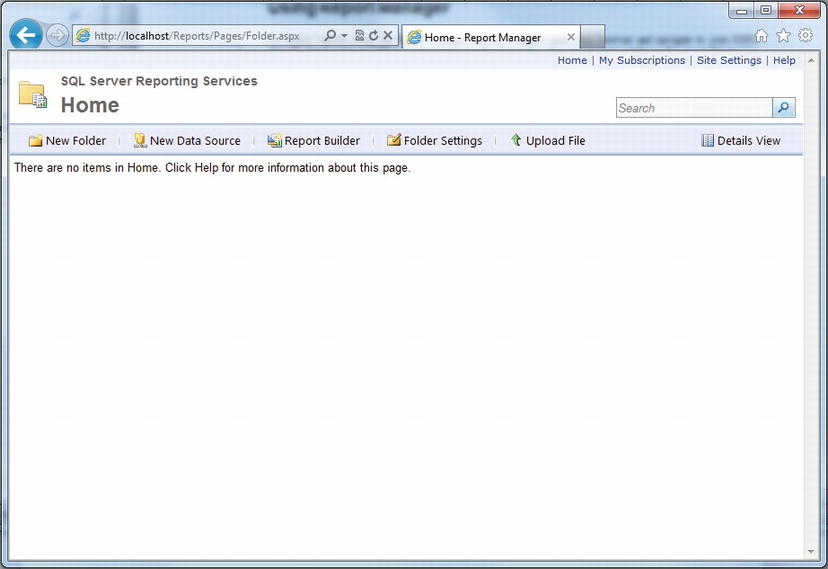
Figure 8-1. Report Manager
As you can see, an Upload File option is available on the Report Manager toolbar. Selecting Upload File opens a standard browser-based upload-style dialog box, such as the one shown in Figure 8-2.
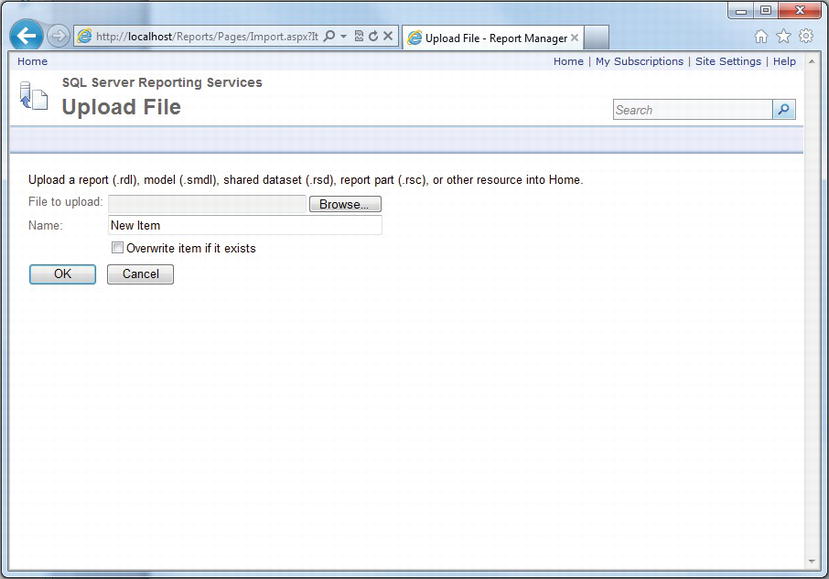
Figure 8-2. Report Manager Upload File dialog box
Using this dialog box, you can browse to the RDL file that you want to upload and then upload it. You can also upload data source files here too, as well as RDS files, but they won’t be automatically seen as data sources. We will show you later in the chapter how to create datasources correctly.
Browse to sample files for Chapter 6 and select the EmployeeServiceCost.rpt file in the reports folder to upload to your report server. The Report Manager places the file into the current folder (the one from which you initiated the upload process).
Note that newly uploaded reports are no longer tagged with a marker showing that they are new, which was done in some older versions of SSRS. Each report that you upload will have a dropdown menu from within the report manager interface. This menu allows you to perform some management functions and open the properties editing page. This “manage” option can be seen below in Figure 8-3.
Figure 8-3. Report Manager with a recently uploaded report
This manage option allows you to modify the properties of the report, such as the name and description, as shown in Figure 8-4.
There is a checkbox in the bottom-center of Figure 8-4, just above the Apply button, that allows you to do the following:
Hide the report in the tile view: This can be useful if you don’t want users with access to the SSRS 2012 server to know that certain reports exist or if you don’t want them to see the detailed information about the report. Remember that this only hides the report in the tile view and not the detail view. You should use SSRS security properties when you need to prevent a user from seeing the contents of folders or running reports they shouldn’t have access to.
Then, the menu going across the top of the screen allows you to:
Delete the report: This gives you the ability to remove reports that are no longer needed.
Move the report to another location on your report server: This allows you to organize the reports into folders for organizational and security purposes.
Create a linked report: This option allows you to create a linked report that is based on the original report. This allows you to keep one copy of the report for deployment somewhere on the server, but have multiple copies available in other locations on the server without the need to redeploy them each time the report is changed.
Download the RDL: You can download the report RDL to a file that you can edit. This can be useful when you want to make a minor modification to a report, such as changing the spelling of a word or modifying an expression. Keep in mind that this method only provides you access to the RDL file; you still have to use another program to edit the file and then you have to upload the modified file.
Replace the RDL by uploading a new copy of the RDL file: If you’ve downloaded and edited the RDL file, then this option allows you to upload the edited copy.
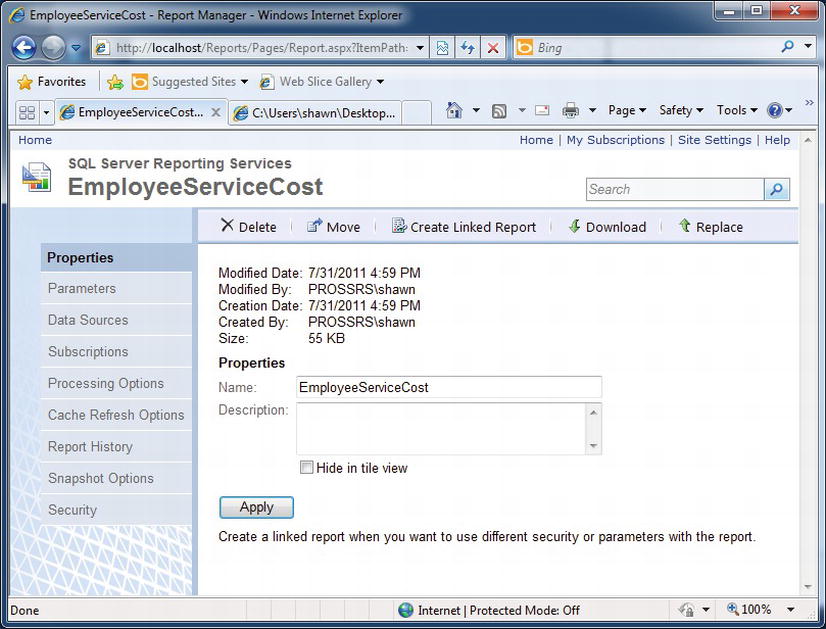
Figure 8-4. Report Properties page
Using the menu on the left side of the page in Figure 8-4, you can do the following:
Make report parameter modifications: From the Parameters section, you can change some options on the report parameters, such as default value, visibility, user prompting, and parameter display text. This ability to change parameters is convenient, since you do not have to download a report to make simple parameter changes.
Make changes to the data source: The Data Sources section allows you to change the data source used by the report. You can change to another data source located on the same server, or you can create a new custom data source from scratch.
Manage Subscriptions: The subscription sections allow you to manage subscriptions and data driven subscriptions of the report. You can create, delete, and modify your report subscriptions from this section.
Processing Options: This section allows you to configure data caching options for use when rendering reports. It also allows you to set up rendering of the report using a report snapshot and configure the report timeout properties.
Cache Refresh Options: You can set up a new cache refresh plan or make modifications to current plans from this section. These plans will create refresh jobs that update cache stores used for reports or shared data sources. This data will be used if your report is set up to render from cached data and not from live data.
Report History: This section allows you to take snapshots of the report or to view historical snapshots of rendered reports. These can be created manually or by a snapshot schedule that is configurable in the next section.
Snapshot Options: From this section, you can manage snapshots and snapshot schedules. You can create a new snapshot schedule or set up a new snapshot on a shared schedule. You also have the ability to manage options for snapshot security and snapshot storage limits.
Manage security settings: You can manage individual security settings for a report from the Security section of the page. By default, a report inherits the parent folder’s security settings, but you can break that inheritance (or restore it) from this menu.
![]() Note You can access the management section from the detail view as well.
Note You can access the management section from the detail view as well.
Using Report Builder 3.0
Another method that is used to deploy reports in Reporting Services 2010 is the new Report Builder 3.0 application. Report Builder 3.0 is a more user friendly way to deploy reports that moves away from using BIDS/Visual studio. We describe using the new BIDS/Visual Studio integrated tools in the next section. You can launch the Report Builder tool from the report manager web interface. You can also install Report Builder 3.0 as a separate utility by downloading the full installer from the Microsoft website. Figure 8-5 will give you an idea of what to expect visually from this new utility.

Figure 8-5. The new Report Builder 3.0 interface
Report Builder 3.0 will feel more familiar to users of Windows 7 or the newer Office suites. The main menu for this program is located under the Pearl in the top-left corner of the screen that looks like the SQL Server symbol. Click the Pearl once to expand the menu and select Open. This will allow you to browse to the report that you wish to open for editing or deploying. This report can be loaded from a file on a local/remote disk or directly from the report server that you are connected to. Once the file has been loaded, the report will appear in design mode in the center window, and the data will populate the window to the left. From here, you can make any changes needed before deploying to the server. Since you opened the report builder from the web interface, go ahead and load the report from the server and your Report Builder should resemble Figure 8-6.
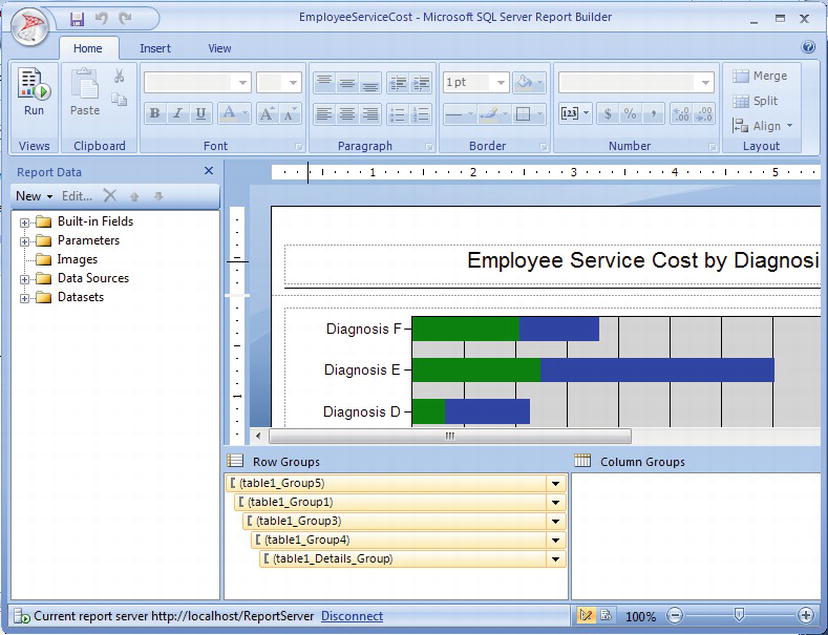
Figure 8-6. Loaded report in Report Builder 3.0
You have the ability to perform most of the functionality that is included with BIDS/Visual Studio 2010 in Report Builder 3.0. From this program, you can add data sources, make report design changes, manage parameters, and deploy reports. The only drawback is that this application only allows for one report to be modified at a time. To perform mass deployments or manage multiple reports for a project, you would still need to use Visual Studio 2010/BIDS or the RS utility, which we will cover later in this chapter. To deploy the report you have just opened, and assuming that you have opened the report from the report server directly, return to the Pearl menu and choose Save. If you have opened the RDL file from your hard drive, then use the Save As option and make sure that you are connected to a report server first. To connect to a report server, simply click the connect link in the bottom status bar of the Report Builder 3.0 interface. Once you are connected to your report server, you can choose that server as the destination for your report to be saved. See Figure 8-7 to see the Pearl menu options that you will be using. Since we launched Report Builder from the web interface directly, we are already connected to the report server and will not be required to specify a server to publish to. Go ahead and make a small change to your report and deploy it to see the changes on the report manager web interface.
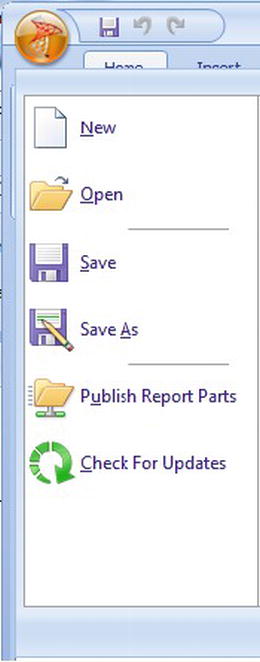
Figure 8-7. Report Builder 3.0 save options
Using BIDS and Visual Studio 2012
You also can deploy reports using the Deploy option in BIDS (Business Intelligence Development Studio), which is integrated directly into Visual Studio 2010. This is convenient, because it is the most robust environment and you will be developing your reports with this tool in most cases.
Configuring Report Deployment Options
BIDS/Visual Studio 2010 allows you to configure a different set of properties for each project in your solution. You also can set these properties for each configuration available for your project, such as Debug, DebugLocal, and Release. For each configuration of a report project, you can define values uniquely for the following properties:
- Start Item: The name of the report to be displayed in the preview window or in a browser window when the report project is run.
- OverwriteDataSets: A Boolean value that configures whether to overwrite existing data set definitions on the report server. Setting this value to true will overwrite any data set definitions when deploying.
- OverwriteDataSources: A Boolean value indicating whether to overwrite an existing data source on the server. Set it to true to overwrite, which redeploys any data sources you have defined in your project each time you select Deploy. Set it to false if you don’t want existing data sources to be overwritten.
- TargetDataSetFolder: The name of the folder where your shared datasets, whether a report server path or a SharePoint library, are placed.
- TargetDataSourceFolder: The name of the folder in which to place your shared data sources.
- TargetReportFolder: The name of the folder in which to place your reports. By default, this is the name of the report project.
- TargetReportPartFolder: The name of the folder in which to place your report parts that are shared with other reports.
- TargetServerURL: The URL of the target report server, such as
http://localhost/reportserver.- TargetServerVersion: This option allows you to specify what version of SSRS the deployment server is running. You can also have this option auto-detect the version if you have already configured the target server URL.
The different configurations are convenient for the report developer because you can set up different servers and/or folders for testing and deployment in the same project. By default, when you create a report project, BIDS/Visual Studio 2010 creates three different configurations for you: Debug, DebugLocal, and Production. You can access the properties of these configurations through the project’s Property Pages. To get to the configuration Property Pages, in the Solution Explorer, right-click the project containing the reports and then click Properties. To see the property settings for each configuration option, select from the Configuration drop-down list at the top of the properties dialog box. Figure 8-8 shows the Property Pages for the Reports project in the Chapter 6 solution that is part of the sample code provided for this chapter in the Source Code/Download area of the Apress Web site (http://www.apress.com).
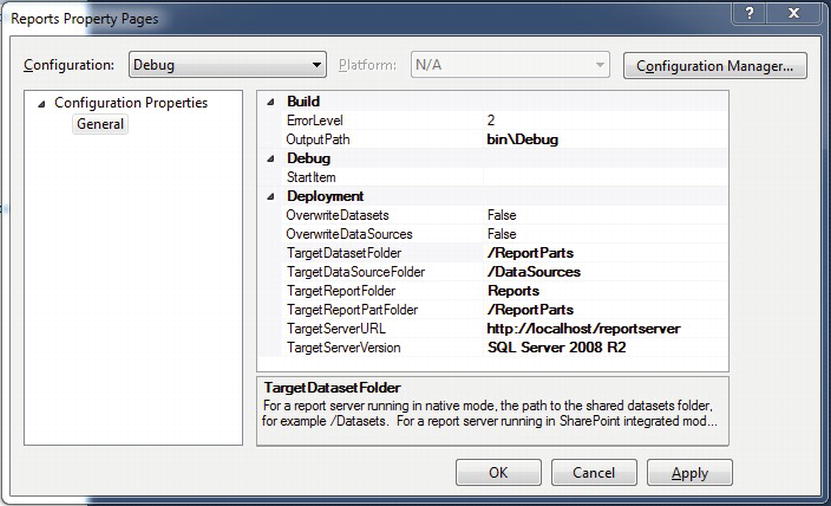
Figure 8-8. Project Property Pages
After the configuration information is set up correctly, you can deploy reports to your server by using the Build and Deploy options in the Configuration Manager or by using the Solution Explorer.
Setting Up Deployments Using the Configuration Manager
The Build and Deploy options in the Configuration Manager determine whether reports are built, deployed, or both when you start the project in Visual Studio 2010.
To open the Configuration Manager, in the Solution Explorer, right-click the project containing the reports and then click Properties. From there, click Configuration Manager to open the dialog box shown in Figure 8-9.

Figure 8-9. Visual Studio 2012 Configuration Manager
By default, you see the setup for the currently active configuration. You can select other configurations by choosing from the Active solution configuration drop-down list. As you can see, for each project in your solution, checkboxes are in the Build and the Deploy columns.
Each time you start the project, you want to build it so that you will always run the latest version of your report. If the Deploy checkbox is also checked, then whenever you start the project in that configuration, Visual Studio 2012 deploys the reports to the specified server that is setup in the report project properties. However, for most configurations, such as when you’re debugging locally, you won’t want to deploy your report to the server each time the project is started, so keeping the deploy checkbox unchecked is what you would want.
Deploying Reports Through the Solution Explorer
You can also manually deploy reports from the Solution Explorer once you are satisfied that your reports are ready to be deployed. The following is a list of options for deploying from the Solution Explorer. You deploy your reports by right-clicking each of the following items and selecting Deploy:
- The solution: Deploys the reports and data sources in all the Report Server projects in your solution to the server that has been set up in each of the project’s properties. This will deploy all projects in your solution, so use this only when you need to deploy everything.
- The project: Deploys the reports and data sources in the specific project in your solution to the server that has been set up in the specified project’s properties. This option is only available for Report Server projects.
- The report: Deploys an individual report or data source from a project in your solution to the server that has been set up in the project properties containing the report you’re deploying.
Figure 8-10 shows an example of how to deploy all the reports in a report project.

Figure 8-10. Deploying a solution through the Solution Explorer
Using the rs.exe Utility
In order to access one of the SSRS Web services, Reporting Services gives us a command-line utility called rs.exe. This utility uses script files written in VB .NET, the only language you can use with the rs utility, to access the Web service and allows us to call any of the published methods in the web service. In this example, you will create folders, deploy a report, and create a new data source through the rs.exe utility.
You can see the two files used in this example under the RS folder in the code examples for Chapter 8. You will find an RDL file containing our report definition that you will deploy and an RSS file containing the VB .NET code used to deploy the report and create the data source needed for the report. If you do not have your code in the folder C:Pro_SSRSCH8RS, some configuration will be needed.
The RSS file has two global variables declared at the top of the file. These hold the information of where the report will be deployed on the report server and where the RDL files exist on your computer. You can see these two variables in Listing 8-1. You should make any necessary changes to these variables based on your setup.
Listing 8-1. RSS File Configuration
Dim parentPath As String = "Pro_SSRS/Chapter 8"

Dim reportPath As String = "C:Pro_SSRSCH8RS"
Now that you have the RSS file configured, we will discuss the three Web service methods that are used. The first is CreateDataSource. This method creates a new data source on the report server and takes the following five arguments:
- DataSource: The name of the data source to be created
- Parent: The full path on the report server where the data source will be created
- Overwrite: A Boolean variable used to express whether to overwrite an existing data source of the same name
- Definition: An object of the type DataSourceDefinition that holds the connection properties of the data source
- Properties: An array of Property[ ] objects that hold property names and values for the data source
The second Web service method used is CreateReport. This method creates a new report on the server and takes the following five parameters:
- Report: The name of the report to be created
- Parent: The full path on the report server where the report will be deployed
- Overwrite: A Boolean variable to express whether to overwrite an existing report of the same name
- Definition: A Byte array holding the report definition
- Properties: An array of Property[ ] objects that hold property names and values for the report
The last Web service method used is CreateFolder. This method creates a new folder on the server and takes the following three parameters:
The main function in the RSS file is calling three internal functions, one that utilizes the CreateFolder method, one that utilizes the CreateDataSource method, and one that utilizes the CreateReport method. You can use these three functions to create more folders and data sources or deploy more reports depending on your needs. In this example, we call all three functions once, but you can modify this file to deploy any number of reports or data sources that you need. You can see the full code for the RSS file in Listing 8-2.
Listing 8-2. RSS File Contents
Dim parentPath As String = "Pro_SSRS/Chapter 8"

Dim reportPath As String = "C:PRO_SSRSChapter 8RS"


Public Sub Main()


    ' Initialize the reporting services credentials

    rs.Credentials = System.Net.CredentialCache.DefaultCredentials


       ' Pass our path information to create the folder structure

       CreateFolder(parentPath, "/")


    ' Pass our data source information to the create data source function

    CreateDataSource("Pro_SSRS", "SQL", "data source=(local);initial catalog=Pro_SSRS")


    ' Pass our report name to the deploy report function

    DeployReport("EmployeeServiceCost")


End Sub


Public Sub CreateDataSource(name As String, extension As String, connectionString As String)

    ' Define the data source definition.

    Dim dataSourceDefinition As New DataSourceDefinition()


    dataSourceDefinition.CredentialRetrieval = CredentialRetrievalEnum.Integrated

    dataSourceDefinition.ConnectString = connectionString

    dataSourceDefinition.Enabled = True

    dataSourceDefinition.EnabledSpecified = True

    dataSourceDefinition.Extension = extension

    dataSourceDefinition.ImpersonateUser = False

    dataSourceDefinition.ImpersonateUserSpecified = True


    'Use the default prompt string.

    dataSourceDefinition.Prompt = Nothing

    dataSourceDefinition.WindowsCredentials = False
    Try

        ' Create the datasource through the web service method

        rs.CreateDataSource(name, "/" + parentPath, False, dataSourceDefinition, Nothing)


        ' Diplay success message on creation

        Console.WriteLine("Data source {0} created successfully", name)

    Catch e As Exception

        ' If the creation failed, catch execption and display the result

        Console.WriteLine(e.Message)

    End Try


End Sub


Public Sub DeployReport(ByVal reportName As String)


    Dim definition As [Byte]() = Nothing

    Dim warnings As Warning() = Nothing


    Try

        ' Attempt to open the report as a file stream to read report definition information

        Dim stream As FileStream = File.OpenRead(reportPath + reportName + ".rdl")

        definition = New [Byte](stream.Length) {}

        stream.Read(definition, 0, CInt(stream.Length))

        stream.Close()


        Try

           ' Attempt to deploy the reportvia the web service

           warnings = rs.CreateReport(reportName, "/" + parentPath, False, definition,

Nothing)


           If Not (warnings Is Nothing) Then

               Dim warning As Warning

               For Each warning In warnings

                  Console.WriteLine(warning.Message)

                  Next warning


           Else

               Console.WriteLine("Report: {0} published successfully with no warnings",

reportName)

            End If


        Catch e As Exception

                Console.WriteLine(e.Message)

        End Try


    Catch e As IOException

        Console.WriteLine(e.Message)

    End Try


End Sub
Public Sub CreateFolder(ByVal folderName as String, ByVal ParentFolder as String)
Dim extraName As String
Dim newFolder As String
if( folderName.IndexOf("/") <> -1 )
newFolder = folderName.Substring(0, folderName.IndexOf("/"))
extraName = folderName.Substring(folderName.IndexOf("/")+1)
else
newFolder = folderName
extraName = ""
end if
Dim props(0) As [Property]
Dim folderProp As new [Property]()
folderProp.Name = "Folder Name"
folderProp.Value = newFolder
props(0) = folderProp
rs.CreateFolder(newFolder, parentFolder, props)
Console.WriteLine("Folder " + newFolder + " created")
if( extraName <> "" and parentFolder = "/")
CreateFolder(extraName, parentFolder + newFolder)
else if(extraName <> "")
CreateFolder(extraName, parentFolder + "/" + newFolder)
end if
End Sub
![]() Note You can deploy a set of data sources and reports to multiple SSRS servers easily with the rs.exe utility. To mirror deployment with the same RSS script file, simply rerun the RS command with a different server parameter. Creating a batch file that calls rs.exe multiple times with different server destinations is an easy way to deploy projects exactly the same way to several locations.
Note You can deploy a set of data sources and reports to multiple SSRS servers easily with the rs.exe utility. To mirror deployment with the same RSS script file, simply rerun the RS command with a different server parameter. Creating a batch file that calls rs.exe multiple times with different server destinations is an easy way to deploy projects exactly the same way to several locations.
The only function that gets called more than once is our user defined CreateFolder method. This is a recursive function that will parse the name of the folder you want to create and build it piece by piece. In order to cut down on space, there is no error checking here. So, if you run this example more than once, you will need to clean up the folders that this creates or it will throw an exception due to the fact that the folder already exists.
From a command prompt, move to the directory where the RDL and RSS file are being stored. Type the following command in the command prompt, and press Enter to run it. Change the report server URL to reflect your report server.
rs -i PublishReports.rss -s http://localhost/reportserver
You can see the command and the results in Figure 8-11.
You now have a new data source and report deployed to your report server. The RSS file included in the example code can be used as a starting point to script your own custom report project deployments.
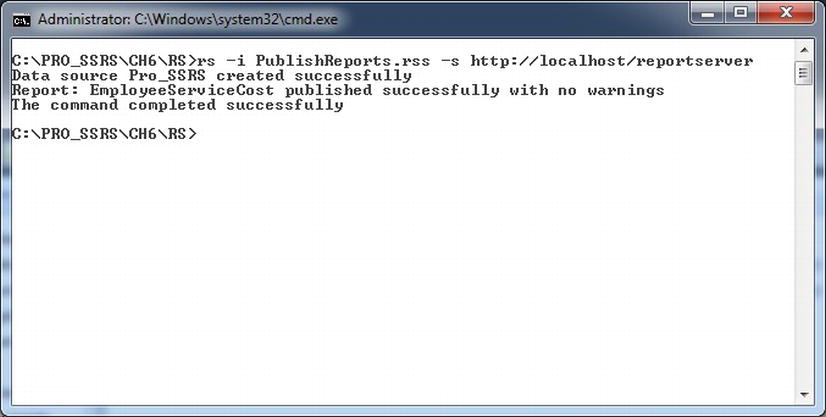
Figure 8-11. Deploying a report and data source with the rs.exe utility
Using the Report Server Web Service
The method provided by SSRS 2012 for deploying reports programmatically is to use one of the Report Server Web services using the SOAP API (which we will use again in Chapter 9 to write a report viewer). In this section, we’ll look at deploying reports to SSRS 2012 by using a Windows Forms application that simulates what customers need to do after they have an RDL file ready for deployment:
- Select a report server to publish their report to.
- Select from a displayed list of folders on that server to determine which folder on the server to publish the report to.
- Browse to the RDL file that is to be uploaded from the local machine to their report server.
There are several web service endpoints available to you when dealing with SSRS 2012. The old versions of each web service are still there for backward compatibility and have the ability to manage either native or SharePoint mode installs separately. These are deprecated and it is advisable to upgrade to the newest version, which allows you to control both types of installations from one web service. We will be using the newest management web service in this example.
You will use the Report Server Web service to get a list of folders on the server and then upload the report to the server. In this example, you’ll upload some of the reports created for the health-care provider. In the health-care setting, it’s important to maintain strict control over the report folders and their permissions on the server, so you won’t allow the users to create a new folder; they will only be allowed to upload to the existing folders that they already have permission to use.
The CreateCatalogItem method of the Report Server Web service allows you to deploy the report to the report server by creating a copy of the report on the server from an RDL file that you provide. This is the same method as described in the previous section, “Using the rs.exe Utility.”
![]() Note The CreateReportEditSession method might pass sensitive data, including user credentials, over the network. You should use SSL encryption whenever possible when making Web service calls.
Note The CreateReportEditSession method might pass sensitive data, including user credentials, over the network. You should use SSL encryption whenever possible when making Web service calls.
First, you’ll create a new C# Windows Forms solution with Visual Studio 2008. Call this project SSRS_Publisher. This example will be in C#, but the source examples from the website will also have a working version written in VB.NET as well. Once your new project is created, rename the Form1.cs file to Publisher.cs and allow VS to update all of the references.
Accessing the Web Service
You need to add a reference to the SSRS 2012 Report Server Web service, which is the same as you did in Chapter 5 for the report viewer. You do this by selecting Project Add Web Reference, right-clicking the references in the Solution Explorer and selecting Add Web Reference; alternatively, you can right-click the project in the Solution Explorer and select Add Web Reference. Depending on the version of VS and .NET you are working with, you may not immediately see the option to add a web reference.
If you don’t see the option for Add Web Reference in those locations, you may need to use a different method to add the reference. You will need to select Project Add Service Reference. From this screen, you will click the advanced button on the bottom left of the window. In the advanced settings window, you will click on the Add Web Reference button in the bottom left of the screen to bring up the web reference window.
When the dialog box appears, enter the following URL:
http://localhost/reportserver/reportservice2010.asmx
Substitute the name of your server for localhost in the preceding URL if you are using a remote server and then click the arrow button next to the URL. You may be prompted for your credentials at this point to verify that you have permissions to access the web service. You should now see a dialog box similar to the one in Figure 8-12.
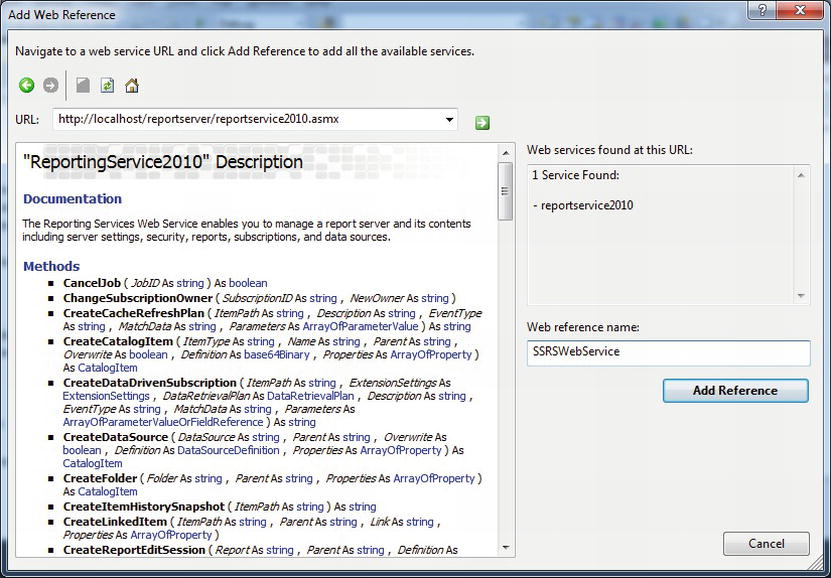
Figure 8-12. Add Web Reference dialog box
In the Web reference name textbox, enter SSRSWebService. This name is how the Web service is referenced in the code. After this dialog box is closed and the reference is added to the project, add the following using directives to the code at the top of your publisher.cs code with the rest of the standard using directives:
using SSRS_Publisher.SSRSWebService;
Now you can reference the Web service much more easily because you don’t have to enter the fully qualified namespace. You’ll also add three others using directives below this one that will allow you to access the Web services and I/O-specific functions more easily in your code, as shown in Listing 8-3. You can see what all of this together should look like in Figure 8-13.
Listing 8-3. Using Directives
using System.IO;

using System.Text.RegularExpressions;

using System.Web.Services.Protocols;
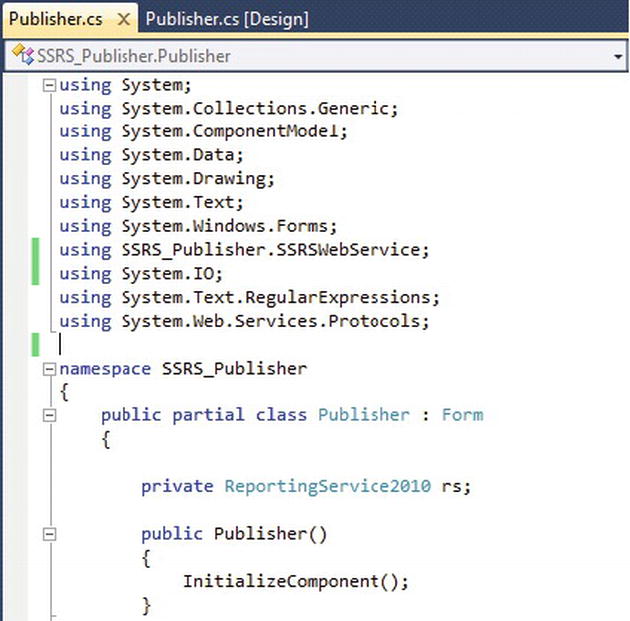
Figure 8-13. Adding directives to your publisher project
Laying Out the Form
From the Toolbox, add one label, one textbox, and one button near the top of the form, set the label text to Report server, and name the textbox reportServer in the textbox properties. Name the button getFolders and set its text to the word Go. You’ll use the reportServer textbox to allow users to enter in the report server name that they want to deploy to.
Next, add a TreeView control to the center of the form and name it ssrsFolders. You’ll use it to display a list of available folders on the server where you can upload your report when the user enters in a server name and clicks the Go button.
Add one label, one textbox, and one button near the bottom of the form; set the label text to Report file; name the textbox reportFile; name the button browseFile; and set the text of the button to Browse. You’ll use the reportFile textbox to accept or display the path name and file name of the report file you want to upload to the specified SSRS 2012 server. You’ll use the Browse buttons to choose the form that accepts the users’ input and allows them to select a report file for deploying.
After you’ve added all these controls, the form should look something like Figure 8-14.
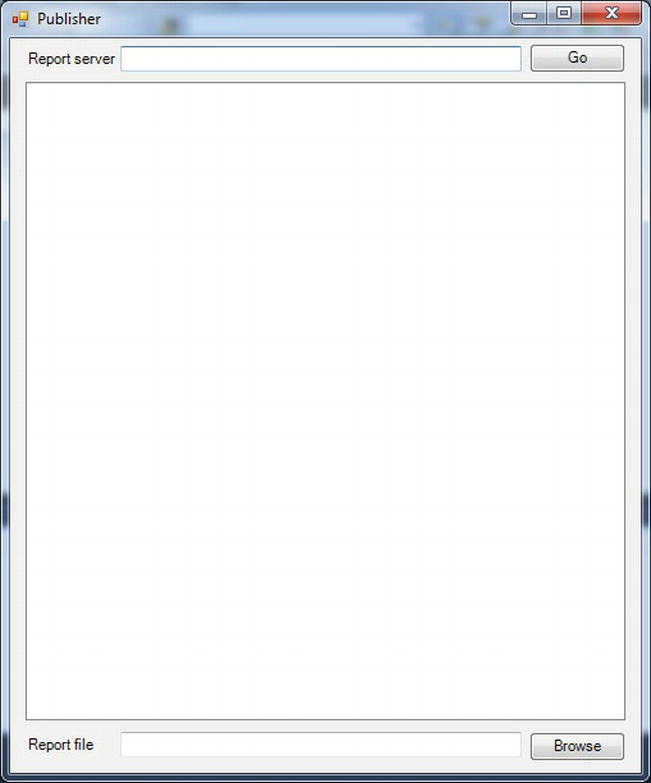
Figure 8-14. Publisher, the example report publisher
Coding the Form
Now that you have the form laid out, you’ll add code to handle the functions necessary to allow users to do the following:
- Enter in a server name.
- Get a list of the folders available on that server.
- Select a target folder and an RDL file to upload.
Allowing Users to Enter a Server Name
When a user types in a server name on the form, the code needs to build the URL that fully identifies the SSRS 2012 server to deploy the RDL file to.
First, you will create a class-level variable to hold the reference to the report server, much as you did in the SSRS viewers in Chapter 5. You do this by adding the variable definition private ReportingService2010 rs; to the class, as is shown in Listing 8-4.
Listing 8-4. Class-level Variable in Context
public partial class Publisher  :   Form {

private ReportingService2010 rs;

public Publisher()
To build the URL that identifies the server based on the user input, you first instantiate the Report Server Web service and then set the URL property to reflect the name of the server that the user entered into the reportServer textbox. We will want to form this URL for the user, so they only need to enter the server name to connect.
To do this, first create a short function to check the server name that the user enters and then append the rest of the path name to the Reporting Services Web service to make up the complete URL necessary to reference the Reporting Services Web service on the desired server. By constructing the URL based on the user’s input, you can use the report deployment application to deploy the reports on any SSRS 2012 server where the user has permission to do so. Start by adding the code shown in Listing 8-5 into the Publisher class.
Listing 8-5. Get Report Server URL
private string GetRSURL() {

        if (reportServer.Text.StartsWith("Error! Hyperlink reference not valid."))

                return reportServer.Text + "/reportserver/ReportService2010.asmx";

        else

                return "Error! Hyperlink reference not valid." + reportServer.Text +

        "/reportserver/ReportService2010.asmx";

}
Populating the TreeView Control With a List of Folders
Now you’ll use the Reporting Services Web service to retrieve a list of objects from the server and use them to populate the ssrsFolders TreeView control. We’ll do this by placing a call to the ListChildren method of the Report Server Web service. The ListChildren method takes two parameters:
- Item: The full path name of the parent folder.
- Recursive: A Boolean expression that indicates whether to return the entire tree of child items below the specified item. The default value is false.
![]() Note The ListChildren method returns all objects on the report server, including data sources, report parts, and reports, not just folders. In this example, you’ll filter out everything but the folders because you’re only interested in showing the user the folder structure. You do this by using the ItemType property of the child object and then testing it against the string “Folder”.
Note The ListChildren method returns all objects on the report server, including data sources, report parts, and reports, not just folders. In this example, you’ll filter out everything but the folders because you’re only interested in showing the user the folder structure. You do this by using the ItemType property of the child object and then testing it against the string “Folder”.
Make sure the Publisher.cs form is open in the design view and double-click the Go button. This creates an empty method to handle the button’s click event. Add the code in Listing 8-6 to the method.
Listing 8-6. Code to Populate the TreeView Control
ssrsFolders.Nodes.Clear();

rs = new ReportingService2010();

rs.Credentials = System.Net.CredentialCache.DefaultCredentials;

CatalogItem[] items = null;

rs.Url = GetRSURL();


TreeNode root = new TreeNode();

root.Text = "Root";

ssrsFolders.Nodes.Add(root);

ssrsFolders.SelectedNode = ssrsFolders.TopNode;


// Retrieve a list items from the server

try

{

          items = rs.ListChildren("/", true);

          int j = 1;


          // Iterate through the list of items and find all of the folders and display them to the user

          foreach (CatalogItem ci in items)

          {

                   if (ci.TypeName == "Folder")

                   {

                             Regex rx = new Regex("/");

                             int matchCnt = rx.Matches(ci.Path).Count;

                             if (matchCnt > j)

                             {

                                      ssrsFolders.SelectedNode =ssrsFolders.SelectedNode.LastNode;

                                      j = matchCnt;

                             }

                             else if (matchCnt < j)

                             {

                                      ssrsFolders.SelectedNode =ssrsFolders.SelectedNode.Parent;

                                      j = matchCnt;

                             }

                             AddNode(ci.Name);

                   }

          }
}
catch (SoapException ex)
{
MessageBox.Show(ex.Detail.InnerXml.ToString());
}
catch (Exception ex)
{
MessageBox.Show(ex.Message);
}
// Make sure the user can see that the root folder is selected by default
ssrsFolders.HideSelection = false;
Right below the method for the Go button’s click event, add the following method as shown in Listing 8-7.
Listing 8-7. AddNode Method
private void AddNode(string name) {

        TreeNode newNode = new TreeNode(name);

        ssrsFolders.SelectedNode.Nodes.Add(newNode);

}
You tell the ListChildren method to start at the root folder by passing in a “/” as the starting point, and also set the recursive option to true, which causes the ListChildren method to iterate through all the folders and subfolders on the SSRS 2008 server. You use this information to create nodes in the TreeView control to display each folder in a hierarchy that represents the hierarchy of the folders on the server. Use a regular expression to look for the number of “/” characters in the path of each CatalogItem to determine how deep you are in the hierarchy (one level, two levels, and so on).
Opening the RDL File and Uploading It to the Server
Now you need to add some code to allow users to browse for the file that they want to upload. You’ll want to limit the users to browse for files ending in “rdl” by default, because this is the native extension for SSRS 2008 report definition files. You also want to read the selected node in the ssrsFolders TreeView so that you know what folder users have selected to deploy the report to on the SSRS 2008 server.
Start by reading the path of the selected node from the TreeView control and turning it into a path name you can use with SSRS 2012’s CreateCatalogItem method.
Make sure the Publisher.cs form is open in design view and double-click the Browse button. This creates an empty method to handle the button’s click event. Add the code in Listing 8-8 to the method.
Listing 8-8. Code to Browse for an RDL File
private void browseFile_Click(object sender, EventArgs e)

{

        // Get the full pathname from the treeview control

        string pathName = ssrsFolders.SelectedNode.FullPath;


        if (pathName == "Root")

                pathName = "/";

        else
{
// Strip off the Root name from the path and correct the path separators for
use with SRS
pathName = pathName.Substring(4, pathName.Length - 4);
pathName = pathName.Replace(@"", "/");
}
byte[] definition = null;
Warning[] warnings = null;
string warningMsg = String.Empty;
OpenFileDialog openFileDialog = new OpenFileDialog();
openFileDialog.Filter = "RDL files (*.rdl)|*.rdl|All files (*.*)|*.*";
openFileDialog.FilterIndex = 1;
if (openFileDialog.ShowDialog() == DialogResult.OK)
{
try
{
// Read the file and put it into a byte array to pass to SRS
FileStream stream = File.OpenRead(openFileDialog.FileName);
definition = new byte[stream.Length];
stream.Read(definition, 0, (int)(stream.Length));
stream.Close();
}
catch (Exception ex)
{
MessageBox.Show(ex.Message);
}
// We are going to use the name of the rdl file as the name of our report
string reportName =
Path.GetFileNameWithoutExtension(openFileDialog.FileName);
reportFile.Text = reportName;
// Now lets use this information to publish the report
try
{
rs.CreateCatalogItem("Report", reportName, pathName, true, definition,
null, out warnings);
if (warnings != null)
{
foreach (Warning warning in warnings)
{
warningMsg += warning.Message + "
";
}
MessageBox.Show("Report creation failed with the following
warnings:
" + warningMsg);
}
else
MessageBox.Show(String.Format("Report: {0} created
successfully with no warnings", reportName)); }
catch (SoapException ex)
{
MessageBox.Show(ex.Detail.InnerXml.ToString());
}
}
}
The code starts by getting the full path on the SSRS 2012 server where the user has selected to place the report from the ssrsFolders TreeView control, strips the word Root off the front of the path, and then replaces all occurrences of a backslash in the string with the forward slash needed for SSRS 2012.
You then set the options for the openFileDialog control so that it browses by default for files with the RDL extension and then displays the dialog box to the user. If the user makes a selection, then the file is opened using a FileStream object and read from the stream into a byte array. That’s because the SSRS 2012 CreateCatalogItem method expects the contents of the RDL file to be passed in as a byte array.
Next, the file name that the user selected is read and used as the title for the report in SSRS 2012. After you have a title, you have everything necessary to upload the report, which you do by calling the CreateCatalogItem method with the values you’ve created. You can see at the end of Listing 8-8 where the necessary code has been added to the complete listing.
Running the Application
Now let’s run the example. Start the project and, when the form displays, enter the name of your report server in the Server textbox and click Go. Localhost was used in the example; use the name of your server if it is different. Your form now looks similar to Figure 8-14, with the folders on your SSRS 2012 server displayed and the Root folder highlighted.
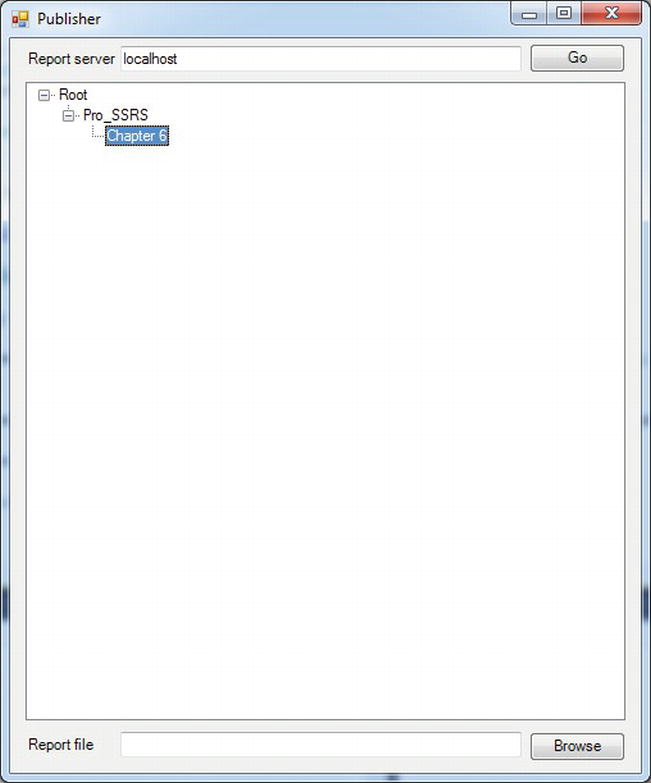
Figure 8-15. Complete report publisher showing folders on SSRS server
![]() Note You need to deploy the shared data source from the Chapter 8 sample code prior to uploading the sample report included in Chapter 8. The report uses this shared data source and will tell you that it could not publish the report because it can't find the shared data source on the SSRS 2012 server. Also note that the shared data source in this chapter is in the local Chapter 8 folder instead of the Pro_SSRS folder we have been using. We did this because, when uploading the report using the SSRS Publisher, it will make the connection to the shared data source Pro_SSRS only if it resides in the same folder as you deploy the report to.
Note You need to deploy the shared data source from the Chapter 8 sample code prior to uploading the sample report included in Chapter 8. The report uses this shared data source and will tell you that it could not publish the report because it can't find the shared data source on the SSRS 2012 server. Also note that the shared data source in this chapter is in the local Chapter 8 folder instead of the Pro_SSRS folder we have been using. We did this because, when uploading the report using the SSRS Publisher, it will make the connection to the shared data source Pro_SSRS only if it resides in the same folder as you deploy the report to.
By default, the Root folder on your server has been selected. Drill down and select the Pro_SSRS node in the TreeView. After you’ve selected the folder to use, click Open, and select the report in the EmployeeServiceCost.rdl file included in the Chapter 8 sample code. When you click Open, your report publishing application uses the Report Server Web services CreateCatalogItem method and publishes the report to the selected server.
In this case, the Pro_SSRS folder on the localhost server has been selected, and we’re uploading a report called EmployeeServiceCost.rdl. If you navigate to that folder with your Web browser, you’ll see something similar to the screen shown in Figure 8-16.

Figure 8-16. Report Manager showing uploaded report
You now have a Windows Forms application that allows files to be uploaded to your report server. This can be a handy way to add the capability to upload or update reports from within an application without needing the user to interact with the SSRS 2012 Report Manager directly.
This can be especially useful if you want users to interact with all aspects of SSRS 2010 from within your application. In Chapter 5, you developed an application that allows users to display reports from within the application. By combining that application with this report publisher, you can handle a number of non-administrative tasks directly from your application. You also could expand on this example by providing the user with some additional options:
- You could allow the user to create shared data sources.
- You could allow the user to enter the name of the report to publish instead of taking the name from the RDL file itself. For example, you could add another textbox to the form and read it for the report title. So, instead of the following code:
// We are going to use the name of the RDL file // as the name of our report string

 reportName =

Path.GetFileNameWithoutExtension(openFileDialog.FileName);
you could do the following:
// We are going to read the contents of textbox reportTitle

// as the name of our report

string reportName = reportTitle.text
- You could allow the user to set other properties of the report, such as adding a description that will be displayed in Report Manager in the detailed list view. For example, you could add a Description property:
Property[]  itemProps = new Property[1];

Property itemProp = new Property();

itemProp.Name = "Description";

itemProp.Value = "Employee Service Cost by Patient";

itemProps[0] = itemProp;
- You could then change your call to CreateReport from the following code:
rs.CreateCatalogItem("Report", reportName, pathName, true, definition, null, out warnings);
to the following code instead:
rs.CreateCatalogItem("Report", reportName, pathName, true, definition, itemProps, out

 warnings);
With Report Server Web service, there isn’t much you can’t do. For more details on additional properties that you can set on reports or to find out more about the SOAP API, see the SQL Server 2012 Books Online. We will be diving into the web service even more in the next chapter.
Summary
In this chapter, we discussed and demonstrated how to use the Report Builder 3.0 utility, the rs.exe application, and BIDS/Visual Studio to deploy reports to your SSRS 2012 server. Additionally, you used the SOAP APIs through the Report Server Web service to list the folders on the selected server and then allowed the user to select an RDL file and upload it to the user-specified folder on the selected report server using both a Visual Studio C# windows application and the rs.exe utility. We also examined some of the additional features you could provide the application by using a few of the many methods and properties exposed by the SSRS 2012 Web service.