C H A P T E R 11
Securing Reports
If a topic is currently on the minds of administrators more than security, we would be hard-pressed to name it. We all know that security threats come in many flavors and levels of severity—from the malicious pop-up Web pages to the invasive worms and viruses that wreak havoc on systems and take their toll on productivity by wasting time and resources to disgruntled employees to nefarious bots to skilled system intruders lurking around our data ready to pounce at any moment..
These threats are often anonymous scripts or executables—automatons—that their human creator has released into the wild. But what about the security violations from real individuals? These are not just elusive system hackers bent on destruction; they can be the overlooked disgruntled employee who left the company with a notebook full of passwords and the determination to make a point about the insecurity of the company’s vital data.
Securing systems takes time and effort and sometimes, unfortunately, has a lower priority than other important daily tasks. However, if your company is affected by the regulations imposed by HIPAA and other laws like Sarbanes Oxley (SOX), meeting stringent security standards is a requirement, not just a recommended practice. Most companies have policies and procedures in place that will meet HIPAA and SOX compliance. As a roles-based application, SSRS will take advantage of the underlying authentication and network already at work in your organization. The SSRS security model has three important components:
- Data encryption
- Authentication and user access
- Report audits
The goal in this chapter is to meet the challenge of effectively setting up and testing each of these security components in your SSRS deployment. We will show how to do this through our experience using SSRS to meet security standards.
You can incorporate your SSRS projects in your business in multiple ways. You may have an intranet site where internal domain users are rendering reports, a .NET application that utilizes the web services to build and display reports, or even an outward facing SSRS site hidden behind an authentication portal.
Encrypting Data
When working with confidential data of any kind, the chief concern is that the only people who can see the data are those who need to see it and who have been specifically granted permission to see it. This is especially true of Protected Health Information (PHI) data, as defined by HIPAA, which has been a significant concern of ours as a software development company. Many other types of data also need this level of protection, including financial, HR, and many more. We’ll start with the first of the three main challenges we defined as crucial to a successful, secure deployment of SSRS; namely, data encryption.
Introducing Encryption
In today’s mixed-technology networked environment, data encryption comes in many varieties. However, regardless of the technology, the encryption algorithms must meet a high standard for complexity and reliability. Fortunately, many applications provide built-in levels of encryption. SSRS natively supports encrypting the sensitive data it stores in the ReportServer database and configuration files. Companies may have the following other technologies in place that can be used in conjunction with SSRS encryption:
- Wireless: Uses Wireless Encryption Protocol (WEP), with shared keys to encrypt data transmitted through wireless access points.
- HTTPS: Uses a server certificate, generally from a trusted authority such as VeriSign, to provide encryption over Secure Sockets Layer (SSL). SSL is used when transmitting data with HTTPS instead of HTTP.
- Terminal Services: Uses Remote Desktop Protocol (RDP) for connecting remotely from a client workstation to a terminal server. This provides four levels of data encryption in Windows: Low, Client Compatible, High, and FIPS Compliant.
- VPNs: Allows accessibility to internal networks from VPN client systems. Encapsulates and encrypts Point-to-Point Tunneling Protocol (PPTP) and Layer 2 Tunneling Protocol (L2TP).
- IPSec: Is the standard security protocol for Transmission Control Protocol/Internet Protocol (TCP/IP) traffic. This adds several layers of security, including data encryption.
Securing Network Traffic Using SSL
In the following sections, we will show how to set up the SSRS server to use SSL. By having an SSL server certificate installed on the server, all data transferred between the client application (which can be a browser or custom application) and the report server will be encrypted. This is essential when transmitting confidential data such as PI information over the Internet. Having a certificate from a trusted authority such as VeriSign or Thawte also ensures that the registered domain name used to access the Web server has been validated and can be trusted to be from the legitimate company that it claims to be from.
Before we show how to install the certificate on the SSRS server, we will cover what data are being transmitted at the packet level to your SSRS server through HTTP requests. In this way, when you do actually install the certificate, you will be able to compare the data packets before and after installation to verify that the certificate is working as it should. To begin, we will show how to use a tool that is available for Windows: Network Monitor.
Analyzing HTTP Traffic
Network Monitor is a packet analysis utility that allows you to capture all of the data packets transferred to and from the target server and client. The version of Network Monitor that comes with Windows is unlike other network capture tools, such as the version of the same tool included in Systems Management Server, in that it can listen to traffic that is destined only for the machine on which it is executed. Network Monitor is not installed with Windows by default, though. You can add it post-installation through the Add/Remove Programs applet. In this applet, select Add Remove Windows Components and then Management and Monitoring Tools. If you are unable to install from this point, you can always download the application from the Microsoft website. We will be using the newest version of this tool at the time of this writing, version 3.4.
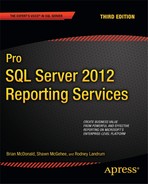
On the SSRS server, we will show how to launch Network Monitor from Administrative Tools. If more than one network interface card (NIC) is installed on your machine, as in our case, make sure that you select the card on which you will be testing. Figure 11-1 shows the main screen of Network Monitor and the traffic that it is capturing on the network, including broadcasts and local packets. Network Monitor can be daunting to the uninitiated, as it was designed to be used by network administrators who have more than a cursory understanding of network protocols.
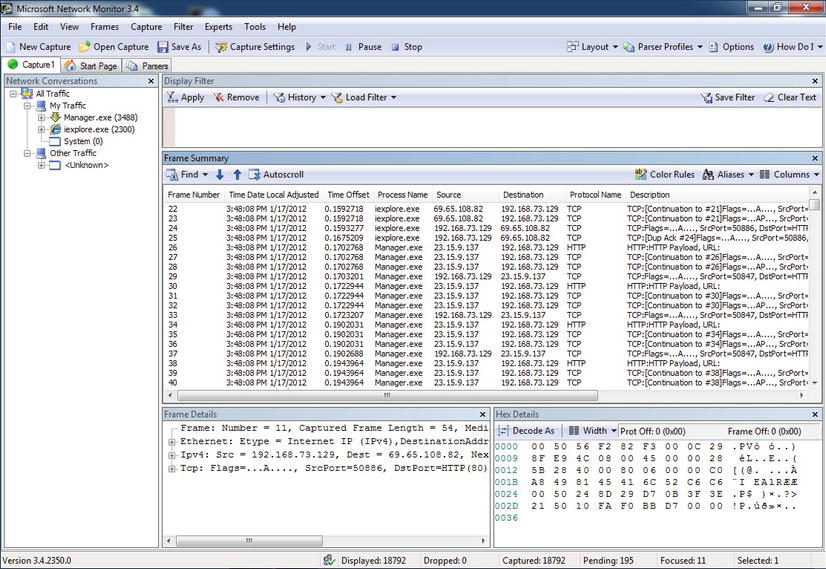
Figure 11-1. Network Monitor
You can filter out any unwanted traffic in the display, which we will cover in this section because we will be showing how to capture SSRS web data. For our example, we want to see only HTTP traffic on port 80. We will be running this directly on the client machine that accesses the report, for simplicity sake. There may be, and will be, plenty of other traffic that we don’t want to see in the monitor, so we will utilize the filtering capabilities to weed out the unwanted data. You could, for example, define a capture filter that uses a pattern match in the data packet to limit the results of the capture. Alternatively, you could capture everything and then configure a display filter to limit the results. In our case, we will setup a display filter to leave out anything that is not HTTP traffic. Setting up a filter is much easier in newer versions of network monitor than in the past. We are going to go ahead and set up a display filter so that we will only see the HTTP traffic that is flowing. To do this, start a new capture and look for the display filter window inside of the capture. If you don’t see it displayed, click View->Display Filter to bring it up. It should look like Figure 11-2.

Figure 11-2. Finding the display filter window
Inside the display filter window, we need to let Network Monitor know to only show us data that are related to HTTP data. The quickest way to do this is to filter out anything that doesn’t have a source or destination port of 80, the standard HTTP port. Inside of the display filter, you will set up a new rule to do just this, as shown in Figure 11-3. Click the apply button to confirm the changes.
Now, click the Start Capture button, and let the capture run as you view a page in the Report Manager. We will be taking a look at the data that are returned from this so that we can see the plain text information in HTML. We will be looking at the front page of the Report Manager to see if we can find it in the returned data for this example.
After loading the report manager, analyzing the captured frames reveals the disturbing news. You can see the HTML being returned in plain text, which is bad for us if we don’t want anyone sniffing around our network to see what information could be gleaned from any of our reports. This naked HTML can be seen in Figure 11-4. The title of the page and other HTML code are plainly readable and could be used to reconstruct the entire web page or a report if it were run.
In this case, you have not analyzed other types of traffic, such as SQL requests on port 1433, to see whether other protocols are potentially sending plain-text information, but you can use the same tool to do that.

Figure 11-3. Display Filter Rule
![]() Tip Although we will not cover the steps to configure SQL Server itself to encrypt network traffic, as we will be doing that with the internal SSRS HTTP service, it is important to mention that SQL Server uses SSL as well, and that by having a certificate installed, you can easily configure SQL Server to transmit encrypted data. A minimal performance hit is associated with encryption. This information can be found in the APRESS book on Pro SQL Server Encryption.
Tip Although we will not cover the steps to configure SQL Server itself to encrypt network traffic, as we will be doing that with the internal SSRS HTTP service, it is important to mention that SQL Server uses SSL as well, and that by having a certificate installed, you can easily configure SQL Server to transmit encrypted data. A minimal performance hit is associated with encryption. This information can be found in the APRESS book on Pro SQL Server Encryption.
Applying an SSL Certificate
Now it is time to apply a certificate to the SSRS server and rescan the traffic to make sure the viewable data in clear text will be encrypted.
Several companies provide server certificates that can be installed on a Web server and verified directly over the Internet from the trusted site that issued the certificate. By using the certificates issued from these trusted sources, such as VeriSign, the client will automatically trust the site. Other certificates, such as those generated through Certificate Services in Windows, may require that the certificate be installed on the client machine because the client will not automatically trust the certificate if it cannot reach the certificate authority. Generally, for Internet use, it is more practical to pay the fee to use the commercial certificate. The online deployment uses a server certificate issued from a commercial certificate authority. However, for the temporary test environment, you can use SelfSSL, a handy little utility that comes with the IIS Support Tools, even though we are not going to be using IIS. You can download SelfSSL from the following location:
www.microsoft.com/downloads/details.aspx?FamilyID=56fc92ee-a71a-4c73-b628

-ade629c89499&displaylang=en
SelfSSL will generate and automatically apply a temporary certificate to a Web site. You run SelfSSL from the command line on the server on which you want to add the certificate. Once it is installed, you can open a command prompt for SelfSSL by clicking Start ![]() All Programs
All Programs ![]() IIS Resources
IIS Resources ![]() SelfSSL. The typical syntax will be in the following format:
SelfSSL. The typical syntax will be in the following format:
Selfssl.exe /N:CN=MACHINENAMEHERE /V:20 /T
The /N:CN=MACHINENAMEHERE /T option indicates that the common name on the certificate will be the name of the server (You will substitute your server name in the command). The /V:20 portion indicates that the certificate is valid for 20 days. The /T option instructs SelfSSL to add the certificate to the Trusted Certificates list so that the local browser will automatically use the certificate when connecting to the site. You can manually install a local copy of the certificate on other client machines that will access this server. Because SelfSSL installs the certificate that it generates, you don’t need to go through the process of generating a certificate request, which would normally be sent to a certificate authority.
![]() Note When you create the temporary certificate on your test server, it will ask if you would like to change the settings for a website on your system. There is no need to do this since we will be binding the certificate in the configuration manager manually. If you do, you may receive an error on opening the metabase, but you can ignore this.
Note When you create the temporary certificate on your test server, it will ask if you would like to change the settings for a website on your system. There is no need to do this since we will be binding the certificate in the configuration manager manually. If you do, you may receive an error on opening the metabase, but you can ignore this.
After we create and install the new SSL certificate, we need to configure SSRS to use this certificate to encrypt the HTTP traffic sent via Report Manager. Open the Reporting Services Configuration Manager by clicking Start ![]() All Programs
All Programs ![]() Microsoft SQL Server 2012
Microsoft SQL Server 2012 ![]() Configuration Tools
Configuration Tools ![]() Reporting Services Configuration Manager. Once open, connect to your SSRS 2012 instance, and click the Report Manager URL link in the left-hand navigation bar.
Reporting Services Configuration Manager. Once open, connect to your SSRS 2012 instance, and click the Report Manager URL link in the left-hand navigation bar.
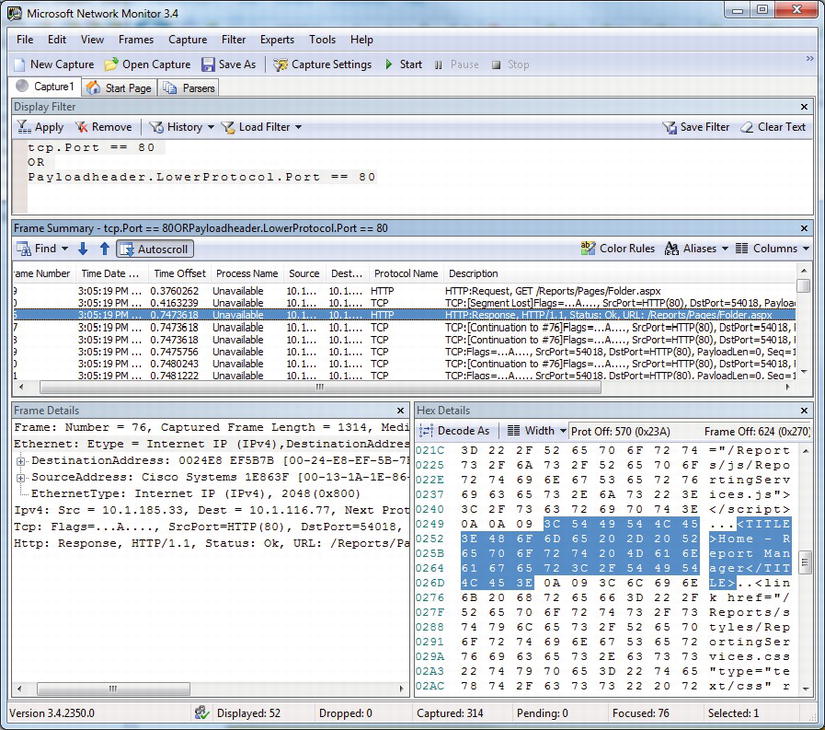
From here, click the Advanced button to open the Advanced Multiple Web Site Configuration screen. You will notice that there are two sections in this configuration window. The top section is used to configure HTTP identities and the bottom for HTTPS/SSL configurations. Click the Add button in the SSL section, and in the Certificate drop-down select the certificate you just created. You can also configure a different port or specify an IP address for use, but we will be using the default for both. Figure 11-5 shows you how the configuration screen should look.
After clicking OK on both open dialogs, the SSRS Server configures and binds the new URL/port combination, and the URL is then ready for use. You will now see two URLs for use in the identification section of the Reporting Services Configuration Manager.
Figure 11-5. Configuring the HTTPS URL
Capturing HTTPS Traffic
Now that you have the certificate installed, let’s return to Network Monitor and capture the running reports, this time using https in the URL to the report server on PROSSRS in this example, which instructs the browser to connect to the site with SSL on port 443, instead of HTTP on port 80.
The first thing you may run into when you navigate directly to the secure report manager is a warning that the certificate has not passed all the criteria to be trusted because it does not come from a known certificate authority (see Figure 11-6).
You can select Continue to This Web Site because you do indeed trust the site. You could also install the certificate on the local machine by clicking the lock at the bottom of the browser and selecting Install Certificate so that you will not be prompted with this message again. Installing the certificate in the local client’s certificate store causes the browser to automatically trust the site. These steps are not required for known certificate authorities such as VeriSign but are required for this self-assigned certificate.
At this point, you can access Report Manager with either HTTP or HTTPS since we have not removed the ability to access via port 80 in the Reporting Services Configuration Manager. You can control the required level of security in a few ways.
One method to control the level of security that SSRS will use is via the service config file, rsreportserver.config, located in the installed folder, typically Drive Letter:Program FilesMicrosoft SQL ServerMSRS11.MSSQLSERVERReporting ServicesReportServer. Open the file in Notepad, and look for the following entry:
<Add Key="SecureConnectionLevel" Value="0"/>

Figure 11-6. Warning for nontrusted security certificate
Four values control the level of security, 0 through 3. The default for a deployment that does not configure SSRS for SSL during installation is 0, which is the least secure. A value of 3, the most secure, requires that every SOAP API call uses SSL. For this example, set the value to 2, which will require encryption of all report data. All calls to the server will now automatically use port 443 and encrypt the data, including the URL string itself, which is important if you are passing any possibly sensitive information in the URL. If a user tried to connect to the Report Manager or report server URL using HTTP, the report server would automatically redirect the client to HTTPS to require a secure connection. You should also add the SSL certificate for use with the Report Service URL section in the SSRS configuration tool before restarting the services to make this change effective. It will need to have a valid certificate to use encrypted communication as well.
You can also remove the HTTP access through the Reporting Services Configuration Manager. In the same section that we used to add the new SSL secured address, you can also remove the HTTP address binding. This would require that any user trying to access the site would have to use the HTTPS address and have all of the Web data encrypted.
We will also need to make a small change to the display filter that we setup earlier. We are looking for port 80 traffic in that example, but we need to now be searching for port 443. Change your display filter so that each instance of port 80 is now searching for port 443 and click the apply button to confirm that change.
When you capture the frames in Network Monitor while using the new secure address, you can see that all of the previous HTTP data on port 80 are now using SSL on port 443, as shown in Figure 11-7. The data are encrypted and we can also see the SSL protocol handling the handshake setup so that all of our HTTP data is safe and secure.
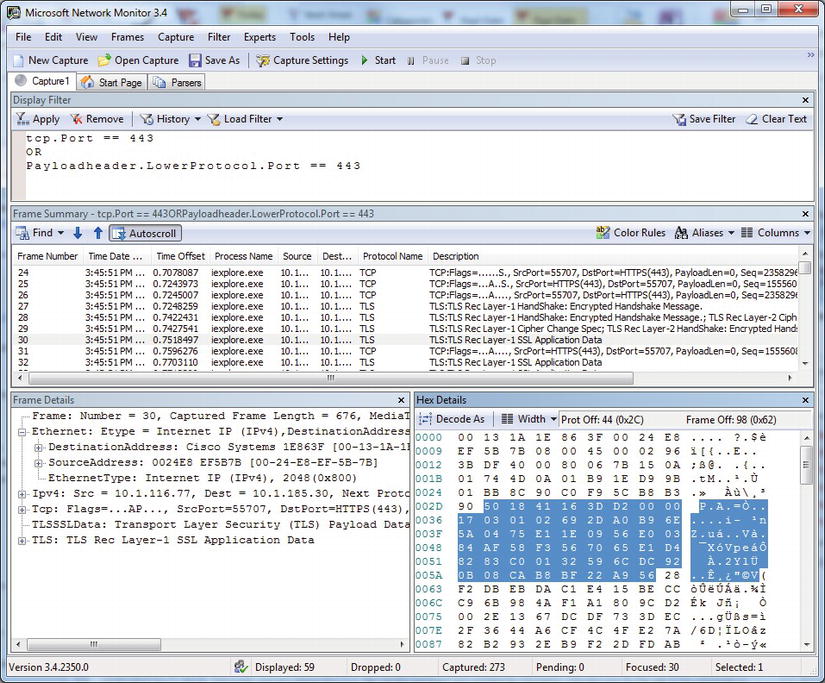
Figure 11-7. Network Monitor with encrypted packets
Securing Data Storage in SSRS
While it is important to ensure that network traffic is encrypted, this is only one aspect of maintaining a secure environment. SSRS requires that sensitive data, such as account information used for data access, be stored securely. Since these data are stored in different locations, such as database tables and configuration files, SSRS uses a symmetrical key encryption process to securely store and access this information. What this means is that the authentication information in the database and configuration files is stored in an encrypted format, and SSRS uses the encryption keys it generates to decrypt the information when needed.
As with many SSRS tasks in SQL Server, multiple tools are available to make configuration changes to the report server. You can manage keys with the Reporting Services Configuration Manager as well as a command-line utility called RSKeyMgmt. You can use either of these tools to back up the keys associated with the report server instance so that if something were to occur that caused the server to have to be rebuilt, you could reapply the keys to the installation. The encryption keys are generated when SSRS is installed or joins a farm. Figure 11-8 shows a section of the RSReportServer.config file, which contains sensitive authentication credentials required to connect to SSRS server components. Notice that parts of the data inside the file are encrypted. SSRS uses the keys associated with the report server instance to decrypt the contents of this file as well as the encrypted content stored in the ReportServer database in the dbo.Keys table.

Figure 11-8. The rsreportserver.config encrypted values
We will show how to use both tools—the Reporting Services Configuration Manager and the RSKeyMgmt utility—to extract the key for the PROSSRS SSRS installation.
First, open the Reporting Services Configuration Manager again and connect to your report server instance (called MSSQLSERVER by default), and then click the Encryption Keys icon on the left. You will see four options on the Encryption Key page: Backup, Restore, Change, and Delete Encrypted Content. You can back up the encryption key to a key file and supply a password, as shown in Figure 11-9. This file should be stored in a secure location. If the report server ever had to be rebuilt for any reason—because of a hardware failure or data corruption issue—then having this key is crucial to restoring the ReportServer database to its previous state. Without the key file, it is still possible to restore and initialize the ReportServer database from backup. However, all objects that require encryption, such as data sources with stored account information, must be reset manually, which could be an arduous task at best.
To use the command-line tool that will essentially perform the same task of backing up, restoring, and deleting the encryption keys for the report server instance, the syntax is as follows:
RSKeyMgmt -e -f C:Pro_SSRSSSRS_KeyPROSSRS_SSRS_Key -P Password
The -e option tells RSKeyMgmt to extract the key to the file PROSSRS_SSRS_Key in the C:Pro_SSRSSSRS_Key folder. The password option is required and the password must meet the minimum complexity requirement. If you needed to do so, you could reapply the key to the server using the same command but changing the -e option to -a. After executing the command, you are timidly instructed to SECURE THE FILE IN A SAFE LOCATION!

Figure 11-9. Encryption keys in the Reporting Services Configuration Manager
The key will also come in handy in case you need to move the Reporting Services instance to another machine on your network. You can simply install SSRS on the new machine, restore the databases from the old instance, restore the key that you have been storing, and remove the original encryption key. This makes a simple standalone SSRS migration fairly simple and painless.
Setting Up Authentication and User Access to Data
Access to confidential electronic data, no matter where they reside, begins and ends with user authentication. Having security users or roles properly configured is critical to a secure deployment of SSRS. In an environment utilizing a Windows Server Domain, SSRS can then take advantage of the authentication provided by Active Directory’s security groups and users. The SSRS administrator is responsible for configuring SSRS-specific security roles that link to Active Directory security accounts. In the following sections, we will show how to set up a test Windows account for an employee who will have limited access to the SSRS report server. We will discuss the following:
- Setting up SSRS roles: SSRS roles dictate what permissions the users will have when they access the SSRS server. An Active Directory security account, either a group or a user, is assigned either to one of five predefined SSRS roles or to a new role that the SSRS administrator may create.
- Assigning SSRS roles: Assignments are the actual SSRS tasks that a user in a specific SSRS role may perform.
- Configuring and testing permissions for SSRS objects: Each report folder and its objects maintain individual permissions that can be set at the folder level and propagated to all children objects or that can be set specifically per object. We will show how to set up two folders for the test user account and add report objects that are to be secured.
- Filtering reports: It is possible to limit which data are displayed within a report, based on the Active Directory login account that is accessing the report server. You do this by associating the value returned from an SSRS global collection, UserlUserlD, with a field value in the dataset of the report; UserlUserlD returns the current login account.
- Authenticating data sources: In addition to the Windows login account and SSRS role assignments, data sources maintain their own authentication properties, which we will discuss.
- Setting permissions on the data source database objects: You may recall from an earlier chapter that you created a stored procedure, Emp_Svc_Cost, to use with the Employee Service Cost report but did not assign user-specific permissions. We will show how to assign the permissions settings in this chapter.
Introducing SSRS Roles
By default, the installed SSRS Web service uses Windows integrated authentication to access reports and report content. Windows user or group security accounts stored in Active Directory must be associated with an SSRS role before they will have access to the SSRS server. Administrators can assign the Windows accounts to SSRS roles with Report Manager. In the test scenario for our health-care application, we have set up a test Windows account, named jyoungblood; you will assume jyoungblood is a registered nurse in a health-care organization who makes home visits to patients.
All the clinical staff, including nurses such as jyoungblood, are associated with security groups within Active Directory for the domain. So, you will make jyoungblood a member of the RNsecurity group. In addition to the security group RN, all registered nurses, including jyoungblood, will be contained with an organizational unit (OU) inside Active Directory, as shown in the Active Directory Users and Computers window in Figure 11-10. Although you will not use OUs when assigning a user or group to a role in SSRS, it is important to note that you can use OUs to configure Group Policy settings that apply to security as well, such as locking down the user’s desktop or Internet Explorer.

Figure 11-10. Test Windows account in Active Directory
Before assigning the test Windows user to an SSRS role and testing the permissions settings, first look at these five predefined roles:
- Browser: Users assigned to the Browser role may only view reports, folders, and resources. They may also manage their own subscriptions.
- Content Manager: Administrators are assigned to the Content Manager role by default. Users assigned to this role can perform every task available for SSRS objects, such as folders, reports, and data sources that they manage.
- My Reports: This is the default role automatically assigned to a user when the My Reports feature is enabled on the SSRS server, discussed later in this section.
- Publisher: Users assigned to this role, by default, have enough privileges to publish reports and data sources to the report server. Typically, this role is used for report authors who work with Report Builder or Visual Studio to create and deploy reports.
- Report Builder: The Report Builder role is used primarily for assigning the required permissions to users who will use the Report Builder application launched from Report Manager, which is covered in Chapter 09.
SSRS roles are defined by the tasks that users assigned to each role may perform. SSRS tasks provide content management permissions and define which SSRS objects are viewable by the user. Users can perform the following tasks:
- Consume reports
- Create linked reports
- Manage all subscriptions
- Manage data sources
- Manage folders
- Manage individual subscriptions
- Manage models
- Manage report history
- Manage reports
- Manage resources
- Set security for individual items
- View data sources
- View folders
- View models
- View reports
- View resources
Each predefined role is configured by default, with a specific combination of allowable tasks. Users assigned to the Publisher role, for example, may manage folders, reports, resources, models, and data sources as well as create linked reports.
SSRS 2012 does not allow administrators to edit the tasks available to roles or to add new roles through the Web-based Report Manager. That work is relegated to the SSMS 2012 interface. Open SSMS and connect to the Reporting Services instance by using the Connect button and selecting Reporting Services. The dialog box will look similar to the normal connection screen, but the server type will be Reporting Services. Enter the name of the SSRS server and click Connect to view the available options. Figure 11-11 shows the connection screen.
Once connected, you will find three sections listed for the instance. The section we will focus on here is the second, Security. Expand the Security node to reveal two subnodes, Roles and System Roles. The Roles section is used to manage user access on a reporting level. This section handles regular users who need to view, browse, and create reports. The second section, System Roles, is used to administer privileges for overall system tasks. We will focus on the Roles section here.

Figure 11-11. Connecting to SSRS via SSMS
Expand the Roles node to see the five default roles that we discussed earlier. To see the properties of the role, right-click the browser and select Properties. You will see a description for the role, along with each of the tasks that the role can have. Figure 11-12 shows you how this will look. From this window, you can edit the description or edit what tasks the role can perform. You do not want to change the Report Builder role tasks now, so have a look around to get a feel for what options you have with security changes, but click Cancel to discard any changes you might have made.
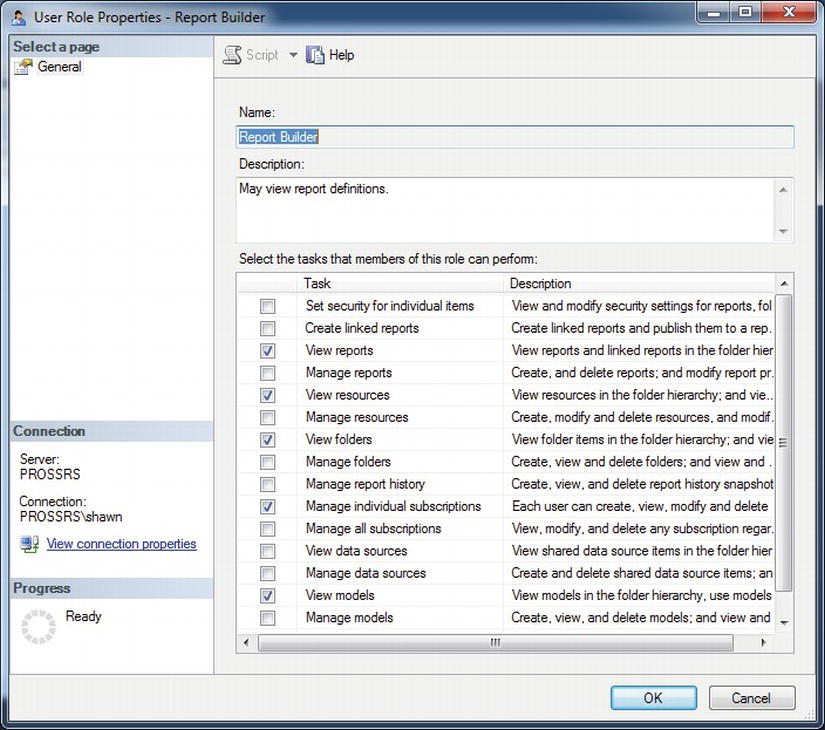
Figure 11-12. Viewing the Report Builder role task permissions
From SSRS, you can also add new roles or edit any existing roles for the server. This is important if you need to create a new custom role for users who may need permission that is slightly elevated from a standard SSRS role. This interface is identical to the role-editing window and can be reached by right-clicking the Roles node and selecting New Role.
Testing SSRS Role Assignments
In this section, we will go through the process of adding folders and report objects that would be in line with what nurse jyoungblood would use. You will want to ensure that she will not have the ability to navigate to other folders and run other reports that may contain confidential information.
The first step in testing jyoungblood’s access to the reports that have been defined for her security group, RN, is to publish the reports to a folder on the SSRS server that will contain reports for registered nurses. As the administrator for the test, open Report Manager, and create two new folders: one in the root folder called Clinical Reports and then one inside the Clinical Reports folder called Registered Nurse. To do this, simply click New Folder in Report Manager. Because both of these folders, by default, are inheriting permissions from the parent folder, which currently is configured for administrator access only, you will alter the permissions manually so that the new folder (and the reports and data source you will add to it) will maintain its own security settings.
To publish reports to the Registered Nurse folder, you could use any method already covered in the previous deployment chapter, but for this test, simply upload a report you have already worked with: Daily Schedule. Then create a data source called RN_DS for the purposes of testing security. Upload the report file Daily Schedule.rdl from Report Manager in the Pro_SSRS project. In Report Manager, in the Registered Nurse folder, simply click Upload File, browse to Daily Activity.rdl, and click OK. To create the data source manually with Report Manager, simply click New Data Source in the Registered Nurse folder, name the data source RN_DS, and set the connection string to the following (replacing localhost, if necessary, with your SQL Server server name where you have created the Pro_SSRS database):
Data Source=localhost;Initial Catalog=Pro_SSRS
In this case, you will choose to set the data source authentication method to Credentials Stored Securely in the Report Server and supply a name and password that will be used to access the data in the Pro_SSRS database. Assuming that jyoungblood’s Windows account was granted access to the data source database, you could have selected the Windows Integrated Security option to pass through the Windows account to the SQL Server database. You know that you will configure the report to filter out data that are relevant only to the clinician jyoungblood, so you don’t need to be overly concerned with the stored credentials. If you don’t already have a SQL Server login with permissions to the Pro_SSRS database, go ahead and create one called myreportuser and give it db_datareader permissions to the database. You can see the completed screen for setting up this new data source in Figure 11-13.
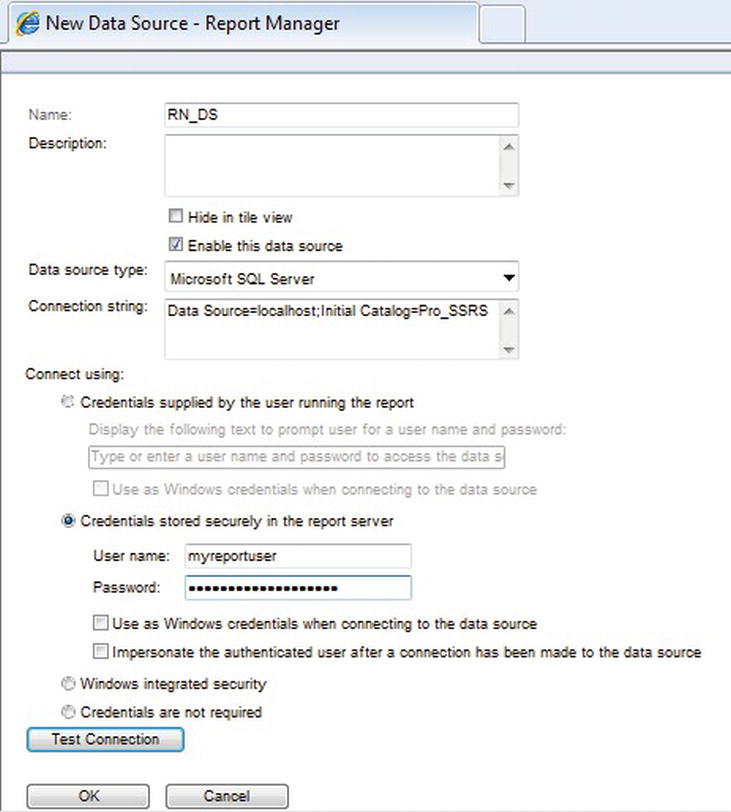
Figure 11-13. Setting up the RN_DS data source
Figure 11-14 shows the folder structure and setup of the report objects for the initial test you will perform. At this point, you have not granted SSRS role assignments to the Windows account, jyoungblood, or the security group, RN, of which she is a member. The Daily Activity report provides clinicians with a list of their daily activities. In a data-driven subscription, where the report can be mailed to the clinicians after processing, the parameter for the employee’s ID was used to create reports with data unique to each individual. In this test now, however, you want to allow access to the same report to be run manually from Report Manager. This poses its own set of concerns, which we will cover as we step you through the process.
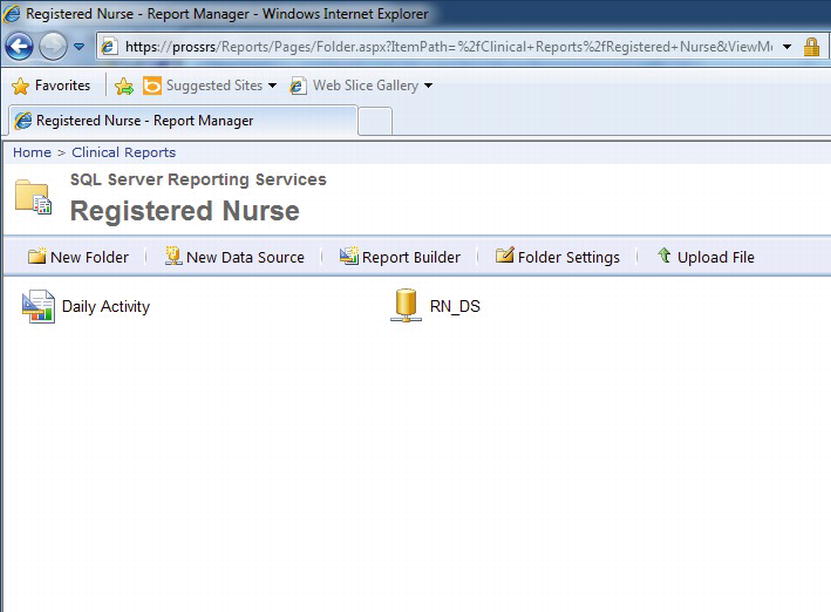
Figure 11-14. Report objects for registered nurse test
To begin the test, open a browser and log in with the user jyoungblood. Once the browser is open, paste the link in the address bar to the Registered Nurse folder you created previously, as shown here:
http://YourServerName/Reports/Pages/Folder.aspx?ItemPath=%2fClinical+Reports%2

 fRegistered+Nurse&ViewMode=Detail
You have to paste the link into the browser because the permissions for jyoungblood currently do not allow navigation to the report directly through Report Manager. As you can see in Figure 11-15, when you view this link, you receive an error message indicating that the user does not have permissions to view the resources in the folder.
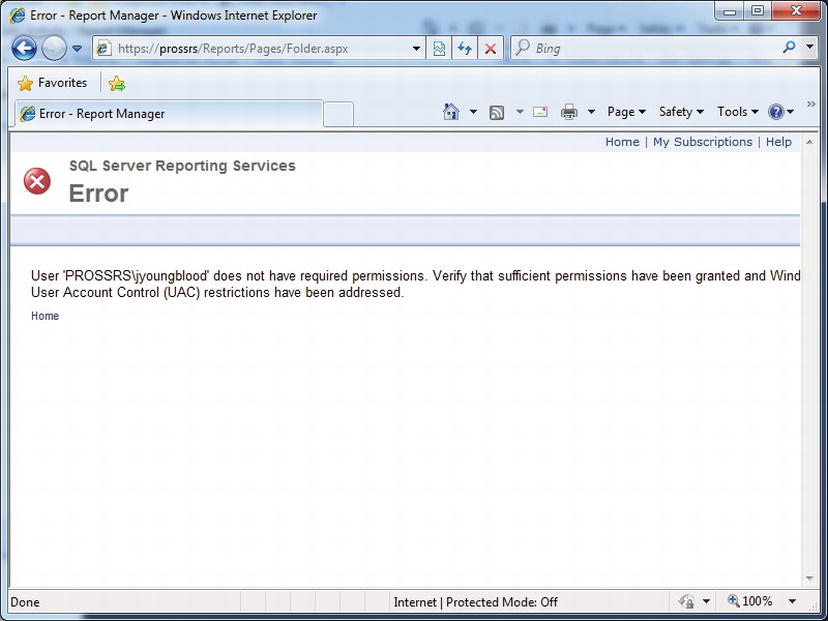
Figure 11-15. Error message for insufficient permissions
Running Report Manager as an administrator again, you are now going to set the permissions for jyoungblood. You can control security settings on the Property tab for each folder as well as on individual report items. In this case, you will set permissions at the folder level for the Registered Nurse folder. Navigate to the Registered Nurse folder while using a browser running from an SSRS Administrator account, click the Folder Settings button in the folder menu bar, and then select the Security option on the left. As you can see in Figure 11-16, the default security group is BUILTINadministrators, which is assigned to the Content Manager role.
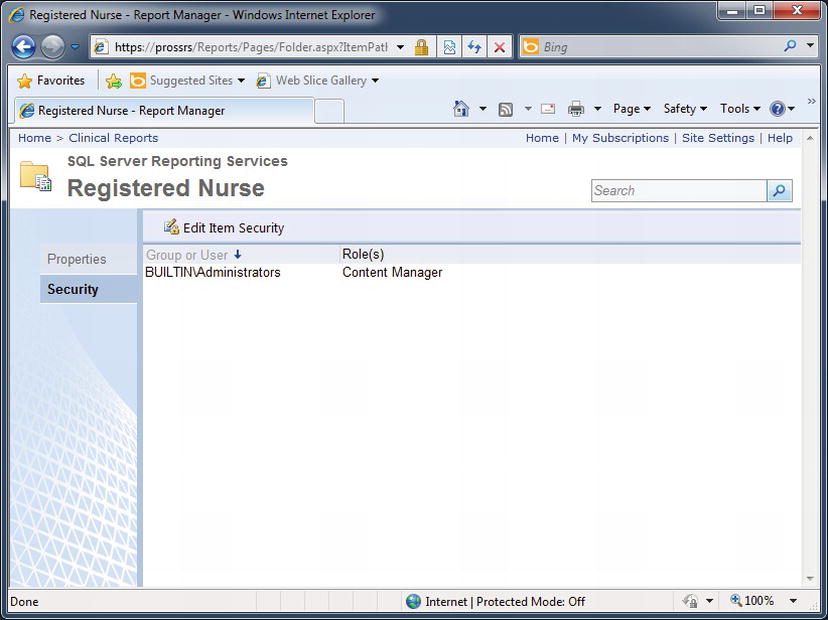
Figure 11-16. Registered Nurse folder’s default permissions
To set permissions for the RN group, click Edit Item Security to break the security inheritance from the parent folder. Go ahead and click OK on the warning screen that you are breaking the security inheritance. Now you can click New Role Assignment and add the RN security group as the group name on the New Role Assignment form. For the role assignment, choose Browser, which will allow the users assigned to the RN group to view the Registered Nurse folder and all its child nodes, to view reports and resources, and to configure their own subscriptions. You can see this in the security list now in Figure 11-17.

Figure 11-17. New security list for the Register Nurse folder
Now when you access the Registered Nurse folder logged in as jyoungblood, all you see are the reports that have been deployed to that folder, not the data source. In addition, all the properties for the objects you can view have limited accessibility and content. If you click the menu for that report item and select Manage, for example, you will see only the general properties information, such as the Creation Date and Modified Date of the Daily Schedule report. In contrast, an administrator viewing the same properties page would be able to see and modify other report property settings such as Parameters, Data Sources, Execution, History, and Security, as shown in Figure 11-18.
There are two SSRS roles that you should be familiar with. We have just mentioned one, System Administrator, and the other available SSRS role is System User. These are site-wide roles that allow users to perform certain tasks within the SSRS installation. These are not different from the folder/item level security we have discussed previously, in that these roles grant privileges to the entire SSRS system. You can assign these roles to users under the Site Settings section of Report Manager. The following is a list of what each role allows the user/group to do when assigned the role:
- System User
- View system properties
- View shared schedules
- Allow use of Report Builder or other clients that execute RDL
- System Administrator
- View/Modify system role assignments
- View/Modify system role definitions
- View/Modify system properties
- View/Modify shared schedules
- All other access granted to System User role
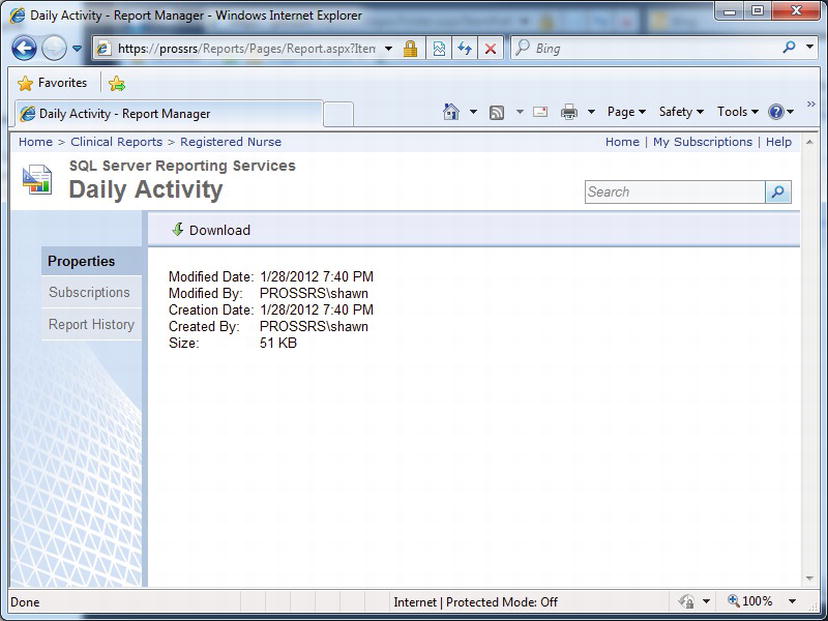
Figure 11-18. Report properties available for an administrator
To complete the test, you will simply execute the Daily Schedule report as jyoungblood. You have granted permission for the RN Windows security group to inherit the SSRS Browser role, so you should not have a problem executing the report. The report executes successfully. However, Figure 11-19 shows one glaring issue—even though jyoungblood has executed this report, she is seeing other employees’ scheduled visits. Although she would be able to enter an EmployeeID parameter value that would limit the data on the report to only her data, she would still be able to see other employees’ schedules by entering their IDs, assuming she knew what they were. Although this might be an acceptable practice for many companies, in the next section we will show how to go a step further to ensure that she will be able to view her schedule only.
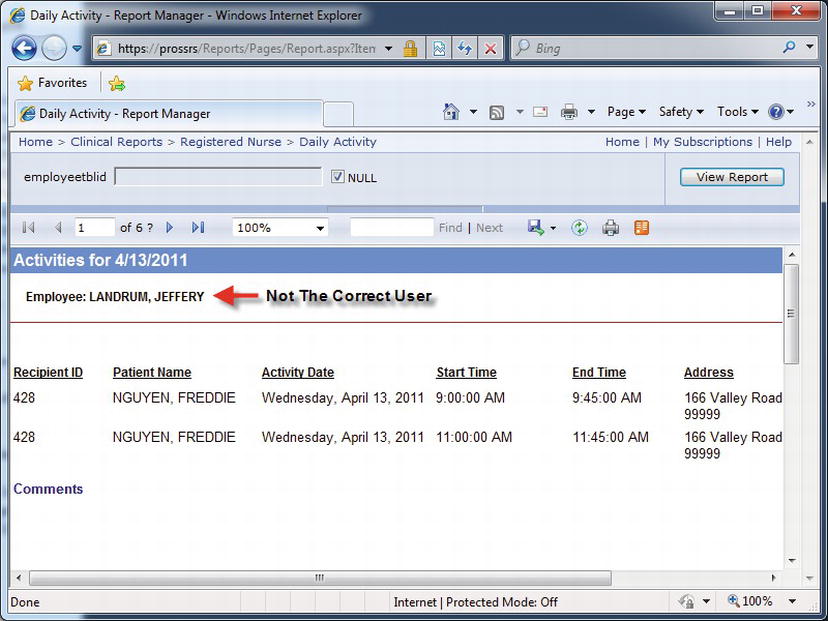
Figure 11-19. Test account viewing other employee’s data
![]() Tip When building a testing environment, a number of available resources can simplify the process. Virtualization is common in most every environment today. Microsoft’s Hyper-V or other desktop virtualization tools are advantageous tools for testing, as they allow you to run multiple operating systems simultaneously on a single machine.
Tip When building a testing environment, a number of available resources can simplify the process. Virtualization is common in most every environment today. Microsoft’s Hyper-V or other desktop virtualization tools are advantageous tools for testing, as they allow you to run multiple operating systems simultaneously on a single machine.
Filtering Report Content with User!UserID
For the Daily Schedule report, say you have decided that you want the users to be able to view only their own schedules. SSRS allows you to accomplish this by creating a report filter that uses the value of the login account for the user executing the report. The login name value is returned from a global collection in SSRS. You have been using global collections all along— for example, when you use an expression such as =Fields!FieldName.Value, you are actually returning a value from the Fields global collection. The global collection that you will use for the report filter is User, and the value you are interested in is UserID. The expression will therefore be =User!UserID.
To use User!UserID in the filter, you will need a field in the dataset that will equal the UserID value. In the dataset for the Daily Schedule report, you may recall that you have a field called HWUserLogin that you can use for this purpose. When compared by the filter, the two values will be identical—one value delivered with the dataset and the other at execution time of the report. After the filter is applied, the report will display only those records where the username of the employee executing the report matches the value of the HWUserLogin field returned with each record of the dataset.
Unlike parameters, filters cannot be set through Report Manager. To set up a filter, you will need to modify the report itself, either in the RDL file directly, through Report Builder or in Visual Studio, as shown in Figure 11-20. Notice that you can use the RTRIM function to strip off the trailing spaces; otherwise, the comparison may fail. Make sure that the employee Login matches the user that you have created so that the comparison will match. In the book example, this is PROSSRSJyoungblood, but it may differ for your examples. Add the filter to the group properties to filter out any other users except the viewing user.
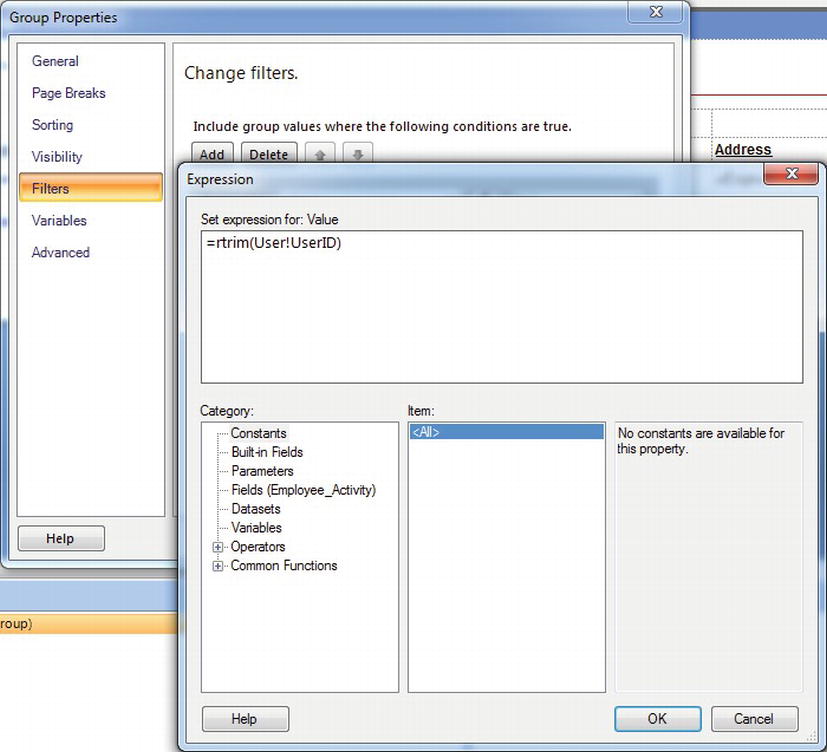
Figure 11-20. UserID filter for daily schedule report
Because this report may return several hundred records, even though it will filter automatically for each user, it is a good idea to cache the report for ten minutes. Caching will help alleviate the performance hit of requerying the data source every time a new user accesses the report. When the user jyoungblood executes the report again, you can see that the schedule now reflects only her schedule, as shown in Figure 11-21.

Figure 11-21. Filtered report execution for a test user
Setting Data Source Security
Once you have deployed the data source to the report server, you can specify its connection properties. This is an important step because the property settings determine how both the user and SSRS will connect to the data source. When executing unattended reports—for example, for a user subscription—SSRS will control passing authentication credentials to the data source and must have access to valid authentication credentials.
Four connection options for the data source are available in Report Manager:
- The Credentials Supplied by the User Running the Report: With this option, users are always prompted to log in to the data source when executing the report.
- Credentials Stored Securely in the Report Server: SSRS uses authentication credentials stored in the ReportServer database. The sensitive login information is encrypted.
- Windows Integrated Security: This option passes the login information for the current user to the data source. Don’t choose this option if the data source will be used for unattended installs or if Kerberos is not configured for the Windows domain. You will also get issues when using this where multiple hops are made from SQL Servers. Unless Kerberos is installed and configured correctly across your entire domain, this may not work correctly in all situations
- Credentials Are Not Required: This is the least secure option and is used when the data source does not require authentication.
Setting SQL Server Permissions
In Chapter 3, when you created the stored procedure called Emp_Svc_Cost, you set the permissions to allow public execution while designing the report. The environment you were working in was otherwise secure, as it was isolated from other networks and there was no fear of it being compromised.
Now that you are deploying the stored procedure in a production environment, you will need to lock down the stored procedure as well. You can do this through SSMS by right-clicking the stored procedure and selecting Properties (see Figure 11-22). Next, click the Permissions page. Search for the RN group using the Search… button to load its explicit permissions. Check the Execute permission under the Grant column and this will allow any user from the RN group to execute this stored procedure. You do not need to explicitly grant Execute rights to the test user jyoungblood, as she is a member of the RN security group.

Figure 11-22. Setting SQL Server stored procedure permissions
Auditing Reports
Having the ability to know the details of report execution, specifically for undesired access, is an essential piece of the security puzzle. In this chapter, we are going to use the built-in report execution logging and a report management table to build a report that will show up who ran what reports and much more information. Having an audit trail of report execution is essential for gaining insight into user behavior and possible security breaches.
SSRS Auditing
In this section, we’ll show how to use the built in views in the ReportServer database to audit the following in SSRS:
The latter is important because even though SSRS contains validation for certain types of parameters, such as Integer and DateTime, when a report parameter uses a string, it is susceptible to a SQL injection attack. SQL injection attacks are made possible when a Web page or service takes input from a user or program that could contain injected code that could execute on the SQL Server machine. These types of attacks can be malicious in nature or can cause the report or page to deliver more data than was intended.
We have simply made the report a table instead of a matrix, which was more in line with the PivotTable analysis for performance. In this modified report, called Report Execution Audit (which is available in the Pro_SSRS chapter 11 files), you will also include the parameters that the user has selected. Go ahead and upload this report and a new datasource pointing to your ReportServer database in a new folder in the root of your SSRS installation called Management. You will also need to point the report to this new datasource that you are creating. You can see the query we are using to pull this information in Listing 11-1.
Listing 11-1. Execution Log Query
SELECT

          Catalog.name

        , ExecutionLog.UserName

        , ExecutionLog.Parameters

        , ExecutionLog.TimeStart

        , ExecutionLog.TimeEnd

        , ExecutionLog.Status

 FROM ExecutionLog

INNER JOIN Catalog ON ExecutionLog.ReportID = Catalog.ItemID
In Figure 11-23, you can see the times that the selected reports were executed as well as the parameter name and value that were entered. In addition to showing how the user interacted with the report via the Parameter field, the Report Execution Audit report also shows when the report was started and ended. Having this level of auditing is a valuable ally in the struggle to maintain security for confidential information. With HIPAA, it is also necessary to maintain an audit trail of user access to data. If you are suspicious that someone is accessing information they are not authorized to view, this report can serve as the audit trail, along with other normal auditing procedures such as the Windows event log.
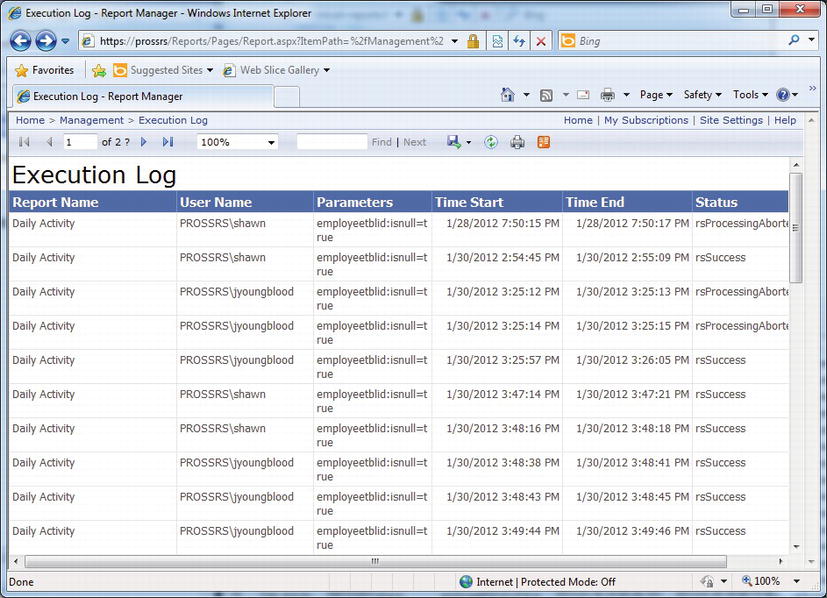
Figure 11-23. Report Execution Audit report
Introducing Log File Auditing
In addition to report auditing, SSRS supports two other types of logging: standard Windows event logging and trace file logging. You can use both of these resources to search for errors and warnings, as well as for other important information such as security information.
All of the trace files are stored in the default installation location Drive:Program Files Microsoft SQL ServerMSRS11.MSSQLSERVERReporting ServicesLogFiles. Several types of log files exist: ReportServerService and ReportServer. Each file is named with a timestamp, such as ReportServerService_05_31_2012_17_00_30.log and ReportServerService_HTTP_05_31_2012_17_00_30.log, and contains information specific to its individual service. You can gather five levels of trace log information— 0 through 4—that are controlled in the ReportingServicesService.exe.config file in the Reporting ServicesReportServerBin folder. Selecting 0 will disable tracing, and selecting 4 will enable verbose mode. Whenever an issue arises with SSRS, the administrator can generally isolate the problem by looking in either the event log or one of the trace files.
Summary
In this chapter, you examined three of the security tasks essential to secure SSRS deployment: encrypting, authenticating, and auditing. Internally, only employees who need access to confidential data should have it, and you can ensure this by applying a special filter for a report deployment. As a company that works heavily with confidential patient information, we are required to conform to the regulations imposed by HIPAA. However, in other industries, many similar regulations exist. Having security policies and procedures in place for any company is good practice, even when not working under stringent regulations. Fortunately, SSRS is designed to use the core-level security mechanisms that already exist in your organization through Windows authentication and can be extended, when required, to support other means of custom authentication.