C H A P T E R 10
Managing Reports
In many reporting solutions prior to SSRS, report management required little more than delivering the completed report file to the end user via a file share or embedded in a third-party application. SSRS is a full reporting environment with features such as scheduled report execution, report subscription services, snapshots, content caching, and on-demand Web access.
With these added benefits comes an additional level of management responsibility. Depending on the size of the organization, some management tasks can be delegated to other users, such as departmental managers, who might maintain report folders for their departments, as well as to system administrators and DBAs. Fortunately, SSRS provides several means of managing the report server at all levels. In this chapter, you’ll continue to work with built-in tools such as Report Manager and command-line utilities, as well as with custom .NET management tools that take advantage of the SSRS programming models to administer an SSRS deployment. We’ll also demonstrate SSRS’s Reporting Services Configuration Manager. When connecting to an SSRS instance, it supplies much, if not all, of the functionality that is available in the Site Settings section of Report Manager and the command-line utilities. Using SSRS 2000 and 2005 once allowed some administrative tasks, like configuring report subscriptions, to be done with SSMS. However, since the 2008 release, this functionality was removed and is now only available using the Report Manager. Therefore, we have chosen to use Report Manager for most of the examples in this chapter. Report Manager can be accessed from a Web browser and does not require a local install of the SQL client tools.
Exploring Management Roles in SSRS Deployment
You can subdivide the management roles for an SSRS deployment into three basic categories:
- Content management
- Performance
- Report execution
It is always best practice to perform a test deployment of any application or service before placing it into a production environment. Because our company provides services via the Internet to a wide range of users, special management considerations—such as how to provide report subscriptions to the same report for different companies—were imperative, and we needed to test various scenarios to ensure proper functionality in each case. Let’s begin by looking at the three management categories and how we implemented and tested them to ensure that when we deployed them to production, we would have few (if any) unexpected consequences. We will show how to perform all these tasks using the built-in administration tools with SSRS and SQL Server 2012. Later in the chapter, we’ll show how to build a management application interface with .NET that provides the ability to schedule reports.
Managing Content
Effective management of content on the SSRS report server requires that you be familiar with the management tasks available. Several aspects of report management are available only after the report has been deployed. We’ll cover each aspect in detail as we show how to deploy the health care reports for selected users:
- Shared schedules
- Report parameters and data sources
- Report snapshots, history, and caching
- Subscriptions
For each content management task, we’ll provide specific real-world scenarios, continuing with the health care agencies as an example. Up to this point, you have deployed several reports, data sources, and other report items, such as graphic images and code, which you have developed throughout the book. Now it’s time to put on your administrator’s cap and take advantage of all the features that make SSRS a unique and powerful report-delivery system as well as one that provides a rich report-authoring environment.
Setting Up Shared Schedules
Generally speaking, a shared schedule is like a shared data source in that it is available system-wide to users who have permission to access it. You can create a shared schedule specifically for a certain job type. It is possible to configure a recurring shared schedule to execute by the hour, day, month, and week or to run only once. In this example, the financial reports will execute at the end of each month. It is important that a history be maintained for these reports so that you can freeze the values at any point in time or use them for auditing capabilities, such as understanding which users viewed a report and what they saw in the report.
You’ll create a shared schedule that will be used to run the financial reports on the last day of each month to provide the following benefits:
- You can schedule the reports to execute at a predetermined time.
- You can store a snapshot of each report to maintain a historical perspective of the data.
![]() Note Report snapshots are reports that are executed at a specific time, either when initiated by a user or as part of a schedule, and that collectively make up the report history. We’ll cover snapshots in more detail later.
Note Report snapshots are reports that are executed at a specific time, either when initiated by a user or as part of a schedule, and that collectively make up the report history. We’ll cover snapshots in more detail later.
One financial report that customers might run at the end of the month is an AR Reconciliation report. This report lists financial transactions that occurred during the current accounting period, such as 10-2009 for October 2009. This report may be one of several that need to execute on the same schedule. Other financial reports might include an Aged Trial Balance report and an AR Aging report. We’ll use the AR Reconciliation report in the following section to show the management tasks associated with setting up shared schedules and creating report snapshots. We’ve included the AR Reconciliation report in the Pro_SSRS report project download, available in the Source Code/Download section of the Apress Web site (www.apress.com). The report definition file is AR Reconciliation.rdl. In this section, we’ll show how to use a deployed version of the AR Reconciliation report to configure its parameter values to coincide with the scheduled times that it will execute each month.
To deploy the AR Reconciliation report, open the Pro_SSRS project in BIDS and then open the Solution Explorer. Before deploying this report, however, you need to change the project property that controls which folder the report will be deployed in on the report server. In the AR Reconciliation example, you will deploy the report to a folder called End of Month Financials. In the Solution Explorer, right-click the Pro_SSRS report project, and select Properties. Change the TargetReportFolder value from Pro_SSRS to End of Month Financials, and click OK. Now, when you right-click the AR Reconciliation report in the Solution Explorer and select Deploy, the new folder is created on your report server that contains the AR Reconciliation report.
Creating a Shared Schedule
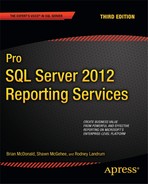
To create the shared schedule in Report Manager, click Site Settings, and then select Schedules at the bottom of the navigation tabs on the left of the page. Click the New Schedule button link, and name the schedule End of Month Financials. In the Schedule Details section, you are presented with the standard scheduling options: Hour, Day, Week, Month, or Once. For this report, choose Month.
The first challenge, when configuring a shared schedule to run on the last day of each month, is to overcome the built-in data validation on the Scheduling form. Although it is possible to tell SSRS to execute the report on the last Sunday of every month, it is not possible to select the last day of each month because the last day is variable (that is, it could be 28, 29, 30, or 31, depending on the month). Well, it should be possible to create a single schedule to encompass all four dates, right? Not exactly! If you try to save the Shared Schedule as shown in Figure 10-1, choosing 31 causes an error when all of the months are selected because not all months have 31 days.
![]() Note You must be logged in as a user who is a member of the SSRS 2012 System Administrator role to add new schedules. If you haven’t been added to the site as a System Administrator, but you are in the local Administrators group, you may need to run your browser with elevated permissions. If using IE, you can right click the IE icon and select Run as administrator.
Note You must be logged in as a user who is a member of the SSRS 2012 System Administrator role to add new schedules. If you haven’t been added to the site as a System Administrator, but you are in the local Administrators group, you may need to run your browser with elevated permissions. If using IE, you can right click the IE icon and select Run as administrator.
The solution in this example—because we know that no activity will occur after 12:00 AM on the last day of the month—is to set the schedule to run on the first day of the month at 12:01 AM. This essentially gives you the last day for every month, and you know the first day of the month will always be 1.
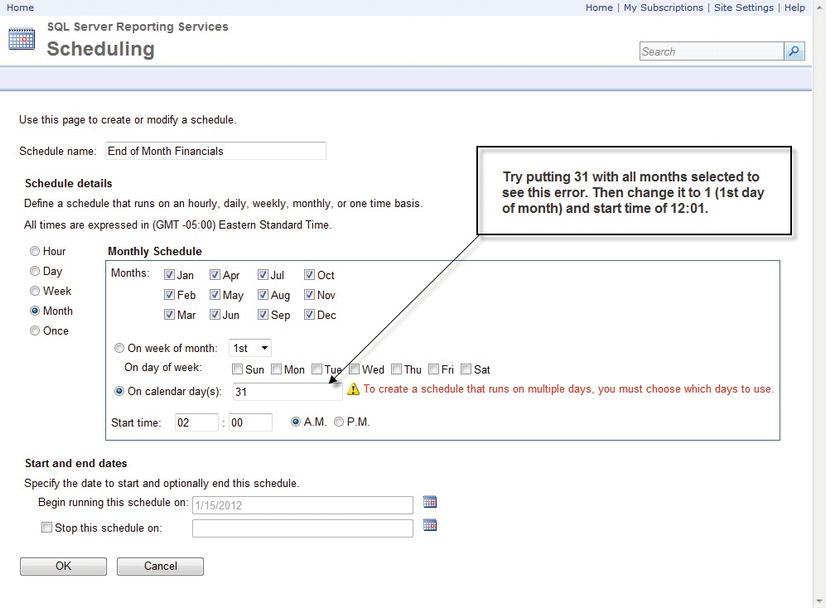
Figure 10-1. Choosing the last day of the month
Next, select an appropriate start date and end date for the schedule (in this case, don’t specify an end date), and then click the OK button. Now you can move on and prepare the report itself to use the new schedule. As a note, schedules in SSRS rely on the SQL Server Agent service, and as such, the service must be running before you can successfully create a schedule.
![]() Note Note that when a job, such as a subscription or an execution snapshot, is scheduled to run within SSRS, a SQL Server job is created using the SQL Server Agent. Jobs can be monitored through SSMS or Report Manager.
Note Note that when a job, such as a subscription or an execution snapshot, is scheduled to run within SSRS, a SQL Server job is created using the SQL Server Agent. Jobs can be monitored through SSMS or Report Manager.
Configuring a Report to Use a Shared Schedule
The AR Reconciliation report contains report parameters that can limit the data displayed on the report. Two of the parameters, AcctPeriodYear and AcctPeriodMonth, are used in the driving stored procedure to limit financial data to an accounting period. When the AR Reconciliation report is executed from a shared schedule, it is important that all the parameters for the report have default values. To begin with, all eight parameters in the AR Reconciliation report are set to allow NULL values, as shown in Figure 10-2, which causes the default value of the parameter to be set to NULL when executed. This is OK because the logic in the main stored procedure that uses the parameters knows to return all data when a NULL value is passed to it.

Figure 10-2. AR Reconciliation report parameters
For the parameters AcctPeriodYear and AcctPeriodMonth, however, you need to add default non-NULL parameter values so that the returned dataset includes only those records for the current accounting period. To do this, you use two functions:
- DATEPART: Returns an integer representing one of the component parts of a date, such as year, quarter, month, or day
- TODAY: Returns the current date
Used together in an expression, these functions allow you to set the desired default values for your two parameters. For AcctPeriodYear, you simply set the default value to the current year, as follows:
=DATEPART("yyyy", TODAY())
For AcctPeriodMonth, you essentially do the same thing, but you need to subtract 1 from the expression value to return the data for the correct month. For example, the expression =DATEPART("m", TODAY()), when run at 12:01 AM on November 1, would return a value of 11, when the current accounting period is 10-October. To account for January, you add an IIF function to evaluate the DATEPART so that when 1 is returned for January, a 12 is returned, letting the report know to process the December accounting period. So the correct expression is as follows:
=IIF(DATEPART("m", TODAY()) = 1, 12, DATEPART("m", TODAY()) -1)
![]() Note Our sample database contains only a snapshot of data taken from a previous point in time. As such, if you are following along the examples, you will need to enter a year and month contained within the sample database. The majority of records are between September 2009 and December 2009. However, in a real world scenario of a report requiring an End of Month frequency, use the above expressions.
Note Our sample database contains only a snapshot of data taken from a previous point in time. As such, if you are following along the examples, you will need to enter a year and month contained within the sample database. The majority of records are between September 2009 and December 2009. However, in a real world scenario of a report requiring an End of Month frequency, use the above expressions.
Updating and Uploading the RDL File Using Report Manager
For this section, you will navigate to the AR Reconciliation report in Report Manager and modify the RDL manually to add the AcctPeriodMonth and AcctPeriodYear default parameter values via Notepad instead of using BIDS. This will demonstrate that you can make simple modifications to published reports without the need for a full-blown design environment. Open Report Manager, and navigate to the AR Reconciliation report in the End of Month Financials folder on your report server, as shown in Figure 10-3.
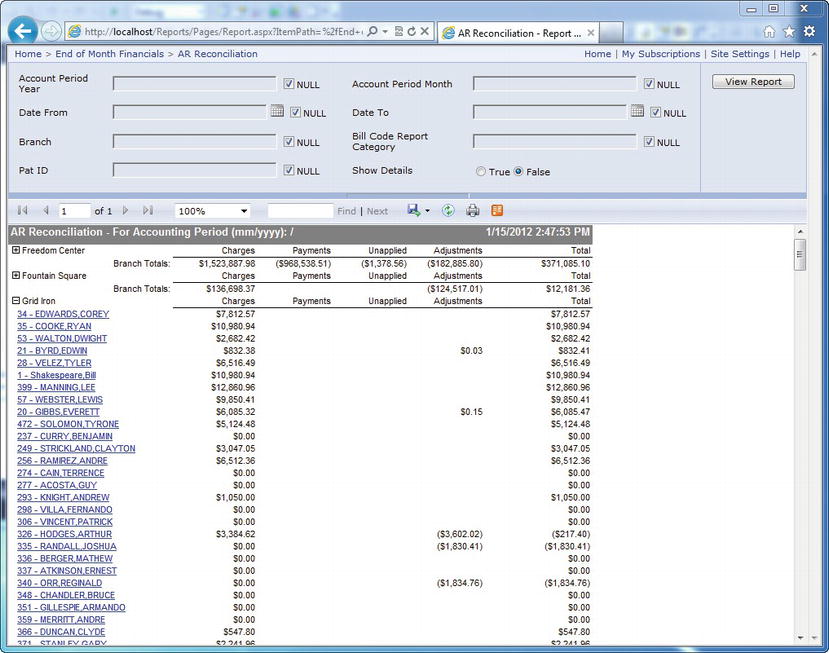
Figure 10-3. AR Reconciliation report in Report Manager
Prior to the SSRS 2008 R2 release of Reporting Services, you could get to the properties page using the Properties tab. Now, you access the report properties by placing the cursor over the report that you want to manage until you see a yellow rectangle around the report and dropdown arrow. When you see the dropdown arrow, click it and select Manage as shown in Figure 10-4. Just be sure not to click the link containing the report name as this will cause the report to execute.
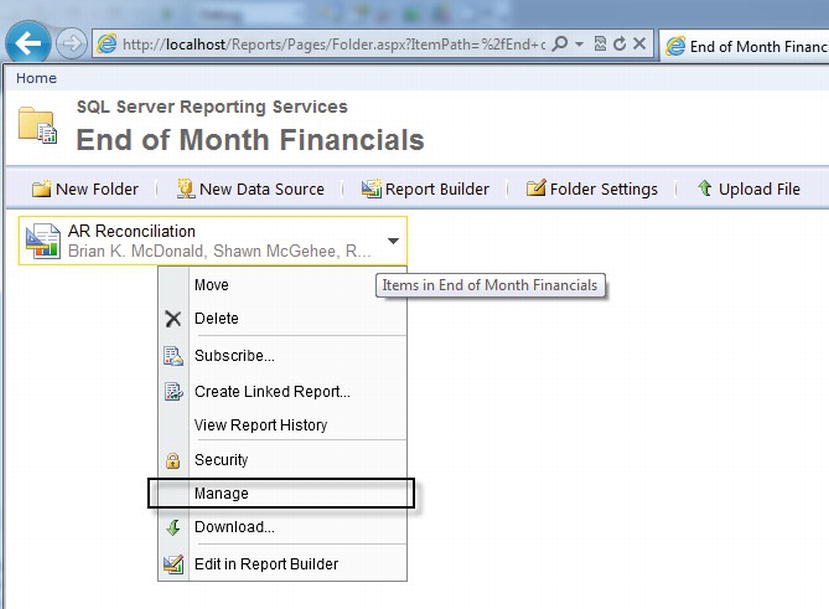
Figure 10-4. Report Management Options menu
After you have clicked Manage, you will be taken to the report properties page and you will see nine tabs along the left and five linked buttons on the top containing items to be used for report maintenance. The links are pretty self-explanatory, so I will not go into the details on each one. However, as you can see in Figure 10-5, you can perform such maintenance tasks as deleting, moving, downloading to edit a report, or replacing the report with another copy.
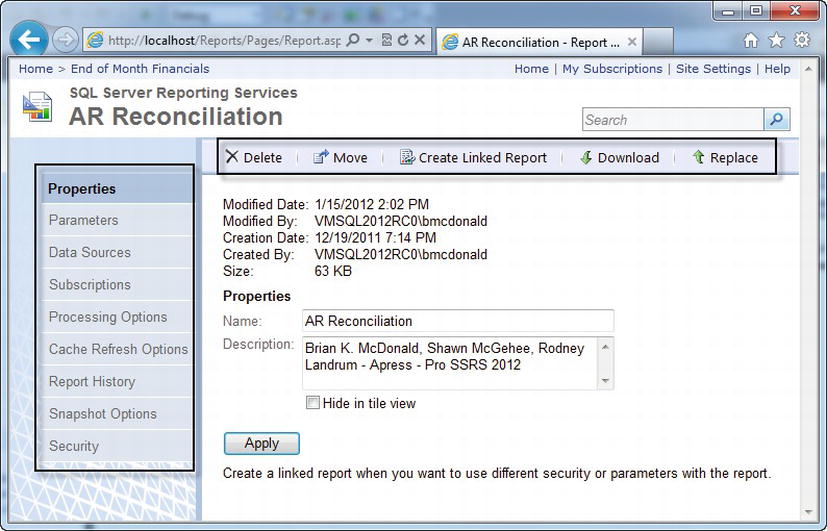
Figure 10-5. Report Properties screen
On the properties page for the AR Reconciliation report are two links—Download and Replace—that administrators can use to modify the RDL directly without having to redeploy reports through other means (such as through use of custom code, the authoring environment, or the rs command-line utility). For further details on deploying reports, please see Chapter 8. Click the Download link to save the file to a location available to you and then open it with Notepad as shown in Figure 10-6. Figure 10-6 shows the RDL file for the AR Reconciliation report. Hit the CTRL and F keys at the same time to do a find and search for ReportParameter. Click Find Next to locate the first instance of the search term entered. Notice the AcctPeriodYear and AcctPeriodMonth parameters in the RDL code.
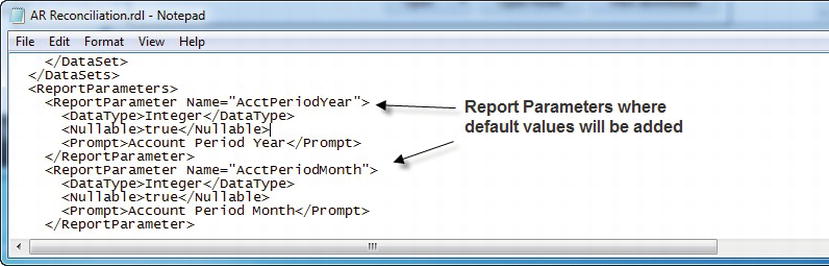
Figure 10-6. RDL file edited in Notepad
To update the report to include the default parameter values that you created in the previous section, you can place RDL code directly in the file and save it. The section of the RDL that generates the default values for each parameter is only five lines long, as you can see in Listing 10-1, which shows the default value section for the AcctPeriodYear parameter.
Listing 10-1. RDL Default Value Section
<DefaultValue>

   <Values>

     <Value>=DATEPART("yyyy", TODAY())</Value>

   </Values>

</DefaultValue>
Figure 10-7 shows the RDL file after the default value code was inserted for both parameters.
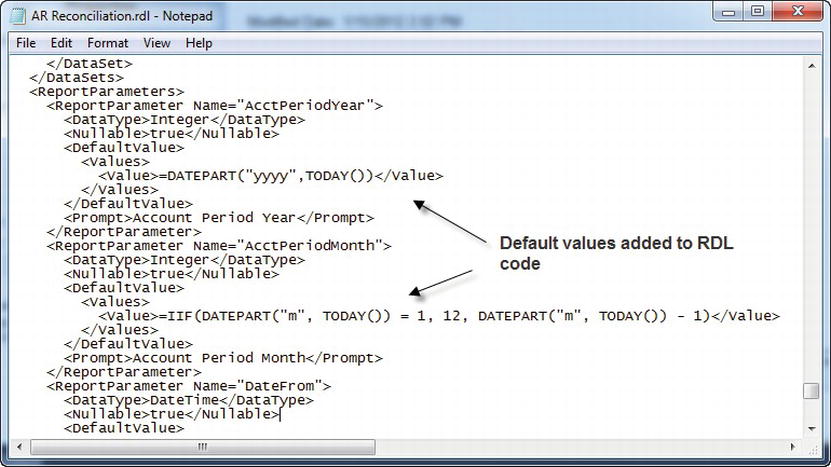
Figure 10-7. RDL file with default parameters
Because you can’t save directly from Notepad to the SSRS server, save your copy of the RDL file to disk. Any accessible location is fine, such as a network share or your local disk. After the file is saved, you can click the Replace link, locate your modified RDL file on disk, and select Open. When you return back to the Upload a report definition screen, click OK to replace the existing report. If you executed the report on January 1st, 2010, you would see the report with correct default values, as shown in Figure 10-8.

Figure 10-8. AR Reconciliation report with default parameters
Updating the report through Report Manager doesn’t overwrite other properties of the report such as history, schedules, and execution methods.
![]() Caution When you use default values based on variable data such as values in a database, it’s important to note that the returned value must coincide with available values. In this example, if a value of 5 is returned for May, but no values for May can be selected, the report will force the user to make a selection, as opposed to executing and returning no data. We chose to limit the data to values actually stored in the database.
Caution When you use default values based on variable data such as values in a database, it’s important to note that the returned value must coincide with available values. In this example, if a value of 5 is returned for May, but no values for May can be selected, the report will force the user to make a selection, as opposed to executing and returning no data. We chose to limit the data to values actually stored in the database.
Setting Up a Data Source for the Report
The AR Reconciliation report will be set up to generate a history that allows users to view the report as it was when it was executed. In addition, because the report will be run at a prescheduled time, SSRS needs to know what credentials to use to access the data for the report. You can either modify our existing data source credentials or we could create a new data source to accommodate this.
Using the Report Manager, navigate to the folder that contains the End of the Month Financials report and then select New Data Source. Name the data source EOM Financials. Because this is a SQL Server–based connection, you supply the appropriate connection string, which includes the server name and database or catalog for the connection. Next, choose to store the credentials securely on the server, and supply a name and password—in this case, SQL authentication credentials. Finally, choose to hide the data source in list view so that you can prevent users from accidentally selecting it when browsing. Your configuration should look similar to Figure 10-9. After you click the Apply button to create the data source, all you need to do is associate the report to the new shared data source, which you’ll do in the following section.
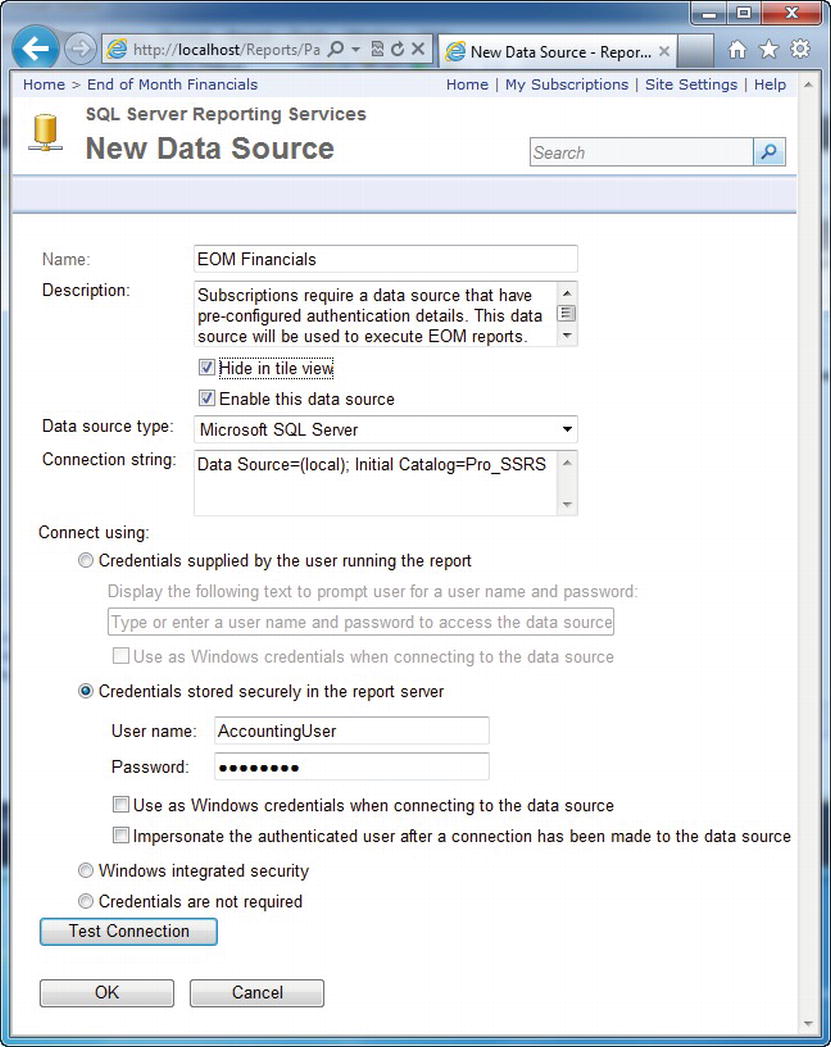
Figure 10-9. Data source selections
Altering Report Data Sources
Now that we have a shared data source that we can use for our Accounting reports, we need to change the data source that the report is configured to use. We can do this from the Data Sources tab under the report Properties within Report Manager. Navigate to our End of Month Financials folder in Report Manager. Next, place your cursor over top of the AR Reconciliation report. When you see the down arrow, click it, and then select Manage followed by Data Sources tab in the left menu. We have the option here to browse to an existing shared data source or create a new one.
As one may deduce, we could have left out the previous section and performed the creation and altering at the same step. However, we wanted to show you how you could use the New Data Source button to create a new data source that could be consumed by other reports needing pre-configured authentication settings. With that being said, let’s continue on and link this report to the shared data source that we just created. Click the Browse button and navigate to our EOM Financials data source under the End of Month Financials folder as shown in Figure 10-10. Click OK to alter the data source that the AR Reconciliation report was using and then click Apply to save the new settings. In the next section, we’ll show you how to create snapshots to store report history.

Figure 10-10. Altering a reports data source
Creating Snapshots for the Report History
The goal for the AR Reconciliation report is to allow it to execute at a specified time of month, during off-peak hours for performance benefits, and to maintain a historical picture of each month’s processing. To this end, we created the End of Month Financials shared schedule earlier in the chapter. Now it’s time to use a beneficial feature of SSRS, which is the capability to process a report as a snapshot.
A snapshot is a static “point-in-time” copy of a report. Two types of snapshots are used in SSRS: those generated as execution snapshots, which render a single report from a pre-executed point in time, and those generated to be stored in report history, which can contain multiple copies of a report at given points in time. In this section, we are concerned with showing how to configure the AR Reconciliation report to generate snapshots for the report history so that we can generate a series of historical financial reports.
You’ll use Report Manager to configure the report history properties for the AR Reconciliation report so that a snapshot of the report is generated each time the report is processed, according to the End of Month Financials schedule.
Let’s begin by looking at the available settings for storing the report history. As you can see in Figure 10-11, several settings affect not only the creation of snapshots, but also how the snapshots are stored in the report history. From within Report Manager, you can navigate to the Snapshot Options screen by placing the cursor over a report, clicking the down arrow, and selecting Manage as described earlier when navigating to the properties. Once you are in the report properties screen, click the Snapshot Options tab on the left.
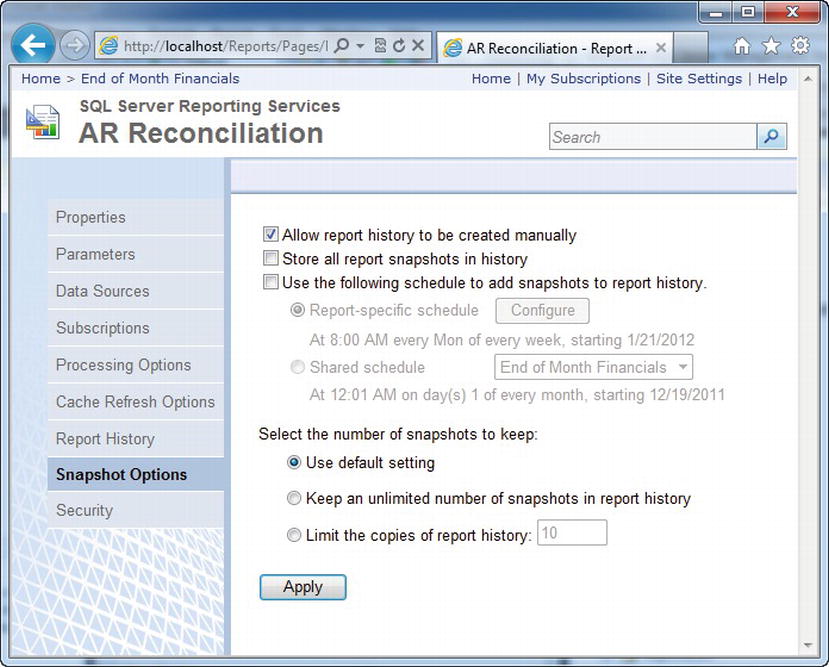
Figure 10-11. Report shapshot options
For the AR Reconciliation report, set the snapshot options so that
- Users will not be able to create snapshots for the report history. Set this entry so that only reports that are run by the schedule will appear in the report history.
- Report execution snapshots are not stored in the report history. This option is related to report execution properties, which is covered in the next section.
- The End of Month Financials shared schedule is used.
- The Default setting is used for the number of snapshots to keep in the report history. The Default setting keeps an unlimited number of reports, but you can change this via Site Settings in Report Manager. If a specific number of snapshots are selected to be kept, such as 10, then older snapshots are removed first to make room.
After making the selections as shown in Figure 10-12, click Apply.
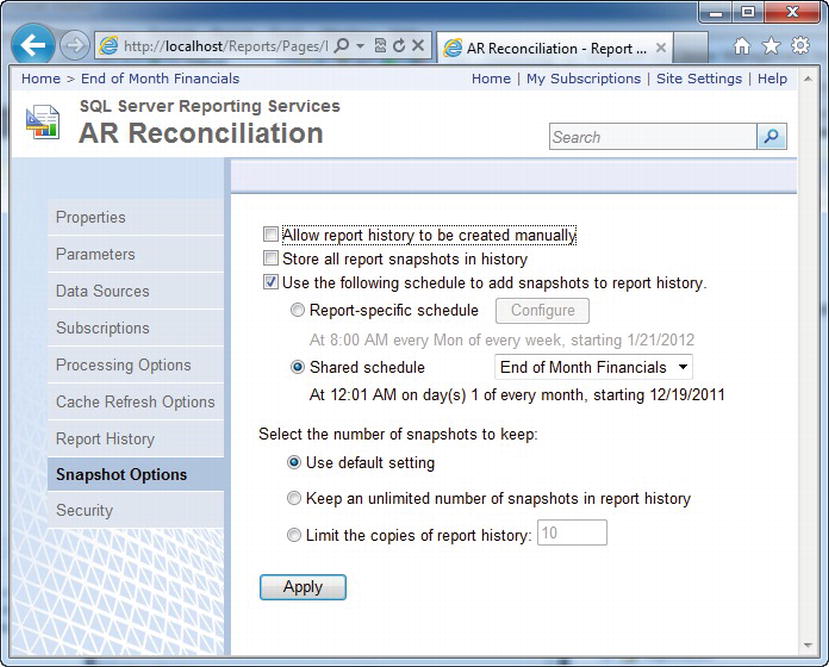
Figure 10-12. Snapshot option for the AR Reconciliation report
![]() Note In order to create snapshots and subscriptions, you will need to ensure that SQL Server Agent is running on the server containing the ReportServer database. If it is not running, you will receive the error: “The SQL Agent service is not running. This operation requires the SQL Agent service. (rsSchedulerNotResponding)”. If you see this error, just start the SQL Agent service in the Administrative Tools or in SQL Server Management Studio (SSMS).
Note In order to create snapshots and subscriptions, you will need to ensure that SQL Server Agent is running on the server containing the ReportServer database. If it is not running, you will receive the error: “The SQL Agent service is not running. This operation requires the SQL Agent service. (rsSchedulerNotResponding)”. If you see this error, just start the SQL Agent service in the Administrative Tools or in SQL Server Management Studio (SSMS).
Over time, the snapshots will be created in the report history. Users who have access to the report history can access the snapshots through Report Manager by navigating to the History tab for the report. The History tab for the AR Reconciliation report, as shown in Figure 10-13, indicates that over a four-month period, four snapshots have been generated, as expected.

Figure 10-13. AR Reconciliation report snapshots created on schedule
It is beneficial for performance to render a report from history, first because the report has been pre-processed and second because there is no need to query the data source for the report, as both the data and layout information are stored in the snapshot. When generating large reports, such as financial reports with hundreds of pages, we highly recommend using snapshots, as well as other performance-enhancing features of SSRS such as report caching, which we will cover next.
Processing Reports and Performing Caching
The AR Reconciliation report is now set up to be delivered from a schedule, rendered from a snapshot, and saved in the report history. Employees will also run this report on-demand, meaning that users can view the report with the most recent data. Because this is potentially a resource-intensive financial report, you should ensure that performance isn’t affected when the report is rendered for multiple users simultaneously. You’ll use Report Manager to configure the settings that control how the report is processed.
The first step is to navigate to the Properties tab for the AR Reconciliation report and then select Processing Options in the left frame. Figure 10-14 shows the available settings for report processing.

Figure 10-14. Processing options properties
The first processing selection, Always Run This Report from the Most Recent Data, has several options that control report caching.
Caching is an SSRS feature that allows temporary copies of a report to be stored and rendered to a user. The main advantage for creating a cached copy of a report is increased performance. Users who access a report that is set to be cached generate the first cached instance. Every subsequent user receives the cached copy if certain conditions are met. The conditions for a user to receive the cached copy are as follows:
- The subsequent user must access the report within the time interval before the cached report is set to expire. When the cached report expires, the next user must create a new copy.
- If the cached report has parameters that change during subsequent executions, and each user receives a new report based on that parameter, each report that’s generated becomes a cached copy specific to the parameter value.
- The report’s data source isn’t set to Windows authentication or to prompt the user for login credentials.
For our report, instruct SSRS to cache a temporary copy of the report and expire the cached copy after ten minutes. Ten minutes is generally a good length of time to maintain cached reports, although it really depends on the time sensitivity of your data. The data in a cached report will, of course, reflect the time at which the report was rendered rather than the current time, and short of printing the execution time on the report, users have no way to know if they’re viewing a cached or live report.
The second selection, Render This Report from a Report Snapshot, shouldn’t be confused with a snapshot that creates a report history. An execution snapshot, unlike a history snapshot, is viewed from a Report folder in Report Manager just like on-demand reports would be viewed. History snapshots, on the other hand, are viewed from the Report History tab of the report and can accumulate many copies.
Snapshots don’t expire like cached reports; rather, they’re refreshed at a specified interval. If you choose to generate an execution snapshot for a report, then that report can’t be cached. In this example, don’t select this option.
The final report execution option sets the timeout interval for the report, either at a default setting, which is typically 1,800 seconds (30 minutes), or at a specified value. This is an important setting because long-running reports use valuable system resources. You’ll use the default value for the AR Reconciliation report.
We mentioned the trade-off involved in using caching for reports with time-sensitive data. Another important consideration when choosing to use either snapshots or cached reports is disk space. Over time, history and cached reports set with lengthy expiration times can accumulate. The cost of disk storage compared to the performance and subsequent productivity increase is negligible, however, and shouldn’t stop anyone from taking advantage of these beneficial features of SSRS.
Managing Subscriptions
Subscription services for SSRS provides a means for delivering pre-executed reports to specified locations, to a user via e-mail, to a network file share, or even directly to a printer. Using subscriptions has several key benefits. Internally in an organization, employees need key information at certain times, such as daily or at the end of a month. Externally, customers may want to receive newsletters or financial statements on a predetermined schedule. Subscriptions can accommodate both of these needs easily.
Setting up subscriptions has the added benefit of allowing you to schedule the processing of resource-intensive reports at off-peak hours, thus ensuring little or no degradation to network performance during periods of heavy usage. You’ll be working with two types of subscriptions in this section:
- Standard subscriptions: Statically set up for one or more users.
- Data-driven subscriptions: Subscriber lists can be derived from multiple data source locations and can be generated from a custom query.
![]() Note Data-driven subscriptions are by far the most powerful form of subscriptions. They’re available only in the Enterprise edition of SSRS.
Note Data-driven subscriptions are by far the most powerful form of subscriptions. They’re available only in the Enterprise edition of SSRS.
Managing Standard Subscriptions
You’ll begin by setting up a standard e-mail subscription for employees in a health care organization that provides home-care services to patients. The report, called Patient Recertification Listing, was designed for employees who are responsible for tracking patient documentation. You can create standard e-mail subscriptions with any report. In our business, it is a requirement that the patient’s documentation, in this case an HCFA 485, be completed and signed by the attending physician. The report is essentially a daily work list for these employees, where any documentation that is unsigned becomes a work item.
You can find the Patient Recertification Listing report in the Pro_SSRS report project provided in the Source Code/Download area on the Apress Web site (www.apress.com). You can deploy the report to your report server using BIDS. Open the Pro_SSRS project, and change the TargetReportFolder for the project to Patient Documentation. Next, right-click the Patient Recertification Listing report, select Deploy to create the Patient Documentation folder, and publish the report and data source to your report server. It is important to note that the Pro_SSRS data source that is provided in the Pro_SSRS project uses Windows authentication, and for subscriptions to work successfully, the credentials will need to be stored securely in the database. To change the deployed Pro_SSRS data source from Windows authentication to stored credentials, navigate in Report Manager to select the Pro_SSRS data source in the Patient Documentation folder. Change the Connect Using option to Credentials Stored Securely in the Report Server, and supply the appropriate credentials.
Because this report needed to be generic enough for on-demand viewing in addition to being used for subscriptions, we added a report parameter called Unsigned that works with a report filter to show patients with both signed and unsigned documentation. This report has other parameters as well, as shown in Figure 10-15. As you’ll see, you will use the parameters when you generate the subscription.
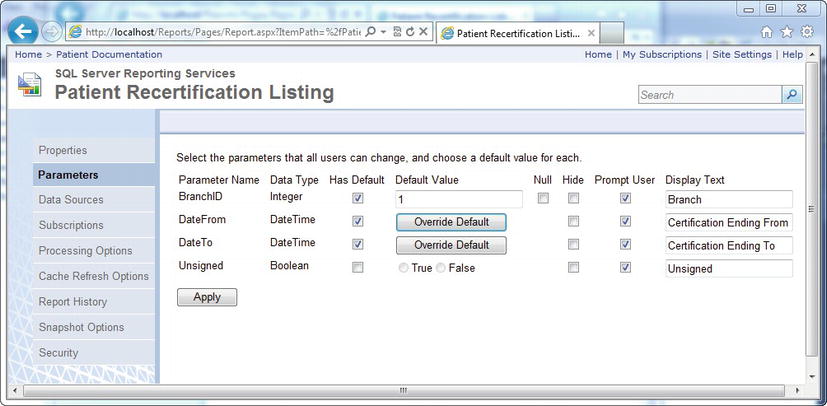
Figure 10-15. Patient Recertification Listing report with parameters
Creating a Standard Subscription
The first step in manually creating a subscription is to run Report Manager and navigate to the report for which you want to create the subscription. For the example, navigate to the Patient Certification Listing report, which is in the Patient Documentation folder on the report server. Place your cursor over top of the report until you see the down arrow and click it to view the options menu. From here you have the option to select Subscribe or Manage and then navigating to the Subscriptions tab. However, this time we are going to select Subscribe to create a new subscription for the report. If you have configured your SMTP server correctly during installation, you will be given the choice to select E-mail as the delivery option. If the E-mail option is not available, you can use the Reporting Services Configuration Manager to set up e-mail, as shown in Figure 10-16. The Reporting Services Configuration Manager can set many of the same properties that control the report server as the command-line tools. The Reporting Services Configuration Manager is a good tool to use to set the properties of the report server that may need to be configured post-installation, such as the report server virtual directory or the account used to execute unattended reports. You’ll use the Reporting Services Configuration Manager again to join the instance of SSRS to another report server, which creates a Web farm of report servers to gain performance. For now, verify that the SMTP settings are correct.

Figure 10-16. Reporting Services Configuration Manager, e-mail settings
A subscription that is delivered via e-mail provides standard delivery options for Cc, Bcc, Reply-To, Subject, Priority, and Comment, which will be the body of the e-mail message. You can also send the entire report in the e-mail, a link to the report, or both. Because the user who will be receiving this subscription will have network access to the report server, you can send just a link to the report. Sending the report itself via e-mail does have benefits, however, especially when working with users who need the report offline, such as traveling staff. We will demonstrate this in the next section when you set up a data-driven subscription. Figure 10-17 shows the e-mail options available for a report subscription.
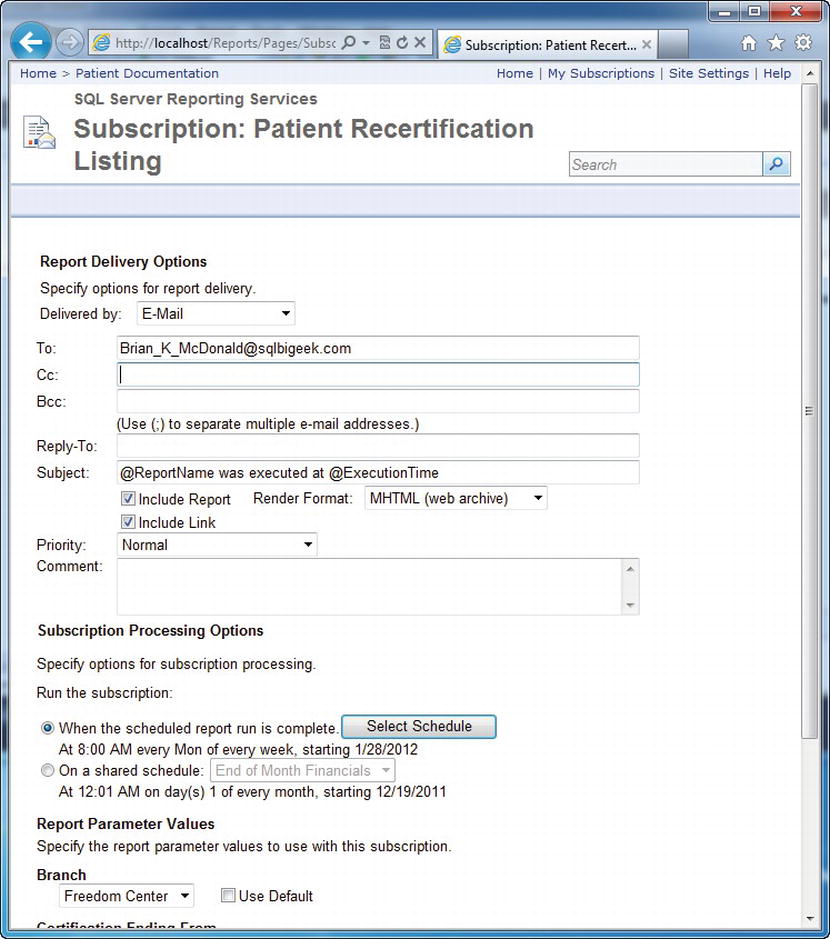
Figure 10-17. E-mail options for subscriptions
Configuring the Subscription
In order to provide an automated delivery system, we can configure Reporting Services subscriptions to execute at a predefined scheduled time and frequency. You can customize the schedule for individual reports or based on a shared schedule. The Patient Recertification Listing report needs to be delivered to staff members daily, and it can be run anytime after 5:00 PM on the previous day as long as it is delivered by the next business day. For our needs, a schedule of 9:30 PM every day except Saturday is sufficient, as shown in Figure 10-18, which is set by clicking the Select Schedule button under Subscription Processing Options.
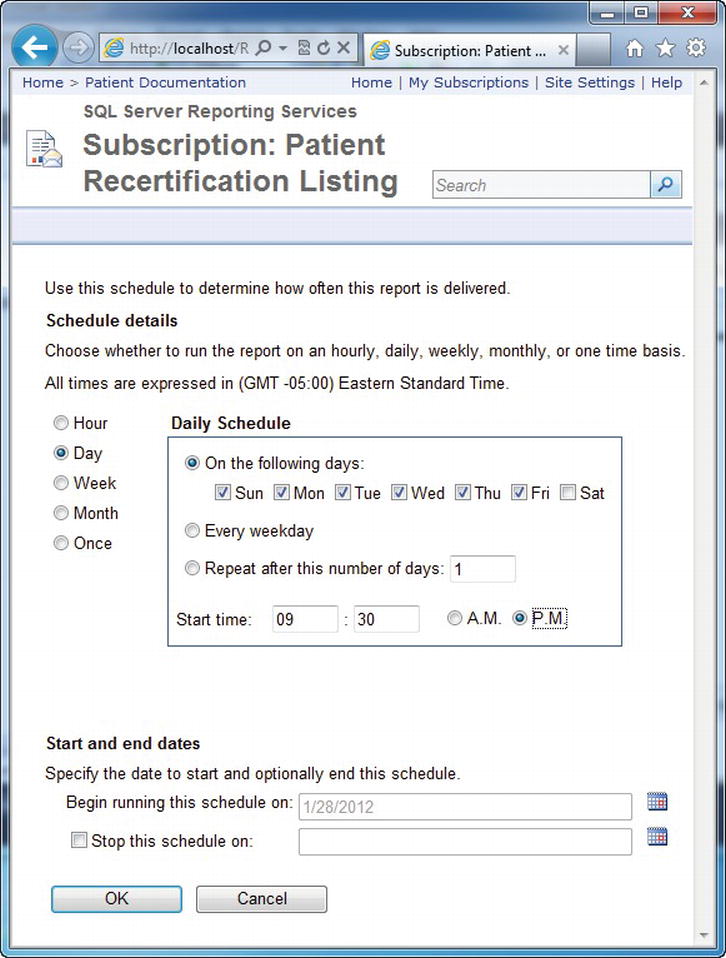
Figure 10-18. Daily schedule for Patient Certification Listing report
After making the appropriate scheduling modifications, click OK to save the changes. This report contains parameters, and we will want to configure the parameters for this subscription. As we mentioned earlier, this particular report has a parameter called Unsigned, which is a Boolean data type (either True or False) that shows both signed and unsigned documentation. The subscribers of this report, however, will be interested in seeing only unsigned documentation, so set the parameter for Unsigned to be True. Because this report has been designed to provide populated drop-downs for the parameter values that are based on individual datasets, these values are available here, such as populated Branch selections, as shown in Figure 10-19. For now, leave all the parameters, except Unsigned, with their default values.
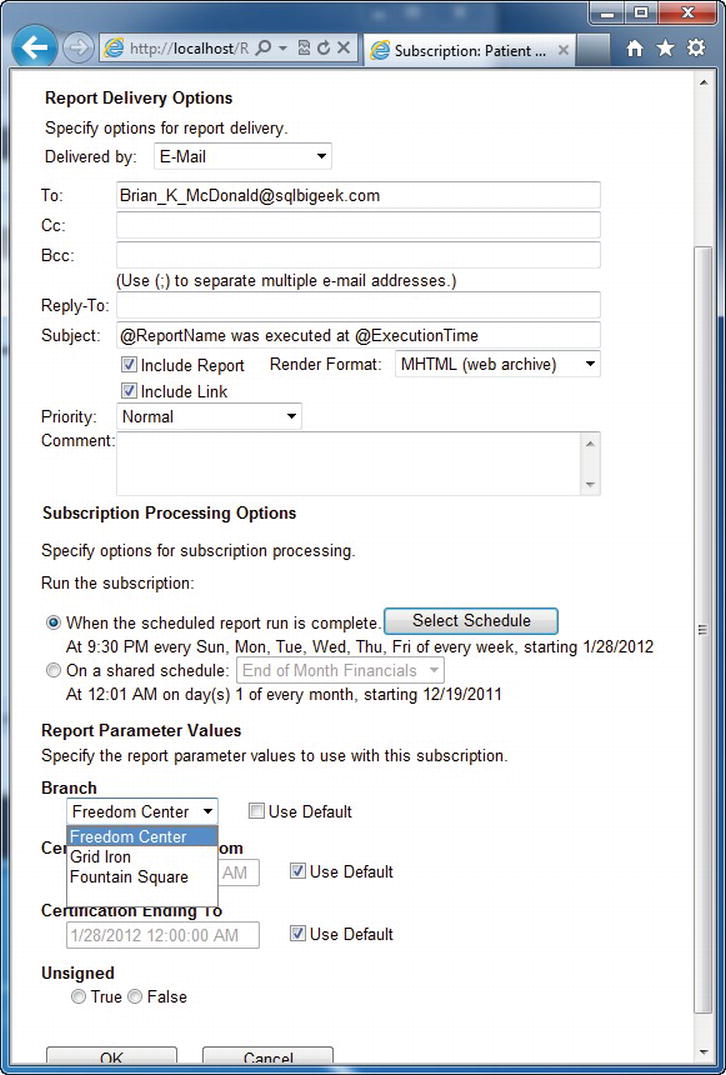
Figure 10-19. Subscription parameter drop-downs
To verify that the subscription is working as anticipated, we made [email protected] the sole recipient of the mail for testing. In Figure 10-20, you can see standard e-mail options for To, Cc, Bcc, and Reply-To. In the To field, you add the recipient’s e-mail address and then click OK to add the subscription. After you verify the subscription’s success, modify the attributes of the subscription to add the real subscribers by navigating to the report in Report Manager, selecting Subscriptions, and then selecting Edit.
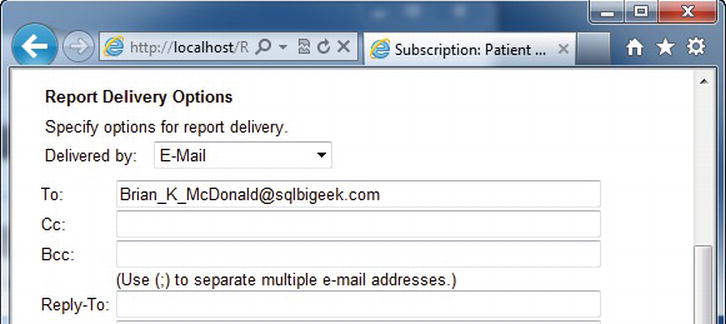
Figure 10-20. Assigning recipients to subscriptions
Managing Data-Driven Subscriptions
Standard subscriptions address the needs of many companies that want to set up custom subscriptions for both their employees and their customers. However, you can use another, much more flexible method for delivering reports: the data-driven subscription. Data-driven subscriptions allow administrators or content managers to query a data source—a SQL Server table, for example—to return a list of subscribers that meets a specific set of criteria. This is the ideal way to deliver reports to a wide-ranging list of subscribers. In addition, you have to manage only one subscription for all subscribers, and those subscribers could have different parameters that are used to generate personalized reports.
We knew we would want to let our customers and their employees take advantage of data-driven subscriptions, and fortunately we had long ago structured our application database to include employee information that would be useful for just this purpose. By storing the employees’ e-mail addresses as well as other data, such as geographical locations and certifications, we had all we needed to provide a flexible delivery system, via e-mail, to traveling staff. The employees we initially targeted were clinicians who had a daily schedule of patients to see. Most of the clinicians operated laptops or PDAs as part of their daily routines.
Designing the Subscription Query
The first step was to redesign a report in SSRS so that it would provide clinical employees with their daily schedules and parameterize it so that it would be employee-specific each time it was executed. As part of the data-driven subscription, the report would be processed and delivered to employees as both an embedded, printable format such as PDF or WORD, and as a link to connect to the SSRS report server if they were online. Figure 10-21 shows the report we created, Daily Activity.
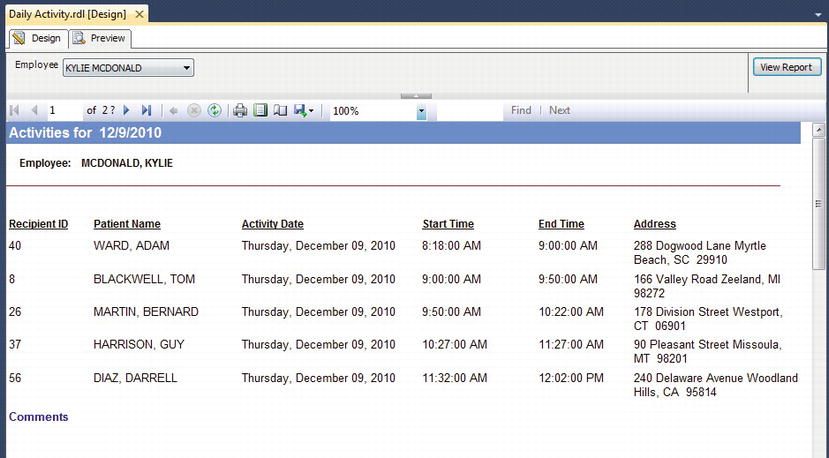
Figure 10-21. Daily Activity report
Because data-driven subscriptions are based on just that, data, a query to drive the subscription is essential. It is important to design the query to have selective criteria, because SSRS delivers a copy of the report for every record that is returned from the data source.
For our recipient list, we use the query in Listing 10-2. Essentially, the query returns all employees who have an e-mail address and who also have scheduled activities for the day following the date of report execution. The report is processed and delivered after hours. It is unusual in our environment that an employee’s schedule will change after 9:00 PM, so we set up the report to execute at that time.
Listing 10-2. T-SQL Query to Return the Subscriber List
SELECT DISTINCT

        EmployeeTblid, Email, HWUserLogin, ActivityDate

FROM

        Employee E (NOLOCK)

        JOIN Activity A (NOLOCK) ON E.EmployeeTblid = A.ProviderID

WHERE

        E.Email IS NOT NULL

        AND A.ActivityDate BETWEEN GETDATE() AND GETDATE() + 1
When this query is executed, the output of the query yields six rows of data, as you can see in Table 10-1, indicating that six clinicians have activities for the next day. You have many ways to format and compare datetime values. However, in this case, using the GETDATE function to compare the current date with the ActivityDate field value was the best choice. It was necessary to use BETWEEN with GETDATE because the ActivityDate value defaults to 00:00:00 for the time value, whereas GETDATE returns the current time. The comparison values wouldn’t match in a one-to-one comparison.
![]() Note The data in the Activity table is static and therefore may not work as expected when you use the
Note The data in the Activity table is static and therefore may not work as expected when you use the GETDATE() function, as there may be no rows to return at the time you run the query. You can easily update the activity dates to be reflective of your current datetime or change the query itself to go back (n) days where n represents the number of days to go back in time.

Creating the Data-Driven Subscription
Now we will show the procedure for creating the data-driven subscription in Report Manager. The Daily Activity report is included in the Pro_SSRS report project available in the Source Code area of the Apress Web site. You can deploy the report to any folder on your report server for testing the subscription. Make sure when you deploy the report that you modify the Pro_SSRS data source that is deployed with the report so that it stores the credentials on the report server, which is required for the subscription to be created. Open the browser, and navigate to the Daily Activity report, and from there select click the down arrow and select Manage. Once you’re on the report properties page, select the Subscriptions tab on the left. On the toolbar, select New Data-Driven Subscription. Follow these steps to complete the data-driven subscription:
- Choose a name, delivery method, and data source type.
- Choose the data source location or define a new data source.
- Choose the command or query to return a list of recipients.
- Choose the settings for the E-mail delivery extension.
- Choose the report parameters.
- Choose when the subscription will be processed.
- Set up a schedule for the report.
The most important of these steps is step 4, in which you specify the settings for the delivery extension. This is where you’ll use the data from the driving query to instruct SSRS how to send the subscription. Every selection in step 4 has the option to retrieve the value derived from the query used in step 3, which is much more versatile than a standard subscription.
You paste the query into the query box in step 3, as you can see in Figure 10-22, and verify it by clicking the Validate button. From this point, the fields you selected in the query, namely EmployeeTblid, Email, HWUserLogin, and ActivityDate, can all be used as criteria in the remaining steps.
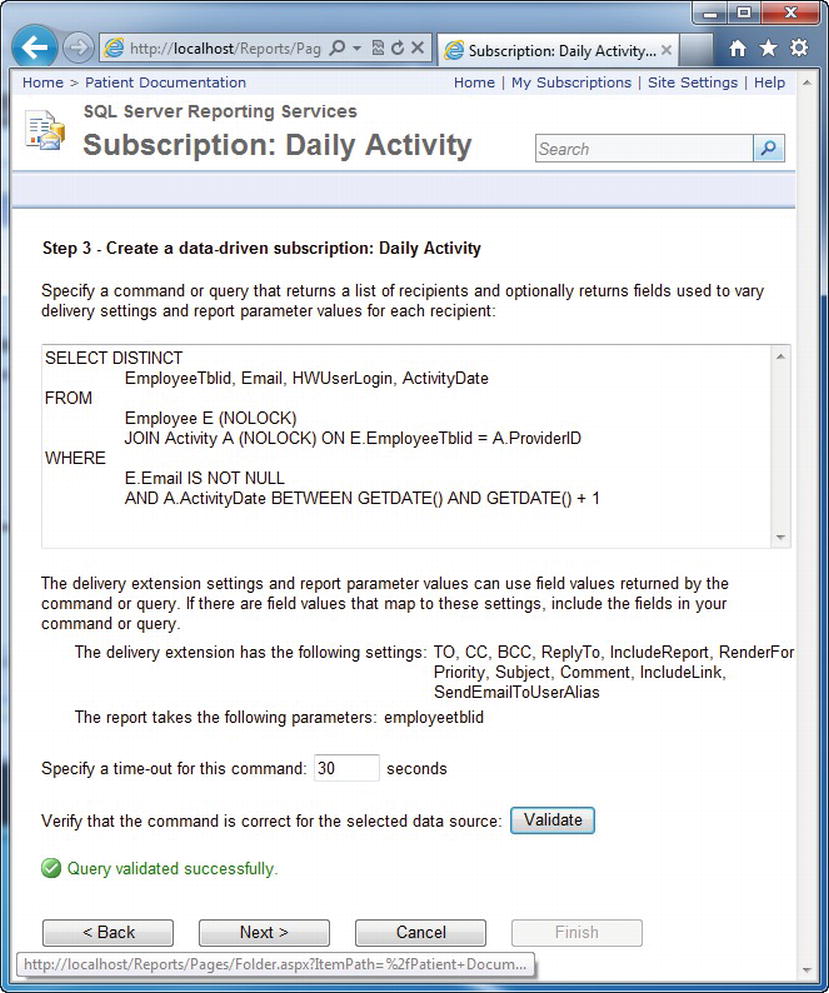
Figure 10-22. The verified query that drives the subscription
In step 4, several settings control how the report will be sent to subscribers: To, Cc, Bcc, ReplyTo, IncludeReport, RenderFormat, Priority, Subject, Comment, and IncludeLink. For each setting, except To, you can choose a static value, a database value, or no value, as shown in Figure 10-23. You assign the To field to the Email field from the subscription query. Leave the values for all the other fields at their default settings and click the Next button to proceed to Step 5 – Create a data-driven subscription. By leaving the defaults, the subscription automatically includes the report itself and the link to the report in the e-mail to the subscribers.
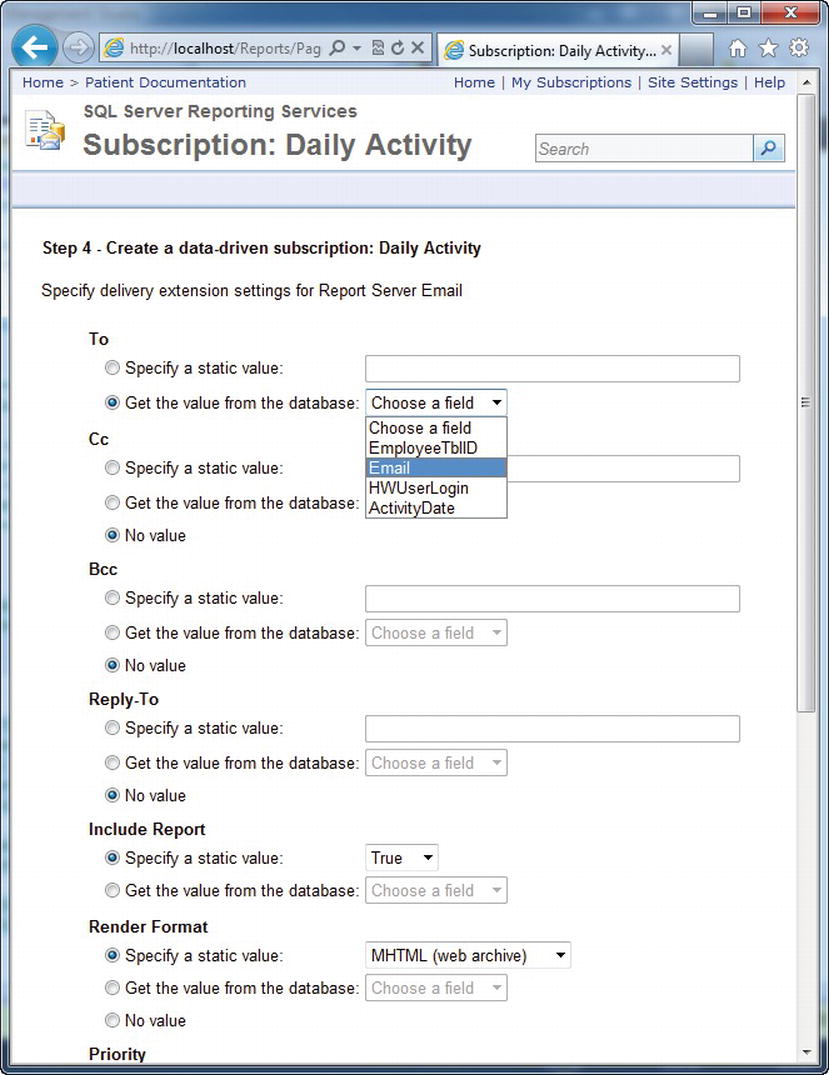
Figure 10-23. Subscription settings
![]() Note With data-driven subscriptions, unlike with standard subscriptions, you can control the rendering format per subscriber because it too is a data-driven setting. If you need to control the rendering format per user, you can add a field to store this value in the Employee table and select this value in the query. Also note that the default rendering format for subscriptions is a Web archive. For many types of reports, this isn’t the ideal choice. Other printable reports are better suited for printed reports, such as Adobe Acrobat PDF, Microsoft Word files or static image files such as TIFF.
Note With data-driven subscriptions, unlike with standard subscriptions, you can control the rendering format per subscriber because it too is a data-driven setting. If you need to control the rendering format per user, you can add a field to store this value in the Employee table and select this value in the query. Also note that the default rendering format for subscriptions is a Web archive. For many types of reports, this isn’t the ideal choice. Other printable reports are better suited for printed reports, such as Adobe Acrobat PDF, Microsoft Word files or static image files such as TIFF.
In step 5, you have the option to specify a static value or a value from the database. Since you want the subscription to produce one report for every record returned, you’ll select the radio button to get the value from the database. The EmployeeTblid field is used for the one parameter in the report. Because you’ve selected this field in the query and passed this as a parameter input, each report is automatically generated with data specific to the employee who subscribed to the report. Select EmployeeTblID as the value to use as the parameter and click the Next button. The other field, HWUserLogin, is put in the driving query, which you’ll ultimately compare to the Windows login name of the user executing the report. You can accomplish this, as you’ll see in Chapter 11, by using the User global collection.
For the final step, you create a schedule that processes the report each weeknight at 9:30 PM, as described earlier. You can create another shared schedule to process the subscription and test it to verify that the e-mail is being delivered successfully. After that is complete, you’re finished with the subscription configuration.
Performing Execution Auditing and Performance Analysis
As you deploy SSRS between development, test, and production environments, you'll find that gauging performance involves a variety of benchmarking and analysis tools. Based on the performance analysis, administrators are armed with the knowledge of what stress levels their servers can endure, and they’ll be able to configure the environment accordingly. We’ll show how to put the components of your SSRS deployment to the test and show how to analyze the output using standard tools.
![]() Note The SSRS 2008 release brought us a redesigned reporting engine, with its memory management features enhanced by removing the reliance on IIS that prior versions of SSRS suffered. With that release, both Web and Windows services were combined into one Windows service.
Note The SSRS 2008 release brought us a redesigned reporting engine, with its memory management features enhanced by removing the reliance on IIS that prior versions of SSRS suffered. With that release, both Web and Windows services were combined into one Windows service.
Many agencies need to monitor and archive the details of user activity. This is especially important if you suspect there’s undesired access to data. SSRS provides a built-in logging feature that captures several key pieces of information. This information is useful in two ways:
- You can capture performance information about the reports, such as the processing duration and record count.
- You can capture security information, such as who executed the report and whether or not they were successful.
The first goal in the following sections is to set up and extend the built-in logging functionality of SSRS using tools provided in the SSRS installation. You’ll need to log all activity so that you can pinpoint the reports and users who are most impacting the server. We have created a custom SSRS report, Report Execution Log, which will deliver the logging statistics to administrators and contain dynamic column groupings based on a report parameter. We’ll show how you can use this report for your SSRS deployment.
The second goal in the following sections is to show how to perform benchmarking tests on the SSRS servers in our test Web farm to ensure there won’t be any unexpected performance problems when SSRS is deployed to a production environment. We’ll show how to work with a Web application stress-test utility called Application Center Test (ACT) to gauge performance.
Configuring SSRS Logging
Getting to the execution log information in SSRS is a fairly straightforward procedure. It consists of a main table in the SSRS database called, appropriately enough, ExecutionLogStorage. When SSRS is installed by default, execution logging is enabled and set to maintain 60 days of logging. After 60 days, the log entries older than 60 days are removed from the table automatically. However, you do have the option to change the duration by connecting to the instance of SSRS using SSMS, then right clicking the server and selecting Properties. After the Server Properties windows comes up, navigate to the Logging tab. Figure 10-24 shows the settings if you wanted to change the number of days to hold 365 days rather than the default 60 days.
With the execution details being stored and being that one of the aims is to build a custom SSRS report to deliver report execution information to administrators, you’ll need to be able to query the log data. Fortunately for us, Microsoft has created three views that utilize the execution details to make it easy to determine information such as the user executing the report, duration a report took to process or render and even if it was executed interactively or via a subscription. The three views in the ReportServer database are ExecutionLog, ExecutionLog2, and ExecutionLog3. We will utilize these views as a basis for our administrative report.
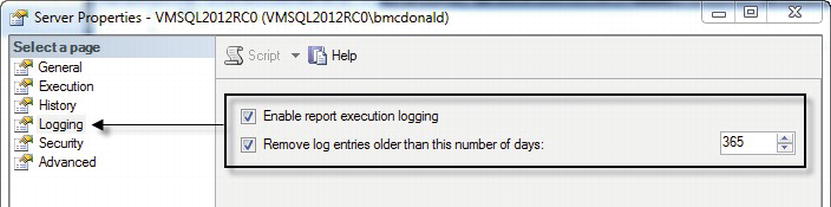
Figure 10-24. Report Server Property execution log settings
Transforming the ExecutionLog Table
Setting up SSRS to transform the logging data is a simple step-by-step procedure. Over the last several years, we have created many solutions to transfer and store the execution data into a historical database so that we do not lose any of the execution details when SSRS removes it from the database. One such solution is to use a SQL Server Integration Services (SSIS) package to transfer the execution history on a daily basis. As part of the Pro_SSRS solution, we have included a SSIS project with a single package called Pro_SSRS_Load_ExecutionLog.dtsx. Furthermore, as part of the download is the Pro_SSRSExecutionLog database. You will need to have this database restored in order for the Pro_SSRS_Load_ExecutionLog package and the reports created in this chapter to run. See the ReadMe.txt file for detailed instructions on how to restore the Pro_SSRSExecutionLog database. You can download the Pro_SSRS project from the Source Code/Download section of the Apress Web site (www.apress.com).
The Pro_SSRS_Load_ExecutionLog package is pretty straightforward. At the top of the package, we just check for the existence of the database and if it does not exist, it branches to a statement that creates the database, a table for archiving the Execution log and loads it with all records up to yesterday. If the database already exists and the records are not already present in the database, then all of those records are pulled into the archival database from the ReportServer database. Upon scheduling this package on a nightly basis, it will get the data for the prior day. Figure 10-25 shows the package results after completing a day’s load when run interactively in the development environment.
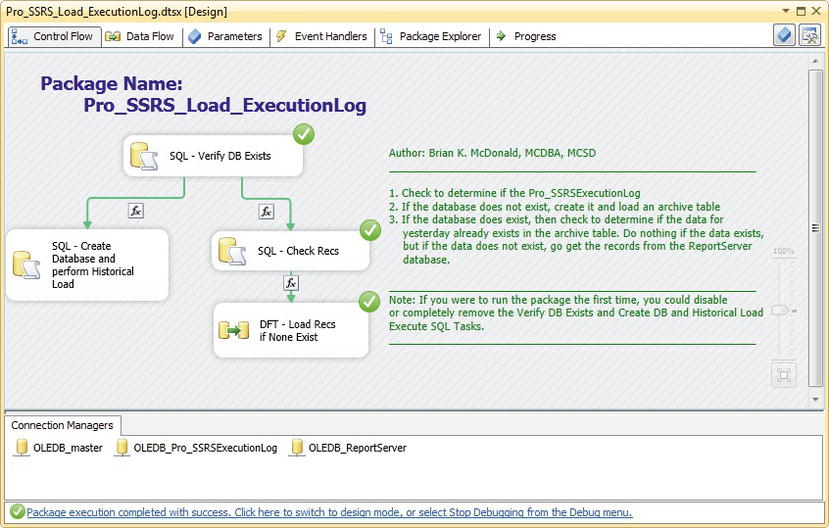
Figure 10-25. Pro_SSRS_Load_ExecutionLog SSIS package
![]() Tip Note that the package needs to be executed regularly to keep the transformed log data current. In our situation, we created a scheduled job for this purpose that runs the SSIS package every evening.
Tip Note that the package needs to be executed regularly to keep the transformed log data current. In our situation, we created a scheduled job for this purpose that runs the SSIS package every evening.
Microsoft provides a set of sample reports that you can use with the ExecutionLog database. These reports are included in the SQL Server 2008 installation in the following location: SamplesReporting ServicesReport SamplesServer Management Sample ReportsExecution Log Sample Reports. The sample reports are useful for giving administrators information, such as report execution by user and report size, among other things. You will find three SSRS execution log sample reports in all. One of these, Execution Summary, is shown in Figure 10-26.
In prior releases of SSRS, Microsoft has provided a set of sample reports that you can use to report data from the ReportServer database in conjunction with an SSIS package that can be used to transfer the data. However, as of today, no new version has been created for the 2012 release. As such, we have created a sample Execution Summary report that gives us a few meaningful metrics that our administrators want to keep an eye on. Some of those metrics include total number of executions, successful executions, failed executions, and number of executions by day number of the month.
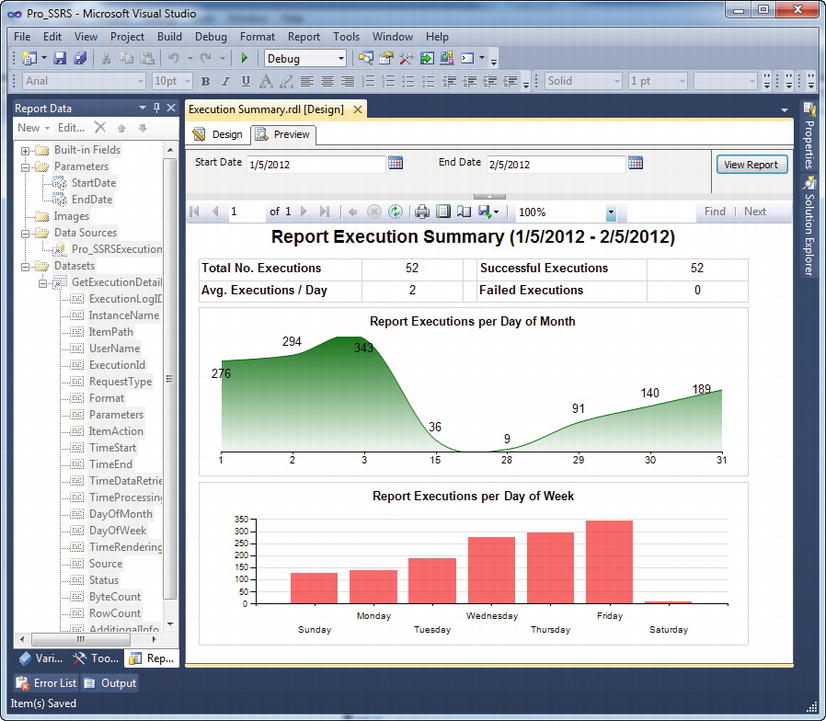
Figure 10-26. Execution Summary sample report
Designing the Log Report
We knew we would need another report that contained all the execution log information and was easy for administrators to analyze. Thus, we created a matrix-style report, called Report Execution Log, using data from a single query.
To measure performance from information contained in the execution log, you need several statistics:
- Total time to retrieve the data: How long did it take to retrieve data?
- Total time to process: How long did the report take to process?
- Total time to render: How long did the report take to render?
- Byte count: How many bytes are in the report?
- Row count: How many rows of data are in the report?
In addition, knowing when the report was executed is also useful. For the row groupings in the matrix, we want to see what report was executed, who ran the report, and from which client machine the report was run. For the column group, we want to have two possible selections: rendering format, such as HTML 4.0, Word or PDF, or source types, meaning how SSRS generated the report (live, cache, or snapshot, for example). Source_Type is an important field to monitor because how SSRS generates reports directly impacts performance. Generating reports from a cached copy or a snapshot, which are both pre-processed copies of reports, is a performance benefit. If SSRS is always generating live or on-demand reports for users, performance may suffer.
To accomplish the dynamic column groupings in the matrix, you’ll use a parameter called Column_Group that takes the values of the field names in the query, Format or Source_Type. You’ll use a default value of Format so that the report is automatically rendered when previewed. Both the column grouping and heading values will use the following expression to make the column dynamic based on the parameter:
=Fields(Parameter!Column_Group.Value).Value
When the report is rendered, as you can see in Figure 10-27, it will default to the Format field, but you can change it dynamically by changing the parameter drop-down selection to Source_Type.
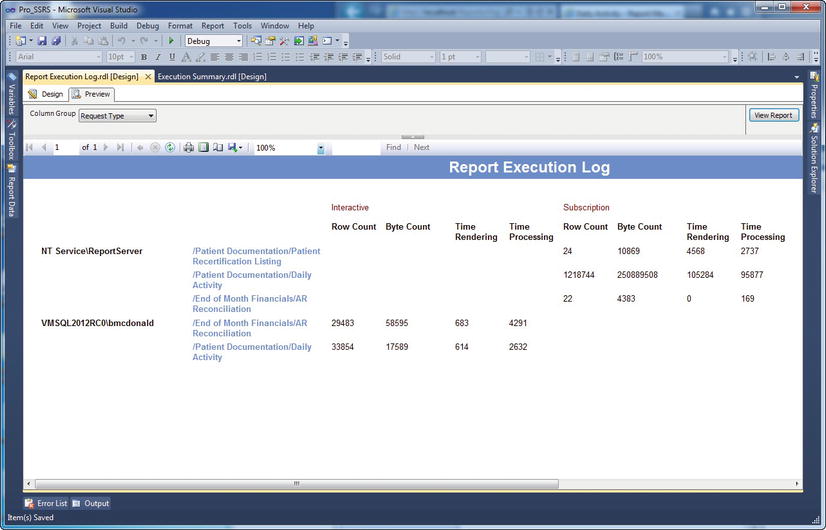
Figure 10-27. Report Execution Log report
Monitoring Performance
Of course, no one wants to experience the frustration of building a solid reporting solution in a development environment only to find out that, when deployed to the masses, it can’t hold up under the strain. Generally, it’s a best practice to put a simulated load on your servers to gain a better understanding of how the systems will function. As well, when you roll out a full solution, it’s a common practice to roll out several pieces at a time to a limited number of users. That is what we’ve done in our online models.
The strategy for rolling out should also include a plan for which reports will be available on-demand versus which ones will be provided via report snapshots or subscriptions, as you’ve done up to this point in the chapter. Combining a strategy of peak and off-peak report processing will greatly improve performance. Another consideration for performance with SSRS lies in splitting the load of SSRS Web services and database services. That is, if the entire SSRS installation resides on the same system, this could negatively impact performance.
In this section, we’ll show the results of a stress test that we ran accessing two report server instances on two separate servers, RS05 and HWC04. Many tools, such as SSRS, are available for stress testing Web applications; fortunately, the Ultimate edition of Visual Studio 2010 has a Web stress-test tool built in that we used to perform a simulated load on the two servers with up to 250 virtual users out of the box. You can find out more about the web test tool at www.microsoft.com/visualstudio.
We’ll also show you how to use rsconfig to join an SSRS server to a Web farm to see how offloading resources to another system will enhance performance. The Reporting Services Configuration Manager can also be used for this purpose.
We began by running a simulated load of 15 users, all executing a single report against RS05. We quickly assessed the performance impact by monitoring the server with Task Manager. Fortunately, when running the simulated load against our Reporting Services server, it didn’t take that high of a performance hit. However, in some instances you may get results that max out the CPU. In those instances, you are likely to find that the individual processes that are taxing the processor are SQL Server and the ReportingServicesService.exe. Figure 10-28 shows spikes of our CPU usage jumping between 25 and 85percent as the test was running.
We knew our test SSRS server was a four processor system with more than 3GB of RAM. In the case where your CPU usage is getting maxed out, this tells us that it is the CPU that is the bottleneck. Because our production deployment of SSRS would not mirror the setup of RS05 (in other words, the production server would be a high-end system with at least 32GB of RAM), we could take that into consideration.
However, one other factor would have a substantial impact on the difference in performance between the production and test environments. In the test environment, the SSRS service and SQL Server were on the same system, RS05. What if we configured the SSRS service to use a remote SQL Server instance for its database? Any performance degradation caused by accessing the ReportServer database over the network instead of a local database would be negligible if the CPU utilization percentage dropped down to a more manageable number.

Figure 10-28. Task Manager
If you have two SSRS servers, then moving an SSRS server from one instance to another is simple. We had two SSRS servers in the test environment, RS05 and HWC04, so the move was easy enough. To instruct the SSRS service on RS05 to use the SSRS databases on HWC04, we used the command-line utility rsconfig. The rsconfig command or Reporting Services Configuration Manager is required when first joining one SSRS Web service to a Web farm that uses the same ReportServer database. The syntax for the rsconfig command is as follows:
rsconfig -c -s HWC04 -d ReportServer -a SQL -u username -p password
With RS05 using the remote SQL Server database, we initiated another test to see whether the CPU utilization improved. The CPU utilization improved substantially and was now under the 60 percent average.
![]() Note Specific licensing guidelines are available for the SSRS 2012 deployment and the location of the databases and data sources. For more information, visit
Note Specific licensing guidelines are available for the SSRS 2012 deployment and the location of the databases and data sources. For more information, visit www.microsoft.com/sqlserver/en/us/get-sql-server/licensing.aspx.
Controlling SSRS Programmatically
There are two main methods of controlling SSRS 2012 through code:
- Web services
- Windows Management Interface (WMI)
In the following sections, we’ll give an introductory look at using both of these technologies to manage reports from code. You’ll use the SOAP API, otherwise known as the Report Server Web service, to add subscription functionality to the SSRS viewer that you created in Chapter 9. You’ll now extend it to allow your users to add subscriptions for the reports you’ve developed and deployed so far. This has two main benefits. First, it allows you to offload some of the processing activity from the SQL Server and SSRS 2012 server during the day, when they are used most heavily. Second, it saves the executives who want to receive the reports from spending time navigating to the report server, entering the parameters, and waiting for the results. Each of the code listings below will be shown in C#, but VB versions are in the Pro_SSRS project download, available in the Source Code/Download section of the Apress Web site (www.apress.com).
Controlling SSRS with SOAP
The SSRS 2012 Report Server Web service offers a feature-rich way of interacting with and controlling your reporting server. Based on SOAP and operating over HTTP, the Report Server Web service is a simple, yet powerful, way to access the features of the server. In fact, SSRS 2012’s Report Manager is built using ASP.NET and the SSRS Report Server Web service.
Using the Report Server Web service, you can create custom applications that control all aspects of the server and cover the entire reporting life cycle:
Adding Subscription Functionality to SSRS Viewer
You’ve already used the Report Server Web service to provide a list of report parameters and their possible values and to deploy reports in Chapters 8 and 9. In this chapter, you’ll learn how to use the Report Server Web service to schedule reports to run automatically each morning before the office opens.
As you saw in the earlier part of this chapter, you can set up subscription services through the user interface of the report server itself. You may, however, want to provide this functionality within your customized Windows Forms (or Web) application. In the example, you’ll expand on the previous Windows Forms application to allow users to provide the parameters that they want to run the report with, as well as schedule the time to run the report and indicate the delivery mechanism to use.
In the example, you’ll allow the users to pick only a shared schedule that has already been defined by the systems administrator. Because you want centralized control over when scheduled reports will be run, you won’t give users the ability to define their own schedules. You’ll also allow them to trigger a subscription based on a snapshot. This allows them to receive their subscribed report whenever a snapshot is created for it. See the “Creating Snapshots for the Report History” section earlier in this chapter for details.
Before you run the included examples, make sure to read the ReadMe.htm file. It is located in a file in the samples root folder. If you have the code open in Visual Studio, it will be under the Solution Items folder. It contains setup and configuration steps that are required before running the examples.
Accessing an Existing Shared Schedule
If you are walking through this code, start by opening the project from Chapter 9, as it will serve as the starting point for our additions. After you have the solution, open the SSRS Viewer RVC project, and complete the following steps:
- Select Project
Add New Item.
- In the Add New Item dialog box, select Windows Form, and enter PickSchedule.cs for the name.
- With the PickSchedule.cs form open in design mode, resize it to 450×150 through the properties page.
- Add a label, set its Text property to Schedules, add a combo box named sharedSchedules, and add a button named setSchedule and set its Text property to OK. When you’re done, you should have a form that looks like Figure 10-29.

Figure 10-29. Pick Schedule dialog box
Now select View Code for the PickSchedule class. For this example, you’ll add a few using statements to import types defined in other namespaces so you can avoid typing the full namespaces during the actual coding. Add the namespaces shown in Listing 10-3 to the PickSchedule.cs class file below the other using statements.
Listing 10-3. Importing Namespaces
using System.Collections;

using System.Diagnostics;

using System.Web.Services.Protocols;

using SSRS_Viewer_RVC.SSRSWebService;
Next, add the class variables shown in Listing 10-4 to PickSchedule.cs just below the class declaration. The ReportingService2010 type contains the methods and properties you can use to call the SSRS 2012 Report Server Web service and is made available through the Web reference you added to the SSRS Viewer RVC project in Chapter 9.
Listing 10-4. Class-Level Private Variables
private string url;

private string server;

private string report;

private ReportingService2010 rs;
Next, modify the PickSchedule_Load event to query the SSRS 2012 server for the shared schedules that are available.
![]() Note You’ll need to set up these shared schedules in advance using Report Manager on your SSRS 2008 server. You can add and edit shared schedules by navigating to your SSRS 2012 server with your Web browser, selecting Site Settings, and then under Schedules, select New Schedule. You can also use SSMS to set up shared schedules. By default, you need to set up these shared schedules as a user who is in the SSRS 2012 System Administrator role, and users who access them must be members of the System User role. In addition, subscriptions require that the SQL Server Agent is running and that your data source have stored credentials. See the “Setting Up Shared Schedules” section earlier in this chapter for details.
Note You’ll need to set up these shared schedules in advance using Report Manager on your SSRS 2008 server. You can add and edit shared schedules by navigating to your SSRS 2012 server with your Web browser, selecting Site Settings, and then under Schedules, select New Schedule. You can also use SSMS to set up shared schedules. By default, you need to set up these shared schedules as a user who is in the SSRS 2012 System Administrator role, and users who access them must be members of the System User role. In addition, subscriptions require that the SQL Server Agent is running and that your data source have stored credentials. See the “Setting Up Shared Schedules” section earlier in this chapter for details.
Next, take the URL that is passed in when the PickSchedule class is initialized and break it apart to get the report name for which you are setting the schedule. Add the code in Listing 10-5 to the class’s constructor.
Listing 10-5. PickSchedule Constructor
public PickSchedule(string URL)

{

     InitializeComponent();

     url = URL;

     string[] reportInfo = url.Split('?'),

     server = reportInfo[0];

     report = reportInfo[1];

}
![]() Note The call to InitializeComponent is present in the constructor already. It was added automatically when the form was created.
Note The call to InitializeComponent is present in the constructor already. It was added automatically when the form was created.
To get a list of available shared schedules from your SSRS 2012 server, you’ll use the ListSchedules method of the Report Server Web service. The ListSchedules method returns an array of Schedule objects, so after you call the method, you’ll need to loop through the array to populate your combo box. Since we are expanding on the SSRS Viewer RVC project that we created in Chapter 9, we need to add two new options to our PickSchedule_Load event as shown in Listing 10-6. To do this, add a Do Not Schedule choice and a Schedule with Snapshot choice to your combo box.
![]() Note You can set up snapshots through the Report Manager Web interface of your SSRS 2012 server.
Note You can set up snapshots through the Report Manager Web interface of your SSRS 2012 server.
The code in Listing 10-6 uses the ComboItem class that you created in Chapter 9 to add the items to combo boxes. With PickSchedule.cs in design mode, double-click the form. This creates an empty method to handle the form’s Load event. Add the code shown in Listing 10-6 to the PickSchedule_Load method.
Listing 10-6. Getting Shared Schedules
private void PickSchedule_Load(object sender, EventArgs e)

{     rs = new SSRSWebService.ReportingService2010();

     rs.Credentials = System.Net.CredentialCache.DefaultCredentials;

     Schedule[] schedules = null;

     try

     {

           schedules = rs.ListSchedules(null);

           if (schedules != null)

           {

                //Build list items

                ArrayList aList = new ArrayList();

                // Now add the Do Not Schedule item

                aList.Add(new ComboItem("Do not schedule", "NS"));

                // And the Snapshot schedule

                aList.Add(new ComboItem("Schedule with Snapshot", "SS"));

                foreach (Schedule s in schedules)

                {

                     aList.Add(new ComboItem(s.Description, s.ScheduleID));

                     Debug.WriteLine(String.Format

                     ("Desc: {0} - ID: {1}", s.Description, s.ScheduleID));

                }

                //Bind list items to combo box

                sharedSchedules.DataSource = aList;

                sharedSchedules.DisplayMember = "Display";

                sharedSchedules.ValueMember = "Value";

                }

     }

     catch (SoapException ex) { MessageBox.Show(ex.Detail.InnerXml.ToString()); }

}
Scheduling the Report
Now that you have the list of available scheduling options, you need to add some code to handle the case in which the user has selected to schedule the report to be delivered based on one of the shared schedules or on the creation of a snapshot. To do this, you’ll use another method of the Report Service Web service, CreateSubscription. The CreateSubscription method of the API takes six parameters:
- Report: The full path name of the report for which to create a subscription.
- ExtensionSettings: A delivery extension that contains a list of settings specific to the extension. SSRS 2012 comes with two built-in extensions: the Email Delivery extension and the File Share Delivery extension.
- Description: A meaningful description displayed to users.
- EventType: The type of event that triggers the subscription. The valid values are TimedSubscription and SnapshotUpdated.
- MatchData: The data that is associated with the specified EventType parameter. This parameter is used by an event to match the subscription with an event that has fired.
- Parameters: An array of ParameterValue[] objects that contains a list of parameters for the report.
In your report scheduler, you’ll create a new method, ScheduleReport, which is called whenever the user chooses to have a report scheduled. This method sets these parameters to the appropriate values and then calls the CreateSubscription method of the SSRS 2012 Report Server Web service. Most of the values are just strings and are straightforward to set.
Check to see whether the user selected a subscription and, if so, whether it is based on a shared schedule or a snapshot. You’ll use this to set the EventType accordingly. If the user selected Shared Schedule, then set the variable matchData to the ScheduledlD. If not, set the variable to null to tell SSRS 2012 to trigger it based on a snapshot.
if (sharedSchedules.SelectedValue.ToString() == "SS")

{

     eventType = "SnapshotUpdated";

     matchData = null;

}

else

{

     eventType = "TimedSubscription";

     matchData = sharedSchedules.SelectedValue.ToStringQ;

}
To set up a subscription, you have to provide SSRS 2012 with some information about how to deliver the subscription. To do this, set the delivery extensions through an ExtensionSettings object, which itself contains ParameterValue objects. ParameterValue objects are essentially name-value pairs, making the ExtensionSettings object essentially an array of name-value pairs.
To use the ExtensionSettings object, create ParameterValue objects (your name-value pairs) with your delivery settings and then add them to the ExtensionSettings object. You’ll then call the CreateSubscription method and pass in the ExtensionSettings object to give SSRS 2012 the subscription specifics. (See Listing 10-7 for details.)
If the user decides on a subscription based on a shared schedule, and the report accepts parameters, then you’ll need to collect them from your report viewer interface so that you can set them in the subscription. These are the values that the report will run with whenever it’s run by the subscription. To do this, you’ll add code to the PickSchedule form to call the GetParameters form. Because the GetParameters class returns values in the form of Winforms.ReportParameters, you’ll have to convert them into an array of ParameterValue objects required by the Report Server Web service. The only other item you need is the report itself, which you already have as a class-level variable that was set in the Forms constructor. The final method should look like Listing 10-7; add it to PickSchedule.cs.
Listing 10-7. Report Scheduler
private void ScheduleReport()

{

     // See whether the user wants to schedule this versus run it now

     if (sharedSchedules.SelectedValue.ToString() != "NS")
     {

          string desc = "Send report via email";

          string eventType = String.Empty;

          string matchData = String.Empty;


          // If the user selected SnapShot, then

          // set up the parameters for a snapshot

          if (sharedSchedules.SelectedValue.ToString() == "SS")

          {

               eventType = "SnapshotUpdated";

               matchData = null;

          }

          // otherwise the user is using a subscription

          else

          {

               eventType = "TimedSubscription";

               matchData = sharedSchedules.SelectedValue.ToString();

          }


          ParameterValue[] extensionParams = new ParameterValue[8];

          extensionParams[0] = new ParameterValue();

          extensionParams[0].Name = "TO";

          extensionParams[0].Value = "[email protected]";

          extensionParams[1] = new ParameterValue();

          extensionParams[1].Name = "ReplyTo";

          extensionParams[1].Value = "[email protected]";

          extensionParams[2] = new ParameterValue();

          extensionParams[2].Name = "IncludeReport";

          extensionParams[2].Value = "True";

          extensionParams[3] = new ParameterValue();

          extensionParams[3].Name = "RenderFormat";

          extensionParams[3].Value = "PDF";

          extensionParams[4] = new ParameterValue();

          extensionParams[4].Name = "Subject";

          extensionParams[4].Value = "@ReportName was executed at @ExecutionTime";

          extensionParams[5] = new ParameterValue();

          extensionParams[5].Name = "Comment";

          extensionParams[5].Value = "Here is your @ReportName report.";

          extensionParams[6] = new ParameterValue();

          extensionParams[6].Name = "IncludeLink";

          extensionParams[6].Value = "True";

          extensionParams[7] = new ParameterValue();

          extensionParams[7].Name = "Priority";

          extensionParams[7].Value = "NORMAL";


          // Configure the extension settings required

          // for the CreateSubscription method

          ExtensionSettings extSettings = new ExtensionSettings();

          extSettings.ParameterValues =  extensionParams;

          extSettings.Extension = "Report Server Email";


          // Get the report parameters using the GetParameters form
          GetParameters reportParameters = new GetParameters(url);

          reportParameters.ShowDialog();

          Microsoft.Reporting.WinForms.ReportParameter[] rps = reportParameters.Parameters;


          // Convert the Winforms.ReportParameter returned

          // from the GetParameters to ParameterValues required for

          // the CreateSubscription method

          int i = 0;

          foreach (Microsoft.Reporting.WinForms.ReportParameter rpin rps)

          {

               if (rp.Values.Count != 0) i++;

          }


          ParameterValue[] pvs = new ParameterValue[i];

          int j = 0;

          foreach (Microsoft.Reporting.WinForms.ReportParameter rp in rps)

          {

               if (rp.Values.Count != 0)

               {

                    pvs[j] = new ParameterValue();

                    pvs[j].Name = rp.Name;

                    pvs[j].Value = rp.Values[0]; j++;

               }

          }


          // Now set up the subscription

          try

          {

               rs.CreateSubscription(report, extSettings, desc, eventType, matchData, pvs);

          }

          catch (SoapException ex)

          {

               MessageBox.Show(ex.Detail.InnerXml.ToString());

          }

     }

}
To complete the PickSchedule form, you need to wire up the setSchedule button’s click event so it will call the ScheduleReport method to actually schedule the report with the schedule selected by the user. With the PickSchedule.cs in design mode, double-click the OK button. Add the code shown in Listing 10-8.
Listing 10-8. Hooking the Schedule Button’s Click Event to the ScheduleReport Method
private void setSchedule_Click(object sender, EventArgs e)

{

     ScheduleReport();

}
Now let’s add a button to the ViewerRVC.cs form that you’ll code to call the new PickSchedule.cs form. First, you need to add a new button to the ViewerRVC.cs form as shown in Figure 10-30. Name it pickSchedule, and set its Text property to Schedule. This will allow the user to pick a schedule from the viewer.
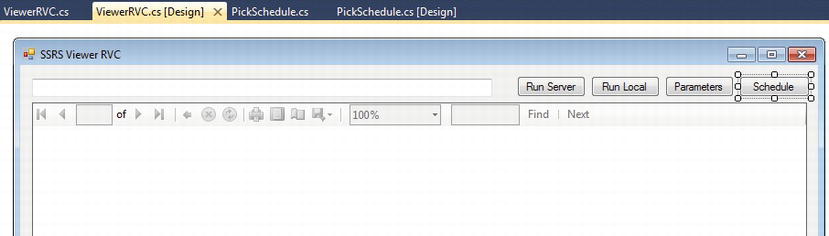
Figure 10-30. Adding Schedule button to the ViewerRVC.cs form
Second, after you add the button to the form, add the code shown in Listing 10-9 to the button’s click event by double-clicking the Schedule button with the ViewerRVC.cs in design mode. Of course, you need to use the name of your report server where you see localhost in the URL.
Listing 10-9. The pickSchedule Button’s click Event
private void pickSchedule_Click(object sender, EventArgs e)

{

     reportURL.Text = "http://localhost/reportserver?/Pro_SSRS/Chapter_7/EmployeeServiceCost";

     PickSchedule reportSchedule = new PickSchedule(reportURL.Text);

     reportSchedule.ShowDialog();

}
At this point, you can run the program; however, before you can schedule the report, you must set the credentials for the shared data source so the report will have login credentials to use when it is not run interactively. If you are using SQL authentication, you can do this by opening the Reports project in the solution and double-clicking the Pro_SSRS.rds data source. On the Shared Data Source dialog box, select the Credentials tab, and select Use a Specific User Name and Password. Enter the appropriate username and password to use when running this report. If you are using Windows integrated authentication, such as running reports under your Windows account, you need to use Report Manager or SSMS to edit the data source and select the Use As Windows credentials when connecting to the data source option. For Windows accounts, specify the login name using the format domainuser.
Now run the program, and pick one of your previously configured schedules. For the parameters, enter ServiceYear 2009 and select OK to set the schedule for this report.
![]() Note Remember to use SSMS or Report Manager to set up your shared schedules. You must be logged in as a user who is a member of the SSRS 2012 System Administrators role to add new schedules. See the section titled “Creating a Shared Schedule” earlier in this chapter for details.
Note Remember to use SSMS or Report Manager to set up your shared schedules. You must be logged in as a user who is a member of the SSRS 2012 System Administrators role to add new schedules. See the section titled “Creating a Shared Schedule” earlier in this chapter for details.
Delivering the Report
In the example, you’ve used PDF to deliver the report to the subscription user. You’ve also hard-coded the e-mail address, which isn’t practical in the real world. One other issue of concern, especially in the health care setting, is complying with HIPAA and protecting patient information.
You could give the user a textbox with which to enter the e-mail address to which the user wants the report delivered. However, the user could possibly type in an incorrect e-mail address and deliver the report to the wrong person. It would be great if the user’s e-mail address could be filled in automatically, to make sure it is the correct address. You can do this by pulling the address from a field in a table in the database similar to the data driven subscription example given earlier in the chapter where you pulled the e-mail address from the Employee table. However, in this case, the user pulling the report may not be in the database table, and you want the report delivered automatically to the user scheduling it. Fortunately, the .NET Framework and Active Directory offer an easy way to do this. For many organizations using Microsoft Exchange Server, e-mail addresses are integrated with Active Directory. If you aren’t using Exchange Server, e-mail addresses aren’t integrated with Active Directory, but you can still enter them into Active Directory manually.
Let’s create a method that determines the e-mail of the currently logged-in user. Then you can use it to provide the To e-mail address for the subscription. Start by adding a new reference to the project for System.DirectoryServices. Select References under the SSRS Viewer RVC project in your solution, and then select Add Reference. In the Add Reference dialog box under the .NET tab, select System.DirectoryServices from the list of component names. Next, add using statements to simplify your typing, as follows:
using System.DirectoryServices;

using System.Security.Principal;
To find the current user’s e-mail address, use DirectorySearcher, which allows you to perform queries against Active Directory, as shown in Listing 10-10. You’ll start at the root level of the directory and look for the user by name. When you find the user’s name, you return the first e-mail address you find for the user.
Listing 10-10. Code to Query Active Directory for E-mail Addresses
private string GetEmailFromAD()

{

     DirectoryEntry rootEntry;

     DirectoryEntry contextEntry;

     DirectorySearcher searcher;

     SearchResult result;

     string currentUserName;

     string contextPath;

     WindowsPrincipal wp = new WindowsPrincipal(WindowsIdentity.GetCurrent());

     currentUserName = wp.Identity.Name.Split('')[1];

     rootEntry = new DirectoryEntry("LDAP://RootDSE");

     contextPath = rootEntry.Properties["defaultNamingContext"].Value.ToString();

     rootEntry.Dispose();

     contextEntry = new DirectoryEntry("LDAP://" + contextPath);

     searcher = new DirectorySearcher();

     searcher.SearchRoot = contextEntry;

     searcher.Filter = String.Format("(&(objectCategory=person)(samAccountName={0}))",

currentUserName);

     searcher.PropertiesToLoad.Add("mail");
     searcher.PropertiesToLoad.Add("cn");

     searcher.SearchScope = SearchScope.Subtree;

     result = searcher.FindOne();

     return result.Properties["mail"][0].ToString();

}
To use this, all you have to do is modify the To parameter for the delivery extension in the ScheduleReport method you wrote earlier to use the new method you just wrote. So, your previous code for the To parameter becomes this:
extensionParams[0] = new ParameterValue();

extensionParams[0].Name = "TO";

extensionParams[0].Value = GetEmailFromAD();
Now run the SSRS Viewer RVC, and choose a schedule from the shared schedules you previously configured. For the parameters, enter ServiceYear 2009, ServiceMonth November, BranchID Grid Iron, and EmployeeTblID McDonald, Sherri; this will create a subscription that is e-mailed to you on the schedule you selected. If you navigate to the server now using your browser, select the Employee Service Cost report, and then select the Subscriptions tab, you should see your subscription, as shown in Figure 10-31. If you click Edit, you see that it has provided all the parameters you selected, and it inserted the desired e-mail address in the To field.

Figure 10-31. Subscription as it appears in SSRS 2012
You haven’t seen all the possible options that you can use when scheduling reports such as the Employee Service Cost report, but we’ve given you a good start to schedule and deliver reports and add other functionality. Some possibilities include the following:
- Allowing the user to decide the format the report will be delivered in
- Allowing the user to attach the report or just provide a link
- Allowing the user to create schedules on the fly
You can use the SSRS 2012 Report Server Web service to control many more aspects of the report server and the reports under its control. We have just scratched the surface here of what you can do, but be aware that the basic aspects of dealing with the report server through the Report Server Web service are the same for nearly all the functions.
Controlling SSRS with WMI
Before we finish this chapter, we should also briefly discuss how you can manage SSRS using two WMI classes. These classes are used more for administrative tasks and allow you to access server settings programmatically. WMI is not used for manipulating reports or report settings.
WMI offers a standardized way to monitor and control systems and services running anywhere on your network. Using the WMI provider, you can write code that allows you to query the current settings of an SSRS 2012 server and also to change those settings through properties and methods of the classes providing these services.
Essentially, these providers allow you to change the settings of the configuration files on the server programmatically. So, as you might guess, the properties of these classes correspond almost directly to the elements within the XML files that hold SSRS 2012 configuration information.
Table 10-2 shows the two classes provided by SSRS 2012 for use with WMI.

You can use the MSReportServer_ConfigurationSetting class to determine and/or configure most of the database settings used by SSRS 2012 itself—that is, for the database that SSRS uses to store the reports, snapshots, and so on. This class doesn’t control the data source connection information used in your reports, although you can set the login information that the server uses to run a report in unattended mode. You can also work with things such as the database server name, database name, and login credential information in this class. You can also use this class to configure the SSRS 2012 service instance name, path name, and virtual directory it maps to in the integrated HTTP system.
You can use the MSReportServerReportManager_ConfigurationSetting class to determine the instance name, path name, and virtual root of the SSRS 2012 Report Manager, as well as to read or set the URL of a particular instance.
To access this information through the SSRS 2012 WMI providers, you use the System.Management namespace, which provides access to WMI.
![]() Note If more than one instance of a report server is installed, you’ll need to locate the correct instance before reading and setting properties. The PathName property is the key property, and it uniquely identifies a particular instance.
Note If more than one instance of a report server is installed, you’ll need to locate the correct instance before reading and setting properties. The PathName property is the key property, and it uniquely identifies a particular instance.
Summary
SSRS 2012 provides many tools for management tasks, and we covered several of them in this chapter. Because SSRS 2012 is a full reporting solution, administrators may find it difficult to manage the entire site single-handedly without some level of automation or divided tasks, especially as the number of reports and other objects such as data sources, folders, and subscriptions grow. Maintaining these objects, whether it be to update the report via Report Manager or to mass deploy reports via a custom application, administrators will continually find themselves maintaining their SSRS report servers. Tools such as SSMS, Reporting Services Configuration Manager, and Report Manager go a long way to centralize the administrative tasks but do not necessarily reduce the potential rote tasks associated with managing a large installation. Fortunately, SSRS provides the flexibility to allow other professionals, department managers, and users to maintain their own reports using tools provided with SSRS 2012 or through your own custom applications. Of course, with this flexibility comes the need for tighter security. We will turn now, in the next chapter, to security and show how to make sure that you can lock down and monitor this flexible model.