Chapter at a Glance

Having immediate access to current, accurate contact information for the people you need to interact with—by e-mail, telephone, mail, or otherwise—is important for timely and effective communication. You can easily build and maintain a detailed contact list, or address book, in the Microsoft Office Outlook 2007 Contacts module. From your address book, you can look up information, generate messages, and share contact information with other people. You can also keep track of your interactions with a person whose contact information is stored in Outlook.
Tip
Throughout this chapter, as well as this book, we frequently refer to people whose contact information you have stored in Outlook as contacts.
In this chapter, you will investigate the command structure in the Outlook contact window, create contact records, and organize your contacts by using color categories. You will create a distribution list and an address book, and personalize your own electronic business card. Next, you will display different views of contact information and filter and find contacts by using the new Instant Search feature. Then you will print a contact record and an address list.
Note
See Also Do you need only a quick refresher on the topics in this chapter? See the Quick Reference section at the beginning of this chapter.
Warning
ImportantBefore you can use the practice files in this chapter, you need to install them from the book’s companion CD to their default location. See Using the Companion CD at the beginning of this book.
Note
Troubleshooting Graphics and operating system–related instructions in this book reflect the Windows Vista user interface. If your computer is running Windows XP and you experience trouble following the instructions as written, please refer to the Information for Readers Running Windows XP section at the beginning of this book.
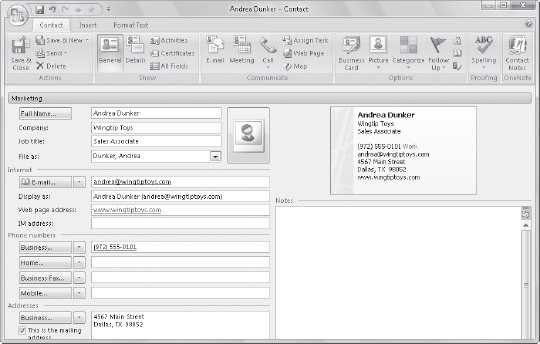
Outlook displays contact records in the Contacts module. When you create or open a contact record, it opens in a contact window. The contact window has its own set of commands separate from those in the Outlook program window. You can create, insert, and format information in a contact record by using the contact window commands.

The new Outlook item window interface is designed to more closely reflect the way people generally work within the item windows. In a contact window, the interface includes the following elements:
Commands related to managing contact records (such as creating, saving, and printing) are available from the menu that appears when you click the Microsoft Office Button. This menu, which we refer to throughout this book as the Office menu, takes the place of the File menu that appeared in previous versions of Outlook in the message, appointment, contact, and other form windows. The File menu still appears in the standard Outlook program window.
Some commands are represented by buttons on the Quick Access Toolbar to the right of the Microsoft Office Button. By default, the contact window Quick Access Toolbar displays the Save, Undo, Redo, Print, Previous Item, and Next Item buttons. The Save and Print commands are available on the Office menu, but the other commands are not available on either the Office menu or the Ribbon; they are available only from the Quick Access Toolbar. You can add commands to the Quick Access Toolbar so that they are available regardless of which tab is currently active in the message window.
The title bar displays the contact’s name. At the right end of the title bar are the three familiar buttons that have the same function in all Windows programs. You can temporarily hide the Word window by clicking the Minimize button, adjust the size of the window by clicking the Restore Down/Maximize button, and close the active document or exit Word by clicking the Close button.
Below the title bar is the Ribbon, a feature of the Microsoft Office Fluent user interface featured in many of the programs in the 2007 Office system. In Outlook 2007, the Ribbon appears in the message, contact, appointment, meeting, event, and task windows. (The Outlook program window displays a menu bar and toolbars.) Commands are presented on the Ribbon rather than on the more-traditional menus or toolbars so that you can work most efficiently within the window. The Ribbon is organized into task-specific tabs, which are further divided into feature- or task-specific groups of commands.
Note
See Also For information about the Ribbon in the Outlook message window, see Working in the Message Window in Chapter 3. For information about the Ribbon in the appointment, meeting, and event windows, see Working in the Calendar Item Windows in Chapter 6. For information about the Ribbon in the task window, see Working in the Task Window in Chapter 8.
The buttons in each group change size depending on the width of the program window. They might be large, small, or wide, and might be labeled with the button name, icon, or both. Pointing to any button displays the button name in a ScreenTip that sometimes also describes the button’s function.
Some buttons have arrows, but not all arrows function the same way. If you point to a button that has the arrow incorporated into the button body, click-ing the button will display a list of options for you to choose from. If the arrow is separate from the button body, clicking the arrow displays a list of options and clicking the button performs the currently selected action.
Related but less common commands are not represented in a group as buttons. Instead they are available from a dialog box, which you can display by clicking the dialog box launcher at the right end of the group title bar.
The Help button appears at the right end of the Ribbon.
The goal of the redesigned environment is to make working within an item window more intuitive. Commands for tasks you perform often are no longer hidden on menus and in dialog boxes, and features that you might not have discovered before are now plainly visible.
Note
See Also For information about customizing the commands shown on the Quick Access Toolbar, see Making Favorite Outlook Commands Easily Accessible in Chapter 12. For information about repositioning the Quick Access Toolbar and hiding the Ribbon tabs, see Working in the Message Window in Chapter 3.
In this exercise, you will take a tour of the available menu, tabs, and groups in an Outlook 2007 contact window. There are no practice files for this exercise.
In the Navigation Pane, click the Contacts button.
The Contacts module opens. The content pane, which in the Contacts module is the Contacts pane, displays your main address book, with any contact records it contains displayed as business cards.
On the Standard toolbar, click the New Contact button.
Tip
If you want to work in two modules at the same time, you can open a module in a second instance of Outlook by right-clicking the module button in the Navigation Pane, and then clicking Open In New Window.
A new contact window opens.
Warning
ImportantDepending on your screen resolution and the size of the contact window, you might see more or fewer buttons in each of the groups, the buttons you see might be represented by larger or smaller icons than those shown, or the group might be represented by a button that you click to display the group’s commands. Experiment with the size of the contact window to understand the effect on the appearance of the tabs.
Click in the Notes area to activate the buttons on the Ribbon. Then in the upper-left corner of the message window, click the Microsoft Office Button to display the menu.
Notice that although you are working in the contact window, you can create any type of Outlook item from the Office menu. We’ll talk more about the commands available from the Office menu in other chapters of this book.
Click away from the Office menu to close it.
In the contact window, the Ribbon includes three tabs:
Tip
Depending on what programs are installed on your computer, tabs and groups other than those described here might also appear on the Ribbon. For example, if Microsoft Outlook with Business Contact Manager is installed on your computer, you will have a Business Tools tab. If you have add-ins installed that interface with Outlook or with the Office system, you might also have an Add-Ins tab.
The Contact tab is active by default. Buttons representing commands related to creating contact records are organized on this tab in five groups: Actions, Show, Communicate, Options, and Proofing. You can create a basic contact record by using only the commands available on this tab.
Buttons representing commands related to inserting additional content in a contact record are organized on this tab in six groups: Include, Tables, Illustrations, Links, Text, and Symbols.
Buttons representing commands related to formatting the text within the Notes field are organized on this tab in six groups: Clipboard, Font, Paragraph, Styles, Zoom, and Editing.
On the Format Text tab, click the Clipboard dialog box launcher.
Click the Font dialog box launcher.
You can access certain settings not available from the Font group, such as Underline Style, Underline Color, and the many font effects, from this dialog box.


Outlook stores contact information from different sources in separate address lists:
Global Address List (GAL). If you’re using Outlook to connect to a Microsoft Exchange Server account, your organization’s contact information is stored in the GAL. The GAL might include names, job titles, e-mail addresses, office locations, telephone numbers, and other contact information. It can also include organizational information (each person’s manager and direct subordinates) and group membership information (the distribution lists and aliases each person belongs to). The GAL is administered as part of Exchange Server. Outlook users can view the GAL but not change its contents.
Outlook Address Books. The Contacts address book automatically created by Outlook is your main address book. This address book does not appear in the folder structure within the Navigation Pane—you display it by clicking the Contacts button. You can create additional address books; for example, you might want to keep contact information for family and friends in an address book separate from client contact information, or maintain an address book for team members attached to a specific project. Each address book is a folder that contains contact items; in other words, a contacts folder. Contacts folders appear in the Navigation Pane along with other folders you create, and you can organize them in the same manner—for example, at the same level as your Inbox or within a project folder. All contacts folders are available from the My Contacts list in the Navigation Pane of the Contacts module.
Note
See Also For information about creating contact folders, see Creating an Additional Address Book later in this chapter.
Mobile Address Book. A Mobile Address Book containing all the contacts in your main address book for whom you have mobile phone numbers listed is created automatically if you have an Outlook Mobile Service account
You can view all your address lists and address books in the Contacts module, or you can display a simple list from the Address Book window that opens when you click the Address Book button on the Standard toolbar. In the Address Book list, click the name of the Outlook address book or address list you want to display.

When you send an e-mail message to a person whose contact information is stored in one of your address books, you can quickly address the message to that person by typing his or her name into the To, Cc, or Bcc box, or by clicking the adjacent button to open the Address Book window and then selecting the intended recipient’s name.
For each person whose information you record in an address book, you can store the following types of general information:
Name, company name, and job title
Business, home, and alternate addresses
Business, home, mobile, pager, and other telephone numbers
Business, home, and alternate fax numbers
Web page address (URL), instant messaging (IM) address, and up to three e-mail addresses
Photo or other identifying image
General notes, which can include text and illustrations such as photos, clip art images, SmartArt diagrams, charts, and shapes
You can also store personal and organization-specific details for each contact:
Professional information, including department, office location, profession, manager’s name and assistant’s name
Personal information, including nickname, spouse or partner’s name, birthday, anniversary, and the title (such as Miss, Mrs., or Ms.) and suffix (such as Jr. or Sr.) for use in correspondence
You can create a contact record containing only one piece of information (for example, a name or company name), or as much information as you want to include. You can quickly create contact records for several people who work for the same company by cloning the company information from an existing record to a new one. And of course, you can add to or change the information stored in a contact record at any time.
The order in which Outlook displays contact records is controlled by the File As setting. By default, Outlook files contacts by last name (Last, First order). If you prefer, you can change the File As order for new contacts to any of the following:
First Last
Company
Last, First (Company)
Company (Last, First)
To set the File As order, click Options on the Tools menu, and then in the Options dialog box, click the Contact Options button. You can change the File As order for an individual contact by selecting the order you want in the File As list in the contact record.
In this exercise, you will create and then edit a contact record. There are no practice files for this exercise.
On the Standard toolbar, click the New Contact button.
A new contact window opens.
Note
See Also For information about the toolbars available in Outlook, see Personalizing Your Outlook Workspace and Exploring the Advanced Toolbar in Chapter 1.
In the Full Name box, type John Emory, and then press the
 key.
key.Outlook transfers the name to the File As box and displays it in the default order (Last, First).
In the Company box, type Wingtip Toys.
In the Job title box, type Assembly Plant Manager.
In the Internet area, type [email protected] in the E-mail box, and press
.The Display As box shows the contact’s name and e-mail address as they will appear in the headers of e-mail messages you send and receive. You can change the display name, for example by removing the e-mail address or by adding a designator of Work or Home.
In the Web page address box, type www.wingtiptoys.com.
Outlook automatically formats the text as a hyperlink.
In the Phone numbers area, type 9725550101 in the Business box, and press
.Note
Troubleshooting The first time you enter a phone number for a contact, The Location Information dialog box opens, prompting you to enter your own country, area code, and any necessary dialing information such as a carrier code. Outlook sets up dialing rules based on the information you enter. You must enter at least your country and area code in the dialog box and then click OK; you can’t close the dialog box without entering the requested information.
Outlook formats the series of numbers you entered as a telephone number.
In the Addresses area, click in the text box, type 4567 Main Street, press the
 key, and then type Dallas, TX 98052.
Tip
When you finish entering information in the Addresses area, Outlook verifies that the address conforms to a standard pattern. If Outlook detects irregularities in the address you enter, the Check Address dialog box opens, prompting you to enter the street address, city, state or province, postal code, and country in separate fields from which it reassembles the address. The intention of this feature is to verify that you have the information necessary to send mail to the contact. If you often create contact records with foreign addresses that don’t conform to the pattern Outlook is looking for, you might find this annoying. If you determine that the information in the Check Address dialog box is correct, you can click Cancel to close the dialog box without making changes.
Click the Business arrow, and then in the list, click Home.
The button label changes to indicate that you are displaying John’s home address information.
In the text box, type 111 Magnolia Lane, press
, and then type Flower Mound, TX 98053.On the Contact tab, in the Actions group, click the Save & Close button.
The Contacts pane now includes the new contact record for John Emory.
In the Contacts pane, double-click the contact record for John Emory.
On the Contact tab, in the Show group, click the Details button.
In the Spouse/Partner box, type Barbara.
Click the Birthday arrow, scroll the calendar to July, and then click 31.
In the Actions group, click the Save & New arrow, and then in the list, click New Contact from Same Company.
Outlook creates a new contact record, already containing the company’s name, URL, phone number, and address.
In the Full Name box, type Andrea Dunker, and in the Job title box, type Sales Associate.
In the E-mail box, type [email protected].
Save and close the open contact records.
Use the techniques described in this exercise to create contact records for the following people:
Full name
E-mail address
Greg Guzik
Jo Berry
Andy Ruth
You will use these contact records in later exercises.


Note
CLOSE each of the open contact records to return to the Contacts pane.
BE SURE TO retain the contact records for use in a later exercise.
Tip
You can create a contact record for the sender of a message you have received by right-clicking the sender’s name in the message header—either in the Reading Pane or the open message item—and then clicking Add To Outlook Contacts. Outlook creates a contact form with the name and e-mail address already filled in. Add any other information you want to record, and then save the contact record.
You can organize contacts in related groups by assigning them to categories. For example, you might assign contact records for customers to a Customers category. You can sort and filter Outlook items by category.
Whereas previous versions of Outlook used simple named categories, Outlook 2007 uses color categories in which category names are linked to colors to provide a quick visual representation of information. You can change the name or color of any category, and create new categories. Twenty-five colors are available, but if that’s not sufficient, you can assign the same color to multiple categories. When you assign a contact to a category, the category color appears at the top of the contact record.
Note
See Also For more information about color categories, see Organizing Messages by Using Color Categories in Chapter 5. For information about grouping contact records by color categories, see Displaying Different Views of Contact Information later in this chapter.
In this exercise, you will assign contacts to color categories and rename a category.
Note
USE the Andrea Dunker and John Emory contact records you created earlier in this chapter.
BE SURE TO display the Contacts module before beginning this exercise.
Double-click the contact record for Andrea Dunker to open the contact window.
On the Contact tab, in the Options group, click the Categorize button, and then in the list, click Green Category.
Because this is the first time you’ve assigned an item to this category, the Rename Category dialog box opens.
With the current category name selected, type Marketing, and then click Yes.
A green category bar labeled Marketing appears across the top of the contact record.
Double-click the contact record for John Emory.
In the Options group, in the Categorize list, click All Categories.
In the Name list, select the Marketing check box, select the Purple Category check box, and then click Rename.
The Purple Category name is selected for editing.
Type Personal to rename the category, and then click OK.
Purple and green category bars at the top of the contact record indicate that John Emory is a member of the Personal and Marketing categories.


In an address book, you can create a contact record containing a variety of contact information for an individual person, or a distribution list containing the e-mail addresses of multiple people. You can add people to a distribution list by selecting them from an address book or by manually entering e-mail addresses.
When you send a message to a distribution list, each member of the distribution list receives a copy of the message. This is a useful tool if you frequently send messages to specific groups of people such as employees working in the marketing department, clients located in a particular region, or players on a sports team.
If you want to send a message to most, but not all, members of a distribution list, you can remove people from the recipient list for a specific message at the time you send it.
In this exercise, you will create a distribution list and add new contacts to your address book.
Note
USE the John Emory contact record you created earlier in this chapter.
BE SURE TO display the Contacts module before beginning this exercise.
On the Standard toolbar, click the New Contact arrow, and then in the list, click Distribution List.
A distribution list window opens.
In the Name box, type Clients, and then on the Distribution List tab, in the Members group, click the Select Members button.
The Select Members dialog box opens. If your organization has a Global Address List, Outlook displays its contents.
If your address book isn’t already displayed, click the Address Book arrow, and then in the list, under Outlook Address Book, click Contacts.
In the Name list, click John Emory. Click the Members button, and then click OK.
In the Add New Members dialog box, type Pat Coleman in the Display name box, and then type [email protected] in the E-mail address box.
Select the Add to Contacts check box to add Pat to your address book as well as to the distribution list.
In the Add New Member dialog box, click OK.
The distribution list now includes John Emory and Pat Coleman.
Repeat steps 5 through 8 to add the following people to the Clients distribution list and to your address book:
Display name
E-mail address
Holly Dickson
Max Stevens
Linda Mitchell
Jill Shrader
Each new distribution list member appears in the distribution list in alphabetical order.


A new feature in Outlook 2007 is the presentation of contact record information in the form of a graphic that resembles a business card. When you enter a person’s contact information in a contact record, basic information including the person’s name, company, and job title; work, mobile, and home telephone numbers; and e-mail, postal, Web page, and instant messaging addresses appear in the business card shown in the upper-right corner of the contact window. (Only the first ten lines of information fit on the card.) If the contact record includes an image, the image appears on the left side. You can change the types of information that appear, rearrange the information fields, format the text and background, and add, change, or remove images such as a logo or photograph.
Creating a business card for yourself provides you with an attractive way of presenting your contact information to people you correspond with in e-mail. You can attach your business card to an outgoing e-mail message or include it as part (or all) of your e-mail signature. The recipient of your business card can easily create a contact record for you by saving the business card to his or her Outlook address book.
Note
See Also For information about e-mail signatures, see Adding Signatures to Messages Automatically in Chapter 3.
In this exercise, you will modify the business card associated with your contact record.
Note
USE the FourthCoffee image. This practice file is located in the DocumentsMicrosoft PressOutlook2007SBSManagingContacts folder.
BE SURE TO display the Contacts module in Business Cards view before beginning this exercise.
If you haven’t already done so, create a contact record for yourself. Include your name, company, job title, business and mobile phone numbers, fax number, and one or more e-mail addresses.
As you enter your information, it appears in the generic business card displayed in the upper-right corner of the contact window.
On the Contact tab, in the Options group, click the Business Card button.
In the Card Design area, click the Background Color button.
You can select from the basic colors or define a custom background color.
In the Color dialog box, click a color you like, and then click OK.
In the Card Design area, click Change.
The Add Card Picture dialog box opens, displaying the contents of your Pictures folder. You can add a business logo, your photograph, or any other identifying image you would like to appear on your business card.
Browse to your DocumentsMicrosoft PressOutlook2007SBSManagingContacts folder, click the FourthCoffee image, and then click OK.
The Fourth Coffee company logo appears on the left side of your business card.
In the Image Area box, type or select (by clicking the arrows) 30%.
Click the Image Align button, and then in the list, click Center Left.
The enlarged logo moves to the vertical center of the business card.
Make any other changes to your business card that you want, and then in the Edit Business Card dialog box, click OK.
The contact window displays your customized business card. Any changes you make to your contact information will be immediately reflected in your business card.
In the Actions group, click the Save & Close button.
The Contacts pane displays your personalized business card.


Although you can certainly track all your contacts—business or personal—within the Contacts module, and locate specific contacts or groups of contacts by categorizing, sorting, and filtering, you might find it useful to create a separate address book containing contact records for only a specific group of people. For example, you might want to have an address book containing only club members, neighborhood contacts, parents and teachers from your child’s school, or sports teammates. You create this additional address book by creating a folder designated as containing contact items (a contacts folder). As with other folders, you can share the contacts folder with other Outlook users on your network, or export it for distribution to other people.
In this exercise, you will create a contacts folder. There are no practice files for this exercise.
Click the New Contact arrow, and then in the list, click Folder.
In the Name box, type SBS Contacts.
Click the Folder contains arrow, and note the types of folders you can create.
Because you are creating this folder from within the Contacts module, Contact Items is selected by default. However, you can create any type of folder from within any module.
In the Folder contains list, click Contact Items.
In the Select where to place the folder list, click Mailbox (or your account name, depending on your installation) to place the folder at the same level as your Inbox.
In the Create New Folder dialog box, click OK.
The SBS Contacts address book appears in the My Contacts list at the top of the Contacts module Navigation Pane, and its contents appear in the content pane.
In the Navigation Pane, click the Mail button to display your Inbox.
The SBS Contacts folder is not visible in the Mail Folders area of the Navigation Pane, which currently displays the All Mail Items list.
At the bottom of the Navigation Pane, click the Folder List button.
The Folder List Navigation Pane, displaying all Outlook items rather than only mail items, replaces the Mail Navigation Pane. The SBS Contacts folder appears above your Sent Items folder.
A contact card icon next to the folder name indicates that the folder is designed to hold contact items.
In the All Outlook Items list, click the SBS Contacts folder.
Outlook displays the currently empty SBS Contacts address book. The same functionality available to you within your main address book is available within this custom address book.
In the Navigation Pane, click the Contacts button.
The Contact module opens, still displaying the SBS Contacts address book.
In the My Contacts list, click Contacts to display your main address book.


You can view an address book in many different formats; each view presents differing information from your contact records either as cards or in a list.
Business Cards view displays the business card associated with each contact record—either the default card created by Outlook, or a custom card if you have one. Business cards are displayed in alphabetical order by first or last name, depending on the File As selection.
Address Cards view displays contact information as truncated business cards, with only the contact’s name and e-mail address visible. Address cards are displayed in alphabetical order by the File As field.
Detailed Address Cards view displays contact information in a format similar to that of Address Cards view but includes more information, such as job title and company name.
Phone List view displays a columnar list including each contact’s name, company, and contact numbers.
Other list views include:
By Category
By Company
By Location
In these views, contact records are grouped by the selected field. You can expand and collapse the groups, or select and take action on an entire group of contacts.
You can search and filter your contact records in any view by using the Instant Search feature. You can sort contact records by any displayed column in a list view by clicking the column header, and you can display or hide any column.
Tip
You can change the fields displayed in each view; the way records are grouped, sorted, and filtered; the display font; the size of business cards; and other settings to suit your preferences. To personalize a view, point to Current View on the View menu, and then click Customize Current View.
In this exercise, you will sort contact records and look at some of the ways you can view contact records.
Note
USE the contact records you created earlier in this chapter.
BE SURE TO display the Contacts module before beginning this exercise.
In the Navigation Pane, look at the Current View list. If the Business Cards option isn’t already selected, select it now.
In Outlook 2007, this is the default Contacts module view, displaying the standard business cards for each contact (as well as any personalized business cards you have saved), organized alphabetically by last name.
By clicking the buttons on the alphabet bar that appears on the right side of the Contacts pane in Business Cards view, Address Cards view, and Detailed Address Cards view, you can quickly jump to contact records beginning with that letter.
Tip
You can display an additional alphabet in the alphabet bar. Options include Arabic, Cyrillic, Greek, Thai, and Vietnamese—other alphabets might be available depending on the version of Outlook and any language packs you have installed. To get started, click the Language Settings button at the bottom of the alphabet bar.
In the Current View list, click Address Cards.
Outlook displays your contact records on smaller cards similar to the Business Cards, but without the additional formatting and sized to fit the available primary contact information, including name, telephone and fax numbers, and postal and e-mail addresses. (Detailed Address Cards view displays all the information available in the contact record, including the Notes field.)
In the Current View list, click Phone List.
Outlook displays your contact records in a grid of columns and rows organized in ascending order based on the File As column. If you have a lot of information recorded for each of your contacts, you will probably find that this view displays more contact information on one screen than any other.
Click the Full Name column heading.
Outlook sorts the contact records in ascending order based on the Full Name field, as indicated by the upward-pointing sort arrow to the right of the column heading. You can reverse the sort order by clicking the active heading again.
Click the Company column heading.
Outlook sorts the contact records in ascending order based on the Company field. You can enter information into contact records from this view.
In the Greg Guzik record, click the Company cell, type Wide World Importers, and then press the
key.Outlook automatically reorganizes the list so Greg Guzik’s record is alphabetized by the company name you entered.
Repeat step 6 for the Jo Berry and Andy Ruth records.
In the Navigation Pane, in the Current View list, click By Category.
Outlook displays the contact records in a grid grouped by category and sorted by the File As field.
Click the Collapse button to the left of the Categories: none header.
Only the categorized contacts are visible.
Notice that Andrea Dunker appears in the Marketing group, and John Emory appears in the Marketing group as well as the Personal group. When you sort contacts, messages, or other Outlook items by category, items assigned to multiple categories appear in both lists.
In the Current View list, click By Company.
Outlook displays the contact records in a grid that is sorted and grouped by the Company field.
In the Pat Coleman, Holly Dickson, and Max Stevens records, type Consolidated Messenger in the Company field. In the Linda Mitchell and Jill Shrader records, type Lucerne Publishing in the Company field.
As you change each record, Outlook reorganizes the display, creating new groups if necessary.
In the Current View list, click Business Cards.
Outlook returns to the default view of your contact records.


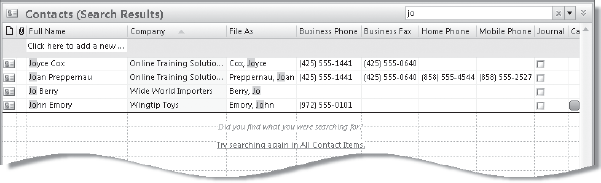
You can use the new Instant Search feature available in many of the programs in the 2007 Office system to immediately find a specific contact record or to filter records based on their content. Instant Search is available in any view of an address book, and all the other Outlook modules as well. We’ll touch on this feature several times throughout this book, but because this is the first time we’ve discussed it, we’ll go into more depth in this chapter.
In this exercise, you will locate a contact record by using Instant Search.
Note
USE the contact records you created earlier in this chapter.
BE SURE TO display the Contacts module before beginning this exercise.
At the top of the Contacts pane, click to position the insertion point in the Search box.
When not in use, this box contains the words Search Contacts.
Type the letter j.
Outlook filters the list to display only those contact records containing the letter j.
Switch to Phone List view.
In any view other than Business Cards view, the search term is highlighted in the results in yellow.
In the Search box, after the letter j, type the letter o.
Outlook filters the list to display only contact records containing jo.
Type hn.
Outlook displays only the contact record for John Emory. The filter will remain in place even if you select another view of the address book.
At the right end of the Search box, click the Show Instant Search Pane Menu button, and then point to Recent Searches.
You can quickly return to previous search results by clicking the search term in this box.
On the Instant Search pane menu, click Search Options.
The Search Options dialog box opens.
From this dialog box, you can set the default search scope and the highlight color for located search terms.
In the Search Options dialog box, click Cancel.
At the right end of the Search box, click the Clear Search button.
Outlook displays the entire contents of your Contacts module.


You can print your Outlook address book or individual contact records, either on paper or to an electronic file (such as a PDF or XPS file), from any address book view. Depending on the view, Outlook offers a variety of print styles, such as the following:
Style | Description | Available in these views |
|---|---|---|
Card | Contact information displayed alphabetically in two columns. Letter graphics appear at the top of each page and the beginning of each letter group | Address Cards, Business Cards, Detailed Address Cards |
Medium Booklet | Contact information displayed alphabetically in one column. Formatted to print four numbered pages per sheet. Letter graphics appear at the top of each page and the beginning of each letter group, and a contact index at the side of each page indicates the position of that pages entries in the alphabet. Print double-sided if possible. | Address Cards, Business Cards, Detailed Address Cards |
Memo | Contact information displayed under a memo-like header containing your name. One record per sheet. | Address Cards, Business Cards, Detailed Address Cards |
Phone Directory | Contact names and telephone numbers displayed in two columns. Letter graphics appear at the top of each page and the beginning of each letter group. | Address Cards, Business Cards, Detailed Address Cards |
Small Booklet | Contact information displayed alphabetically in one column. Formatted to print eight numbered pages per sheet. Letter graphics appear at the top of each page and the beginning of each letter group, and a contact index at the side of each page indicates the position of that pages entries in the alphabet. Print double-sided if possible. | Address Cards, Business Cards, Detailed Address Cards |
Table | Contact information displayed in a grid. Field names appear at the top of each page. | By Category, By Company, By Location, Phone List |
You can customize the layout of most of the default print styles, and save custom print styles.
In this exercise, you will print a contact list and individual address cards.
Warning
ImportantYour computer must be connected to a local or network printer to complete this exercise. If you don’t have a printer installed, you can install one at this time or follow the alternate instruction in step 15.
Note
USE the contact records you created earlier in this chapter, or your own contact records.
BE SURE TO display the Contacts module in Phone List view before beginning this exercise.
On the Standard toolbar, click the Print button.
Tip
Your Print dialog box might look slightly different than the one shown here, depending on your operating system and printer.
Only one print style (Table Style) is available in the Print Style box.
With the All rows option selected in the Print range area, click Preview.
The Print Preview window opens, displaying the contact list in Table Style. The current page and total number of pages are shown at the left end of the status bar.
Click below the vertical scroll bar to display Page 2.
The last few columns of the phone list appear on the second page.
On the Print Preview window toolbar, click Page Setup.
The Page Setup: Table Style dialog box opens.
Look at the settings available from each of the dialog box tabs. For this print style, you can change only the fonts, paper size, page orientation and margins, header and footer, and other basic settings.
Close the Page Setup dialog box and the Print Preview window.
In the Navigation Pane, in the Current View list, click Address Cards.
On the Standard toolbar, click the Print button.
The Print dialog box opens, displaying more options than it did when printing from Phone List view.
In the Print style list, click Phone Directory Style. Then click Preview.
The Print Preview window opens, showing the contact list as it will appear when printed in Phone Directory Style.
Click the center of the preview page to zoom in for a closer look at the information included in this style.
On the Print Preview window toolbar, click Page Setup.
The Page Setup: Phone Directory Style dialog box opens.
In addition to the basic settings, you can change the number of columns shown on a page and stipulate whether to display a contact index and letter graphics.
In the Options area, select the Contact index on side check box. Then click Print Preview.
Close the Print Preview window.
In the Contacts pane, click the Andrea Dunker contact record to select it, press and hold the
 key, and then click the John Emory contact record to add it to the selection.
On the Standard toolbar, click the Print button.
In the Print style list, click Card Style. In the Print range area, click Only selected items, and then click OK.
Outlook prints a page displaying only the selected contacts.
Experiment with the other ways in which you can print your contact records and your address book.


You can create and access different types of address books including the Global Address List provided by your Exchange Server account, your main address book, and any custom address books that you create.
You can share your stored contact information with other people on or off your network.
Contact records can include names, e-mail and IM addresses, phone numbers, mailing addresses, birthdays, and other information.
You can assign contact records and distribution lists to color-coded categories in order to more easily locate a group of records.
You can print your address book or individual contact records in several formats.