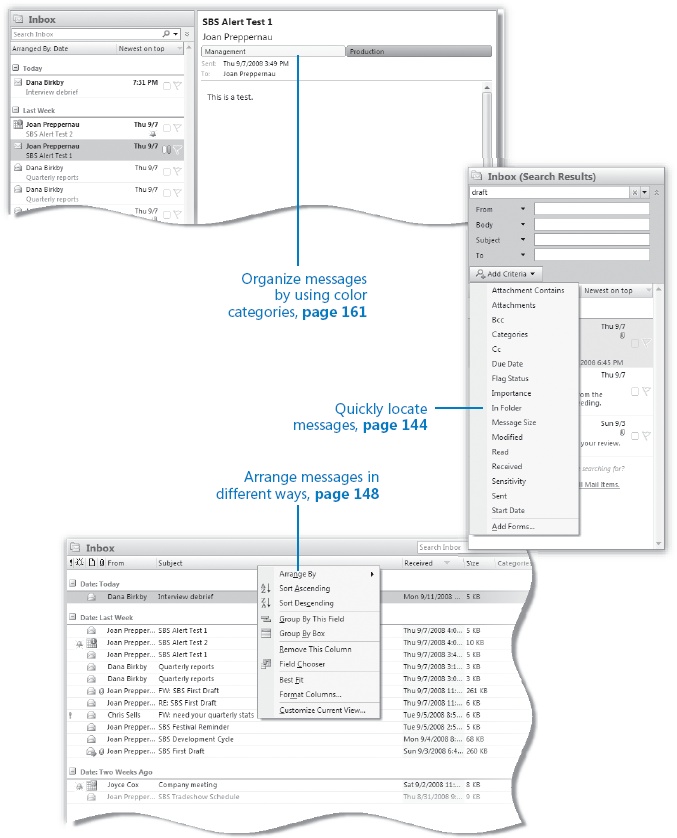
Chapter at a Glance
So far in this book, we’ve discussed the basic mechanics of sending and receiving messages, and the Outlook components used for those purposes. Now we’ll tackle the task that heavy e-mail users spend a lot of time on—managing the messages you receive. This is where Microsoft Office Outlook 2007 really stands apart from its competitors.
In addition to providing ways to organize messages in subfolders within the Inbox and to archive messages, Outlook 2007 includes a number of new features that simplify the process of managing messages and other Outlook items. The greatest of these is the new Instant Search capability, which filters messages as you type the keywords you want to search for, highlighting the search terms within each message. Another useful tool is Color Categories, which combines the named categories available in earlier versions of Outlook with colored labels to provide quick visual recognition and search capabilities.
In this chapter, you will filter and find messages by using Instant Search, display the messages in your Inbox in a variety of arrangements, and use Search Folders. Then you will organize messages by assigning color categories and by organizing them in folders within the Inbox. Finally, you will look at the default archive settings and manually archive an e-mail folder.
Note
See Also Do you need only a quick refresher on the topics in this chapter? See the Quick Reference section at the beginning of this book.
Warning
Important The exercises in this chapter require only practice files created in earlier chapters; none are supplied on the companion CD. For more information about practice files, see Using the Companion CD at the beginning of this book.
Note
Troubleshooting Graphics and operating system–related instructions in this book reflect the Windows Vista user interface. If your computer is running Windows XP and you experience trouble following the instructions as written, please refer to the Information for Readers Running Windows XP section at the beginning of this book.
We discussed using the Instant Search feature to locate contact records in Chapter 2. Although you can use Instant Search in the Calendar, Contacts, and Tasks modules, you will most often use it to locate messages in your Inbox and other mail folders. You can search a particular mail folder or search all mail folders.
Note
See Also For information about mail folders, see Organizing Messages in Folders later in this chapter.
As you define the criteria for a search, Outlook filters out all messages that don’t match, making it easy to find exactly what you’re looking for. And here’s the neat thing: Outlook searches not only the content of the e-mail message header and the message itself, but also the content of message attachments. So if the search term you’re looking for is in a Microsoft Office Word document attached to a message, the message will be included in the search results.
Tip
You can’t instantly filter content in a Public Folder (if your organization uses these) but you can enter the search criteria and then click the Search button to get the same results as you would in your Inbox.
Instant Search is based on the same technology that drives the search functionality in Windows Vista. With this very powerful search engine, you can find any file on your computer containing a specified search term—whether in a file or folder name, in document or workbook content, in an e-mail message within Outlook, in a message attachment, in a picture, music, or video file, and so on. As a matter of fact, if you prefer to do so, you can conduct all of your Outlook searches from the Windows Vista Start menu.
Note
See Also For information about Windows Vista search features, refer to Windows Vista Step by Step by Joan Preppernau and Joyce Cox (Microsoft Press, 2007).
If the search term you enter produces more than 200 results, the Search Results pane displays this information bar:

You can display all the results for the current search term by clicking the message bar, or you can narrow the results by expanding the search term or by specifying other search criteria, such as the sender, the recipient (whether the message was addressed or only copied to you), a category assigned to the item, whether the message contains attachments, and so on.
Note
See Also For information about categories, see Organizing Messages by Using Color Categories later in this chapter.
In this exercise, you will use the Instant Search feature to locate a specific message in your Inbox. There are no practice files for this exercise.
Note
BE SURE TO start Outlook, display your Inbox, and display the Reading Pane before beginning this exercise.
In the Search Inbox box in the Inbox header, type one or more words likely to appear in messages in your Inbox. For example, if you completed the exercises in previous chapters of this book, you could enter alert, draft or development.
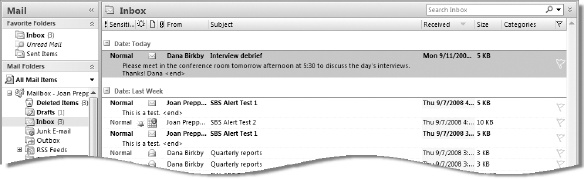
As you type, Outlook filters the contents of your Inbox to display only those items containing the characters, word, or words you enter, and highlights the search term in the displayed messages.
In the lower-left corner of the program window, the status bar displays the number of messages included in the search results. The search results include only messages contained in the Inbox folder and not in any of its subfolders or any other mailbox folders.
To the right of the Search Inbox box, click the Expand the Query Builder button.
The search pane expands to include text boxes in which you can specify the sender, a term that appears in the message body, a term that appears in the message subject, or a primary recipient of the message.
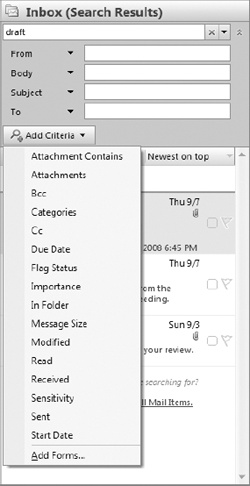
In the expanded Search Results pane, click Add Criteria to display a list of additional criteria.
Selecting a field from this list adds the field to the search criteria section.
Alternatively, you can click the arrow to the right of any of the default criteria and select a different field.
In the Add Criteria list, click Attachments to add that field to the search pane.
Click the Attachments arrow, and then in the list, click Yes.
Notice that your search criteria are also described in the search term box.
Outlook instantly updates the search results to display only the messages in your Inbox that contain the search term and one or more attachments.
To expand the search to include all the folders in your mailbox, at the end of the list of results shown in the Search Results pane, click Try searching again in All Mail Items.
Outlook displays the expanded search results grouped by the folder in which they appear. You can open, delete, and process a message from the Search Results pane as you would from any other. If, however, you change a message so that it no longer fits the search criteria—for example, if you search for flagged messages and then mark the message task as complete, the message no longer appears in the Search Results pane. (It does still appear in whatever folder it is in.)
Experiment with locating information by specifying criteria. When you finish, click the Clear Search button to remove the filter and redisplay the Inbox message list.


As the number of messages in your Inbox increases, it can be challenging to prioritize them. You can customize how you view, arrange, sort, and group messages in Outlook to help you quickly determine which are the most important, decide which can be deleted, and locate any that need an immediate response. You can view only certain groups of messages, such as messages received in the last seven days, unread messages, or messages sent to a certain person or distribution list. You can also view a timeline of all your received messages. Outlook 2007 offers eight predefined views, and you can customize any of these to fit your needs.
List views | Other views | |
|---|---|---|
Messages | Messages with AutoPreview | Message Timeline |
Sent To | Last Seven Days | |
Outlook Data Files | Unread Messages in This Folder | |
Documents |
In category views, the Inbox header includes only the arrangement and sort order, the Reading Pane is visible by default, and the message header information is grouped on multiple lines. In list views, information appears in columns; the Reading Pane is not displayed by default, but you can display it if you want. To experiment with different views, point to Current View on the View menu, and then click the view option you want.
Tip
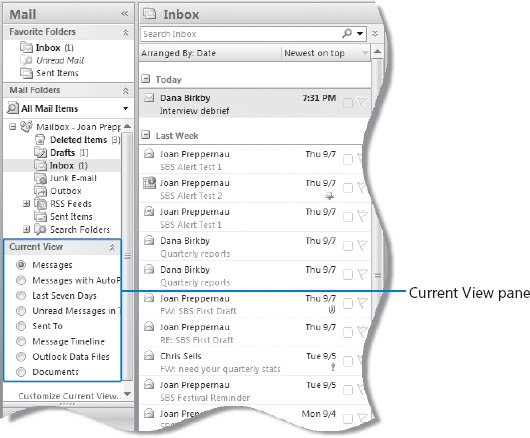
For one-click access to the various views available in the Mail module, on the View menu, point to Navigation Pane, and then click Current View Pane. (If a check mark appears before the command, this feature is already in use.) You can then switch views by selecting the view option you want from the list.
The Current View pane is displayed by default in the Contacts, Tasks, and Notes modules but not in the Mail and Calendar modules.
Note
See Also For more information about viewing messages in the Reading Pane or by using the AutoPreview feature, see Viewing Messages and Message Attachments in Chapter 4.
You can also group messages by the contents of any field—by the sender of the message, for example, or by the subject. You can arrange messages by conversation.
By default, Outlook displays messages in the order you receive them, with the newest messages at the top of your Inbox. Messages received during the current week are grouped by day. Earlier messages are grouped by week or by longer periods. You can easily change the order in which messages and other items (such as meeting requests and task assignments) appear in the Inbox or any other mail folder. You can arrange items by:
Attachments. Messages are grouped by whether they have attachments, and secondarily by date received.
Category. Messages are arranged by the category to which they are assigned. Messages without a category appear first. Messages assigned to multiple categories appear in each of those category groups.
Conversation. This grouped view is similar to sorting messages by subject except that each series of related messages is grouped together, and messages within the group appear in a threaded conversation order. This arrangement is particularly useful when you want to find a response to a specific version of a message in a multi-person e-mail trail. In conversations with multiple messages, Outlook displays only unread or flagged messages, indicating additional messages by a small arrow to the left of the conversation title. Click the arrow to display all the messages in the conversation.
Date. Messages are arranged by date of receipt in order from newest to oldest. Outlook groups messages received on each of the past four days, each of the previous four weeks, the previous month, and those more than one month old.
E-mail Account. Messages are grouped by the e-mail account to which they were sent. This is useful if you receive messages for more than one e-mail account in your Inbox (for example, if you receive messages sent to your POP3 account within your Microsoft Exchange Server mailbox).
Importance. Messages are grouped by priority: High (indicated by a red exclamation point), Normal (the default), or Low (indicated by a blue arrow).
Recipient (To). Messages are grouped alphabetically by the primary recipients (the addresses or names on the To line). The group name exactly reflects the order in which addresses appear on the To line. Therefore, a message addressed to Bart Duncan; Lukas Keller will not be grouped with a message addressed to Lukas Keller; Bart Duncan.
Sender (From). Messages appear in alphabetical order by the message sender’s display name. If you receive messages from a person who uses two different e-mail accounts, or who sends messages from two different e-mail clients (for example, from Outlook and from Windows Mail), the messages will not necessarily be grouped together.
Size. Messages are grouped by the size of the message, including any attachment. Groups include Huge (1–5 MB), Very Large (500 KB–1 MB), Large (100–500 KB), Medium (25–100 KB), Small (10–25 KB), and Tiny (less than 10 KB). This feature is useful if you work for an organization that limits the size of your Inbox, because you can easily locate large messages and delete them or move them to a personal folder.
Start date or due date. Unflagged messages and messages without specific schedules appear first. Messages that you’ve added to your task list with specific start or due dates are grouped by date.
Subject. Messages are arranged alphabetically by their subject lines and secondarily by date. This is similar to arranging by conversation except that the messages aren’t threaded.
Type. Items in your Inbox (or other folder) are grouped by the type of item; for example, messages, encrypted messages, message receipts, meeting requests and meeting request responses, tasks, Microsoft InfoPath forms, and server notifications.
When viewing messages in a category view, the Arranged By bar in the Inbox header indicates how the messages are arranged and in what order. Clicking the order indicator reverses the order; for example, from Newest On Top to Oldest On Top. Regardless of what order you choose, group headers divide the messages into groups that you can collapse or expand.

To experiment with the arrangement options, on the View menu, point to Arrange By, and then click the arrangement option you want.
Regardless of the view and arrangement you choose, you can sort messages by any visible field simply by clicking its column heading (and reverse the sort order by clicking the column heading a second time). You can change the displayed fields from the Show Fields dialog box, which you display by pointing to Arrange By on the View menu, and then clicking Custom.
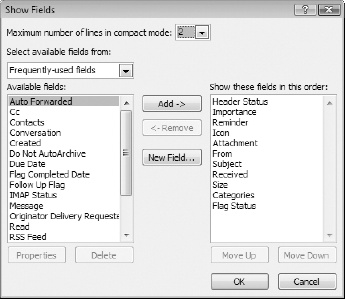
Outlook displays the selected fields in the order shown in the right column. If displaying all the fields requires more space than is available, only some of the fields will be visible. If necessary, you can change the number of lines shown to accommodate more fields. However, it is likely that one of the standard views will fit your needs.
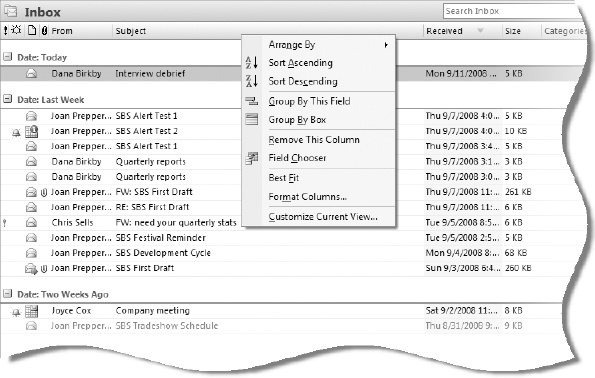
In a list view, you can control the message arrangement, sorting, grouping, visible fields, and other settings from the context menu that appears when you right-click any column header.
In this exercise, you will change the display, arrangement, sort order, and grouping of messages in your Inbox. Then you will filter the Inbox content, add and remove fields, and change the appearance of the Inbox. Finally, you will restore the default settings. There are no practice files for this exercise.
If there are no unread messages in your Inbox, right-click a message, and then click Mark as Unread.
The message header will change to bold, and its icon will change from an open envelope to a closed envelope.
On the View menu, point to Navigation Pane, and then if a check mark doesn’t appear to the left of it, click Current View Pane.
The basic view options appear at the bottom of the Navigation Pane.
On the View menu, if the icon to the left of it is not shaded, click AutoPreview.
The first three lines of each unread message appear in the Inbox below the message header.
On the View menu, point to Arrange By, and then click From.
Outlook rearranges and groups the messages in your Inbox alphabetically by sender.
In the Inbox header, click A on Top.
Outlook reverses the order of the messages.
In the Inbox header, click the Arranged By bar, and then click Subject.
Outlook groups the messages by subject.
On the View menu, point to Expand/Collapse Groups, and then click Collapse All Groups.
Notice that the number of unread items in each group (if there are any) is indicated in parentheses following the conversation subject.
You can use this method to expand or collapse all groups. You can expand or collapse individual groups by clicking the Expand (+) or Collapse (-) button to the left of the group name. You can collapse the group containing the currently selected item by pressing the Left Arrow key and expand a selected group by pressing the Right Arrow key.
In the Current View pane, click Unread Messages in This Folder.
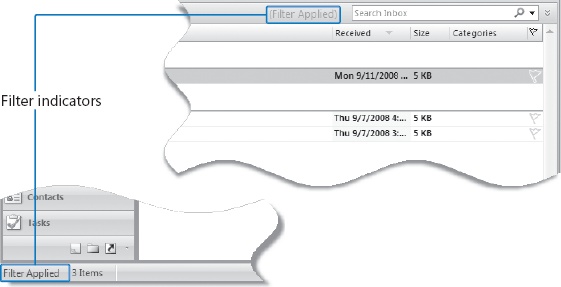
Outlook filters the Inbox to display only unread messages.
The Inbox header and the status bar indicate that a filter has been applied. (If you have no unread messages in your Inbox, it will appear to be empty.)
In the Current View pane, click Messages with AutoPreview.
Outlook removes the filter and displays a list view of the messages, with the first lines of each unread message visible.
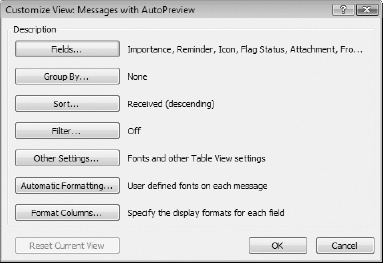
Experiment with the available arrangement, sorting, and grouping options if you want. Then on the View menu, point to Current View, and click Customize Current View.
In the Customize View dialog box, click Fields.
In the Available fields list, click Sensitivity, and then click Add.
The Sensitivity field moves to the bottom of the list of columns to be shown in this view.
In the Show these fields in this order list, drag Sensitivity to appear below Importance.
While you drag the field, red arrows indicate where it will appear when you release the mouse button.
In the Customize View dialog box, click Other Settings.
Under Grid Lines and Group Headings, click the Grid line style arrow, and then in the list, click Small dots. Then click OK in each of the two open dialog boxes to return to the Inbox, which displays the new view settings.
Drag the Sensitivity column heading downward into the message list, and release the mouse button when a large black X appears over the heading.
Outlook removes the Sensitivity column from the view.
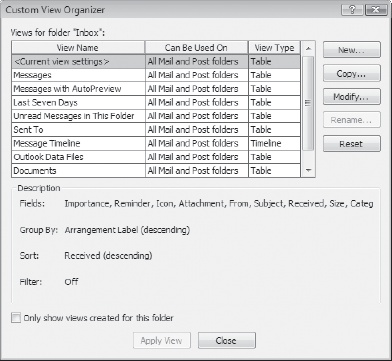
On the View menu, point to Current View, and then click Define Views.
The Custom View Organizer dialog box opens, with the current view selected.
In the Custom View Organizer dialog box, click the Reset button. In the Microsoft Office Outlook message box asking whether you want to reset the current view to its original settings, click OK.
In the View Name list, click each view in turn.
If the view settings have been changed from the default, the Reset button becomes active.
Repeat step 19 to reset any customized views you want. When you finish, click the Messages view, and then click Apply View.
The Inbox is restored to its default view.


Assigning messages to categories can help you more easily locate information. Outlook 2007 introduces the Color Categories feature, which combine named categories with color bars to provide an immediate visual cue when viewing messages in your Inbox.
You can apply color categories to messages, calendar items, contacts, tasks, and notes. You can apply color categories several ways:
In any folder, you can select one or more items, click the Categorize button on the Standard toolbar, and then click the category you want.
In any folder, you can right-click one item or a selection of multiple items, point to Categorize, and then click the category you want.
In any mail folder, you can right-click the Category bar that appears when the Reading Pane is displayed, and then click the category you want.
If you frequently use a particular category, you can assign it as your Quick Click category. You can then apply the Quick Click category to a message by clicking its Category bar.
To quickly view the messages belonging to a category, you can group your messages by category or include the category as a search criterion in the Query Builder. On the To-Do Bar, you can arrange your flagged messages and tasks by category.
Note
See Also For more information about color categories, see Organizing Contacts by Using Color Categories in Chapter 2.
Tip
To help you easily distinguish messages received from certain people, you can color-code message headers. For example, you might show all messages from your boss in red and all messages from the finance department in green. You can also choose to have messages that were sent only to you displayed in a different color than messages sent to multiple people or a distribution list. You apply color-coding on a per-folder basis. To experiment with color-coding, click Organize on the Tools menu, and then click the Using Colors tab.
In this exercise, you will display the default color categories, rename and create categories, change the color associated with a category, categorize a message, and sort the Inbox contents by category.
Note
USE the SBS Alert Test 1 message you created in Working with New Mail Notifications in Chapter 4. If you did not complete that exercise, you can do so now, or you can experiment with this feature by using any message in your Inbox.
BE SURE TO start Outlook and display your Inbox in the default Messages view before beginning this exercise.
In the Inbox, click the SBS Alert Test 1 message.
On the Standard toolbar, click the Categorize button.
Note
Troubleshooting If the Categorize button is not visible or active, click any message in the Inbox to activate it.
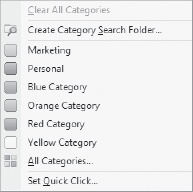
The Category list displays the standard and currently assigned categories. Notice that you can remove all categorizations from a message by clicking Clear All Categories.
In the Category list, click All Categories.
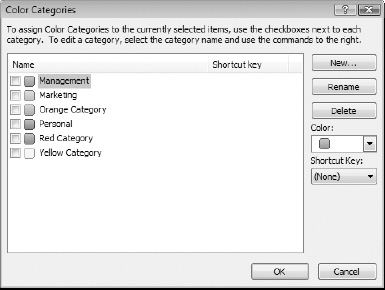
The Color Categories dialog box opens, displaying the current color-to-category assignments. You can rename any of the standard color categories or create new color categories.
In the Color Categories dialog box, click the Blue Category name (not the check box), and then click Rename. With the category name selected for editing, type Management, and then press
 .
.Tip
If you haven’t renamed a color category, Outlook gives you the option of renaming the category the first time you use it.
The category name changes.
With the Management category still selected, click the Color arrow, and then in the color palette, click the Yellow square.
The color associated with the Management category changes from Blue to Yellow.
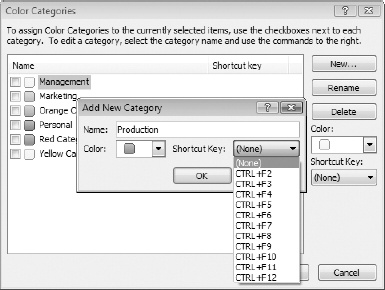
In the Color Categories dialog box, click New.
In the Name box, type Marketing. Click the Color arrow, and then in the color palette, click the Red square. Then click the Shortcut Key arrow.
You can assign keyboard shortcuts to up to 11 color categories. You might want to implement this feature if you frequently use multiple categories.
In the Shortcut Key list, click None. Then in the Add New Category dialog box, click OK.
The new category appears at the bottom of the Color Categories list. Its check box is selected, indicating that it has been assigned to the currently selected message.
In the Color Categories dialog box, click OK.
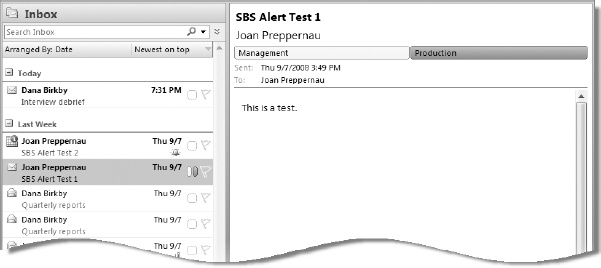
In the message list, a red square appears in the Category bar of the selected message, and in the Reading Pane, a red bar with the category name Production appears at the top of the message.
In the message list, right-click the Category bar of the SBS Alert Test 1 message, and then in the list, click Management.
The Category bar changes to display both red and yellow icons, indicating that the message is assigned to two categories. You can assign a message to an unlimited number of categories, but only the three most recently assigned appear in the Category bar.
The Reading Pane displays two colored bars of equal size. Up to three categories can be displayed in one row; additional categories are displayed in additional rows.
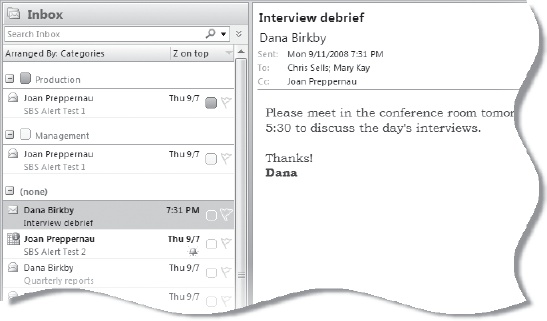
In the Inbox header, click the Arranged By bar, and then click Categories.
The messages are arranged by category, beginning with the uncategorized messages.
To the right of the Arranged By bar, click A on top.
The order reverses to display the categorized messages at the top of the list.
After you’ve read and responded to messages, you might want to keep some for future reference. You can certainly choose to retain them all in your Inbox if you want, but as the number of messages in your Inbox increases to the hundreds and then into the thousands, it might quickly become overwhelming. To keep your Inbox content low and avoid an accumulation of unrelated messages, you can organize messages into folders.
Popular personal-organization gurus advocate various folder structures as an important part of an organizational system. You can apply any of these physical folder structures to Outlook, or you can use any other structure that works for you. For example, you might create a folder for each project you’re working on and store all messages regarding a particular project in its own folder. Or you might create a folder to store all messages from a particular person, such as your manager, no matter what they are about.
You can move messages to folders manually, or if your organization is running Exchange Server, you can have Outlook move them for you. You can automatically move messages to another folder by creating a rule; for example, you can instruct Outlook to automatically move all messages received from your manager to a separate folder. You can set up different rules that go into effect when you’re away from the office.
Note
See Also For information about automatically moving messages, see Creating Rules to Process Messages in Chapter 12.
In this exercise, you will create a folder and then move messages to it.
Note
USE the RE: SBS First Draft and FW: SBS First Draft messages you created in Replying to and Forwarding Messages in Chapter 4. If you did not complete that exercise, you can do so now, or you can experiment with this feature by using any messages in your Inbox.
BE SURE TO start Outlook and display your Inbox in Messages view before beginning this exercise.
On the Standard toolbar, click the New arrow, and then in the list, click Folder.
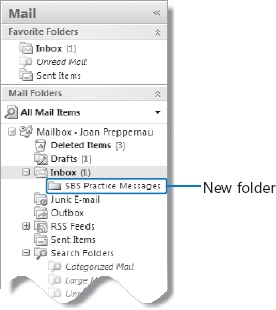
In the Name box, type SBS Practice Messages, and then click OK.
Warning
Important The name of this folder begins with SBS so that you can easily differentiate it from other folders in your mailbox.
Note
See Also For information about sharing Outlook folders, see Sharing Your Folders with Other People in Chapter 10.
Because you created this folder from the Inbox, Outlook creates the new folder as a subfolder of the Inbox, and formats it to contain mail items.
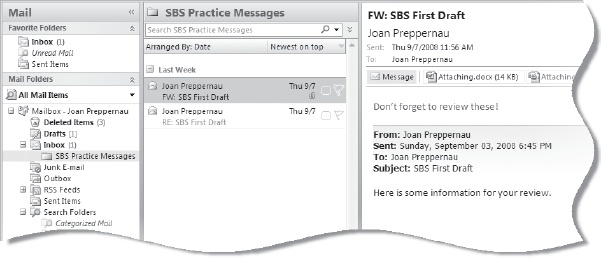
In the Navigation Pane, locate the RE: SBS First Draft and FW: SBS First Draft messages.
Drag the RE: SBS First Draft message to the SBS Practice Messages folder in the Navigation Pane.
The message disappears from the Inbox.
Right-click the FW: SBS First Draft message, and then click Move to Folder.
In the Move the selected items to the folder list, click SBS Practice Messages (if it isn’t already selected). Then click OK.
The message disappears from the Inbox.
In the Navigation Pane, under the Inbox folder, click the SBS Practice Messages folder.
The two messages appear in the new folder.


As messages accumulate in your Inbox and other message folders, you might need to consider other ways to store them in order to cut down on the amount of storage space you’re using. For example, you might want to archive all messages received or sent before a certain date. Archiving messages in a separate Outlook message file helps you manage clutter and the size of your primary data file, while still allowing easy access to the archived messages from within Outlook.
By default Outlook automatically archives messages in all your folders at regular intervals to a location determined by your operating system—usually an Archive data file you can access from the Navigation Pane. You can change the default AutoArchive settings, such as the archive frequency and location, and you can specify unique archive settings for individual folders.
If you are working on an Exchange Server network, your archival options might be limited by retention policies set by your network administrator. For instance, your company might have a policy that you may retain items for no more than a certain number of days.
Tip
You can use the Mailbox Cleanup feature to see the size of your mailbox, find and delete old items or items that are larger than a certain size, manually archive your mail, empty your Deleted Items folder, and delete conflicting versions of items stored on your computer or on the server. To use this feature, click Mailbox Cleanup on the Tools menu.
In this exercise, you will learn how to set the default automatic archive options, how to manually archive a folder, and how to set the archive options for an individual folder. There are no practice files for this exercise.
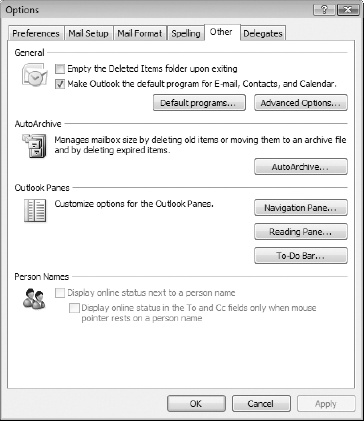
On the Tools menu, click Options.
In the Options dialog box, click the Other tab.
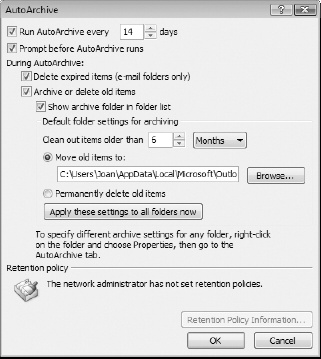
Review your AutoArchive settings—particularly note how often Outlook will start the archival process, the age at which items will be archived, and the location in the Move old items to box.
If the Prompt Before AutoArchive Runs check box is selected, Outlook requests your approval each time it runs the AutoArchive process. If you decline, the process doesn’t start again until the next scheduled time.
Notice that you have the option to permanently delete old items. If you make changes to your AutoArchive settings or want to standardize settings across all folders, you can apply the changes to all the folders in your mailbox by clicking the Apply These Settings To All Folders Now button.
If you want to make changes to your AutoArchive settings, do so, and then click OK in each of the open dialog boxes. Otherwise, click Cancel in each of the dialog boxes to close them without initiating any changes.
With the Inbox active, on the File menu, point to Folder, and then click Properties for “Inbox”.
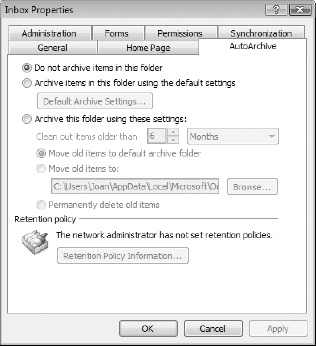
Click the AutoArchive tab.
You can set the archive options for each folder individually from the AutoArchive tab of the folder’s Properties dialog box.
If you click Archive Items In This Folder Using The Default Settings, you can view and modify the default settings in the AutoArchive dialog box shown earlier by clicking the Default Archive Settings button.
If you click Archive This Folder Using These Settings, you can specify a unique archival age and location for the items in this folder.
If you want to make changes to the Inbox AutoArchive settings, do so, and then click OK. Otherwise, click Cancel to close the dialog box without initiating any changes.
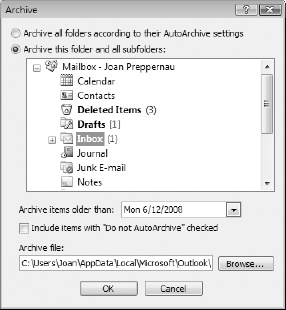
On the File menu, click Archive.
From this dialog box, you can manually start the archive process for your entire mailbox or for selected folders.
If you want to initiate the archive process for your mailbox now, click Archive all folders according to their AutoArchive settings, and then click OK. Otherwise, click Cancel.
If you click OK, Outlook displays the progress of the archive process on the status bar in the lower-right corner of the program window. You can cancel an archive process by clicking the Archiving button on the status bar and then in the list, clicking Cancel Archiving.
The first time Outlook archives messages, it creates an Archive Folders data file that you can access from the Navigation Pane. The data file contents are organized in the same folder structure as the original contents, and are stored in a separate file on your computer.
You can filter and locate messages in your mailbox by using the new Instant Search function. You can create virtual Search Folders that automatically update to display messages meeting certain criteria.
You can group and sort messages by sender, time, subject, size, category, or any other field.
You can assign color-coded categories to messages, tasks, appointments, and other Outlook items, and then group and sort items by color category. You can use the default Outlook categories or tailor them to fit your needs.
You can create folders to organize your mail, and move items to folders manually or automatically.
Outlook automatically archives old and expired items to a separate data file. You can specify the AutoArchive frequency, location, and other settings on a global and per-folder basis.