Chapter at a Glance

Most new e-mail messages you receive appear in your Microsoft Office Outlook Inbox. (The exceptions to this are messages processed by any Outlook rules you or your administrator has set up, and messages diverted to the Junk E-mail folder due to suspicious content.)
After messages arrive in your Inbox, you can handle them in various ways. For example, you can:
Read the message, either in the Reading Pane or in a message window.
View any attachments, either in the Reading Pane or in the appropriate program, and save attachments to your hard drive.
Respond to the message sender or to the message sender and all recipients.
Forward the message to another person.
Create an appointment or task based on the message.
Categorize the message or file it in an Outlook folder for future electronic reference.
Print the message for future “hard copy” reference.
Delete the message.
When you are working online, you usually receive messages as soon as they are processed by your e-mail server. If you are working offline, you will need to connect to your server to download new messages. You can do this manually or set up Outlook to automatically check for new messages at regular intervals.
Note
See Also For information about Outlook rules, see Creating Rules to Process Messages and for information about junk e-mail, see Blocking Unwanted Messages, both in Chapter 12.
In this chapter, you will experiment with receiving, viewing, responding to, or otherwise processing e-mail messages. You will preview and view messages and files attached to them. You will reply to and forward messages. Then you will work with incoming messages through New Mail notifications and learn to configure the notifications to display the way you want. You will also flag a message for follow-up so that it appears in the To-Do list, create an appointment from a message, and print a message.
Note
See Also Do you need only a quick refresher on the topics in this chapter? See the Quick Reference section at the beginning of this book.
Warning
Important The exercises in this chapter require only practice files created in earlier chapters; none are supplied on the companion CD. For more information about practice files, see Using the Companion CD at the beginning of this book.
Note
Troubleshooting Graphics and operating system–related instructions in this book reflect the Windows Vista user interface. If your computer is running Windows XP and you experience trouble following the instructions as written, please refer to the Information for Readers Running Windows XP section at the beginning of this book.
Each time you start Outlook and connect to your e-mail server, any new messages received since the last time you connected appear in your Inbox. Depending on your settings, Outlook downloads either the entire message to your computer or only the message header, which provides basic information about the message, such as:
The item type (message, meeting request, task assignment, and so on)
Who sent it
When you received it
The subject
If you forwarded or replied to it
If it contains attachments
If it has been digitally signed or encrypted
If it has been marked as being of high or low importance

Messages that you haven’t yet read are indicated by closed envelope icons and bold headers. You can view the text of a message in several ways:
You can open a message in its own window by double-clicking its header in the message list.
You can read a message without opening it by clicking its header in the message list to display the message in the Reading Pane.
If you turn on the Single Key Reading Using Space Bar option, you can page through a message in the Reading Pane by pressing the Spacebar. When you reach the end of a message, the first page of the next message is displayed. This option is very convenient if you want to read through several consecutive messages in the Reading Pane, or if you find it easier to press the Spacebar than to scroll the Reading Pane by using the mouse. If you do not turn on this option, pressing the Spacebar while viewing a message does nothing, so there is no harm in turning it on even if you aren’t sure you will use it.
Tip
To control whether you can page through messages by pressing the Spacebar, click Options on the Tools menu. On the Other tab of the Options dialog box, in the Outlook Panes area, click Reading Pane. Then in the Reading Pane dialog box, select or clear the Single Key Reading Using Space Bar check box, and click OK twice.
You can display the first three lines of each message under the message header by using the AutoPreview feature. Scanning the first three lines of a message frequently gives you enough information to make basic decisions about how to manage it. The only drawback is that AutoPreview dedicates five lines to each message rather than the two lines of the default Messages view, so fewer messages are visible on your screen at one time.
You can view message attachments in several ways:
You can open the attachment from an open message or from the Reading Pane.
You can preview certain types of attachments (including Microsoft Office Excel spreadsheets, Microsoft Office PowerPoint slideshows, Microsoft Office Word documents, and Portable Document Format (PDF) files) directly in the Reading Pane without opening the attached file. This new feature of Outlook 2007 saves time and increases efficiency. If you install add-ins provided by companies other than Microsoft (called third-party add-ins), you can preview other types of files as well.
You can save the attachment to your hard disk and open it from there. This strategy is recommended if you suspect an attachment might contain a virus, because you can scan the attachment for viruses before opening it (provided that you have a virus scanning program installed).
If you receive a contact record as a message attachment, you can add it to your primary address book by dragging the attachment from the e-mail message to the Contacts button in the Navigation Pane. To add the contact record to a secondary address book, expand the folder structure in the Navigation Pane and drag the attachment to that folder.
Note
See Also For information about protecting your computer from viruses, refer to Windows Vista Step by Step, by Joan Preppernau and Joyce Cox (Microsoft Press, 2007) or Microsoft Windows XP Step by Step, by Online Training Solutions, Inc. (Microsoft Press, 2004).
In this exercise, you will preview and open a message and an attachment.
Note
USE the SBS First Draft message you created in Attaching Files to Messages in Chapter 3. If you did not complete that exercise, you can do so now, or you can use any message with an attachment in your Inbox.
BE SURE TO start Outlook and display your Inbox before beginning this exercise.
On the View menu, click AutoPreview.
Note
Troubleshooting If the AutoPreview icon on the View menu is shaded, this feature is already turned on.
The first three lines of each message appear in the Inbox below the message header.
Locate the SBS First Draft message in your Inbox, and then click the message.
Outlook displays the message in the Reading Pane. Note that the Reading Pane displays the message header and the names of any attached files.
In the Reading Pane, point to the Message button below the message header.
Note
Troubleshooting If you are working through this exercise with a message that does not have an attachment, you will not see a Message button.
A ScreenTip displays the number of attachments.
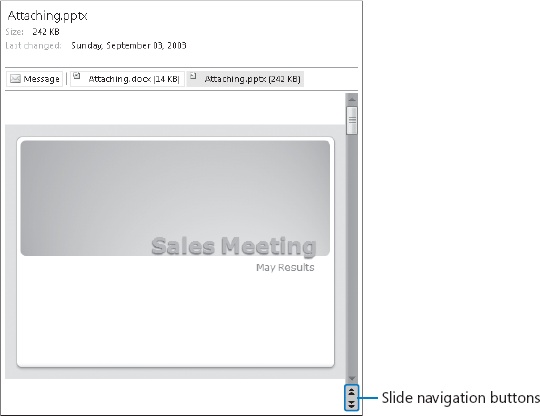
Point to the Attaching.docx attachment.
A ScreenTip displays the name, type, and size of the attached file.
Click the Attaching.docx attachment once.
Outlook asks you to confirm that you want to preview the file. This security measure is designed to prevent viruses or other malicious content from running without your consent.
In the Reading Pane, click Preview file.
Tip
If you want Outlook to display previews of attachments without your explicit permission in the future, clear the Always Warn Before Previewing This Type Of File check box.
The fully formatted Word 2007 document appears in the Reading Pane. You can scroll through the entire document within this pane, without starting Word.
Click the Attaching.pptx attachment, and then click the Preview file button.
The title slide of this PowerPoint presentation appears in the Reading Pane. You can move among the presentation’s slides by clicking the Previous Slide and Next Slide buttons in the lower-right corner of the pane.
In the Reading Pane, click the Message button.
The message text reappears in the Reading Pane. You can switch between the message and any attachments in this way.
In the Reading Pane, double-click the Attaching.pptx attachment, and then in the Opening Mail Attachment message box, click Open.
PowerPoint 2007 starts and opens the Attaching presentation.
Close the presentation to return to your Inbox.
In the message list, double-click the SBS First Draft message.
The message opens in its own window.
Note the message header and the attached file at the top. You can preview an attachment in the message window by clicking it once, and open an attachment by double-clicking it.


You can reply to or forward most e-mail messages that you receive by clicking the Reply, Reply To All, or Forward button either within the message window or on the Standard toolbar. When replying to a message, Outlook fills in the To and Cc boxes for you, addressing the response either to only the original message sender or to the message sender and all other people to whom the message was addressed or copied (recipients listed in the To and Cc boxes), depending on the reply option you choose. Outlook does not include recipients of blind courtesy copies (Bcc recipients) in message replies. You can add, change, and delete recipients from any reply before sending it.
To include all recipients of a message in your reply, click the Reply To All button. Outlook addresses your reply to the original message sender and any recipients listed in the To box of the original message, and sends a copy to any recipients listed in the Cc box of the original message.
Similarly, you can forward a received message to any e-mail address (regardless of whether the recipient uses Outlook) provided the message was not sent with restricted permissions. When forwarding a message, Outlook does not fill in the recipient boxes for you.
Note
See Also For information about restricting recipients from copying, printing, or forwarding messages, see Securing Your E-Mail in Chapter 12.
When responding to an e-mail message, take care to use good e-mail etiquette. For example, don’t forward messages containing large attachments to people with low-bandwidth connections who don’t need the attachment. If your response is not pertinent to all the original recipients of a message, don’t reply to the entire recipient list, especially if the message was addressed to a distribution list that might include hundreds of members.
Tip
You can prevent people who are using Outlook from automatically replying to all recipients of a message you send, by creating a custom message form with the Reply To All functionality disabled. For more information, see the article “Prevent e-mail message recipients from using Reply All or Forward” at
http://office.microsoft.com/en-us/assistance/HA011142241033.aspx
This method does not prevent recipients using Windows Mail, Microsoft Outlook Express, or Microsoft Outlook Web Access from using the Reply To All function. And of course, the person responding to your message can always choose to manually address his or her response to all the original recipients.
An easier way to prevent people from replying to multiple message recipients is to address the message to yourself and send blind courtesy copies to all other recipients. Then the recipient list will not be visible to anyone.
If the original message contains one or more attachments, be aware that replies do not include attachments, and forwarded messages do.
Tip
If a message contains voting buttons, you can respond by opening the message and clicking the button corresponding to the response you want to send. Or you can click the Infobar (labeled Click Here To Vote) in the Reading Pane and then click the option you want. You can choose to send a blank response containing your vote in the message header, or you can edit the response to include additional text.
Note
See Also For information about responding to other Outlook items, see Responding to Meeting Requests in Chapter 6, and Managing Task Assignments in Chapter 8.
If you use an e-mail signature, you can specify a different signature to appear in replies and forwarded messages than in new messages. For example, you might want to include your full name and contact information in the signature that appears in new messages, but only your first name in the signature that appears in replies and forwarded messages.
Note
See Also For more information about e-mail signatures, see Adding Signatures to Messages Automatically in Chapter 3.
If you reply to or forward a received message from within the message window, the original message remains open after you send your response. You can instruct Outlook to close original messages after you respond to them—you will probably be finished working with the message at that point. To do so, click Options on the Tools menu. On the Preferences tab of the Options dialog box, click the E-mail Options button. In the E-mail Options dialog box, select the Close Original Message On Reply Or Forward check box, and then click OK in each of the two open dialog boxes.
In this exercise, you will reply to and forward messages.
Note
USE the SBS First Draft message you created in Attaching Files to Messages in Chapter 3. If you did not complete that exercise, you can do so now, or you can use any message in your Inbox.
BE SURE TO display your Outlook Inbox before beginning this exercise.
OPEN the SBS First Draft message.
Look at the header information at the top of the message window.
Note that this message includes two attachments, and the message window Ribbon displays only one tab (the Message tab), which contains all the commands you can use in a received message.
On the Message tab, in the Respond group, click the Reply button.
Outlook creates a reply message, already addressed to you (the original sender). If the message had been sent to any other people, the reply would not include them.
A prefix, RE:, appears at the beginning of the message subject to indicate that this is a response to an earlier message. Note that the response does not include the original attachments (and in fact there is no indication that the original message had any). The original message, including its header information, appears in the content pane separated from the new content by a horizontal line.
With the insertion point at the top of the content pane, type
We’ll need to get approval from the Marketing team before proceeding.
In the reply message header, click the Send button.
Outlook sends your reply. (If you are connected to your e-mail server, the reply will appear shortly in your Inbox.) The original message remains open on your screen.
In the original message, in the Respond group, click the Forward button.
Note
Troubleshooting If the original message is closed, click the Forward button on the Standard toolbar.
Outlook creates a new version of the message that is not addressed to any recipient. The FW: prefix at the beginning of the message subject indicates that this is a forwarded message. The files that were attached to the original message appear in the Attached box. The message is otherwise identical to the earlier reply message.
You address and send a forwarded message as you would any other.
With the insertion point at the top of the content pane, type
Don’t forget to review these!
Send the message, and then close the original message window.
Note
Troubleshooting If you are not working online you will not receive the messages. Connect to your server to download the messages before continuing.
When the second message appears in your Inbox, compare the two messages. The forwarded message includes the original message attachments. Otherwise, other than the Subject prefixes and the text you entered, the messages are identical.


Deleting Messages
When you delete a message, contact record, or any other item, Outlook temporarily moves it to the Deleted Items folder of your mailbox. You can open the folder from the Navigation Pane, view items that have been deleted but not purged, and restore items (undelete them) by moving them to other folders.
Outlook does not permanently delete items until you purge them from the Deleted Items folder, You can empty the entire Deleted Items folder manually or automatically, or permanently delete individual items from it.
To permanently delete an individual item:
In the Navigation Pane, click the Deleted Items folder to display its contents.
In the Deleted Items list, click the item (or select multiple items) you want to delete.
On the Standard toolbar, click the Delete button (or press the
 key).
key).In the Microsoft Office Outlook message box asking you to confirm that you want to delete the selected item(s), click Yes.
To manually empty the Deleted Items folder:
In the Navigation Pane, right-click the Deleted Items folder, and then click Empty “Deleted Items” Folder.
To automatically empty the Deleted Items folder each time you exit Outlook:
On the Tools menu, click Options.
On the Other tab of the Options dialog box, select the Empty the Deleted Items folder upon exiting check box. Then click OK.
When new messages, meeting requests, or task delegations arrive in your Inbox, Outlook alerts you in several ways so that you can be aware of e-mail activity if you are working in another application or away from your computer:
A New Mail Message icon appears in the notification area at the right end of the Windows taskbar.
A semi-transparent desktop alert appears on your screen for a few seconds, displaying the name of the sender, the subject, and the first few words of the message (approximately 125 characters). From the desktop alert, you can open a message, mark it as read, flag it for action, respond to it, or delete it.
You can change the location, transparency, and length of time desktop alerts appear, or choose to not display them:
You can position the alert inside or outside of the Outlook program window. For example, if you usually work with the Windows taskbar hidden, you might want to position the alert away from the taskbar to prevent you from accidentally displaying the taskbar each time you point to an alert.
The alert can stay on screen for 3 to 30 seconds. The default is 7 seconds.
The alert can be a solid color or up to 80% transparent. The default is 20% transparent. You might find that transparent alerts are less likely to interfere with your view of the work you’re doing.
If Outlook is minimized or another application window is active, a beep sounds. You can change the sound or turn it off.
The mouse pointer briefly changes shape when you receive a message. You can turn off this feature.


You can customize and turn off these notifications.
In this exercise, you will customize your desktop alert settings and process messages through desktop alerts as you receive them. There are no practice files for this exercise.
On the Preferences tab, click E-mail Options. Then in the E-mail Options dialog box, click Advanced E-mail Options.
In the Advanced E-mail Options dialog box, click Desktop Alert Settings.
Click the Desktop Alert Settings button.
Drag the How long should the Desktop Alert appear slider to the left end of the slider bar to set it to 3 seconds, and then click Preview.
A semi-transparent sample desktop alert appears in the lower-right corner of your desktop and fades away after three seconds.
Click Preview again, and when the alert appears, point to it.
The transparent alert becomes solid. As long as the mouse pointer is positioned over the alert, it remains visible.
Drag the sample desktop alert to the upper-right corner of your screen.
Future desktop alerts will appear wherever you move the sample alert.
In the Desktop Alert Settings dialog box, drag the How transparent should the Desktop Alert be slider to the left end of the slider bar to set it to 0% transparent, and then click Preview.
The sample desktop alert appears in the upper-right corner of the screen, and darkens until it is opaque.
Move the desktop alert to the position you want it to appear in the future. Then experiment with the options in the Desktop Alert Settings dialog box, and set the duration and transparency as you want, previewing your changes as necessary.
When you’re done, click OK in each of the four open dialog boxes.
On the Standard toolbar, click the New Mail Message button.
A new message window opens.
Enter your e-mail address in the To box, and then in the Subject box, type SBS Alert Test 1.
In the message body, type This is a test. Then send the message.
When the message arrives in your Inbox, a New Mail Message icon appears in the notification area at the right end of the Windows taskbar, and a desktop alert appears on your screen.
When the desktop alert appears, point to it to keep it active.
If you point to the text displayed in the alert, it appears underlined. You can click the underlined text to open the message in a message window.
In the desktop alert, click the Options button, and then click Mark as Read.
The desktop alert closes, and the message in your Inbox is marked as read (whether on not the Inbox is visible).
On the Standard toolbar, click the New Mail Message arrow, and then in the list, click Meeting Request.
A new meeting request window opens.
In the To box, type your e-mail address; in the Subject box, type SBS Alert Test 2; and in the Location box, type my Inbox. Then send the meeting request.
If a Reminder window opens, click Dismiss.
Note
See Also For more information about meeting requests, see Scheduling, Updating, and Canceling Meetings in Chapter 6.
When the desktop alert appears, point to it, and then click the Delete Item button.
The message moves from your Inbox to the Deleted Items folder, and the desktop alert closes.


Frequently you need to take some type of action based on the information you receive from another person in an e-mail message. Among other actions, you might need to add an item to your task list or calendar.
Outlook 2007 makes it incredibly simple to add a task to your task list from an e-mail message. In Outlook 2003, you could flag messages for follow up, locate flagged messages within a folder by sorting it on flags, or within your entire mailbox by viewing the For Follow Up Search Folder. In Outlook 2007, flagging a message in any mail folder or flagging a contact record adds that item to your task list, which you can view from the To-Do Bar or the Tasks module.
Note
See Also For more information about the To-Do Bar and the To-Do Bar Task List, see Personalizing Your Outlook Workspace in Chapter 1. For information about creating and managing tasks, see Chapter 8.
Although creating a task by flagging a message is very useful, you should be aware of a few limitations. Flagging the message doesn’t create a regular task; it simply adds the message to the task list. Because of this, you can’t assign a flagged message to another Outlook user or track its status. You can mark it as complete by clicking its flag in either the message window, message list, or task list, or by selecting the message and then clicking the Follow Up button on the Standard toolbar: doing so removes the message from your task list and changes the flag to a check mark. The biggest drawback, however, is that you must retain the message—you can move it between mail folders, but deleting the message deletes the task as well.
Tip
Tasks created by simply clicking a message flag appear on your task list under the default due date header. You can change the default due date by right-clicking the flag and then clicking Set Quick Click. In the Set Quick Click dialog box, click the due date you want to appear by default (options are limited to Today, Tomorrow, This Week, Next Week, No Date, and Complete), and then click OK.
You can specify a task due date other than the default when you flag the message, by right-clicking the flag and then clicking the due date: Today, Tomorrow, This Week, Next Week, No Date, or Custom (which allows you to set specific start and end dates).
Outlook also provides a convenient method of creating a Calendar items (an appointment, event, or meeting request) based on an e-mail message; you simply drag the message to the Calendar button in the Navigation Pane. When you release the mouse button, an appointment window opens, already populated with the message subject as the appointment subject, the message text in the content pane, and any message attachments attached to the appointment. The start and end times are set to the next half-hour increment following the current time. You can convert the appointment to an event or meeting in the same way that you would create an event or meeting from within the Calendar module. You can retain any or all of the information within the message as part of the Calendar item so that you (and other participants, when creating a meeting request) have the information on hand when you need it. After creating the Calendar item, you can delete the actual message from your Inbox.
Note
See Also For information about creating and managing Outlook Calendar items, see Chapter 6.
In this exercise, you will create a task and then an appointment from an e-mail message.
Note
USE the SBS Tradeshow Schedule message you created in Creating and Sending Messages in Chapter 3. If you did not complete that exercise, you can do so now, or you can use any message in your Inbox.
BE SURE TO display your Outlook Inbox and the To-Do Bar before beginning this exercise.
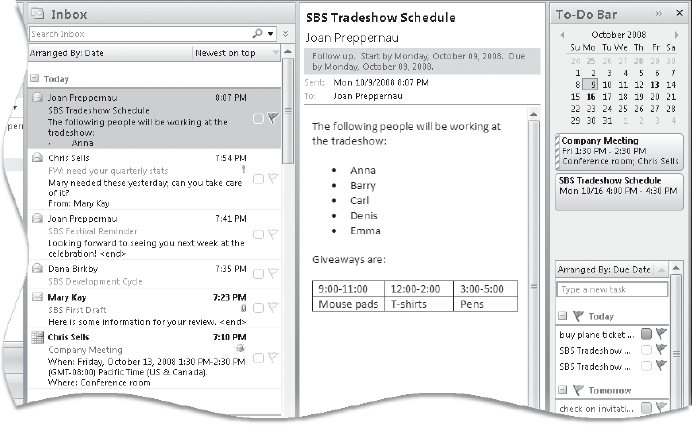
In the message list, scroll to the SBS Tradeshow Schedule message, and then click the transparent flag in the right margin of the message header.
The flag becomes red, and a task named SBS Tradeshow Schedule appears under the Today header on your To-Do Bar task list.
In the To-Do Bar Task List, point to the SBS Tradeshow Schedule task.
A ScreenTip appears displaying the start date, reminder time, due date, the folder in which the message appears, and any categories assigned to the message.
Double-click the SBS Tradeshow Schedule task.
The flagged message opens in a message window. The message header indicates that you need to follow up on this message. The start and due dates given are tomorrow’s date.
Close the message window.
In the Navigation Pane, click the Tasks button to display the Tasks module.
Your active tasks appear in the To-Do List. The icon preceding each item in the list indicates whether it is a standard task, e-mail message, contact, and so on. Message icons match those shown in the Inbox, indicating whether the message is read or unread and whether you’ve replied to or forwarded the message.
In the To-Do List, click the SBS Tradeshow Schedule task to display its details in the Reading Pane.
For the purposes of this exercise, assume that you flagged this message for follow-up because you need to organize a meeting with colleagues to discuss its contents.
Drag the message from the To-Do List to the Calendar button in the Navigation Pane, but don’t release the mouse button.
As you hold the dragged message over the Calendar button, the Navigation Pane changes to display the Calendar module information instead of the Mail module information.
Drop the message on the Calendar button to create an appointment based on the message.
You can convert the appointment to an event by selecting the All Day Event check box, or convert it to a meeting by inviting other people to attend. You can edit the information in the content pane without affecting the content of the original message, and you can move or delete the original message without affecting the appointment.
In the appointment window, click the Save & Close button to save the appointment to your calendar.
When the appointment reminder window appears (15 minutes prior to the start time of the appointment) click Dismiss.


Note
See Also For information about appointment reminders, see Scheduling and Changing Appointments in Chapter 6.
You can print an e-mail message, for example, if you want to take a hard copy of it to a meeting for reference, or if you keep a physical file of important messages or kudos. You can print the message exactly as it appears in your Inbox, or embellish it with page headers and footers. Outlook prints the message as shown on-screen, including font and paragraph formats.
In this exercise, you will preview a message as it will appear when printed, add a page header, and then print the message.
Note
USE the SBS Tradeshow Schedule message you created in Creating and Sending Messages in Chapter 3. If you did not complete that exercise, you can do so now, or you can use any message in your Inbox.
BE SURE TO install a printer before beginning this exercise.
OPEN the SBS Tradeshow Schedule message.
In the message window, click the Microsoft Office Button, and then point to Print.
Tip
Unlike previous versions of Outlook, the Print and Print Preview commands are not available from the message window toolbar (or in this case, the Ribbon).
The right pane displays these preview, print, and page setup options:
Print opens the Print dialog box, where you can make changes to the default printing options before printing.
Quick Print prints the open or selected message with the default printing options, without first displaying the Print dialog box.
Print Preview displays the message as it will appear when printed. You can change the page setup options before printing the message.
Define Print Styles allows you to make changes to an existing print style (the way the message is presented on the printed page) or create a new one. The default print style is Memo style, which prints your name, the message header information, and then the message content.
Click the Print button (not its arrow).
The Print dialog box opens, displaying your default printer settings, which you can change before printing just as you would when printing from any Office program. Clicking OK prints the message with the default settings.
In the Print dialog box, click Preview.
The Print Preview window opens, displaying the message as it will appear when printed.
On the Print Preview window toolbar, click the Actual Size button to display the message at 100% magnification.
Tip
When previewing a message that will be longer than one page when printed with the current settings, you can click the Multiple Pages button to preview all pages of the message at the same time. This can be useful when, for example, you want to check page breaks or scan a document for a particular element.
In the Print Preview window, click the Page Setup button.
The Page Setup: Memo Style dialog box opens. You can change the font, paper size, page margins, header, and footer from this dialog box.
In the Page Setup: Memo Style dialog box, click the Paper tab to see the available options.
In addition to choosing the paper size, you can select the number of pages that print on each sheet of paper and set the page margins and the orientation.
Click the Header/Footer tab.
In the Header area, type For Your Information in the center box, and then click the Font button. In the Font dialog box, under Size, click 16, and then click OK.
In the Footer section, select the default text (the page number) that appears in the center box. Then in the AutoText box, click the User Name button.
Outlook will print the specified text at the top of the page and your name (or user name, if different) at the bottom.
In the Page Setup dialog box, click Print, and then in the Print dialog box, click OK.
Note
Troubleshooting If the Save As dialog box opens, you do not have a printer installed. Click the Start button, click Printers And Faxes, and then under Printer Tasks, click Add A Printer. Follow the wizard’s instructions to install a local or network printer.
Outlook prints the message, including your custom header and footer.


By default, messages you receive appear in your Inbox. Outlook alerts you to new messages in several ways, all of which are customizable.
You can see the first few lines of each message in AutoPreview, open a message in its own window, or preview messages in the Reading Pane.
You can preview message attachments in the Reading Pane.
You can reply to the message sender only or to the sender and all other recipients. You can also forward a message and its attachments to other people.
You can create tasks or calendar items from received e-mail messages.
You can print a message when you need a paper copy of its information.