Chapter at a Glance
Before you can begin using Microsoft Office Outlook 2007, you need to create one or more e-mail profiles containing the information Outlook needs to connect to your e-mail server. You can create a profile from within Outlook or from the Mail module of Control Panel. Your profile consists of information about your e-mail account such as the user name, display name, server name, password, and where your Outlook data is stored. You can connect to more than one e-mail account per profile, to manage all your e-mail communications through Outlook. However, each profile can connect to only one Exchange Server account.
The Outlook user interface is organized in a manner intended to enable you to easily view, locate, and link to information. You might find, though, that it is not perfectly suited for the way that you work on a day-to-day basis. Or perhaps you’d just like to try a different layout. There are many ways in which you can personalize the way Outlook appears and functions.
In this chapter, you will configure Outlook to connect to different types of e-mail accounts. You will also create additional Outlook profiles and personalize your Outlook workspace layout to suit your needs.
Note
See Also Do you need only a quick refresher on the topics in this chapter? See the Quick Reference section at the beginning of this book.
Warning
Important No practice files are required to complete the exercises in this chapter. For more information about practice files, see Using the Companion CD at the beginning of this book.
Note
Troubleshooting Graphics and operating system—related instructions in this book reflect the Windows Vista user interface. If your computer is running Windows XP and you experience trouble following the instructions as written, please refer to the Information for Readers Running Windows XP section at the beginning of this book.
The automatic setup functionality provided by the Outlook 2007 Startup wizard is a significant improvement over previous versions of Outlook, which required that you provide much more information. In most cases, the only information you need is your e-mail address and password.
Note
See Also If the Outlook automatic setup functionality doesn’t work for you, see Troubleshooting the Startup Wizard later in this chapter.
In this exercise, you will start Outlook and configure it to connect to a Microsoft Exchange Server account. Although we demonstrate connecting to an Exchange Server account, you can follow the same basic process to connect to another type of e-mail server. There are no practice files for this exercise.
Note
BE SURE TO have your e-mail address and password available before beginning this exercise. If connecting to an Exchange Server account, you must be connected to your network. If you are working off-network, you might first need to establish a virtual private network (VPN) connection.
Note
See Also For information about establishing a VPN connection, see Connecting Outlook to Your Server from a Remote Location in Chapter 11.
On the Windows taskbar, click the Start button.
On the Start menu, point to All Programs, click Microsoft Office, and then click Microsoft Office Outlook 2007.
Tip
If the E-mail link at the top of the Start menu specifies Microsoft Office Outlook as your default e-mail program, you can click that link instead.
Outlook 2007 starts. If Outlook hasn’t yet been configured to connect to an e-mail account, the Outlook 2007 Startup wizard starts.
Tip
What you see on your screen might not match the graphics in this book exactly. The screens in this book were captured on a monitor set to a resolution of 1024x768 pixels, with the Windows taskbar hidden to increase the display space.
Note
See Also If Outlook is already configured to connect to an e-mail account and you would like to configure a second account, see Connecting to Additional E-Mail Accounts later in this chapter.
On the welcome page, click Next.
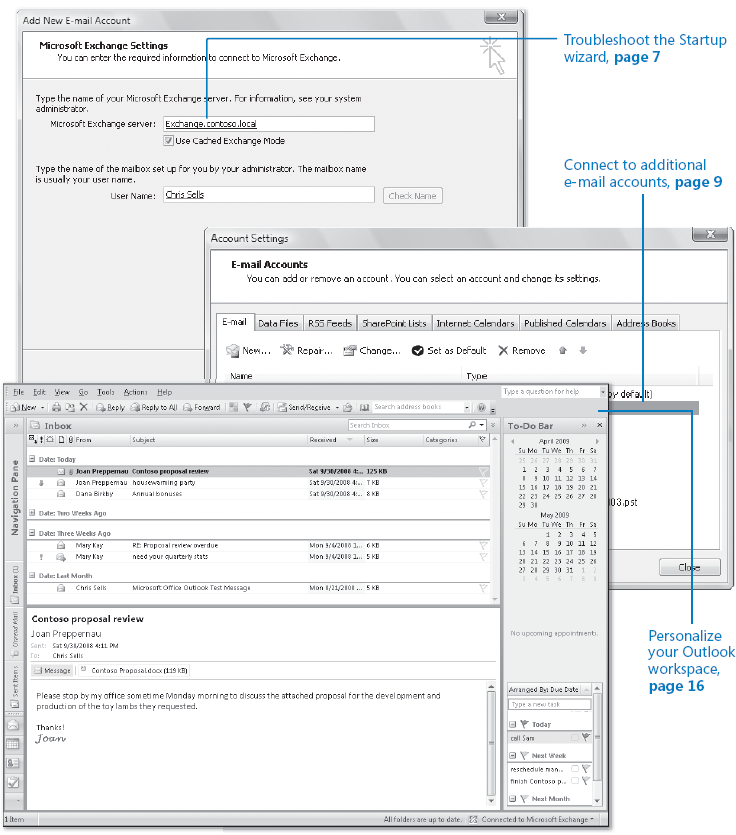
If you have an e-mail account set up in another e-mail program on this computer, Outlook offers the option of importing account information from that account.
For the purposes of this exercise, we will not select that option, but you might find it convenient to do so when setting up your own account.
On the E-mail Upgrade Options page, click Do not upgrade, and then click Next to display the E-mail Accounts page.
With the Yes option selected, click Next.
On the Auto Account Setup page, enter your name, e-mail address, and password in the corresponding text boxes.
Notice the option here to manually configure your server settings. If you have trouble configuring Outlook by using the automatic setup tool, you can make manual changes by selecting this check box and then clicking Next.
Note
See Also For information about manually setting up Outlook, see Troubleshooting the Startup Wizard later in this chapter.
On the Auto Account Setup page, click Next.
Provided it doesn’t encounter any connection or security issues, Outlook uses the minimal information you provided to connect to your e-mail server and create your Outlook profile.
Tip
If this is the first time you have started a 2007 Microsoft Office system program, Office prompts you to enter your full name and initials. The programs in the 2007 Office system use this information when tracking changes, responding to messages, and so on. Next, Office prompts you to select the type of information you want to share over the Internet, and finally, offers the option of signing up for automatic program updates from the Microsoft Update service. None of these options place you at risk, and all can be quite useful.
The first time you start Outlook, it asks whether you want to combine and synchronize RSS feeds in Outlook and Microsoft Internet Explorer.
Unless you have a reason not to do so, in the Microsoft Office Outlook message box asking whether to combine the RSS Feed lists, click Yes.
Outlook displays your Inbox.
A test message from Outlook appears at the top of the Inbox. Your other e-mail messages will appear below the test message.


You are most likely to encounter problems with the automatic setup feature when configuring Outlook to connect to an Exchange Server account from a remote location (not directly connected to your domain). Here are some common error messages and problems you could encounter:
Server certificate does not match site. If Outlook encounters any security issues—for example, if the mail server’s digital certificate does not match the name of your domain—Outlook notifies you of this problem and lets you choose whether to proceed.
If a Security Alert message box appears, you can click the View Certificate button to see the digital certificate of the remote server and verify that you know and trust the company that issued the certificate. If you want, you can install the certificate on your computer by clicking the Install Certificate button and following the steps in the Certificate Import wizard. When you are confident of the validity of the certificate, in the Security Alert message box, click Yes.
Note
See Also For more information about digital certificates, see Securing Your E-Mail in Chapter 12.
Encrypted connection not available. Outlook first tries to establish an encrypted connection with the server. If this attempt is not successful, Outlook notifies you of this problem and asks whether you want to try to establish an unencrypted connection.
If you select this option, Outlook might inadvertently configure your Exchange Server account as an IMAP or POP3 account instead of as an Exchange Server account. This configuration will result in a loss of functionality—for example, the To-Do Bar will not display your calendar and task information.
If you encounter either of these errors when connecting to your Exchange Server account, verify that your computer is connected to your network domain (locally or over a VPN connection, if you’re not connecting by using HTTP) and using the correct internal server address method. For example, if your e-mail address is [email protected], you might address your e-mail server as mail.adatum.com or by an internal address such as ADATUMExchange.adatum.local.
Note
See Also For information about connecting to Microsoft Exchange by using HTTP, see Connecting Outlook to Your Server from a Remote Location in Chapter 11.
To successfully troubleshoot your connection issues, you will most likely need to manually configure your server settings. This process is similar to that of configuring an account in Outlook 2003.
Display the Auto Account Setup page of the Outlook 2007 Startup wizard.
Select the Manually configure server settings check box, and then click Next to display the Choose E-mail Service page.
Click Microsoft Exchange, and then click Next.
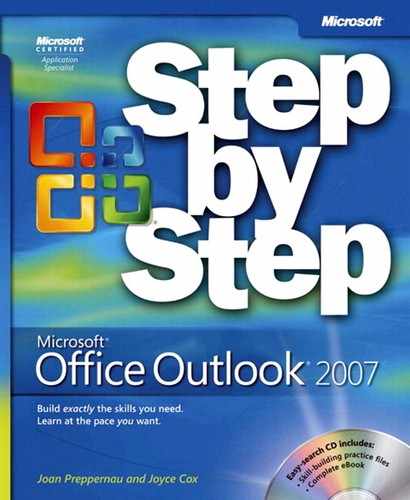
On the Microsoft Exchange Settings page, enter the name or address of your Exchange Server and your user name, and then click the Check Name button.
If you didn’t provide your password on the Auto Account Setup page, Outlook prompts you for it now. If the Connect to dialog box appears, enter your logon information, and then click OK.
If you are connected to your network and the user name you enter matches the information on the server, the wizard replaces your user name with your display name (as recorded in your organization’s Global Address List) and underlines it. (This is known as resolving the address.)
After your name appears underlined, click Next, and then on the final page of the wizard, click Finish.


You can add e-mail accounts to the your primary Outlook profile. For example, if you want to check your work and personal e-mail accounts from the same Outlook profile, or if you monitor another e-mail alias, such as a support alias. Your profile may include only one Exchange Server account, but it may contain multiple HTTP, IMAP, and POP3 accounts.
Tip
If your profile includes multiple e-mail accounts, you can select the account you want to use each time you send an e-mail message. In the message header, click the Account button, and then in the list, click the account from which you want to send the message. The Account button is visible only when multiple accounts are configured within a profile.
Note
See Also For information about connecting to a second Exchange Server account, see Creating Additional Outlook Profiles later in this chapter.
In this exercise, you will add an HTTP, IMAP, or POP3 e-mail account to your Outlook profile. There are no practice files for this exercise.
Note
BE SURE TO have the logon information for your HTTP, IMAP, or POP3 account available before beginning this exercise.
On the Tools menu, click Account Settings.
The Account Settings dialog box opens.
The Add New E-mail Account wizard starts.
Although Microsoft Exchange is shown as an option, you can’t configure more than one Exchange Server account per profile.
On the Choose E-mail Service page, with the Microsoft Exchange, POP3, IMAP, or HTTP option selected, click Next.
On the Auto Account Setup page, enter the display name, e-mail address, and password of the account you want to add to your profile. Then click Next.
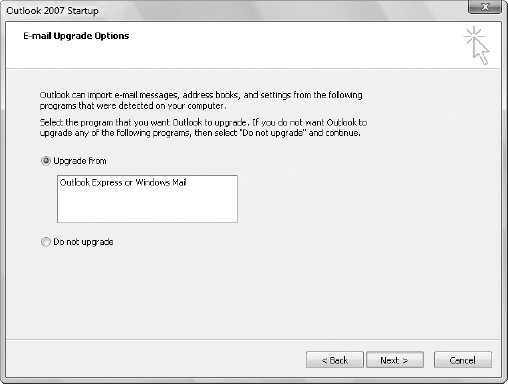
Outlook establishes a network connection and searches for the server settings. After locating the server and validating your user name and password, Outlook displays a confirmation message.
Click Finish to complete the account setup.
The new account appears on the E-mail tab of the Account Settings dialog box and in the All Mail Folders list.


In the same way that multiple users of a computer running Windows Vista or Windows XP can have individual user profiles, you can have more than one e-mail profile on your computer. Each profile can include multiple e-mail accounts, but only one Exchange account. Most people will have only one e-mail profile, but if you want to connect to multiple Exchange accounts—for example, if you have e-mail accounts with two companies that you access from the same computer—you can do so only through a second e-mail profile.
E-mail profiles are stored in the Windows registry. You create additional profiles from Windows, rather than from Outlook.
If you have multiple e-mail profiles, you can instruct Outlook to log on to one by default or to prompt you to select a profile each time it starts. If you’re planning to regularly access more than one profile, the latter is the easiest solution.
Tip
You can’t switch between profiles while Outlook is running. If you don’t choose to have Outlook prompt you for a profile, you can change the default profile from the Mail Setup dialog box discussed in the following exercise.
In this exercise, you will create a second Outlook profile and configure Outlook so that you can choose which profile to log on to each time you start Outlook. There are no practice files for this exercise.
Exit Outlook if it is running.
On the Start menu, click Control Panel.
If your computer is running Windows Vista, type Mail in the Search box, and then double-click the Mail icon in the search results. Otherwise, click Classic View in the left pane, and then double-click the Mail icon in the individual icon view.
In the User Account Control dialog box, if you’re running as an administrator, click Continue. Otherwise, enter an administrator password, and then click OK.
Note
Troubleshooting The Mail icon appears only after you have completed the initial Outlook account configuration.
The Mail Setup dialog box opens. You can set up e-mail accounts and data files from this dialog box or from Outlook.
In the Mail Setup dialog box, click Show Profiles.
The Mail dialog box opens, listing the mail profiles set up on your computer under your user account profile. Other people’s mail profiles are not visible to you.
Outlook created the Outlook profile the first time you configured Outlook to connect to an e-mail account.
In the Mail dialog box, click Add.
The New Profile dialog box opens.
In the Profile Name box, type a name to identify your second profile.
Tip
You cannot change the name of a profile after you create it. If you want to work under a different profile name you must create a new profile.
You should make this name obvious—for example, the name of the company or e-mail account the profile applies to.
Click OK.
The Add New E-mail Account wizard starts.
If the Choose E-mail Service page appears, click Internet E-mail or Microsoft Exchange, and then click Next.
On the Auto Account Setup page, enter the display name, e-mail address, and password of the e-mail account you want to associate with the new profile in the corresponding text boxes, and then click Next.
After Outlook connects to the e-mail account, click Finish.
Note
Troubleshooting If Outlook isn’t able to successfully connect to your account, see Troubleshooting the Startup Wizard earlier in this chapter.
In the Mail dialog box, click Prompt for a profile to be used, and click OK.
Start Outlook.
The Choose Profile dialog box opens.
Click the Profile Name arrow, and in the list, click the profile you want to connect to.
If you want to stop this box from appearing in the future, you can click Options, and then select the Set As Default Profile check box. You can select an alternate default profile or have Outlook prompt you by returning to the Mail dialog box in Control Panel.


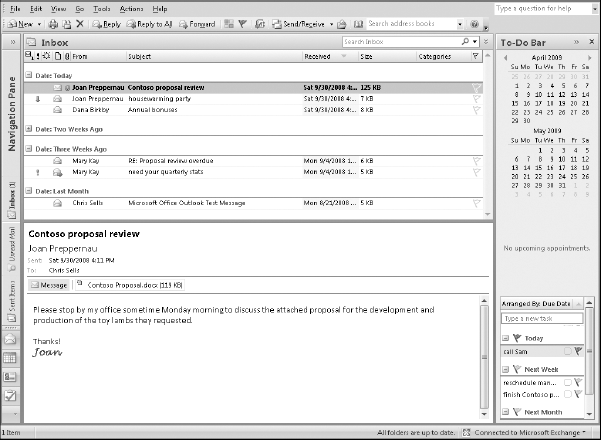
The Outlook program window includes six areas or elements in which you work with Outlook or with your Outlook items (e-mail messages, contact records, calendar entries, tasks, or notes).

You might find that this is an ideal arrangement for the way you work. But if you’re viewing the program window on a low-resolution screen, don’t need all the available tools, or would like more space for the main work area, you can easily change the appearance and layout of the workspace in the following ways:
Menu bar. When working in the Outlook program window, you can access commands from the menus displayed here. You can’t hide the menu bar, but you can move it, docking it on any side of the program window or floating it anywhere on your screen.
Toolbars. The buttons on the Standard toolbar, which is shown by default, represent frequently used commands in the File, Edit, and Actions categories. You can also display the Advanced toolbar and the Web toolbar. To display or hide a toolbar, right-click anywhere on the menu bar or toolbar area, and then click the name of the toolbar.
Note
See Also For information about the Advanced toolbar, see Exploring the Advanced Toolbar later in this chapter.
Navigation Pane. This view pane appears on the left side of the Outlook window. Its contents change depending on the module you’re viewing—it might display the module organizational structure, view options, links to external content or Help topics, and so on. You can tailor the Navigation Pane to suit your preferences:
You can minimize or expand the Navigation Pane by clicking the left- or right-facing chevrons at the top of the pane.
You can change the width of the Navigation Pane by dragging the vertical frame divider to its right.
You can change the number and size of the module buttons.
To display more buttons at the bottom of the Navigation Pane, drag the handle above the module buttons to increase the available space, or click the Configure Buttons button in the lower-right corner of the Navigation Pane, and then click Show More Buttons. To display buttons in a small format or allocate more space to the Navigation Pane folders and options, drag the handle to decrease the available space, or click the Configure Buttons button and then click Show Fewer Buttons.
Module content pane. This view pane appears in the center of the window, and displays the content of the selected module—your e-mail messages, calendar, contacts, and so on. You can display and organize content in this pane in many ways. These options are covered in this book as part of the individual module discussions.
Reading Pane. When displayed, you can preview a selected message, appointment, attached document, and so on in this view pane. You can display the pane to the right of or below the content pane, or close it entirely.
Note
See Also For information about previewing messages and message attachments in the Reading Pane, see Viewing Messages and Message Attachments in Chapter 4.
To-Do Bar. On the right side of the Outlook window, this view pane displays a monthly calendar, your upcoming appointments, and your task list. You can hide or display the pane, change the number of calendar months and appointments shown, and arrange the task list in different ways. You can change the size of the module content pane by minimizing or maximizing the To-Do Bar—the minimized pane bar displays your next appointment and the number of active and completed tasks due today.
Note
See Also For information about working with tasks on the To-Do Bar, see Displaying Different Views of Tasks in Chapter 8.
All of these window elements are available from every Outlook module, but the Reading Pane and To-Do Bar are not always displayed by default. The following table indicates whether they appear by default in each module.
Module | Reading Pane | To-Do Bar |
|---|---|---|
Yes | Yes | |
Calendar | No | No |
Contacts | No | Yes |
Tasks | Yes | Yes |
Notes | No | Yes |
Tip
We refer to each of the above as modules. You might also think of them as folders, because each is represented in the Navigation Pane as a folder.
You can display or hide any of the workspace elements (other than the menu bar, which can’t be changed) from the View menu. Your Outlook environment preferences are preserved from session to session. When you start Outlook, the Navigation Pane, To-Do Bar, and Calendar will appear the same way they did when you last exited.
When you first start Outlook, the Mail module appears and displays your Inbox. The Navigation Pane displays the folder structure of your mailbox (e-mail account). When connecting to any type of e-mail account, these four folders are visible:
Deleted Items. Outlook items that you delete from other folders are held in this folder, and not deleted permanently until you empty the folder.
Note
See Also For information about deleting and restoring items, see the sidebar Deleting Messages in Chapter 4.
Inbox. Outlook delivers new messages to this folder.
Junk E-mail. Outlook delivers messages held by the spam filter to this folder.
Sent Items. When you send a message, Outlook stores a copy of it in this folder.
In Exchange account mailboxes, these four folders are also visible:
Drafts. Outlook stores temporary copies of in-progress messages in this folder.
Note
See Also For information about creating and working with drafts, see Creating and Sending Messages in Chapter 3.
Outbox. Outlook holds outgoing messages in this folder while establishing a connection to your mail server.
RSS Feeds. Web site information feeds you subscribe to are available from this folder. When you first start Outlook, you might find information feeds recommended by Microsoft here.
Search Folders. These virtual folders track messages matching specific search criteria.
When you click the Folder List button at the bottom of the Navigation Pane, these six folders appear in Exchange Server mailboxes:
Calendar. Displays the Outlook Calendar module.
Contacts. Displays the Outlook Contacts module.
Journal. Displays the Outlook Journal.
Notes. Displays the Outlook Notes module.
Sync Issues. Tracks conflicts and communication failures on your mail server or in your mailbox.
Tasks. Displays the Outlook Tasks module.
You can display any of the modules—Mail, Calendar, Contacts, Tasks, or Notes—by clicking the corresponding button at the bottom of the Navigation Pane, by clicking the module name on the Go menu, or by holding down the Ctrl key and then pressing the function key representing the module you want to display:
Module | Keyboard shortcut |
|---|---|
Ctrl+1 | |
Calendar | Ctrl+2 |
Contacts | Ctrl+3 |
Tasks | Ctrl+4 |
Notes | Ctrl+5 |
The Navigation Pane contents differ depending on the displayed module. We discuss each module’s Navigation Pane in the related chapters of this book.
In this exercise, you will change the space allocated to the module content pane, change the content displayed on the To-Do Bar, and learn how to move the menu bar and move or hide the toolbars. There are no practice files for this exercise.
At the top of the Navigation Pane, click the Minimize the Navigation Pane button.
The Navigation Pane contracts to display only a vertical bar on the left side of the program window. In the Mail module, buttons on the minimized Navigation Pane give you one-click access to the folders included in your Favorite Folders list.
Click the Navigation Pane bar at the top of the pane.
Outlook displays your Favorite Folders and Mail Folders in a slide-out window.
Click away from the slide-out window to collapse it.
At the top of the To-Do Bar, click the Expand the To-Do Bar button.
The To-Do Bar expands to display the calendars of the current and next months, your next four appointments, and your task list.
On the View menu, point to To-Do Bar, and then click Options.
The To-Do Bar Options dialog box opens.
Change the Date Navigator setting to display 2 months and the Appointments setting to display 4 appointments. Then click OK.
On the View menu, point to Reading Pane, and then click Bottom.
The Reading Pane moves from the side of the content pane to the bottom.
On the View menu, point to Reading Pane, and then click Off to close the Reading Pane entirely.
At the top of the Outlook window, point to the move handle (the vertical line of four dots) to the left of the File menu.
The mouse pointer changes to a four-headed arrow.
Drag the menu bar to the right side of the Outlook program window. (Release the menu bar when it changes to a vertical orientation.)
The menu names rotate to follow the window edge, but clicking any menu name displays the menu at the normal angle. You can use the same drag-and-drop technique to move any of the displayed toolbars.
Drag the menu bar by the move handle to the content pane.
The menu bar becomes a floating toolbar.
Right-click the floating menu bar or the toolbar area at the top of the Outlook window.
On the toolbar shortcut menu, you can select the toolbars you want to display.
Using the techniques discussed in this topic, rearrange the Outlook window elements to your liking.


Note
Troubleshooting Changes you implement might make your Outlook window appear different from those shown in this book. We depict the Outlook window with the menu bar and Standard toolbar at the top of the window, the Navigation Pane and To-Do Bar maximized, and the Reading Pane displayed on the right side of the window.
The Outlook program window has three toolbars: the Standard toolbar, the Advanced toolbar, and the Web toolbar. Even people who use Outlook on a daily basis might find that they have never displayed the Advanced toolbar or used any of the commands available on it.
Tip
You can access Internet resources and interact with Internet Explorer from the Web toolbar. Because the Web toolbar functionality is not specific to Outlook, we don’t discuss it in this book.
We don’t make use of the Advanced toolbar in this book, but you can experiment with it on your own—you might find it very useful to have its commands available to you. To display the Advanced toolbar, right-click the menu bar or toolbar and then click Advanced.

In the Mail module, the features and commands available from the Advanced toolbar include:
Outlook Today. The Outlook Today page, which in a previous version of Outlook appeared by default when you started the program, presents information from your Calendar and Tasks list along with a count of the unread messages in your Inbox and all the messages in your Drafts folder and Outbox. If you would like to see this overview page when you start Outlook, display the Outlook Today page, click the Customize Outlook Today button, select the When Starting, Go Directly To Outlook Today check box, and then click Save Changes. On the Customize Outlook Today page, you can also configure what is shown in the message, calendar, and tasks areas, and choose between five page layouts and themes.
Back, Forward, and Up One Level. You can quickly move between folders by using these commands.
Reading Pane. Toggles the display of the Reading Pane on the right side of the window.
Print Preview. Previews the currently selected item as it would be printed using the default settings.
Undo. Reverts your most recent change. For example, if you delete an e-mail message and then click the Undo button, the message moves back to the original folder.
Rules and Alerts. Opens the Rules And Alerts dialog box, where you can create and manage rules for incoming e-mail and RSS feeds, and alerts.
Current View list. This drop-down list includes all available views of the current folder.
Group By Box. Toggles the display of a box in the content pane header from which you can choose how Outlook groups the displayed content.
Field Chooser. Toggles the display of the Field Chooser window, from which you can specify the item fields you want to display in the content pane, by dragging fields between the Field Chooser window and the content pane header.
AutoPreview. Toggles the display of the first three lines of message text within the content pane. AutoPreview is specific to the folder in which you select it, so you can choose to display extra message text in only certain folders.
In the Calendar module, the Advanced toolbar includes:
Plan a Meeting. Opens the Plan A Meeting dialog box in which you can view prospective attendees’ schedules. This is similar to the Scheduling page of a meeting window. After you enter information in the Plan A Meeting dialog box, Outlook displays a meeting window in which you can enter the meeting subject and location before sending invitations.
In the Contacts module, the Advanced toolbar includes:
New Meeting Request to Contact. Opens a meeting window addressed to the currently selected contact(s).
New Task for Contact. Opens a task window assigned to the currently selected contact.
Explore Web Page. Displays the Web page listed in the currently selected contact record in your default Internet browser.
When you display the Advanced toolbar it is available (in its different forms) from any module.
You can configure Outlook 2007 to connect to most e-mail accounts automatically. You need to provide only your e-mail address and account password.
You can configure multiple e-mail accounts within one Outlook profile, but you can have only one Exchange account per profile. To connect to multiple Exchange accounts from the same computer, you must log on to each through its own profile.
You can rearrange the Outlook window to suit your working preferences. Any of the Outlook view panes—the Navigation Pane, To-Do Bar, and Reading Pane—as well as the Advanced toolbar can be displayed in any Outlook module. Outlook preserves changes to the default arrangement from session to session.