Chapter at a Glance

Although Microsoft Office Outlook 2007 includes useful components for managing your calendar, contacts, tasks, and notes, the primary reason most people use Outlook is to send and receive e-mail messages. Over the past decade, e-mail (short for electronic mail) has become an accepted and even required form of business communication. And of course, many people use e-mail to keep in touch with friends and family, either from work or from home. Outlook makes it easy to connect to multiple e-mail accounts, either on a business network or over the Internet, and provides all the tools you need to send, respond to, organize, filter, sort, find, and otherwise manage e-mail messages.
Tip
In this chapter and throughout this book, for expediency’s sake, we might refer to e-mail messages simply as messages.
When sending messages from Outlook, you can:
Include attachments such as documents, workbooks, or business graphics.
Personalize your messages by using colors, fonts, backgrounds, electronic signatures, and electronic business cards.
Set message options such as voting buttons, importance, sensitivity, and reminders.
Request electronic receipts when a message is delivered to the recipient’s mailbox or opened by the recipient.
In this chapter, you will look at elements of the item window interface in addition to those we discussed in Chapter 2. You will create and send messages, learn various ways of addressing messages to recipients, and practice sending messages with and without attachments. Then you will create and format a business graphic using the exciting new SmartArt feature provided in Outlook as well as in Microsoft Office PowerPoint 2007 and Microsoft Office Word 2007. Finally, you will experiment with the various ways you can personalize a message, including changing the font and background and adding a signature.
Warning
Important You will use the messages you create in this chapter as practice files for exercises in later chapters of this book.
Note
See Also See Also Do you need only a quick refresher on the topics in this chapter? See the Quick Reference section at the beginning of this book.
Warning
Important Before you can use the practice files in this chapter, you need to install them from the book’s companion CD to their default location. See Using the Companion CD at the beginning of this book for more information.
Note
Troubleshooting Graphics and operating system–related instructions in this book reflect the Windows Vista user interface. If your computer is running Windows XP and you experience trouble following the instructions as written, please refer to the Information for Readers Running Windows XP section at the beginning of this book.
Outlook displays e-mail messages in the Mail module. When you create or respond to an e-mail message, it opens in a message window. The message window has its own set of commands separate from those in the Outlook program window. You can format and modify outgoing e-mail messages by using the message window commands.
Commands related to managing messages (such as saving, printing, securing, and sharing a message) are available from the Office menu.
Note
See Also For more information about the elements of the Ribbon, see Working in the Contact Window in Chapter 2.
In this exercise, you will take a tour of the message item window elements that differ from the contact window elements discussed in Chapter 2. There are no practice files for this exercise.
On the Standard toolbar, click the New Mail Message button.
An untitled message window opens.
Warning
Important Depending on your screen resolution and the size of the message window that opens, you might see more or fewer buttons in each of the groups, or the buttons you see might be represented by larger or smaller icons than those shown in this book. Experiment with the size of the message window to understand the effect on the appearance of the command interface tabs.
In the upper-left corner of the message window, click the Microsoft Office Button to display the menu.
Notice that although you are working in the message window, you can create any type of Outlook item from the Office menu. We’ll review the commands available from the Office menu in other chapters of this book.
Note
See Also For more information about restricting recipients from forwarding, copying, or printing messages you send, see Securing Your E-Mail in Chapter 12. For information about the Print commands, see Printing Messages in Chapter 4. For information about the commands available in the Editor Options dialog box, see Personalizing Your Office and Outlook Settings in Chapter 12.
Click away from the Office menu to close it.
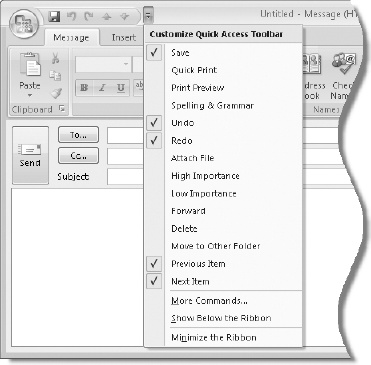
Click the Customize Quick Access Toolbar button.
A menu of commonly used commands and customization options appears.
Clicking a command in the first menu section adds it to the Quick Access Toolbar.
Note
See Also For information about customizing the commands shown on the Quick Access Toolbar, see Making Favorite Outlook Commands Easily Accessible in Chapter 12.
On the Customize Quick Access Toolbar menu, click Show Below the Ribbon.
The Quick Access Toolbar moves to a position between the tabs and the message header. You might find this position useful if you place many additional commands on the Quick Access Toolbar and it crowds the text shown in the message title bar.
On the Customize Quick Access Toolbar menu, click Show Above the Ribbon to return the Quick Access Toolbar to its original location.
The message window commands are organized in groups on four tabs:
Tip
Depending on what programs you have installed on your computer, tabs and groups other than those described here might also appear on the Ribbon.
The Message tab is active by default. Buttons representing commands related to creating messages are organized on this tab in six groups:
Clipboard
Basic Text
Names
Include
Options
Proofing
You can compose and send any standard e-mail message by using only the commands available on this tab.
Double-click the Message tab.
Double-clicking the active tab hides the Ribbon and provides more space for the message.
The Ribbon reappears, with the Insert tab active.
Tip
If you click away from the Ribbon (for example, in the content pane) the Ribbon hides again. This behavior is the default until you again double-click a tab.
Buttons representing commands related to items you can insert are organized on this tab in six groups:
Include
Tables
Illustrations
Links
Text
Symbols
Buttons representing commands related to the format, appearance, and actions of messages are organized on this tab in five groups:
Command buttons related to the appearance of message content are organized on this tab in six groups:
Clipboard
Font
Paragraph
Styles
Zoom
Editing
Many of the commands on this tab also appear on the Message tab.


Regardless of the type of e-mail account you have, as long as you have an Internet connection you can send e-mail messages to people within your organization and around the world. You can personalize your messages by using an individual font style or color, and by inserting your contact information in the form of an e-mail signature or business card. (You can apply other formatting, such as themes and page backgrounds, but these won’t always appear to e-mail recipients as you intend them to, and they can make your communications appear less professional.) You can format the text of your message to make it more readable, by including headings, lists, or tables, and represent information graphically by including charts, pictures, clip art, and other types of graphics. You can attach files to your message and link to other information such as files or Web pages.
Note
See Also For more information about formatting messages, see Personalizing the Appearance of Messages later in this chapter.
Addressing an e-mail message is as simple as typing the intended recipient’s e-mail address into the To box. If you want to send a message to more than one person, indicate a different level of involvement for certain recipients, or include certain people without other recipients knowing, here are some tips.
By default, Outlook requires that you separate multiple e-mail addresses with semicolons. If you prefer, you can instruct Outlook to accept both semicolons and commas. To do this:
On the Tools menu, click Options.
In the Options dialog box, on the Preferences tab, click E-mail Options.
In the E-mail Options dialog box, click Advanced E-mail Options.
In the When sending a message area, select the Allow comma as address separator check box, and then click OK in each of the three open dialog boxes.
As you type a name or an e-mail address into the To, Cc, or Bcc box, Outlook displays matching addresses in a list below the box. Select a name or e-mail address from the list and then press Tab or Enter to insert the entire name or address in the box.
If your e-mail account is part of an Exchange Server network, you can send messages to another person on the same network by typing only his or her e-mail alias (for example, joan)—the at symbol (@) and domain name aren’t required.
If a message recipient’s address is in your address book, you can type the person’s name and Outlook will look for the corresponding e-mail address. (You can either wait for Outlook to validate the name or press Ctrl+K to immediately validate the names and addresses in the address boxes.) By default, Outlook searches your Global Address List and main address book. To have Outlook also search other address books:
On the Tools menu, click Address Book.
In the Address Book window, on the Tools menu, click Options.
In the Addressing dialog box, click Add.
In the Add Address List dialog box, click the address list you want to add, click Add, and then click Close.
In the Addressing dialog box, click OK, and then close the Address Book window.
If the address book does not contain an entry for a name that you type in the To, Cc, or Bcc box of a new message, when you send the message, Outlook prompts you to select an address book entry or provide a full e-mail address.
To send a courtesy copy of a message to a person, enter his or her e-mail address in the Cc box. This is commonly referred to as “CCing” a person. You might CC someone to provide him or her with information but indicate that you don’t require his or her involvement in the conversation. To send a message to a person without making it known to other recipients, enter the person’s e-mail address in the Bcc box to send a “blind” courtesy copy (also known as “BCCing” a person). Outlook does not display the Bcc field by default. To display the Bcc field:
Addresses entered in the Bcc box can’t be seen by other message recipients. They also aren’t included in any replies to the original message.
Until you save or send a message, Outlook maintains a temporary copy of it in your Drafts folder. If you close Outlook (or if a problem causes Outlook to close or your computer to shut down) before you send the message, the draft retains most or all of your work. When the first draft of a message is saved (either automatically or manually), a banner appears in the message header with the notation “This message has not been sent.”
You can save a message draft at any time by clicking the Save button on the Quick Access Toolbar in the message window, or by closing the message window and then clicking Yes in the Microsoft Office Outlook message box asking whether to keep the draft. (If you click No, Outlook deletes the draft.) To restart work on a draft message, display the Mail module, click the Drafts folder in the Navigation Pane, and then double-click the message you want to open.
Outlook automatically stores a copy of each message you send in the Sent Items folder affiliated with the e-mail account you sent the message from.
Note
See Also You can change the location in which Outlook saves message drafts and sent messages from the Advanced E-mail Options dialog box. For more information about this dialog box, see Specifying Advanced E-Mail Options in Chapter 12.
In this exercise, you will compose and send a new e-mail message. There are no practice files for this exercise.
On the Standard toolbar, click the New Mail Message button.
A new message window opens.
In the To box, type your own e-mail address.
In the Subject box, type SBS Tradeshow Schedule.
In the content pane, type The following people will be working at the tradeshow: and press the
 key twice. Then type the following names, pressing once after each of the first four names, and twice at the end: Anna, Barry, Carl, Denis, Emma.
Select the list of names. Then on the Message tab, in the Basic Text group, click the Bullets button (not its arrow).
Outlook converts the list of names to a simple bulleted list.
With the bulleted list still selected, in the Basic Text group, click the Bullets arrow.
Notice the types of bullets available in the Bullet Library. You can change the list to use any of these bullets by clicking the bullet you want.
In the Bullets gallery, point to Change List Level.
You can demote (or promote) a list item to any of nine levels, differentiated by the bullet character and indent level.
Press
 twice to close the Bullets gallery without making changes.
Press
 to move the insertion point to the end of the message. Type Giveaways are: and then press twice.
On the Insert tab, in the Tables group, click the Table button.
On the Insert Table menu, point to the third cell in the second row.
A preview of the table appears in the message window behind the Insert Table menu. This is a display of the new live preview functionality available in many parts of Outlook and other programs in the 2007 Microsoft Office system. You can use live preview to see the effect of an option before you actually select it.
Click the selected cell to insert the table in the message.
The Table Tools contextual tabs, Design and Layout, appear on the Ribbon. Contextual tabs appear only when the element they control is active (selected). Contextual tabs are differentiated from standard tabs by color: the contextual group name is highlighted and the active tab is colored. Contextual groups are differentiated from each other by color.
Enter the following information in the table:
9:00-11:00
12:00-2:00
3:00-5:00
Mouse pads
T-shirts
Pens


In the message header, click the Send button.
Outlook closes the message window and sends the message. When you receive the message in your Inbox, leave it there for use in a later exercise.
A convenient way to distribute a file (such as a Microsoft Office Word document, Microsoft Office Excel workbook, Microsoft Office PowerPoint presentation, or picture) to other people is by attaching the file to an e-mail message. The message recipient can save the file to his or her hard disk, open the file from the message, or if he or she is using Outlook 2007, preview the file in the Reading Pane.
You can send a file as a regular attachment or—if your organization has a collaboration site built on Microsoft SharePoint products and technologies—as a shared attachment. When you send a shared attachment, Outlook creates a document workspace for the attached file and, rather than sending a copy of the file to each message recipient, sends an invitation to visit the workspace.
Note
See Also For information about creating a shared workspace for a file attachment, see Creating a Document Workspace from Outlook in Chapter 10.
In this exercise, you will send a Word document and a PowerPoint presentation as attachments to an e-mail message.
Note
USE the Attaching document and the Attaching presentation. These practice files are located in the DocumentsMicrosoft PressOutlook2007SBSSendingMessages folder.
BE SURE TO start Outlook and display the Inbox before beginning this exercise.
In the To box of the new message window, type your own e-mail address.
In the Subject box, type SBS First Draft.
In the content pane, type Here is some information for your review. Then press
to move to the next line.On the Message tab, in the Include group, click the Attach File button.
The Insert File dialog box opens, displaying the contents of your Documents folder.
Browse to the DocumentsMicrosoft PressOutlook2007SBSSendingMessages folder, click the Attaching document, hold down the
 key, click the Attaching presentation, and then click Insert.
Note
Troubleshooting By default, Windows does not display file extensions in Explorer windows or dialog boxes. You can usually differentiate file types by their icons—for example, the Word icon precedes the Attaching document name. However, the icon preceding a PowerPoint 2007 presentation is an image of the first slide in the presentation, and in the default Small Icons view, you will probably see only the slide background.
You can display the file type by clicking Details on the Views list, or you can display larger icons by clicking Extra Large Icons, Large Icons, Medium Icons, or Tiles on the Views list. In these views, you can see that the PowerPoint icon appears in the lower-right corner of the icon image. If you want Windows to display file extensions, display a folder (such as your Documents folder) in Explorer, click Folder And Search Options on the Organize menu, and then on the View tab of the Folder Options dialog box, clear the Hide Extensions For Known File Types check box, and click Apply or OK.
The files appears in the Attach box in the message header.
In the message header, click the Send button.
Outlook closes the message window and sends the message. When you receive the message in your Inbox, leave it there for use in a later exercise.


Tip
Many picture files are quite large, requiring a lot of bandwidth to send and a lot of storage space to receive. You can send and simultaneously resize a picture by right-clicking the picture file in Windows Explorer, clicking Send To, and then clicking Mail Recipient. In the Attach Files dialog box that appears, choose from among five picture size options; the corresponding file size appears when you select a picture size. Then click Attach to open a message window in your default e-mail program.
Tip
Readers of a previous edition of this book wrote to us asking how to create mail-merge e-mail messages from Outlook. This is actually a function of Word, rather than Outlook.
For information about creating e-mail messages to multiple recipients by using mail-merge, refer to Microsoft Office Word 2007 Step by Step by Joyce Cox and Joan Preppernau (Microsoft Press, 2007).
The saying that “a picture is worth a thousand words” is especially true in business communications, when you need to clearly explain facts or concepts, particularly to an increasingly global audience. Several programs in the 2007 Office system include a new feature called SmartArt. This tool is very useful for creating professional business graphics within documents, workbooks, presentations, and messages. You can easily create lists and diagrams depicting relationships, processes, cycles, hierarchies, and so on in your e-mail messages. When sending a message, Outlook converts any SmartArt graphics within the message to static graphics.
In this exercise, you will create a SmartArt diagram within an e-mail message. There are no practice files for this exercise.
Maximize the message window, and then click in the content pane.
On the Insert tab, in the Illustrations group, click the SmartArt button.
Scroll the center pane of the dialog box for an overview of the available SmartArt graphics. You can display the name of a graphic by pointing to it.
In the left pane, click Process, and then in the center pane, click the last icon in the top row (Alternating Flow).
A preview of the selected SmartArt graphic appears in the right pane. This is a process diagram showing the details of a three-step process.
In the Choose a Smart Art Graphic dialog box, click OK.
Outlook inserts the selected process diagram in the content pane. It looks similar to the preview graphic, but without the colors and three-dimensional aspects. (You select formatting options later.) The SmartArt Tools contextual tabs, Design and Format, appear on the Ribbon.
Tip
You can display or hide the Text Pane for any SmartArt diagram by clicking the diagram and then clicking the Text Pane button in the Create Graphic group on the Design contextual tab, or by clicking the Text Pane tab on the left side of the diagram drawing area.
You can enter text in the Text Pane or directly in the diagram—selecting a diagram element or positioning the insertion point within the bulleted list also selects the corresponding element in the diagram or Text Pane. The diagram type appears at the bottom of the Text Pane; pointing to it displays a ScreenTip describing the purpose of the selected type of diagram.
In the Text Pane, click the [Text] placeholder to the right of the first bullet, and then type Plan.
As you type in the pane, the text appears in the diagram.
Click the [Text] placeholder to the right of the first second-level bullet, and type Survey current customers. Press the
 key to move to the next second-level bullet, and then type Survey potential customers.
The font size in the diagram adjusts to fit the available space.
Press
to create another second-level bullet in the Text Pane and in the diagram, and then type Analyze competition.In the diagram, click the second solid blue box to select the placeholder, and then type Define.
As you type, the text also appears in the second first-level bullet in the Text Pane.
In the third solid blue box, type Design.
On the Design contextual tab, in the Create Graphic group, click the Add Shape arrow (not the button), and then in the list, click Add Shape After.
An additional item appears at the right end of the diagram and in the Text Pane.
You can add shapes above, below, before, or after the selected shape, depending on the diagram layout.
In the new solid blue box, type Develop.
In the Text Pane, click at the end of the word Develop, and then press
.A first-level bullet and additional shape appear.
Type Test, and then in the Text Pane, click the Close button.
At its current size, the text within the diagram is very difficult to read.
Point to the move handle on the right side of the diagram until the pointer becomes a double-headed arrow. Drag the move handle to the right to fill the message window.
In the Layouts group, click the More button.
In the Layouts gallery, point to a few of the diagram layouts to display live previews. Then click the fifth icon in the first row (Continuous Block Process).
The process diagram layout changes but the contents remain the same.
In the SmartArt Styles gallery, point to a few of the diagram styles to display live previews. Then under 3-D, click the first icon (Polished).
In the SmartArt Styles group, click the Change Colors button.
The color schemes displayed in the Colors gallery are variations of the current theme, and are organized in groups reflecting the six thematic accent colors. Changing the theme also changes the color schemes in the gallery.
Point to a few of the diagram styles to display live previews. Then under Colorful, click the second icon (Colorful Range – Accent Colors 2 to 3).
Enter your own e-mail address in the To box, and type SBS Development Cycle in the Subject box.
Send the message, and then display your Inbox.
When you receive the message, the diagram is visible in the Reading Pane. Open the message, and click the diagram.
The diagram is no longer an active SmartArt graphic; it has been converted to a static image. If you open the message from your Sent Items folder, you will find that the same is true of the diagram in that message.


Changing Message Settings and Delivery Options
When sending a message, you can optionally include visual indicators of the importance, sensitivity, or subject category of a message or other Outlook item, flag a message for follow-up, restrict other people from changing or forwarding message content, provide a simple feedback mechanism in the form of voting buttons, and specify message delivery options to fit your needs.
Common message settings and delivery options include:
Flags and reminders. You can place an outgoing message on your task list, add an informational reminder to it, or set a reminder to appear at a certain time and date, for yourself and/or for the message recipient(s).
Importance. You can indicate the urgency of a message by setting its importance to High or Low. A corresponding banner appears in the message header and, if the Importance field is included in the view, an importance icon appears in the Inbox or other message folder.
You can easily sort and group messages based on importance by clicking Importance in the Arranged By list.
Sensitivity. You can indicate that a message should be kept private by setting its sensitivity to Confidential, Personal, or Private). No indicator appears in the message folder, but a banner appears in the message header to indicate a sensitivity other than Normal. You can choose to include the sensitivity as one of the message attributes shown in the Inbox pane, but if you do, it replaces the message subject, which isn’t very helpful.
Security. If you have a digital ID, you can digitally sign the message; or you can encrypt the contents of the message.
Voting options. If you and your message recipients have Exchange Server accounts, you can add voting buttons to your messages to enable recipients to quickly select from multiple-choice response options.
Tracking options. You can track messages by requesting delivery receipts and read receipts. These receipts are messages automatically generated by the recipient’s e-mail server when it delivers the message to the recipient and when the recipient reads the message.
Delivery options. You can have reply messages delivered to an e-mail address other than yours, specify a date and time for the message to be delivered and to expire, and set advanced attachment format and encoding options.
Categories. You can assign a message to a color category that will be visible to the recipient if he or she views the message in Outlook.

The most commonly used options are available in the Options group on the Message tab of the message window. You can access other options from the Message Options dialog box, which you open by clicking the Options dialog box launcher.

You can limit the actions other people can take with messages they receive from you by restricting the message permissions. For example, you can prevent recipients from forwarding or printing the message, copying the message content, or changing the content when they forward or reply to the message. (Restrictions apply also to message attachments.) Within a message window, permission options are available both on the Office menu and in the Options group on the Message tab.
Note
See Also For information about digital signatures and for more information about restricting recipients from forwarding, copying, or printing messages you send, see Securing Your E-Mail in Chapter 12.
By default, the content of an Outlook message appears in black, 10-point Calibri (a very readable sans serif font that is new in this release of the Office system), arranged in left-aligned paragraphs on a white background. You can change the appearance of a message either by applying local formatting (text or paragraph attributes) or global formatting (a theme or style).
The local formatting options available in Outlook 2007 are largely the same as those available in Word and other programs in the 2007 Office system, and you might already be familiar with them from working with those programs. Here’s a quick review of the types of formatting changes you can make:
Font, size, and color. More than 220 fonts in a range of sizes and in a virtually unlimited selection of colors.
Font style. Regular, bold, italic, or bold italic.
Underline style and color. Plain, multiple, dotted, dashed, wavy, and many combinations thereof, in every color of the rainbow.
Effects. Strikethrough, superscript, subscript, shadow, outline, emboss, engrave, small caps, all caps, or hidden.
Character spacing. Scale, spacing, position, and kerning.
Paragraph attributes. Alignment, indentation, and spacing.
The global formatting options are sets of local formatting that you can apply with a couple of clicks. You use a theme to apply a pre-selected combination of several formatting options to the entire message. In addition, the 2007 Office system introduces a handy new set of formatting options called Quick Styles that you can apply to individual elements of a message.
You are more likely to use Quick Styles when working in Word documents than in messages, but we’ll give you an overview and you can investigate further on your own. Within a message window, Quick Styles are available in the Styles group on the Format Text tab. They include a number of standard styles for titles, headings, lists, quotes, emphasis, and so on. You can see a live preview of the effect of a style on your text by pointing to the style in the Quick Styles gallery.

You can change the appearance of all the styles in the Quick Styles gallery by selecting any of the 11 available style sets (or creating your own). Selecting a style set changes the appearance of all the text in the current document, as well as the appearance of the icons in the Quick Style gallery. You can select or preview a style set, color scheme, or font set by clicking the Change Styles button in the Styles group on the Format Text tab and then pointing to Style Set, Colors, or Fonts.
Note
See Also For more information about Quick Styles, style sets, color schemes, and font sets, refer to Microsoft Office Word 2007 Step by Step by Joyce Cox and Joan Preppernau (Microsoft Press, 2007).
In this exercise, you will experiment with some of the formatting features that are new or improved in this version of Outlook while changing the font and background color of an e-mail message. Then you will apply a theme to the same message, overwriting the local formatting. There are no practice files for this exercise.
Note
BE SURE TO start Outlook and display the Inbox before beginning this exercise.
OPEN a new message window.
In the content pane, type
Looking forward to seeing you next week at the celebration!
Select the sentence you just typed by pointing to its left edge until the pointer becomes an arrow (pointing at the paragraph), and then clicking once.
This context-sensitive toolbar makes several common formatting options immediately available when you select a letter, word, or phrase by using the mouse. When the toolbar first appears, it is nearly transparent, and it disappears in a short time if you don’t activate it by pointing to it.
On the Mini toolbar, click the Font arrow.
Tip
If the Mini toolbar is not visible, you can find the Font box in the Basic Text group on the Message tab, and in the Font group on the Format Text tab.
Many more fonts are available in Outlook 2007 than in previous versions of Outlook. The name of each font appears in the list in that font, so you can easily select a font that appeals to you.
Scroll the Font list, noting the many available fonts, and then click Franklin Gothic Medium.
The font of the selected text changes.
On the Mini toolbar or in the Font group on the Format Text tab, click the Font Size arrow, and in the list, click 12.
The size of the selected text changes.
Click once in the word next, without selecting any letters. Then on the Format Text tab, in the Font group, click the Font Color arrow.
Outlook 2007 offers a new palette of theme colors (which change depending on the selected theme) and standard colors.
In the Font Color gallery, under Standard Colors, click the Red box.
The font color of the word next changes to red. Notice that the entire word changes even though you didn’t select it. This is a new feature of Outlook 2007.
Double-click the word next, and on the Mini toolbar (or in the Clipboard group), click the Format Painter button. Then click once in the word week.
Outlook copies the formatting of the word next to the word week. By using the Format Painter, you can copy formatting from one item to any other item. To copy formatting to multiple items, double-click the Format Painter button to turn it on and then click it again to turn it off after you’re finished applying the formatting.
On the Options tab, in the Themes group, click the Page Color button.
The Page Color gallery includes the same theme colors and standard colors as the Font Color gallery.
In the Page Color gallery, point to any color.
Outlook displays a live preview of the color in the message window.
In the Page Color gallery, in the color gradient area, click the second shade down in the fifth column from the left (Accent 1, Lighter 60%).
In the Themes group, click the Themes button.
Outlook displays a gallery of themes. In each theme icon, the theme colors appear across the bottom, and the presentation background appears on the right.
In the Themes gallery, click Oriel.
The message background and font change to those of the theme.
Notice that the colors displayed on the Colors button in the Themes group have changed.
In the Themes group, click the Page Color button. In the list, compare the new page background to the new set of colors displayed in the color gradient area. The page background color is still Accent 1, Lighter 60% (the shade you selected in step 11).
Enter your own e-mail address in the To box; type SBS Festival Reminder in the Subject box, and then send the message.
When you receive the message in your Inbox, leave it there for use in a later exercise.


Tip
You can change the colors, fonts, and effects associated with a theme by clicking those buttons in the Themes group on the Options tab. You might want to experiment with different combinations on your own. However, Outlook offers such an extensive selection of themes that you will more than likely find that one of these ready-made combinations fits your needs.
When you create a paper-based message, you can add a signature at the end of the message by writing your name. When you create an Outlook message, you can add an e-mail signature at the end of the message by manually or automatically inserting a predefined block of text (with optional graphics). An e-mail signature provides consistent information to message recipients. You can include any text or graphics you want in your e-mail signature; you would commonly include your name and contact information, but depending on your own situation you might also include information such as your company name, job title, a legal disclaimer, a corporate or personal slogan, a photo, and so on. When using Outlook 2007, you can choose to include your electronic business card as part or all of your e-mail signature.
Note
See Also For more information about electronic business cards, see Personalizing an Electronic Business Card in Chapter 2.
You can create different signatures for use in different types of messages. For example, you might create a formal business signature for client correspondence, a casual business signature for interoffice correspondence, and a personal signature for messages sent from a secondary account. Or you might create a signature containing more information to send with original e-mail messages, and a signature containing less information to send with message replies. You can format the text of your e-mail signature in the same ways that you can format message text.
In this exercise, you will create an e-mail signature and then instruct Outlook to insert the signature in all the new messages you create. There are no practice files for this exercise.
On the E-mail Signature tab, click New.
In the Type a name for this signature box, enter Professional as the name of your new e-mail signature, and then click OK.
Outlook creates the Professional signature.
In the Edit signature box, type Regards followed by a comma, press the
key, and then type your name.Select your name, click the Font arrow, and then in the list, click Lucida Handwriting (or any other font you like).
Click the Font Size arrow, and then in the list, click 14.
Click the Font Color arrow, and then under Standard Colors, click the Purple box. Then click away from your name to see the results of your changes.
Apply any other types of formatting you want.
Tip
If you would like to include your electronic business card as part of your signature, click the Business Card button. Then in the Insert Business Card dialog box, locate and click your name, and click OK.
You can manually insert any signature you create in an e-mail message, but it is more common to instruct Outlook to automatically insert it for you.
In the Choose default signature area, click the New messages arrow, and then in the list, click Professional.
Outlook will now insert your signature into all new e-mail messages you send from this account, but not into replies or forwarded messages.
Tip
If you have more than one e-mail account set up in Outlook, you can instruct Outlook to insert a different signature in messages sent from each account. To do so, click the account in the E-mail Account list, click the signature you want to use with that account in the New Messages and/or Replies/Forwards list, and then click OK.
Make any other changes you want, and then click OK in the two open dialog boxes.
On the Standard toolbar, click the New Mail Message button.


A new message opens, with your e-mail signature in the content pane.

All the commands you need when creating a message in Outlook 2007 are available on the Ribbon at the top of the message window, grouped on tabs by function.
You can easily create e-mail messages that include text, hyperlinks, and attachments.
You can send messages in a variety of formats. Some message formats support more formatting options than others. Recipients using e-mail programs that don’t support HTML or Rich Text Formatting will see the message in plain text.
You can format the text and background of your messages, either by choosing individual formatting options and styles or by applying a theme.
You can create professional business graphics by using the new SmartArt feature available in Outlook 2007, Word 2007, and PowerPoint 2007.
You can automatically insert contact information in e-mail messages by using an electronic signature. You can create different signatures for different purposes and instruct Outlook to insert a specific signature for each e-mail account and message type.