Chapter at a Glance

Although Microsoft Office Outlook is primarily a personal information management program, it also provides means by which you can share information with other people, whether they are within your organization or external to it. In previous chapters, you learned ways to send finite pieces of information (such as messages, contact cards, and notes) to other people, and ways of incorporating information you receive from other people into your own system. In this chapter, we discuss ways of creating and maintaining real-time connections either to information that is stored in Outlook or to information that is stored on a collaboration site built with Microsoft SharePoint products and technologies.
SharePoint products such as Microsoft Office SharePoint Server 2007, Microsoft Office SharePoint Portal Server, and Windows SharePoint Services, provide a simple and effective way for team members to share information and collaborate on projects. It is becoming increasingly common for people in disparate locations to work together, with a collaboration site providing a central location to store and distribute information and to manage team processes.
In this chapter, you will first learn how to share an Outlook folder containing calendar, e-mail, or other items with another person. You will learn how to create a document workspace to share a document with other team members, how to work offline with files that are stored in a document library, and how to view and update a calendar created as part of a collaboration site, all from within Outlook.
Note
See Also Do you need only a quick refresher on the topics in this chapter? See the Quick Reference section at the beginning of this book.
Warning
Important The exercises in this chapter require only practice files created in earlier chapters; none are supplied on the book’s companion CD. For information about practice files, see Using the Companion CD at the beginning of this book.
Note
Troubleshooting Graphics and operating system–related instructions in this book reflect the Windows Vista user interface. If your computer is running Windows XP and you experience trouble following the instructions as written, please refer to the Information for Readers Running Windows XP section at the beginning of this book.
Outlook stores your messages, contacts, appointments, and other items in folders. By default, the standard Outlook folders (Calendar, Contacts, Deleted Items, Drafts, Inbox, Journal, Junk E-mail, Notes, Outbox, RSS Feeds, Sent Items, Tasks, and Search Folders) and any folders you create are private, meaning that only you can access them. However, if you are working on a Microsoft Exchange Server network, you can give permission to other people on your network to create and modify items within a folder.
Suppose you have a collection of messages you want to share with a co-worker. You can store those messages in a folder and then give your co-worker permission to access that folder. You can select from eight permission levels controlling whether someone can view, create, edit, and delete items, and whether he or she can share the folder with other people.
For example, you might grant Author permissions to your assistant who will help you manage incoming e-mail. As an Author, your assistant can read items, create items, and edit and delete items that he or she creates on your behalf, but can’t edit or delete items other people create, and can’t create subfolders. You can define varying levels of permission to each person you share a folder with, and you can grant the same person different permission levels on different folders.
You can share any type of Outlook folder, not only those containing e-mail messages. For example, you can share any of your address books, your calendar or a secondary calendar you create, or even a folder of notes.
You can hand over complete control of one or more of your primary folders (Calendar, Tasks, Inbox, Contacts, Notes, and Journal) to another person on your Exchange Server network by making him or her a delegate with permission to control specific items, such as the following:
A delegate can be an Editor in one folder and a Reviewer in another. Recipients of messages sent by a delegate see both your name and the delegate’s name in the message header.
Tip
Regardless of access level, a delegate cannot create subfolders. To allow someone to create subfolders, you must give him or her permission to share the folder and specifically grant permission to create subfolders.
Note
See Also For more information about delegating control of a folder, see the sidebar Delegating Control of Your Calendar in Chapter 7.
In this exercise, you will grant a standard level of permission to a folder to another person on your Exchange Server network. You will then modify the level of access granted to that person.
Note
USE the SBS Practice Messages folder you created in Organizing Messages in Folders in Chapter 5. If you did not complete that exercise, you can do so now or use any other folder.
BE SURE TO inform your co-worker that you will be sharing a folder with him or her before beginning this exercise.
In the Navigation Pane, display the SBS Practice Messages folder.
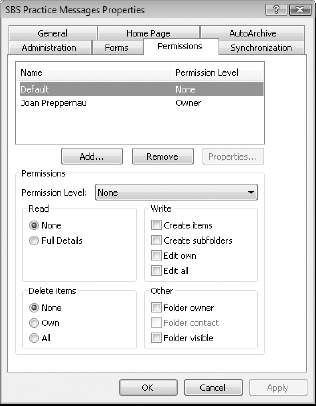
Right-click the SBS Practice Messages folder, and then click Change Sharing Permissions.
The SBS Practice Messages Properties dialog box opens, displaying the Permissions tab.
In the dialog box, click Add.
In the Add Users dialog box, double-click the name of a co-worker with whom you want to share this folder, and then click OK.
With your co-worker’s name selected on the Permissions tab, click the Permission Level arrow, and then in the list, click Editor.
The selections in the check boxes in the Permissions area change to the default Editor permissions.
In the SBS Practice Messages Properties dialog box, click Apply.
Your co-worker can now view the folder by opening it from within Outlook on his or her computer and can create, edit, and delete items within it.
In the Delete items area, click Own, and then click OK.
Your co-worker can now create and edit items within the shared folder, but can delete only those items she or he created.
If your co-worker is available, ask him or her to connect to your SBS Practice Messages folder to verify that the folder is shared as expected.

If you would like a co-worker to share one of his her primary mailbox folders with you, you can request access to that folder from within Outlook. Outlook sends a request form to your co-worker, who simply clicks a button to approve the request; then you receive a message from which you can add the shared folder to those that you see in your mailbox.
In this exercise, you will ask another person on your Exchange Server network to share a folder with you. There are no practice files for this exercise.
Note
BE SURE TO inform your co-worker that you will be requesting permission to his or her folder before beginning this exercise.
On the File menu, point to Open, and then click Other User’s Folder.
In the Open Other User’s Folder dialog box, type or select your co-worker’s name or e-mail alias.
Click the Folder type arrow, and in the list, click Tasks.
In the Open Other User’s Folder dialog box, click OK.
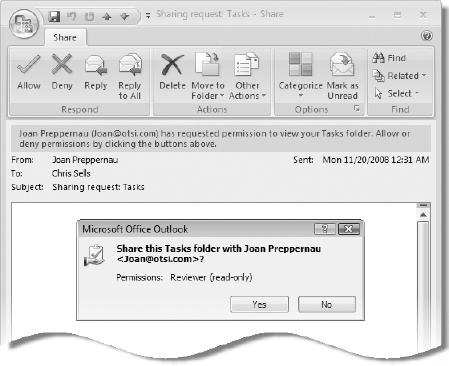
Assuming your co-worker has not yet granted you permission to his or her Tasks folder, Outlook displays a message asking whether you want to request permission to view the folder.
In the Microsoft Office Outlook message box, click Yes.
Outlook creates an e-mail message requesting permission to view the selected folder.
You can give reciprocal permission to your own Tasks folder by selecting the Allow Recipient To View Your Tasks Folder check box.
In the Sharing request: Tasks message header, click the Send button.
Ask your co-worker to open the sharing request, click the Allow button in the Respond group on the Share tab, and then click Yes in the Microsoft Office Outlook message box.
After Outlook shares the folder, a message box appears, informing your co-worker that the folder has been successfully shared. Then you receive a message notifying you that your co-worker has allowed you to view the Tasks folder.
In the Open group, click the Open this Tasks folder button.
Tip
If someone shares a folder with you but you don’t receive a message containing a link to the folder, point to Open on the File menu, click Other User’s Folder, type or select the name of the person who shared the folder with you, select the folder type, and then click OK to link to the shared folder.
Your co-worker’s Tasks folder opens in a separate Outlook window; Outlook also adds it to the People’s Tasks list in your Tasks module.
To open the shared Tasks folder at any time, click the Tasks button in the Navigation Pane and then select the shared task list.


Frequently, you might want to share useful documents, such as procedural documentation, sales figures, or calendars, with other members of your organization. You can send a document to your co-workers as an attachment to an e-mail message, but if several people return edited versions, you will have to take the time to merge all the changes into one document. If you have permission to add content to your organization’s collaboration site, you can add the document to a document library on the site and other people can review and edit the document from there.
You can quickly create a document workspace for one or more files from Outlook instead of from the collaboration site by sending the files as shared attachments to an e-mail message. Shared attachments are made available within a document workspace on a collaboration site, and can be automatically updated with changes that recipients make.
Note
See Also For information about creating workspaces for collaborating on meetings, see the sidebar Creating a Meeting Workspace in Chapter 6.
In this topic, we demonstrate the process of creating a document workspace on a collaboration site from Outlook.
Follow these steps:
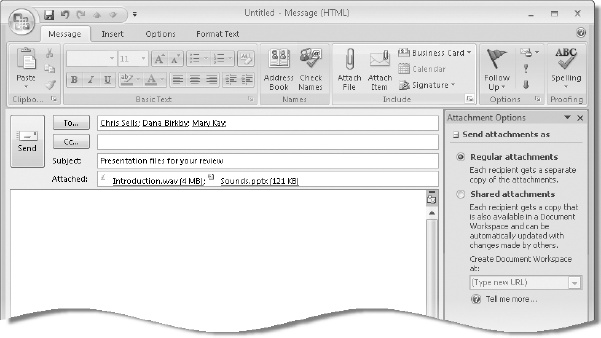
Open a new message window, address the message to the people you want to invite to the document workspace, and insert the message subject.
On the Message tab, in the Include group, click the Attach File button.
The Insert File dialog box opens.
Browse to and select the file(s) you want to share through a document library, and then click Insert.
Click the Include dialog box launcher.
Under Send attachments as, click Shared attachments.
In the Create Document Workspace at box, type the address of your collaboration site (or if the site address appears in the list, click it), and then press the
 key.
key.An invitation to the document workspace that will be created when you send the e-mail message appears in the content area.
Send the message.
A document workspace containing the file or files you attached to the message is created on the specified collaboration site. The message recipients are added to the workspace as members; you don’t need to take any other action to give them permission to edit the document, but you can add other members to the workspace if you want.
You receive a message confirming that the workspace was successfully created, and the message recipients receive the invitation message. Each message contains a link to the document workspace.


Creating Group Schedules
When organizing a meeting, it’s helpful to be able to see when attendees are available without having to contact each person individually. With Outlook, you can add them to a meeting request and then view their status on the Scheduling page. If you want to find a time at which several people are all available, and your organization is not running Exchange Server 2007, you can create a group schedule that shows the combined schedules of multiple people and resources.
To create a group schedule:
Display your calendar, and then on the Actions menu, click View Group Schedules.
In the Group Schedules dialog box, click New. In the Create New Group Schedule dialog box, type the schedule name (for example, Management Team), and then click OK.
In the scheduling window, add members to the group by clicking in the Group Members list and then typing a name or an e-mail alias, or by clicking Add Others and then selecting group members from your address book.
The group schedule immediately displays availability for each group member. You can point to any appointment or meeting to see information about it. Information will not be available if an appointment is marked as private.
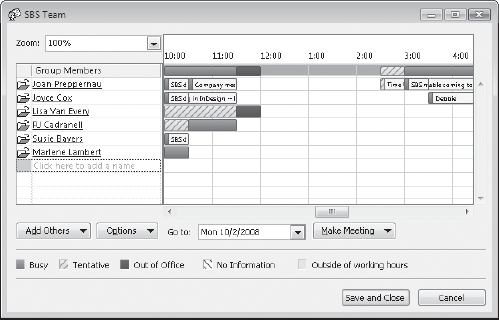
You can view an up-to-date group schedule at any time by clicking View Group Schedules on the Actions menu.
You can create a copy of a SharePoint Server 2007 document library as a folder in Outlook 2007. You can then preview in the Outlook message pane any document, workbook, or presentation that is stored in the document library, or you can work with a local copy of the document, workbook, or presentation on your computer.
In this topic, we demonstrate the process of creating local copies of the files stored in a document library in an Outlook folder, and merging changes you make to those files with the original versions.
Follow these steps:
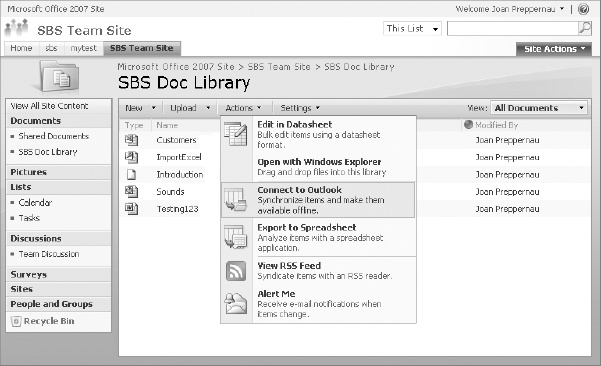
On your organization’s collaboration site, display the document library you want to work with.
On the Actions menu, click Connect to Outlook. If an Internet Explorer Security alert appears (on computers running Windows Vista), click Allow.
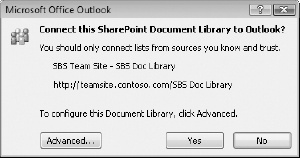
Outlook starts, if it isn’t already running, and a message box appears asking whether you want to connect the SharePoint document library to Outlook.
In the message box, click Yes. If a Connect dialog box appears, prompting you for your site credentials, enter your user name and password and then click OK.
Outlook creates and displays a folder, named for the site and document library, as a subfolder of the SharePoint Lists folder in your mailbox, and downloads a copy of each of the items stored in the document library as an Outlook item within the folder. The icon to the left of the item name indicates the file type (for example, document, workbook, presentation, or database).

Tip
Outlook creates the SharePoint Lists folder the first time you connect a document library or other SharePoint list to Outlook.
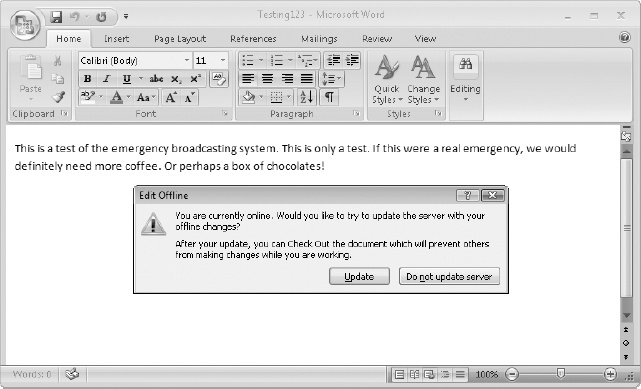
You can preview any item by clicking it, or open a read-only version of the item by double-clicking it. When you open an item, a banner at the top informs you that you’re working in an Offline Server Document; if you want to make changes and merge them with the document stored in the document library, click Edit Offline.
While you work with an offline copy of a file, a local version is stored in the SharePoint Drafts folder (a subfolder of the SharePoint Lists folder). An icon depicting a red arrow on a page indicates that you are currently editing the item. To transfer changes from the offline file to the document library, save your changes, close the file, and then reopen it. In the Edit Offline message box that appears, click Update.
If your organization maintains team calendars on a collaboration site, you might find it convenient to view the calendar in Outlook rather than on the site. By connecting a SharePoint calendar to Outlook, you can display the SharePoint calendar in the Outlook Calendar pane, either by itself, next to other calendars, or overlaid on other calendars. You can work with the SharePoint calendar as you would with any other calendar. Any changes you make to the SharePoint calendar in Outlook are immediately reflected in the calendar on the collaboration site, and vice versa.
Follow these steps to display a SharePoint calendar in Outlook:
On your organization’s collaboration site, display the calendar you want to work with.
On the Actions menu, click Connect to Outlook. If an Internet Explorer Security alert appears, click Allow.
Outlook starts, if it isn’t already running.
In the Microsoft Office Outlook message box asking you to confirm that you want to connect the SharePoint calendar to Outlook, click Yes. If a Connect dialog box appears, prompting you for your site credentials, enter your user name and password and then click OK.
Outlook displays the SharePoint calendar next to your own.

You can share any type of Outlook folder with other members of your organization. You can grant specific levels of permission to people to create, edit, and delete information within a shared folder.
You can give full control of all or parts of your mailbox to someone by making him or her a delegate.
If your organization shares information through a SharePoint collaboration site, you can create document workspaces and assign permissions from within Outlook; maintain a local copy of document library contents in Outlook, work with files, and upload your changes to the SharePoint site; and work with SharePoint calendars within Outlook.