Chapter at a Glance
You might find that your Microsoft Office Outlook Calendar runs your life—but that isn’t necessarily a bad thing! Using the Calendar effectively can help you to stay organized, on task, and on time. You can schedule and track appointments, meetings, and events. Because Outlook 2007 maps your scheduled tasks to your calendar, you can look at your calendar in Day view or Week view to see the tasks that need to be completed that day or that week, and you can track your progress by marking tasks as complete when you finish them.
In this chapter, you will record different types of information in your Outlook calendar, scheduling an appointment and an event on your own calendar and then scheduling a meeting with another person. You will learn methods of determining meeting times during which other people are available. Then you will learn about responding to, updating, and canceling meeting requests.
Note
See Also Do you need only a quick refresher on the topics in this chapter? See the Quick Reference section at the beginning of this book.
Warning
Important No practice files are required to complete the exercises in this chapter. For more information about practice files, see Using the Companion CD at the beginning of this book.
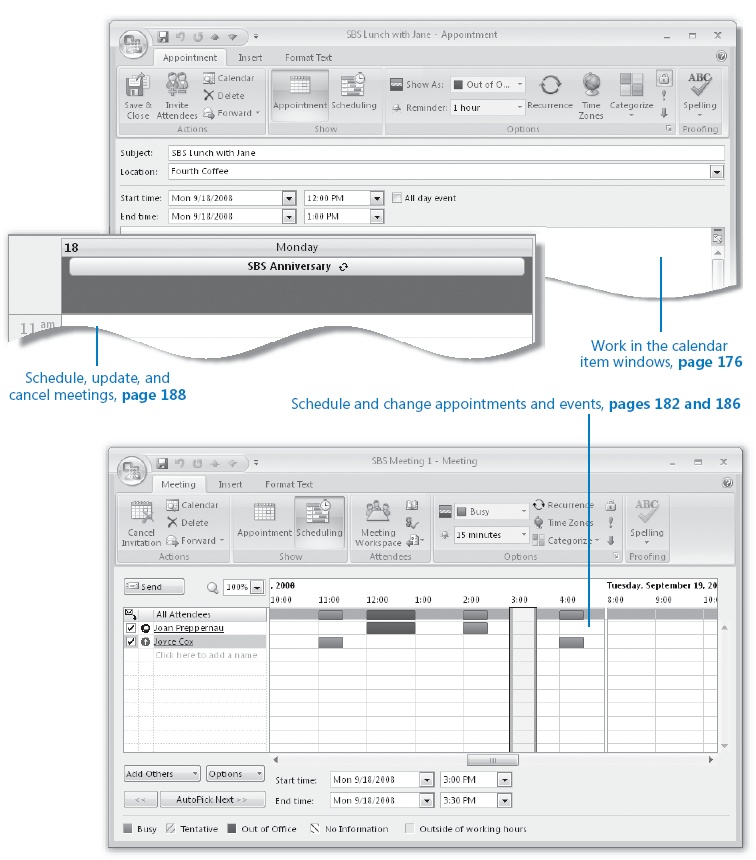
We refer to the window in which you create or respond to an appointment as the appointment window, to a meeting as the meeting window, and to an event as the event window; collectively we refer to these windows as the calendar item windows. Like the contact and message windows, the calendar item windows contain their own commands, arranged on the new Office Ribbon instead of on menus and toolbars.
Note
See Also For more information about the user interface for Outlook 2007 item windows, see Working in the Contact Window in Chapter 2.
In this exercise, you will take a tour of the calendar item window elements that differ from the contact and message window elements discussed in earlier chapters, and you’ll learn about the differences between the types of calendar items. There are no practice files for this exercise.
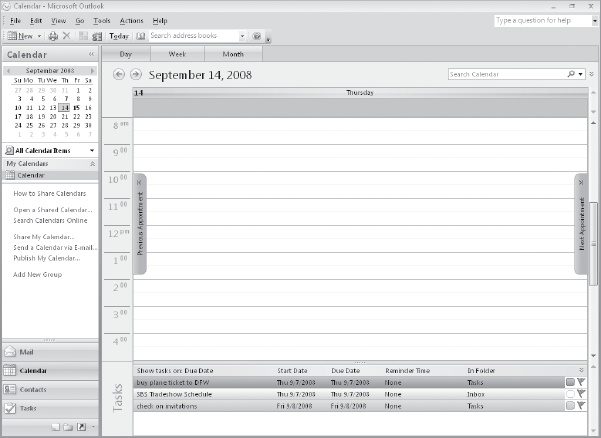
In the Navigation Pane, click the Calendar button to display the Calendar module.
Note
Troubleshooting Graphics and operating system–related instructions in this book reflect the Windows Vista user interface. If your computer is running Windows XP and you experience trouble following the instructions as written, please refer to the Information for Readers Running Windows XP section at the beginning of this book.
On the Standard toolbar, click the New Appointment button.
An untitled appointment window opens.
Warning
Important Depending on your screen resolution and the size of the appointment window that opens, you might see more or fewer buttons in each of the groups, or the buttons you see might be represented by larger or smaller icons than those shown in this book. Experiment with the size of the appointment window to understand the effect on the appearance of the Ribbon.
Note
See Also For more information about the tabs and groups on the Ribbon, see Working in the Contact Window in Chapter 2.
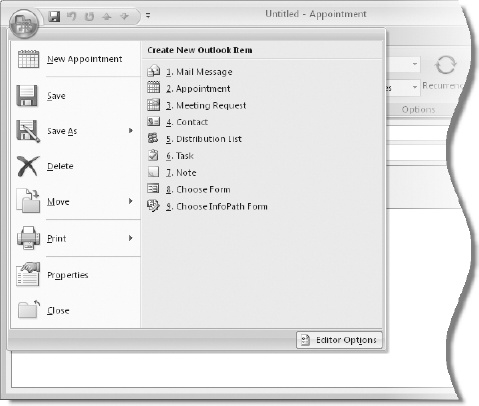
In the upper-left corner of the window, click the Microsoft Office Button.
Commands related to managing appointments (such as creating, saving, deleting, and printing) are available from the Office menu that appears.
Note
See Also For information about the Print commands, see Printing Messages in Chapter 4. For information about the commands available in the Editor Options window, see Personalizing Your Office and Outlook Settings in Chapter 12.
Click away from the Office menu to close it.
The appointment window commands are organized in groups on three tabs:
Appointment
Insert
Format Text
Tip
Depending on what programs you have installed on your computer, tabs and groups other than those described here might also appear on the Ribbon. For example, if Microsoft Office OneNote is installed on your computer, a OneNote group appears on the Appointment tab.
The Appointment tab is active by default. Buttons representing commands related to creating appointments are organized on this tab in four groups: Actions, Show, Options, and Proofing. You can create a simple appointment by using only the commands available on this tab.
Buttons representing commands related to items you can insert are organized on this tab in six groups: Include, Tables, Illustrations, Links, Text, and Symbols.
Buttons representing commands related to the appearance of message content are organized on this tab in six groups: Clipboard, Font, Paragraph, Styles, Zoom, and Editing.
On the Appointment tab, in the Options group, click the Time Zones button.
A new field displaying the time zone for each of the start and end times appears. With this useful Outlook 2007 feature, you can schedule an appointment that crosses time zones—for example, a flight from Los Angeles to New York.
Note
See Also For more information about configuring Outlook for different time zones, see Configuring Outlook for Multiple Time Zones in Chapter 7.
In the Start time area, select the All day event check box.
The window changes from an appointment window to an event window. The contents of the Format Text and Insert tabs don’t change, but an Event tab replaces the Appointment tab.
Click the Event tab.
The Event tab contents are nearly identical to the Appointment tab contents—the only change is that on the Event tab, in the Options group, by default your time is shown as Free rather than Busy, and the reminder is set to display 18 hours prior to the event rather than 15 minutes.
In the Start time area, clear the All day event check box to change the event to an appointment.
In the Actions group, click the Invite Attendees button.
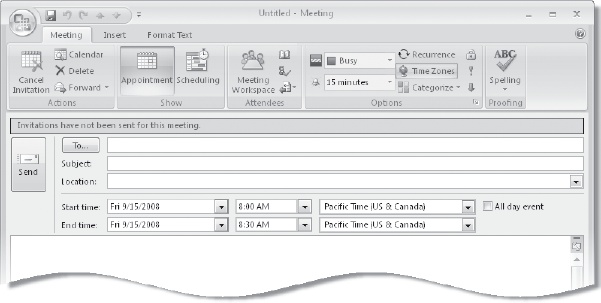
The window changes from an appointment window to a meeting window. The contents of the Format Text and Insert tabs don’t change, but a Meeting tab that includes one additional group, Attendees, replaces the Appointment tab:
Tip
You can invite people to an event in the same way you do to a meeting, by clicking the Invite Attendees button from within an event window.
The meeting request header includes a To field in addition to the standard Subject and Location fields. You can invite attendees by entering them in the To field or by clicking the Scheduling button in the Show group.


Appointments are blocks of time you schedule for only yourself (as opposed to meetings, to which you invite other people). If an appointment recurs at specific intervals, such as every Tuesday and Thursday, every other week or every month, you can set it up in your Outlook calendar as a recurring appointment; doing so creates multiple instances of the appointment in your calendar at the time interval you specify. Recurring appointments are linked. When making changes to recurring appointments, you can choose to update all occurrences or only an individual occurrence of the appointment.
When creating an appointment, you can show your time on the calendar as Free, Tentative, Busy, or Out Of Office. This information is available to other people on your network, and also when you send your schedule information to other people in an e-mail message or share your calendar. You can include information such as driving directions or Web site links in the Notes field, and attach related files so that they are easily available to you at the time of the appointment.
Note
See Also For information about sending your schedule information via e-mail, see Sending Calendar Information in an E-Mail Message in Chapter 7. For information about sharing your calendar, see Sharing Your Folders with Other People in Chapter 10.
Tip
When viewing your calendar in Day or Week view, each item on your Outlook task list appears in the Tasks section below its due date. You can schedule specific time to complete a task by dragging it from the Tasks area to your calendar.
Note
See Also For information about creating an appointment from an e-mail message, see Creating a Task or an Appointment from a Message in Chapter 4. For information about assigning appointments to categories, see Organizing Messages by Using Color Categories in Chapter 5.
When Outlook is running, it displays a reminder message 15 minutes before the appointment start time—you can change the reminder time or turn it off completely if you want to. If you synchronize your Outlook installation with a mobile device such as a BlackBerry or a mobile phone running Windows Mobile, you can also receive reminders on your device. This is very convenient when you are away from your computer.
In this exercise, you will schedule an appointment and a recurring appointment. There are no practice files for this exercise.
Note
Troubleshooting The default Calendar display is Day view. If your calendar does not look like the one shown in this exercise, click the Day button on the Standard toolbar.
In the Navigation Pane, in the Date Navigator, click tomorrow’s date.
Tip
The Date Navigator displays six weeks at a time, including the selected month. The days of the selected month are black; days of the previous and next months are gray, but you can still select them in the Date Navigator.
Outlook displays tomorrow’s schedule.
In the Calendar pane, point to the 1:00 P.M. time slot (or, if you already have an appointment scheduled at 1:00 P.M., to another time when you have 30 minutes available).
Click To Add Appointment appears in the time slot.
Click once to activate the time slot.
In this mode, you can enter basic appointment details directly in the Calendar pane.
Type SBS Lunch with Jane, and then press
 .
.Warning
Important The subject of each appointment, meeting, or event we have you create while working through the exercises in this book begins with SBS so that you can easily differentiate the practice files from other items on your calendar.
Outlook creates a half-hour appointment beginning at 1:00 P.M.
Drag the appointment from the 1:00 P.M. time slot to the 12:00 P.M. time slot (or, if you already have an appointment scheduled at noon, to another time when you have an hour available).
Outlook changes the appointment start time.
Point to the bottom border of the appointment, and when the pointer becomes a double-headed arrow, drag down so that the appointment ends at 1:00 P.M.
You can add more details to the appointment and vary from the default settings from within the appointment window.
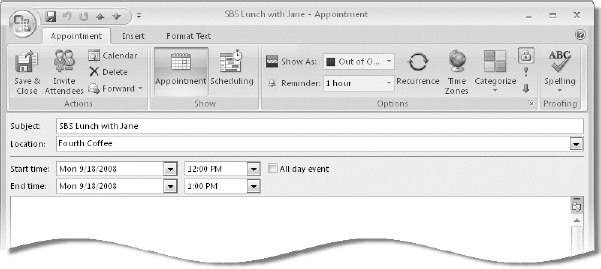
Double-click the SBS Lunch with Jane appointment.
The appointment window opens. The subject, start time, and end time are set according to the information you entered in the Calendar pane.
In the Location box, type Fourth Coffee.
On the Appointment tab, in the Options group, click the Show As arrow, and then in the list, click Out of Office.
In the Options group, click the Reminder arrow, and then in the list, click 1 hour.
In the Options group, click the Private button.
Marking an appointment, event, or meeting as Private hides the details from anyone you share your calendar with.
In the Actions group, click the Save & Close button.
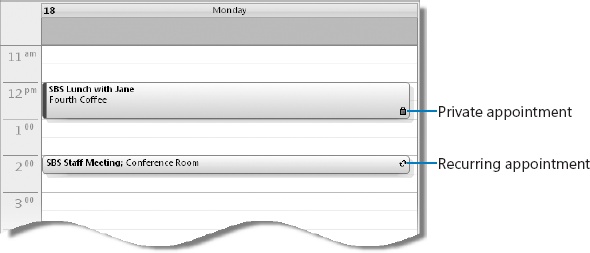
Outlook adds a purple stripe at the left side of the appointment to indicate you will be out of the office, and displays the location. The lock icon in the lower-right corner indicates that the appointment has been marked as private.
Double-click the 2:00 P.M. time slot.
Outlook opens an appointment window with the appointment start time set to 2:00 P.M. and the end time set 30 minutes later.
In the Subject box, type SBS Staff Meeting. Then in the Location box, type Conference Room.
On the Appointment tab, in the Options group, click the Recurrence button.
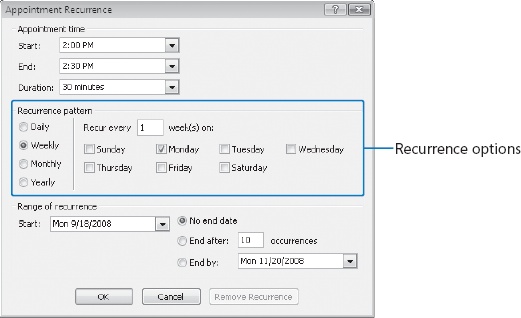
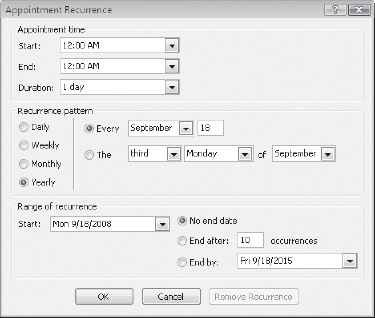
The Appointment Recurrence dialog box opens.
The default appointment recurrence is weekly on the currently selected day of the week. You can set the appointment to recur until further notice, or to end after a certain number of occurrences or by a certain date.
In the Range of recurrence area, click End after, and then in the box, replace 10 with 2.
To create a 30-minute appointment beginning at 2:00 P.M. on the selected day of the week, this week and next week only, click OK.
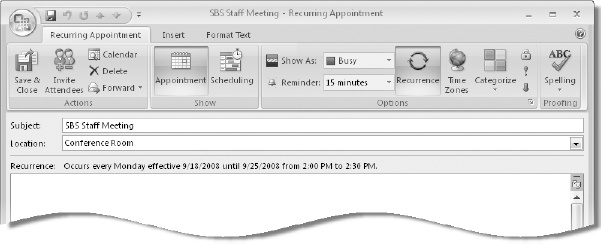
The appointment window title bar changes to reflect that this is now a recurring appointment, the Appointment tab changes to a Recurring Appointment tab, and the frequency (labeled Recurrence) appears in the message header.
On the Recurring Appointment tab, in the Actions group, click the Save & Close button.
The appointment appears on your calendar. The circling arrow icon at the right end of the time slot indicates the recurrence.
In the Date Navigator, click the day of the appointment in each of the next two weeks, to verify that the appointment appears on your calendar the next week, but not the following week.

Note
See Also For information about creating a OneNote page linked to an appointment, see the sidebar Creating a OneNote Page Linked to an Appointment, an Event, or a Meeting in Chapter 7.
Events are day-long blocks of time that you schedule on your Outlook calendar—for example, a birthday, a payroll day, or anything else occurring on a particular day but not at a specific time. In all other respects, events are identical to appointments, in that you can specify a location, indicate recurrence, indicate your availability, invite attendees, and attach additional information to the event item.
You can create an event when viewing your calendar in Day view, Week view, or Month view.
Note
See Also For information about creating an event from an e-mail message, see Creating a Task or an Appointment from a Message in Chapter 4.
In this exercise, you will schedule an event and convert it to a recurring event. There are no practice files for this exercise.
In the Date Navigator, click tomorrow’s date.
In the Calendar pane, point to the blank space below the day header and above the delineated time slots.
Click To Add Event appears in the space.
Click once to activate the event slot.
In this mode, you can enter basic event details directly in the Calendar pane.
Type SBS Anniversary, and then press
.Outlook creates a one-day event. You can add more details to the event and vary from the default settings from within the event window.
Double-click the SBS Anniversary event.
The event window opens. The subject and date are set according to the information you entered in the Calendar pane.
On the Event tab, in the Options group, click the Recurrence button.
The Appointment Recurrence dialog box shown earlier in this chapter opens. The default recurrence for events is the same as for appointments—weekly on the currently selected day of the week.
In the Recurrence pattern area, click Yearly.
You can schedule an annual event to recur on a specific date or on a selected (first, second, third, fourth, or last) day of the month.
To create a recurring annual appointment on the same date each year, click OK.
The event window title bar changes to reflect that this is now a recurring event, the Event tab changes to a Recurring Event tab, and the frequency appears in the header.
On the Recurring Event tab, in the Actions group, click the Save & Close button.
The event appears at the top of the Calendar pane. The circling arrow icon at the right end indicates the recurrence.

Scheduling meetings through Outlook is significantly simpler than scheduling meetings manually, particularly when you are coordinating the schedules of several people. A primary difficulty when scheduling a meeting is finding a time that works for everyone. Outlook displays the individual and collective schedules of people within your own organization, and of people outside of your organization who have published their availability to the Internet.
You can send a meeting invitation (referred to as a meeting request) to any person who has an e-mail account (even to people who don’t use Outlook). You can inform non-critical attendees of the meeting by marking their attendance as Optional. You can invite entire groups of people by using an e-mail alias or distribution list. The meeting request can include text and Web links, as well as file attachments. This is a convenient way of ensuring that meeting attendees have specific information available to them. Outlook automatically tracks responses from attendees and those responsible for scheduling the resources you requested, so you always have an up-to-date report of how many people will be attending your meeting.
If your organization is running Microsoft Exchange Server and the Exchange Server directory includes shared resources such as conference rooms or presentation equipment, you can request these resources by inviting them to the meeting. Resource requests may be automatically approved, or an individual may be assigned the responsibility of approving each resource request.
Using the Exchange Server 2007 Smart Scheduling Feature
If your organization is running Exchange Server 2007, Outlook simplifies even further the process of selecting a suitable meeting time by presenting you with a list of meeting times of any duration you specify, and indicating for each time the number of required and optional attendees who are available.
The Scheduling Assistant page is similar to the Scheduling page displayed when organizing a meeting on an Exchange Server 2003 network.
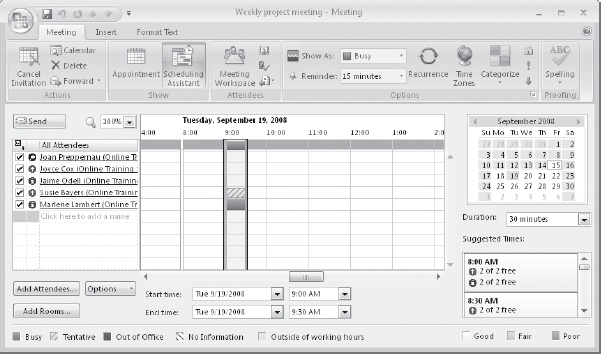
The calendar on the right side of the window indicates the collective availability of the group by color. Dates that occur in the past and non-working days are shaded; scheduling suggestions are not provided for those days.
Days when all attendees are available are white (Good)
Days when most attendees are available are light blue (Fair)
Days when most attendees are not available are medium blue (Poor)
In the Suggested Times list, Outlook displays attendee availability for appointments of the length specified in the Duration list. The availability of required attendees is shown separately from that of optional attendees and resources.
Selecting a date in the calendar displays the suggested meeting times for that day. Clicking a meeting time in the Suggested Times list updates the meeting request.
You might find it necessary to change the date, time, or location of a meeting—for example, because of a schedule conflict. You can change any information in a meeting request at any time, including adding or deleting invited attendees, or canceling the meeting. To edit a meeting request, double-click the meeting on your calendar. If the meeting is one of a series (a recurring meeting), Outlook prompts you to indicate whether you want to edit the meeting series or only the selected instance of the meeting. After you make changes, Outlook sends an updated meeting request to the invited attendees to keep them informed. If the only change you make is to the attendee list, Outlook gives you the option of sending an update only to the affected attendees.
Note
See Also For information about creating a meeting request from an e-mail message, see Creating a Task or an Appointment from a Message in Chapter 4.
In this exercise, you will create and send a meeting request. There are no practice files for this exercise.
Note
BE SURE TO display the Calendar and inform a co-worker or friend that you are going to practice inviting him or her to a meeting.
In the Date Navigator, click tomorrow’s date. Then in the Calendar pane, click the 3:00 P.M. time slot (or if you have a conflicting appointment, click a time when you have 30 minutes available).
On the Standard toolbar, click the New Appointment arrow, and then in the list, click Meeting Request.
An untitled meeting window opens.
In the To box, type the e-mail address of someone within your organization, or if you aren’t working on an Exchange Server network, type any e-mail address, for example, [email protected].
In the Subject box, type SBS Meeting 1.
In the Location box, type Test – please accept to indicate to the person you are inviting that the meeting request is for testing purposes only.
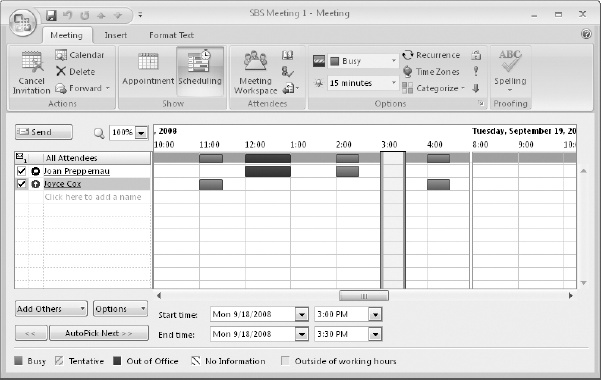
On the Meeting tab, in the Show group, click the Scheduling button.
The All Attendees list on the Scheduling page includes you and the e-mail address (or if the person is in your address book, the associated name) you entered in the To box. The black icon next to your name indicates that you are the meeting organizer. The red icon next to the sole attendee’s name indicates that he or she is a required attendee. You can click an attendee’s icon to switch between Required Attendee and Optional Attendee status, or to indicate a resource rather than a person.
Tip
You can enter additional attendees in the To box on the Appointment page or in the All Attendees list on the Scheduling page. If you prefer, you can organize a meeting directly from a Scheduling page-like interface by clicking Plan A Meeting on the Actions menu.
Outlook indicates the suggested meeting time with green (start time) and red (end time) vertical bars. If free/busy information is available for meeting invitees, their time is shown as white (Available), blue (Busy), or purple (Out of Office). Tentative bookings are indicated by light-blue diagonal stripes. If no information is available (either because Outlook can’t connect to a person’s calendar or because the proposed meeting is further out than the scheduling information stored on the server), Outlook indicates this by gray diagonal stripes. The gray row at the top of the schedule indicates the collective schedule of all the invitees.
You can change the time and duration of the meeting to work with the displayed schedules by selecting from the lists at the bottom of the Scheduling page, by dragging the green and red vertical bars in the schedule area, or by clicking the time you want in the schedule area.
In the lower-right corner of the Scheduling page, click the AutoPick Next button.
The Start Time and End Time bars move to the next available half-hour time slot.
You can change the Show As and Reminder settings, create recurrences, assign color categories, and make any other changes you want. The availability specified in the Show As list will apply to all attendees who accept your meeting request.
After you select the meeting time you want, click the Appointment button in the Show group.
The Appointment page is displayed.
Verify the meeting details, and then click the Send button.
The meeting appears in your calendar on the specified date and in the specified time slot.


When you receive a meeting request from another Outlook user, the meeting appears on your calendar with your time scheduled, but shown as Tentative. Until you respond to the meeting request, the organizer doesn’t know whether you plan to attend. You can respond in one of four ways:
You can accept the request. Outlook deletes the meeting request and adds the meeting to your calendar.
You can tentatively accept the request, indicating that you might be able to attend the meeting but are undecided. Outlook deletes the meeting request and shows the meeting time on your calendar as tentatively scheduled.
You can propose a new meeting time. Outlook sends your request to the meeting organizer for confirmation and shows the original time on your calendar as tentatively scheduled.
You can decline the request. Outlook deletes the meeting request and removes the meeting from your calendar.
If you don’t respond to a meeting request, the meeting remains on your calendar, with your time shown as tentatively scheduled.

If you’re unsure whether a meeting time works for you, you can click the Calendar button within the meeting request window to open your Outlook calendar for the suggested meeting day in a separate window, so you can view any conflicting appointments.
When accepting or declining a meeting, you can choose whether to send a response to the meeting organizer. If you don’t send a response, your acceptance will not be tallied in the Meeting form, and the organizer and other attendees will not know whether you are planning to attend the meeting. If you do send a response, you can add information to the response before sending it, if you want to convey a message to the meeting organizer.
To manually respond to a meeting request:
In the meeting request window, in the Reading Pane, or on the shortcut menu that appears when you right-click the meeting request, click Accept, Tentative, or Decline.
Choose whether to send a standard response, a personalized response, or no response at all.
To propose a new time for a meeting:
In the meeting request window, in the Reading Pane, or on the shortcut menu that appears when you right-click the meeting request, click Propose New Time.
In the schedule area of the Propose New Time dialog box, similar to the Scheduling page of the meeting request window shown earlier, change the meeting start and end times to the times you want to propose, and then click the Propose Time button.
In the meeting response window that opens, enter a message to the meeting organizer if you want to, and then click Send.
Outlook sends your response and adds the meeting to your calendar as tentatively scheduled for the original meeting time. After the meeting organizer approves the meeting time change, you and other attendees will receive updated meeting requests.
You can also choose to respond to meeting requests automatically. If you do, Outlook will process meeting requests and cancellations in accordance with your instructions.
To instruct Outlook to automatically respond to meeting requests:
On the Tools menu, click Options.
On the Preferences tab of the Options dialog box, click the Calendar Options button.
In the Calendar Options dialog box, click the Resource Scheduling button.
In the Resource Scheduling dialog box, select the Automatically accept meeting requests and process cancellations check box.
Select the Automatically decline conflicting meeting requests and/or the Automatically decline recurring meeting requests check boxes if you want Outlook to do this.
Click OK in each of the open dialog boxes.
You can create and manage appointments and all-day events in your calendar.
You can use Outlook to set up meetings, invite participants, and track their responses. Outlook can help you choose a meeting time based on participants’ schedules.
Other people in your organization can see your free, busy, and out-of-office time that you indicate in your calendar. You can personalize the display of your available working hours, and mark appointments as private to hide the details from other people.
If your organization has a SharePoint collaboration site, you can create a meeting workspace to accompany a meeting request. Meeting workspaces provide a central location for sharing information and files among meeting attendees.
If your organization is running Exchange Server 2007, you can use the Smart Scheduling feature to quickly identify meeting times of a specific duration during which your planned attendees are available.