Chapter at a Glance

A host of configuration and customization options are available to help you take advantage of everything that Microsoft Office Outlook 2007 has to offer. In addition to customizing the program’s interface to your personal working style (which we discussed in Personalizing Your Outlook Workspace in Chapter 1), you can put frequently used commands at your fingertips by adding them to the Quick Access Toolbar. To more easily manage the information you receive through e-mail, you can specify how messages are processed and where they are stored. Most importantly, you can take advantage of the many security features built into Outlook 2007 to keep your outgoing communications secure and to protect your computer system from spam, viruses, Web beacons, and other modern electronic threats.
In this chapter, you will learn how to maintain your information in Outlook in a secure and organized fashion. First you will learn where to find commands that aren’t available on the Outlook 2007 item window Ribbon, and how to make those (or other favorite commands) conveniently available by adding them to the Quick Access Toolbar, either for one document or all documents. Then you will learn ways of controlling incoming messages by using rules and by properly managing junk messages, as well as ways of ensuring that your e-mail communications are secure. You will create personal folders and address books to store and transport information, and finally, take a quick look at the additional ways you can configure Outlook to handle messages that you create, send, and receive.
Note
See Also Do you need only a quick refresher on the topics in this chapter? See the Quick Reference section at the beginning of this book.
Warning
Important No practice files are required to complete the exercises in this chapter. For more information about practice files, see Using the Companion CD at the beginning of this book.
Note
Troubleshooting Graphics and operating system–related instructions in this book reflect the Windows Vista user interface. If your computer is running Windows XP and you experience trouble following the instructions as written, please refer to the Information for Readers Running Windows XP section at the beginning of this book.
The commands you use to control Outlook are available from menus and toolbars within the program window. The basic command structure hasn’t changed substantially from that in previous versions of Outlook: Buttons representing common commands are located on the Standard and Advanced toolbars, and other commands that you probably use less frequently can be found on the File, Edit, View, Go, Tools, Actions, and Help menus. You can also invoke many commands by using keyboard shortcuts.
Tip
To see a list of the available keyboard shortcuts, click the Microsoft Office Outlook Help button, type keyboard shortcuts in the Search box, and press Enter. Then click the Keyboard Shortcuts For Outlook topic.
As we first discussed in Chapter 2, big changes have been made to the way commands are presented within the Outlook item windows. Buttons representing commonly used commands are grouped on tabs to make them easily accessible in the specific context in which you’re working. This new design makes all the commands you need at any given time available with only one click. However, you might find that the buttons you use frequently are scattered on different tabs. To give you more control over the way you work in the 2007 Microsoft Office system, Microsoft has provided the Quick Access Toolbar, the Office equivalent of the Quick Launch bar available in Windows. The Quick Access Toolbar is located to the right of the Microsoft Office Button in Outlook item windows (and in the Microsoft Office Word 2007, Microsoft Office Excel 2007, and Microsoft Office PowerPoint 2007 program windows). You can add a button for any command to the Quick Access Toolbar so that it is always available, no matter which tab is currently active.
In this exercise, you will add a button to the Quick Access Toolbar. There are no practice files for this exercise.
Note
BE SURE TO start Outlook and display the Inbox before beginning this exercise.
OPEN a message window.
At the right end of the Quick Access Toolbar, click the Customize Quick Access Toolbar button.
The Customize Quick Access Toolbar menu opens, displaying a short list of frequently used commands that you can click to add to the toolbar.
Near the bottom of the menu, click More Commands.
The Editor Options window opens, displaying the Customize page. The current Quick Access Toolbar commands are listed (in order of appearance) in the right pane.
Click the Choose commands from arrow, and then in the list, click Options Tab.
The list displays all the commands available from the Options tab.
Tip
You can display an alphabetical list of all Outlook commands by clicking All Commands in the Choose Commands From list. In some cases, multiple instances of a command appear in the list—these correspond to the locations in which the command appears within the program. Pointing to a command displays the command location in a ScreenTip. Commands that appear on contextual tabs and commands that don’t appear on any tab are also available from this list.
In the Options Tab list, point to the first command, Browse for Themes.
A ScreenTip displays the tab and group where you can locate this command. Point to a few other commands to view their ScreenTips and gain a better understanding of how commands are grouped and where you can find them.
In the Options Tab list, click Request a Delivery Receipt. Then between the two command lists, click Add.
Outlook adds the Request A Delivery Receipt command to the end of the list of commands available from the Quick Access Toolbar.
In the right pane, click Request a Delivery Receipt, and then click the Move Up button four times to move the selected command to the second position in the list.
At the bottom of the Customize page, click OK.
The Request A Delivery Receipt check box now appears on the Quick Access Toolbar so that you can conveniently select it before sending a message.
You can remove the button from the Quick Access Toolbar by repeating steps 1 and 2, selecting the command in the right pane, and then clicking Remove and OK.


While you are still becoming familiar with the 2007 Office system programs, and in particular with Outlook, you might be quite content to work with the default settings. But as you become more experienced, you might want to adjust some of the settings to tailor the Office environment to the way you work.
In this exercise, you will explore the ways in which you can customize Outlook. There are no practice files for this exercise.
Click the Microsoft Office Button, and then in the lower-right corner of the Office menu, click Editor Options.
The Editor Options window opens, displaying the Popular page.
The settings on the Popular page apply to all 2007 Office system programs, not only to Outlook. These settings include showing the Mini toolbar when you select text, enabling live previews of gallery options, showing the Developer tab on the Ribbon, changing the color scheme, and setting the ScreenTip style. In addition, you can specify your user information (name and initials) on this page.
In the page list in the left pane, click Display.
The settings on the Display page control whether Outlook displays various types of formatting marks within message windows.
In the page list, click Proofing.
From the Proofing page, you can set AutoCorrect options to specify how Outlook will correct and format the content of your messages as you type them, and customize the spelling and grammar checking settings.
In the page list, click Advanced.
This page contains settings for many features you might want to customize to suit the way you work.
In the Editing Options area of this page, you can turn on or off advanced editing features, such as how Outlook selects and moves text, whether to track formatting changes, and whether Overtype mode is available.
In the Cut, Copy, And Paste area, you can specify whether Outlook will apply source or destination formatting to text copied within a message, between messages, and from other programs. You can also set options for smart cut and paste (whether to automatically add and remove spaces as needed) and the Paste Options button (whether it appears after a past operation).
In the Display E-mail Content area, you can specify how Outlook displays your message content on screen. You can turn on or off text wrapping, picture placeholders, Smart Tags, field codes, and text animation.
In the Display area, you can set whether measurements are shown in inches, centimeters, millimeters, points, or picas; whether pixels are shown for HTML features; whether ScreenTips display keyboard shortcuts; and whether character positioning is optimized for layout rather than readability.
In the page list, click Customize.
As discussed in Making Favorite Outlook Commands Easily Accessible earlier in this chapter, from the Customize page, you can add frequently used commands to the Quick Access Toolbar.
Make any changes that you want to the default Office settings, to the way Outlook displays, corrects, and formats message and other items, and to the way Outlook functions. Then at the bottom of the Editor Options window, click OK (or click Cancel to close the window without implementing changes).


You can have Outlook evaluate your incoming or outgoing e-mail messages and make decisions about what to do with them based on instructions called rules. You can create rules based on senders, recipients, words, attachments, categories, or other message criteria, and have Outlook automatically move, copy, delete, forward, redirect, reply to, or otherwise process messages based on those criteria.
You can choose from a collection of standard rules or create your own from scratch. All the rules you specify are summarized in a list and are differentiated by icons that indicate what they do.
If you have a Microsoft Exchange Server account, you can set up server rules that are applied to messages as they are received or processed by your Exchange server. Whether or not you have an Exchange Server account, you can set up client rules that are applied to messages stored on your computer.
In this exercise, you will create a rule to process incoming messages that meet specific criteria.
Note
USE the SBS Practice Messages folder and the messages you created in earlier exercises. If you did not create the folder or messages, you can complete the exercise by specifying your own criteria.
BE SURE TO start Outlook, connect to your mail server, and display the Inbox before beginning this exercise.
On the E-mail Rules tab, click New Rule.
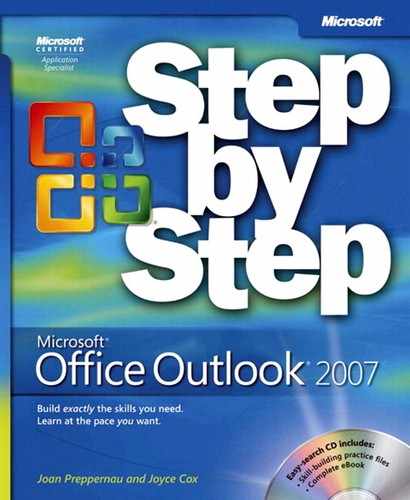
You can base a rule on one of the 10 rule templates provided by Outlook, or you can start from a blank rule. Take a moment to look over the available templates; clicking a template displays an example in the Edit The Rule Description box.
In the Select a template list, under Start from a blank rule, click Check messages when they arrive.
Outlook updates the Edit The Rule Description box to reflect your choice.
Scroll the Select condition(s) list to see the conditions you can apply, and then select the with specific word(s) in the subject check box.
Outlook updates the Edit The Rule Description box to include the selected criterion. You can specify as many criteria as you want.
In the Edit the rule description box, click the underlined term specific words.
In the Specify words or phrases to search for in the subject box, type SBS, click Add, and click OK. Then in the Rules wizard, click Next.
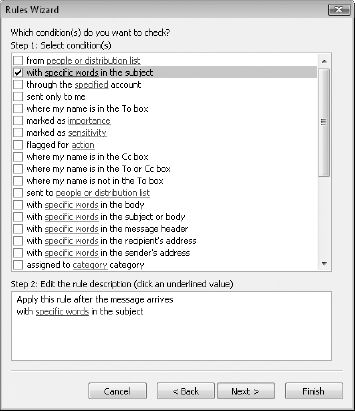
Scroll the Select action(s) list to review the actions Outlook can perform on incoming items meeting the criteria you specify. Then select the move a copy to the specified folder check box, and in the Edit the rule description box, click the underlined word specified.
The Rules And Alerts dialog box opens, displaying the folders in your mailbox.
Expand the Inbox, click the SBS Practice Messages folder, and then click OK.
In the Rules wizard, click Next.
Conditions you specify on this page overrule the original selection criteria.
Without selecting an exception, click Next.
The final page of the Rules wizard summarizes the parameters of the SBS rule.
Select the Run this rule now on messages already in “Inbox” check box, and then click Finish.
Outlook saves the rule to the Rules And Alerts dialog box and runs it on the contents of your Inbox.
The selected check box to the left of the rule name indicates that this rule is active and Outlook will apply it to all incoming messages.
In the Rules and Alerts dialog box, click OK.
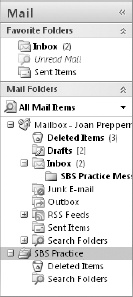
In the All Mail Folders list in the Navigation Pane, expand the Inbox if necessary, and then click the SBS Practice Messages folder.
The folder contains copies of any practice messages you created in earlier chapters of this book.


The items you create and receive in Outlook—including messages, appointments, contacts, tasks, notes, and journal entries—are kept in a data file in one of the following locations:
On a network server. If your Outlook items are stored on a server, which is usually the case when you are working on a network that uses Exchange Server, they are stored in a data file called a private store. You can access this store only when you are connected to your server. This is the most common storage configuration.
On your computer. If your Outlook items are stored on your computer, they are stored in a data file called a Personal Folders file, which has a .pst file extension.
Warning
Important If your Outlook items are kept on your computer, take care to back up the .pst file on a regular basis, because that is the only copy of your data.
Whether your Outlook items are stored on a server or on your computer, you can create Personal Folders files at any time. If your items are server-based, you might want to keep specific items in a Personal Folders file so that they are available whether or not you are connected to the server—for example, if you work on a laptop that you use both in the office and at home—or you might choose to store personal or confidential information in a .pst file so that it is not available to other people on your network, or if you want or need to keep your server file small (many companies limit the amount of data employees can store on servers). If you already store your Outlook items in a Personal Folders file, you might want to keep items related to a particular project in a different Personal Folders file—for example, so that you can back up those items separately from your other Outlook items or so that you can copy the file containing those items to a different computer.
In this exercise, you will create a Personal Folders file, move messages and folders to it, and learn how to open and close data files from within Outlook.
On the File menu, point to New, and then click Outlook Data File.
If you run Microsoft Outlook 2002 or an earlier version on a different computer and you might want to open this Personal Folders file in that version, click Outlook 97-2002 Personal Folders File, and then click OK. Otherwise, with Office Outlook Personal Folders File selected, click OK.
Note
Troubleshooting The Personal Folders file format used by Outlook 2003 and Outlook 2007 supports international Unicode character sets and large items. If you want to export a Personal Folders file to a computer that uses an older version of Outlook, you must export the file in the older Personal Folders file format. Both file formats have the same extension (.pst).
The Create Or Open Outlook Data File dialog box opens. The default Personal Folders file location is within your Outlook profile folder, but you can save the file anywhere you want.
In the Favorite Links list, click Documents.
In the File name box, type SBSFolder, and then click OK.
Replace the suggested name in the Name box with SBS Practice.
If you want, you can assign a password to the file to keep it secure. For the purposes of this exercise, you will not assign a password.
In the Create Microsoft Personal Folders dialog box, click OK.
Outlook creates the new SBS Practice personal folder, which appears in the All Mail Items list in the Navigation Pane at the same level as your primary mailbox.
Click the plus sign to the left of the SBS Practice folder to expand it.
By default, a newly created Personal Folders file contains only a Deleted Items folder and a Search Folders folder. You can create other folders within the Personal Folders file in the same way you would within your Inbox.
Hold down the right mouse button and drag the SBS Practice Messages folder from your Inbox to the SBS Practice personal folder. When you release the mouse button, click Copy.
Outlook copies the selected folder and its contents into the personal folder.
Click the SBS Practice Messages folder that now appears in the SBS Practice folder. Verify that the contents are identical to the original folder.
Right-click the SBS Practice folder, and then click Close “SBS Practice”.
The Personal Folders file no longer appears in the All Mail Items list.
On the File menu, point to Open, and then click Outlook Data File.
In the Open Outlook Data File dialog box, browse to your Documents folder, and then double-click the SBSFolder data file.
The SBS Practice folder re-opens in Outlook. In this way, you can access the contents of any data file from within Outlook.


As your e-mail messages travel from server to server en route to you or your recipients, they are vulnerable to interception by hackers and others who are intent on viewing them. With Outlook 2007, you can safeguard your messages in several ways, including implementing digital signatures, encryption, plain text messages, and Information Rights Management (IRM). Only you can decide which of these strategies is most appropriate for your individual situation.
When sending messages, you can reassure message recipients that they are receiving valid messages from you by using a digital signature—a piece of code that validates the identity of a message sender (not the actual person, but the e-mail account and computer from which the message originates).
To digitally sign all outgoing messages:
On the Tools menu, click Trust Center, and then in the page list, click E-mail Security.
On the E-mail Security page, select the Add digital signature to outgoing messages check box.
If all your message recipients don’t have Secure Multipurpose Internet Mail Extensions (S/MIME) security (for instance, if you’re sending messages to people who you know aren’t using Outlook), select the Send clear text signed message when sending signed messages check box.
Click OK.
To digitally sign an individual e-mail message:

Note
Troubleshooting If you haven’t previously used the Digital Signature feature in Outlook 2007, the Digitally Sign Message button might not be visible. In this case, click the Options dialog box launcher, and then in the Message Options dialog box, click Security Settings. In the Security Settings dialog box, select the Add Digital Signature To This Message check box, and click OK. Then close the Message Options dialog box.
A message with a valid digital signature has a red ribbon on its message icon and a digital signature icon (also a red ribbon) in its message header. When you receive a digitally signed message, you can click the digital signature icon to view information about the signature.
You can secure the contents of outgoing messages by using encryption. Encryption ensures that only the intended recipients can read the messages you send. The message recipient’s e-mail program must have corresponding decryption capabilities in order to read the message.
To encrypt all outgoing messages:
On the Tools menu, click Trust Center, and then in the page list, click E-mail Security.
On the E-mail Security page, select the Encrypt contents and attachments for outgoing messages check box.
To receive verification that a message recipient received an encrypted message in its encrypted format, select the Request S/MIME receipt for all S/MIME signed messages check box.
Click OK.
To encrypt an individual message:
On the Message tab, in the Options group, click the Encrypt Message Contents and Attachments button.

Note
Troubleshooting If you haven’t previously used the Encryption feature in Outlook 2007, the Encrypt Message Contents And Attachments button might not be visible. In this case, click the Options dialog box launcher, and then in the Message Options dialog box, click Security Settings. In the Security Settings dialog box, select the Encrypt Message Contents And Attachments check box, and click OK. Then close the Message Options dialog box.
An encrypted message has a blue lock on its message icon and an encryption icon (also a blue lock) in its message header. When you receive an encrypted message, you can click the encryption icon to view the layers of security in the message.
These days, viruses and other harmful programs can easily be spread from computer to computer in e-mail messages. To ensure that the e-mail messages you receive won’t harm your computer, you might want to display them in plain text, rather than in Rich Text Format or HTML. Links, scripts, and other active content are disabled in plain text messages.
To receive all messages in plain text format:
If you don’t want a message recipient to forward, copy, or print your message, you can send it with restricted permissions. You use IRM to set these permissions, which control who can read your messages and what they can do with them. If the restricted message includes an attachment, such as a Word document, an Excel workbook, or a PowerPoint presentation, the recipient can’t edit, copy, or print the attachment (unless you have set individual permissions within the document).
To use IRM, you need access to an IRM server. If your organization has its own IRM server, your administrator can advise you how to set restricted permissions. If you don’t have access to an IRM server when you first try to set permissions for a message, Outlook prompts you to sign up for a free trial on an IRM server provided by Microsoft. To take advantage of this free trial, you click Yes in the Service Sign-Up dialog box and then sign up for a Rights Management (RM) account certificate for your outgoing e-mail address (which must be registered as a Microsoft .NET Passport or Windows Live ID). After finishing the process, you can restrict permissions for outgoing messages sent from the computer on which the certificate is installed.
Note
See Also For more information about Passport and Windows Live credentials, refer to Windows Vista Step by Step, by Joan Preppernau and Joyce Cox (Microsoft Press, 2007).
To prevent message recipients from forwarding, printing, or copying a message:
On the Message tab, in the Options group, click the Permissions arrow, and then in the list, click Do Not Forward.
The message header in the outgoing and received messages indicates what recipients can and can’t do with the message.
To read a message sent with restricted permissions, recipients must have Outlook 2003 or later.
Outlook offers levels of protection for managing junk e-mail messages (also called spam)—the unsolicited advertisements, sometimes containing dangerous attachments, that can swamp your Inbox if your e-mail address finds its way into the hands of unscrupulous mailing list vendors. When enabled, the Junk E-Mail Filter either moves messages that appear to be junk e-mail to a special folder or deletes them. You can specify a list of e-mail addresses or domains whose messages should always be treated as junk; you can also specify a list that should never be treated as junk.
Outlook 2007 also offers protection from phishing messages—a dangerous and widespread identity theft scam. Phishing messages contain links to phishing sites purporting to represent trusted, known entities, such as banks or e-commerce sites that would likely have your personal information on file. The messages request that you “update” your personal information through the link provided. If you do so, you inadvertently provide the requested information (which might include your social security number, bank account number, passwords, and other confidential information) to scam artists, who then sell or otherwise use the information for their own financial gain. In the past, you were in danger only if you submitted your information through the phishing site, but these sites are becoming increasingly sophisticated, with many now hosting malicious keystroke-logging software. You can infect your computer just by visiting the site, which makes it vital that you protect yourself from these threats.
Note
See Also Windows Internet Explorer 7 provides built-in protection against phishing sites. For more information, refer to Windows Vista Step by Step, by Joan Preppernau and Joyce Cox (Microsoft Press, 2007).
In this exercise, you will review the spam filtering options provided by the Junk E-Mail Filter. There are no practice files for this exercise.
On the Actions menu, point to Junk E-mail, and then click Junk E-mail Options.
On the Options tab, select a level of protection.
If you don’t have additional filters in place, such as those that might be supplied by your organization, you might prefer to click High. Otherwise, click Low.
If you want Outlook to automatically delete suspected junk e-mail, select the Permanently delete suspected Junk E-mail instead of moving it to the Junk E-mail folder check box.
Do not select this check box if you set the protection level to High or to Safe Lists Only. With these settings, it is likely that the Junk E-Mail Filter will catch quite a few valid messages that you don’t want deleted.
Note that the Disable Links And Other Functionality In Phishing Messages check box is selected by default. Unless you are very confident that you have another protective system in place, leave this option selected.
Click the Safe Senders tab.
You can add a specific person’s e-mail address to the Safe Senders List (for instance, [email protected]), or specify that e-mail received from any sender at a particular domain is safe by adding only the domain (for instance, @contoso.com—you don’t need to specify a wildcard symbol). To ensure that messages from your legitimate contacts aren’t held by the Junk E-Mail Filter, select the Also Trust E-mail From My Contacts and Automatically Add People I E-mail To The Safe Senders List check boxes.
Click the Safe Recipients tab.
You can add distribution lists or mailing lists you belong to to your Safe Recipients List to ensure that messages sent to them will never be treated as junk e-mail.
Click the Blocked Senders tab.
You can manually add e-mail addresses and domain names to the Blocked Senders List, or Outlook will add them for you whenever you identify a received message as junk e-mail.
Tip
To add the sender or recipient of a message to one of your Junk E-Mail lists, right-click the message in your Inbox or other mail folder, point to Junk E-Mail, and then click Add Sender To Blocked Senders List, Add Sender To Safe Senders List, Add Sender’s Domain To Safe Senders List, or Add Recipient To Safe Recipients List.
Click the International tab.
The Junk E-Mail Filter gives you the option of blocking all messages from a country-specific, top-level domain (click Blocked Top-Level Domain List to see them all), or all messages containing specific non-English text encoding (click Blocked Encodings List to see them all).
If you want to keep any changes you’ve made to the Junk E-Mail Filter options, click OK; otherwise, click Cancel to close the Junk E-mail Options dialog box without saving your changes.


Outlook includes a selection of advanced options so that you can manage your e-mail most effectively. To avoid losing your work, you can choose to have Outlook automatically save messages you have created but not yet sent. When new messages arrive, you can choose to have Outlook alert you by playing a sound, briefly changing the mouse pointer to an envelope icon, showing an envelope icon in the notification area, or any combination of these effects. You can also set default options for sending a message. For example, if you are concerned about privacy, you might choose to set the sensitivity of all new messages to Private.
In this exercise, you will review the types of settings you can control, save message drafts more frequently, specify how Outlook saves messages, what happens when new messages arrive, and which options are used when sending messages. There are no practice files for this exercise.
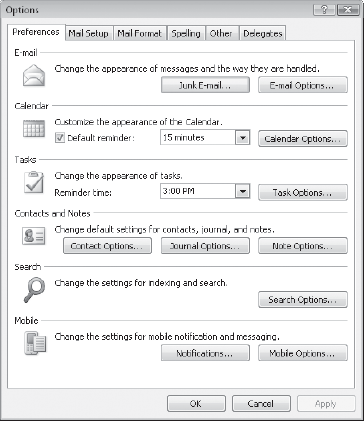
On the Tools menu, click Options.
From this dialog box, you can control the settings and appearance of many Outlook features, including the following:
E-mail accounts, functionality, and formatting
Editorial and archive functions
The Outlook Panes (Navigation Pane, Reading Pane, and the To-Do Bar)
Your calendar, tasks list, contact list, and notes
The Journal
The indexing and search functions
The new telephone and voice mail functions
On the Preferences tab, click E-mail Options, and then in the E-mail Options dialog box, click Advanced E-mail Options.
In the Save messages area, with the AutoSave items every check box selected, replace the number in the minutes box with 1.
Every minute, Outlook will save any message that you are composing but have not yet sent in your Drafts folder. In the event of a computer crash—for example, if you experience a power failure, or your toddler turns off your computer—you won’t lose more than one minute’s worth of work.
In the When new items arrive in my Inbox area, clear the Briefly change the mouse cursor check box.
Outlook will alert you to the arrival of new messages by sounding a chime and displaying a desktop alert. If you haven’t activated a message since the most recent message was received, an envelope icon appears in the notification area at the right end of the Windows taskbar.
Note
See Also For more information about desktop alerts, see Working with New Mail Notifications in Chapter 4.
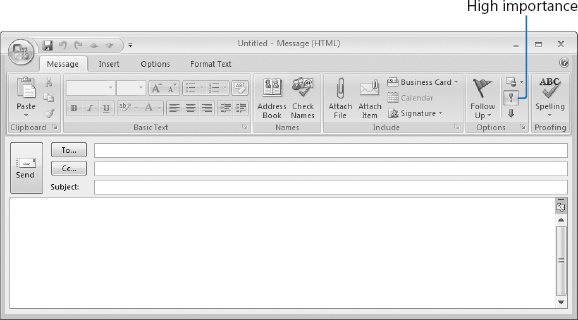
In the When sending a message area, click the Set importance arrow, and then in the list, click High.
You’ll see the effect of this setting later in this exercise.
Select the Allow comma as address separator check box.
Enabling this option allows Outlook to recognize commas as well as semicolons as separators between names or addresses in the To, Cc, or Bcc boxes. This very convenient option should (in this author’s opinion) be set by default! For some reason, this has not been the case in any version of Outlook to date.
Take note of the other available options (and make any changes you want). Then click OK in each of the open dialog boxes to close them and save your changes.
On the Standard toolbar, click the New Mail Message button.
A new message window opens. On the Message tab, in the Options group, the High Importance button is active, indicating that the message will be flagged as high priority. This probably isn’t a setting you want to keep, but it’s a good visible indication of the changes you made to the e-mail options.
Close the message window. If prompted to save it, click No.
On the Tools menu, click Options. Click E-mail Options, and then click Advanced E-mail Options.
In the Advanced E-mail Options dialog box, in the Set importance list, click Normal.
By default, new messages will now be normal priority. You can set an individual message to high or low priority by clicking the High Importance or Low Importance button in the Options group on the Message tab of the message window.
Select or clear any other options you want, and then click OK in each of the open dialog boxes to close them and save your changes.


Need one-click access to commands that are scattered in different places? Simply add a button for that command to the Quick Access Toolbar.
You can adjust many aspects of the Outlook environment to tailor it to the way you work.
It’s worth taking the time to set up a few rules so that Outlook can evaluate and process messages depending on the sender, subject, contents, time, or almost any other criteria you care to set. You can create a different set of rules to be applied when you are out of the office.
You can store e-mail messages and other Outlook items on your organization’s server or locally, on your own computer.
You can digitally sign your messages so that recipients will know the messages haven’t been tampered with; encrypt them so that only intended recipients can read them; and set restricted permissions so that recipients can’t forward, print, or copy them. You can also display messages in plain text to disable any active content.
Built-in filters block annoying or hazardous messages that conform to spam patterns or that contain active content. You determine the level of protection, and specify trusted (and untrusted) message senders.
Advanced e-mail option settings give you control over the way Outlook handles the messages you write. If you frequently send messages with the same settings, you can save time by setting the defaults to your liking.