Chapter at a Glance

In addition to the information you collect and store in Microsoft Office Outlook 2007 as e-mail messages, contact records, task lists, and calendar items, you can collect news and articles from Web sites that interest you and record general notes, so that all the information you need is in one place. You can also share information with other people about a particular topic by participating in newsgroup discussions.
In this chapter, you will subscribe to a news feed and learn how to participate in a newsgroup from Outlook. Then you will create, update, organize, and share electronic notes by using the Outlook Notes component.
Note
See Also Do you need only a quick refresher on the topics in this chapter? See the Quick Reference section at the beginning of this book.
Warning
Important The exercises in this chapter require only practice files created in earlier chapters; none are supplied on the companion CD. For more information about practice files, see Using the Companion CD at the beginning of this book.
Note
Troubleshooting Graphics and operating system–related instructions in this book reflect the Windows Vista user interface. If your computer is running Windows XP and you experience trouble following the instructions as written, please refer to the Information for Readers Running Windows XP section at the beginning of this book.
Many commercial Web sites offer the option of subscribing to a news feed so that you can receive information from the site without actually visiting it. This option is also increasingly offered by personal Web logs. (Commonly referred to as blogs, these are personal online journals through which people share information, thoughts, and opinions with the general public.) The technology behind the news feeds is called Really Simple Syndication (RSS).
To receive RSS feeds, you need an RSS reader (a program that receives and processes the information), and until now, that meant that you needed to install one of the many standalone RSS readers that are available. However, you can now use a convenient RSS reader that is included in Outlook 2007.
You can subscribe to a site’s RSS feeds from within Outlook or from the site itself. You don’t need to provide any personal information when you subscribe to an RSS feed; all you are doing is creating a connection between Outlook and the news server.
Outlook creates a folder for each RSS feed you subscribe to. The folder displays an article item (similar to a message) containing the headline and some text from each article the site feeds to you. You can:
Display the article on the originating Web site by clicking a link in the article window.
Download the entire article to Outlook by right-clicking the article item and then clicking Download.
Use the Instant Search feature to locate relevant content within a feed.
Add articles to your task list.
Forward articles to other people.
Outlook includes RSS subscriptions in your Send/Receive group and updates them with your e-mail accounts, within the limits set by the content provider. If you prefer to update RSS feeds less frequently than the default—for example, if you subscribe to a large number of RSS feeds and are concerned that the download time will interfere with other Outlook activities—you can create a separate Send/Receive group for your RSS feeds.
In this exercise, you will subscribe to an RSS feed from within Outlook and then cancel the subscription. There are no practice files for this exercise.
In the Navigation Pane, under your primary mailbox, click the RSS Subscriptions folder or RSS Feeds folder.
Note
Troubleshooting Depending on the operating system running on your mail server, the folder name might be RSS Feeds rather than RSS Subscriptions.
The RSS Subscriptions folder is at the same hierarchical level within your mailbox as your Inbox.
Scroll the Outlook Syndicated Content (RSS) Directory page to the Partner Feeds section.
Notice the many types of RSS feeds available from this central location.
In the Entertainment/Sports list under Partner Feeds, click Top sports stories.
Outlook asks for confirmation that you want to configure the selected RSS feed.
In the Microsoft Office Outlook message box, click Yes.
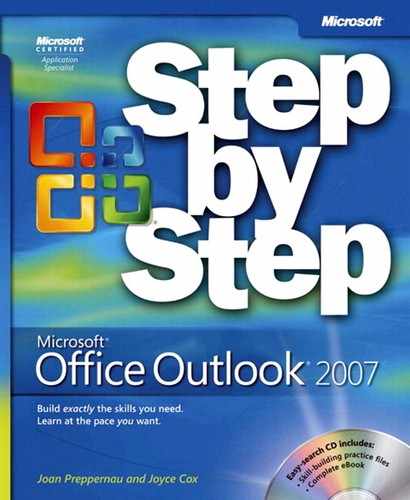
A FOXSports.com News subfolder containing recent news feeds appears within the RSS Subscriptions folder.
In the Account Settings dialog box, click the RSS Feeds tab.
On this tab, you can select a feed in the Feed Name list and then click Change to make changes to the display name, delivery folder, download settings, and update limit.
In the Feed Name list, click FOXSports.com News, and then click Remove.
In the Microsoft Office Outlook message box that asks whether to remove the RSS feed from Outlook, click Yes.
Outlook removes the selected feed from the Feed Name list, but leaves the corresponding folder in the RSS Subscriptions folder in case you want to retain the news items it currently contains.


A newsgroup (also known as a forum) is an online discussion group focused on a specific topic. Thousands of newsgroups exist, covering such diverse topics as software programs, technologies, medical conditions, parenting, dieting, and personal service referrals. Some newsgroups are publicly available to anyone wanting to participate, and others are private. Most are moderated on some level to ensure that people don’t post inappropriate content, or if they do, that it doesn’t remain available for long.
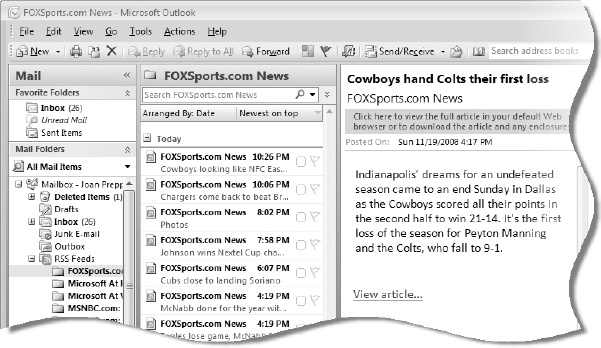
To participate in a newsgroup, you need a newsreader, a program that interfaces with the news server hosting the newsgroup. Outlook doesn’t provide its own newsreader technology. Instead, it uses the newsreader built into Windows Mail (or if your computer is running Windows XP, Outlook Express). You can subscribe to a newsgroup directly from Windows Mail, or if you prefer, you can connect to the newsreader from within Outlook. To do so, you need to add the News command to the Go menu.
To add the News command to the Go menu:
To start the newsreader, click News on the Go menu. The first time you start the news-reader, Windows Mail leads you through the process of subscribing to a newsgroup.
Note
See Also For more information about Windows Mail, refer to Windows Vista Step by Step by Joan Preppernau and Joyce Cox (Microsoft Press, 2007). For information about Outlook Express, refer to Microsoft Windows XP Step by Step by Online Training Solutions, Inc. (Microsoft Press, 2004).
After you subscribe to a newsgroup, you can read messages posted to the newsgroup, respond to existing messages either through the newsgroup or directly to the person who posted the message, and post new messages, by clicking the buttons at the top of the newsgroup window.
To connect to additional newsgroups, click Accounts on the Tools menu, and in the Internet Accounts dialog box, click the News heading. Click the Add button, click News, and then complete the steps in the wizard to set up a new Newsgroup Account.
You can store miscellaneous information such as reminders, passwords, account numbers, and processes by recording them as electronic notes. Because your notes are available to you from wherever you access Outlook, this can be a very convenient way of retaining information you might need later. And because you’re less likely to accidentally delete a note than a message, it is safer than sending information to yourself in an e-mail message.
Although notes are a type of Outlook item, they don’t appear in the same type of windows as messages, appointments, contact records, and tasks. Instead, they appear in the form of “sticky notes” resembling the popular 3M-brand Post-It notes. You can view, sort, and organize notes in the same way you do other Outlook items. The standard views include:
You switch the view by selecting the option you want in the Current View list in the Navigation Pane, or by pointing to Current View on the View menu and then clicking the View you want. If you’re looking for a specific piece of information in a note, you can quickly locate it by typing a search word or phrase in the Search Notes box above the content pane.
By default, the Reading Pane is hidden in the Notes pane, but if you prefer, you can display the Reading Pane and view the content of notes without opening them. To do so, point to Reading Pane on the View menu, and then click Right or Bottom to display the Reading Pane in that location.
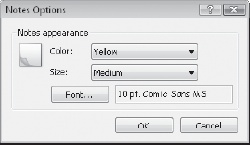
To help you organize your notes, previous versions of Outlook supported five note colors, as well as named categories. The Color Category function in Outlook 2007 serves a similar purpose. You can still create notes in five different colors (blue, green, pink, yellow, and white) but only by changing the default note color.
You can change the default note color, size, or font by clicking Options on the Tools menu, and then clicking Note Options. You can then adjust the settings and click OK to close the open dialog boxes.
In this exercise, you will create two notes. There are no practice files for this exercise.
In the Navigation Pane, click the Notes button.
Outlook displays the Notes pane.
On the Standard toolbar, click the New Note button.
Outlook displays a new note. The current date and time appear at the bottom.
Type SBS Program Logon Info, and then press the
 key twice.
The first line of the note appears as its subject or title.
Type User name: Administrator, press
, and then type Password: Tru$tNo1.To save and close the note, click the Close button in the upper-right corner.
The note appears in the Notes pane. Notice that only the subject is visible. You can access the note’s information by opening the note (or by displaying the Reading Pane).
On the Standard toolbar, click the New Note button.
Type SBS Office Online: http://www.microsoft.com/office/, and then press
.Outlook formats the URL as a hyperlink. You can click a hyperlink in a note to open the specified site in your default Internet browser.
Close the note.
The note appears in the Notes pane. Because the URL is part of the first line of the note, it appears as part of the subject. After you close the note, the hyperlink is available directly from the Notes pane.


BE SURE TO retain the notes for use in other exercises later in this chapter.
If you save information that pertains to a person in your contact list in an electronic note, you can link the note to the contact record so that you can easily retrieve the information later. Linked notes appear on the Activities page of a contact record.
In this exercise, you will link a note to a contact and then access the note from the contact record.
Note
USE the SBS Program Logon Info note you created in Recording Information by Using Notes earlier in this chapter, and the John Emory contact record you created in Saving and Updating Contact Information in Chapter 2. If you didn’t complete those exercises, you can do so now, or you can substitute any other note and contact record.
BE SURE TO display the Notes pane before beginning this exercise.
OPEN the SBS Program Logon Info note.
In the upper-left corner of the note, click the Note icon, and then click Contacts.
With Contacts selected in the Look in list, click Emory, John in the Items list. Then click OK.
Close the Contacts for Note dialog box and the note.
In the Navigation Pane, click the Contacts button.
Locate and open the contact record for John Emory.
On the Contact tab, in the Show group, click the Activities button.
Outlook generates a list of items linked to the selected contact. While Outlook searches for items, an animated icon of a magnifying glass moving around a piece of paper appears above the list.
On the Activities page of the contact record, click the Show arrow, and then in the list, click Notes.
The Activities page displays the SBS Program Logon Info note.


When you want to send information that is recorded in an electronic note to someone in an e-mail message, you can forward the note instead of retyping or copying the information into the message.
In this exercise, you will forward a note, open the received note, and save a copy with another name.
Note
USE the SBS Office Online note you created in Recording Information by Using Notes earlier in this chapter. If you did not complete that exercise, you may do so now, or you can use any notes of your own.
BE SURE TO display the Notes pane before beginning this exercise.
Right-click the SBS Office Online note, and then click Forward.
Outlook opens a message window with the note title as the message subject and the note itself as an attachment. The URL in the Subject box appears as a hyperlink.
In the To box, type your own e-mail address.
In the message header, click the Send button.
Outlook sends the message.
Display your Inbox, and click the URL in the SBS Office Online message header.
The Microsoft Office Online Web site opens in your default Internet browser.
Return to your Outlook Inbox. In the Reading Pane, right-click the attached note, and then click Open.
The SBS Office Online note opens.
Select Office Online, type Web Link, and then close the note.
In your Inbox, click another message, and then click this one again to see the change.
Drag the SBS Web Link note from the Reading Pane to the Notes button at the bottom of the Navigation Pane. Then display the Notes pane.
The SBS Office Online and SBS Web Link notes both appear in the notes list.


You can receive information from Web sites and blogs that offer RSS feeds by subscribing to them. Whether you subscribe to a feed from within Outlook or from the originating site, you can read the content in your Outlook RSS Subscriptions folder.
Outlook doesn’t have a built-in newsreader, but you can access the Windows Mail (or Outlook Express) newsreader from within Outlook.
You can record miscellaneous information in electronic notes. You can categorize, search, display, and sort notes, and send notes to other people.