
Chapter 2
Planning Your Sites
In This Chapter
![]() Planning multipage websites
Planning multipage websites
![]() Working with the client
Working with the client
![]() Analyzing the audience
Analyzing the audience
![]() Building a site plan
Building a site plan
![]() Creating HTML and CSS templates
Creating HTML and CSS templates
![]() Fleshing out the project
Fleshing out the project
At some point, your web efforts begin to grow. Rather than think about single web documents, you begin to build more complex systems. Most real-life web problems require a lot more than a single page to do the work. How do you make the transition to a site with many different but interconnected pages? How do you think through the process of creating a site that serves a specific purpose?
You might even be thinking about doing commercial web development work. If so, it's definitely time to think about how to put together a plan for a customer.
Creating a Multipage Website
A complete website has these characteristics:
- A consistent theme: All the pages in a website should be about something — a product, a shop, a hobby. It doesn't matter much what the theme is, but the pages should be unified around it.
- Consistent design: The site should have a unified color scheme. All pages should have the same (or similar) layout, and the font choices and images should all use a similar style.
- A navigation scheme: Users must have a clear mechanism to move around from page to page. The organization of the pages and their relationships should be clear.
- A common address: Normally, all pages in a site are on the same server and have a common DNS name so that they're easy to distinguish.
Obviously, the skills of web design are critical to building a website, but a broader skill set is required when creating something larger than individual pages.
If you're starting to build a more complicated website, you need to have a plan, or else you won't succeed. This plan is even more important if you're building a site for somebody else.
Planning a Larger Site
Here are some questions you need to ask yourself when designing a larger website:
- What's the point of the site? The site doesn't have to be serious, but it does have to have a theme. If you don't know what your site is about, neither do your users (and they'll leave in a hurry).
- Who am I talking to? Websites are a form of communication, and you can't communicate well if you don't understand your audience. Who is the primary target audience for this site?
- Which resources do I have available? Resources involve a lot more than money (but it helps). How much time do you have? Do you have access to a solid technical framework? Can you get help if you need it? Do you have all the copy and raw materials?
- What am I trying to say? Believe it or not, this question often poses a huge problem. Somebody says, “I need a website.” When you ask what she wants on the site, she says, “Oh, lots of things.” When you try to pin down the answers, though, people often don't know what they want their website to say.
- What are the visual design constraints? If you're building a page for a small business, it probably has some kind of visual identity (through brochures or signage, for example). The business owner often wants you to stick with the company's current branding, which may involve negotiating with graphic artists or advertisers the business has worked with.
- Where will I put this thing? Does the client already have a domain name? Will moving the domain name cause a problem? Does content that's already on the web need to be moved? Do you already have hosting space and a DNS name in mind?
Understanding the Client
Often, a larger site is created at the behest of somebody else. Even if you're making a site for your own purposes, you should consider yourself a client. If the project is going to be successful, you need to know a few things about the client, as described in the following sections.
Ensuring that the client's expectations are clear
The short answer to the question of whether a client's expectations are clear is, “Not usually.”
A client who truly understands the Internet and knows what it takes to realize her vision for the site probably doesn't need you. Most of the time, a client's own concepts of what should happen on the site are vague, at best. Here are some introductory questions you can ask to get a sense of your client's expectations:
- What are you trying to say with this site? If the website has a single message that can be boiled down to one phrase or sentence, find out what that message is.
- Who are you trying to reach with this site? Determine who the client expects to be the typical users of the site. Find out whether she expects others and whether the site has more than one potential type of user. (For example, customers and employees may need different things.)
- What problem is this site trying to solve? Sometimes, a website is envisioned as a solution to a particular problem (getting the schedule online or keeping an online newsletter updated, for example.)
- What kind of design framework is already in place? Determine whether the organization already has some sort of branding and design strategy or whether you have freedom in this arena. If the client is already working with a graphic designer or artist, you'll need contact information.
- What is the time constraint? Find out how quickly the client needs the site completed. Does the client want the entire project at one time, or can it be phased in?
- Do you already have a technical framework in place? Determine whether the project needs to work with an existing database, web server, website, or domain name and whether you have complete access to those resources.
- Are there security concerns? First ask whether you will be asked to post data (personal information, credit card numbers, or Social Security numbers, for example) on the Internet that shouldn't be there. Run from any project that requires you to work with this potentially dangerous data, unless you're extremely comfortable with security measures.
- How will you get the copy? Any professional web developer can tell you that the client usually promises to make the copy available immediately but rarely delivers it without a lot of pleading. If the content is available, it's often incomplete or incorrect. You need to have some plan for getting the material from the client, or else you cannot proceed past a certain point.
- Does the client have a remuneration strategy? If you will be paid for your work, find out how you will be paid and whether it's hourly or by the project. If you have a business arrangement, treat it as such and write out a contract. Even if the page is written for free for a friend, a written contract is a good idea because you don't want to ruin a friendship over something as silly as a website.
Delineating the tasks
Building a website can involve a lot of different tasks. Your contract should indicate which of these tasks is expected. This list describes the potential scope of the project:
- Site layout: Determine which pages the site has and how they're connected to each other.
- HTML coding: Some projects simply require HTML coding and CSS. Presumably, the copy has already been provided, and you simply need to convert it to HTML format. This work isn't difficult, but it's tedious. Use a text editor with macro capability — after you create an HTML template.
- HTML template design: Devise an overall page design. The content isn't important here, but the general page design is the issue. This task requires sample data and an editor. It's normally done in conjunction with CSS templating.
- CSS design: After you have an HTML template or two (so that you know the logical structure of the pages), you can work on the visual design. Start with sketches on paper and maybe images from a paint program. After you have a layout approved, write the CSS to implement it.
- Data design: If the project will have a database component, take some time to analyze (and, often, rebuild) the data structure to follow the normalization rules. Data work is difficult because it doesn't have a visual result, yet it's critical to the overall site. This step is usually put off until the end, and that decision often dooms web projects. If you need data design, start it early.
- Data implementation: If the project has a data component, write and test the SQL code to build the database, including tables, views, and sample queries. You need time to write PHP code to connect the database to the HTML front end.
- Site integration and implementation: It takes some effort to fit all the pieces back together and make them work. Usually, this process is ongoing. The site needs to be set up on a production server and then tested and launched.
- Testing: Testing your work with live users is critical. You can use formal usability studies, but failing that, you still learn a lot by asking people to use your system and watching them do it (with your mouth shut). This method is the best way to see whether your assumptions are correct and the site is doing what it needs to do.
 For this discussion, I'm assuming you're building the entire site manually. In Chapter 3 of this minibook, I explain how to use content management systems to simplify the process of building large websites.
Understanding the Audience
Understanding your audience is one of the trickiest parts of web planning. You need to anticipate the audience in a number of ways, as described in the following sections.
Determining whom you want to reach
Before you make a lot of design decisions, you need to think carefully about the type of person you're trying to reach with the website.
Try to anticipate the mindset that people have when they use a particular site. For example, one of my students simultaneously worked on two sites: one for a graduate program at a university and another for a spa and salon. She had to think quite differently about the users of the two sites, which had implications for how she approached each step of the process.
The graduate program page was part of a website for a university. The university already had its own style and branding guidelines, official colors, and a number of (evolving) standards. The potential users of this site were graduate students seeking online degrees. The focus of this site was all business. People were there to learn about the graduate program and set up their schedules. They wanted information about classes, instructors, and schedules, but they didn't want anything that interfered with the problem at hand. The writing was efficient and official, the color scheme was standard, and the layout was also official.
The spa and salon page had an entirely different feel. The owner loves design and spent long hours picking exactly the right paint color for the walls in the physical space. She's really happy with her brochure, and although she's not sure exactly what she wants, she knows when something isn't right. She wants to give her customers information about the salon, but more importantly, she wants them to get a sense of how invigorating, relaxing, and feminine the experience of visiting her salon can be.
These two sites, although they require the same general technical skills, demand vastly different visual and technical designs because the clients and their users are vastly different.
Of course, someone could simultaneously be a graduate student and a patron of the salon, but the person would still have a different identity in these different sites. If you're going to a university site, in a student mindset, you want quick, reliable information. If, after you sign up for classes, you're looking for a salon, you likely want to be pampered. Websites are experiences. The design of the site should reflect the experience you're trying to give the user when he visits your site.
Finding out the user's technical expertise
Understanding the user isn't just an exercise in psychology. You also need to estimate the users’ technical proficiency because it can have a major impact on your site. Consider these issues for the typical user:
- Whether the user has broadband access: University students, hard-core gamers, and web developers often have high-speed Internet access, so they don't mind a page with lots of video, multimedia assets, and large file sizes. (In fact, they may expect a page like this.) Lots of people still use dialup connections or mobile access with limited bandwidth. If your audience has slower connections, every image creates a delay. Audio and video assets are completely unavailable to this group — and even make your site unattractive to them.
- Whether the user has a recent browser: You have no way to predict which browser a user has, but think about whether your target audience has a reason to install any of the current browsers. By and large, grandmothers use whichever browsers were on their machines when they purchased them. (I do know some L337 H@XX0R grandmas, however.) If most people in your audience are still using ancient browser — believe it or not, they're still used a lot — using advanced CSS and JavaScript tricks on your page may not be the best choice.
- Whether the user has a recent computer: As technical people, we tend to assume that everyone else keeps up-to-date on technology. That's not necessarily an accurate assumption.
- Whether the user has certain proficiencies: If you include a Flash animation, for example, the user might not have the right version of Flash installed. You have to decide whether it's reasonable to expect the user to install a plug-in.
- Whether this will be a largely mobile application: These days, every website should be considered a potential mobile site, but if a large percentage of your visitors will be using mobile devices to view your page, this will have implications on your design.
This process isn't about stereotyping, but you must consider the user while you're building a site. You want to match users’ expectations and capabilities, if possible.
Of course, you're making assumptions here, and you may well be wrong. I once did some work for a club for retired professors, and I based my expectations on their being retired. I should have based my assumptions on their being professors. And they let me have it! Be willing to adjust your expectations after you meet real users. (For professional work, you must meet and watch real users use your site.)
Building a Site Plan
Often, the initial work on a major site involves creating a plan for the site design. I like to do this step early because it helps me see the true scope of the project. A site plan is an overview of a website. Normally, it's drawn as a hierarchy chart.
I was asked to help design a website for an academic department at a major university. The first question I asked was, “What do you want on the website?” I wrote down everything on a whiteboard, with no thought of organization. Figure 2-1 shows a (cleaned-up) version of that sketch.

Figure 2-1: We need a lot of stuff on this site. Good grief!
 For all the sketches in this chapter, I used Dia, the open-source drawing tool. An excellent tool for this kind of work, I've added a link on the website so that you can play with it.
After all participants suggested everything they thought their site needed, I shooed them out of the room. Using only paper and pencil, I created a more organized sketch based on how I thought the information should be organized. My diagram looked like the one shown in Figure 2-2.

Figure 2-2: This chart shows an organized representation of the data.
Creating a site overview
Keep these suggestions in mind while creating a site overview diagram:
- Use the Law of Seven. This law suggests that people generally can't handle more than seven choices at a time. Try not to have more than seven major segments of information at any level. Each of these can be separated into as many as seven chunks, and each of these can have seven chunks.
Note: Even this book uses the Law of Seven! (Well, sorta — this book has eight minibooks.) The monster you're holding is too intimidating to look at as just one book, but if you break it into smaller segments, it becomes easier to manage. Clever, huh?
- Identify commonalities. While you look over the data, general groupings emerge. In the university example, I could easily see that we had a lot of course data, degree information, information about faculty, and research. I wanted to consider a few other topics that didn't fit as well, until I realized that they could be grouped as events and opportunities.
- Try to assign each topic to a group. I'm doing a form of data normalization here. This data structure isn't necessarily a formal one, but I'm using the same sort of thinking, so it could be. Clearly, I'm using the principle of functional dependency.
- Arrange a hierarchy. Group the topics from most general to most specific. For example, the term course info is very broad. N100 is a specific course, and it may have many sections (specific date, time, and instructor combinations). Thus, it makes sense to group sections under N100 and to group N100 under courses.
- Provide representative data. Not every single scrap of information is necessary here. The point is to have enough data so you can see the relationships among data.
- Keep in mind that this diagram does not represent the site design. When I showed this diagram to people, many assumed that I was setting up a menu structure, and they wanted a different kind of organization or menu. That's not the point yet. The purpose of this type of diagram is to see how the data itself fits together. Of course, this diagram tends to inform the page setup and the menu structure, but it doesn't have to.
- Not each box is a page. It might be, but it doesn't have to be. Later in the process, you can decide how to organize the parts of the site. For example, we decided to put all sections of N100 on one page with the N100 information using AJAX.
Building this sort of site diagram is absolutely critical for larger sites, or else you never really grasp the scope of the project. Have the major stakeholders look it over to see whether it accurately reflects the information you're trying to convey.
Building the site diagram
The site diagram is a more specific version of the site overview. At this point, you make a commitment about the particular pages you want in the system and their organizational relationship. Figure 2-3 shows a site diagram for the department site.
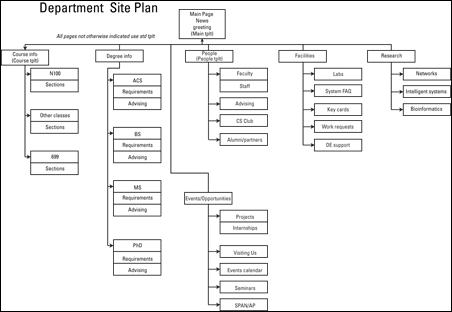
Figure 2-3: Now you have a site diagram for the department site.
The site diagram is a bit different from the overview for these reasons:
- Each box represents a page. Now you have to make some decisions about how the pages are organized. Determine at which level of the overview you have separate pages. For example, are all the course sections on one page, or all the sections of N100? Does each section of each course have a different page? These decisions will help you determine which technologies to use in constructing the page.
- The site diagram still doesn't need every page. If you have 30 classes, you don't need to account for each one if you know where they go and they all have the same general purpose and design.
- The navigation structure should be clear. The hierarchy should give you a clear navigation structure. (Of course, you can, and often should, add a secondary navigation structure. See the sidebar “Semantic navigation.”)
- Name each box. Each page should have a name. These box names translate to page titles and help you form a unified title system. This arrangement is useful for your navigation scheme.
- Identify overall layout for each box. Generally, a site uses only a few layouts. You have a standard layout for most pages. Often, the front page has a different layout (for news and navigation information). You may have specialty layouts, as well. For example, the faculty pages all have a specific layout with a prominent image. Don't plan the layout here — just identify it.
- Sort out the order. If the order of the pages matters, the site diagram is the place to work it out. For example, I organized the degrees from undergraduate to PhD programs.
The goal for this part of the site-planning process is to have a clear understanding of what each page requires. This information should make it easy for you to complete the data and visual design steps. The site diagram is an absolutely critical document. After you have it approved, print it and tape it to your monitor. It's your map for the rest of the project.
Creating Page Templates
If you've developed a site diagram, you should have a good feel for the overall requirements of the web development project. You should know how many layouts you need and the general requirements for each one. Your next task is to think about the visual design. Here are some guidelines:
- Get help if you need it. Visual design is a skill that requires insight and experience. If you “design like a programmer” (I sure do!), don't be afraid to get help from a person who has design sensibility. You still need to translate the design into code, however.
- Identify unifying design goals. All pages on the site have certain characteristics in common. Find out the overall color scheme, whether you will have a logo, and whether all pages will have the same header and retain the same fonts throughout.
- Identify a primary layout. Generally, a website requires one major layout that's repeated throughout the site. Often, the main page does not use this primary layout, but most internal pages do. Determine, for example, which broad design elements can be shared by most of the pages, whether every page has a headline, whether you need columns, and how important images are.
- Identify specialty designs. The main page is often a bit different from the other pages because it serves as an overview to the site. Likewise, if you will be repeating certain kinds of pages (the course pages and faculty pages in my university example), you have to know how these designs differ from the primary layout. Keep design elements as consistent as you can because unity makes your job easier and ties the site pages together.
Sketching the page design
Do not write even a single line of code before sketching out some design ideas. Figure 2-4 shows a page sketch for my sample site.
Your page sketch gives you enough information to create HTML and CSS code. It needs to start showing some detail, such as the following details:
- Draw out each element on the page. Any major page element (headlines, menus, columns) must be delineated.
- Include the class or ID identifier for each element. If you have a segment that will be used as a menu, name it “menu,” for example. If you have a content area, identify that name now. Write all names directly on the diagram so that you're clear about what belongs where.
- Include all relevant style information. Describe every font, the width of every element (including measurement units), the foreground and background colors (with hex codes), the background images (including sizes), and anything else you might need in order to code CSS styles for the page.
- Build a page sketch following these guidelines for each page template in your site. If you have three page designs, for example, you need three separate diagrams.
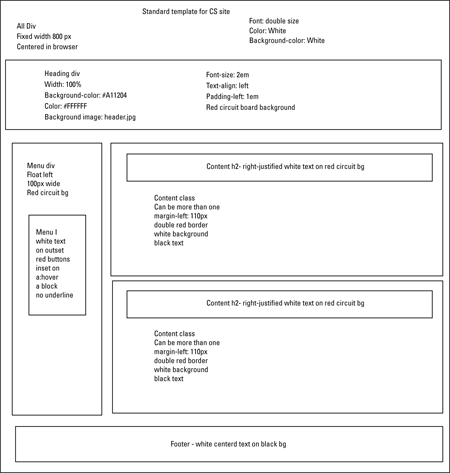
Figure 2-4: Here's a sample sketch for the standard template on this site.
These diagrams are finished only if they give you everything you need to build the HTML and CSS templates. The idea is to do all your design work on paper and then implement and tweak your project with code. If you plan well, the coding is easy.
The design sketch isn't a page mock-up. It's not meant to look exactly like the page. Instead, it's a sketch that explains with text all the various details you need to code in HTML and CSS. Often, designers produce beautiful mock-ups that aren't helpful in development because you need to know sizes and colors, for example. If you want to produce a mock-up, by all means do so, but also make a design sketch that includes things like actual font names and hex color codes so that you can re-create the mock-up with live code.
Building the HTML template framework
With a page layout in place, you can finally start writing some code. Begin with your standard page layout diagram and create an HTML template to implement the diagram in working code. The HTML template is quite simple because most of the design should happen in the CSS. Keep these guidelines in mind:
- Remember that the template is simply a framework. The HTML is mainly blank. It's meant to be duplicated and filled in with live data.
- It has a reference to the style sheet. External CSS is critical for large web projects because many pages refer to the same style sheet. Make a reference to the style sheet, even though it may not actually exist yet.
- Include all necessary elements. The elements themselves can be blank, but if your page needs a list for a menu, add an empty list. If you need a content div, put it in place.
- Create a prototype from the template. You'll need sample data in order to test the CSS. Build a prototype page that contains typical data. The amount of data should be typical of the actual site so that you can anticipate formatting problems.
 It's very possible that you'll never manually put content in your template. There are several options for automating this process, which can be found in Chapter 4 of this minibook.
The HTML template should be easy to construct because everything you need is in the page template diagram. Figure 2-5 shows an HTML prototype.
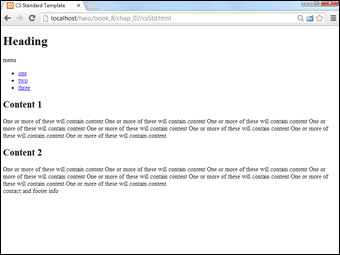
Figure 2-5: An HTML prototype for my site (with no CSS attached yet).
Here's the HTML code for my prototype:
<!DOCTYPE html>
<html lang = "en-US">
<head>
<meta charset = "UTF-8">
<title>CS Standard Template</title>
<link rel = "stylesheet"
type = "text/css"
href = "csStd.css" />
</head>
<body>
<div id = "all">
<!-- This div centers a fixed-width layout -->
<div id = "heading">
<h1>Heading</h1>
</div><!-- end heading div -->
<div id = "menu">
menu
<ul>
<li><a href = "#">one</a></li>
<li><a href = "#">two</a></li>
<li><a href = "#">three</a></li>
</ul>
</div> <!-- end menu div -->
<div class = "content">
<h2>Content 1</h2>
One or more of these will contain content
One or more of these will contain content
One or more of these will contain content
One or more of these will contain content
One or more of these will contain content
One or more of these will contain content
One or more of these will contain content
One or more of these will contain content
</div> <!-- end content div -->
<div class = "content">
<h2>Content 2</h2>
One or more of these will contain content
One or more of these will contain content
One or more of these will contain content
One or more of these will contain content
One or more of these will contain content
One or more of these will contain content
One or more of these will contain content
One or more of these will contain content
</div> <!-- end content div -->
<div id = "footer">
contact and footer info
</div> <!-- end footer div -->
</div> <!-- end all div -->
</body>
</html>
 People commonly start writing pages at this point, but that's a dangerous idea. Don't use any real data until you're certain of the general HTML structure. You can always change the style later, but if you create 100 pages and then decide that each of them needs another <div> tag, you have to go back and add 100 divs.
Creating page styles
With an HTML framework in place, you can start working on the CSS. The best way to incorporate CSS is by following these steps:
- Begin with the page template diagram.
It should have all the information you need.
- Test your CSS in a browser.
Begin with a simple CSS implementation that ensures you have the right names for all the page elements. (I like to give each element a different background color, for example.) Then modify each element according to your design document, testing as you go.
- Implement the CSS from your diagram.
You should be implementing the design you already created, not designing the page. (That already happened in the diagramming process.)
- Save the design.
For multi-page projects, external CSS in a separate file is definitely the way to go. As you work, save the CSS in the normal way so the browser will be able to read it. (See Book II for information on implementing external style sheets.)
- Test and tweak.
Things are never quite what they seem with CSS because browsers don't conform to standards equally. You need to test and tweak on other browsers. If users with older technologies are a concern, you may have to use a secondary style sheet for older versions of IE. You may also want to make a mobile version.
- Repeat for other templates.
Repeat this process for each of the other templates you identified in your site diagram.
The result of this process should be a number of CSS files that you can readily reuse across your site.
Here's the CSS code for my primary page:
body {
background-color: #000000;
}
h1 {
text-align: center;
font-family: sans-serif;
color: white;
text-shadow: 0 0 10px black;
}
#all {
background-color: white;
border: 1px solid black;
width: 800px;
margin-top:2em;
margin-left: auto;
margin-right: auto;
min-height: 600px;
}
#heading {
background-color: #A11204;
background-image: url("cbBackground.png");
color: #FFFFFF;
height: 100px;
font-size: 2em;
padding-left: 1em;
border-bottom: 3px solid black;
margin-top: -1.5em;
}
#menu {
background-image: url("cbBackground.png");
background-color: #A11204;
color: #FFFFFF;
float: left;
width: 100px;
min-height: 500px;
}
#menu li {
list-style-type: none;
margin-left: -2em;
margin-right: .5em;
text-align: center;
}
#menu a {
color: #FFFFFF;
display: block;
border: #A11204 3px outset;
text-decoration: none;
}
#menu a:hover {
border: #A11204 3px inset;
}
.content {
border: 3px double #A11204;
margin: 1em;
margin-left: 110px;
padding-left: 1em;
padding-bottom: 1em;
padding-right: 1em;
border-radius: 5px;
box-shadow: 5px 5px 5px gray;
}
.content h2 {
background-color: #A11204;
background-image: url("cbBackground.png");
color: #FFFFFF;
text-align: right;
}
#footer {
color: #FFFFFF;
background-color: #000000;
border: 1px solid #A11204;
float: left;
clear: both;
width: 100%;
text-align: center;
}
Figure 2-6 shows the standard template with the CSS attached.

Figure 2-6: The HTML template looks good with the CSS attached.
Building a data framework
The examples throughout this chapter assumed that a large web project can be done in straight HTML and CSS. That's always a good starting point, but if your program needs data or interactivity, you probably have a data back end.
Most data-enabled sites fail because they weren't planned properly.
The reason is almost always that the data normalization wasn't incorporated into the plan early enough, and the other parts of the project inevitably depend on a well-planned data back end.
If you suspect your project will involve a database, you should follow these steps early in the process (during the early site-planning phase):
- Identify the true data problem to be solved.
Data gets complicated in a hurry. Determine why exactly you need the data on the site. Keep the data as simple as you can, or else you'll become overwhelmed.
- Identify data requirements in your site diagram.
Find out where on the site diagram you're getting data. Determine which data you're retrieving and record this information on the site diagram.
- Create a third normal form ER diagram.
Don't bother building a database until you're sure that you can create an ER diagram in third normal form. Check Book VI, Chapter 3 for details on this process. If you're spotty on data design, get help.
- Implement the data structure.
Create an SQL script that creates all the necessary data structures (including tables and views) and includes sample data. Implementing the design is easy after you've made it. (That seems to be a theme, doesn't it?)
- Create PHP middleware.
After the database is in place, you usually need PHP code to take requests, pass them to the database, and return the results. Most of the PHP code for the main site consists of simple queries from the database. If you can use AJAX or SSI, it simplifies the process because your PHP code doesn't have to create entire pages — it simply creates snippets of code.
See Chapter 3 of this minibook for help on implementing these technologies. - Consider update capabilities.
Usually, when you have a database, you need another part of the site to allow the client to update information. It's often an administrative site with password access. An administrative site is much more complex than the main site because it requires the ability to add, edit, and update records.
Fleshing Out the Project
If you completed all the steps in the preceding section, it becomes relatively easy to create the page: It's simply a matter of forming the copy into the templates you created, tying it all together, and launching the site.
Making the site live
Typically, you do the primary development on a server that isn't in public view. Follow these steps to take the site to production:
- Test your design.
Do some usability testing with real users. Watch people solve typical problems on the site and see what problems they encounter.
- Proofread everything.
Almost nothing demolishes credibility as quickly as sloppy writing. Get a quality proofreader or copy editor to look over everything on the site to check for typos and spelling errors. If your page contains a specific type of content (technical information or company policy, for example), have an expert familiar with the subject check the site for factual or content errors.
- Prepare the online hosting environment.
Be sure that you have the server space to handle your requirements. Make a copy of your database and test it. Check the domain name to be sure that you have no legal encumbrances.
- Move your site online.
Move the files from your development server to the main server.
- Test everything again.
Try a beta test, where your page is available to only a few people. Get input and feedback from these testers and incorporate the best suggestions.
- Ensure you have a maintenance agreement.
Websites are complicated, and they will have a long lifespan. Make sure you have an agreement in place that clearly indicates your ongoing relationship with the project. You should generally have the client sign off that the project is complete and build in some kind of contract for on-going support.
- Take a vacation. You earned it!
Contemplating efficiency
When you start working with the site, you'll probably encounter repeated code. For example, each page may have exactly the same title bar. You obviously don't want to write exactly the same code for 100 different pages because it might change, and you don't want to make the change in 100 different places. You have three options in this case:
- Use AJAX to import the repeated code. Follow the AJAX instructions in Chapter 3 of this minibook to import your header (or other repeated code).
- Use Server-Side Includes (SSI) to import code on the server. If your server allows it, you can use the SSI technology to import pages on the server without using a language like PHP. SSI is explained in Chapter 3 of this minibook.
- Build the pages with PHP. Put all segments in separate files and use a PHP script to tie them together. When you do this, you're creating a content management system, which is the topic of Chapters 3 and 5 of this minibook.