
Chapter 2
PHP and HTML Forms
In This Chapter
![]() Understanding the relationship between HTML and PHP
Understanding the relationship between HTML and PHP
![]() Using the date( ) function
Using the date( ) function
![]() Formatting date and time information
Formatting date and time information
![]() Creating HTML forms designed to work with PHP
Creating HTML forms designed to work with PHP
![]() Choosing between get and post data transmission
Choosing between get and post data transmission
![]() Retrieving data from your HTML forms
Retrieving data from your HTML forms
![]() Working with HTML form elements
Working with HTML form elements
PHP is almost never used on its own. PHP is usually used in tight conjunction with HTML. Many languages have features for creating input forms and user interfaces, but with PHP, the entire user experience is based on HTML. The user never really sees any PHP. Most of the input to PHP programs comes from HTML forms, and the output of a PHP program is an HTML page.
In this chapter, you discover how to integrate PHP and HTML. You explore how PHP code is embedded into HTML pages, how HTML forms can be written so they will send information to a PHP program, how to write a PHP program to read that data, and how to send an HTML response back to the user.
Exploring the Relationship between PHP and HTML
PHP is a different language than HTML, but the two are very closely related. It may be best to think of PHP as an extension that allows you to do things you cannot do easily in HTML. See Figure 2-1 for an example.

Figure 2-1: This program gives me the current date and time.
Every time you run getTime.php, it generates the current date and time and returns these values to the user. This would not be possible in ordinary HTML because the date and time (by definition) always change. While you could make this page using JavaScript, the PHP approach is useful for demonstrating how PHP works. First, take a look at the PHP code:
<!DOCTYPE html>
<html lang = "en-US">
<head>
<meta charset = "UTF-8">
<title>showDate.php</title>
</head>
<body>
<h1>Getting the Time, PHP Style</h1>
<?php
print "<h2>Date: ";
print date("m-d");
print "</h2>
";
print " <h2>Time: ";
print date("h:i");
print "</h2>";
?>
</body>
</html>
Embedding PHP inside HTML
The PHP code has some interesting characteristics:
- It's structured mainly as an HTML document. The doctype definition, document heading, and initial H1 heading are all ordinary HTML. Begin your page as you do any HTML document. A PHP page can have as much HTML code as you wish. (You might have no PHP at all!) The only thing the PHP designation does is inform the server that PHP code may be embedded into the document.
- PHP code is embedded into the page. You can switch from HTML to PHP with the <?php tag. Signify the end of the PHP code with the ?> symbol.
- The PHP code creates HTML. PHP is usually used to create HTML code. In effect, PHP takes over and prints out the part of the page that can't be created in static HTML. The result of a PHP fragment is usually HTML code.
- The date()function returns the current date with a specific format. The format string indicates how the date should be displayed. (See the sidebar “Exploring the date( ) format function,” in this chapter, for more information about date formatting.)
- The result of the PHP code will be an HTML document. When the PHP code is finished, it will be replaced by HTML code.
Viewing the results
If you view showDate.php in your browser, you won't see the PHP code. Instead, you'll see an HTML page. It's even more interesting when you use your browser to view the page source. Here's what you'll see:
<!DOCTYPE html>
<html lang = "en-US">
<head>
<meta charset = "UTF-8">
<title>showDate.php</title>
</head>
<body>
<h1>Getting the Time, PHP Style</h1>
<h2>Date: 07-05</h2>
<h2>Time: 03:50</h2>
</body>
</html>
The remarkable thing is what you don't see. When you look at the source of showDate.php in your browser, the PHP is completely gone! This is one of the most important points about PHP: The browser never sees any of the PHP. The PHP code is converted completely to HTML before anything is sent to the browser. This means that you don't need to worry about whether a user's browser understands PHP. Because the user never sees your PHP code (even if he views the HTML source), PHP code works on any browser, and is a touch more secure than client-side code.
Sending Data to a PHP Program
You can send data to a PHP program from an HTML form. For an example of this technique, see askName.html in Figure 2-2.

Figure 2-2: This HTML page has a simple form.
HTML forms (described fully in Book I, Chapter 7) allow the user to enter data onto a web page. However, HTML cannot respond to a form on its own. You need some sort of program to respond to the form. Book IV describes how to use JavaScript to respond to forms, but you can also write PHP code to handle form-based input. When the user submits the form, the askName.html disappears completely from the browser and is replaced with greetUser.php, as shown in Figure 2-3.
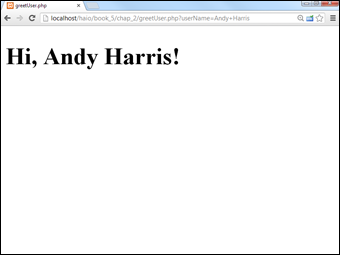
Figure 2-3: This program uses the entry from the previous form.
The greetUser.php program retrieves the data from the previous page (askName.html, in this case) and returns an appropriate greeting.
Creating a form for PHP processing
The askName.html program is a standard HTML form, but it has a couple of special features which make it suitable for PHP processing. (See Book I, Chapter 7 for more information about how to build HTML forms.) Here is the HTML code:
<!DOCTYPE html>
<html lang = "en-US">
<head>
<meta charset = "UTF-8">
<title>askName.html</title>
</head>
<body>
<form action = "greetUser.php"
method = "get">
<fieldset>
<label>Please enter your name</label>
<input type = "text"
name = "userName" />
<button type = "submit">
submit
</button>
</fieldset>
</form>
</body>
</html>
To build a form designed to work with PHP, there are a few special steps to take:
- Write an HTML page as the framework.
This page is a regular HTML page. Begin with the same HTML framework you use for building your standard HTML pages. You can use CSS styles, if you wish (but I'm leaving them out of this simple example).
 Normally, you can create an HTML document anywhere you want, but this is not so when your page will be working with PHP. This page is meant to be paired with a PHP document. PHP documents will run only if they are in a server's file space, so you should save your HTML document under htdocs to be sure it will call the PHP form correctly.
 - Set the form's action property to point to a PHP program.
The form element has an attribute called action. The action attribute is used to determine which program should receive the data transmitted by the form. I want this data to be processed by a program called greetUser.php, so I set greetUser.php as the action:
<form action = "greetUser.php"
method = "get"> - Set the form's method attribute to get.
The method attribute indicates how the form data will be sent to the server. For now, use the get method. See the section “Choosing the Method of Your Madness,” later in this chapter, for information on the various methods available:
<form action = "greetUser.php"
method = "get"> - Add any input elements your form needs.
The point of a form is to get information from the user and send it to a program on the server. Devise a form to ask whatever questions you want from the server. My form is as simple as possible, with one text field, but you can use any HTML form elements you want:
<form action = "greetUser.php"
method = "get">
<fieldset>
<label>Please enter your name</label>
<input type = "text"
name = "userName" />
<button type = "submit">
submit
</button>
</fieldset> - Give each element a name attribute.
If you want a form element to be passed to the server, you must give it a name attribute. Note: This is a different attribute than id, which is used in client-side processing.
<input type = "text"
name = "userName" />The name attribute will be used by the PHP program to extract the information from the form.
 A form element can have both a name and an ID, if you wish. The name attribute will be used primarily by server-side programs, and the id attribute is mainly used for CSS and JavaScript. The name and ID can (and usually do) have the same value.
 - Add a submit button to the page.
The most important difference between a client-side form and a form destined for processing on the server is the button. A special submit button packages all the data in the form and passes it to the program indicated in the action property. Submit buttons can be created in two forms:
<input type = "submit" value = "click me"/>
or
<button type = "submit">click me</button>
Specify submit as the button's type attribute to ensure the button sends the data to the server.
 If your form has a submit button and a blank action attribute, the current page will be reloaded.
Receiving data in PHP
PHP code is usually a two-step process. First, you create an HTML form, and then you send that form to a PHP program for processing. Be sure to read the previous section on “Creating a form for PHP processing” because now I show you how to read that form with a PHP program.
The HTML form in the last section pointed to a program named greetUser.php. This tells the server to go to the same directory that contained the original HTML document (askName.html) and look for a program named greetUser.php in that directory. Because greetUser is a PHP program, the server passes it through PHP, which will extract data from the form. The program then creates a greeting using data that came from the form. Look over all the code for greetUser.php before I explain it in more detail:
<!DOCTYPE html>
<html lang = "en-US">
<head>
<meta charset = "UTF-8">
<title>greetUser.php</title>
</head>
<body>
<?php
$userName = filter_input(INPUT_GET, "userName");
print "<h1>Hi, $userName!</h1>";
?>
</body>
</html>
greetUser.php is not a complex program, but it shows the most common use of PHP: retrieving data from a form. Here's how you build it:
- Build a new PHP program.
This program should be in the same directory as askName.html, which should be somewhere the server can find (usually under the htdocs or public_html directory).
- Start with ordinary HTML.
PHP programs are usually wrapped inside ordinary HTML, so begin the document as if it were plain HTML. Use whatever CSS styling and ordinary HTML tags you want. (I'm keeping this example as simple as possible, although I'd normally add some CSS styles to make the output less boring.)
- Add a PHP segment.
Somewhere in the page, you'll need to switch to PHP syntax so that you can extract the data from the form. Use the <?php symbol to indicate the beginning of your PHP code:
<?php
$userName = filter_input(INPUT_GET, "userName");
print "<h1>Hi, $userName!</h1>";
?> - Extract the username variable.
All of the data that was sent from the form is stored in a special variable in memory. There are a number of ways to extract that data, but the preferred method is to use the filter_input() function as I have done here. This function takes two parameters: The first is a constant determining the type of input (I'm looking for input passed through the GET mechanism here). The second parameter is the name associated with the form element. Typically you'll make a PHP variable with the same name as the corresponding form element.
See the upcoming section “Getting data from the form” for more information on the filter_input() mechanism and some of the other tools that are available for retrieving information.
- Print the greeting.
Now, your PHP program has a variable containing the user's name, so you can print a greeting to the user. Remember that all output of a PHP program is HTML code, so be sure to embed your output in a suitable HTML tag. I'm putting the greeting inside a level-one heading:
print "<h1>Hi, $userName!</h1>";
The greetUser.php script is not meant to be run directly. It relies on askName.html. If you provide a direct link to greetUser.php, the program will run, but it will not be sent the username, so it will not work as expected. Do not place links to your PHP scripts unless you designed them to work without input. On this book's companion website, you'll find a link to the source code of each of my PHP files, but most of them cannot be run directly, but must be called by an HTML file. See this book's Introduction for more on the website.
Choosing the Method of Your Madness
The key to server-side processing is adding method and action properties to your HTML form. You have two primary choices for the method property:
- GET: The get method gathers the information in your form and appends it to the URL. The PHP program extracts form data from the address. The contents of the form are visible for anyone to see.
- POST: The post method passes the data to the server through a mechanism called environment variables. This mechanism makes the form elements slightly more secure because they aren't displayed in public as they are with the get method.
Using get to send data
The get method is easy to understand. View getRequest.php after it has been called from askName.html in Figure 2-4. Pay careful attention to the URL in the address bar.

Figure 2-4: The address has been modified!
The address sent to the PHP program has additional material appended:
http://localhost/haio/book_5/chap_2/greetUser.php?userName=Andy+Harris
Most of this address is the (admittedly convoluted) address of the page on my test server. The interesting part is the section after greetUser.php:
greetUser.php?userName=Andy+Harris
This line shows exactly how the get method passes information to the program on the server:
- The URL is extracted from the form action property. When the submit button is activated, the browser automatically creates a special URL beginning with the action property of the form. The default address is the same directory as the original HTML file.
- A question mark indicates form data is on the way. The browser appends a question mark to the URL to indicate form data follows.
- Each field/value pair is listed. The question mark is followed by each field name and its associated value in the following format:
URL?field1=value1&field2=value2
- An equal sign (=) follows each field name. Each field name is separated by the value of that field with an equal sign (and no spaces).
- The field value is listed immediately after the equal sign. The value of each field follows the equal sign.
- Spaces are converted to hexadecimal symbols. get data is transmitted through the URL, and URLS are not allowed to have spaces or other special characters in them. The browser automatically converts all spaces in field names or values to values it can manage, often converting spaces to special characters. Fortunately, the decoding process removes these special characters, so it's not something you need to worry about.
Sometimes, the spaces are converted to %20 symbols, rather than + signs. It isn't really that important because the conversion is done automatically. Just know that URLs can't contain spaces.
- An ampersand (&) is used to add a new field name/value pair. This particular example (the URL created by askName.html) has only one name/value pair. If the form had more elements, they would all be separated by ampersands.
You don't have to do any of the URL formatting. It automatically happens when the user clicks the submit button. You'll also never have to decode all this, as PHP will do it for you.
If you understand how the get method works, you can take advantage of it to send data to programs without the original form. For example, take a look at this address:
http://www.google.com/search?q=dramatic+chipmunk
If you type this code into your browser's location bar, you'll get the Google search results for a classic five-second video. (If you haven't seen this video, it's worth viewing.) If you know a particular server-side program (like Google's search engine) uses the get protocol, and you know which fields are needed (q stands for the query in Google's program), you can send a request to a program as if that request came from a form.
You can also write a link with a preloaded search query in it:
<a href = "http://www.google.com/search/q=dramatic+chipmunk">
Google search for the dramatic chipmunk
</a>
If a user clicks the resulting link, he would get the current Google search for the dramatic chipmunk video. (Really, it's a prairie dog, but “dramatic chipmunk” just sounds better.)
Of course, if you can send requests to a program without using the intended form, others can do the same to you. You can never be 100 percent sure that people are sending requests from your forms. This can cause some problems. Look at the next section for a technique to minimize this problem by reading only data sent via the post method.
Using the post method to transmit form data
The GET method is easy to understand because it sends all data directly in the URL. This makes it easy to see what's going on, but there are some downsides to using get:
- The resulting URL can be very messy. Addresses on the web can already be difficult without the added details of a get request. A form with several fields can make the URL so long that it's virtually impossible to follow.
- All form information is user-readable. The get method displays form data in the URL, where it can easily be read by the user. This may not be desired, especially when the form sends potentially sensitive data.
- The amount of information that can be passed is limited. Some servers won't accept URLs longer than 4,000 characters. If you have a form with many fields or with fields that contain a lot of data, you will easily exceed this limit.
The answer to the limitations of the get method is another form of data transmission: the post method.
Here’s how it works:
- You specify that the form's method will be POST. You create the HTML form in exactly the same way. The only difference is the form method attribute. Set it to post:
<form action = "greetUser.php"
method = "post"> - Data is gathered and encoded, just like it is in the get method. When the user clicks the submit button, the data is encoded in a format similar to the get request, but it's not attached to the URL.
- The form data is sent directly to the server. The PHP program can still retrieve the data (usually through a mechanism called environment variables) even though the data is not encoded on the URL. Again, you won't be responsible for the details of extracting the data. PHP makes it pretty easy.
The post method is often preferable to get because
- The URL is not polluted with form data. The data is no longer passed through the URL, so the resulting URL is a lot cleaner than one generated by the get method.
- The data is not visible to the user. Because the data isn't presented in the URL, it's slightly more secure than get data.
- There is no practical size limit. The size of the URL isn't a limiting factor. If your page will be sending a large amount of data, the post method is preferred.
 With all these advantages, you might wonder why anybody uses get at all. Really, there are two good reasons. The get approach allows you to embed requests in URLs (which can't be done with post). Also, get is sometimes a better choice for debugging because it's easier to see what's being passed to the server.
Getting data from the form
The preferred way to extract data from the form is the filter_input() function. This powerful tool not only extracts data from the form, but it also protects against certain kinds of attacks and allows you to sanitize your data before you use it. Filter input requires two or three parameters:
- The input type constant: The first parameter is a constant describing where the data can be found. Most often, this value is INPUT_GET or INPUT_POST. A few other values are available (INPUT_COOKIE and INPUT_ENV) but they are rarely used. A couple of very useful values are not yet implemented (INPUT_SESSION and INPUT_REQUEST).
- A variable name: This is the name attribute from the form which called this program. If the name is misspelled or does not exist, the results will be unpredictable (see Chapter 3 of this minibook on how to handle this situation). The variable name must have the same case as the HTML form element name, must be encased in quotes, and does not include the dollar sign because this is an HTML variable rather than a PHP variable. Typically you'll pass the result of the filter_input() function to a PHP variable with the same name as the form element.
- An optional filter: You can specify one of a number of filters to pass input through before processing. These filters come in two main flavors:
Sanitizing filters all begin with the phrase FILTER_SANITIZE, and they are designed to strip off various types of characters. FILTER_SANITIZE_STRING removes or converts any special characters, and FILTER_SANITIZE_EMAIL removes any character not allowed in an e-mail address. There are filters for all the main data types (int and float) as well as special web-specific filters (e-mail, URL, special HTML characters).
Validation filters do not actually load the value, but check to see that it is in an acceptable format. They all begin with FILTER_VALIDATE and return a Boolean expressing whether the variable passed the validation. Typically you'll validate a variable before you accept it to prevent hackers from passing malicious code to your programs.
If you don't indicate a filter, the FILTER_SANITIZE_STRING filter is automatically applied, which does give you one level of protection. A list of the most commonly used filters is presented in Table 2-1.
Table 2-1 Standard PHP Filters
Filter
Description
FILTER_SANITIZE_STRING
Strips tags, encodes or removes special characters.
FILTER_SANITIZE_SPECIAL_CHARS
Converts HTML special characters (<>&) with ASCII equivalents.
FILTER_SANITIZE_EMAIL
Removes any characters not allowed in an e-mail address.
FILTER_SANITIZE_URL
Removes any characters not allowed in a URL.
FILTER_SANITIZE_NUMBER_INT
Removes all characters but numeric digits and sign (+/-) symbols
FILTER_SANITIZE_NUMBER_INT
Removes all characters but numeric digits, periods, commas, and sign (+/-) symbols.
FILTER_VALIDATE_INT
True if input is an int.
FILTER_VALIDATE_FLOAT
True if input is a floating point value.
FILTER_VALIDATE_BOOLEAN
True if input can be read as a Boolean (true/false, on/off, yes/no, 1/0). Returns NULL if input is non-Boolean.
FILTER_VALIDATE_URL
True if input is a legal URL (doesn't check the address).
FILTER_VALIDATE_EMAIL
True if input is a legal e-mail address (doesn't check the address).
FILTER_VALIDATE_IP
True if input is a valid IP address (doesn't check the address).
FILTER_VALIDATE_REGEXP
True if input matches a given regular expression. (See more about regular expressions in Book IV, Chapter 5.)
There are few more filters, and some have optional parameters, so you may need to look at the online documentation to get all the details. Ninety percent of the time, you'll just stick with the default FILTER_SANITIZE_STRING filter.
Retrieving Data from Other Form Elements
It's just as easy to get data from drop-down lists and radio buttons as it is to get data from text fields. In PHP (unlike JavaScript), you use exactly the same technique to extract data from any type of form element.
Building a form with complex elements
For an example of a more complex form, look over monty.html in Figure 2-5. This program is a tribute to my favorite movie of all time. (You might just have to rent this movie if you're really going to call yourself a programmer. It's part of the culture.)
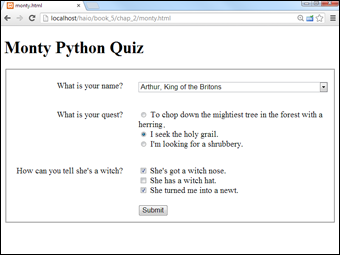
Figure 2-5: The Monty Python quiz features a drop-down list, radio buttons, and check boxes (and a newt).
The HTML form poses the questions. (Check out Book I, Chapter 7 for a refresher on HTML forms, if you need it.) Here's the code:
<!DOCTYPE html>
<html lang = "en-US">
<head>
<meta charset = "UTF-8">
<title>monty.html</title>
<link rel = "stylesheet"
type = "text/css"
href = "monty.css" />
</head>
<body>
<h1>Monty Python Quiz</h1>
<form action = "monty.php"
method = "post">
<fieldset>
<p>
<label>What is your name?</label>
<select name = "name">
<option value = "Roger">
Roger the Shrubber
</option>
<option value = "Arthur">
Arthur, King of the Britons
</option>
<option value = "Tim">
Tim the Enchanter
</option>
</select>
</p>
<p>
<label>What is your quest?</label>
<span>
<input type = "radio"
name = "quest"
value = "herring" />
To chop down the mightiest tree in the forest
with a herring
</span>
<span>
<input type = "radio"
name = "quest"
value = "grail" />
I seek the holy grail.
</span>
<span>
<input type = "radio"
name = "quest"
value = "shrubbery" />
I'm looking for a shrubbery.
</span>
</p>
<p>
<label>How can you tell she's a witch?</label>
<span>
<input type = "checkbox"
name = "nose"
value = "nose"/>
She's got a witch nose.
</span>
<span>
<input type = "checkbox"
name = "hat"
value = "hat"/>
She has a witch hat.
</span>
<span>
<input type = "checkbox"
name = "newt"
value = "newt" />
She turned me into a newt.
</span>
</p>
<button type = "submit">
Submit
</button>
</fieldset>
</form>
</body>
</html>
There's nothing too crazy about this code. Please note the following features:
- The action attribute is set to monty.php. This page (monty.html) will send data to monty.php, which should be in the same directory on the same server.
- The method attribute is set to post. All data on this page will be passed to the server via the post method.
- Each form element has a name attribute. The name attributes will be used to extract the data in the PHP program.
- All the radio buttons have the same name value. The way you get radio buttons to work together is to give them all the same name. And although they all have the same name, each has a different value. When the PHP program receives the request, it will get only the value of the selected radio button.
- Each check box has an individual name. Check boxes are a little bit different. Each check box has its own name, but the value is sent to the server only if the check box is checked.
I don't cover text areas, passwords fields, or hidden fields here because, to PHP, they are just like text boxes. Retrieve data from these elements just like you do for text fields.
Responding to a complex form
The monty.php program is designed to respond to monty.html. You can see it respond when I submit the form in monty.html, as shown in Figure 2-6.

Figure 2-6: The monty.php program responds to the Monty Python quiz.
It's no coincidence that monty.html uses monty.css and calls monty.php. I deliberately gave these files similar names so it will be easy to see how they fit together.
This program works like most PHP programs: It loads data from the form into variables and assembles output based on those variables. Here's the PHP code:
<!DOCTYPE html>
<html lang = "en-US">
<head>
<meta charset = "UTF-8">
<title>monty.php</title>
<!-- Meant to run from monty.html -->
</head>
<body>
<h1>Monty Python quiz results</h1>
<?php
//gather the variables
$name = filter_input(INPUT_POST, "name");
$quest = filter_input(INPUT_POST, "quest");
//don't worry about check boxes yet; they may not exist
//send some output
$reply = <<< HERE
<p>
Your name is $name.
</p>
<p>
Your quest is $quest.
</p>
HERE;
print $reply;
//determine if she's a witch
$witch = false;
//See if check boxes exist
if (filter_has_var(INPUT_POST, "nose")){
$witch = true;
}
if (filter_has_var(INPUT_POST, "hat")){
$witch = true;
}
if (filter_has_var(INPUT_POST, "newt")){
$witch = true;
}
if ($witch == true){
print "<p>She's a witch!</p>
";
} // end if
?>
</body>
</html>
If you want to respond to a form with multiple types of data, here's how it's done:
- Begin with the HTML form.
Be sure you know the names of all the fields in the form because your PHP program will need this information.
- Embed your PHP inside an HTML framework.
Use your standard HTML framework as the starting point for your PHP documents, too. The results of your PHP code should still be standards-compliant HTML. Use the <?php and ?> symbols to indicate the presence of PHP code.
- Create a variable for each form element.
Use the $_REQUEST technique described in the “Receiving data in PHP” section of this chapter to extract form data and store it in local variables:
//gather the variables
$name = filter_input(INPUT_POST, "name");
$quest = filter_input(INPUT_POST, "quest");Don't worry about the check boxes yet. Later on, you'll determine whether they exist. You don't really care about their values.
- Build your output in a heredoc.
PHP programming almost always involves constructing an HTML document influenced by the variables that were extracted from the previous form. The heredoc method (described in Chapter 1 of this minibook) is an ideal method for packaging output:
//send some output
[ $reply = <<< HERE
[ <p>
Your name is $name.
</p>
<p>
Your quest is $quest.
</p>
[HERE;
[ print $reply; - Check for the existence of each check box.
Check boxes are the one exception to the “treat all form elements the same way” rule of PHP. The important part of a check box isn't really its value. What you really need to know is whether the check box is checked. Here's how it works: If the check box is checked, a name and value are passed to the PHP program. If the check box is not checked, it's like the variable never existed:
- Create a variable called $witch set to false. Assume innocent until proven guilty in this witch hunt.
Each check box, if checked, would be proof that she’s a witch. The filter_has_var() function is used to determine whether a particular variable exists. This function takes an input type and a variable name (just like filter_input()) and returns true if the variable exists and false if it doesn’t.
- Check each check box variable. If it exists, the corresponding check box was checked, so she must be a witch (and she must weigh the same as a duck — you've really got to watch this movie).
After testing for the existence of all the check boxes, the $witch variable will still be false if none of the check boxes were checked. If any combination of check boxes is checked, $witch will be true:
//determine if she's a witch
$witch = false;
//See if check boxes exist
if (filter_has_var(INPUT_POST, "nose")){
$witch = true;
}
if (filter_has_var(INPUT_POST, "hat")){
$witch = true;
}
if (filter_has_var(INPUT_POST, "newt")){
$witch = true;
}
if ($witch == true){
print "<p>She's a witch!</p> ";
} // end if
- Create a variable called $witch set to false. Assume innocent until proven guilty in this witch hunt.
Before the filter_has_var() mechanism became available, programmers used another function called isset() to determine if a variable existed. Either is fine, but for this book I stick with the filter mechanisms for consistency.