
Chapter 1
Coloring Your World
In This Chapter
![]() Introducing the style element
Introducing the style element
![]() Adding styles to tags
Adding styles to tags
![]() Modifying your page dynamically
Modifying your page dynamically
![]() Specifying foreground and background colors
Specifying foreground and background colors
![]() Understanding hex colors
Understanding hex colors
![]() Appreciating HSL colors
Appreciating HSL colors
![]() Developing a color scheme
Developing a color scheme
HTML does a good job of setting up the basic design of a page, but face it: The pages it makes are pretty ugly. In the old days, developers added a lot of other tags to HTML to make it prettier, but changing the design with HTML code was a haphazard affair. Now, HTML disallows all the tags that made pages more attractive. That sounds bad, but it isn't really a loss. Today, HTML is almost always written in concert with CSS (Cascading Style Sheets). It's amazing how much you can do with CSS to beautify your HTML pages.
CSS allows you to change the color of any image on the page, add backgrounds and borders, change the visual appearance of elements (like lists and links), as well as customize the entire layout of your page. Additionally, CSS allows you to keep your HTML simple because all the formatting is stored in the CSS. CSS is efficient, too, because it allows you to reuse a style across multiple elements and pages. If HTML gives your pages structure, CSS gives them beauty.
This chapter gets you started by describing how to add color to your pages.
Now You Have an Element of Style
The secret to CSS is the style sheet, a set of rules for describing how various objects will display. For example, look at basicColors.html in Figure 1-1.
 As always, don't take my word for it. This chapter is about color, and you need to look at these pages from the companion website to see what I'm talking about. See this book's Introduction for more on the companion website.

Figure 1-1: This page is in color!
Nothing in the HTML code provides color information. What makes this page different from plain HTML pages is a new section that I've stashed in the header. Take a gander at the code to see what's going on (interesting part is in bold):
<!DOCTYPE html>
<html lang = "en-US">
<head>
<meta charset = "UTF-8">
<title>basicColors.html</title>
<style type = "text/css">
body {
color: yellow;
background-color: red;
}
h1 {
color: red;
background-color: yellow;
}
</style>
</head>
<body>
<h1>Red text on a yellow background</h1>
<p>
Yellow text on a red background
</p>
</body>
</html>
As you can see, nothing is dramatically different in the HTML code. The body simply contains an h1 and a p. Although the text mentions the colors, nothing in the HTML code makes the colors really happen.
The secret is the new <style></style> pair I put in the header area:
<style type = "text/css">
body {
color: yellow;
background-color: red;
}
h1 {
color: red;
background-color: yellow;
}
</style>
The <style> tag is an HTML tag, but what it does is special: It switches languages! Inside the style elements, you're not writing HTML anymore. You're in a whole new language — CSS. CSS has a different job than HTML, but they're made to work well together.
 It may seem that the CSS code is still part of HTML because it's inside the HTML page, but it's best to think of HTML and CSS as two distinct (if related) languages. HTML describes the content, and CSS describes the layout. CSS (as you soon see) has a different syntax and style than HTML and isn't always embedded in the web page.
Setting up a style sheet
Style sheets describe presentation rules for HTML elements. If you look at the preceding style sheet (the code inside the <style> tags), you can see that I've described presentation rules for two elements: the <body> and <h1> tags. Whenever the browser encounters one of these tags, it attempts to use these style rules to change that tag's visual appearance.
Styles are simply a list of selectors (places in the page that you want to modify). For now, I use tag names (body and h1) as selectors. However, in Chapter 3 of this minibook, I show many more selectors that you can use.
Each selector can have a number of style rules. Each rule describes some attribute of the selector. To set up a style, keep the following in mind:
- Begin with the style tags. The type of style you'll be working with for now is embedded into the page. You should describe your style in the header area.
- Include the style type in the header area. The style type is always “text/css”. The beginning <style> tag always looks like this:
<style type = "text/css">
- Define an element. Use the element name (the tag name alone) to begin the definition of a particular element's style. You can define styles for all the HTML elements (and other things, too, but not today). The selector for the body is designated like this:
body {
- Use braces ({}) to enclose the style rules. Each style's rules are enclosed in a set of braces. Similar to many programming languages, braces mark off special sections of code. It's traditional to indent inside the braces.
- Give a rule name. In this chapter, I'm working with two very simple rules: color and background-color. Throughout this minibook, you can read about many more CSS rules (sometimes called attributes) that you can modify. A colon (:) character always follows the rule name.
- Enter the rule's value. Different rules take different values. The attribute value is followed by a semicolon. Traditionally, each name-value pair is on one line, like this:
body {
color: yellow;
background-color: red;
}
Changing the colors
In this very simple example, I just changed some colors around. Here are the two primary color attributes in CSS:
- color: This refers to the foreground color of any text in the element.
- background-color: The background color of the element. (The hyphen is a formal part of the name. If you leave it out, the browser won't know what you're talking about.)
With these two elements, you can specify the color of any element. For example, if you want all your paragraphs to have white text on a blue background, add the following text to your style:
p {
color: white;
background-color: blue;
}
CSS is case-sensitive. CSS styles should be written entirely in lowercase.
You'll figure out many more style elements in your travels, but they all follow the same principles illustrated by the color attributes.
Specifying Colors in CSS
Here are the two main ways to define colors in CSS. You can use color names, such as pink and fuchsia, or you can use hex values. (Later in this chapter, in the section “Creating Your Own Color Scheme,” you find out how to use special numeric designators to choose colors.) Each approach has its advantages.
Using color names
Color names seem like the easiest solution, and, for basic colors like red and yellow, they work fine. However, here are some problems with color names that make them troublesome for web developers:
- Only 16 color names will validate. Although most browsers accept hundreds of color names, only 16 are guaranteed to validate in CSS and HTML validators. See Table 1-1 for a list of those 16 colors.
- Color names are somewhat subjective. You'll find different opinions on what exactly constitutes any particular color, especially when you get to the more obscure colors. (I personally wasn't aware that PeachPuff and PapayaWhip are colors. They sound more like dessert recipes to me.)
- It can be difficult to modify a color. For example, what color is a tad bluer than Gainsboro? (Yeah, that's a color name, too. I had no idea how extensive my color disability really was.)
- They're hard to match. Say you're building an online shrine to your cat and you want the text to match your cat's eye color. It'll be hard to figure out exactly what color name corresponds to your cat's eyes. I guess you could ask the cat.
Hex color values can be indicated in uppercase or lowercase. The mysterious hex codes are included in this table for completeness. It's okay if you don't understand what they're about. All is revealed in the next section.
Table 1-1 Legal Color Names and Hex Equivalents
|
Color |
Hex Value |
|
Black |
#000000 |
|
Silver |
#C0C0C0 |
|
Gray |
#808080 |
|
White |
#FFFFFF |
|
Maroon |
#800000 |
|
Red |
#FF0000 |
|
Purple |
#800080 |
|
Fuchsia |
#FF00FF |
|
Green |
#008800 |
|
Lime |
#00FF00 |
|
Olive |
#808000 |
|
Yellow |
#FFFF00 |
|
Navy |
#000080 |
|
Blue |
#0000FF |
|
Teal |
#008080 |
|
Aqua |
#00FFFF |
Obviously, I can't show you actual colors in this black-and-white book, so I added a simple page to this book's companion website that displays all the named colors. Check namedColors.html to see the actual colors, and see this book's Introduction for information on how to access the website.
Putting a hex on your colors
Colors in HTML are a strange thing. The “easy” way (with color names) turns out to have many problems. The method most web developers really use sounds a lot harder, but it isn't as bad as it may seem at first. The hex color scheme uses a seemingly bizarre combination of numbers and letters to determine color values. #00FFFF is aqua. #FFFF00 is yellow. It's a scheme only a computer scientist could love. Yet, after you get used to it, you'll find the system has its own geeky charm. (And isn't geeky charm the best kind?)
Hex colors work by describing exactly what the computer is doing, so you have to know a little more about how computers work with color. Each dot (or pixel) on the screen is actually composed of three tiny beams of light (or LCD diodes or something similar). Each pixel has tiny red, green, and blue beams.
The light beams work kind of like stage lights. Imagine a black stage with three spotlights (red, green, and blue) trained on the same spot. If all the lights are off, the stage is completely dark. If you turn on only the red light, you see red. You can turn on combinations to get new colors. For example, turning on red and green creates a spot of yellow light. Turning on all three lights makes white.
Coloring by number
In a computer system, each of the little lights can be adjusted to various levels of brightness. These values measure from 0 (all the way off) to 255 (all the way on). Therefore, you could describe red as rgb(255, 0, 0) and yellow as rgb(255, 255, 0).
The 0 to 255 range of values seems strange because you're probably used to base 10 mathematics. The computer actually stores values in binary notation. The way a computer sees it, yellow is actually 111111111111111100000000. Ack! There has to be an easier way to handle all those binary values. That's why we use hexadecimal notation. Read on. . . .
Figure 1-2 shows a page which allows you to pick colors with red, green, and blue sliders. Each slider shows its value in base 10 as well as in hexadecimal.

Figure 1-2: Play with this program to see the various colors you can use.
 The colorChooser program shown in Figure 1-2 uses technology that will be described in Book IV. Any page that interacts with the user will tend to use a programming language (in this case, JavaScript). Feel free to look over the code, but don't worry if you're not yet ready to add programming to your sites. You'll get there soon enough, I promise.
Hex education
All those 1s and 0s get tedious. Programmers like to convert to another format that's easier to work with. Believe it or not, it's easier to convert binary numbers to base 16 than base 10, so that's what programmers do. You can survive just fine without understanding base 16 (also called hexadecimal or hex) conversion, but you should understand a few key features, such as:
- Each hex digit is shorthand for four digits of binary. The whole reason programmers use hex is to simplify working with binary.
- Each digit represents a value between 0 and 15. Four digits of binary represent a value between 0 and 15.
- We have to invent some digits. The whole reason hex looks so weird is the inclusion of characters. This is for a simple reason: There aren't enough numeric digits to go around! Table 1-2 illustrates the basic problem.
Table 1-2 Hex Representation of Base Ten Numbers
|
Decimal (Base 10) |
Hex (Base 16) |
|
0 |
0 |
|
1 |
1 |
|
2 |
2 |
|
3 |
3 |
|
4 |
4 |
|
5 |
5 |
|
6 |
6 |
|
7 |
7 |
|
8 |
8 |
|
9 |
9 |
|
10 |
A |
|
11 |
B |
|
12 |
C |
|
13 |
D |
|
14 |
E |
|
15 |
F |
The ordinary digits 0–9 are the same in hex as they are in base 10, but the values from 10–15 (base ten) are represented by alphabetic characters in hexadecimal.
You're very used to seeing the value 10 as equal to the number of fingers on both hands, but that's not always the case when you start messing around with numbering systems like we're doing here. The number 10 simply means one of the current base. Until now, you may have never used any base but base ten, but all that changes today. The numeral 10 is ten in base ten, but in base two, 10 means two. In base eight, 10 means eight, and in base sixteen, 10 means sixteen. This is important because when you want to talk about the number of digits on your hands in hex, you can't use the familiar notation 10 because in hex 10 means sixteen. We need a single-digit value to represent ten, so computer scientists legislated themselves out of this mess by borrowing letters. 10 is A, 11 is B, and 15 is F.
If all this math theory is making you dizzy, don't worry. I show in the next section some shortcuts for creating great colors using this scheme. For now, though, here's what you need to understand to use hex colors:
- A color requires six digits of hex. A pixel requires three colors, and each color uses eight digits of binary. Two digits of hex cover each color. Two digits represent red, two for green, and finally two for blue.
- Hex color values usually begin with a pound sign. To warn the browser that a value will be in hexadecimal, the value is usually preceded with a pound sign (#). So, yellow is #FFFF00.
Working with colors in hex may seem really crazy and difficult, but it has some important advantages:
- Precision: Using this system gives you a huge number of colors to work with (over 16 million, if you really want to know). There's no way you could come up with that many color names on your own. Well, you could, but you'd be very, very old by the time you were done.
- Objectivity: Hex values aren't a matter of opinion. There could be some argument about which color is burnt sienna, but hex value #666600 is unambiguous.
- Portability: Most graphic editing software uses the hex system, so you can pick any color of an image and get its hex value immediately. This would make it easy to find your cat's eye color for that online shrine.
- Predictability: After you understand how it works, you can take any hex color and convert it to a value that's a little darker, a little brighter, or that has a little more blue in it. This is difficult to do with named colors.
- Ease of use: This one may seem like a stretch, but after you understand the web-safe palette, which I describe in the next section, it's very easy to get a rough idea of a color and then tweak it to make exactly the form you're looking for.
Using the web-safe color palette
A long time ago, browsers couldn't even agree on what colors they'd display reliably. Web developers responded by working within a predefined palette of colors that worked pretty much the same on every browser. Today's browsers have no problems showing lots of colors, but the so-called web-safe color palette is still sometimes used because it's an easy starting point.
The basic idea of the web-safe palette (shown in Table 1-3) is this: Each color can have only one of the following values: 00, 33, 66, 99, CC, or FF. 00 is the darkest value for each color, and FF is the brightest. The primary colors are all made of 0s and Fs: #FF0000 is red (all red, no green, no blue). A web-safe color uses any combination of these values, so #33CC00 is web-safe, but #112233 is not.


To pick a web-safe value from this chart, determine how much of each color you want. A bright red will have red turned on all the way (FF) with no green (00) and no blue (00), making #FF0000. If you want a darker red, you might turn the red down a little. The next darker web-safe red is #CC0000. If that isn't dark enough, you might try #990000. Say you like that, but you want it a little purple. Simply add a notch or two of blue: #990033 or #990066.
Figure 1-3 is a simple tool that allows you to experiment with the web-safe color palette.
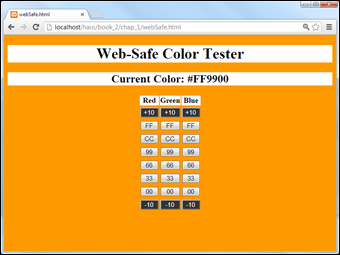
Figure 1-3: Use this tool to explore web-safe colors.
The original problem web-safe colors were designed to alleviate is long resolved, but they're still popular as a starting point. Web-safe colors give you a dispersed and easily understood subset of colors you can start with. You don't have to stay there, but it's a great place to start.
Choosing Your Colors
Colors can seem overwhelming, but with a little bit of practice, you'll be managing colors with style.
Starting with web-safe colors
The webSafe.html program works by letting you quickly enter a web-safe value. To make red, press the FF button in the red column. The blue and green values have the default value of 00, so the background is red.
The web-safe colors give you a lot of room to play, and they're very easy to work with. In fact, they're so common that you can use a shortcut. Because the web-safe colors are all repeated, you can write a repeated digit (FF) as a single digit (F). You can specify magenta as either #FF00FF or as #FOF and the browser understands, giving you a headache-inducing magenta.
To make a darker red, change the FF to the next smallest value, making #CC0000. If you want it darker yet, try #990000. Experiment with all the red values and see how easy it is to get several different types of red. If you want a variation of pink, raise the green and blue values together. #FF6666 is a dusty pink color; #FF9999 is a bit brighter; and #FFCCCC is a very white pink.
Modifying your colors
The web-safe palette is convenient, but it gives you a relatively small number of colors (216, if you're counting). Two hundred and sixteen crayons in the box are pretty nice, but you might need more. Generally, I start with web-safe colors and then adjust as I go. If you want a lighter pink than #FFCCCC, you can jump off the web-safe bandwagon and use #FFEEEE or any other color you wish!
In the webSafe.html program, you can use the top and bottom button in each row to fine-tune the adjustments to your color.
Doing it on your own pages
Of course, it doesn't really matter how the colors look on my page. The point is to make things look good on your pages. To add color to your pages, do the following:
- Define the HTML as normal.
The HTML shouldn't have any relationship to the colors. Add the color strictly in CSS.
- Add a <style> tag to the page in the header area.
Don't forget to set the type = “text/css” attribute.
- Add a selector for each tag you want to modify.
You can modify any HTML tag, so if you want to change all the paragraphs, add a p { } selector. Use the tag name without the angle braces, so <h1> becomes h1{ }.
- Add color and background-color attributes.
You'll discover many more CSS elements you can modify throughout Books II and III but for now, stick to color and background-color.
- Specify the color values with color names or hex color values.
Changing CSS on the fly
The Chrome web browser has an especially cool trick when it comes to CSS coding. You can look at the CSS of any element on a web page and change it, seeing the results in real time!
Here's how it works:
- Build the page in the normal way.
Use your text editor to build the basic page.
- Add CSS selectors.
Specify the CSS for the elements you intend to change. The emptyCSS.html page on the website shows a very simple example. You can put any values you want in the CSS, or you can simply leave the CSS blank for now. If you want to experiment, take a look at emptyCSS.html on the website. It has empty selectors for the three elements described on the page (body, h1, and p).
- Load your page in Chrome.
The other browsers are starting to develop tools like Chrome, but it's clearly the leader, so start with Chrome.
- Inspect an element.
Right-click any element and choose Inspect element from the resulting pop-up menu.
- Gasp in wonderment at the awesome developer tools.
Figure 1-4 shows the developer tools that pop up when you inspect an element. Keep it in the Elements tab for now.
- Change the HTML code!
You can double-click the code in the code viewer and modify the contents. This is fun, but not permanent or especially helpful.
- You can also modify the CSS.
If a style selector has been defined, it appears under the Styles tab in the Matched CSS Rules section. You can add new style rules or change the existing ones, and you'll be able to see the results on the fly.
- You can even use a fancy color selector.
When a color rule has been defined, you'll see a little color swatch. Click on that color to get a nice color selector you can use.
- Select different parts of the page to modify other rules.
You can modify the CSS of any element as long as some sort of rule has been saved.
- Copy and paste any style rules you want to keep.
Modifications made in the web developer toolbar are not permanent. If you find colors or other style rules you like, you can copy them from the developer window and paste them into your code.
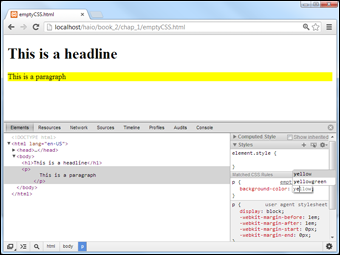
Figure 1-4: The Chrome developer tools allow you to change CSS on the fly.
Creating Your Own Color Scheme
The technical side of setting colors isn't too difficult, but deciding what colors to use can be a challenge. Entire books have been written about how to determine a color scheme. A little bit of subjectivity is in the process, but a few tools and rules can get you started.
Understanding hue, saturation, and lightness
The RGB color model is useful because it relates directly to how computers generate color, but it's not perfect. It's a bit difficult to visualize variations of a color in RGB. For that reason, other color schemes are often used. The most common variation is Hue, Saturation, and Lightness, or HSL. The HSL system organizes colors in a way more closely related to the color wheel.
Sometimes you'll run across the HSB or HSV color schemes, which are very similar to HSL. In all these color modes, you begin with a Hue, and then use saturation to indicate how far the color is from a grayscale. Brightness, value and lightness, do basically the same thing (determine the general amount of energy in the color) but using different models.
To describe a color using HSL, you specify three characteristics of a color using numeric values:
- Hue: The basic color. The color wheel is broken into a series of hues. These are generally middle of the road colors that can be made brighter (closer to white) and darker (closer to black).
- Saturation: How pervasive the color is. A high saturation is very bright. A low saturation has very little color. If you reduce all the saturation in an image, the image is grayscale, with no color at all.
- Lightness: The amount of light in the color. The easiest way to view value is to think about how the image would look when reduced to grayscale (by pulling down the saturation). All the brighter colors will be closer to white, and the darker colors will be nearly black.
The HSL model is useful because it allows you to pick colors that go well together. Use the hue property to pick the basic colors. Because there's a mathematical relationship between the various color values, it becomes easy to predict which colors work well together. After you have all the hues worked out, you can change the saturation and value to modify the overall tone of the page. Generally, all the colors in a particular scheme have similar saturation and values.
You can use the HSL color model to pick colors if you prefer. Figure 1-5 shows a color picker that lets you design colors based on the HSL model.

Figure 1-5: The HSL model provides another way to view colors.
Using HSL colors in your pages
You can assign an HSL value wherever you use colors in your CSS. As an example, look at HSLcolors.html on the companion website. (I do not show it here because the color differences are too subtle to display in a black and white book.) The code for HSLcolors.html shows how the HSL scheme can be used:
<!DOCTYPE html>
<html lang = "en-US">
<head>
<meta charset = "UTF-8">
<title>HSLcolors.html</title>
<style type = "text/css">
body {
background-color: HSL(180, 75%, 75%);
}
h1 {
color: HSL(180, 75%, 25%);
background-color: HSL(180, 75%, 90%);
}
p {
color: HSL(0, 75%, 25%);
}
</style>
</head>
<body>
<h1>This is a headline</h1>
<p>
This is a paragraph
</p>
</body>
</html>
To specify a color using the HSL scheme, do this:
- Set up your selectors as usual.
In the CSS, set up a selector for each element you wish to color.
- Add the color rule.
In this chapter you learn two color rules: color and background-color. Apply one or both to each selector.
- Use the HSL function.
Using HSL followed by parentheses indicates you wish to calculate the color using the HSL technique.
- Indicate the hue.
Imagine a color wheel with red at the top. The hue is the angle (in degrees) of the color you want to pick. Hue should have a value between 0 and 360.
- Determine the saturation.
Saturation is measured as a percentage. Saturation of 0% indicates a grayscale (somewhere between black and white) whereas Saturation of 100% is a fully saturated color with no grayscale. You need to include the percent sign as part of the saturation value.
- Specify the lightness.
Lightness is also indicated as a percentage, with 0% being completely black and 100% being completely white. A lightness value of 50% will determine a balanced color between white and black. Lightness values should also include the percent sign.
The HSL model is a relatively recent addition to CSS, so it may not work with older browsers, but it can be extremely helpful. HSL makes it easier to predict whether colors will look good together. If you keep any two of the HSL values the same and change the third, the two colors are likely to fit together well.
Using the Color Scheme Designer
Some people have great color sense. Others (like me) struggle a little bit because it all seems a little subjective. If you're already confident with colors, you may not need this section — although, you still might find it interesting validation of what you already know. On the other hand, if you get perplexed in a paint store, you might find it helpful to know that some really useful tools are available.
One great way to get started is with a free tool: the Color Scheme Designer, shown in Figure 1-6. This tool, created by Petr Stanicek, uses a variation of the HSV model to help you pick color schemes. You can find this program at http://colorschemedesigner.com.

Figure 1-6: The Color Scheme Designer helps you pick colors.
The Color Scheme Designer has several features, such as
- The color wheel: This tool may bring back fond memories of your elementary school art class. The wheel arranges the colors in a way familiar to artists. You can click the color wheel to pick a primary color for your page.
- The color scheme selector: You can pick from a number of color schemes. I describe these schemes a little later in this section.
- A preview area: This area displays the selected colors in action so you can see how the various colors work together.
- Hex values: The hex values for the selected colors display on the page so you can copy them to your own application.
- Variations: You can look at variations of the selected scheme. These variations are often useful because they show differences in the saturation and value without you doing the math.
- Color-blindness simulation: This very handy tool lets you see your color scheme as it appears to people with various types of color-blindness.
This won't make sense without experimentation. Be sure to play with this tool and see how easy it is to create colors that work well together.
Selecting a base hue
The Color Scheme Designer works by letting you pick one main hue and then uses one of a number of schemes for picking other hues that work well with the base one. To choose the base hue you want for your page, click a color on the color wheel.
The color wheel is arranged according to the traditional artist's color scheme based on HSV rather than the RGB scheme used for computer graphics. When you select a color, the closest RGB representation is returned. This is nice because it allows you to apply traditional (HSV-style) color theory to the slightly different RGB model.
When you pick a color on the color wheel, you're actually picking a hue. If you want any type of red, you can pick the red that appears on the wheel. You can then adjust the variations to modify the saturation and value of all the colors in the scheme together.
To pick a color using this scheme, follow these steps:
- Pick a hue.
The colors on the color wheel represent hues in the HSV model. Find a primary color you want to use as the foundation of your page.
- Determine a scheme.
The scheme indicates which other colors you will use and how they relate to the primary hue. More information on the various schemes is available in the next section.
- Adjust your scheme.
The main schemes are picked using default settings for saturation and value. The Adjust Scheme tab allows you to modify the saturation and value settings to get much more control of your color scheme. You can also adjust the level of contrast to get very interesting effects.
- Preview the scheme.
The Designer has several options for previewing your color scheme, including the ability to create quick web pages using the scheme. You might also look at the color blindness simulators to see how your page appears to people with different kinds of color blindness.
- Export the color settings.
If you want, you can export the color settings to a number of formats, including a very nice HTML/CSS format. You can also save the colors to a special file for importing into GIMP or Photoshop, so the exact colors used in your page will be available to your image editor, too.
Picking a color scheme
The various color schemes use mathematical relationships around the color wheel to predict colors that work well with the primary color. Here are the basic schemes, including what they do:
- Mono (monochromatic): Takes the base hue and offers a number of variations in saturation and value. This scheme is nice when you really want to emphasize one particular color (for example, if you're doing a website about rain forests and want a lot of greens). Be sure to use high contrast between the foreground and background colors so your text is readable.
- Complement: Uses the base hue and the complementary (opposite) color. Generally, this scheme uses several variations of the base hue and a splash of the complementary hue for contrast.
- Triad: Selects the base hue and two opposite hues. When you select the Triad scheme, you can also choose the angular distance between the opposite colors. If this distance is zero, you have the complementary color scheme. When the angle increases, you have a split complementary system, which uses the base hue and two hues equidistant from the contrast. Such schemes can be jarring at full contrast, but when adjusted for saturation and value, you can create some very nice color schemes.
- Tetrad: Generates four hues. As with the Triad scheme, when you add more hues, keeping your page unified becomes more difficult unless you adjust the variations for lower contrast.
- Analogic: Schemes use the base hue and its two neighbors.
- Accented Analogic: Just like the Analogic scheme, but with the addition of the complementary color.