
Chapter 6
Working with Files and Directories
In This Chapter
![]() Saving to text files
Saving to text files
![]() Reading from text files
Reading from text files
![]() Reading a file as an array
Reading a file as an array
![]() Parsing delimited text data
Parsing delimited text data
![]() Working with file and directory functions
Working with file and directory functions
An important part of any programming language is file manipulations. Whether you need to create a comma-separated value (CSV) file or generate a dynamic list of files in a directory, or just need a semi-permanent place to log records on the server, file manipulation functions are an indispensable part of your PHP toolbox.
Text File Manipulation
Work with text files is split into two basic categories: writing and reading. Writing and reading come down to six basic functions. See the following bullet list for a brief explanation of the six basic file functions. Each function has an entire subsection in the following “Writing text to files” and “Reading from the file” sections:
- fopen(): Stores a connection to a file you specify in a variable you specify
- fwrite(): Writes text you specify to a file you specify
- fclose(): Closes the connection to a file you specify that you created with fopen()
- fgets(): Reads a line from a file you specify
- feof(): Checks whether you have hit the end of a file you specify during a file read
- file(): Puts the entire contents of a file you specify into an array
Writing text to files
This section details the functions needed to access and write to a file, such as how to request access to a file from PHP with the fopen() function, write to the file using the fwrite() function, and let PHP know you are done with the file with the fclose() function.
fopen()
To do any file manipulations, you must tell PHP about the file you would like to manipulate and tell PHP how you would like to manipulate that file.
The fopen() function has two required parameters that you must pass to it: the path to the file and the type of file manipulation you would like to perform (the mode).
The fopen() function returns a connection to the requested file if it's successful. (The connection is called a pointer — see the “Official file manipulation terminology” sidebar for more information.) If there is an error, the fopen() function returns False. Whatever the fopen() function returns (the connection or False), it should be assigned to a variable (a stream).
Here is an example of the fopen() function; see the section “Storing data in a CSV file” later in this chapter for an example of the fopen() function in action:
$fileConnection = fopen($theFile, $theMode);
In the preceding example, the file connection returned by the fopen() function is assigned to the variable $fileConnection. The variable $theFile would contain the path to a file; for example, both C:\xampp\htdocs\inc\info.txt and /inc/log.txt are valid file paths. The file must be in a place the server can access, meaning that you can put the file anywhere you could put a PHP page for the server to serve.
 Although possible, you probably shouldn't try to connect to a file in the My Documents folder or its equivalent on your operating system. You'll need the actual file path, which can be quite convoluted. It's also not necessary for the files you open to be in the htdocs directory. This could be useful if you want to access a file that will not be available except through your program. Use a relative reference if the file will be in the same directory as your program, or use an absolute reference if it will be somewhere else on your system. If you move your program to a remote server, you can only access files that reside on that server.
The variable $theMode would contain one of the values from the following list:
- r: Grants read-only access to the file
- w: Grants write access to the file
 Be careful, though, because if you specify this mode (w) for the fopen() function and use the fwrite() function, you will completely overwrite anything that may have been in the file. Don't use w if there's anything in the file you want to keep.
- a: Grants the right to append text to the file. When you specify this mode for the fopen() function and use the fwrite() function, the fwrite() function appends whatever text you specify to the end of the existing file.
- r+ or w+: Grants read and write access to the file. I don't talk about r+ and w+ in this book, except to say that they're a special way of accessing the file, called random access. This allows you to simultaneously read and write to the file. If you require this type of access, you probably should be using something more simple and powerful, like relational databases.
fwrite()
After you open a file with the fopen() function and assign the file connection to a variable (see the “fopen( )” section, earlier in this chapter, for more information), you can use the file in your PHP code. You can either read from the file, or you can write to the file with the fwrite() function.
Depending on what mode you specify when you opened the file with the fopen() function, the fwrite() function either overwrites the entire contents of the file (if you used the w mode) or it appends the text you specify to the end of the file (if you used the a mode).
The fwrite() function has two required parameters you must pass to it: the connection to the file that was established by the fopen() function and the text you wish to write to the file. The fwrite() function returns the number of bytes written to the file on success and False on failure.
Here is an example of the fwrite() function (see the section “Storing data in a CSV file” later in this chapter for an example of the fwrite() function in action):
$writeResults = fwrite($fileConnection, $text);
 The fwrite() function can also be written fputs(). fwrite() and fputs() both do the exact same thing. fputs() is just a different way of writing fwrite(). fputs() is referred to as an alias of fwrite().
fclose()
After you finish working with the file, closing the file connection is important.
To close the connection to a file you've been working with, you must pass the connection to the file you wish to close to the fclose() function. The fclose() function will return True if it is successful in closing the connection to the file and False if it is not successful in closing the connection to the file.
Here is an example of the fclose() function:
fclose($fileConnection);
Writing a basic text file
Often, you'll want to do something as simple as record information from a form into a text file. Figure 6-1 illustrates a simple program that responds to a form and passes the input to a text form.

Figure 6-1: Here's a standard form that asks for some contact information.
I didn't reproduce the code for this form here because it's basic HTML. Of course, it's available on the book's companion website, and I encourage you to look it over there. See this book's Introduction for more on the companion website.
When the user enters contact data into this form, it will be passed to a program that reads the data, prints out a response, and stores the information in a text file. The output of the program is shown in Figure 6-2.

Figure 6-2: This program has responded to the file input.
The more interesting behavior of the program is not visible to the user. The program opens a file for output and prints the contents of the form to the end of that file. Here are the contents of the data file after a few entries:
first: Andy
last: Harris
email: [email protected]
phone: 111-1111
first: Bill
last: Gates
email: [email protected]
phone: 222-2222
first: Steve
last: Jobs
email: [email protected]
phone: 333-3333
first: Linus
last: Torvalds
email: [email protected]
phone: 444-4444
first: Rasmus
last: Lerdorf
email: [email protected]
phone: 123 456 7890
The program to handle this input is not complicated. It essentially grabs data from the form, opens up a data file for output, and appends that data to anything already in the file. Here's the code for addContact.php:
<!DOCTYPE html>
<html lang=”en”>
<head>
<meta charset=”UTF-8”>
<title>addContact.html</title>
<link rel = “stylesheet”
type = “text/css”
href = “contact.css” />
</head>
<body>
<?php
//read data from form
$lName = filter_input(INPUT_POST, “lName”);
$fName = filter_input(INPUT_POST, “fName”);
$email = filter_input(INPUT_POST, “email”);
$phone = filter_input(INPUT_POST, “phone”);
//print form results to user
print <<< HERE
<h1>Thanks!</h1>
<p>
Your spam will be arriving shortly.
</p>
<p>
first name: $fName <br />
last name: $lName <br />
email: $email <br />
phone: $phone
</p>
HERE;
//generate output for text file
$output = <<< HERE
first: $fName
last: $lName
email: $email
phone: $phone
HERE;
//open file for output
$fp = fopen(“contacts.txt”, “a”);
//write to the file
fwrite($fp, $output);
fclose($fp);
?>
</body>
</html>
The process is straightforward:
- Read data from the incoming form.
Just use the filter_input mechanism to read variables from the form.
- Report what you're doing.
Let users know that something happened. As a minimum, report the contents of the data and tell them that their data has been saved. This is important because the file manipulation will be invisible to the user.
- Create a variable for output.
In this simple example, I print nearly the same values to the text file that I reported to the user. The text file does not have HTML formatting because it's intended to be read with a plain text editor. (Of course, you could save HTML text, creating a basic HTML editor.)
- Open the file in append mode.
You might have hundreds of entries. Using append mode ensures that each entry goes at the end of the file, rather than overwriting the previous contents.
- Write the data to the file.
Using the fwrite() or fputs() function writes the data to the file.
- Close the file.
Don't forget to close the file with the fclose() function.
The file extension you use implies a lot about how the data is stored. If you store data in a file with an .txt extension, the user will assume it can be read by a plain text editor. The .dat extension implies some kind of formatted data, and .csv implies comma-separated values (explained later in this chapter). You can use any extension you want, but be aware you will confuse the user if you give a text file an extension like .pdf or .doc.
 In this program, I joke about sending spam to the user, but of course I don't do it. If you really do want to send e-mails to people in a list, it's not difficult to do. Look up the mail(to, subject, message) function in the PHP documentation. Of course just because you can do something doesn't mean you should. If you send e-mails to folks without their permission, they will consider you a spammer, and often you can get kicked off of your server for this behavior. The ability to send e-mails with PHP has been heavily abused by spammers, so a number of servers have turned off this feature for the cheaper hosting plans.
Reading from the file
If you can write data to a file, it would make sense that you could read from that file as well. The readContact.php program displayed in Figure 6-3 pulls the data saved in the previous program and displays it to the screen.

Figure 6-3: This program reads the text file and displays it onscreen.
It is not difficult to write a program to read a text file. Here's the code:
<!DOCTYPE html>
<html lang=”en”
<head>
<meta charset=”UTF-8”
<title>readContact.php</title>
</head>
<body>
<h1>Contacts</h1>
<div>
<?php
//open up the contact file
$fp = fopen(“contacts.txt”, “r”) or die(“error”);
//print a line at a time
while (!feof($fp)){
$line = fgets($fp);
print “$line <br />”;
}
//close the file
fclose($fp);
?>
</div>
</body>
</html>
The procedure is similar to writing the file, but it uses a while loop.
- Open the file in read mode.
Open the file just as you do when you write to it, but use the r designator to open the file for read mode. Now you can use the fgets() function on the file.
- Create a while loop for reading the data.
Typically, you'll read a file one line at a time. You'll create a while loop to control the action.
- Check for the end of the file with feof().
You want the loop to continue as long as there are more lines in the file. The feof() function returns the value true if you are at the end of the file and false if there are more lines to read. You want to continue as long as feof() returns false. The exclamation point (!) operator is a logical not. The condition !feof($fp) is true when there is data left in the file and false when there are no lines left, so this is the appropriate condition to use here.
- Read the next line with the fgets()function.
This function reads the next line from the file and passes that line into a variable (in this case, $line).
- Print out the line.
With the contents of the current line in a variable, you can do whatever you want with it. In this case, I'll simply print it out, but you could format the contents, search for a particular value, or whatever else you want.
Using Delimited Data
This basic mechanism for storing data is great for small amounts of data, but it will quickly become unwieldy if you're working with a lot of information. If you're expecting hundreds or thousands of people to read your forms, you'll need a more organized way to store the data. You can see how to use relational databases for this type of task in Book VI, but for now, another compromise is fine for simpler data tasks. You can store data in a very basic text format that can be easily read by spreadsheets and databases. This has the advantage of imposing some structure on the data and is still very easy to manage.
The basic plan is to format the data in a way that it can be read back into variables. Generally, you store all of the data for one form on a single line, and you separate the values on that line with a delimiter, which is simply some character intended to separate data points. Spreadsheets have used this format for many years as a basic way to transport data. In the spreadsheet world, this type of file is called a CSV (for comma-separated values) file. However, the delimiter doesn't need to be a comma. It can be nearly any character. I typically use a tab character or the pipe symbol (|) because they are unlikely to appear in the data I'm trying to save and load.
Storing data in a CSV file
Here's how you store data in a CSV file:
- You can use the same HTML form.
The data is gathered in the same way regardless of the storage mechanism. I did make a new page called addContactCSV.html, but the only difference between this file and the addContact.html page is the action property. I have the two pages send the data to different PHP programs, but everything else is the same.
- Read the data as normal.
In your PHP program, you begin by pulling data from the previous form.
$lName = filter_input(INPUT_POST, “lName”);
$fName = filter_input(INPUT_POST, “fName”);
$email = filter_input(INPUT_POST, “email”);
$phone = filter_input(INPUT_POST, “phone”); - Store all the data in a single tab-separated line.
Concatenate a large string containing all the data from the form. Place a delimiter (I used the tab symbol ) between variables and a newline ( ) at the end.
//generate output for text file
$output = $fName . “ ”;
$output .= $lName . “ ”;
$output .= $email . “ ”;
$output .= $phone . “ ”; - Open a file in append mode.
This time, I name the file contacts.csv to help myself remember that the contact form is now stored in a CSV format.
- Write the data to the file.
The fwrite() function does this job with ease.
- Close the file.
This part (like most of the program) is identical to the earlier version of the code.
Here's the code for addContactCSV.php in its entirety:
<!DOCTYPE html>
<html lang=”en”>
<head>
<meta charset=”UTF-8”>
<title>addContactCSV.php</title>
<link rel = “stylesheet”
type = “text/css”
href = “contact.css” />
</head>
<body>
<?php
//read data from form
$lName = filter_input(INPUT_POST, “lName”);
$fName = filter_input(INPUT_POST, “fName”);
$email = filter_input(INPUT_POST, “email”);
$phone = filter_input(INPUT_POST, “phone”);
//print form results to user
print <<< HERE
<h1>Thanks!</h1>
<p>
Your spam will be arriving shortly.
</p>
<p>
first name: $fName <br />
last name: $lName <br />
email: $email <br />
phone: $phone
</p>
HERE;
//generate output for text file
$output = $fName . " ";
$output .= $lName . " ";
$output .= $email . " ";
$output .= $phone . "
";
//open file for output
$fp = fopen("contacts.csv", "a");
//write to the file
fwrite($fp, $output);
fclose($fp);
?>
</body>
</html>
As you can see, this is not a terribly difficult way to store data.
Viewing CSV data directly
If you look at the resulting file in a plain text editor, it looks like Figure 6-4.
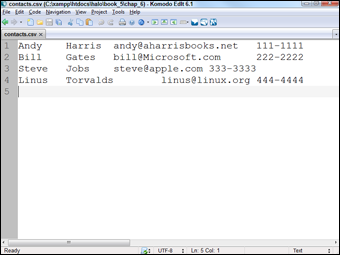
Figure 6-4: The data is separated by tab characters and each entry is on its own line.
Of course, CSV data isn't meant to be read as plain text. On most operating systems, the .csv file extension is automatically linked to the default spreadsheet program. If you double-click the file, it will likely open in your spreadsheet, which will look something like Figure 6-5.

Figure 6-5: Most spreadsheets can read CSV data directly.
This is an easy way to store large amounts of data because you can use the spreadsheet to manipulate the data. Of course, relational databases (described in Book VI) are even better, but this is a very easy approach for relatively simple data sets. I've built many data entry systems by using this general approach.
Reading the CSV data in PHP
Of course, you may also want to read in the CSV data yourself. It's not too difficult to do. Look over the following code for readContactCSV.php:
<!DOCTYPE html>
<html lang="en">
<head>
<meta charset="UTF-8">
<title>readContactCSV.php</title>
</head>
<body>
<h1>Contacts</h1>
<div>
<?php
print <<< HERE
<table border = "1">
<tr>
<th>First</th>
<th>Last</th>
<th>email</th>
<th>phone</th>
</tr>
HERE;
$data = file("contacts.csv");
foreach ($data as $line){
$lineArray = explode(" ", $line);
list($fName, $lName, $email, $phone) = $lineArray;
print <<< HERE
<tr>
<td>$fName</td>
<td>$lName</td>
<td>$email</td>
<td>$phone</td>
</tr>
HERE;
} // end foreach
//print the bottom of the table
print "</table>
";
?>
</div>
</body>
</html>
Figure 6-6 shows this program in action.

Figure 6-6: This program creates an HTML table from the data in the file.
In this program, I read the contents of a CSV file and display it in an HTML table. It's not terribly different than reading any other text file, but there are some new twists.
- Print the table heading.
It's easiest to manually print out the table heading with the field names, because I know what they'll be. A simple heredoc will do the job.
print <<< HERE
<table border = "1">
<tr>
<th>First</th>
<th>Last</th>
<th>email</th>
<th>phone</th>
</tr>
HERE; - Load the data into an array.
PHP has a marvelous tool called file. This function takes a filename as its only input. It then opens that file and places all the contents in an array, placing each line in its own element of the array. There's no need to make a file pointer, or to open or close the file. In this example, I load all the contents of contacts.csv into an array called $data.
$data = file("contacts.csv");
- Use a foreach loop to step through the contents.
Now I can walk through the contents of the file with a simple foreach loop. I place the current line in a variable called (wait for it . . .) $line.
foreach ($data as $line){
- Explode each line into its own array.
You have got to love a function with a violent name, especially when it's really useful. Use the explode command to separate the line into its component parts. For this example, I break on the tab ( ) character because that's the delimiter I used when storing the file.
$lineArray = explode(" ", $line);
- Use the list()function to store each element of the array into its own variable.
I could just use the array, but I think it's easier to pass the data back to the same variable names I used when creating the program. The list() construct does exactly that. Feed it a bunch of variable names and assign an array to it, and now each element of the array will be assigned to the corresponding variable.
list($fName, $lName, $email, $phone) = $lineArray;
- Print the variables in an HTML table row.
All the variables fit well in an HTML table, so just print out the current row of the table.
print <<< HERE
<tr>
<td>$fName</td>
<td>$lName</td>
<td>$email</td>
<td>$phone</td>
</tr>
HERE; - Clean up your playthings.
There's a little housekeeping to do. Finish the loop and close up the HTML table. There's no need to close the file because that was automatically done by the file() function.
} // end foreach
//print the bottom of the table
print "</table> ";
These shortcuts — the file() function and list() — make it very easy to work with CSV data. That's one reason this type of data is popular for basic data problems.
The list() construct works only on numerically indexed arrays and assumes that the array index begins at 0. If you want to use the list() function with associative arrays, surround the array variable with the array_values() function. Technically, list() is not a function but a language construct. (See http://us3.php.net/list for more information on the list() function.)
The file() function is appealing, but it isn't perfect for every situation. It's great as long as the file size is relatively small, but if you try to load in a very large file, you will run into memory limitations. The “line at a time” approach used in readContact.php doesn't have this problem because there's only a small amount of data in memory at any given time.
HTML purists tend to freak out whenever they see an HTML table. It's true that HTML tables were once horribly abused as a layout technique, but that doesn't mean they should never be used. It's perfectly suitable to use a table tag to lay out tabular data, which is exactly what I'm doing in this program.
Working with File and Directory Functions
Sometimes, you may need PHP to work with files in a directory. Say you have a reporting tool for a client. Each week, you generate a new report for the client and place it in a directory. You don't want to have to alter the page each time you do this, so instead, make a page that automatically generates a list of all the report files for the client to select from. This is the kind of thing you can do with functions like openddir() and readdir().
opendir( )
Using the opendir() function, you can create a variable (technically speaking, this type of variable is called a handle) that allows you to work with a particular directory.
The opendir() function takes one parameter: the path to the directory you want to work with. The opendir() function returns a directory handle (kind of like a connection to the directory) on success and False on failure.
Here is an example of the opendir() function (see the “Generating the list of file links” section to see the opendir() function in action). This function stores a directory handle to the C:xampphtdocsXFDxfd5.7 directory in the $directoryHandle variable:
$directoryHandle = opendir("C:xampphtdocsXFDxfd5.7");
readdir( )
After you open the directory with the opendir() function, you have a cursor pointed at the first file. At this point, you can read the filenames one by one with a while loop. To do this, use the readdir() function.
The readdir() function takes one parameter: the variable containing the directory handle created with the opendir() function. The readdir() function returns the name of a file currently being focused on by the cursor on success and False on failure.
Here is an example of the readdir() function. This function iterates through each file in the directory specified by $dp and assigns the filename of the current file to a new index in $fileArray array:
while($currentFile !== false){
$currentFile = readDir($dp);
$filesArray[] = $currentFile;
}
The actual readdir() function itself is readdir($dp). For more on the readdir() function, see the official PHP online documentation at http://us.php.net/function.readdir.
In some circumstances, the readdir() function might return non-Boolean values which evaluate to False, such as 0 or ““. When testing the return value of the readdir() function, use === or !==, instead of == or !=, to accommodate these special cases.
chdir( )
If you want to create a file in a directory other than the directory that the PHP page creating the file is in, you need to change directories. You change directories in PHP with the chdir() function.
If you want to be absolutely sure that you're in the right directory before writing the file, you can use an if statement with the getcwd() function. This is usually a bit of overkill, but it can be helpful.
The chdir() function takes one parameter: the path to the directory you wish to work with. The chdir() function returns True on success and False on failure.
Here is an example of the chdir(). This function changes to the C:xampphtdocsXFDxfd5.6 directory:
chdir("C:xampphtdocsXFDxfd5.6");
When you change to a directory, you're then free to write to it with the fwrite() function. See the “fwrite( )” section, earlier in this chapter.
Generating the list of file links
Using the opendir() and readdir() functions, you can generate a list of links to the files in a directory.
Take a look at the PHP code for the file links list example; see Figure 6-7 for the HTML generated by this example:
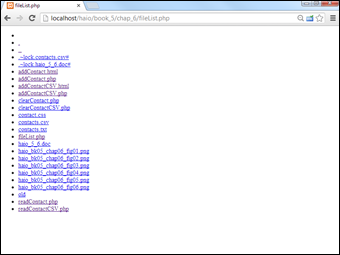
Figure 6-7: A list of links to all files in the directory specified by the opendir() function.
<!DOCTYPE html>
<html lang="en">
<head>
<meta charset="UTF-8">
<title>fileList.php</title>
</head>
<body>
<ul>
<?php
$dp = opendir(".");
$currentFile = "";
while($currentFile !== false){
$currentFile = readDir($dp);
$filesArray[] = $currentFile;
} // end while
//sort the array in alpha order
sort($filesArray);
//write the output
$output = "";
foreach($filesArray as $aFile){
$output .= " <li><a href="$aFile">$aFile</a></li>
";
} // end foreach
print "$output";
?>
</ul>
</body>
</html>
Here's how the fileList.php program performs its magic:
- Open a directory pointer to the current directory.
In all major operating systems, the period (.) character indicates the current directory.
$dp = opendir(".");
- Build a loop that repeats until there are no files left.
The special !== comparison is used to prevent rare problems, such as files named false. (Yes, believe it or not, that sometimes happens.)
while($currentFile !== false){
- Read the next file from the directory pointer.
The readDir() function reads the next file in and stores it to a variable ($currentFile).
$currentFile = readDir($dp);
- Append the current file to an array.
If you simply assign a file to an array without an index, PHP places the element in the next available space.
$filesArray[] = $currentFile;
- Sort the array.
The files won't be in any particular order in the array, so use the sort() function.
sort($filesArray);
- Print each element of the array.
I use an unordered list of links to display each file. Make it a link so that the user can click the file to view it directly.
foreach($filesArray as $aFile){
$output .= " <li><a href="$aFile">$aFile</a></li> ";
} // end foreach
On a Windows server, you have to escape the backslashes in the file path. You do this by adding a backslash before the backslashes in the file path. (For example, you would write C:\xampp\htdocs\XFD\xfd5.7\ instead of C:xampphtdocsXFDxfd5.7.) On a Unix server, you don't have to do this because file paths use slashes (/) instead of backslashes ().
If you want just one particular file type, you can use regular expressions to filter the files. If I had wanted only the .txt and .dat files from the directory, I could have run the file’s array through this filter to weed out the unwanted file types:
$filesArray = preg_grep("/txt$|dat$/", $filesArray);
For more on regular expressions, check Book IV, Chapter 5 as well as Chapter 4 of this book.