
Chapter 5
Taking Control of Content
In This Chapter
![]() Approximating CMS with Server Side Includes (SSI)
Approximating CMS with Server Side Includes (SSI)
![]() Reviewing client-side includes using AJAX
Reviewing client-side includes using AJAX
![]() Using PHP includes to build a basic CMS-style system
Using PHP includes to build a basic CMS-style system
![]() Building a data-based CMS
Building a data-based CMS
![]() Creating a form for modifying content
Creating a form for modifying content
Commercial sites today combine many skills and tools: HTML, CSS, JavaScript, AJAX, databases, and PHP. This book covers many of these techniques. In this chapter you combine all these techniques to build your own content management systems. Some are very simple to build, and some are quite sophisticated.
Building a “Poor Man's CMS” with Your Own Code
The benefits of using a CMS are very real, but you may not want to make the commitment to a full-blown CMS. For one thing, you have to learn each CMS's particular way of doing things, and most CMSs force you into a particular mindset. For example, you think differently about pages in Drupal than you do in WebsiteBaker (both described in Chapter 3 of this minibook). You can still get some of the benefits of a CMS with some simpler development tricks, as described in the following sections.
 The examples in this chapter build on information from throughout the entire book. All of the CMSs (and pseudo-CMSs) built in this chapter use the design developed in Chapter 2 of this minibook.
Using Server Side Includes (SSIs)
Web developers have long used the simple SSI (Server Side Include) trick as a quick and easy way to manage content. It involves breaking the code into smaller code segments and a framework that can be copied. For example, Figure 5-1 shows a variation of the website developed in Chapter 2 of this minibook.

Figure 5-1: This web page appears to be a standard page.
Even if you view the source code in the browser, you don't find anything unusual about the page.
However, if you look at the code in a text editor, you find some interesting discoveries:
<!DOCTYPE html>
<html lang = "en-US">
<head>
<meta charset = "UTF-8">
<title>csSSI.shtml</title>
<link rel = "stylesheet"
type = "text/css"
href = "csStd.css" />
</head>
<body>
<div id = "all">
<!-- This div centers a fixed-width layout -->
<div id = "heading">
<!--#include virtual = "head.html" -->
</div><!-- end heading div -->
<div id = "menu">
<!--#include virtual = "menu.html" -->
</div> <!-- end menu div -->
<div class = "content">
<!--#include virtual = "story1.html" -->
</div> <!-- end content div -->
<div class = "content">
<!--#include virtual = "story2.html" -->
</div> <!-- end content div -->
<div id = "footer">
<!--#include virtual = "footer.html" -->
</div> <!-- end footer div -->
</div> <!-- end all div -->
</body>
</html>
Some interesting things are happening in this code snippet:
- The page has no content! All the actual content (the menus and the book information) are gone. This page, which contains only structural information, is the heart of any kind of CSS — the structure is divorced from the content.
- A funky new tag is in place of the content. In each place that you expect to see text, you see an <!–#include –> directive, instead. This special instruction tells the server to go find the specified file and put it here.
- The filename is unusual. The server doesn't normally look for include tags (because most pages don't have them). Typically, you have to save the file with the special extension .shtml to request that the server look for include directives and perform them. (It's possible to use special server configurations to allow SSI with normal .html extensions.)
- Servers don't always allow SSI technologies. Not every server is configured for Server Side Includes. You may have to check with your server administrator to make this work.
The nice thing about Server Side Includes is the way that it separates the content from the structure. For example, look at the code for the first content block:
<!--#include virtual = "story1.html" -->
This code notifies the server to look for the file story1.html in the current directory and place the contents of the file there. The file is a vastly simplified HTML fragment:
<h2>Book I - Creating the HTML Foundation</h2>
<ol>
<li>Sound HTML Foundations</li>
<li>It's All About Validation</li>
<li>Choosing your Tools</li>
<li>Managing Information with Lists and Tables</li>
<li>Making Connections with Links</li>
<li>Adding Images</li>
<li>Creating Forms</li>
</ol>
This approach makes it very easy to modify the page. If I want a new story, I simply make a new file, story1.html, and put it in the directory. Writing a program to do this automatically is easy.
 Like PHP code, SSI code doesn't work if you simply open the file in the browser or drag the file to the window. SSI requires active participation from the server; to run an SSI page on your machine, therefore, you need to use localhost, as you do for PHP code.
If you view the source code of csSSI.shtml you won't see the include lines; they'll be replaced with the included HTML snippets. I've placed a special source view of this program on the website so you can see the source code as I do for PHP programs.
Using AJAX and jQuery for client-side inclusion
If you don't have access to Server Side Includes, you can use AJAX to get the same effect.
Figure 5-2 shows what appears to be the same page, but all is not what it appears to be.

Figure 5-2: This time, I grabbed content from the client side using AJAX.
Figures 5-1 and 5-2 look identical, but they're not. I used totally different means to achieve exactly the same output, from the user's point of view.
The code reveals what's going on:
<!DOCTYPE html>
<html lang = "en-US">
<head>
<meta charset = "UTF-8">
<title>csAJAX.html</title>
<link rel = "stylesheet"
type = "text/css"
href = "csStd.css" />
<script type = "text/javascript"
src = "jquery-1.10.2.min.js"></script>
<script type = "text/javascript">
$(document).ready(function() {
$("#heading").load("head.html");
$("#menu").load("menu.html");
$("#content1").load("story1.html");
$("#content2").load("story2.html");
$("#footer").load("footer.html");
});
</script>
</head>
<body>
<div id = "all">
<!-- This div centers a fixed-width layout -->
<div id = "heading">
</div><!-- end heading div -->
<div id = "menu">
</div> <!-- end menu div -->
<div class = "content"
id = "content1">
</div> <!-- end content div -->
<div class = "content"
id = "content2">
</div> <!-- end content div -->
<div id = "footer">
</div> <!-- end footer div -->
</div> <!-- end all div -->
</body>
</html>
Once again, the page content is empty. All the contents are available in the same text files as they were for the Server Side Includes example. This time, though, I used a jQuery AJAX call to load each text file into the appropriate element.
Here's the plan:
- Import the jQuery library.
The jQuery library is by far the easiest way to work with AJAX, so import jQuery any time you want to work with AJAX. See Book VII, Chapter 2 for more on importing the jQuery library.
- Add an initialization function.
There are many ways to call initial functions in jQuery (discussed in Book VII, Chapter 2). It doesn't matter which mechanism you use as long as it occurs after the page has loaded but before any other JavaScript. I use the standard $(document).ready mechanism in this example.
- Load each div with the load() method.
The jQuery library has a load() method that allows you to make an AJAX call and place the document in the indicated element. Use this mechanism on each element in your page.
The same document structure can be used with very different content by changing the JavaScript. If you can't create a full-blown CMS (because the server doesn't allow SSI, for example) but you can do AJAX, this is an easy way to separate content from layout. See Book VII, Chapter 2 for more information on using jQuery and AJAX for page includes.
Building a page with PHP includes
Of course, if you have access to PHP, it's quite easy to build pages dynamically.
The csInclude.php program shows how this is done:
<!DOCTYPE html>
<html lang = "en-US">
<head>
<meta charset = "UTF-8">
<title>CS PHP Includes</title>
<link rel = "stylesheet"
type = "text/css"
href = "csStd.css" />
</head>
<body>
<div id = "all">
<!-- This div centers a fixed-width layout -->
<div id = "heading">
<?php include("head.html"); ?>
</div><!-- end heading div -->
<div id = "menu">
<?php include("menu.html"); ?>
</div> <!-- end menu div -->
<div class = "content">
<?php include("story1.html"); ?>
</div> <!-- end content div -->
<div class = "content">
<?php include("story2.html"); ?>
</div> <!-- end content div -->
<div id = "footer">
<?php include("footer.html"); ?>
</div> <!-- end footer div -->
</div> <!-- end all div -->
</body>
</html>
As you can see, using PHP is almost the same as using the SSI and AJAX approaches from the last two sections of this chapter:
- Start by building a template.
The general template for all three styles of page inclusion is the same. There's no need to change the general design or the CSS.
- Create a small PHP segment for each inclusion.
In this particular situation, it's easiest to write HTML code for the main site and write a small PHP section for each segment that needs to be included.
- Include the HTML file.
Each PHP snippet does nothing more than include the appropriate HTML.
Creating Your Own Data-Based CMS
If you've come this far in the chapter, you ought to go all the way and see how a relational database can add flexibility to a page-serving system. If you really want to turn the corner and make a real CMS, you need a system that stores all the data in a data structure and compiles the pages from that structure dynamically. That sounds like a project. Actually, creating your own CMS neatly ties together most of the skills used throughout this book: HTML, CSS, PHP, and SQL. It's not nearly as intimidating as it sounds, though.
Using a database to manage content
The first step is to move from storing data in files to storing in a relational database. Each page in a content management system is often the same structure, and only the data is different. What happens if you move away from text files altogether and store all the content in a database?
The data structure might be defined like this in SQL:
DROP TABLE IF EXISTS cmsPage;
CREATE TABLE cmsPage (
cmsPageID INTEGER PRIMARY KEY AUTO_INCREMENT,
title VARCHAR(30)
);
DROP TABLE IF EXISTS cmsBlock;
CREATE TABLE cmsBlock (
cmsBlockID INTEGER PRIMARY KEY AUTO_INCREMENT,
blockTypeID INTEGER,
title VARCHAR(50),
content TEXT,
pageID INTEGER
);
DROP TABLE IF EXISTS blockType;
CREATE TABLE blockType (
blockTypeID INTEGER PRIMARY KEY AUTO_INCREMENT,
name VARCHAR(30)
);
DROP VIEW IF EXISTS pageView;
CREATE VIEW pageView AS
SELECT
blockType.name as 'block',
cmsBlock.title as 'title',
cmsBlock.content as 'content',
cmsBlock.pageID as 'pageID',
cmsPage.title as 'page'
FROM
cmsBlock, blockType, cmsPage
WHERE
cmsBlock.blockTypeID = blockType.blockTypeID;
INSERT INTO cmsPage VALUES (
null,
'main page'
);
INSERT into blockType VALUES (null, 'head'),
INSERT into blockType VALUES (null, 'menu'),
INSERT into blockType VALUES (null, 'content1'),
INSERT into blockType VALUES (null, 'content2'),
INSERT into blockType VALUES (null, 'footer'),
INSERT INTO cmsBlock VALUES (
null,
1,
'it's a binary thing',
null,
1
);
INSERT INTO cmsBlock VALUES (
null,
2,
'menu',
'
<ul>
<li><a href = "dbCMS.php?pageID=1">one</a></li>
<li><a href = "dbCMS.php?pageID=2">two</a></li>
<li><a href = "dbCMS.php?pageID=1">three</a></li>
</ul>
',
1
);
INSERT INTO cmsBlock VALUES (
null,
3,
'Book I - Creating the HTML Foundation',
'
<ol>
<li>Sound HTML Foundations</li>
<li>It's All About Validation</li>
<li>Choosing your Tools</li>
<li>Managing Information with Lists and Tables</li>
<li>Making Connections with Links</li>
<li>Adding Images</li>
<li>Creating forms</li>
</ol>
',
1
);
INSERT INTO cmsBlock VALUES (
null,
4,
'Book II - Styling with CSS',
'
<ol>
<li>Coloring Your World</li>
<li>Styling Text</li>
<li>Selectors, Class, and Style</li>
<li>Borders and Backgrounds</li>
<li>Levels of CSS</li>
</ol>
',
1
);
INSERT INTO cmsBlock VALUES (
null,
5,
null,
'see <a href = "http://www.aharrisbooks.net">aharrisbooks.net</a> for more information',
1
);
This structure has three tables and a view:
- The cmsPage table: Represents the data about a page, which currently isn't much. A fuller version might put menu information in the page data so that the page would “know” where it lives in a menu structure.
- The cmsBlock table: Represents a block of information. Each block is the element that would be in a miniature HTML page in the other systems described in this chapter. This table is the key table in this structure because most of the content in the CMS is stored in this table.
- The blockType table: Lists the block types. This simple table describes the various block types.
- The pageView view: Ties together all the other information. After all the data is loaded, the pageView view ties it all together, as shown in Figure 5-3.

Figure 5-3: This view describes all the data needed to build a page.
 Most of the data is being read as HTML, but it's still text data. I included the entire SQL file, including the INSERT statements, on the companion website as buildCMS.sql.
Writing a PHP page to read from the table
The advantage of using a data-based approach is scalability. In using all the other models in this chapter, I had to keep copying the template page. If you decide to make a change in the template, you have to change hundreds of pages. If you use data, you can write one PHP program that can produce any page in the system. All this page needs is a page-number parameter. Using that information, it can query the system, extract all the information needed for the current page, and then display the page. Here's the (simplified) PHP code for such a system:
<!DOCTYPE html>
<html lang = "en-US">
<head>
<meta charset = "UTF-8">
<title>CS Basic CMS</title>
<link rel = "stylesheet"
type = "text/css"
href = "csStd.css" />
</head>
<?php
//get pageID from request if possible
$pageID = filter_input(INPUT_POST, "pageID");
if ($pageID == ""){
$pageID = 1;
} // end if
try {
//connect to database
$con= new PDO('mysql:host=host;dbname=dbName', "user", "pwd");
$con->setAttribute(PDO::ATTR_ERRMODE, PDO::ERRMODE_EXCEPTION);
//read current page information from the db
$stmt = $con->prepare("SELECT * FROM pageView WHERE PageID = ?");
$stmt->execute(array($pageID));
$result = $stmt->fetchAll(PDO::FETCH_ASSOC);
//make page variables based on the current record
foreach ($result as $row){
if ($row["block"] == "head"){
$head = $row["title"];
} else if ($row["block"] == "menu"){
$menu = $row["content"];
} else if ($row["block"] == "content1"){
$c1Title = $row["title"];
$c1Text = $row["content"];
} else if ($row["block"] == "content2"){
$c2Title = $row["title"];
$c2Text = $row["content"];
} else if ($row["block"] == "footer"){
$footer = $row["content"];
} // end if
} // end foreach
} catch(PDOException $e) {
echo 'ERROR: ' . $e->getMessage();
} // end try
?>
<body>
<div id = "all">
<!-- This div centers a fixed-width layout -->
<div id = "heading">
<h1>
<?php print $head; ?>
</h1>
</div><!-- end heading div -->
<div id = "menu">
<?php print $menu; ?>
</div> <!-- end menu div -->
<div class = "content">
<h2>
<?php print $c1Title; ?>
</h2>
<div>
<?php print $c1Text; ?>
</div>
</div> <!-- end content div -->
<div class = "content">
<h2>
<?php print $c2Title; ?>
</h2>
<div>
<?php print $c2Text; ?>
</div>
</div> <!-- end content div -->
<div id = "footer">
<?php print $footer; ?>
</div> <!-- end footer div -->
</div> <!-- end all div -->
</body>
</html>
Here's the cool thing about dbCMS. This page is all you need! You won't have to copy it ever. The same PHP script is used to generate every page in the system. If you want to change the style or layout, you do it in this one script, and it works automatically in all the pages. This is exactly how CMS systems work their magic!
Looking at all the code at one time may seem intimidating, but it's quite easy when you break it down, as explained in these steps:
- Pull the pageID number from the request.
If possible, extract the pageID number from the GET request. If the user has sent a particular page request, it has a value. If there's no value, get page number 1:
//get pageID from request if possible
//note this is a GET request, for flexibility
$pageID = filter_input(INPUT_GET, "pageID");
if ($pageID == ""){
$pageID = 1;
} // end ifNote that I'm using a sneaky trick to indicate the page. The menu links will all call the same program, but with a different pageID:
<ul>
<li><a href = "dbCMS.php?pageID=1">one</a></li>
<li><a href = "dbCMS.php?pageID=2">two</a></li>
<li><a href = "dbCMS.php?pageID=1">three</a></li>
</ul> - Query pageView to get all the data for this page.
The pageView view was designed to give you everything you need to build a page with one query.
- Make a data connection.
Build a standard PDO connection to the database. (Check Book VI, Chapter 5 if you need more on building a PDO connection.) Don't forget to set up an exception handler and the appropriate error constants.
try {
//connect to database
$con= new PDO('mysql:host=localhost;dbname=haio', "haio", "haio");
$con->setAttribute(PDO::ATTR_ERRMODE, PDO::ERRMODE_EXCEPTION);
// OTHER CODE WILL GO HERE
} catch(PDOException $e) {
echo 'ERROR: ' . $e->getMessage();
} // end try - Form and execute the query.
Use the prepared statement mechanism to build a statement that will return all records for the current page. Execute the statement and fetch all the results in a variable called $results.
//read current page information from the db
$stmt = $con->prepare("SELECT * FROM pageView WHERE PageID = ?");
$stmt->execute(array($pageID));
$result = $stmt->fetchAll(PDO::FETCH_ASSOC);<Warning>Don't simply interpolate the $pageID variable into the SQL query. Doing so would open yourself up to SQL injection attacks. Use the prepare/execute mechanism to prevent this type of attack.
- Use the entry to populate page variables.
Each entry contains two fields: block and content. The block field determines the type of content, and the content field shows what content is there. Use this data to populate the variables used to build the page:
//make page variables based on the current record
foreach ($result as $row){
if ($row["block"] == "head"){
$head = $row["title"];
} else if ($row["block"] == "menu"){
$menu = $row["content"];
} else if ($row["block"] == "content1"){
$c1Title = $row["title"];
$c1Text = $row["content"];
} else if ($row["block"] == "content2"){
$c2Title = $row["title"];
$c2Text = $row["content"];
} else if ($row["block"] == "footer"){
$footer = $row["content"];
} // end if
} // end foreach - Write out the page.
Go back to HTML and generate the page, skipping into PHP to print the necessary variables.
<body>
<div id = "all">
<!-- This div centers a fixed-width layout -->
<div id = "heading">
<h1>
<?php print $head; ?>
</h1>
</div><!-- end heading div -->
<div id = "menu">
<?php print $menu; ?>
</div> <!-- end menu div -->
<div class = "content">
<h2>
<?php print $c1Title; ?>
</h2>
<div>
<?php print $c1Text; ?>
</div>
</div> <!-- end content div -->
<div class = "content">
<h2>
<?php print $c2Title; ?>
</h2>
<div>
<?php print $c2Text; ?>
</div>
</div> <!-- end content div -->
<div id = "footer">
<?php print $footer; ?>
</div> <!-- end footer div -->
</div> <!-- end all div -->
</body>
Allowing user-generated content
The hallmark of a CMS is the ability of users with limited technical knowledge to add content to the system. My very simple CMS illustrates a limited way to add data to the CMS. Figure 5-4 shows the buildBlock.html page. This page allows authorized users to add new blocks to the system and produces the output shown in Figure 5-5.
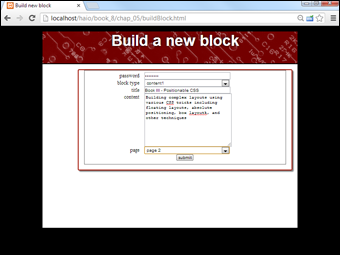
Figure 5-4: A user can add content, which updates the database.

Figure 5-5: The result of a successful page update.
After a few entries, a user can build a complete second page, which might look similar to Figure 5-6.

Figure 5-6: This page is simply another set of page blocks added by the user.
The system is simple but effective. The user builds blocks, and these blocks are constructed into pages. First, look over the buildBlock.html page.
<!doctype html>
<html lang="en">
<head>
<meta charset="UTF-8">
<title>Build new block</title>
<link rel = "stylesheet"
type = "text/css"
href = "csStd.css" />
<style type = "text/css">
label {
float: left;
width: 10em;
clear: left;
text-align: right;
padding-right: 1em;
}
input, select, textarea {
float: left;
width: 20em;
}
button {
display: block;
clear: both;
margin: auto;
}
</style>
</head>
<body>
<div id = "all">
<div id = "heading">
<h1>Build a new block</h1>
</div>
<div class = "content">
<form action = "buildBlock.php"
method = "post">
<fieldset>
<label>
password
</label>
<input type = "password"
name = "password" />
<label>block type</label>
<select name = "blockType">
<option value = "1">head</option>
<option value = "2">menu</option>
<option value = "3">content1</option>
<option value = "4">content2</option>
<option value = "5">footer</option>
</select>
<label>title</label>
<input type = "text"
name = "title" />
<label>content</label>
<textarea name = "content"
rows = "10"
cols = "40"></textarea>
<label>page</label>
<select name = "pageID">
<option value = "1">main page</option>
<option value = "2">page 2</option>
</select>
<button type = "submit">
submit
</button>
</fieldset>
</form>
</div>
</div>
</body>
</html>
This code is a reasonably standard HTML form. Here are the highlights:
- Add CSS for consistency: It's important that the user understands she is still in a part of the system, so I include the same CSS used to display the output. I also add local CSS to improve the form display.
- Build a form that calls buildBlock.php: The purpose of this form is to generate the information needed to build an SQL INSERT statement. The buildBlock.php program provides this vital service.
- Ask for a password: You don't want just anybody modifying your forms. Include a password to make sure only those who are authorized add data.
- Get other data needed to build a block: Think about the INSERT query you'll be building. You'll need to get all the data necessary to add a new record to the cmsBlock table.
Honestly, this page is a bit sloppy. I hard-coded the block types and page IDs. In a real system, this data would be pulled from the database (ideally through AJAX). However, I decided to go with this expedient to save space.
Adding a new block
When the page owner submits the buildBlock.html form, control is passed to buildBlock.php. This program reads the data from the form, checks the password, creates an INSERT statement, and passes the query to the database.
Here's the code and then the details:
<!doctype html>
<html lang="en">
<head>
<title>buildBlock.php</title>
<meta charset="UTF-8">
</head>
<body>
<?php
//retrieve data from form
$password = filter_input(INPUT_POST, "password");
$blockType = filter_input(INPUT_POST, "blockType");
$title = filter_input(INPUT_POST, "title");
$content = filter_input(INPUT_POST, "content");
$pageID = filter_input(INPUT_POST, "pageID");
//check password
if ($password == "allInOne"){
manageResults();
} else {
print "<h2>Unauthorized access...</h2>";
} // end if
function manageResults(){
global $blockType, $title, $content, $pageID;
//return output
print <<<HERE
<h2>Page input:</h2>
<p>
blockType: $blockType <br />
title: $title <br />
content: $content <br />
pageID: $pageID
</p>
HERE;
try {
//connect to database
$con= new PDO('mysql:host=host;dbname=dbName', "user", "pwd");
$con->setAttribute(PDO::ATTR_ERRMODE, PDO::ERRMODE_EXCEPTION);
//create an INSERT statement based on input
$stmt = $con->prepare('INSERT INTO cmsBlock VALUES(null, ?, ?, ?, ?)'),
$result = $stmt->execute(array($blockType, $title, $content, $pageID));
//provide feedback
if ($result){
print "System updated";
} else {
print "There was an error";
} // end if
} catch(PDOException $e) {
echo 'ERROR: ' . $e->getMessage();
} // end try
} // end function
?>
<p>
<a href = "dbCMS.php">return to the CMS</a>
</p>
</body>
</html>
Here's how you use the PHP code with the HTML form to update the database:
- Retrieve data from the form.
Use the filter_input or $_REQUEST mechanism to extract all data from the previous form.
- Filter all input that's used in the query.
All form variables except the password are used in an SQL query, so pass each variable through the mysql_filter_input() function to prevent SQL injection attacks. (See Book VI, Chapter 5 for information about SQL injection attacks and how to prevent them.)
- Check the password.
You obviously don't want just anybody to change your system. Check the password and continue only if the user is authorized
- Print the form contents.
Ensure the form contents are what you expect before passing data to a database.
- Connect to the database.
Build a standard database connection so you can pass the query to the database.
- Build and execute the query.
Send the query to the database with the prepare/execute mechanism. Note that an INSERT command doesn't return a data result, so there's no need to do a fetch command. However, the $result variable will still contain a true or false value, so compare this value to ensure the insertion worked correctly.
Improving the dbCMS design
Although the simple PHP/MySQL combination described in the last section is a suitable starting point, you probably want to do a bit more to make a complete CMS because a better CMS might have the following features:
- Automatic menu generation: The menu system in dbCMS is too static as it is. Your database should keep track of where each page is located in the system, and your menu code should be dynamically generated based on this information.
- Better flexibility: To keep the code simple, I made only one page type, and the page always has exactly two content blocks. You'll want a much more flexible design.
- Error-checking: This program isn't nearly robust enough for real use (yet). It crashes if the data isn't complete. Before you can use this system in a real application, you need a way to improve its “crash-worthiness.”
- Improved data input: The very basic input form described in this chapter is fine, but it could certainly be improved. Loading the block type and page data directly from the database would be better. It would also be nice if the user could create new block types. Still, this basic CMS shows how you can start building your own content systems.