
Chapter 3
Introducing Content Management Systems
In This Chapter
![]() Understanding the need for content management systems
Understanding the need for content management systems
![]() Previewing typical content management systems
Previewing typical content management systems
![]() Installing a content management system
Installing a content management system
![]() Adding content to a content management system
Adding content to a content management system
![]() Setting up the navigation structure
Setting up the navigation structure
![]() Adding new types of content
Adding new types of content
![]() Changing the appearance with themes
Changing the appearance with themes
![]() Building a custom theme
Building a custom theme
If you've ever built a large website, you'll probably agree that the process can be improved. Experienced web developers have discovered the following maxims about larger projects:
- Duplication should be eliminated whenever possible. If you find yourself repeatedly copying the same HTML code, you have a potential problem. When (not if) that code needs to be changed, you have a lot of copying and pasting to do.
- Content should be separated from layout. You've already heard this statement, but it's taken to a new level when you're building a large site. Separating all content from the layout would be helpful so that you could create the layout only one time and change it in one location.
- Content is really data. At some point, the content of the website is really just data. It's important data, to be sure, but the data can — and should — be separated from the layout code.
- Content belongs to the user. Developing a website for somebody can become a long-term commitment. If the client becomes dependent on the site, he frequently pesters you for changes. It would be helpful if the client could change his own content and ask you only for changes in structure or behavior.
- A website isn't a collection of pages — it's a framework. If you can help the client own the data, you're more concerned with the framework for manipulating and displaying that data. It's a good deal for you and the client.
A content management system (CMS) is designed to address exactly these issues, as this chapter will show you.
Overview of Content Management Systems
CMSs are used in many of the sites you use every day. As you examine these CMSs, you start to recognize them all over the web. If you have your own server space, a little patience, and a little bit of knowledge, you can create your own professional-looking site using a CMS.
This list describes the general characteristics of a CMS:
- It's written in a server-side language. The language is usually PHP, but CMSs are sometimes written in other languages. Stick with PHP for now because it's described in this book, it's easy to use, and it's the most frequently used CMS language.
- All content is treated as data. Almost all the content of the CMS is stored in text files or (more commonly) a MySQL database. A CMS usually has few HTML files.
- The layout consists of data, too. The CSS and HTML templates, and everything else the CMS needs, are also stored as data, in either text files or the database.
- All pages are created dynamically. When a user logs in to a CMS, she is normally talking to a PHP program. This program analyzes the current situation and generates an HTML document on the fly.
- There are different levels of access. Most CMSs allow anonymous access (like regular web pages) but also allow users to log in for increased access, and usually a special form of administrative access to modify the site.
- The content can be modified from within the system. Users with the appropriate access can modify the content of the CMS without knowing anything about PHP or databases. Often, you don't even need to know HTML or CSS.
- The layout can be modified from within the system, too. Many CMSs allow you to change the layout and design from within the system, although the process is usually more involved.
- CMSs can be expanded. Most CMSs are easily modified with hundreds of visual themes, add-in modules, and new capabilities available for free. In most cases, if you need something that isn't there, you can make it yourself.
- Many of the best CMSs are open-source. CMSs are a shocking value. When you consider how much they can contribute to your online presence, it's amazing that most CMS programs are absolutely free.
Previewing Common CMSs
To get a true feel for the power of CMSs, you should test-drive a few. The wonderful resource www.opensourcecms.com allows you to log in to hundreds of different CMSs as a user and as an administrator to see how they work. I show you a few typical CMSs so that you can get a feel for how they work.
Moodle
Often, you have a special purpose in mind. For example, I wanted to teach an online course without purchasing an expensive and complicated course management system. I installed the special-purpose CMS Moodle. Figure 3-1 shows the Moodle screen for one of my courses.

Figure 3-1: Moodle is useful for managing online courses.
Moodle has a lot of features that lend it to the educational setting:
- Student and instructor management: The system already understands the roles of student and instructor and makes appropriate parts of the system available.
- Online assignment creation and submission: One of the biggest problems with online courseware is getting assignments to and from students. Moodle has a complete system for handling this problem.
- Online grade book: When a teacher grades an assignment (online through Moodle), the student's grades are automatically updated.
- Online testing support: Moodle has built-in modules for creating, managing, and scoring online quizzes and exams.
- Communication tools: Moodle includes a wiki (a collaborative documentation tool), online chat, and forum tools you can set up for improved communication with your students.
- Specialized educational content: Moodle was put together by hundreds of passionate (and geeky) teachers, so it has all kinds of support for various teaching methodologies.
Community-created software can be very good (as Moodle is) because it's built by people who know exactly what they want, and anybody with an idea (and the skills to carry them out) can add or modify the features. The result is an organic system that can often be better than the commercial offerings.
 I find Moodle easier to use and more reliable than the commercial course management system that my university uses. I keep a Moodle backup for my classes because when the “official” system goes down, I can always make something available for my students.
WordPress
WordPress is another specialty CMS, meant primarily for blogging (short for web logging, or keeping an online public diary). WordPress has become the dominant blogging tool on the Internet. Figure 3-2 shows a typical WordPress page.

Figure 3-2: Woot! I'm blogging!
WordPress takes one simple idea (blogging) and pushes it to the limit. Unregistered users see the blog output, but if you log in, you gain access to a complete set of tools for managing your online musings.
Figure 3-3 illustrates the administrator view of WordPress.

Figure 3-3: You can easily get started with WordPress — just start writing.
Additionally, you can change the layout and colors, add new templates, and do much more, as you can in a more traditional CMS.
Of course, hundreds of other specialized CMSs are out there. Before you try to build your own CMS from the ground up, take a look at the other available offerings and see whether you can start by using the work of somebody else.
Drupal
Drupal is one of the most popular multipurpose CMSs out there. Intended for larger sites, it's more involved than the specialty CMSs — although it can do almost anything.
Figure 3-4 shows a basic site running Drupal.

Figure 3-4: Drupal is intended to support online communities.
Drupal was designed primarily for managing community websites. It is commonly used in the following types of sites:
- Gaming sites: Many game communities are based around a CMS like Drupal because it allows opportunities for users to share information, opinions, news, and files.
- Software sites: A CMS like Drupal is an ideal place to post information about your software, including downloads, documentation, and user support.
- Forums: Although you can find many dedicated forum packages, Drupal supports several good forum tools.
- Blogging: You can also use Drupal as a news site and a location to post your blog. You can add community features when you want or need them.
Drupal is powerful and extremely popular. However, this power has led to increased complexity. Learning everything you can do with Drupal will take some time and effort.
Building a CMS site with WebsiteBaker
For the rest of this chapter, I take you through the installation and customization of a complete website using the WebsiteBaker CMS. This is one of my favorite CMSs for a number of reasons:
- It's easy to understand: Systems like Drupal have gotten so complicated that you often require entire books on how to use them. WebsiteBaker (as you'll see) is not complicated at all, even for somewhat advanced features.
- It's easy to modify: WebsiteBaker uses a reasonably simple template system that's primarily HTML and CSS (with a few PHP functions thrown in). This makes it very easy to adapt pages that were not designed in WebsiteBaker to a CMS format.
- It's easy to teach to clients: When you're building a commercial site, it's critical that your customer learns how to manage the site. The easier you can make managing the site for the customer, the easier your job is down the road.
- It's reasonably complete: The basic install of WebsiteBaker is not large, but you can customize your installation with hundreds of modules and templates to get exactly the look and behavior you want.
- It's free and open source: Like almost all the software I recommend, WebsiteBaker is entirely free and open source, even for commercial use.
I focus on WebsiteBaker in the upcoming section, but it's just a sample CMS. Look over this section, but if you want to use a different CMS other than WebsiteBaker, by all means do so. You'll see the overall steps are pretty much the same regardless of the particular package you use. (I used almost exactly the same steps to install Drupal and WordPress on my demo server.)
Installing your CMS
A CMS package typically contains many different kinds of files. Most are primarily PHP programs with HTML/HTML pages and CSS. Most CMSs also include databases written in MySQL. To install a CMS, you need to download these components and install them on your server.
- Download the latest version of WebsiteBaker at www.websitebaker2.org/en/home.
Download the .zip file. (The CMS is all web code, so it doesn't matter which operating system you use.)
- Create a subdirectory on your web root.
If you use a local server, create a new subdirectory under htdocs (or wherever you save your web files). If you're on a remote server, use FTP or the file management tool to create the subdirectory you want the files to go in.
- Copy all WebsiteBaker files to the new directory.
The .zip file you download from WebsiteBaker contains a wb directory. Copy all files and folders in this directory to your new directory.
- Navigate to the new directory in your browser.
Be sure you have Apache and MySQL turned on. If you're on a local machine, be sure to use the localhost mechanism to find the directory.
If all is well, you see the WebsiteBaker Installation Wizard, as shown in Figure 3-5.

Figure 3-5: The Website-Baker Installation Wizard helps you get started.
Most CMSs work in a similar way: You install a set of base files to the server, and then the system helps you get the other systems configured. Here's how to install WebsiteBaker:
- Check system configuration.
The Step 1 section of the installation wizard ensures all the needed components are available on your server.
- Ensure folders are writable.
The CMS will need to write files to the server. If you're in a Unix-based system, you may have to check the file permissions to ensure all files and folders specified in this section can be written to. Each specified file or folder can be set to 777 permission.
See Chapter 1 of this minibook for more on changing Unix permissions. (Even if you use a Windows or Mac at home, your web server might use Linux or Unix.)
- Set default settings.
Specify the path to the CMS, the default time zone, and the default language.
- Specify your operating system.
Windows has its own way of doing things, so let WebsiteBaker know whether you're using Windows or a Unix-based system. (Mac OSX and Linux are both Unix-based.)
- Include database information.
Supply the information needed so WebsiteBaker can get to your database. Supply a database name as well as the username and password you want to use to access the database. Check the Install Tables option to have WebsiteBaker automatically build the database you need.
- Enter the website name.
This name appears on all the site's pages (but you can change it later).
- Create an administrator account.
The admin account will have the ability to change the site. Create a user named admin with a password you can remember.
- Install the CMS.
Press the Install WebsiteBaker button to install the CMS. Figure 3-6 shows the installation wizard after I filled in the contents.
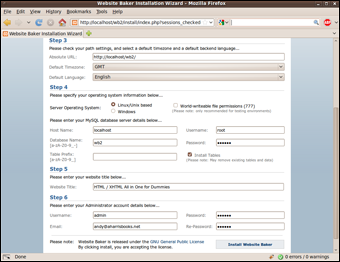
Figure 3-6: The CMS is ready to install.
If all goes well, you're greeted by the administration page shown in Figure 3-7.

Figure 3-7: Congratulations! You now own a bouncing baby CMS!
The final step of installing your CMS is to remove the install directory. This directory contains the scripts and tools you used to install the CMS. If you leave it in place, bad guys can reinstall your CMS from the web and destroy your settings. Use your file management or FTP tool to delete the install directory from your WebsiteBaker directory as soon as you're satisfied the installation went well. When you do this, the warning about the installation directory will disappear.
Instead of installing the CMS manually, many hosting services have automated installation scripts for popular CMSs that you can use. Freehostia has built-in support for WebsiteBaker, but I find the automated systems tend to have older versions of the software. You should still know how to set up the CMS by hand.
Getting an overview of WebsiteBaker
The administration page (refer to Figure 3-7) is the control panel you and other administrators use to build the site. The administration page's tools are the foundation of the entire site:
- Pages: Where you add the primary content for the site. Each page is built here. WebsiteBaker features a few standard page types, and you can install hundreds more through the module feature.
- Add-ons: The core installation of WebsiteBaker is reasonably basic, but you can customize it in many ways. The most important techniques are to add new types of pages (modules) and new visual themes (templates). I describe both techniques later in this chapter.
- Settings: Allows you to change global settings for the site. You can modify the site name, description, theme, and other settings from this panel.
- Access: Allows you to add new users and groups and grant various users access to different parts of the system. For example, if you're setting up a site for a church, you might want the children's pastor to have access to only the site's children's ministry parts.
- Media: You can add images and video to your site. This section allows you to manage and upload the various media to your server.
- Preferences: Allows you to change a few more settings, including the e-mail address and password of the admin account.
- Admin-Tools: Contains advanced options for improving the administration experience.
Adding your content
The point of a content management system is to manage some content, so it's time to add pages to the system.
- From the administration page, choose Pages.
A screen similar to Figure 3-8 appears.

Figure 3-8: This page allows you to add, modify, and delete pages.
- Type main as the first page name.
Each page you create needs to have a name.
- Keep the page type WYSIWYG.
You can make many different kinds of pages, but most of your pages will be the standard WYSIWYG format.
- Leave all other settings at their default.
The other settings available here don't mean much until you have multiple pages.
- Click the Add button to add the page.
A screen similar to Figure 3-9 appears.

Figure 3-9: Now you're at a nice page editor.
Using the WYSIWYG editor
The purpose of the CMS is to make editing a website without any technical skills easy. You can give admin access to an HTML novice, and he can use the system to build web pages with no knowledge of HTML or CSS. The editor has a number of useful tools that make creating and editing much like working with a word processor.
- Predefined fonts and styles: The user can choose fonts and styles from drop-down menus, unaware that these options are taking advantage of predefined CSS styles.
- The ability to add lists, links, and images: The editor includes the ability to add lists, links, and images (and other types of content) without any knowledge of HTML. If you add an image, the editor includes a wizard that helps you upload the image to the server. If you add a link, a wizard helps you specify the URL of the link.
- Multiple paste options: Many users create content in Microsoft Word. A Paste from Word button attempts to delete all the excess junk Word adds to a file and paste the content cleanly, which is a major lifesaver.
- A plain source editor: My favorite button on the WYSIWYG editor is the one that turns off the WYSIWYG features. The Source button displays the page as plain HTML/HTML text. The automated features are nice, but I can usually build a page a lot faster and more accurately by hand. This feature is especially useful when the visual tools aren't doing what you want.
When you finish building your page, click the Save button to save the contents of the page.
Along the top of the editor is a series of icons: a house, a blue screen, a life ring, and a lock. Click the blue screen (which is the View icon) to open your new page and see it the way the user will see it. Figure 3-10 shows the results of my simple page.

Figure 3-10: This is how the page looks to the user.
The WYSIWYG page is the most commonly used page type (especially by nontechnical users) but it's not the only option. The standard edition of WebsiteBaker also comes with a number of other default page types:
- Code: Interprets the page as PHP code. This is any easy way to enter any PHP code you wish, including database lookups. The code is interpreted as PHP, so if you want it to be HTML, you can just use a giant heredoc. Figure 3-11 shows a PHP snippet being written, and Figure 3-12 shows the results.

Figure 3-11: The code page allows you to write any PHP code you wish.

Figure 3-12: How the code page looks to the user.
- Form: Allows you to build a basic HTML form without knowing any HTML. The administrator can add all the normal form elements. Figure 3-13 shows the form editor in action. When the user enters form data, the content is automatically e-mailed to the administrator and stored in a database that can be retrieved via the CMS. This feature is one of the most important factors of a CMS because it's something that plain HTML websites simply can't do.

Figure 3-13: The form editor simplifies creating forms and collecting form data.
- Menu Link: This placeholder (it isn't really a page type) allows you to create a menu item that helps organize other pages. Use the parent attribute of a page to make it a child of a menu or an ordinary page. The menu structure adapts automatically.
- News V3.5: A blog feature that allows the user to write blog articles. I often use it for other things, such as sermon archives for church sites, specials of the week for commercial sites, and so on. A blog feature is good any time you're working with repetitive, dated material. You can add multiple blogs to the same site easily. Figure 3-14 shows the news page in action.

Figure 3-14: The news page type allows you to build a blog-like document.
- Wrapper: This incredibly versatile page type allows you to do all kinds of interesting things. Essentially, it allows you to embed any page into the CMS. Figure 3-15 shows the wrapper used to embed a Google search into my site. The wrapper is handy when you want to access an external ordering or newsgroup system but keep within the visual structure of the CMS.

Figure 3-15: Use the wrapper page type to embed other pages into your system.
You are not limited to these page types. See the section “Adding new functionality” later in this chapter for information on how to add additional page types to your system.
Changing the template
One of the primary goals of a CMS is to separate the visual layout from the contents. So far, you've seen how to modify the contents, but you'll also want to change the appearance of the page. The visual settings of a site are all based on a template concept. You can easily overlay a new template onto the existing site without changing the contents at all.
- Log in as the administrator.
Obviously, the administrator has the ability to change the template (although you can allow individual users to change their own templates).
- Go to the system menu.
Templates are set in the system menu.
- Change template under Default Settings.
Don't worry about the Backend Theme and Search Settings templates. It's best to leave these alone until you're a bit more experienced because they don't have a major impact on the user experience.
- Choose a template from the drop-down list.
All the templates installed in the system are available in a drop-down list. For this example, I chose the All CSS template (the default). See the section “Adding additional templates” for how to download and install templates that aren't already installed in the system.
- Preview the site with your new template in place.
Figure 3-16 shows the contents of the site with the All CSS template in place. The template essentially encapsulates core HTML code and the CSS used to display each file.

Figure 3-16: The same site has a new look!
Adding additional templates
The standard installation of WebsiteBaker includes only a few templates. Typically, you'll want to work with additional templates. Fortunately, there are hundreds of great templates available, and you can easily build your own. Here's how to add additional templates.
- Locate the template you want online.
A number of web places offer great, free templates for WebsiteBaker. My favorite is the Templates repository available at www.websitebaker2.org/template/pages/templates.php. The templates in this archive are approved by the WebsiteBaker community and meet minimum quality standards. (Note that many of these templates have been adopted from other CMS systems so you can often get the same general look and feel regardless of the CMS you choose.)
- Download a template or two that you like.
When browsing templates, remember that you will be able to modify them. If you don't like the particular colors or images, you can change them later. Save the downloaded .zip file somewhere on your local machine.
- Log in to WebsiteBaker as admin.
Only the administrator can add new templates to the system.
- Navigate to the Templates page of the Add-ons section.
This is where you install and uninstall downloaded templates.
- Click the Browse button to locate the .zip file on your local system.
Load the entire .zip file containing the template onto the server.
- Click the Install button to begin the process.
You receive a notification when the installation is complete.
- Navigate to the Settings section.
Installing a template does not apply the template automatically.
- In Settings, apply the new template.
Specify the template to display from the drop-down list of templates.
- Preview your new look.
Use the Preview button (or reload the currently showing version of the CMS) to see the new look. Figure 3-17 shows my site with the Multiflex-3 template installed.

Figure 3-17: You can install any template onto your existing system.
 The Multiflex-3 template is one of the most commonly used templates on the Internet. The original design (www.oswd.org/design/preview/id/3626) was built with plain HTML/CSS implementation in mind but has been ported to nearly every CMS including WebsiteBaker. The design is a solid and very flexible starting place. I've used it as the foundation of dozens of sites. After you get to know it, you'll recognize it all over the place.
Adding new functionality
In addition to custom templates, you can add modules to your system. A module is a new page type that adds additional functionality. Dozens of add-ons are available at the WebsiteBaker AMASP (All Modules and Snippets Project) at www.websitebakers.com.
The add-on modules include many new types of functionality, including online shopping modules, image galleries, event calendars, and many more. In addition to full-fledged modules, the AMASP also includes PHP snippets you can copy into your code for advanced functionality and droplets, which are small, self-contained PHP modules to add features to your site. It's probably best you start with full modules because they require the least effort to get working. As you become more proficient with WebsiteBaker, you'll want to investigate how to add more features.
Many of my clients like to have image galleries. I use them for a number of things, including a simple form of an online catalog and for viewing sample work for craft or artist sites. Here's how to add a basic but full-featured image gallery:
- Find a module you wish to test.
Go to the AMASP site and browse the various modules until you find one you like; there's about a dozen. For this example, I'm looking at the (unimaginatively named) Image Gallery module. This one works very well, looks pretty good, and is very easy for my clients to use, so I almost always install it on commercial sites.
- Download the module.
Modules are installed much like templates. Download the module, which is usually PHP and HTML code in a .zip file, and then save the .zip file somewhere on your local file system.
- Log in as admin.
As usual, anything that involves changing the site requires administrator access.
- Navigate to the Add-ons section.
You add modules in the same section you add templates; that is, the Modules page of the Add-ons section.
- Browse to find the .zip file you downloaded.
Click the Browse button to look on your local system for the .zip file containing the module. Click the Install button when you locate the file. WebsiteBaker uploads the module to the server and places the files in the correct location.
- A new page type will appear.
When you go to the Pages section, you see a new type of page. In this case, you can now add image galleries.
Building Custom Themes
WebsiteBaker is an outstanding way to build a complex and fully featured website easily and quickly. With over a hundred templates, you're bound to find something you like. However, you almost never find something exactly the way you want it. This is especially important if you're developing for somebody else. Usually, you find a template that is close, but you still need to modify the colors and images. For that reason, it's important to understand the general structure of a WebsiteBaker template and how to make your own.
Starting with a prebuilt template
Although it's possible to build a WebsiteBaker template from scratch, it's generally not a good idea. It's much smarter to begin with a template that's close and add those features you need to make it your own. That way the general structure is already proven, and you only need to customize it to your specifications.
- Find a starting template you like.
Often I have clients look over the Templates repository (www.websitebaker2.org/template/pages/templates.php) and tell me their favorite three templates. I also like to have them explain what they like or dislike about each template. I tell them we can change colors or banner graphics in a template, so to focus more on the general look and feel.
If you don't have another place to start, I like the templates built into the WebsiteBaker core (especially All CSS and Round). Blank Template is especially designed for customizing. I often build commercial sites based on Multiflex-3 because it's well known throughout the web community and has some great features.
- Install the template on your local system.
It's much easier to work with a template on your local system than on a remote server.
- Locate the local copy of the template.
Normally, templates are stored in the wb/templates directory of your server. Each template will have its own folder.
- Copy the folder of the template you want to modify.
It's generally smarter to work with a copy rather than the original. Paste the copied folder in the templates directory.
- Rename the new folder to reflect your new template name.
Your new template needs a different name than the original template.
At this point, you have a copy of the original template, but this copy will not be reflected in the CMS yet. You need to make a few changes before the new template is available. Before you do that, take a look at the file structure of a typical WebsiteBaker template. Figure 3-18 shows my copy of the Multiflex-3 template.

Figure 3-18: Typical file structure for Website- Baker templates.
One of the reasons I like WebsiteBaker so much is how relatively simple the template structure is compared to other CMSs. The directory contains a relatively small number of files:
- index.php: This PHP file is the basic file that's used as the foundation of every page in the system. It's essentially an HTML page with a few special PHP functions built in. You can edit any of the HTML you wish, and the resulting changes will be reflected in every page of the site.
- info.php: This simple PHP file contains a number of variables used to control the overall behavior of the template. You'll make a few changes in this file to give your template an official name.
- layout_setup.css: This CSS file describes the CSS used for the overall page design. You can change the contents of this CSS file to change font colors or other big-picture CSS.
- layout_text.css: This CSS file is used to define the styles of the various text elements in the site. If you're looking for a class that isn't defined in layout_setup.css, you may find it here. Note: The names of the CSS files may change in other templates, but there will be at least one CSS file.
- editor.css: This file is used to modify the internal WYSIWYG editor. It describes how various elements are displayed in the editor.
- images directory: Often a template will include a number of images. These are stored in a subdirectory for convenience. You may need to change some of these images to create the look you're going for.
Some templates are more complex, some less so. Really, you can have as many or as few files as you want. You'll always need to have index.php and info.php. You'll almost always have at least one CSS page. You can have anything else you wish in the template, but nothing else is absolutely necessary.
Changing the info.php file
The info.php file contains a few PHP variables. You can modify these variables to identify this template as your own. You must change the template name to a unique value, and you can also change such variables as the developer name and version number. I typically claim any substantial changes I make to a template, but I always give credit to the original developer. It's great to stand on the shoulders of giants, and you should give them their due in the documentation. Here's the info.php file after I made a few changes:
<?php
/*
Website Baker Project <http://www.websitebaker.org/>
Copyright (C) 2004-2006, Ryan Djurovich
Website Baker is free software; you can redistribute it and/or modify
it under the terms of the GNU General Public License as published by
the Free Software Foundation; either version 2 of the License, or
(at your option) any later version.
Website Baker is distributed in the hope that it will be useful,
but WITHOUT ANY WARRANTY; without even the implied warranty of
MERCHANTABILITY or FITNESS FOR A PARTICULAR PURPOSE. See the
GNU General Public License for more details.
You should have received a copy of the GNU General Public License
along with Website Baker; if not, write to the Free Software
Foundation, Inc., 59 Temple Place, Suite 330, Boston, MA 02111-1307 USA
*/
$template_directory = 'aio';
$template_name = 'aio';
$template_version = '1.1';
$template_platform = '2.x';
$template_author = 'Andy Harris, from Erik Coenjaerts (WB port)';
$template_license = '<a href="http://www.1234.info/webtemplates/">Open Source</a>';
$template_description = 'Original design from <a href="http://www.1234.info/webtemplates/">1234.info</a>. Ported to Website Baker by <a href="http://www.coenjaerts.com">Erik Coenjaerts</a>.';
$menu[1]='Main Menu';
$menu[2]='Top Menu';
$menu[3]='Extra Menu';
$block[2]='Sidebar';
$block[3]='News';
?>
Note that the template has the potential for three different types of menus and three blocks of information. ($block[1] is the main content block and is available by default.)
Modifying index.php
For the most part, you can leave index.php alone. However, there are a few modifications you might make. If you look over the file, it's basically plain HTML/HTML with a few PHP functions thrown in. Generally, you can change the HTML code without any worries, but be more careful about the PHP code. The PHP code tends to call special functions defined in the WebsiteBaker code base. Here are the functions and variables you're likely to run across:
- TEMPLATE_DIR: This constant contains the template directory. Use it to make links to the template directory.
- WEBSITE_TITLE: Use this constant to display the website name anywhere in your template.
- PAGE_TITLE: The title of the current page as defined in the menu.
- WEBSITE_HEADER: This constant displays the header defined in the admin panel.
- show_menu(menuID): This is a powerhouse of a function. It analyzes your site structure and uses it to build a navigation structure. It takes a parameter, which is the level of menu. (Typically the left menu is level 1 and the top menu is level 2, but this can be changed.) Note: Some templates use the more advanced show_menu_2() function, which has additional parameters, like the ability to define template code for how the menu displays.
- page_content(blockID): This function is used to display content for the current page. The parameter describes which block of content should display. Use 1 for the main page content, 2 for block 2, and so on.
- page_footer(): Display the page footer identified in the admin panel.
WebsiteBaker features many more constants and functions, but these are the basic ones used in nearly all templates. See the online documentation at www.websitebaker2.org/ for complete documentation. Other CMS systems use the same idea (HTML templates with PHP functions embedded), but of course the function names are a bit different in a different CMS.
You may want to make other modifications of the default template. For example, the Multiflex-3 template includes multilanguage support and a large number of different “Post-it note” features. I generally remove the multilanguage content (because I only speak one language) and change all the “Post-it notes” to use the same CSS style (or remove them all).
Modifying the CSS files
Of course, the most powerful way to change the appearance of your pages is to modify the CSS files. Here's how:
- Make a backup first.
You're very likely to break things when you go mucking around in unfamiliar code, so make a backup first so when you (inevitably) destroy something, you'll be able to get back to a sensible starting place.
- Identify the class you want to modify.
This can be surprisingly difficult in a system you didn't create. Use the Inspect feature of the Chrome or Firebug developer tools to quickly identify which styles act on a particular element and what its class hierarchy is.
- Find the class definition in the CSS sheets.
Note that a system may have more than one CSS file, so find the one containing the class information you're interested in.
- Make incremental changes.
Make small changes and test frequently.
- Test on a local server.
You can make changes directly on the files in your local server. Just reload the page after every change to make sure the changes are being reflected. Of course, you need to have the template installed in your system.
Packaging your template
A template is nothing more than a set of PHP and CSS files (and perhaps some images and other files). It's pretty easy to port a template for installation. Just follow these steps:
- Create a stable version of the template.
It doesn't have to be perfect before you package it, but at a minimum you need to change the info.php page to reflect the new template's name.
- Package the entire directory into a .zip file.
Use a utility like IZArc for Windows or the xip utility that comes installed with Linux or Mac. Save the .zip file with the same name as your template. Note: Don't include the template directory itself in the template; just include any contents of that directory (including subdirectories, if you have them).
- Install the template into your copy of WebsiteBaker.
Install your template the way you do any other template.