
Some people say Microsoft’s Silverlight technology is a “Flash killer,” but I’m not sure that I agree. The similarities are striking. Both Adobe Flash (formerly Macromedia Flash) and Silverlight are browser plug-ins. Both support vector graphics, audio and video playback, animations, and scripting support. But their underlying technologies are different; Flash uses a semi-open binary format, and Silverlight is based on WPF. Before it was called Silverlight, the technology was code-named WPF/E (Windows Presentation Foundation Everywhere). And thanks to good browser support, Silverlight does really run everywhere, at least in theory.
At the time of this writing, Silverlight plug-ins are available for the two big players, Microsoft Internet Explorer and Mozilla Firefox on Windows. Also, a Mac OS X plug-in exists that targets Safari and Mozilla Firefox on the Apple platform. According to Microsoft, other platforms were considered, but given the high market shares of Windows and Mac OS X, these browsers were given priority.
Silverlight 2 requires Windows 2004 SP4 or higher (i.e., Windows XP, Vista, Server 2008) to run. Opera support is planned for a future release; Opera is currently the third most used browser and has a relatively small but very loyal user base. However, since the Opera browser supports the same plug-in API as all successors of the Netscape browsers (i.e., Firefox and other Mozilla browsers), Silverlight 2 works there as well, though currently without official support by Microsoft.
Note
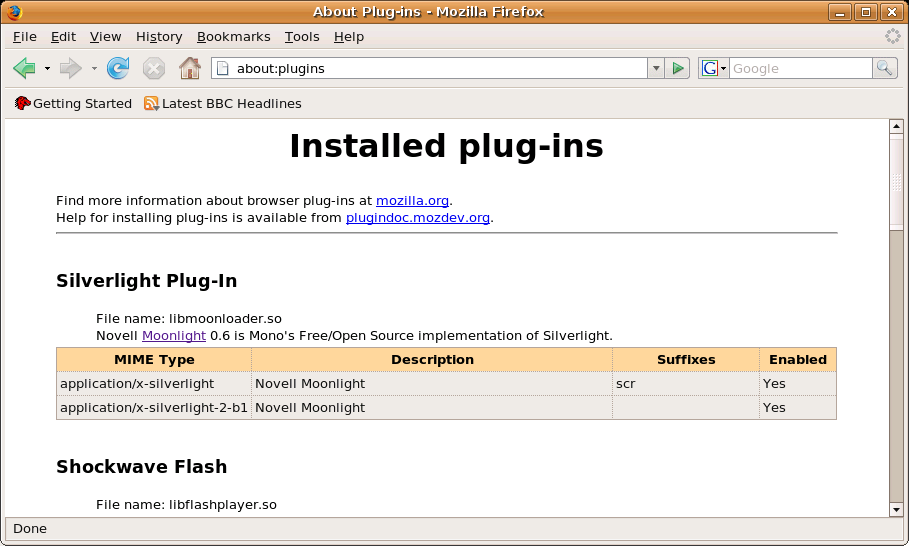
The Mono project (http://www.mono-project.com/), renowned for its open source implementation of .NET, is working on an open source Silverlight port that targets the Linux platform (and the Firefox browser on it). This project is called Moonlight (see http://www.mono-project.com/Moonlight for a sneak peek). http://www.go-mono.com/moonlight/ also provides you with access to up-to-date builds of those efforts, which allow you to test your Silverlight (1.0) applications on Linux (see Figure 3-1). Microsoft has also announced that it is teaming with Novell to support the Moonlight project and bring Silverlight to Linux.
But what exactly is Silverlight, apart from a browser plug-in provider? The heart of the plug-in is the graphics subsystem, which supports a certain subset of WPF (see Chapter 5 for details). It also includes the codes responsible for displaying audio and video content (see Chapter 8 for more information on including multimedia content).
For the programming part of Silverlight, a text editor would suffice, but it is far more productive for you to use a “real” development environment. The most obvious choice is to use some of Microsoft’s offerings. From a code perspective, Visual Studio 2008 is currently the best choice for developing Silverlight 2 content. You will want to use one of the full versions (Standard Edition, Professional Edition, or Team Suite), but Visual Web Developer Express Edition also supports Silverlight to a certain extent.
There are no special prerequisites for installing Visual Studio or Visual Web Developer apart from using Windows XP or higher. You do not even need a web server, as the IDE comes with one! However, if you can, you may want to install Microsoft’s IIS (Internet Information Services). IIS is hidden in the control panel, under Software (Vista: Programs), where you can turn Windows features on and off (see Figure 3-2).
When installing Visual Studio 2008, make sure you select the Visual Web Developer option (see Figure 3-3). Otherwise, the web editor will not be part of your IDE, which you need to create web sites since Silverlight is a web technology, whereas WPF is a desktop technology.


Whatever version of Visual Studio you install, you should apply any available service packs right away. Silverlight 2 requires at least Service Pack 1 of both Visual Studio 2008 and .NET 3.5.
The most convenient way to get your system up-to-date regarding software patches for Microsoft products is to use the built-in Windows Update mechanism. Microsoft Update is an extended version of that service. Windows Update gives you patches only for Windows and core Windows components, such as Internet Explorer, but Microsoft Update also patches other Microsoft products, including Office, Visual Studio, and SQL Server (see Figure 3-4).
Activating Microsoft Update depends on which Windows edition you are using. For versions prior to Windows Vista, just go to the update web site, which will install the feature (http://update.microsoft.com/microsoftupdate/). If you are using Windows Vista, launch Windows Update from the Start menu, and then choose the “Get updates for more products” link (see Figure 3-5). The next time you search for updates, you will also get patches for Visual Studio (and other installed Microsoft software, including Silverlight itself!).
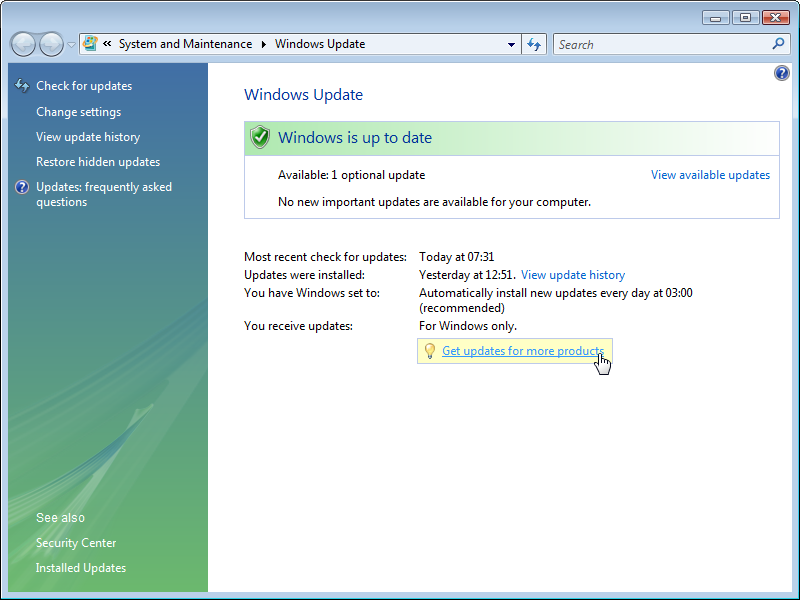
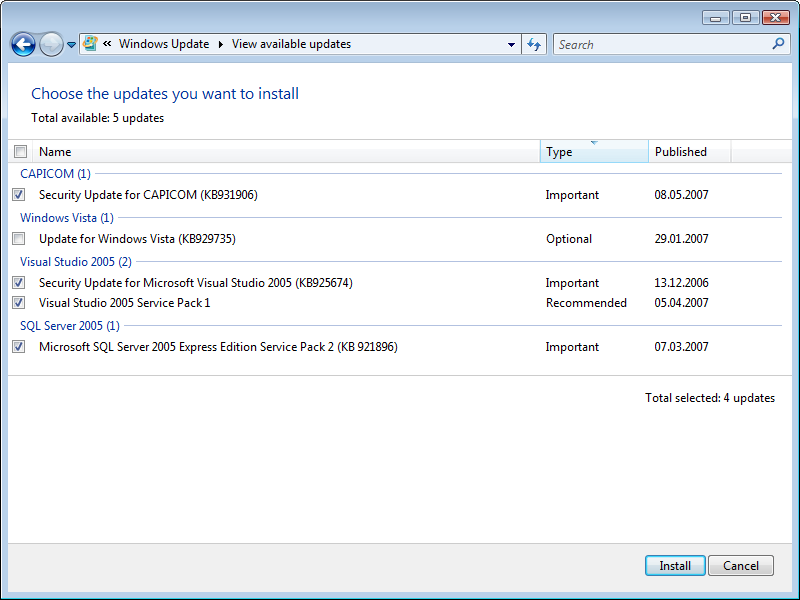
Figure 3-5. Microsoft Update offers you more updates, including those for Visual Studio (here: version 2005)
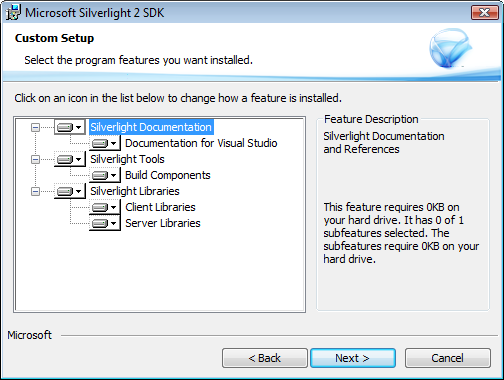
Once the IDE is up and running, it is time to make it Silverlight-aware. For both Silverlight 1.0 and 2, Microsoft provides SDKs. We are using the version 2 SDK in this book (see Figure 3-6). The final version of the Silverlight SDK is available in the Microsoft Silverlight download section at http://www.microsoft.com/downloads/details.aspx?FamilyID=8d933343-038f-499c-986c-c3c7e87a60b3&DisplayLang=en. It installs documentation, Silverlight libraries including controls, additional ASP.NET server controls for Silverlight, and tools to enable CLR debugging. The SDK also offers to install a Visual Studio 2008 template. However, if you want to actively develop Silverlight applications, you should install the Visual Studio 2008 Tools for Silverlight. These include additional tools for Visual Studio’s Silverlight support. Visual Studio then gets several new templates, including a C# web site project template section for Silverlight (see Figure 3-7). Starting with a template such as this facilitates all subsequent steps, since a web site based on these templates comes with a lot of helper code so that you don’t have to type it all in. The Visual Studio 2008 Tools for Silverlight are part of a bigger package: an all-in-one installer that installs the SDK, the Visual Studio add-in, and a developer version of the Silverlight browser plug-in (see Figure 3-8). You can download the installer from http://www.microsoft.com/downloads/details.aspx?FamilyID=c22d6a7b-546f-4407-8ef6-d60c8ee221ed&DisplayLang=en.
Caution
The Visual Studio 2008 Tools for Silverlight installer requires an
Internet connection to be active, since the developer browser plug-in is
downloaded (despite the size of the installer). If your development
machine has a slow Internet connection or no access at all, the
following workaround should get you started: open up a command prompt
and execute Silverlight_Tools.exe /x. This extracts
the contents of the installer instead of running the GUI. Then download
the Silverlight developer plug-in (a file called
Silverlight.2.0_Developer.exe) from http://go.microsoft.com/fwlink/?LinkId=127693 and place
it in the same directory in which you extracted the all-in-one
installer. Finally, execute the file
SPInstaller.exe, and the installation should run
smoothly.


Now you are ready to create Silverlight content, at least in a code editor. Before you actually start developing, you should download a package called Silverlight SDK Documentation from http://www.microsoft.com/downloads/details.aspx?FamilyID=bce7684a-507b-4fc6-bc99-6933cd690cab&DisplayLang=en. It contains a huge CHM (Compiled HTML Help) file that serves as an offline reference for various Silverlight topics (see Figure 3-9).

To create Silverlight content, you first need to create a Silverlight project. There are two ways to do this in Silverlight 2. The first is to create a web site and “just” use XAML and JavaScript in there. No compilation is needed; however, your coding is limited to the scripting language. The second option is to create a web project, including compilation, but also offering .NET support. In this section, we will show you the former option; A Second Silverlight Example: Creating a Project later in this chapter will cover the latter (and recommended) option.
Thanks to the Silverlight SDK’s Visual Studio template, both options consist of relatively few steps. If you are using Visual Web Developer Express Edition, you can’t use a project; you need to create all of your files manually (and are limited to the first option). The best way to begin is to go to http://www.oreilly.com/catalog/9780596519988 and download the book’s samples and start with those files.
In Visual Studio, choose File→New Web Site (not File→New Project!). There, you will find a Silverlight Script Web entry (see Figure 3-10).

The web site that the Silverlight template creates initially consists of the following files:
Caution
On one of my systems, I kept getting strange error messages with previous Silverlight versions stating that Visual Studio could not access the Scene.xaml.js file, as it was called back then. I later found out that the guilty party was my antivirus software. By default, Windows does not show file extensions, so Scene.xaml.js shows as Scene.xaml. Because a JavaScript file may contain malicious code (especially if run locally), some viruses use this technique and my antivirus software wanted to protect me from that danger. All I could do at that point was move my Silverlight development into a secured environment and disable the resident shield of my antivirus software. With Silverlight 2, this has been fixed with the use of a different file naming scheme.
First, open the Default.html file and run the solutions (press F5 for debugging mode, Ctrl-F5 for release mode). A browser window will open, but instead of fancy Silverlight content, you will get a message stating that Silverlight needs to be installed. (If you have already installed Silverlight, you will immediately see the content, of course.) Figure 3-11 shows how this looks, regardless of what supported browser and operating system you are using.
The plug-in comes as an installation program; Figure 3-12 shows the Windows version. You may need to restart your browser afterward. After installing Silverlight, the content will appear, as Figure 3-13 shows.


Before we dive deeper into the world of Silverlight, let’s take a closer look at the files that came with the template. We will not look at the XAML file (and the associated JavaScript script), because it uses quite a number of techniques that we will cover throughout this book. Let’s start with the Default.html file (omitting some JavaScript code). It is reprinted in Example 3-1.
Example 3-1. The sample HTML file (Default.html)
<html xmlns="http://www.w3.org/1999/xhtml">
<head>
  <title>Silverlight</title>

  <script type="text/javascript" src="Silverlight.js"></script>
  <script type="text/javascript" src="Scene.js"></script>
    <style type="text/css">
    #errorLocation {
      font-size: small;
      color: Gray;
    }
    #silverlightControlHost {
      height: 480px;
            width: 640px;
    }

  </style>
</head>

<body>
    <!-- Runtime errors from Silverlight will be displayed here.
  This will contain debugging information and should be removed or hidden when
     debugging is completed -->
  <div id='errorLocation'></div>

  <div id="silverlightPlugInHost">
    <!-- omitted some JavaScript code here -->
  </div>
</body>
</html>
So, quite a number of things happen in this file:
You especially need to remember the ID of the <div> container because it will later hold
the Silverlight file. However, you need to tell JavaScript (and the
Silverlight) plug-in explicitly where to put the content. In previous
versions, this was done in a file called Default.html.js; with Silverlight 2, the
associated code resides directly within the <div id="silverlightPlugInHost">
element and is shown in Example 3-2.
Example 3-2. The JavaScript file that loads the Silverlight content (from Default.html)
<script type="text/javascript">
  if (!window.Silverlight)
    window.Silverlight = {};

  Silverlight.createDelegate = function(instance, method) {
    return function() {
          return method.apply(instance, arguments);
      }
  }

  var scene = new ScriptWeb1.Scene();

  Silverlight.createObjectEx({
    source: 'Scene.xaml',
    parentElement: document.getElementById('silverlightPlugInHost'),
    id: 'silverlightPlugIn',
    properties: {
      width: '100%',
      height: '100%',
      background:'white',
      version: '1.0'
    },
    events: {
      onLoad: Silverlight.createDelegate(scene, scene.handleLoad),
      onError: function(sender, args) {
      var errorDiv = document.getElementById("errorLocation");
      if (errorDiv != null) {
        var errorText = args.errorType + "- " + args.errorMessage;

        if (args.ErrorType == "ParserError") {
          errorText += "<br>File: " + args.xamlFile;
          errorText += ", line " + args.lineNumber;
          errorText += " character " + args.charPosition;
        }
        else if (args.ErrorType == "RuntimeError") {
          errorText += "<br>line " + args.lineNumber;
          errorText += " character " +  args.charPosition;
        }
        errorDiv.innerHTML = errorText;
      }
    }
    },
    context: null
  });
</script>
As you can see, the code first instantiates the Silverlight.Scene object, which we do not need
at the moment, and then executes the Silverlight.createObjectEx() method. This
method is solely responsible for initializing and loading XAML content
with the help of the browser plug-in. The method expects an object as an
argument that holds all relevant information. The syntax of the object
notation using JSON (JavaScript Object Notation) as part of the JavaScript
language syntax is as follows:
{property1: "value1", property2: "value2", ...}The following properties are essential:
parentElementThe ID of the
<div>container where the Silverlight content will be shown on the page.sourceThe URL of the XAML file to be loaded.
idAn identification for Silverlight content that will later facilitate JavaScript access to Silverlight.
propertiesA set of properties, including the dimensions of the content (
width,height), and the background color (background).versionThe Silverlight plug-in version is at least required to run the example (part of the properties).
The events property is used to
wire up events, which we will cover in greater detail in Chapter 6.
Since this first example contains a bit too much complexity for a
simple “Hello World” file, we will now create our own Silverlight
application. Create a new XML file and call it HelloWorld.xaml. The root element of every
Silverlight XAML file is <Canvas>
(this may be compared to a <div>
element in HTML or to ASP.NET’s <asp:Panel>). In there, you will put an
orange rectangle (<Rectangle>)
element and a text block (<TextBlock>) element. In the end, your
markup should look like Example 3-3.
Example 3-3. A simple “Hello World” XAML file (HelloWorld.xaml)
<Canvas xmlns="http://schemas.microsoft.com/client/2007"
        xmlns:x="http://schemas.microsoft.com/winfx/2006/xaml">
  <Rectangle Width="300" Height="150" Stroke="Orange" StrokeThickness="15" />
  <TextBlock FontFamily="Arial" FontSize="56" Canvas.Left="25" Canvas.Top="40"
             Foreground="Black" Text="Silverlight" />
</Canvas>
IntelliSense will help as you type, as Figure 3-14 shows.

The next file to be created is HelloWorld.html, which will contain both the
HTML markup and the JavaScript code to load the XAML. You can use the
Default.html file as a basis and
remove all unnecessary elements (e.g., the extra JavaScript code related
to the scene). Don’t forget to provide the correct XAML URL in the
source property. At the end, you should
have something similar to Example 3-4. For brevity, we set
the onError property (the Silverlight
error handler) to null and removed
onLoad, so errors are not specifically
handled and no code is executed upon loading of the XAML file. You could,
of course, also stick to the error handling code from Default.html.
Example 3-4. A simple “Hello World” HTML file (HelloWorld.html)
<html xmlns="http://www.w3.org/1999/xhtml">
<head>
  <title>Silverlight</title>

  <script type="text/javascript" src="Silverlight.js"></script>
  <script type="text/javascript" src="Scene.js"></script>
    <style type="text/css">
    #errorLocation {
      font-size: small;
      color: Gray;
    }
    #silverlightControlHost {
      height: 480px;
            width: 640px;
    }

  </style>
</head>

<body>
    <!-- Runtime errors from Silverlight will be displayed here.
  This will contain debugging information and should be removed or hidden
  when debugging is completed -->
  <div id='errorLocation'></div>

  <div id="silverlightPlugInHost">
        <script type="text/javascript">
      if (!window.Silverlight)
        window.Silverlight = {};

      Silverlight.createObjectEx({
        source: 'HelloWorld.xaml',
        parentElement: document.getElementById('silverlightPlugInHost'),
        id: 'silverlightPlugIn',
        properties: {
          width: '400',
          height: '300',
          background:'white',
          version: '1.0'
        },
        events: {
          onError: null
        },
        context: null
      });
    </script>
  </div>
</body>
</html>
Running this example in the browser will work like a charm. If you still don’t have the Silverlight plug-in installed, you will be prompted to do so, and then you will see the text and the orange rectangle, just as in Figure 3-15.

The only file we haven’t looked at yet is Silverlight.js. This JavaScript library takes care of several things: it tries
to detect the web browser (unfortunately, it has the same habit as ASP.NET
Ajax and accepts only Firefox of all the Mozilla browsers, e.g., SeaMonkey, the soon-to-be-defunct Netscape,
and others), provides the Silverlight.createObjectEx() method,
and helps access the Silverlight content using a JavaScript API (see Chapter 15 for more information). Just copy the Silverlight.js file into all Silverlight
applications to have this functionality.
As previously mentioned, Silverlight 2 supports .NET languages such as C# for implementing the logic of an application. The Silverlight plug-in is capable of executing this .NET code (or, to be exact, the Microsoft Intermediate Language [MSIL] code created during compilation). To create such an application with Visual Studio 2008, you need to create a web project based on the Silverlight template included as a part of the SDK installation. This template will create two projects: one for the actual Silverlight application and one for the web site hosting the Silverlight content. At first this may look a bit more cumbersome than the single-project approach in the previous section, but it also helps us to keep Silverlight content and HTML/JavaScript code separate.
The application that you create here will be the basis for all the
remaining examples in this book. We chose to call it Silverlight, but you can choose another name if
you want. As you will see later, the web site will be called Silverlight_Web. By default, the project uses
the built-in development of Visual Studio and assigns a random port. This
port will be 12345 throughout the book, but all examples also work on
other free ports and also when using IIS instead.
In Visual Studio, choose File→New Project (not File→New Web Site!),
and open the Visual C# node. There you will find a Silverlight
Application entry (see Figure 3-16). You can provide a
name for both the project and the associated solution; we used Silverlight in both cases. Then an application
wizard will pop up (see Figure 3-17), asking you whether
you want to automatically create a web page to debug the Silverlight
application. Here, you have the following choices:
- Add a new ASP.NET Web project to the solution to host Silverlight
Creates a new web site (default name:
<project name>.Web- Automatically generate an HTML test page to host Silverlight at build time
The control (or in our case, application) you are about to create will automatically create a test page upon compilation. This is a convenient option, but it makes adding JavaScript code a bit harder.
- Link this Silverlight control into an existing Web site
Creates a test page for the current application in an existing web site. It is disabled when initially creating an application based on the Visual Studio template. When activated, you may additionally choose whether you want to make the test page the default page and whether you want to enable debugging.


Using the first option here, we created a web site (using the name
Silverlight_Web,
to keep in sync with previous Silverlight 2 versions) that will hold
sample files for all our Silverlight applications. So, every application
will be in its own project but will be part of the Silverlight Visual Studio solution. When adding
a new project to the solution, the third option (“Link this Silverlight
control into an existing Web site”) is available and will be used to
create a new test page in the existing web site (see Figure 3-18).

If you now take a look at the Silverlight_Web project, you will see these
files and folders:
The Silverlight project initially
contains these files:
So, the bulk of the work is done in the Page.xaml and Page.xaml.cs files. More advanced examples will also use additional files, but for your first steps, you should be set with these files.
Create a new Silverlight Control project within the current
solution, and call it HelloWorld. You will now get a new test
page, HelloWorldTest.aspx, and a new
project called HelloWorld. Open the
Page.xaml file, which currently looks
as follows:
<UserControl x:Class="HelloWorld.Page"
    xmlns="http://schemas.microsoft.com/winfx/2006/xaml/presentation"
    xmlns:x="http://schemas.microsoft.com/winfx/2006/xaml"
    Width="400" Height="300">
    <Grid x:Name="LayoutRoot" Background="White">

    </Grid>
</UserControl>
The root node is <UserControl> (contrary to the layout in
the previous section), and within that node, a
<Grid> element is used (more on this XAML element
in Chapter 5). We can, however, replace it with the
well-known <Canvas> element as
long as we take care that the x:Name="LayoutRoot"
attribute remains intact. Within this <Canvas> element, you can place
all of the XAML elements you want to use in your application (see Example 3-5).
Example 3-5. A simple “Hello World” Silverlight application (Page.xaml, project HelloWorld)
<UserControl x:Class="HelloWorld.Page"
    xmlns="http://schemas.microsoft.com/winfx/2006/xaml/presentation"
    xmlns:x="http://schemas.microsoft.com/winfx/2006/xaml"
    Width="400" Height="300">
    <Canvas x:Name="LayoutRoot" Background="White">
        <Rectangle Width="300" Height="150"
                   Stroke="Orange" StrokeThickness="15" />
        <TextBlock FontFamily="Arial" FontSize="56"
                   Canvas.Left="25" Canvas.Top="40"
                   Foreground="Black" Text="Silverlight" />
    </Canvas>
</UserControl>
Let’s have a look at the HelloWorldTestPage.aspx file. It contains the following code:
<%@ Page Language="C#" AutoEventWireup="true" %>

<%@ Register Assembly="System.Web.Silverlight"
    Namespace="System.Web.UI.SilverlightControls" TagPrefix="asp" %>

<!DOCTYPE html PUBLIC "-//W3C//DTD XHTML 1.0 Transitional//EN"
  "http://www.w3.org/TR/xhtml1/DTD/xhtml1-transitional.dtd">

<html xmlns="http://www.w3.org/1999/xhtml" style="height:100%;">
<head runat="server">
    <title>Test Page For HelloWorld</title>
</head>
<body style="height:100%;margin:0;">
    <form id="form1" runat="server" style="height:100%;">
    <div>
        <asp:ScriptManager ID="ScriptManager1" runat="server"></asp:ScriptManager>
        <div style="height:100%;">
            <asp:Silverlight ID="Xaml1" runat="server"
                             Source="~/ClientBin/HelloWorld.xap"
                             MinimumVersion="2.0.310050"
                             Width="100%" Height="100%" />
        </div>
    </div>
    </form>
</body>
</html>
The <%@ Register %>
directive loads a special Silverlight library that contains the
<asp:Silverlight> control. This
control can load a Silverlight XAML application; the file extension used
for that is .xap. By the way,
if you are wondering where the ClientBin directory and HelloWorld.xap came from, they were created
during compilation. Basically, a .xap
file is a ZIP archive containing the XAML markup, the compiled server-side
code, and additional resources. The Silverlight plug-in then unpacks this
archive and executes the application within.
The XAML markup resulting from loading HelloWorldTestPage.aspx contains JavaScript code that is doing essentially what the Visual Studio 2008 Silverlight Script Web template is doing—it loads the XAMP application. If you run the HelloWorldTestPage.aspx page, you will get a result very similar to the one in Figure 3-15.
Note
Apart from the HelloWorldTestPage.aspx file, Silverlight also creates an HTML/JavaScript-only file called HelloWorldTestPage.html. As of this writing, the markup generated by the .aspx file is not compatible with the Opera browser, but the .html file is.
The adoption rate of new Silverlight versions should be quite high. By default, Silverlight checks once a day to see whether there is a new version (whenever the user visits a site with Silverlight content). You can change this setting in the Silverlight configuration dialog (see Figure 3-19) available when right-clicking on any Silverlight content. If there is a new version, the user is prompted to download and install the new plug-in (see Figure 3-20 for the update dialog on Mac OS X). Depending on the operating system and configuration, this might even happen automatically.


Now that you’ve set up your development environment and created your first applications, let’s take a quick look in Chapter 4 at tools available or coming soon from Microsoft and others to make the job easier.
- http://silverlight.net/GetStarted/
All the resources you need to get started with Silverlight
- http://silverlight.net/quickstarts/
Silverlight quickstarts that touch upon many features