
Adobe Flash has made a remarkable transition in the past few years. Market penetration of the Flash player (the plug-in) has always been very high, but whenever a new player version came out, it took several months for it to reach a good-size audience. However, this adoption has sped up significantly recently. There may be many reasons for this, but one of the most compelling is that recent Flash versions have acquired much better video support. Given that video sites such as YouTube are extremely popular at the moment, they prompt users to install the latest player to see the content.
Multimedia support is a key feature of many browser plug-ins, and Silverlight clearly does not want to disappoint its users here. For obvious reasons, the supported media formats are biased toward Microsoft’s offerings. Silverlight supports Windows Media Audio (WMA) and Windows Media Video (WMV) files, versions 7 through 9. Also, WMVA and WMVC1, two rather new video formats from Microsoft, are supported. The only external format Silverlight can process is the very popular MP3 audio format.
There is a reason for this bias, however. The plug-in plays content in these formats without the help of any other software or player. So, it is not necessary to have an MP3 player or even Windows Media Player to play supported multimedia content in Silverlight. This applies to both the Windows and Mac platforms.
Silverlight also supports streaming, in the form of either Windows Media Server streaming data, or ASX files. Note, however, that the stream support has some limitations: the content may not be paused and not all ASX features are supported. Refer to the Silverlight SDK for a list of restrictions when using streamed multimedia data.
Ideally, you already have your audio or video data in the correct format and can directly embed it into your Silverlight application (see Embedding Multimedia later in this chapter for details). However, usually at least one step remains—converting the audio data. For example, the audio data could be in the wrong format, the video data might be too big for reasonable web playback, or you would like to add some markers to a video presentation. You can use some helpful tools to get your multimedia data into the right format.
Starting with Windows XP, Microsoft began bundling a simple but reasonable video editing tool: the Windows Movie Maker. If you are using Windows XP and don’t see it in your Start menu, you might want to visit Windows Update (menu entry in Internet Explorer’s Tools menu) and install it from there. Windows Vista users will find the Windows Movie Maker in their Start menu. However, there is a catch; if you have an outdated video card, its hardware acceleration may not be good enough for Windows Movie Maker (see Figure 8-1). Also, some editions of Windows don’t come with Windows Movie Maker. If this is the case, there is one more option: an older Windows Movie Maker version, 2.6, has been made available for Windows Vista. You can download it from http://www.microsoft.com/downloads/details.aspx?FamilyID=d6ba5972-328e-4df7-8f9d-068fc0f80cfc&DisplayLang=en.
Note that Windows Movie Maker needs some libraries installed by Windows Media Player. Some Windows editions (the ones whose names are ending in “N”—e.g., Vista Business N) do not come with Windows Media Player, but you can download it too: http://www.microsoft.com/downloads/details.aspx?FamilyID=1d224714-e238-4e45-8668-5166114010ca&DisplayLang=en. Do not let the name of the download page confuse you: although it says that you get “Windows Media Player 11 for Windows XP,” it also runs under Windows Vista and restores the Windows Media components there, as you can see in Figure 8-2.
Note
Make sure you visit Windows Update after installing Windows Media Player, since there have been some security updates for this product recently.


Figure 8-2. “N” editions of Windows XP and Windows Vista can get Windows Media Player and Windows Movie Maker
You can import a number of formats into Windows Movie Maker, including AVI. Within the software, you can also cut the video and add special effects, including rotating effects (see Figure 8-3). For instance, the sample video used in this chapter was originally recorded in portrait mode, but cameras usually default to landscape mode. Windows Movie Maker provided an easy way to get the video into the right orientation.

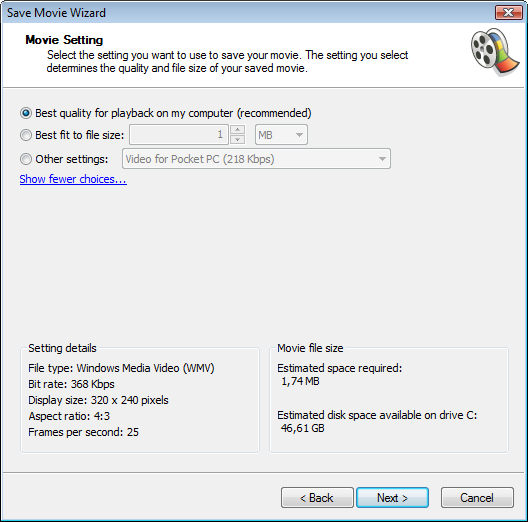
After editing the video, you can export it using File→Save Movie File. You can tune the output format quite a bit (see Figure 8-4). If you optimize it for web play, you have a lower quality, but the file size can get drastically smaller. If you want to retain reasonable video and audio quality, the trade-off may be a big file size. Experiment a bit with the settings to find a good compromise between size and quality.
Another video editing option is a tool from the Microsoft Expression offerings (Chapter 4 introduced other tools from that product line): the Microsoft Expression Media Encoder (see Figure 8-5).
As of this writing, you can get a time-limited trial version of version 2 of the Encoder from http://www.microsoft.com/downloads/details.aspx?FamilyID=A04DCC8C-9DB7-41CB-A27C-08CBEB0A01BA&DisplayLang=en (the full version is available for purchase). You will also want to install the associated Service Pack 1 from http://www.microsoft.com/downloads/details.aspx?FamilyID=a29be9f9-29e1-4e70-bf67-02d87d3e556e&DisplayLang=en. The Expression Media Encoder installs special profiles for generating Silverlight content.

A third option, available only for Windows versions 2000 and XP, is the Windows Media Encoder 9 series. This is available for download from http://www.microsoft.com/downloads/details.aspx?FamilyID=5691ba02-e496-465a-bba9-b2f1182cdf24&DisplayLang=en. Figure 8-6 shows the software in action.

An advanced multimedia feature that can be really convenient, especially with video data, is marker support. This lets you mark special points within a media file. You can compare this to the chapters of a movie on a DVD, where you can jump between chapters to reach a certain point in the movie.
The same things are valid for markers. You can define markers, either within the media file (covered in this section) or, temporarily, within the Silverlight application (covered later in Working with markers). Silverlight provides a C# API that can access markers and also determine when a marker has been reached.
The Windows Media File Editor component of the Windows Media Encoder allows markers to be inserted into Microsoft’s video formats. Figure 8-7 shows what this looks like. Just navigate to certain positions in the file, provide a name, and you have a marker. Microsoft Expression Media Encoder also allows you to set markers in the UI. The marker editor resides by default in the top-right corner and is displayed in Figure 8-8.


When you convert media data into one of the supported formats, the whole file will then be loaded from the Silverlight plug-in and will play. A much better option, of course, is to use streaming video. With streaming video, the file resides at a (usually fast) remote server, the amount of data transferred can be adapted to the connection speed of the current user, and it is impossible to directly download the media file. Various streaming options exist, but for Silverlight users, the Windows Media Server is a good choice. Microsoft has recently started to offer more or less free Silverlight streaming. “More or less free” means there are some restrictions, but for many scenarios, they do not hurt the application. Currently, the maximum speed for streaming is 700 kbps, and the streamed files may comprise up to 4 GB of space. The streaming service is currently in alpha, and later versions will add additional restrictions, but plans include 1 million minutes of streaming per month or unlimited streaming if you agree to have advertisements shown.
The streaming service’s home page, http://silverlight.live.com/, contains up-to-date information about the streaming service and the current restrictions.
There are two ways to use the streaming service. You can either host your complete Silverlight application on the streaming server, or just put your video file up on the server and reference it in your locally hosted Silverlight application. At the time of this writing, the service and API are frequently changing, so we will discuss it only briefly here.
Figure 8-9 shows the streaming site, and Figure 8-10 shows how you can upload your own files and applications to the service. You can find more information in the web-based Silverlight streaming SDK at http://dev.live.com/silverlight/.


Tip
If you are using Microsoft Expression Media Encoder, the application already comes with suitable Silverlight profiles for exporting content. However, when you want to use the Windows Media Encoder, you can find Silverlight profiles at:
Regardless of
whether you want to use video or audio data, you need to know about only
one element: <MediaElement>. It takes care of playing the media content, as long as the
format is supported.
<MediaElement> supports a number of attributes. Some of them are general, and
some of them are media-specific.
For example, the NaturalVideoWidth and NaturalVideoHeight
properties/attributes determine the size of the video. Obviously, this
does not make sense for audio content because these two properties have
the value 0.
The most important attribute is Source. It provides
the URL of the audio or video data to play. Since audio data is just a
special case of video data (no visual output), we will focus on video in
this chapter. Example 8-1 shows the simplest Silverlight
video player imaginable. Figure 8-11 shows the output
in the browser.
Example 8-1. A simple video player (Page.xaml, project Player)
<UserControl x:Class="Player.Page"
        xmlns="http://schemas.microsoft.com/client/2007"
        xmlns:x="http://schemas.microsoft.com/winfx/2006/xaml"
        Width="640"
        Height="480"
        >
  <Grid x:Name="LayoutRoot" Background="White">
    <Canvas Canvas.Left="25" Canvas.Top="25">
      <MediaElement Source="video.wmv"/>
   </Canvas>
  </Grid>
</UserControl> 
What’s missing in Figure 8-11? The UI for using the player. This is not shipped as part of Silverlight; however, Silverlight provides a powerful C# API for controlling multimedia content, which we will discuss in Controlling Multimedia later in this chapter.
Note
We will now successively add features to the player. The filenames remain the same, but the number of features grows. In the downloadable code for this book, you will see the final version (see http://www.oreilly.com/catalog/9780596519988).
The Silverlight SDK contains a complete list of
<MediaElement> attributes. We will introduce a number
of them throughout the chapter, but some of them are of general interest
and will be discussed here:
AutoPlayBy default, referenced media files are played as soon as the application has been fully loaded. You can disable this behavior by setting the attribute/property to
False.BalanceThis provides the audio volume ratio between the left and right speakers.
–1means that all audio is played in the left speaker only, and1means that all audio is played in the right speaker only. The default value of0means that the audio is evenly shared between the left and right speakers. You can choose any float values in between.IsMutedThis is a Boolean value that depends on whether the audio output by the
<MediaElement>is muted (True) or not (False).NaturalDurationThis is the duration of the media file; it can only be read, not set.
NaturalVideoHeightThis is the height of the video. It is
0for audio files, and it can only be read, not set.NaturalVideoWidthThis is the width of the video. It is
0for audio files, and it can only be read, not set.StretchThis stretches the media if the display area is greater than the video size. The following options are available:
NoneFillThe video fills up the available area, losing its aspect ratio.
UniformThe video size is increased, maintaining the aspect ratio, until the video has the width or the height of the display area.
UniformToFillThe video size is increased, maintaining the aspect ratio, until the video width and height are both greater than or equal to the width and height of the display area. If necessary, parts of the video are cropped.
VolumeThe audio volume has a value between
0(muted) and1(the maximum volume made available by the operating system). The default value is0.5.
Warning
When (programmatically) assigning a value to
Volume, make sure you always provide a string value.
JavaScript can usually automatically convert numbers into strings, but
the Silverlight API will complain.
<MediaElement> plays
a media file. If it is audio, the sound is played. If it
is video, the video is shown (and if there is sound within the video,
the sound is played too). Apart from that,
<MediaElement> does not have any kind of output or
UI. Instead, you need to create your own UI. Figure 8-12 shows a simple UI for our Silverlight media
player. It was initially created in Expression Design, exported as XAML,
imported into Expression Blend 2.5, and then tweaked and tuned. To keep
the code size maintainable and printable, very basic structures were
used to create the UI.

The UI consists of several buttons and other elements:
A play and pause button (depending on the state of the media content)
A button to jump to the previous marker
A button to jump to the next marker
Buttons to increase and decrease the volume
Text containing the current volume level
A timeline that serves as a progress bar for the media playback, including a pointer
A text field that will later show the name of any marker (not visible at the moment)
The XAML file is structured so that every button (including
<Path> elements on the button) is grouped in a
<Canvas> element. We use attributes to assign event handlers. Example 8-2 shows the complete XAML markup for the UI. Don’t
worry about whether the meaning of all the event handlers is obvious at
the moment. Here is a list of all of the assigned handler
functions:
PlayOrPause()Called when the play/pause button is pressed; needs to play or pause the media content
GotoPreviousMarker()Called when the previous marker button is pressed; needs to seek to the position of the previous marker, if available
GotoNextMarker()Called when the next marker button is pressed; needs to seek to the position of the next marker, if available
VolumeUp()Called when the upper volume button is pressed; needs to increase the volume by
0.1, if possibleVolumeDown()Called when the lower volume button is pressed; needs to decrease the volume by
0.1, if possibleShowMarker()Called when a marker is reached; needs to display the name of that marker
InitVideo()Called when the video header has been loaded; needs to initialize the application and also start updating the progress bar pointer’s position
We will discuss these event handlers in more detail when we write the associated code. You will also learn the significance of the two storyboards at the end of the XAML file.
Example 8-2. The Silverlight media player, the XAML file (Page.xaml, project Player)
<UserControl x:Class="Player.Page"
        xmlns="http://schemas.microsoft.com/client/2007"
        xmlns:x="http://schemas.microsoft.com/winfx/2006/xaml"
        Width="1000"
        Height="600">
  <Grid x:Name="LayoutRoot" Background="White">
    <Canvas Canvas.Left="25" Canvas.Top="25">
      <Canvas x:Name="PlayerControls">
        <Canvas x:Name="PlayPause" MouseLeftButtonUp="playOrPause">
          <Rectangle Width="122.014" Height="91.0105"
            Canvas.Left="-0.50001" Canvas.Top="-0.5"
            Stretch="Fill" StrokeLineJoin="Round"
            Stroke="#FF000000" Fill="#FF000000"/>
          <Path x:Name="Path" Width="53.5274" Height="58.6534"
            Canvas.Left="13.9888" Canvas.Top="17.1706"
            Stretch="Fill" StrokeLineJoin="Round"
            Stroke="#FF000000" Fill="#FFFFFFFF"
            Data="F1 M 67.0161,47.9973L 14.4888,17.6706L 14.4888,75.324L
            67.0161,47.9973 Z"/>
          <Rectangle Width="12.9994" Height="46.9976"
            Canvas.Left="73.5164" Canvas.Top="24.5136"
            Stretch="Fill" StrokeLineJoin="Round"
            Stroke="#FF000000" Fill="#FFFFFFFF"/>
          <Rectangle Width="12.9994" Height="46.9976"
            Canvas.Left="91.5155" Canvas.Top="24.5138"
            Stretch="Fill" StrokeLineJoin="Round"
            Stroke="#FF000000" Fill="#FFFFFFFF"/>
        </Canvas>
        <Canvas x:Name="Marker">
          <Canvas x:Name="PrevMarker" MouseLeftButtonDown="gotoPreviousMarker">
            <Rectangle Width="122.014" Height="91.0105"
              Canvas.Left="149.003" Canvas.Top="-0.5"
              Stretch="Fill" StrokeLineJoin="Round"
              Stroke="#FF000000" Fill="#FF000000"/>
            <Rectangle Width="12.9994" Height="46.9976"
              Canvas.Left="170.511" Canvas.Top="24.5139"
              Stretch="Fill" StrokeLineJoin="Round"
              Stroke="#FF000000" Fill="#FFFFFFFF"/>
            <Path Width="53.5274" Height="58.6534"
              Canvas.Left="191.245" Canvas.Top="17.6856"
              Stretch="Fill" StrokeLineJoin="Round"
              Stroke="#FF000000" Fill="#FFFFFFFF"
              Data="F1 M 191.745,45.5123L 244.273,75.839L 244.273,18.1856L
              191.745,45.5123 Z "/>
          </Canvas>
          <Canvas x:Name="NextMarker" MouseLeftButtonDown="gotoNextMarker">
            <Rectangle Width="122.014" Height="91.0105"
              Canvas.Left="301.486" Canvas.Top="-0.5"
              Stretch="Fill" StrokeLineJoin="Round"
              Stroke="#FF000000" Fill="#FF000000"/>
            <Path Width="53.5273" Height="58.6534"
              Canvas.Left="327.24" Canvas.Top="17.6856"
              Stretch="Fill" StrokeLineJoin="Round"
              Stroke="#FF000000" Fill="#FFFFFFFF"
              Data="F1 M 380.267,48.5123L 327.74,18.1856L 327.74,75.8391L
              380.267,48.5123 Z "/>
            <Rectangle Width="12.9994" Height="46.9976"
              Canvas.Left="387.502" Canvas.Top="24.5138"
              Stretch="Fill" StrokeLineJoin="Round"
              Stroke="#FF000000" Fill="#FFFFFFFF"/>
          </Canvas>
          <TextBlock x:Name="MarkerName" FontFamily="Segoe UI" FontSize="24"
            Foreground="#FF000000" Canvas.Left="50" Canvas.Top="150" />
        </Canvas>
        <Canvas x:Name="Volume">
          <Canvas x:Name="Up" MouseLeftButtonDown="volumeUp">
            <Rectangle Width="122.014" Height="43.0129"
              Canvas.Left="452.987" Canvas.Top="-0.5"
              Stretch="Fill" StrokeLineJoin="Round"
              Stroke="#FF000000" Fill="#FF000000"/>
            <Path Width="88.9956" Height="24.0292"
              Canvas.Left="468.496" Canvas.Top="8.87177"
              Stretch="Fill" StrokeLineJoin="Round"
              Stroke="#FF000000" Fill="#FFFFFFFF"
              Data="F1 M 512.994,9.37177L 468.996,32.401L 556.992,32.401L
              512.994,9.37177 Z "/>
          </Canvas>
          <Canvas x:Name="Down" MouseLeftButtonDown="volumeDown">
            <Rectangle Width="122.014" Height="43.0128"
              Canvas.Left="452.987" Canvas.Top="46.5052"
              Stretch="Fill" StrokeLineJoin="Round"
              Stroke="#FF000000" Fill="#FF000000"/>
            <Path Width="88.9955" Height="24.0292"
              Canvas.Left="467.497" Canvas.Top="55.9971"
              Stretch="Fill" StrokeLineJoin="Round"
              Stroke="#FF000000" Fill="#FFFFFFFF"
              Data="F1 M 511.995,79.5264L 555.992,56.4971L 467.997,56.4971L
              511.995,79.5264 Z "/>
          </Canvas>
          <TextBlock x:Name="VolumeText" FontFamily="Segoe UI" FontSize="48"
            Text="0.5" Foreground="#FF000000"
            Canvas.Left="590" Canvas.Top="10" />
        </Canvas>
        <Canvas x:Name="Position">
          <Rectangle x:Name="Timeline" Width="669.987" Height="12.9994"
            Canvas.Left="-0.5" Canvas.Top="119.509"
            Stretch="Fill" StrokeLineJoin="Round"
            Stroke="#FF000000" Fill="#FF000000"/>
          <Rectangle x:Name="Pointer" Width="32.0184" Height="36.9982"
            Canvas.Left="-0.5" Canvas.Top="105.51"
            Stretch="Fill" StrokeLineJoin="Round"
            Stroke="#FF000000" Fill="#FFA01F1F"/>
        </Canvas>
      </Canvas>
      <Canvas x:Name="Player" Canvas.Top="200">
        <MediaElement x:Name="Video" Source="video.wmv" AutoPlay="False"
          MarkerReached="showMarker" MediaOpened="initVideo" />
      </Canvas>
    </Canvas>
    <Canvas>
      <Canvas.Resources>
        <Storyboard x:Name="intervalStoryboard"
          Duration="0:0:1" Completed="intervalStoryboardCompleted" />
        <Storyboard x:Name="timeoutStoryboard"
          Duration="0:0:2" Completed="timeoutStoryboardCompleted" />
      </Canvas.Resources>
    </Canvas>
  </Grid>
</UserControl> The application needs permanent access to the embedded video
file. Since Silverlight 2, you can directly access any XAML element
that has its x:Name attribute set.
However, in this example, we will use the FindName() approach. This is a good
opportunity to see this alternative technique in action; it will also
facilitate re-creating the same effect with JavaScript code.
To have permanent access to the embedded media we save a
reference in a global property whenever the first event handler fires.
This will be the handler for the MediaOpened event (if a user clicks a
button before the video has been loaded, the user’s request cannot be
fulfilled at that time). In the handler function, the global
video property will
be filled:
var video = null;

private void initVideo(object sender, RoutedEventArgs e)
{
    if (video == null)
    {
        video = (sender as MediaElement);
    }
    // ...
}
Silverlight supports several methods for controlling whether given media content is played:
Note
Conveniently, you will not get any C# errors if you try an invalid operation, such as playing media content that is already playing, or pausing stopped media content. So, you do not need any error handling in that respect.
You can determine the current state of the movie by
accessing its CurrentState property. The following
values are possible:
If the video is paused or stopped, the code tries to play it; otherwise, JavaScript tries to pause it:
private void playOrPause(object sender, MouseButtonEventArgs e)
{
    if (video.CurrentState == MediaElementState.Paused ||
        video.CurrentState == MediaElementState.Stopped)
    {
        video.Play();
    } else {
        video.Pause();
    }
}
And indeed, if you include this code in your XAML code-behind C#
file (and also provide empty shells for the other event handler
methods), a click on the movie will play it (note that it does not
start automatically, thanks to
AutoPlay="False"), a second click will pause
it, and a third click will resume it.
You can set the volume of a media file using the aforementioned Volume property (remember
that C# properties are identical to XAML attributes). So, when a user
clicks on the upper volume button, the volume increases by 0.1;
clicking on the lower button decreases the volume by 0.1. In theory,
that’s easy, but you do have to take some extra precautions. First,
you need to make sure the new volume is within the valid interval
(from 0 through 1). Silverlight is not very forgiving when you supply
invalid values here. Therefore, make sure the value is correct. For
instance, when increasing the volume, determine the old volume, add
0.1, and then check whether this is greater than 1.0, like
this:
double newVolume = Math.Min(1.0, video.Volume + 0.1);
Now we can set the new volume:
video.volume = newVolume;
Finally, we display the new volume in the text field. To get rid of any extraneous decimal digits, we cut off everything after the first decimal digit:
TextBlock volumeText = video.FindName("VolumeText") as TextBlock;
volumeText.Text = String.Format("{0:0.0}", newVolume);
Here is the complete code for both the
volumeUp() and the volumeDown() methods:
private void volumeUp(object sender, MouseButtonEventArgs e)
{
    double newVolume = Math.Min(1.0, video.Volume + 0.1);
    video.Volume = newVolume;
    TextBlock volumeText = video.FindName("VolumeText") as TextBlock;
    volumeText.Text = String.Format("{0:0.0}", newVolume);
}

private void volumeDown(object sender, MouseButtonEventArgs e)
{
    double newVolume = Math.Max(0.0, video.Volume - 0.1);
    video.Volume = newVolume;
    TextBlock volumeText = video.FindName("VolumeText") as TextBlock;
    volumeText.Text = String.Format("{0:0.0}", newVolume);
}
When you run the code in the browser, you will actually hear that your code works when clicking on the volume buttons, and you will also see the new volume values, as Figure 8-13 shows.

Although playing and pausing a video is relatively trivial, determining its
current position requires an extra step. Fortunately, a property is
available that exposes this information: position. However, this
property is of type TimeSpan, so you need to be careful when calculating with these
values. A subproperty of any TimeSpan value is TotalSeconds, which converts the
TimeSpan value into a float value, or the number of
seconds (not necessarily integral). You can read out this value and
set it, which we will cover in Working with markers later in
this chapter.
But before that, we will tackle the progress bar. We need to
look up the current position of the media with
video.Position.TotalSeconds. Then we need to determine the length of the media with
Video.NaturalDuration.TimeSpan.TotalSeconds.
The NaturalDuration.Timespan
property also returns a TimeSpan value, so
accessing the TotalSeconds subproperty yields the desired
result.
By dividing the current position by the length of the media, we have a percentage of how much has already been played—for example, 30%. Consequently, we need to put the progress bar pointer at 30% of the progress bar length! Or, to be exact, the center of the progress bar pointer needs to be at 30%. If the pointer has a width of 30 pixels, we need to place it at 30% of the progress bar and then move it 15 pixels (half the length) to the left. Generally speaking, this code calculates the correct position of the pointer, relative to the progress bar:
double currentPosition = video.Position.TotalSeconds;
double length = video.NaturalDuration.TimeSpan.TotalSeconds;
Rectangle progressBar = video.FindName("Timeline") as Rectangle;
Rectangle progressPointer = video.FindName("Pointer") as Rectangle;
double relativePosition = (currentPosition / length) * progressBar.Width -
                          (progressPointer.Width / 2);
The relative position needs to be converted into an absolute
position within the surrounding <Canvas>
element. The easiest way to achieve this is to determine the
position of the progress bar and then just add the relativePosition value:
Canvas.SetLeft(progressPointer, Canvas.GetLeft(progressBar) + relativePosition);
We need to make sure the position is updated again (and again
and again). As of this writing, Silverlight does not have a working
timer component. However, there is a neat workaround. Remember the
Storyboard elements in the XAML
files? We will use them to execute code at a given interval. The
first storyboard has a duration of one second. When the storyboard is
completed, the intervalStoryboardCompleted
private void intervalStoryboardCompleted(object sender, EventArgs e)
{
    double currentPosition = video.Position.TotalSeconds;
    double length = video.NaturalDuration.TimeSpan.TotalSeconds;
    Rectangle progressBar = video.FindName("Timeline") as Rectangle;
    Rectangle progressPointer = video.FindName("Pointer") as Rectangle;
    double relativePosition = (currentPosition / length) * progressBar.Width -
                              (progressPointer.Width / 2);
    Canvas.SetLeft(progressPointer, Canvas.GetLeft(progressBar) + relativePosition);
    (video.FindName("intervalStoryboard") as Storyboard).Begin();
}
In the initVideo() method, intervalStoryboardCompleted()
is then called for the first time by starting intervalStoryboard.
Note
You may want to shorten the interval in which the pointer position is updated so that the pointer moves smoothly over the progress bar.
Figure 8-14 shows the result. The progress pointer is moving as the movie is playing along.

A marker defines a certain spot within a media file. There are at least
two UI approaches for markers. One is to notify the user when a marker
has been reached, and the other is to offer to let the user jump
between markers. Let’s start with the first one. The
MediaElement element supports the
MarkerReached event. When a marker is reached while a
media file is playing, this event is fired. As always, the event
handling function passes two arguments: the sending object (the
MediaElement) and event information. The latter argument
is of great interest here: its marker property provides three fields
from the marker:
The XAML file already contains a text field (named
MarkerName) for the name of the marker. Whenever a marker
is reached, its name is written into that field:
private void showMarker(object sender, TimelineMarkerRoutedEventArgs e)
{
    TextBlock markerName = video.FindName("MarkerName") as TextBlock;
    ...
}
However, it would be a bad idea in terms of usability to let
this information stay where it is. A few seconds later, the name of
the marker may no longer be suitable. Therefore, we remove this text
after two seconds by using a storyboard timeout (timeoutStoryboard):
(video.FindName("timeoutStoryboard") as Storyboard).Begin();


...

private void timeoutStoryboardCompleted(object sender, EventArgs e)
{
    TextBlock markerName = video.FindName("MarkerName") as TextBlock;
    markerName.Text = ""
}
What happens if there are two markers within a span of two
seconds? Imagine that there is one marker at 00:00:02, and one at
00:00:03. The appearance of the first marker sets a timeout that will
be fired at 00:00:04; the second marker sets a timeout that will be
fired at 00:00:05 (after two seconds each). However, the 00:00:04
timeout will empty the text field, which has just been populated by
the second marker at 00:00:03! Therefore, we need to make sure there
are no pending timeouts. To do so, we just stop timeoutStoryboard at the beginning of
the showMarker()
method:
(video.FindName("timeoutStoryboard") as Storyboard).Stop(); Here is the complete code for the showMarker()
method:
private void showMarker(object sender, TimelineMarkerRoutedEventArgs e)
{
    (video.FindName("timeoutStoryboard") as Storyboard).Stop();
    TextBlock markerName = video.FindName("MarkerName") as TextBlock;
    markerName.Text = e.Marker.Text;
    (video.FindName("timeoutStoryboard") as Storyboard).Begin();
}
As Figure 8-15 shows, the marker names are displayed once a marked position in the movie has been reached.

The final item on our to-do list is also related to markers:
remember that we still have functionless buttons that allow users to
jump to the next or previous marker. To implement this functionality, we first
have to determine all the markers. We could also look up all the
markers once one of the buttons is pressed, but then we would be
repeating our efforts. Therefore, the markers are retrieved once the
movie has started load. Once the MediaOpened event has
been fired, we have access to all markers. The embedded media’s
markers property provides us with a
collection of all markers. Every collection item is a marker with the
aforementioned properties of Text, Time, and
Type. We are interested only in the marker time, and we
save this information in a global C# list. At the end, we numerically
sort the array, just to make sure the marker times are in the correct
position:
private List<TimeSpan> markerTimes = new List<TimeSpan>();

private void loadMarkers()
{
    for (int i = 0; i < video.Markers.Count; i++)
    {
        markerTimes.Add(video.Markers[i].Time);
    }
    markerTimes.Sort(delegate(TimeSpan a, TimeSpan b)
    {
        return (a.TotalSeconds == b.TotalSeconds) ? 0 :
            (a.TotalSeconds > b.TotalSeconds) ? 1 : -1;
    });
}
The loadMarkers() method is called in
the MediaOpened event handler.
First we tackle the gotoNextMarker() method.
We determine the current position of the clip and then
go through all the markers. If we find a marker that is later than the
current media position (assuming that all the markers are sorted by
their time), we use this marker and immediately leave the loop. Here
is the code:
private void gotoNextMarker(object sender, MouseButtonEventArgs e)
{
    double currentTime = video.Position.TotalSeconds;
    for (int i = 0; i < markerTimes.Count; i++)
    {
        if (markerTimes[i].TotalSeconds > currentTime)
        {
            video.Position = markerTimes[i];
            break;
        }
    }
}
The gotoPreviousMarker() method is implemented in an analogous fashion. Make sure you start
searching from the end. We go through the markers starting with the
last one, until we find one that is earlier than the current media
position:
private void gotoPreviousMarker(object sender, MouseButtonEventArgs e)
{
    double currentTime = video.Position.TotalSeconds;
    for (int i = markerTimes.Count - 1; i >= 0; i--)
    {
        if (markerTimes[i].TotalSeconds < currentTime)
        {
            video.Position = markerTimes[i];
            break;
        }
    }
}
If you run this example in the browser, you will notice that the player jumps to the appropriate position in the clip (see Figure 8-16), but only if the media format supports jumping to markers. If not, you conveniently do not get an error message.

Caution
Previous Silverlight versions had a (possible) bug that
prevented you from setting video.Position.Seconds
(setting the value had no effect). This is fixed now, but in case
you are running into this in legacy applications, our special
example shows how we can avoid this issue: we save the TimeSpan marker values in
an array and can then assign the TimeSpan values back
to video.Position when jumping to a marker.
Every feature implemented in this chapter should not have been extraordinarily difficult to understand, and if you combine them, you will get a very functional application. Example 8-3 contains the complete JavaScript code for the Silverlight media player.
Example 8-3. The Silverlight media player, the XAML C# file (Page.xaml.cs, project Player)
using System;
using System.Windows;
using System.Windows.Controls;
using System.Windows.Input;
using System.Windows.Media;
using System.Windows.Media.Animation;
using System.Windows.Shapes;
using System.Collections.Generic;

namespace Player
{
    public partial class Page : UserControl
    {
        private MediaElement video = null;
        private List<TimeSpan> markerTimes = new List<TimeSpan>();

        public Page()
        {
            // Required to initialize variables
            InitializeComponent();
        }

        private void showMarker(object sender, TimelineMarkerRoutedEventArgs e)
        {
            (video.FindName("timeoutStoryboard") as Storyboard).Stop();
            TextBlock markerName = video.FindName("MarkerName") as TextBlock;
            markerName.Text = e.Marker.Text;
            (video.FindName("timeoutStoryboard") as Storyboard).Begin();
        }

        private void initVideo(object sender, RoutedEventArgs e)
        {
            if (video == null)
            {
                video = (sender as MediaElement);
            }
            loadMarkers();
            (video.FindName("intervalStoryboard") as Storyboard).Begin();
        }

        private void loadMarkers()
        {
            for (int i = 0; i < video.Markers.Count; i++)
            {
                markerTimes.Add(video.Markers[i].Time);
            }
            markerTimes.Sort(delegate(TimeSpan a, TimeSpan b)
            {
                return (a.TotalSeconds == b.TotalSeconds) ? 0 :
                    (a.TotalSeconds > b.TotalSeconds) ? 1 : -1;
            });
        }

        private void playOrPause(object sender, MouseButtonEventArgs e)
        {
            if (video.CurrentState == MediaElementState.Paused ||
                video.CurrentState == MediaElementState.Stopped)
            {
                video.Play();
            } else {
                video.Pause();
            }
        }

        private void gotoPreviousMarker(object sender, MouseButtonEventArgs e)
        {
            double currentTime = video.Position.TotalSeconds;
            for (int i = markerTimes.Count - 1; i >= 0; i--)
            {
                if (markerTimes[i].TotalSeconds < currentTime)
                {
                    video.Position = markerTimes[i];
                    break;
                }
            }
        }

        private void gotoNextMarker(object sender, MouseButtonEventArgs e)
        {
            double currentTime = video.Position.TotalSeconds;
            for (int i = 0; i < markerTimes.Count; i++)
            {
                if (markerTimes[i].TotalSeconds > currentTime)
                {
                    video.Position = markerTimes[i];
                    break;
                }
            }
        }

        private void volumeUp(object sender, MouseButtonEventArgs e)
        {
            double newVolume = Math.Min(1.0, video.Volume + 0.1);
            video.Volume = newVolume;
            TextBlock volumeText = video.FindName("VolumeText") as TextBlock;
            volumeText.Text = String.Format("{0:0.0}", newVolume);
        }

        private void volumeDown(object sender, MouseButtonEventArgs e)
        {
            double newVolume = Math.Max(0.0, video.Volume - 0.1);
            video.Volume = newVolume;
            TextBlock volumeText = video.FindName("VolumeText") as TextBlock;
            volumeText.Text = String.Format("{0:0.0}", newVolume);
        }

        private void intervalStoryboardCompleted(object sender, EventArgs e)
        {
            double currentPosition = video.Position.TotalSeconds;
            double length = video.NaturalDuration.TimeSpan.TotalSeconds;
            Rectangle progressBar = video.FindName("Timeline") as Rectangle;
            Rectangle progressPointer = video.FindName("Pointer") as Rectangle;
            double relativePosition = (currentPosition / length) *
               progressBar.Width
                                     -(progressPointer.Width / 2);
            Canvas.SetLeft(progressPointer, Canvas.GetLeft(progressBar) +
                                     relativePosition);
            (video.FindName("intervalStoryboard") as Storyboard).Begin();
        }

        private void timeoutStoryboardCompleted(object sender, EventArgs e)
        {
            TextBlock markerName = video.FindName("MarkerName") as TextBlock;
            markerName.Text = "";
        }

    }
}Using audio and video from Silverlight is quite convenient. Just
convert your content into a supported file format and use
<MediaElement> markup. With a little bit of C# you
can turn your UI into a full-fledged media player; but obviously, if
it came out of the box that way it would be even more convenient.