
The previous parts of this book have used a lot of C# code to enrich XAML-based Silverlight applications. Here we will introduce a different approach. We will create a number of <something>.js files, or code-behind JavaScript files for the HTML document containing the Silverlight content, so to speak. The JavaScript code will access the Silverlight content, add new Silverlight elements, and read information about the plug-in or the content of the XAML file.
We will use the Script Web Visual Studio template as the basis for the examples in this part of the book. Of course, you can achieve everything we are covering in the chapters in this part of the book using the project template; however, it is a bit easier to inject JavaScript code in the Script Web template, since the sample page there is already using JavaScript code.
To access Silverlight content embedded on a page, you first need to access the Silverlight plug-in. There are two ways to retrieve this information: access the plug-in from within the XAML event handler code or use the JavaScript Document Object Model (DOM). Let’s start with the latter option and look at the automatically generated (thanks to the template) JavaScript code to load Silverlight content:
Silverlight.createObjectEx({
  source: 'Scene.xaml',
  parentElement: document.getElementById('silverlightPlugInHost'),
  id: 'silverlightPlugIn',
  properties: {
    width: '100%',
    height: '100%',
    background:'white',
    version: '1.0'
  },
  events: {
    onLoad: Silverlight.createDelegate(scene, scene.handleLoad),
    onError: function(sender, args) {
    var errorDiv = document.getElementById("errorLocation");
    if (errorDiv != null) {
      var errorText = args.errorType + "- " + args.errorMessage;

      if (args.ErrorType == "ParserError") {
        errorText += "<br>File: " + args.xamlFile;
        errorText += ", line " + args.lineNumber;
        errorText += " character " + args.charPosition;
      }
      else if (args.ErrorType == "RuntimeError") {
        errorText += "<br>line " + args.lineNumber;
        errorText += " character " +  args.charPosition;
      }
      errorDiv.innerHTML = errorText;
    }
  }
  },
  context: null
});
Note the id property. This provides the DOM ID JavaScript can use to access the
plug-in:
var plugin = document.getElementById('silverlightPlugIn'),If you are using the ASP.NET ScriptManager, you can, of course, save some
typing and use $get() instead of document.getElementById().
Caution
It is tempting to use the ID of the <div>
element holding the Silverlight content (in all of this book’s
examples: SilverlightPlugInHost), but this will not
access the plug-in itself.
Then, starting with the plugin variable, you can
access quite a bit of data on the plug-in and its contents, but we will
come back to that in a minute. First we will have a look at the other
option to access the plug-in, from within the XAML event handling
code.
Every object in the XAML has a (JavaScript) method called
getHost() that also returns a reference to the plug-in.
Assuming that the eventHandler() function handles any event for the XAML file, this code would
appropriately fill the plugin variable:
function eventHandler(sender, eventArgs) {
  var plugin = sender.getHost();
}
Once you have accessed the plug-in, you can go further. The Silverlight plug-in exposes three types of information to JavaScript:
- General plug-in information
These are accessible as direct properties or methods of the plug-in object. Examples are
source(the XAML source code),initParams(the set of options used when initializing the Silverlight plug-in in thecreateSilverlight()function), andonError(the event handler that handles errors).- Plug-in settings information
These are accessible using
plugin.settings.<property>. Examples arebackground(the background color of the current Silverlight content) andmaxFrameRate(the maximum frame rate in frames per second).- Plug-in content information
These are accessible using
plugin.content.<property>. Examples arefindName()(a method to find XAML elements by their names, just like the server-sideFindName()method),fullScreen(whether to display the content in full-screen mode), androot(therootcanvas element of the Silverlight content).
This chapter will showcase some of the most interesting options. For a complete list of the APIs, refer to the Appendix A.
Once your JavaScript code has access to the plug-in, you can find details about the plug-in and its configuration as well as achieve relatively flexible access to the Silverlight content. This section features some scenarios and examples.
The first example will determine some of the plug-in’s settings.
It will also feature both access methods by using the JavaScript DOM and
the JavaScript code in the XAML code-behind. First, we need the
containing HTML page, where we load the Silverlight content. A button on
the page will be used to trigger the retrieval and display of plug-in
information. Example 15-1 shows the code; for the sake of
legibility, we shortened the error handler (onError).
Example 15-1. Displaying plug-in information, the HTML file (Info.html)
<html xmlns="http://www.w3.org/1999/xhtml">
 <head>
 <title>Silverlight</title>

  <script type="text/javascript" src="Silverlight.js"></script>
  <script type="text/javascript" src="Info.js"></script>
    <style type="text/css">
    #errorLocation {
      font-size: small;
      color: Gray;
    }
    #silverlightControlHost {
      height: 300px;
      width: 400px;
    }

  </style>
</head>

<body>
    <!-- Runtime errors from Silverlight will be displayed here.
  This will contain debugging information and should be removed or hidden when
  debugging is completed -->
  <div id='errorLocation'></div>

  <div id="silverlightPlugInHost">
    <script type="text/javascript">
        if (!window.Silverlight)
              window.Silverlight = {};

            Silverlight.createObjectEx({
              source: 'Info.xaml',
              parentElement: document.getElementById('silverlightPlugInHost'),
              id: 'silverlightPlugIn',
              properties: {
                width: '100%',
                height: '300px',
                background:'white',
                version: '1.0'
              },
              events: {
                onError: null
              },
              context: null
            });
    </script>
  </div>
  <div>
    <form action="">
      <input type="button" value="Show plugin info" onclick="showInfoJS();" />
    </form>
  </div>
</body>
</html>
In the code-behind JavaScript file Info.js, the showInfoJS()
function accesses the plug-in using the DOM, and then calls another
function called showInfo(). This latter function will be
implemented later on:
function showInfoJS() {
  var plugin = document.getElementById('silverlightPlugIn'),
  showInfo(plugin);
}
Example 15-2 shows the XAML file without any complicated XAML markup, but an event handler for the left mouse button is attached to the canvas.
Example 15-2. Displaying plug-in information, the XAML file (Info.xaml)
<Canvas xmlns="http://schemas.microsoft.com/client/2007"
        xmlns:x="http://schemas.microsoft.com/winfx/2006/xaml"
        MouseLeftButtonDown="showInfoXaml">
  <Rectangle Width="300" Height="150" Stroke="Orange" StrokeThickness="15" />
  <TextBlock FontFamily="Arial" FontSize="56" Canvas.Left="25" Canvas.Top="40"
             Foreground="Black" Text="Silverlight" />
</Canvas>
The JavaScript file associated with the XAML file, displayed in
Example 15-3, determines the plug-in and submits it as an
argument to showInfo(), which is the same function that
Info.html.js is using. However,
from the browser’s point of view, there is no difference between them
whether JavaScript code is logically tied to the HTML page or to the
XAML data. Therefore, we put both code snippets in one JavaScript
file.
Example 15-3. Displaying plug-in information, the XAML JavaScript file (Info.js; excerpt)
function showInfoXaml(sender, eventArgs) {
  var plugin = sender.getHost();
  showInfo(plugin);
}
Finally, the showInfo() function needs to be
implemented. It takes the plug-in reference, accesses two information
points, and outputs them using the JavaScript alert()
function. Example 15-4 shows the code. When you click on
either the Silverlight content or the HTML button, you will get output
similar to that shown in Figure 15-1.
Example 15-4. Displaying plug-in information, the HTML JavaScript file (Info.js; excerpt)
function showInfoJS() {
  var plugin = document.getElementById('SilverlightPlugIn'),
  showInfo(plugin);
}

function showInfo(plugin) {
  var s = 'Background: ' + plugin.settings.background;
  s += '
MaxFrameRate: ' + plugin.settings.maxFrameRate;
  alert(s);
}
The plug-in’s source property (plugin.content.source, to be exact) not only retrieves the XAML markup of the
currently loaded Silverlight content, but also sets this information.
This allows us to create a sample application with a similar concept as
the WPF content viewer XAMLPad, mentioned in Chapter 2.
An HTML text box enables users to enter XAML markup; JavaScript code
then tries to load this markup into the Silverlight plug-in. Let’s start with the HTML and the
input field, as shown in Example 15-5.
Example 15-5. SilverlightPad, the HTML file (SilverlightPad.html)
<html xmlns="http://www.w3.org/1999/xhtml">
<head>
  <title>Silverlight</title>
  <script type="text/javascript" src="Silverlight.js"></script>
  <script type="text/javascript" src="SilverlightPad.js"></script>
    <style type="text/css">
    #errorLocation {
      font-size: small;
      color: Gray;
    }
    #silverlightControlHost {
      height: 300px;
      width: 400px;
    }

  </style>
</head>

<body>
    <!-- Runtime errors from Silverlight will be displayed here.
  This will contain debugging information and should be removed or hidden when
  debugging is completed -->
  <div id='errorLocation'></div>

  <div id="silverlightPlugInHost">
    <script type="text/javascript">
        if (!window.Silverlight)
              window.Silverlight = {};

            Silverlight.createObjectEx({
              source: 'SilverlightPad.xaml',
              parentElement: document.getElementById('silverlightPlugInHost'),
              id: 'silverlightPlugIn',
              properties: {
                width: '100%',
                height: '300px',
                background:'white',
                version: '1.0'
              },
              events: {
                onError: null
              },
              context: null
            });
    </script>
  </div>
  <div id="InputHost">
    <textarea id="XamlMarkup" style="width:600px;" rows="10"></textarea><br />
    <input type="button" value="Update!" onclick="update();" />
  </div>
</body>
</html>
The initial XAML markup is quite simple. In this example, it is the user’s job to provide some fancy Silverlight content, after all. Example 15-6 shows the code.
Example 15-6. SilverlightPad, the XAML markup (SilverlightPad.xaml)
<Canvas xmlns="http://schemas.microsoft.com/client/2007"
        xmlns:x="http://schemas.microsoft.com/winfx/2006/xaml">
  <Rectangle Width="600" Height="200" Stroke="Orange" StrokeThickness="15" />
  <Canvas Canvas.Left="30" Canvas.Top="30" x:Name="XamlOutput">
    <TextBlock FontFamily="Arial" FontSize="32" Foreground="Black"
               Text="Enter data below ..."/>
  </Canvas>
</Canvas>
The most sophisticated part of this example is certainly the
JavaScript code. However, once you know how to do it, you just need a
couple of lines. First, convert the XAML string provided by the user
into a XAML JavaScript object that can work with the Silverlight
plug-in. The plug-in.content.createFromXaml() method
does exactly that:
var plugin = document.getElementById('silverlightPlugIn'),
var obj = plugin.content.createFromXaml(
  document.getElementById('XamlMarkup').value);
If the XAML is not valid, obj is null,
so we can act accordingly. If, on the other hand, obj is
not null, the user-supplied XAML is valid and can be
applied to the page.
If you take a look back at Example 15-6, you will
see that there is a second <Canvas> element
within the root <Canvas>. The idea is
that the outer (orange) border will always be there, whereas the content
of that rectangle may be changed by the user. Therefore, the JavaScript
code first needs to access the inner <Canvas>. You
can do this by using findName():
var XamlOutput = plugin.content.findName('XamlOutput'),XamlOutput—and any other XAML JavaScript object—does
not support the HTML DOM, but a similar API accesses all child
elements: XamlOutput.children. The following properties and methods
exist:
For this example, we need to do only two things: delete
all children of the inner <Canvas> element (imagine that a
user has already submitted XAML that has been rendered in the plug-in)
and add the XAML JavaScript object (obj) to the children
list:
 if (obj != null) {
  XamlOutput.children.clear();
  XamlOutput.children.add(obj);
} else {
  alert('Error! XAML might not be valid.'),
}
Example 15-7 shows the complete JavaScript code
(minus the createSilverlight()
function), and Figure 15-2 presents SilverlightPad in
action. The XAML entered in the text field is displayed within the
orange border.
Example 15-7. SilverlightPad, the JavaScript file (SilverlightPad.js)
function update() {
  var plugin = document.getElementById('silverlightPlugIn'),
  with (plugin.content) {
    var XamlOutput = findName('XamlOutput'),
    var obj = createFromXaml(
      document.getElementById('XamlMarkup').value);
  }
  if (obj != null) {
    XamlOutput.children.clear();
    XamlOutput.children.add(obj);
  } else {
    alert('Error! XAML might not be valid.'),
  }
}
Note
There is a simpler implementation. Instead of using the pseudo
DOM of Silverlight, you can just set the source property
of the plug-in.
As a final sample application for this chapter, we will create a development helper tool that dumps information about a given Silverlight application. The sample features dynamic loading of Silverlight content and also recursive access of all elements. As usual, we start with the HTML file (see Example 15-8).
But there is a surprise—there is no
createSilverlight() call, only the empty
<div> container SilverlightPlugInHost.
Additionally, there are three more HTML UI widgets on the page:
The page also contains an empty <div> element,
called OutputDiv, where the “data dump” will be later
displayed.
Example 15-8. Dumping Silverlight content, the HTML file (SilverlightDumper.html)
<html xmlns="http://www.w3.org/1999/xhtml"> <head> <title>Silverlight</title> <script type="text/javascript" src="Silverlight.js"></script> <script type="text/javascript" src="SilverlightDumper.js"></script> <style type="text/css"> #errorLocation { font-size: small; color: Gray; } #silverlightControlHost { height: 300px; width: 400px; } </style> </head> <body> <form> <div> <div id="silverlightPlugInHost"> </div> <div id="LoadXamlFile"> <input type="text" name="XamlFile" /> <input type="button" value="Load file" onclick="loadFile(this.form);" /> — <input type="button" id="DumpButton" value="Dump XAML" onclick="dump();" disabled="disabled" /> </div> <div id="OutputDiv"> </div> </div> </form> </body> </html>
In the JavaScript code-behind file, the loadFile() function is responsible for loading the XAML file the user
previously selected. First, the filename needs to be determined:
function loadFile(f) {
  var filename = f.elements['XamlFile'].value;
  ...
}
Note
Note that in Example 15-8, the text field doesn’t
have an id attribute, just a name attribute.
So, you can’t use document.getElementById() to access
the form element. However, you can use the JavaScript document.forms[0].elements array to read
out the name. In this special case, we saved some typing. When we
called loadFile(this.form) from the HTML page, a
reference to the current form was submitted to loadFile(). Therefore,
f.elements['XamlFile'] grants access to the form field,
and the value property contains the field’s
contents.
This filename is then provided to a function named createSilverlight(). This
function actually is a modified implementation of the JavaScript
code that usually loads the Silverlight content. The modified version
accepts the XAML filename to load as a parameter, allowing the
application to dynamically load XAML files. The
loadFile() function also enables the button that takes
care of the (not yet implemented) dumping of Silverlight
contents:
function loadFile(f) {
  createSilverlight(f.elements['XamlFile'].value);
  document.getElementById('DumpButton').disabled = false;
}
Figure 15-3 shows that the code so far already works. Enter a (relative) file path to a XAML file, and click the first button. The XAML content is displayed above the form.

The next step in our application is also the final one: dumping the contents of the currently loaded XAML file. To implement this, the code first needs to access the plug-in, as always:
var plugin = document.getElementById('silverlightPlugIn'),We want to dump all elements, so we have to start at the top. The
root property provides us with a reference to the root
(<Canvas>) node:
var rootNode = plugin.content.root;
All that’s left to do is to recursively dump the contents starting
with the root node, and then display this information in the output
<div>:
var html = dumpNode(rootNode);
document.getElementById('OutputDiv').innerHTML = html;
Admittedly, that’s cheating, since we did not implement the
dumpNode() function yet. But doing so is not that hard:
dumpNode() expects a node as its first argument. The function then notes the
string representation of the node (e.g., <Canvas> has
the string representation Canvas). If the node has a name,
the name is remembered as well:
function dumpNode(node) {
  var html = node.toString();
  if (node.name) {
    html += ' (' + node.name + ')';
  }
Now comes the tricky part. What if the node has child nodes? In
that case, recursion comes into play: for every child node,
dumpNode() calls dumpNode() again so
that every child node is dumped as well. To visualize the hierarchy of
the document, all child nodes are indented, using the
<blockquote> HTML element.
There is one catch, however: if a node doesn’t have children,
accessing node.chidren will result in a
JavaScript error. So, we need to use a try...catch
statement instead:
  try {
    if (node.children.count > 1) {
      html += '<blockquote>';
      for (var i = 0; i < node.children.count; i++) {
        html += dumpNode(node.children.getItem(i));
      }
      html += '</blockquote>';
    }
  } catch (ex) {
  }
Finally, the dumpNode() function adds a line
break at the end and returns the HTML markup:
  html += '<br />';
  return html;
}
Note
For security reasons, you may want to HTML-escape the element
names by replacing &, <,
>, ', and " with
&, <, >,
', and " (in that specific
order!).
Refer to Example 15-9 for the complete JavaScript code. Figure 15-4 shows the data dumped for a simple “Hello World” file.
Example 15-9. Dumping Silverlight content, the JavaScript file (SilverlightDumper.html.js)
function createSilverlight(XamlFile)
{
  Silverlight.createObjectEx({
    source: XamlFile,
    parentElement: document.getElementById('silverlightPlugInHost'),
    id: 'silverlightPlugIn',
    properties: {
      width: '600',
      height: '300',
      background:'#ffffffff',
      isWindowless: 'false',
      version: '1.0'
    },
    events: {
      onError: null
    }
  });
}

function loadFile(f) {
  createSilverlight(f.elements['XamlFile'].value);
  document.getElementById('DumpButton').disabled = false;
}

function dump() {
  var plugin = document.getElementById('silverlightPlugIn'),
  var rootNode = plugin.content.root;
  var html = dumpNode(rootNode);
  document.getElementById('OutputDiv').innerHTML = html;
}

function dumpNode(node) {
  var html = node.toString();
  if (node.name) {
    html += ' (' + node.name + ')';
  }
  try {
    if (node.children.count > 1) {
      html += '<blockquote>';
      for (var i = 0; i < node.children.count; i++) {
        html += dumpNode(node.children.getItem(i));
      }
      html += '</blockquote>';
    }
  } catch (ex) {
  }
  html += '<br />';
  return html;
}
Combining HTML, JavaScript, and Silverlight makes sense in many scenarios. For instance, you could use HTML forms to enter data and Silverlight to process it.
So far, we have used JavaScript to directly access the Silverlight plug-in and especially its markup (XAML). In this section, however, we go one step further and bring managed code to the table. We will call managed code from JavaScript and also execute JavaScript code from managed code. For this to work, we have to use a Silverlight application project; the Silverlight Script Web template is insufficient. So it’s back to port 12345 again.
The next example will allow a user to use JavaScript to call a
method written in managed code that is part of a Silverlight
application. The method is simple and just changes the text in a
<TextBlock> element, but the approach presented
can of course be easily adapted to more complex scenarios. Example 15-10 contains the XAML markup for the application. Note
that the <TextBlock> element is named
myTextBlock.
Example 15-10. Bridging from JavaScript to managed code, the XAML file (Page.xaml, project BridgeToManaged)
<UserControl x:Class="BridgeToManaged.Page"
    xmlns="http://schemas.microsoft.com/winfx/2006/xaml/presentation"
    xmlns:x="http://schemas.microsoft.com/winfx/2006/xaml"
    Width="400" Height="300">
    <Canvas x:Name="LayoutRoot" Background="White">
        <Rectangle Width="300" Height="150"
                   Stroke="Orange" StrokeThickness="15"/>
        <TextBlock FontFamily="Arial" FontSize="56"
                   Canvas.Left="25" Canvas.Top="40"
                   Foreground="Black" Text=""
                   x:Name="myTextBlock" />
    </Canvas>
</UserControl>
In the code-behind file for Page.xaml, we
will implement a method that accepts a string as parameter and writes
that string into the text block. This method will later be callable by JavaScript. To enable that,
the method needs to be marked with the [ScriptableMember] attribute, which is
part of the System.Windows.Browser namespace:
using System.Windows.Browser;
// ...
[ScriptableMember]
public void showText(string s) {
    myTextBlock.Text = s;
}
However, that is only the first of three necessary steps to make
the method callable from JavaScript. The Page class
itself needs to be marked with a specific attribute, [ScriptableType]:
[ScriptableType]
public partial class Page : UserControl
{
    // ...
}
Finally, we need to implement a bridging mechanism that takes care
of receiving JavaScript calls and
delegating them to the appropriate managed code methods. Unlike some
other technologies, such as Java applets, JavaScript cannot directly
access Silverlight methods marked
with [ScriptableMember]; rather, it needs to route
requests through such a bridge object. Luckily, creating such an entry
point to the Silverlight application is fairly easy. In the
Page class’s constructor, call the method HtmlPage.RegisterScriptableObject(). The
first argument to that method is the name of the bridge and will later
be used by JavaScript code:
public Page()
{
    InitializeComponent();
    HtmlPage.RegisterScriptableObject("JSBridge", this);
}
Example 15-11 puts it all together and implements the C# code-behind file for the application.
Example 15-11. Bridging from JavaScript to managed code, the C# file (Page.xaml.cs, project BridgeToManaged)
using System.Windows.Controls;
using System.Windows.Browser;

namespace BridgeToManaged
{
    [ScriptableType]
    public partial class Page : UserControl
    {
        public Page()
        {
            InitializeComponent();
            HtmlPage.RegisterScriptableObject("JSBridge", this);
        }

        [ScriptableMember]
        public void showText(string s) {
            myTextBlock.Text = s;
        }
    }
}
Finally, we have to set up the JavaScript code. As usual, the
Silverlight template created two test pages within the web site. Just
delete the .aspx version, as we will use the HTML
page this time. First of all, we need to make sure that the
<object> tag that loads the Silverlight content
does receive an id attribute so that we can easily
reference it later from JavaScript:
<div id="silverlightControlHost">
    <object data="data:application/x-silverlight-2,"
        type="application/x-silverlight-2"
        width="400" height="200" id="silverlightPlugIn">
        <param name="source" value="ClientBin/BridgeToManaged.xap" />
        <param name="background" value="white" />
        <param name="minRuntimeVersion" value="2.0.31005.0" />
        <param name="autoUpgrade" value="true" />
        <a href="http://go.microsoft.com/fwlink/?LinkID=124807"
            style="text-decoration: none;">
            <img src="http://go.microsoft.com/fwlink/?LinkId=108181"
                alt="Get Microsoft Silverlight"
                style="border-style: none" />
        </a>
    </object>
</div>
Furthermore, we add some HTML UI that allows users to enter a text and send it to the Silverlight application:
<div id="inputField">
    <input type="text" id="textInput" />
    <input type="button" value="Show text" onclick="showUserText();" />
</div>
When the user clicks on the button, the
showUserText() JavaScript function is called, which
in turn needs to address the JavaScript bridge we have defined in the
Silverlight application. The required syntax looks like this:
SilverlightPlugIn_Object.content.Name_of_Bridge.Name_of_Method()showUserText():
function showUserText() {
    var input = document.getElementById("textInput").value;
    var plugin = document.getElementById("silverlightPlugIn");
    plugin.content.JSBridge.showText(input);
}
Example 15-12 contains the complete code, and Figure 15-5 shows the application in action.
Example 15-12. Bridging from JavaScript to managed code, the HTML file (BridgeToManagedTestPage.html)
<!DOCTYPE html PUBLIC
  "-//W3C//DTD XHTML 1.0 Transitional//EN"
  "http://www.w3.org/TR/xhtml1/DTD/xhtml1-transitional.dtd">
<html xmlns="http://www.w3.org/1999/xhtml">
<head>
  <title>Silverlight</title>

  <style type="text/css">
  #silverlightControlHost {
    height: 200px;
    width: 400px;
  }
  </style>

  <script type="text/javascript" src="Silverlight.js"></script>

  <script type="text/javascript">
    function showUserText() {
      var input = document.getElementById("textInput").value;
      var plugin = document.getElementById("silverlightPlugIn");
      plugin.content.JSBridge.showText(input);
    }
  </script>
</head>
<body>
    <div id="silverlightControlHost">
        <object data="data:application/x-silverlight-2,"
            type="application/x-silverlight-2"
            width="400" height="200" id="silverlightPlugIn">
            <param name="source" value="ClientBin/BridgeToManaged.xap" />
            <param name="background" value="white" />
            <param name="minRuntimeVersion" value="2.0.31005.0" />
            <param name="autoUpgrade" value="true" />
            <a href="http://go.microsoft.com/fwlink/?LinkID=124807"
                style="text-decoration: none;">
                <img src="http://go.microsoft.com/fwlink/?LinkId=108181"
                    alt="Get Microsoft Silverlight"
                    style="border-style: none" />
            </a>
        </object>
    </div>
    <div id="inputField">
      <input type="text" id="textInput" />
      <input type="button" value="Show text" onclick="showUserText();" />
    </div>
</body>
</html>
Caution
As you may have already guessed from the name, the
System.Windows.Browser namespace is not available
for WPF applications, so be careful if you plan to later port a
Silverlight application to WPF.
The approach we took in the preceding section can also be
reversed: managed code is able to execute JavaScript code and can even
access the DOM (Document Object Model) of the browser, in a very
interesting way. The System.Windows.Browser namespace
exposes common JavaScript methods and objects through a .NET API. This
allows you to code almost exactly as you would in JavaScript, but with
IntelliSense, strong typing, and more. The following example will
implement the well-known Rock-Paper-Scissors game (which is probably a
sport, since I saw it once on ESPN2) with Silverlight, HTML, and
JavaScript. The HTML UI will allow users to choose one of the three
available weapons and display the result. The Silverlight application
will pick the computer’s weapon and determine who won the battle. To do
so, the Silverlight application needs to read from the web application
(to determine which weapon the user chose) and also to write to it (to
output the result of the battle).
Let’s start, as almost always, with XAML. We define three icons,
one for each weapon, but initially render them invisible. Also, we add a
button and wire it up with an event handler method called
newRound() in the code-behind file. Refer to Example 15-13 for the complete markup.
Example 15-13. Rock-Paper-Scissors, the XAML file (Page.xaml, project RockPaperScissors)
<UserControl x:Class="RockPaperScissors.Page"
    xmlns="http://schemas.microsoft.com/winfx/2006/xaml/presentation"
    xmlns:x="http://schemas.microsoft.com/winfx/2006/xaml"
    Width="150" Height="150">
    <Canvas x:Name="LayoutRoot" Background="White">
        <Rectangle Width="150" Height="110"
                   Stroke="Orange" StrokeThickness="15"/>
        <Polygon Points="50,25 100,25 125,55 100,85 50,85 25,55"
                 Stroke="Black" StrokeThickness="5"
                 x:Name="Rock" Visibility="Collapsed" />
        <Polygon Points="25,25 125,25 125,85 25,85"
                 Stroke="Black" StrokeThickness="5"
                 x:Name="Paper" Visibility="Collapsed" />
        <Canvas x:Name="Scissors" Visibility="Collapsed">
            <Ellipse Width="20" Height="20"
                     Canvas.Left="25" Canvas.Top="25"
                     Stroke="Black" StrokeThickness="5" />
            <Ellipse Width="20" Height="20"
                     Canvas.Left="25" Canvas.Top="65"
                     Stroke="Black" StrokeThickness="5" />
            <Line X1="42.5" Y1="40" X2="115" Y2="75"
                  Stroke="Black" StrokeThickness="5" />
            <Line X1="42.5" Y1="70" X2="115" Y2="35"
                  Stroke="Black" StrokeThickness="5" />
        </Canvas>

        <Button x:Name="btnNextRound" Click="newRound"
                Content="New round" Canvas.Left="40" Canvas.Top="120" />
    </Canvas>
</UserControl>
Next up is the HTML test page. As with Example 15-12, we do not use the .aspx test
page created for us, since it is a bit more straightforward to use the
HTML version. Example 15-14 contains the complete UI,
including three radio buttons for the weapons (called
rock, paper, and
scissors), and a <div>
container for the result (called result).
Example 15-14. Rock-Paper-Scissors, the HTML file (RockPaperScissors.html)
<!DOCTYPE html PUBLIC
    "-//W3C//DTD XHTML 1.0 Transitional//EN"
    "http://www.w3.org/TR/xhtml1/DTD/xhtml1-transitional.dtd">
<html xmlns="http://www.w3.org/1999/xhtml" >
<head>
    <title>RockPaperScissors</title>

    <style type="text/css">
    #silverlightControlHost {
      height: 150px;
      width: 150px;
    }
    </style>
    <script type="text/javascript" src="Silverlight.js"></script>
</head>

<body>
    <div id="silverlightControlHost">
    <object data="data:application/x-silverlight-2,"
      type="application/x-silverlight-2" width="150" height="150">
      <param name="source" value="ClientBin/RockPaperScissors.xap"/>
      <param name="background" value="white" />
      <param name="minRuntimeVersion" value="2.0.31005.0" />
      <param name="autoUpgrade" value="true" />
      <a href="http://go.microsoft.com/fwlink/?LinkID=124807"
          style="text-decoration: none;">
          <img src="http://go.microsoft.com/fwlink/?LinkId=108181"
              alt="Get Microsoft Silverlight" style="border-style: none"/>
      </a>
    </object>
    </div>
    <div id="selectWeapon">
        <form action="">
            <input type="radio" name="weapon" id="rock" /> rock<br />
            <input type="radio" name="weapon" id="paper" /> paper<br />
            <input type="radio" name="weapon" id="scissors" /> scissors<br />
        </form>
    </div>
    <div id="result" style="border-style: dotted; border-width: 10px;
                            border-spacing: 5px; font-size: 36pt; width: 200px;
                            height: 50px; text-align: center;"></div>
</body>
</html>
We now implement the Silverlight logic for our game. Whenever a new round starts, we make sure that all three weapons are not visible (after every round, the weapon the computer chose is shown):
Rock.Visibility = Visibility.Collapsed;
Paper.Visibility = Visibility.Collapsed;
Scissors.Visibility = Visibility.Collapsed;
Then we access the browser’s DOM to determine which weapon was
chosen by the user. The System.Windows.Browser
namespace implements a few classes for this and related tasks. Here is a
selection:
HtmlDocumentRepresentation of JavaScript’s
documentobject. It can be accessed throughHtmlPage.Document.HtmlElementGeneral representation of a DOM element.
HtmlWindowRepresentation of JavaScript’s
windowobject. It can be accessed throughHtmlPage.Window.
Many JavaScript methods and properties were directly ported to the
System.Windows.Browser API; however, the style was
changed to upper camel case to maintain consistency with the rest of the
API. So, for instance, the JavaScript getElementById() method of the
document object is represented by the .NET GetElementById() method of the
Document property of HtmlPage. The
return value of that method is of type HtmlElement. The following code snippet
returns references to the three HTML checkboxes:
HtmlDocument doc = HtmlPage.Document;
HtmlElement cbRock = doc.GetElementById("rock");
HtmlElement cbPaper = doc.GetElementById("paper");
HtmlElement cbScissors = doc.GetElementById("scissors");
If you look through the documentation or the IntelliSense
suggestions, you will notice that
the HtmlElement class supports methods such
as getAttribute() and setAttribute(); however, in order to get
and set HTML attributes in a really browser-agnostic fashion, you should
use getProperty() and
setProperty() instead. Let’s start with getProperty() and access the checkboxes’
checked properties. Depending on the outcome of this,
the application can determine which weapon was chosen. Internally, this
will be represented by an integer value: 0 stands for rock, 1 for paper,
2 for scissors, and –1 for no selection:
int userChoice = (cbRock.GetProperty("checked").ToString() == "True") ? 0 :
                 (cbPaper.GetProperty("checked").ToString() == "True") ? 1 :
                 (cbScissors.GetProperty("checked").ToString() == "True") ? 2 :
                 -1;
If no selection has been made, a JavaScript error window will
appear. In JavaScript this would be done using the
window.alert() method; from Silverlight you more or
less just have to change it to upper camel case:
if (userChoice == -1)
{
    HtmlPage.Window.Alert("Select your weapon!");
}
Figure 15-6 shows this kind of error window.

If the player did choose a weapon, it’s now the computer’s turn. The following code snippet determines a random weapon and makes the associated XAML element visible:
UIElement[] elements = { Rock, Paper, Scissors };
int r = new Random().Next(0, 3);
elements[r].Visibility = Visibility.Visible;
Now we have to find out who actually won. Paper beats rock, scissors beat paper, rock beats scissors:
if (userChoice == r)
{
    // draw
}                }
else if ((userChoice == 0 && r == 2) || //rock beats scissors
         (userChoice == 1 && r == 0) || //paper beats rock
         (userChoice == 2 && r == 1)) //scissors beat paper
{
    // player wins
}
else
{
    // computer wins
}
Since the GetProperty() method returns a
property, it is obvious that SetProperty() will
change a property. So in case the player wins, the following code would
be appropriate to output the result:
resultDiv.SetProperty("innerHTML", "You win!");You may have noticed in Example 15-14 that the
output also has a border. Depending on the result of the game, the color
of the border will change, too. You could again use the
SetProperty() method to change the element’s
style attribute, but there is a more convenient
approach for CSS styles. The methods GetStyleAttribute() and SetStyteAttribute() (so it’s attributes
again, not properties) provide you with read and write access to single
CSS properties. In our case, this allows us to specifically change the
border color but leave the other CSS styles intact—for instance, by
coloring the border red in case the player loses:
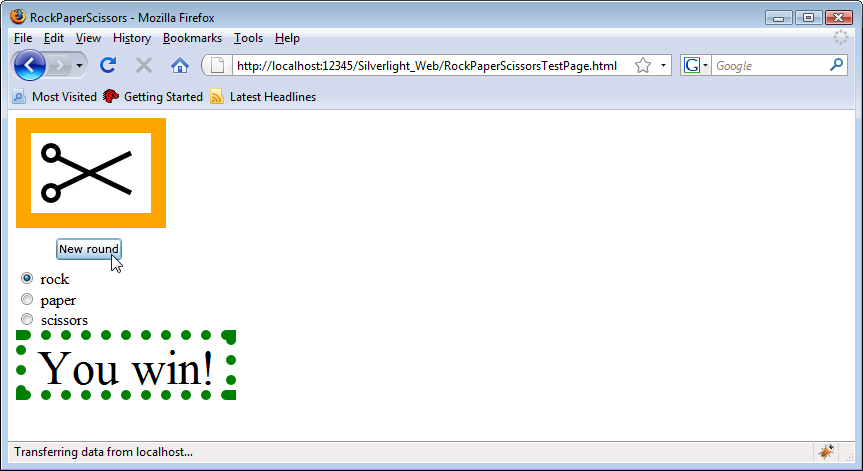
resultDiv.SetStyleAttribute("borderColor", "red");Example 15-15 contains the complete C# code for our little game, and Figure 15-7 shows the computer losing against a skilled (or lucky) player.
Example 15-15. Rock-Paper-Scissors, the C# file (Page.xaml.cs, project RockPaperScissors)
using System;
using System.Collections.Generic;
using System.Linq;
using System.Net;
using System.Windows;
using System.Windows.Controls;
using System.Windows.Documents;
using System.Windows.Input;
using System.Windows.Media;
using System.Windows.Media.Animation;
using System.Windows.Shapes;
using System.Windows.Browser;

namespace RockPaperScissors
{
    public partial class Page : UserControl
    {
        public Page()
        {
            InitializeComponent();
        }

        public void newRound(object sender, RoutedEventArgs e)
        {
            resetCanvas();
            HtmlDocument doc = HtmlPage.Document;
            HtmlElement cbRock = doc.GetElementById("rock");
            HtmlElement cbPaper = doc.GetElementById("paper");
            HtmlElement cbScissors = doc.GetElementById("scissors");
            int userChoice =
                (cbRock.GetProperty("checked").ToString() == "True") ? 0 :
                (cbPaper.GetProperty("checked").ToString() == "True") ? 1 :
                (cbScissors.GetProperty("checked").ToString() == "True") ? 2 :
                -1;
            if (userChoice == -1)
            {
                HtmlPage.Window.Alert("Select your weapon!");
            }
            else
            {
                UIElement[] elements = { Rock, Paper, Scissors };
                int r = new Random().Next(0, 3);
                elements[r].Visibility = Visibility.Visible;

                HtmlElement resultDiv = doc.GetElementById("result");
                if (userChoice == r)
                {
                    resultDiv.SetProperty("innerHTML", "Draw!");
                    resultDiv.SetStyleAttribute("borderColor", "gray");
                }
                else if ((userChoice == 0 && r == 2) || //rock beats scissors
                    (userChoice == 1 && r == 0) || //paper beats rock
                    (userChoice == 2 && r == 1)) //scissors beat paper
                {
                    resultDiv.SetProperty("innerHTML", "You win!");
                    resultDiv.SetStyleAttribute("borderColor", "green");
                }
                else
                {
                    resultDiv.SetProperty("innerHTML", "You lose!");
                    resultDiv.SetStyleAttribute("borderColor", "red");
                }
            }
        }

        private void resetCanvas()
        {
            Rock.Visibility = Visibility.Collapsed;
            Paper.Visibility = Visibility.Collapsed;
            Scissors.Visibility = Visibility.Collapsed;
        }

    }
}
- JavaScript: The Definite Guide by David Flanagan (O’Reilly)