
One of the advantages of connected systems is that the network can be used to send or retrieve additional information. Silverlight provides you with several ways to access remote data, either using standard HTTP requests or more complex techniques such as Windows Communication Foundation (WCF).
The most straightforward way to access external data from
Silverlight applications is to use an HTTP request. One convenient class
to achieve that is WebClient. It
provides you with an asynchronous means of retrieving data. Using an
asynchronous approach is better than a synchronous one, since one of the
key issues of many web applications is latency. If the server takes a long
time to respond, the application stalls until the data is there. When
using an asynchronous call, the application continues to run; once the
server returns data, the application code can intercept it and use the
retrieved information.
The WebClient class
supports two important events that you can hook your code
into:
We will implement a simple progress counter using
the WebClient class.
Example 13-1 contains the UI: a button to start the
download, and a text block to output the progress.
Example 13-1. Using the WebClient class, the XAML file (Page.xaml, project DownloadProgress)
<UserControl x:Class="DownloadProgress.Page"
    xmlns="http://schemas.microsoft.com/winfx/2006/xaml/presentation"
    xmlns:x="http://schemas.microsoft.com/winfx/2006/xaml"
    Width="400" Height="300">
    <Grid x:Name="LayoutRoot" Background="White">
        <Canvas>
            <Rectangle Width="300" Height="150" Stroke="Orange"
                       StrokeThickness="15" />
            <TextBlock x:Name="DownloadText" FontSize="52"
                Canvas.Left="25" Canvas.Top="35" Foreground="Black"
                Text="loading ..."/>
            <Button Content="Load data" Click="loadData"
                    Canvas.Left="115" Canvas.Top="175" />
        </Canvas>
    </Grid>
</UserControl>
Next, we need to ensure that we have a server resource that
takes some time to respond and sends only chunks of data. We use a simple
ASP.NET script (which, by the way, will be recycled in Chapter 16). Example 13-2 contains the complete
code. Make sure you save the file in the web solution (Silverlight_Web).
Example 13-2. Using the WebClient class, the ASP.NET file (DownloadProgress.aspx, project Silverlight_Web)
<%@ Page Language="C#" %>
<script runat="server">
void Page_Load() {
    Response.Clear();
    Response.BufferOutput = false;
    Response.AddHeader("Content-Length", "1003");
    for (int i = 0; i < 17; i++)
    {
        Response.Write(
            "AAAAAAAAAAAAAAAAAAAAAAAAAAAAAAAAAAAAAAAAAAAAAAAAAAAAAAAAAAA");
        System.Threading.Thread.Sleep(500);
    }
    Response.End();
}
</script>
Finally, we need to load this external script and then
continuously display the progress of this effort. First of all, we create
a WebClient instance and setup the
event handler:
WebClient wc = new WebClient();
wc.DownloadProgressChanged +=
  new DownloadProgressChangedEventHandler(updateProgress);
wc.DownloadStringCompleted +=
  new DownloadStringCompletedEventHandler(endProgress);
Then, we actually load the external resource. The appropriate method
of WebClient for this task is DownloadStringAsync(). Since during deployment the Silverlight application will be saved
in Silverlight_Web’s ClientBin folder, but the DownloadProgress.aspx file resides in Silverlight_Web’s root folder, we need to use a
relative URI in the following fashion:
wc.DownloadStringAsync(new Uri("../DownloadProgress.aspx", UriKind.Relative));Now to the event handlers. The one for the DownloadStringCompleted event is easier to
implement; in this case, we just output “done”:
void endProgress(object o, DownloadStringCompletedEventArgs e)
{
  DownloadText.Text = "done.";
}
When the DownloadProgressChanged
event is fired, we determine how much of the data has already been
transmitted. The HTTP protocol supports the Content-length header, which is optional, but if
used, provides the number of bytes the server is about to send. In our
example, the code from Example 13-1 uses the header, which
allows the code to determine how much data is about to be sent.
The second argument for the DownloadProgressChanged event handler is of
type DownloadProgressChangedEventArgs and
supports, among others, the following useful properties:
These allow us to calculate the percentage of how much data has already been sent, and to output this value in the text block:
void updateProgress(object o, DownloadProgressChangedEventArgs e)
{
  double percentage = Math.Round(100.0 * e.BytesReceived / e.TotalBytesToReceive);
  DownloadText.Text = percentage + " %";
}
Example 13-2 contains the complete code for the C# code-behind file, including both event handler methods. Figure 13-1 shows how this will look in a web browser.
Example 13-3. Using the WebClient class, the C# file (Page.xaml.cs, project DownloadProgress)
using System.Windows.Controls;
using System.Windows.Input;

namespace DownloadProgress
{
    public partial class Page : UserControl
    {
        public Page()
        {
            InitializeComponent();
        }

        private void loadData(object sender, RoutedEventArgs e)
        {
            WebClient wc = new WebClient();
            wc.DownloadProgressChanged += new
               DownloadProgressChangedEventHandler(updateProgress);
            wc.DownloadStringCompleted += new
               DownloadStringCompletedEventHandler(endProgress);
            wc.DownloadStringAsync(new Uri("../DownloadProgress.aspx",
               UriKind.Relative));
        }

        void updateProgress(object o, DownloadProgressChangedEventArgs e)
        {
            double percentage = Math.Round(100.0 * e.BytesReceived /
               e.TotalBytesToReceive);
            DownloadText.Text = percentage + " %";
        }

        void endProgress(object o, DownloadStringCompletedEventArgs e)
        {
            DownloadText.Text = "done.";
        }
    }
}
Tip
When you can provide more options to the HTTP request, e.g.,
setting the request method (HTTP verb) or HTTP headers, use the
HttpWebRequest
and HttpWebResponse classes.

Windows Communication Foundation, or WCF, is a framework for application intercommunication and an integral part of .NET. Especially in homogenous environments, WCF services are a common alternative to (system-agnostic, but not as well performing) Simple Object Access Protocol (SOAP) web services. Since Silverlight is a Microsoft technology, as is WCF, it is no surprise that Silverlight allows consumption of WCF services, as we will demonstrate in this chapter. Of course, Silverlight can also talk with SOAP services; the approach is identical.
First of all, we need to implement a (simple) WCF service, which we will
directly place in the Silverlight_Web
project. When you use Visual Studio 2008 and the WCF
Service item template, most of the service’s skeleton has
already been generated for you; you just need to fill in the blanks (and
the business logic, of course). The service file, as you can see in Example 13-4, just references the code-behind C# file that
resides in the App_Code folder. You
can see the C# code in Example 13-5.
Example 13-4. The WCF service, the .svc file (AddService.svc, project Silverlight_Web)
<%@ ServiceHost Language="C#" Debug="true" Service="AddService"
                CodeBehind="~/App_Code/AddService.cs" %>
Example 13-5. The WCF service, the C# file (AddService.cs, project Silverlight_Web)
using System;
using System.Linq;
using System.Runtime.Serialization;
using System.ServiceModel;
using System.ServiceModel.Activation;

[ServiceContract(Namespace = "http://www.arrabiata.de/silverlight")]
[AspNetCompatibilityRequirements(RequirementsMode =
                                 AspNetCompatibilityRequirementsMode.Allowed)]
public class AddService
{
    [OperationContract]
    public int Add(int a, int b)
    {
        return a + b;
    }
}
As you can see in Example 13-5, we implemented
a simple Add() method
and used the [OperationContract]
attribute to make it accessible from the outside. Now it is time to create
a Silverlight project and set up the XAML UI for consuming this service.
Example 13-6 shows the result of our efforts: a couple of
input boxes, a button, and several text fields.
Example 13-6. Consuming a WCF service, the XAML file (Page.xaml, project WCFService)
<UserControl x:Class="WCFService.Page"
    xmlns="http://schemas.microsoft.com/winfx/2006/xaml/presentation"
    xmlns:x="http://schemas.microsoft.com/winfx/2006/xaml"
    Width="400" Height="300">
    <Grid x:Name="LayoutRoot" Background="White">
        <Canvas>
            <Canvas Canvas.Left="25" Canvas.Top="25">
                <StackPanel Orientation="Horizontal"
                            VerticalAlignment="Center">
                    <TextBox x:Name="a" Width="30" />
                    <TextBlock Text=" + " />
                    <TextBox x:Name="b" Width="30" />
                    <TextBlock Text="  " />
                    <Button Content=" = " Click="CallAddService" />
                    <TextBlock x:Name="c" Text="" />
                </StackPanel>
            </Canvas>
        </Canvas>
    </Grid>
</UserControl>
Now we need to connect this UI to the WCF service. Right-click
in Visual Studio’s solution explorer on the Silverlight project and choose
the Add Service Reference option. Manually enter the
URI of the WCF service, or use the Discover button to
find it. For the remainder of this example, we assign the namespace
AddServiceReference to the proxy class Visual Studio 2008 is automatically
generating for us. Figure 13-2 shows the Add
Service Reference dialog with the appropriate settings.

Afterward, you can access the service in the code. A click on
the <Button> control in the XAML
file calls a method called CallAddService(), as Example 13-6 shows. There, we first instantiate the AddServiceClient class provided in the AddServiceReference namespace. When you use
another name for your WCF service, just use the pattern <NameOfService>Client
AddServiceReference.AddServiceClient client =
  new AddServiceReference.AddServiceClient();
For every method
Xyz() in the service,
the proxy supports an event called XyzCompletedXyzCompletedEventArgs
client.AddCompleted +=
  new EventHandler<AddServiceReference.AddCompletedEventArgs>(showResult);
Finally, a method named after the pattern XyzAsync()<TextBox> elements and convert it to integers
before sending it to the server:
client.AddAsync(Convert.ToInt32(a.Text), Convert.ToInt32(b.Text));
The event handler can then use its second argument to retrieve the
data from the server, using the Result property. Example 13-7 contains the complete C# code for this example, and
Figure 13-3 shows the output in the browser. Notice how
the application calls the service, as the Firebug extension proves.
Example 13-7. Consuming a WCF service, the C# file (Page.xaml.cs, project WCFService)
using System.Windows.Controls;
using System.Windows.Input;
using System.Net;

namespace WCFService
{
    public partial class Page : UserControl
    {
        public Page()
        {
            InitializeComponent();
        }

        private void CallAddService(object sender, RoutedEventArgs e)
        {
            AddServiceReference.AddServiceClient client =
              new AddServiceReference.AddServiceClient();
            client.AddCompleted +=
              new EventHandler<AddServiceReference.AddCompletedEventArgs>(
                showResult);
            client.AddAsync(Convert.ToInt32(a.Text),
                            Convert.ToInt32(b.Text));
        }

        void showResult(object o,
                        AddServiceReference.AddCompletedEventArgs e)
        {
            c.Text = "  " + e.Result.ToString();
        }
    }
}
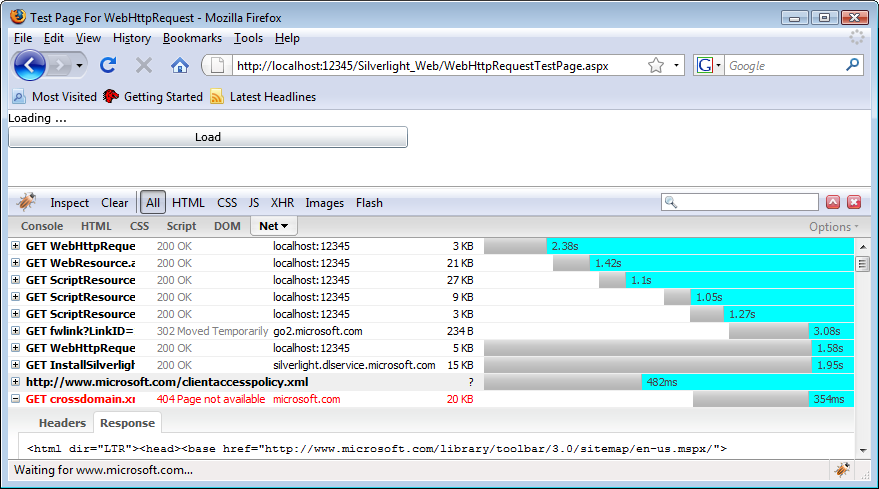
If you are using an absolute URI when calling a resource or service from Silverlight, and you trace the HTTP requests the browser is sending (e.g., using the Firebug extension for Firefox), you will notice that the browser tries to load a file called accesspolicy.xml from the remote server. If the file does not exist, the browser then tries to load a file called crossdomain.xml (see Figure 13-4). If both files do not exist (or do not contain the appropriate data, as we will discuss shortly), the request is not made and a security exception is thrown.
The main reason for doing this is to avoid an attack known as
CSRF (cross-site request forgery), or session riding.
Imagine you go to a shady web site. This site contains a Silverlight
application that then creates an HTTP request (as you saw earlier in Using HTTP Resources) and sends it to another server, say oreilly.com. Now further imagine that this HTTP
request looks exactly like the HTTP request the browser would perform when
someone ordered a book on the O’Reilly web site. It will be hard for the
O’Reilly e-commerce application to find out whether the request was
actually made voluntarily (by a user visiting http://www.oreilly.com) or
involuntarily (by a Silverlight application on another site). The browser
automatically sends all applicable
oreilly.com cookies alongside all HTTP requests to
oreilly.com, so there is a chance that the server correctly
identifies the user and the order is executed. (To be honest, the ordering
process at http://www.oreilly.com is luckily
more complicated than that, but this kind of attack works against many
unnamed web sites; I used the O’Reilly example for the sake of demonstration.)
This is one of the reasons why a Silverlight application may not send requests to external web servers, unless it has been specifically allowed. Adobe Flash implemented a similar defense mechanism years ago, which works as follows: when a request is sent to an origin other than the current page (origin meaning the same domain name, same protocol, same port), a file called crossdomain.xml is requested from the root directory of the target server. A typical crossdomain.xml file looks as follows:
<?xml version="1.0"?>
<!DOCTYPE cross-domain-policy SYSTEM
          "http://www.adobe.com/xml/dts/cross-domain-policy.dtd">
<cross-domain-policy>
    <allow-access-from domain="*.oreilly.com" />
</cross-domain-policy>
If the preceding XML file is saved in the root directory of a server
under the name crossdomain.xml, Adobe Flash
applications from any domain ending in .oreilly.com may send
HTTP requests to the server. The crossdomain.xml file
format provides additional functionality, including allowing specific
extra HTTP headers being sent. And the good news is: Microsoft Silverlight
supports the same format. So if a web server is “Adobe Flash remote
request enabled,” the same applies for Silverlight content, too.
The crossdomain.xml format has disadvantages, however. Most notably, all settings are restricted to specific domain names. So, if you want to have different settings for specific sections of your web site, each section needs its own domain name. Tying settings to paths is not possible, at least not with crossdomain.xml.
Therefore, Microsoft created its own format regarding remote request security settings. It also uses XML; the mandatory filename is accesspolicy.xml, and the file must be placed in the root directory of the target server. Here is what such a file might look like:
<access-policy>
  <cross-domain-access>
    <policy>
      <allow-from http-request-headers="*">
        <domain uri="*.oreilly.com"/>
      </allow-from>
      <grant-to>
        <resource path="/apis" include-subpaths="true"/>
      </grant-to>
    </policy>
  </cross-domain-access>
</access-policy>
This XML markup allows all requests coming from domains ending in
.oreilly.com to send any HTTP request headers to all endpoints
within the /apis virtual directory on the web server, including
subpaths. Since accesspolicy.xml provides more
features than crossdomain.xml and is also specific to
Silverlight, it takes precedence over crossdomain.xml. If
accesspolicy.xml exists, Silverlight does not even
bother trying to load crossdomain.xml. Refer to the
Further Reading section next for more information about the
two file formats.
Caution
Note that even with these XML files, a server application can still be prone to CSRF attacks
The XML policy files are targeting HTTP requests. If you open up socket connections, there are two requirements you have to meet:
You need an accesspolicy.xml file available at port 943 of the target server
Only target ports 4502 through 4534 are available
So, as you have seen in this chapter, Silverlight provides several ways to communicate with a remote server, where most of the business logic usually resides. If you are using an external server, you need to prepare it by creating an XML-based policy file, either using Macromedia/Adobe’s or Microsoft’s format.
- Learning WCF, by Michele Leroux Bustamante (O’Reilly)
An easy-to-use introduction to Windows Communication Foundation
- http://msdn.microsoft.com/en-us/library/cc645032(VS.95).aspx
Information on the accesspolicy.xml file format used by Silverlight
- http://www.adobe.com/devnet/articles/crossdomain_policy_file_spec.html
Information on the crossdomain.xml file format used by Flash and also supported by Silverlight