
2
Using Azure Container Registry for Storing and Managing Images
Containerization has become more and more popular with both legacy and greenfield projects. It is not a surprise – being able to run an application using a statically defined runtime environment helps in both development and operations. It also saves time and resources. However, before you run a container, you need to define its image description and store it somewhere so that both developers and applications can fetch and run a container from it. This chapter should help you to find the proper solution for your case using Microsoft Azure.
In this chapter, you will learn about the following:
- How to run and deploy your own image registry using Azure Container Registry
- How to tag and version your images
- What can be done to improve the reliability of your registry?
- How to automate the most common tasks related to images
Technical requirements
To perform the exercises in this chapter, you will need the following:
- Access to an Azure subscription
- Visual Studio Code installed (available at https://code.visualstudio.com/)
- The Azure CLI (https://docs.microsoft.com/en-us/cli/azure/)
- Docker (https://www.docker.com/get-started)
Different hosting options for Azure Container Registry
In Azure, the recommended way of hosting a container image is using a service called Azure Container Registry (ACR). It is a Platform as a service (PaaS), which allows you to focus on uploading and managing images instead of configuring and maintaining a registry infrastructure.
Important Note
If you're looking for an alternative solution or Azure Container Registry doesn't satisfy your requirements, there are many different options available. You can, for example, use Project Quay or host your own Docker registry. Deployment details and configuration will be different for each of those solutions but ultimately give you the same result – your very own image registry that can be customized and modified as you wish. The downside is the need to manage all aspects of the solution – from infrastructure to authentication and updates.
Before we describe the hosting options for ACR, let's quickly answer a question – why do we need a private image registry instead of using a public one such as Docker Hub?
In the enterprise world (or companies, which require more strict privacy policies), using a public registry may be disallowed for a number of reasons:
- You do not manage the infrastructure (even indirectly); thus, it may be difficult or even impossible to reach performance expectations.
- Very often, you do not have any kind of confirmation that you are not using a shared infrastructure with other clients.
- If the public service provider goes down, you lose access to your images (which may render your deployments impossible to finish).
- Public vendors are much more vulnerable to generic cyberattacks than most companies (due to the fact that an attacker may gain access to multiple companies' data).
- Sometimes, it is difficult to integrate a public vendor registry with your networking stack.
For all those reasons, you will be often encouraged to use a solution that somehow addresses the listed issues. This is where ACR comes in – while it is a service built by a cloud vendor and offered as part of their marketplace products, it can still be owned by your company.
Deploying ACR with the Azure portal
To deploy ACR using the Azure portal, we will need to click on the + Create a resource button and search for Container Registry:

Figure 2.1 – Creating a resource
Then, click the Create button, which will forward us to the ACR creation wizard. As per the current portal's User Interface (UI), the process of provisioning a service is divided into multiple steps (tabs). For ACR, we have three different steps:
- Basics
- Networking
- Encryption
Important Note
Each service wizard contains two additional tabs, Tags and Review + create. They are common for all Azure services and do not provide any kind of real value besides tag creation and displaying a summary. In most cases, we will skip their description and go straight to a service instance creation.
The Basics tab, as the name suggests, contains most of the initial information related to the service. In our case, it will allow us to provide things such as subscription and resource group configuration, instance name and location, and SKU:

Figure 2.2 – The Basics tab
Let's focus a bit on the most important fields. Registry name directly identifies your registry instance and is part of the registry DNS address. That means that it must be globally unique (such records are registered in Azure DNS servers) and cannot contain any special characters. Location describes the Azure region in which your registry will be deployed. Availability zones affects your service availability, but for now, let's leave it unchecked, as we will come back to that parameter later. The last field is SKU; here, we have three different options available:
- Basic
- Standard
- Premium
Each SKU has a different price and offers a different set of features. If we consider a monthly charge, the cost of each SKU will look like this (West Europe – 30 days):
- Basic – $5.01
- Standard – $20.01
- Premium – $50.01
As you can see, the difference is not that big when compared to the overall cost of most IT projects.
Tip
You can always start with the Basic tier and then scale up to more expensive ones. As with most Azure services, ACR supports scaling up and down, so it can be extended in parallel with your application.
When you have entered all the required information, click the Review + create button (we will cover the Networking and Encryption tabs later in this chapter). Once validation passes, click Create and wait a moment – after a few seconds, a new ACR instance should be created and ready to work:

Figure 2.3 – The Overview screen of ACR
We will describe the various features of ACR later in the chapter.
Deploying ACR using the Azure CLI
As a developer, you may want to work with your Azure resources using a Command-Line Interface (CLI). It may look difficult at first glance, but you will soon realize that it will make things easier on several occasions (especially if you want to do things quicker; going through all the screens in the Azure portal can be cumbersome, especially if you have hundreds of them). To use the Azure CLI for our deployment, open any kind of terminal (it can be Command Prompt (CMD) in Windows, Bash/Shell in Linux, or even custom terminals such as ConEmu) and ensure that you are signed in by using the following command:
az login
You should see an output like this:
Figure 2.4 – The az login output
Now, the Azure CLI will gather information about all the subscriptions you have access to (it can take a while if there are a lot of them) and display the metadata of all the connections.
Important Note
If you are not signed in, the Azure CLI will open a browser where you can enter your credentials.
To create a new instance of ACR, we will use the following command:
az acr create
To understand it better, let's see what can be used as a parameter and which one will be required:

Figure 2.5 – The az acr create parameters description
As you can see, we will need three parameters (or rather four to be precise, as location may not be required; yet it is still worth setting it up explicitly). Let's run it and see the results:
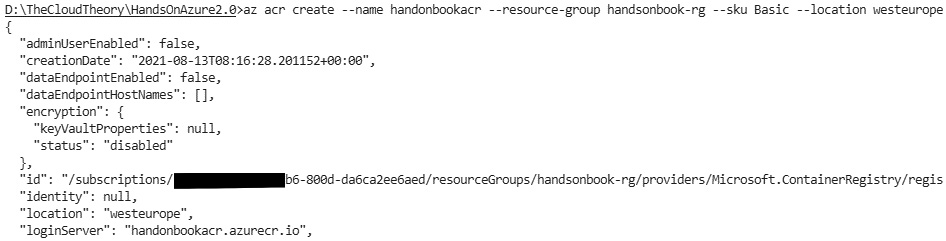
Figure 2.6 – The Azure CLI output for creating an ACR
If everything is correct, you will see the command's output describing the created resource.
Tip
If you do not know the possible location values for your resources, use the following command: az provider show –namespace Microsoft.ContainerRegistry.
Congratulations! You have just deployed your own ACR instance using one of the described methods. Now, we will switch our focus to particular features to learn more about the service.
Registries, repositories, and images
In the previous steps, we managed to deploy our own instance of ACR. What we have currently is a private registry that will allow us to push container images for later use. In this section, we will cover two additional topics – repositories and images. Let's briefly describe them:
- A registry is an instance of ACR. It is the main layer of the service, which acts as a control plane and gives us the possibility to configure things such as encryption, identity, and networking.
- A repository is a logical container for your images. Each registry can have multiple repositories. You can think of them as categories of images or projects – once a repository is created, you can start pushing your images there.
- An image is a blueprint for each container. Images can be pulled onto a machine and then used to create an instance of it called a container. In ACR, images must be pushed into repositories.
If you want to remember the main difference between repositories and images, look at the following example:
- my-image:v1
- my-image:v2
- my-image:latest
All those images have the same name; the only difference is the tags. This is exactly what tells you which thing is a repository and which is an image. In ACR, each repository will have images with the same name but a different tag.
Tip
Think about repositories as a collection of container images. If you want to differentiate them further, include a namespace so that you can have setups such as my-app/my-feature1:v1 and my-app/my-feature2:v1.
Let's now see how we can work with repositories and images.
Working with repositories and images
In ACR, there is no direct way to create a repository. Instead, a repository is created once the first image is pushed to a registry. To push anything to an ACR instance, we will need a Docker image locally. To have a Docker image, we need to prepare a Dockerfile, build it, and then upload it using, for example, the Azure CLI. To do so, create a file called Dockerfile on your computer and enter the following code:
FROM mcr.microsoft.com/hello-world
That single command will tell Docker that our base image will be hello-world. Now, there are two ways to continue:
- You can use the Docker CLI to build an image and then the Azure CLI to push it.
- You can use the Azure CLI to push your image with the files associated with it to build it in Azure and then automatically push it to ACR.
We will focus on the latter, as it will save us some time. One of the additional ACR features is the ability to build Docker images based on the files sent to it. It is a great feature, which works even if you do not have Docker on your machine. To leverage that, use the following command:
az acr build --image handsonbook/hello-world:v1 --registry handsonbook --file Dockerfile .
First, we need to set the image parameter, which describes the name of an image. Note that, in my example, it combines two values – handsonbook and hello-world, with a v1 tag. The first value is a repository (it will be visible once we push the image). The second describes the name of an image. Then, we need to enter our repository's name and, finally, the Dockerfile location with a path to it.
Important Note
The little dot at the end of the command is the location of Dockerfile. If used like this, it expects it in the same directory as the working directory of your terminal. It is important to make sure the location is passed along with the command, as failing to do so results in an error.
Here, you can see the result of running the command:

Figure 2.7 – The az acr build command output
Now, if we go back to the Azure portal, we should be able to see our image pushed there:

Figure 2.8 – The Repositories blade in ACR
The same result should be returned from the Azure CLI if we use the az acr repository command:
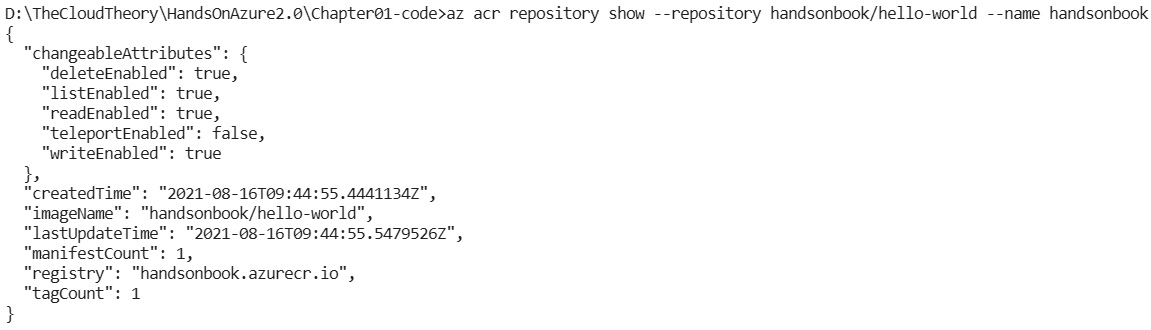
Figure 2.9 – az acr repository showing output
Note that if I use handsonbook/hello-world as my image name, the repository's name will be the same.
Granting permissions for pulling/pushing images
In many scenarios, we will be the owners of Azure resources. This gives us almost infinite possibilities when managing them – we can change the configuration, scale up and down, disable encryption, and many other things. However, when applying real-world use cases, we will quickly face problems such as failed authorization. For ACR, if we want, for instance, to push images from our Continuous Integration/ Continuous Delivery (CI/CD) pipelines, we need to learn what permissions are required to be able to do so.
There are two special roles in Azure that can be assigned to a particular identity to grant it the ability to pull or push images:
- AcrPull
- AcrPush
To go more into details, let's check the definition of an AcrPush role and see what actions are allowed:
- Microsoft.ContainerRegistry/registries/pull/read
- Microsoft.ContainerRegistry/registries/push/write
As you can see, if you assign somebody (or something) the AcrPush role, you will grant them the ability to read pushed images and push new ones.
Important Note
Both the AcrPush and AcrPull roles limit the permissions to those two actions listed previously. This is why they are an excellent choice if you do not want a user to be able to do anything else but this.
To grant the described roles, use the Access control (IAM) blade in the Azure portal:
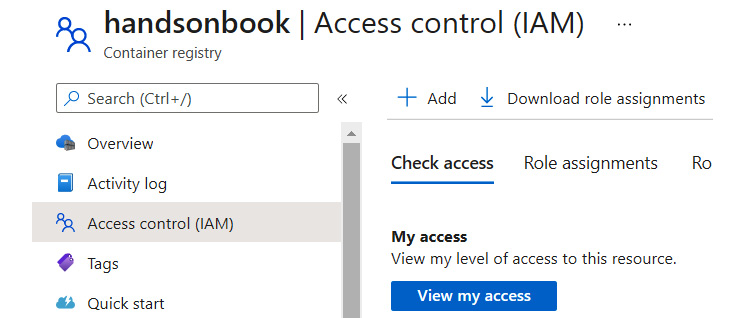
Figure 2.10 – The Access control (IAM) blade
From there, you can use the + Add button and click on Add role assignment. This will display a new screen, where you can select the desired role and a principal that a role should be assigned to:
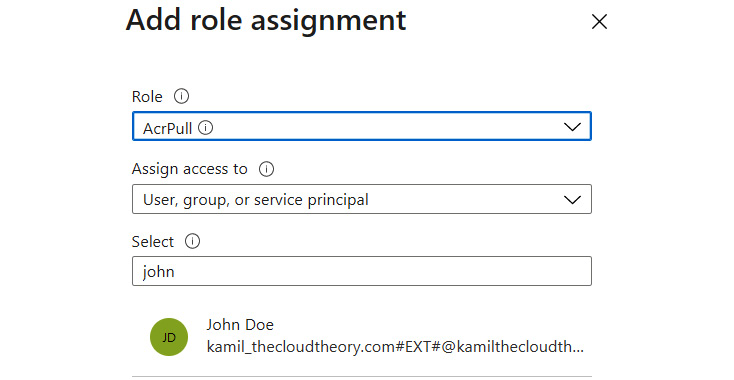
Figure 2.11 – Assigning an AcrPull role for a user
After clicking the Save button, a new role for this particular resource will be assigned with the appropriate permissions.
Tagging and versioning
All images in ACR must have a tag associated with them. You can think about it as a way to version your images. Let's consider the following convention:
- my-image:v1
- my-image:v2
- my-image:latest
Here, we follow two paths:
- Each new image is tagged with the latest tag.
- We are incrementing the index value of our images so that the registry contains all the versions of our application.
It is important to remember that ACR does not change the default value of many tools, which allows you to fetch container images. For most cases, if you omit the tag value when downloading an image, you will get the latest version (the one with the latest tag).
When building a tagging strategy for ACR, you should follow the same set of rules you would normally follow when using any other kind of image registry:
- Leverage stable tags, which do not guarantee content stability but rather allow your automation to fetch a specific image version without changes (for example, latest can be used to automatically run tests on the newest application version without a need to introduce changes to the process).
- Use unique tags, which can be used as direct links between the application version and deployment. Unique tags can be generated based on things such as timestamps, a git commit SHA value, and your build identifier. In contrast to stable tags, unique tags are considered good practice when releasing a new version of your application – most of the time, they will change with each deployment, so you know there is a new version without digging into code. Stable tags do not grant you that certainty – they never change, so it is impossible to tell whether they contain new artifacts or not.
Additionally, each image can be locked, so you can cover yourself in case of an accidental update or image deletion.
Important Note
The image lock is not the same as the resource lock available on the Azure resource level. They also work differently – resource locking prevents changes and delete operations made via Azure Resource Manager; image locking secures an image from deletion and makes it read-only for all registry users (but if you delete your instance of ACR, locked images can still be deleted).
There are two levels of registry locks in ACR:
What is more, you can use locks in different ways:
- A full-delete/read-only lock
- A delete lock only
- A disabled reading of an image/repository
To lock an image, you can use az acr repository update with the --write-enabled parameter set to false:
az acr repository update --name handsonbook --image handsonbook/hello-world:v1 --write-enabled false
As a result, you should get JSON like mine:
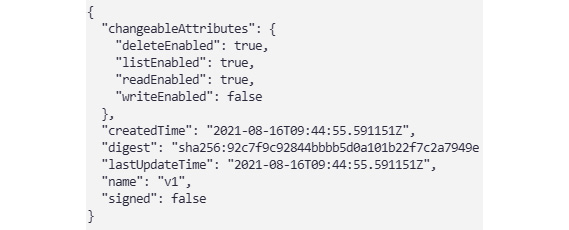
Figure 2.12 – The result of disabling writing on a repository level
As you can see, the command I run disabled writes permission but still preserved deletion and reads permission of the image.
Tip
If you omit the tag name in the –image parameter, a lock will be applied on a repository level instead.
Here is a list of the available parameters to disable reads, writes, and deletions:
- --write-enabled true/false
- --delete-enabled true/false
- --read-enabled true/false
A rule of thumb is to use those parameters along with your process – for example, once an application is released, you disable both writes and deletions to secure it from modifications. If you have outdated images, which you cannot delete due to legal requirements and yet people should not be allowed to do anything with them, you can disable writes, deletions, and reads.
Zone redundancy and geo-replication
At the beginning of this chapter, when we were creating our instance of ACR, you probably noted the Availability zones option:
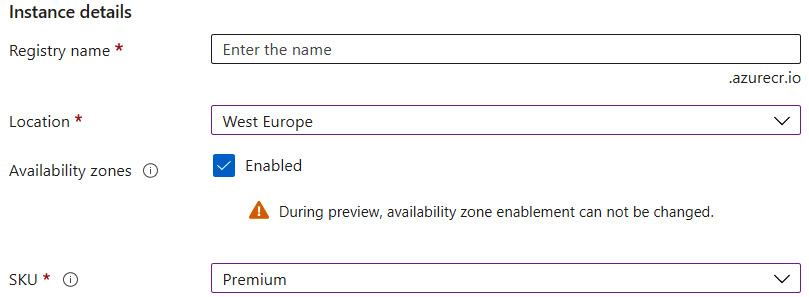
Figure 2.13 – Availability zones enabled when creating the ACR instance
To enable it, you must change the SKU parameter to Premium, as this feature is available only for the highest tier. You can do so via the Overview blade and by clicking on the Update button.
Important Note
Availability zones are available only for a subset of Azure resources. If you cannot select that option, make sure your location has them available. A full list of regions with zones is available here: https://docs.microsoft.com/en-us/azure/availability-zones/az-region.
Once your instance of ACR is deployed, it will have a feature called zone redundancy enabled without the need for any additional steps. When an Azure service is deployed across availability zones, it offers a much higher availability standard than services, which do not (or cannot) leverage zones.
The concept of availability zones is quite simple – when a service itself supports zone redundancy and is deployed to a region, where zones are available, it is provisioned across multiple physical locations. You can treat them as regions inside regions – each zone has its own physical infrastructure, including power, an internet connection, and cooling. They are also positioned in a way that limits the risk of an outage affecting all of them at once.
Tip
Zone redundancy in Azure is one of the easiest ways to improve the reliability of your application. They cost nothing and the only limitation is region and service support. However, remember that availability zones do not secure you from region-wide disasters. If a whole region goes down, zones cannot do anything to prevent your system from collapsing.
At the time of writing, you cannot enable or disable availability zones once your ACR is created. That feature will be enabled in the future, but for now, the only option is to recreate your instance.
In addition to zone redundancy (which introduces local replication across the region), ACR supports a feature called geo-replication. As the name suggests, it allows us to replicate our instance across multiple Azure locations around the world. Geo-replication in ACR requires Premium SKU, but if your ACR was deployed as a Basic or Standard tier, do not worry – you still can upgrade it to the Premium version. When you access the Replications blade in your ACR, you will see a warning telling you that you need to upgrade to Premium SKU to enable that feature:
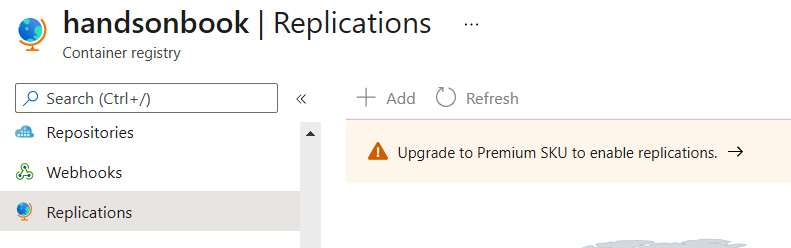
Figure 2.14 – A non-premium ACR notification
Click on that text and change the SKU parameter to Premium. After clicking the Save button, replication should be enabled on your instance:

Figure 2.15 – Updating ACR with a new tier
Now, the Replications blade should look a little bit different, with Azure locations available to interact:

Figure 2.16 – Replications screen
If you want to configure geo-replication for your ACR, you have two options:
- Click the + Add button.
- Click on any of the available regions.
Both methods will display a replication screen, where you can select the desired location and enable zone redundancy for it:

Figure 2.17 – Creating a replication target for ACR
Clicking on the Create button below will start the process of replication. Once it is completed, you should be able to see new region availability on your map:
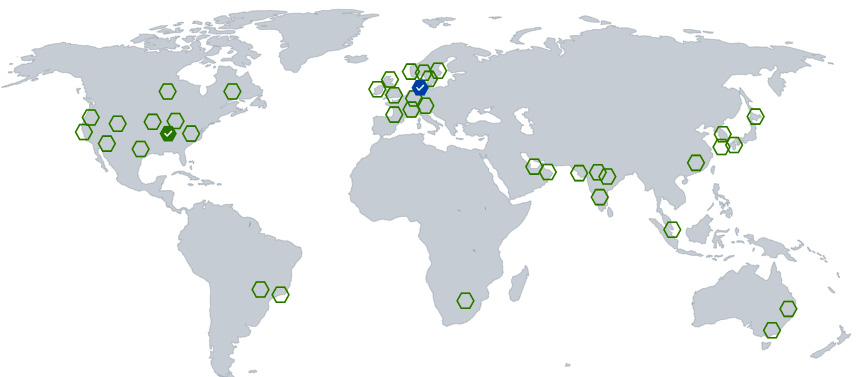
Figure 2.18 – Two replication targets enabled
As with everything, consider the following points when working with geo-replication:
- ACR is responsible for replicating images you are pushing to it, but it will take some time to do that. This is especially true if your ACR is already filled with images. Do not expect immediate replication of images.
- Each location you will choose is an individual Premium SKU ACR, meaning the total cost of your infrastructure will be N x the Premium SKU charge, where N is the number of regions.
- Azure Traffic Manager is responsible for routing push and pull requests, so they are directed to the closest location. The management of Traffic Manager is ACR's responsibility.
For production environments, using geo-replication in ACR is often a must – it will guarantee that if some regions are unable to serve a request, it is still possible to perform deployment or run an application.
ACR Tasks
The last topic of this chapter is about an additional feature of ACR called Tasks. Up until now, we were using ACR as a simple registry of container images that can be tagged and managed. However, there are some additional scenarios that are not covered by the basic ACR functionality:
- Automated image builds
- Base image patching
- Security updates
To address those points, ACR Tasks was created. In general, each task is a file written with YAML following a predefined schema. They consist of steps that dictate what operations should be performed now. An example task may look like this:
version: v1.1.0
steps:
- build: -t $Registry/hello-world -f hello-world.dockerfile .
As you can see, it consists of a single step that will build a container image. In ACR Tasks, you have access to three different step types:
- build, which is like using docker build
- push, for pushing a built image to a registry
- cmd, to run a command in a similar fashion to docker run
Each task file can contain a single step or several (which we call a multi-step task). Task files are then sent to your ACR instance, where all the steps are analyzed and performed.
Tip
ACR Tasks offers quite a verbose syntax suitable for multiple scenarios and involving various tools (such as Helm, the Azure CLI, or curl). You can learn the whole schema here: https://docs.microsoft.com/en-us/azure/container-registry/container-registry-tasks-reference-yaml.
To run a task, you will need the Azure CLI and the az acr run command:
az acr run -r MyRegistry -f MyTaskFile.yaml ./<local-context>
The same command can be used with the Git repository instead of using a local context:
az acr run -r MyRegistry <my-repo>.git -f MyTaskFile.yaml
The result for both commands will be the same – a task file will be sent to your instance of ACR and all the steps will be executed there. Here, you can see where the result of running the task is available in the Azure portal:

Figure 2.19 – The Tasks blade in ACR
Using tasks may simplify your workloads and pipelines – instead of multiple commands for building a container image, pushing it and testing, and setting up an agent with Docker installed, you can just prepare a task file with all the steps and let ACR do the job.
ACR Tasks has one additional feature – base image updates. Before we dive into that, let's describe what a base image is. In most cases, when you are defining your image using Dockerfile, you are using a baseline coming from another container image. Such a link is built using the FROM command in Dockerfile:
FROM mcr.microsoft.com/hello-world
The preceding definition will imply that when an image is built, it should be based on a hello-world image available in the mcr.microsoft.com registry. Now, base images can (and will) be updated. This is caused by various things:
- New features
- Security patches
- Hotfixes
Normally, you are responsible for monitoring new releases and applying them to your container images. As that kind of activity is rarely considered valuable (it is a repeatable and easy-to-automate task), it is always worth leveraging a solution that can take care of that. This is where base image patches come in handy. To enable that feature in ACR, use the following command:
az acr task update --registry myregistry --name mytask --base-image-trigger-enabled True
There are also some additional considerations when using this functionality:
- If you are using multi-stage Dockerfile files, updates are only applied for final images.
- Updates work for stable tags only. An update will not be triggered by new tags.
- When creating an ACR using the Azure CLI, the base image trigger is enabled by default. The preceding command should be run only if you created the ACR from the portal or disabled that feature explicitly.
A base image update is a very useful feature of ACR; however, you should consider using it only if base image patches will not trigger any kind of manual process. Many business domains require that artifacts that have reached production environments cannot be mutated. That means that a base image update may render your application noncompliant and enforce starting a release process from the start. If this is not the case for you, you can consider automated patches safe for your process.
Summary
As you can see, Azure Container Registry is a simple service that greatly simplifies the management process of container images and helps store them with ease. In this chapter, you have had a chance to deploy your very own registry and learn something about the main components – repositories and images. We also discussed topics related to the availability of your registry and reliability – zone redundancy and geo-replication. These are the things you should look out for when making your solution production-ready. The next chapter will continue topics related to containers, as we will discuss containerization in web applications.
Questions
- What is the difference between a registry, a repository, and a tag?
- Which SKU is required for enabling geo-replication?
- If ACR is replicated across three different regions, how many instances will you be charged for monthly?
- Can you build your container image using ACR?
- What kind of locks are available for container images in ACR?
- If ACR is removed, will it also delete locked images?
- What does ACR Tasks do?
- What is a base image and how can ACR help you keep it updated?
Further reading
- Azure Container Registry documentation: https://docs.microsoft.com/en-us/azure/container-registry/container-registry-intro
- ACR Tasks documentation: https://docs.microsoft.com/en-us/azure/container-registry/container-registry-tasks-overview
- ACR Tasks examples: https://docs.microsoft.com/en-us/azure/container-registry/container-registry-tasks-samples