
20
Serving Static Content Using Azure CDN
Hosting many static files, especially when we’re developing a highly popular application, is a serious task that impacts both the performance of our web service and the overall user experience (UX). If we load images, files, or documents too slowly, our customers may choose one of our competitors that provides similar features but performs better. Thanks to cloud services such as Azure Content Delivery Network (CDN), we’re able to handle high-bandwidth content quickly, due to integration with Azure Storage and using components native to Azure.
The following topics will be covered in this chapter:
- Azure CDN fundamentals
- Optimization and caching
- Developing applications using Azure CDN
Technical requirements
To perform the exercises from this chapter, you will need the following:
- An Azure subscription
Azure CDN fundamentals
If you are hosting a popular website that contains many static files, you may wonder what the best way is to optimize serving them to your users. When searching for a solution, you must take into consideration many different factors–Hypertext Transfer Protocol (HTTP) specification, browser capabilities, your server performance, network latencies, and so on. The whole problem is far from being trivial and requires significant resources to be implemented in the right way. To overcome the listed difficulties, the idea of CDNs was developed. A CDN encapsulates the concept of a complex service that takes care of delivering content to everyone who browses your website. In this chapter, you will learn about Azure CDN, which is an Azure component that is designed to be a fast and reliable solution for all the listed problems.
Let’s start by describing the process of working with CDNs and integrating them with an application.
Working with CDNs
When a user accesses your website, it must fetch all the static content that is provided for a specific page. This implies the following actions:
- A browser must request all images, files, and scripts that are required by a web page.
- The requests must be queued, as there is a limit on how many requests to a single domain a browser can perform.
- In most cases, a page must be rendered gradually as content is fetched from the server.
- A server can throttle requests if it is currently overloaded.
- A browser must respect all implemented caching mechanisms—of course, if your website tells it how to do it.
We can describe the whole process as follows:
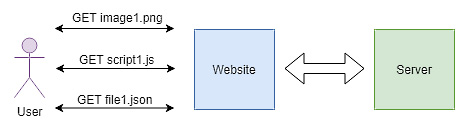
Figure 20.1 – A communication diagram with static files and single server
In the preceding scenario, each request from a user is routed directly to the website. It then connects with the server to fetch the data. Of course, we can imagine a situation where files are hosted by separate servers, as demonstrated in the following diagram:

Figure 20.2 – A communication diagram with static files and multiple servers
Such an alternative can improve performance a little bit (as servers will be identified using different domain names), but it complicates maintenance and configuration. What is more, such a setup is not the right solution if you struggle with network latencies (as an additional server will not make a difference). While we are discussing different architectures, you are probably starting to imagine one more setup that may make a difference.
A proxy between a website and the server that is responsible for proper caching can be easily scaled up and is highly available, as can be seen in the following diagram:
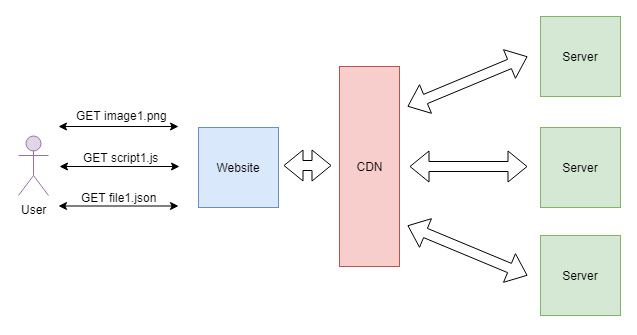
Figure 20.3 – A communication diagram with static files, multiple servers, and aCDN in place
CDNs are exactly the proxy that we are talking about. They provide the following functionalities:
- They can be easily scaled up/out if the load exceeds our expectations.
- They can cache requests, so the end servers are not utilized too much.
- They respect the cache-control header, so it is easy to provide the time-to-live (TTL) of a resource.
- They improve the responsiveness of your website by serving content to multiple users simultaneously.
Later in this chapter, you will learn how to leverage such services by using Azure CDN. For now, let’s check how an Azure CDN can be created in the Azure portal.
Creating an Azure CDN in the portal
The process of creating an Azure CDN is like all the other services that you are working with when reading this book. To get started, you must click on the + Create a resource button and search for Front Door and CDN profiles. When you click the Create button, you will see a comparison of available offerings, including Azure Front Door and other options such as classic, Verizon, and Akamai. We will go for the classic (Microsoft) option, as you can see in the following screenshot:

Figure 20.4 – Selected options for the classic CDN
When you proceed by clicking once again the Create button, you will see a form where you can enter all the required information regarding the new service, as illustrated in the following screenshot:
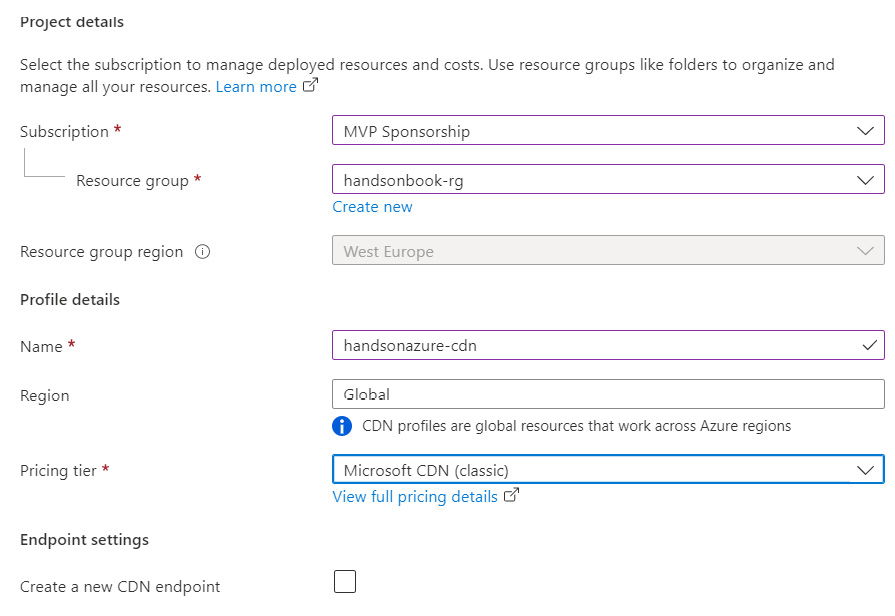
Figure 20.5 – Creating an Azure CDN in the Azure portal
There are two things worth mentioning here, as follows:
- Pricing tier: Pricing tiers look a little bit different compared to other Azure services, as you no longer have the Basic, Standard, and Premium options to choose from. Here, you can decide which product you will be using—you can select one from a list containing providers such as Verizon, Akamai, and Microsoft. They offer different features, such as dynamic site acceleration, video streaming optimization, and asset pre-loading. A full list can be found in the Further reading section for this chapter.
- Create a new CDN endpoint: If you know what your origin (an endpoint that will cache the resources) will be, you can create it right now for the whole service.
To quickly check what is available in the pricing tier, you can click on the View full pricing details link—this will redirect you to a documentation page where all the details regarding different versions of the service will be provided.
For Azure CDN, you pay for each gigabyte (GB) of outbound data transfer, and depending on the selected provider, the price can differ almost fivefold. Therefore, when designing a solution based on Azure CDN, you should carefully read the pricing details. There are also additional features available such as data transfer acceleration, which can greatly improve the performance of your application, though they cost extra.
When you click on the Create button, the service creation process will start. Once it finishes, you can access your very own instance of Azure CDN, as illustrated in the following screenshot:
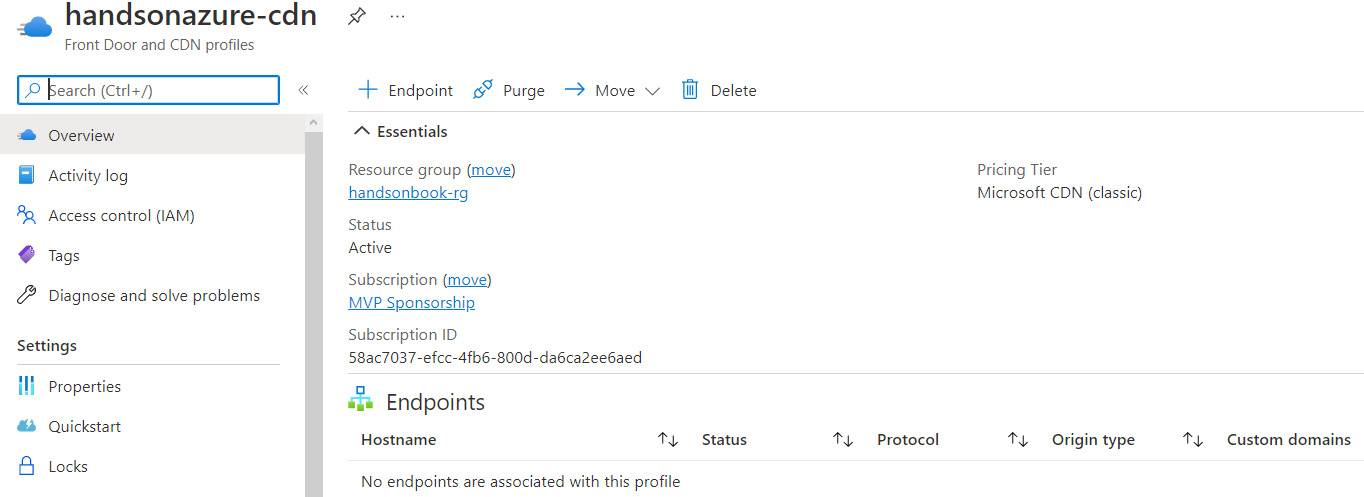
Figure 20.6 – Overview of Azure CDN
Let’s now click on the + Endpoint button to create a new endpoint. As mentioned before, an endpoint is the element of a CDN that caches the data and serves it for a particular purpose. Here, you can find an example setup:
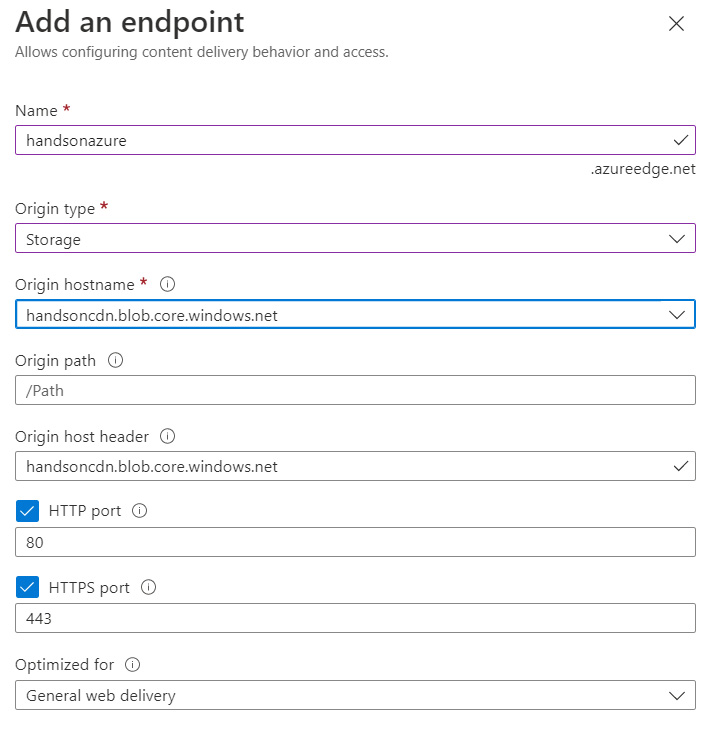
Figure 20.7 – Configuration of a new endpoint
As you can see, I selected Storage as the Origin type value. To be able to do so, you must have an instance of Azure Storage in the same resource group as your CDN. You can also select other available types, such as Cloud Service, Web App, or a Custom Origin type. Once you add an endpoint, you will be able to manage it by clicking on it on the Overview tab.
We created a CDN service using Azure CDN—let’s now do a comparison using Azure Front Door as our solution.
Optimization and caching
CDNs are all about optimizing the content and caching it. In that way, they improve the performance of your website and the UX. In the previous section, you learned a little bit about the concept of CDNs and configured your instance of Azure CDN. Now, we will try to learn some more advanced features, such as compression, caching rules, and optimization.
Configuring an endpoint
To access the endpoint configuration, click on it on the Overview blade, which will take you to the following screen:

Figure 20.8 – Endpoint available on the Overview blade
This will display a new screen, where you can find all information regarding that particular CDN endpoint, such as its hostname, available protocols, and configured rules for content optimization. In fact, the screen looks very similar to the previous one—it just offers some additional options, as we can see here:
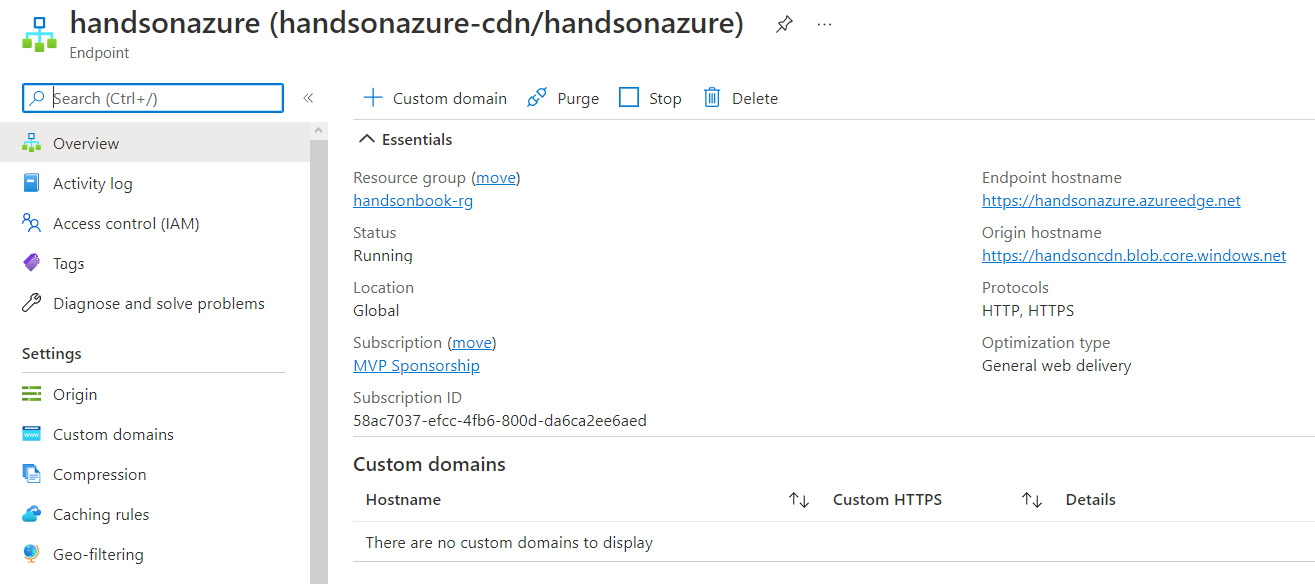
Figure 20.9 – Overview of an endpoint in Azure CDN
Now, we will discuss different features available for an endpoint.
Compression
One of the basic features of CDNs is Compression—this allows you to compress different file types on the fly, such as lowering their size and reducing network latency:

Figure 20.10 – Selecting Multipurpose Internet Mail Extensions (MIME) types for compression
When you enable it, you can select the MIME types you are interested in. You can also add new ones if you plan to support any.
Note
Remember that a file must be cached by a CDN to be compressed on the fly.
Adding a custom type will be crucial if your application supports any file type that is not listed in the list. Once added, you can simply select it and let Azure CDN handle it once cached.
Caching rules
By default, CDN caches content based on the Cache-Control header you provide. However, you can explicitly define how it should behave if one of the following applies:
- A header is missing
- A query string is introduced
- A particular match condition is met
By default, Azure CDN offers you a limited list of behaviors when a query string is considered, as illustrated in the following screenshot:

Figure 20.11 – Default caching rules
Fortunately, you can control the behavior of the service using custom caching rules, as illustrated in the following screenshot:
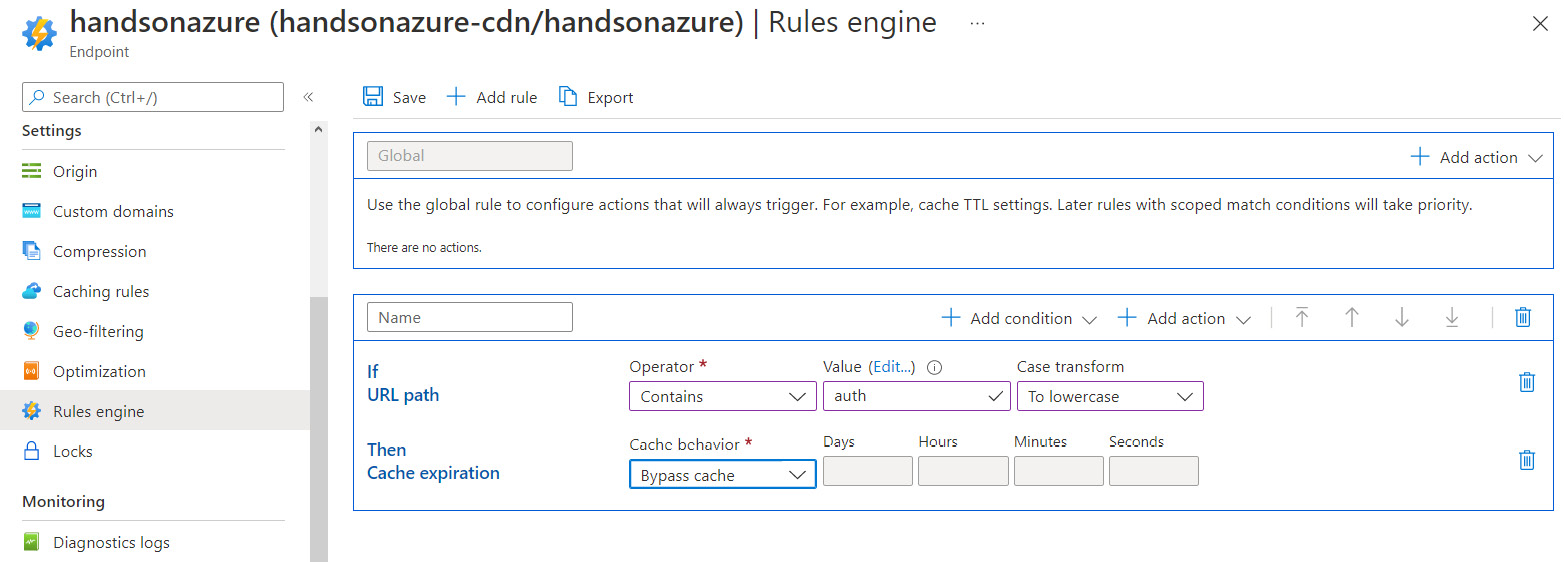
Figure 20.12 – Configuring custom caching rules with Rules engine
By using Rules engine, you can configure any behavior you want for your system. For example, if you feel there are some paths that should be excluded from the cache, this is the place to do that. The same applies to the logic behind headers, or even payloads sent via the request body.
Geo-filtering
Sometimes, you need to block or allow content for specific countries. Such a feature might be problematic without a CDN—you must control programmatically who can access a given image or a file based on the geo-location. With Azure CDN, you can enable it within seconds, as illustrated in the following screenshot:

Figure 20.13 – Configuring geo-filtering
On the Geo-filtering blade, you can configure different rules blocking or allowing access to a folder or a particular file inside a CDN for a particular country.
The last part of this chapter is related to integrating Azure CDN with an application. We are going to see how managed Azure services can leverage what Azure CDN offers to them and what that integration changes from a source-code point of view.
Developing applications using Azure CDN
Azure CDN itself does not give you anything special—it just caches content and takes responsibility for serving it without delays. The important thing, however, is to know how you can use it in your applications. In Azure, integrating Azure CDN with—for example—Azure App Service—is a piece of cake. It only takes a few mouse clicks to get your CDN working with your existing web applications. In the last section of this chapter, you will see what is required to get the integration set up and ready to improve your website’s performance.
Configuring Azure App Service with Azure CDN
To configure Azure App Service to work with your instance of Azure CDN, you will need to go to the Networking blade, as shown in the following screenshot. This gives you the ability to enable different web app features, including a CDN:
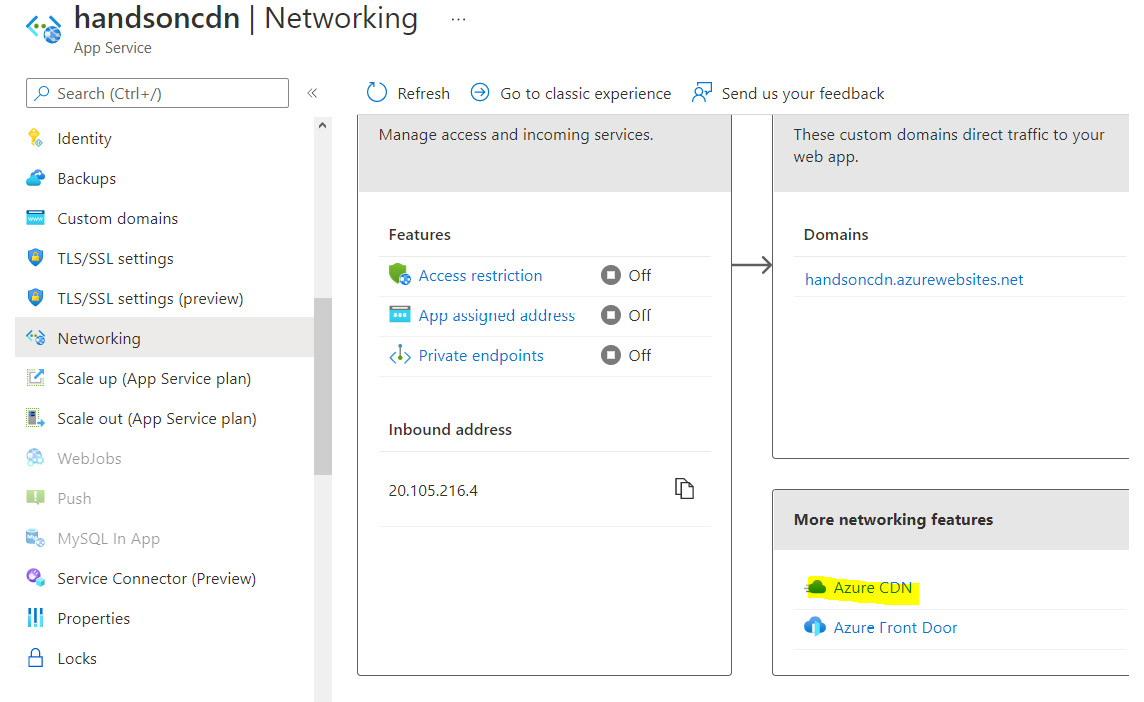
Figure 20.14 – The Networking tab for Azure App Service with Azure CDN
When you click on Azure CDN, you will see another screen where you can configure the link between Azure App Service and Azure CDN.
Note
Azure CDN will automatically start caching static files that can be found on your site. It is a good idea to publish your application at this moment so that you will not have to wait for the process to end later.
In fact, you have two options to proceed now, as follows:
- Use the existing CDN profile (if you performed the exercises from the previous section of this chapter, you should have your CDN already created and ready to work).
- Create a brand-new profile.
In the following screenshot, you can find my configuration (I chose an existing endpoint to speed things up):

Figure 20.15 – Configuring an endpoint for Azure CDN and Azure App Service
Once your endpoint is created, you can check whether it works. To do so, you can check—for example—the source of your application, as I did here:

Figure 20.16 – Source of an application running on Azure App Service with Azure CDN
As you can see, with the CDN configured, the source of my application is automatically altered—all static content is served using my Azure CDN endpoint instead of my server. This will improve overall load times for my files and let customers access the website quicker.
Summary
In this chapter, you learned what CDNs are and how they may help you in achieving better performance and an improved UX for your web applications. We have configured an Azure CDN instance and saw how to optimize serving content by compressing it. After reading this chapter, you should be able to filter content for countries and develop proper caching rules so that you can define how your instance will behave.
In the next chapters, we are going to cover more advanced topics related to load balancing and application programming interface (API) management with services such as Azure Traffic Manager, Azure Front Door, and Azure API Management.
Questions
Here are some questions to test your knowledge of the important topics covered in this chapter:
- Which problems does the use of Azure CDN solve?
- What are the available CDN providers for Azure CDN?
- What is the origin of a CDN?
- How does compression work in Azure CDN?
- What is the default TTL of content stored within Azure CDN?
Further reading
For more information, refer to the following source:
- CDN features: https://docs.microsoft.com/en-us/azure/cdn/cdn-features