
19
Scaling Azure Applications
We cannot talk about reliable and stable applications in the cloud without scaling. While this process may have seemed a bit complicated and cumbersome in models such as infrastructure as a service (IaaS) or on-premises, Azure provides many ways to multiply our applications quickly, and without downtime.
The following topics will be covered in this chapter:
- Autoscaling, scaling up, scaling out
- Scaling Azure App Service
- Scaling Azure Functions
- Scaling Azure Cosmos DB
- Scaling Azure Event Hubs
Technical requirements
To perform the exercises from this chapter, you will need the following:
- Access to an Azure subscription
Autoscaling, scaling up, scaling out
The cloud is all about scaling—it is one of the most important advantages of such a setup over an on-premises setup. The ability to rapidly adapt to new demands when it comes to incoming traffic, and the flexibility a cloud offers, enable you to create more stable services that are less prone to unexpected load spikes and insufficient hardware performance. In this chapter, we will focus a little bit on diving deeper into the scaling topic, to build a deep understanding of how different services behave in Azure, and how you can ensure that the scaling feature is automated and requires as little attention as possible.
Autoscaling
You can define the autoscaling feature of many services as follows:
Autoscaling is a feature that allows a service, a machine, or an application to automatically scale up or out based on predefined parameters, such as central processing unit (CPU) utilization, memory used, or artificial factors, such as throughput units (TUs), or worker utilization.
In general, it can be described using the algorithm shown in the following diagram:

Figure 19.1 – Basic autoscaling algorithm
The preceding diagram can be described as follows:
- A resource accepts incoming requests as normal.
- Simultaneously, there is an entity that monitors a resource—it checks it against the scaling rules and decides whether a scaling operation is required.
- An entity takes a decision regarding scaling—it can scale a resource up/down or out, depending on the settings.
Of course, besides pros, scaling has its downsides, including the following:
- It may render your application unresponsive.
- It requires additional resources for load balancing (if scaling out).
- It takes time, depending on the scaling characteristics. It is, therefore, crucial to plan such action at the design stage.
- In many cases, it causes your solution to be many times more expensive.
How a service scales depends solely on the service itself. Let’s look at some examples here:
- Azure Event Hubs can be scaled manually/automatically (using the auto-inflate feature). You can assign more TUs to an instance to enable it to accept more messages. Automatic scaling down is not implemented.
- Azure App Service can be scaled both manually and automatically (it depends on the tier you have chosen). You have multiple different parameters available, and scaling down is also performed automatically.
- Azure Cosmos DB relies on the request units (RUs) assigned to an instance. With the Autopilot feature introduced, it can dynamically adjust its performance based on incoming traffic.
- Azure SQL has different provisioning models—you can use either database transaction units (DTUs), virtual cores (vCores), or elastic pools. Depending on the model, it will scale different parameters.
- Azure Functions service scales automatically using an internal mechanism of workers and the scale controller for the consumption model. When a Premium/App Service plan model is used, autoscaling is done in the same way as in Azure App Service.
- Azure Storage does not support scaling as it does not offer parameters requiring dynamic adjustments.
As you can see, there is no single solution for scaling your services in Azure—you must implement a working solution for each component individually. The rule of thumb is that the less control over a resource you have, the more automated the scaling will be. While for IaaS scenarios, you must operate the number of virtual machines (VMs), in platform-as-a-service (PaaS) scenarios, you will end up with vCores or other units. Here, you can find different cloud models ordered from left to right in terms of the scaling complexity (where IaaS has the most complex model):

Figure 19.2 – Scaling complexity in the cloud (starting with the most difficult model)
Scaling up and scaling out
There are two different types of scaling (at least when it comes to Azure), as outlined here:
Scaling up can be presented as follows:
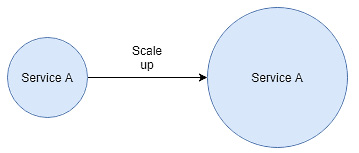
Figure 19.3 – Scaling-up visualization
While for comparison, scaling out is presented as follows:

Figure 19.4 – Scaling-out visualization
So, in the first scenario (scaling up), you will get better performance from a single instance, while scaling out will allow you to parallelize your work. The use cases are different in both options and are basically dependent on the workload you are planning to run. These are some examples:
- If your code is sequential and there is no option to multiply it, use scaling up.
- If your code requires much compute power in a unit of time rather than dividing it into multiple machines, use scaling up.
- If you have a way to load-balance your load, use scaling out.
- If you can perform the same work on multiple machines without risk of collision, use scaling out.
Using scaling out can be compared to multithreading—but of course, on a much bigger scale. In fact, the problems are quite similar. If your machine has multiple cores and they can execute your code at the same time, you must introduce very similar constraints.
Note
Common problems of scaling out are often caused by access to the state—whether it is shared via any kind of storage or distributed among many machines. Make sure you are aware of this before using this feature.
In Azure, multiple services scale out/up differently. We will focus on three of them to get a better understanding of the topic.
Scaling Azure App Service
We started our journey through Microsoft Azure by learning some basics of Azure App Service. This is a very common PaaS component that is widely used among many Azure users, both for very simple websites and complex systems requiring high performance and reliability. To make sure that your web app is always on or to check if it is under pressure, you must implement scaling rules. When it comes to this service, you have two options—either using manual scaling (and implementing an alert so that you know when such an action should happen) or an autoscale feature, which makes things much easier in terms of maintenance. In this section, we will cover and compare both.
Manual scaling
Manual scaling is a feature that is available starting from the Basic tier—it is not available for free or shared ones. Depending on the actual tier chosen, there will be a different number of instances that can be used for your Azure App Service.
Here, you can find how things look like for the B2 tier:

Figure 19.5 – Manual scaling for Azure App Service
In the preceding configuration, the maximum number of instances available is set to 3. However, if I scale up to the Standard tier, the result looks like this:

Figure 19.6 – Scale-out options for Standard tier in Azure App Service
Things look quite different—two features have changed, as noted here:
- I can set the Instance count value to the maximum number of 10.
- Autoscaling can be enabled.
Note
Scaling up to the Premium tier (version 3, or v3) will allow you to set the maximum number of 30 instances for your App Service.
Let’s now compare manual scaling with autoscaling.
Autoscaling
While manual scaling can be fine for less demanding websites and systems (as they do not require quick actions when something happens), when your application is—for example—a popular e-commerce shop, you want things to happen quickly, including scaling out. Let’s try to enable autoscaling for now—it will display a form that enables you to manage these settings, as illustrated in the following screenshot:
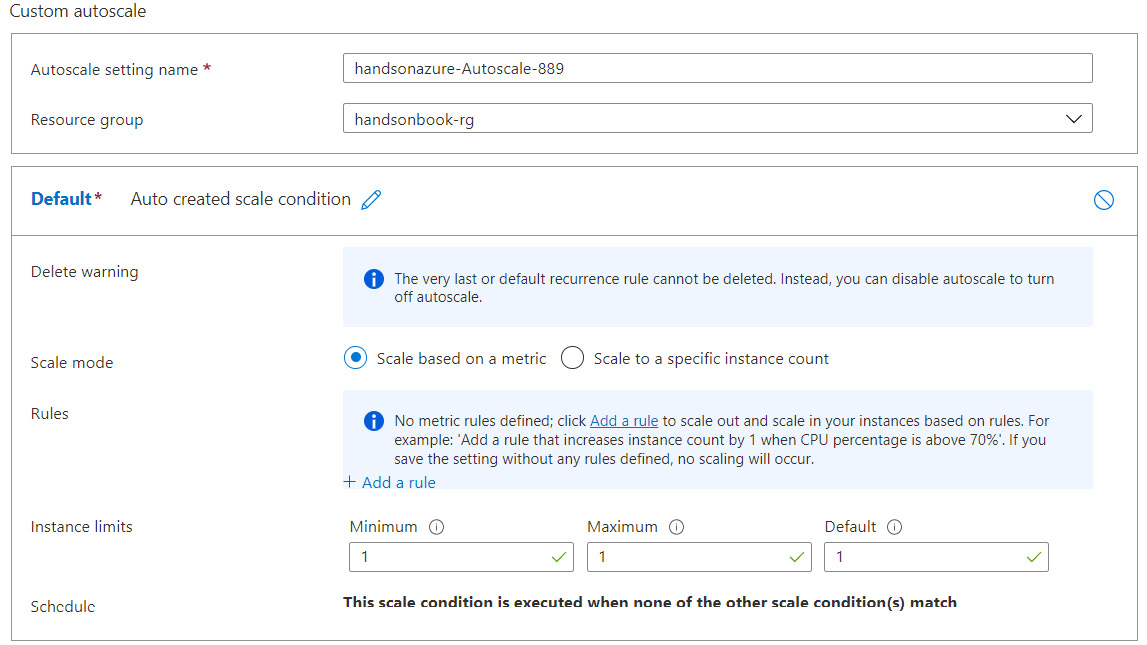
Figure 19.7 – Autoscaling options for Azure App Service
In fact, you have two options here, as follows:
- Scale based on a metric: This allows you to select a metric that will be a trigger for autoscaling.
- Scale to a specific instance count: Executed by default (so should be used along with scaling based on a metric).
To configure Scale based on a metric, you will need a rule. You can add this by clicking on the + Add a rule link. Doing so will display another form (which is far more complex than the current one), where you can select all that is interesting to you. The form looks like this:
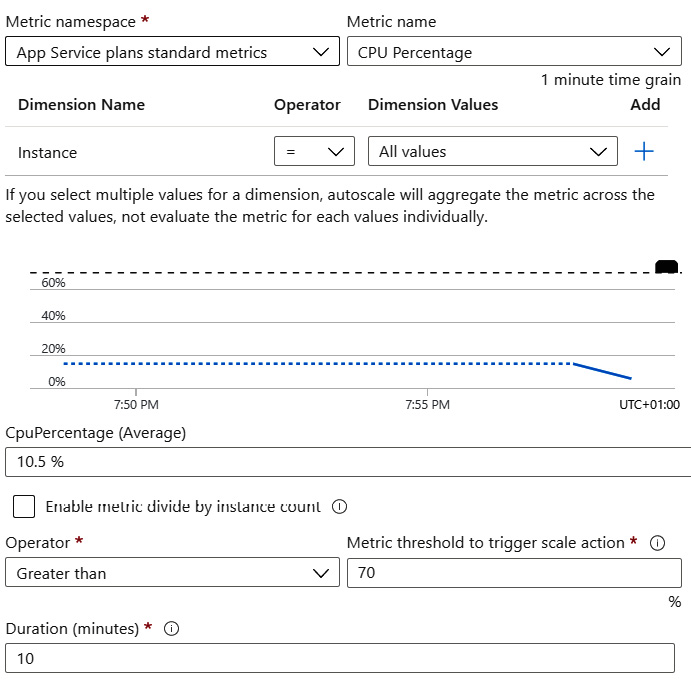
Figure 19.8 – Adding a rule
In the preceding screenshot, you can see a rule that will trigger autoscaling when CPU utilization exceeds 70% over a 10-minute period. Once all conditions are met, the runtime will add another instance to the App Service. What is more, if the conditions are true after another 5 minutes (Cool down (minutes) period), the scaling-out operation will be triggered once more. This will happen if the maximum number of instances that you have set is hit.
Note
Remember that you can set more than a single rule for your application. What is more, it seems like a good idea to create a decreasing count by rule, which will remove additional instances if the load gets back to normal.
Once your rule is added, you can click Save to confirm your changes—now, your application will be scaled out anytime a rule is considered active. Before we go further, I would like to show you two more things. Look at the following screenshot:

Figure 19.9 – Scale-out panel for Azure App Service
You probably noticed two additional sections on the Scale out blade: JSON and Notify. These give you some additional options when it comes to managing a service, as outlined here:
- JSON: This generates a JavaScript Object Notation (JSON) template that can be used with Azure Resource Manager (ARM) templates for automatic provisioning of your resource. It will automatically add scaling rules when a service is created.
- Notify: This enables you to automatically send a notification to administrators of the resource in Azure, to notify them when something wrong happens there.
Here, you can find a JSON example that was generated for my rules:
{
    “location”: “West Europe”,
    “tags”: {},
    “properties”: {
        “name”: “handsonazure-Autoscale-889”,
        “enabled”: false,
        “predictiveAutoscalePolicy”: {
            “scaleMode”: “Disabled”
        },
        “targetResourceUri”: “…”,
        “profiles”: [
            {
                “name”: “Auto created scale condition”,
                “capacity”: {
                    “minimum”: “1”,
                    “maximum”: “1”,
                    “default”: “1”
                },
                “rules”: [
                    {
                        “scaleAction”: {
                            “direction”: “Increase”,
                            “type”: “ChangeCount”,
                            “value”: “1”,
                            “cooldown”: “PT5M”
                        },
                        “metricTrigger”: {
                            “metricName”: “CpuPercentage”,
                            “metricNamespace”: “microsoft.web/serverfarms”,
                            “metricResourceUri”: …
                        }
                    }
                ]
            }
        ],
        “notifications”: [],
        “targetResourceLocation”: “West Europe”
    },
    “id”: “…”
    “name”: “handsonazure-Autoscale-889”,
    “type”: “Microsoft.Insights/autoscaleSettings”
}
As you can see, it can easily be adjusted to your needs and put in your code repository for further use and automation.
With the topic of scaling Azure App Service complete, let’s now extend our knowledge and see how we can work with Azure Functions in terms of changing the number of working instances.
Scaling Azure Functions
When using PaaS services, you can configure how your application will behave when CPU utilization hits the maximum allowed value, or the number of requests exceeds the threshold. However, Azure offers services in other models—one of the most interesting is serverless architecture, which abstracts control even more in favor of easier configuration, minimum maintenance, and the ability to focus on delivering a business value.
In this section, you will see the differences between Azure App Service and Azure Functions when it comes to scaling, both from a technical and conceptual point of view.
Scaling serverless applications
When you are using serverless services (such as Azure Functions, Azure Cosmos DB, or Azure Event Grid), you have limited options when it comes to configuring the feature. Here are some examples:
- In Azure Functions, you rely on the pricing model (consumption plan versus App Service plan).
- In Azure Cosmos DB, you modify the number of RUs.
- In Azure Event Grid, you have no way of defining how the service will scale.
This is all caused by the fact that you do not control the application host—the underlying service engine is completely detached from your application and there is no possibility to directly modify it. What you can do is control it indirectly, either by changing the number of processing units (PUs) or via available configuration options, which can be interpreted and applied.
Note
Serverless architecture is meant to be a model where you are isolated from the runtime (and, in some cases, even from the cloud vendor). If the lack of control does not play well for you, it is better to try PaaS or IaaS models and services.
Let’s now dive into the details of the Azure Functions scaling mechanism.
Azure Functions scaling behavior
In Azure Functions, there is no possibility to scale up, at least for the consumption plan. Of course, when using the App Service plan, you can scale it up and get better hardware, but it does not affect the service itself. Instead, it creates more resources to consume. On the other hand, you cannot scale out manually—the only possibility is to let Azure Functions scale automatically. To do so, this service implements the concept of a scale controller. This is an internal feature that constantly monitors how particular workers hosting the function’s runtime behave, and if one of them seems to be overloaded, another machine is added to the set.
Note
Azure Functions scaling behavior is quite sophisticated and only partially described, as it contains parts that are either open sourced or not available publicly. I will try to describe it in detail in this chapter so that you are aware of the exact algorithm for making a scaling decision.
Before your instance of Azure Functions will make a scaling decision, it will check the following:
- Scaling interval: Scaling only happens after a specific interval has passed.
- Current workers number: If the number of workers (running the function’s hosts) exceeds the configured maximum, a decision will be made to remove one from the working set.
- Load factor: If the load factor approaches the maximum value, a new worker will be added. Alternatively, if the load factor drops, one worker will be removed.
- Busy worker ratio: If the number of busy workers exceeds the configured maximum, another worker will be added to the set.
- Free workers: If the number of free workers is greater than the defined maximum, one of them will be removed from the working set.
Defined values for the preceding actions can be found here:
public const int DefaultMaxWorkers = 100;
public const int DefaultBusyWorkerLoadFactor = 80;
public const double DefaultMaxBusyWorkerRatio = 0.8;
public const int DefaultFreeWorkerLoadFactor = 20;
public const double DefaultMaxFreeWorkerRatio = 0.3;
public static readonly TimeSpan DefaultWorkerUpdateInterval = TimeSpan.FromSeconds(10);
public static readonly TimeSpan DefaultWorkerPingInterval = TimeSpan.FromSeconds(300);
public static readonly TimeSpan DefaultScaleCheckInterval = TimeSpan.FromSeconds(10);
public static readonly TimeSpan DefaultManagerCheckInterval = TimeSpan.FromSeconds(60);
public static readonly TimeSpan DefaultStaleWorkerCheckInterval = TimeSpan.FromSeconds(120);
Note
The preceding values come from the GitHub repository of Azure Functions Host. They may be changed after a while, but if you are interested, look at the following project: https://github.com/Azure/azure-functions-host.
Additionally, you can control the maximum number of instances by providing the WEBSITE_MAX_DYNAMIC_APPLICATION_SCALE_OUT value in the Application settings option of your Function App, as illustrated in the following screenshot:
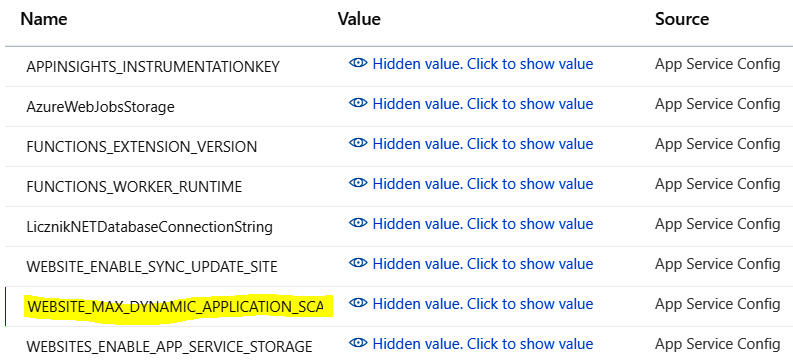
Figure 19.10 – Configuring the maximum number of workers for Azure Functions
What is more, if you connect the instance of your function app to an instance of Azure Application Insights, you will be able to verify how many workers it has by checking the Live Metrics Stream feature, as illustrated in the following screenshot:

Figure 19.11 – Checking active Azure Functions hosts using Azure Application Insights
With Azure Functions scaling details described, we will now switch our focus to Azure Cosmos DB.
Scaling Azure Cosmos DB
Scaling in Azure Cosmos DB works in a different way depending on your capacity mode, as illustrated in the following screenshot:
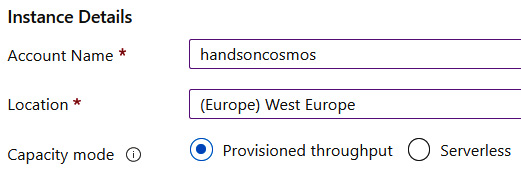
Figure 19.12 – Selecting capacity mode in Azure Cosmos DB
The difference is quite crucial as, depending on the selected mode, Azure Cosmos DB will be scaled differently, as outlined here:
- For Provisioned throughput, you manually select provisioned capacity for your containers. If you want to incorporate some automation, you can use the Autopilot feature for dynamic capacity selection.
- Serverless mode automatically manages available throughput for your containers.
As both capacity modes offer completely different logic for handling database load, you need to analyze the behavior of your application and apply what seems to suit it the most. For example, if you feel that you are unable to predict its performance, Serverless mode is a better fit. If you need geo-distribution, then you are left with only one mode as serverless Azure Cosmos DB does not support it. Another big limit is applied for storage per container—in Serverless mode, you are allowed to host only 50 gigabytes (GB) of data in each one. As you can see, the correct mode must be chosen carefully to get the most from your instance of the database.
Autoscaling for provisioned throughput
The Autoscale feature can be enabled for each container created in Azure Cosmos DB, as illustrated in the following screenshot:

Figure 19.13 – Enabling Autoscale in Azure Cosmos DB container
Once enabled, Azure Cosmos DB will allow you to adjust the maximum number of RUs that can be used by the container, as illustrated in the following screenshot:
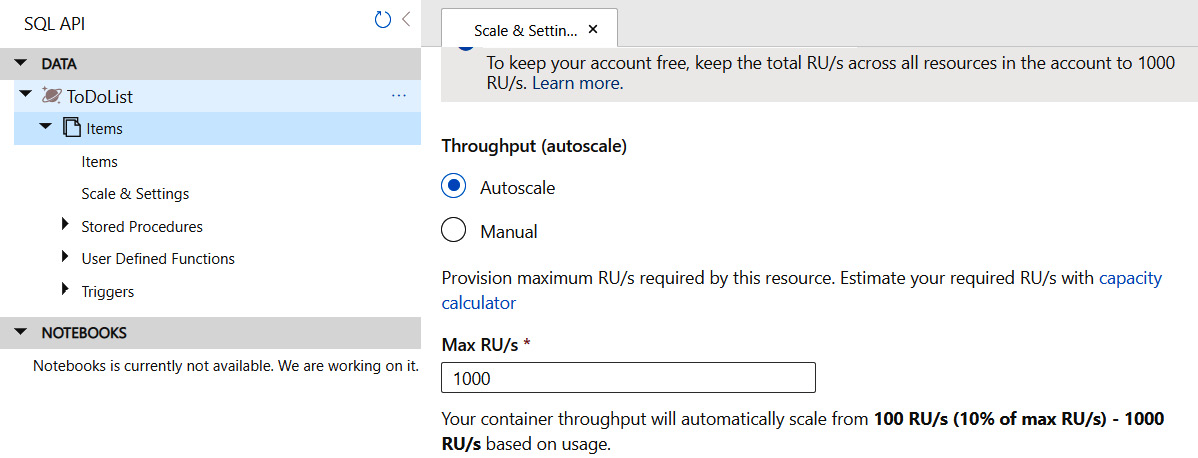
Figure 19.14 – Autoscale enabled for a container
With Autoscale, Azure Cosmos DB takes care of monitoring the usage of a container and modifying its throughput depending on actual metrics. The Max RU/s parameter can be also altered using the Azure Cosmos DB software development kit (SDK), as follows:
// Requires Microsoft.Azure.Cosmos -Version 3.26.1
await container.ReplaceThroughputAsync(ThroughputProperties.CreateAutoscaleThroughput(autoscaleMaxThroughput));
The same can be done, for example, in Java. The following code snippet illustrates how to do this:
// <dependency>
//    <groupId>com.azure</groupId>
//    <artifactId>azure-cosmos</artifactId>
//    <version>4.27.0</version>
// </dependency>
container.replaceThroughput(ThroughputProperties.createAutoscaledThroughput(autoscaleMaxThroughput));
The last topic we will cover is scaling options for Azure Event Hubs.
Scaling Azure Event Hubs
As mentioned earlier, Azure Event Hubs is based on TUs. These tell you how many messages Azure Event Hubs can handle. For 1 TU, you will have the following available:
- Up to 1 megabyte (MB)/1,000 events per second for ingress
- Up to 2 MB/4,096 events for egress
Once exceeded, your instance of Azure Event Hubs will start failing by returning HTTP 429 status codes.
What we have just said is true only if you are using the Standard tier for your Azure Event Hubs instance. When provisioned using the Premium tier, the capacity of that service is defined using PUs. While much more expensive, a Premium instance of Azure Event Hubs with 1 PU can handle 5-10 MB of ingress and 10-20 MB for egress.
In Azure Event Hubs, you can handle all messages in parallel using partitions. The more partitions you have, the more consumers you can host. Generally speaking, this directly affects your ability to handle more traffic. If each consumer can work on its own partition without creating a bottleneck, they will linearly scale by adding more TUs/PUs.
Azure Event Hubs offers an automation mode for scaling TUs by using the Auto-inflate feature. Its mechanics are quite simple—you start with a minimum number of TUs, which allow your application to work without creating bottlenecks. When Auto-inflate is enabled, Azure Event Hubs will automatically add more throughput to handle more data. The only thing that should be taken care of is scaling down—unfortunately, Auto-inflate will not deflate your Event Hubs instances when traffic goes back to normal.
Summary
In this chapter, we covered the scaling of various services. You saw how this operation works for different application models—sometimes, you scale service instances and VMs, or simply, you do not control it and let the runtime do it for you. In fact, scaling services in the cloud is much easier than when using your own servers. You do not have to reconfigure load balancers, firewalls, routers, and servers. When using the scaling feature, always try to automate the process—manual scaling works only for very simple scenarios and tends to keep your servers underutilized.
In the next two chapters, we will cover two additional Azure services, Azure Content Delivery Network (Azure CDN) and Azure Traffic Manager, which help in keeping your applications available, even under heavy load.
Questions
Here are some questions to test your knowledge of the important topics in this chapter:
- What is the difference between scaling up and scaling out?
- What are the use cases for scaling out?
- Is scaling up available in serverless services?
- Does scaling out in Azure App Service affect the pricing of the service?
- What are the cons of manual scaling?
- What do you do if you want to automatically scale your Azure App Service instance when CPU utilization reaches 80%?
Further reading
For more information, refer to the following sources:
- Azure SDKs: https://docs.microsoft.com/en-us/azure/index#pivot=sdkstools&panel=sdkstools-all
- Azure Event Hubs scalability: https://docs.microsoft.com/en-us/azure/event-hubs/event-hubs-scalability
- Best practices for Autoscale: https://docs.microsoft.com/en-us/azure/azure-monitor/autoscale/autoscale-best-practices