Begin by opening the hose clamps and fitting their ends together to form a 20″ steel hoop (Figure 10-3). Set this aside.
Prepare the spring. The spring should be loose enough so that it can be dangled and jiggled in a manner that a kitten would love (the ideal goal is to be able to twirl it into a sloppy standing S-wave, as in Figure 10-4). An old, used screen door spring will likely already be this way.
A new spring will be too rigid to do this (and is likely stiff enough to balance upright on its end). If you must use a new spring, then don work gloves and gently stretch the spring out: work up and down the length, making it stretch a little farther than it likes. Be sure to keep the coils tight at one end (this will make it easier to mount it on the drumhead in Step 8).
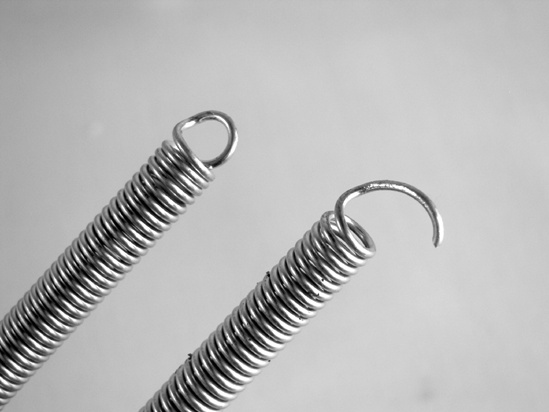
Use needle-nose pliers to open up the loop on the tighter end of the spring, making a hook (as in Figure 10-5). Set the prepared spring aside.
Use the can opener to remove the bottom of the coffee can.
If you’re sure you want to install a pickup on the inside of the drum, consider skipping ahead to Step 11 (drilling the hole) now, as it will be somewhat harder to do after you install the drumhead. See Step 10 for more information.
Lay the small x-ray over one end of the can and place the hoop of hose clamps on top of it, centered around the can’s opening. Lay the piece of scrap wood over the hoop and press down, forcing the hoop to crumple the x-ray film around the mouth of the can. X-rays are very rigid and don’t like this at all; it is much harder than you’d expect. Fortunately, x-rays are also shockingly durable, and the cylindrical steel wall of a food can is quite sturdy. If you can’t get the x-ray to succumb using arm strength alone, try setting the can on the floor and pressing your knee on the scrap wood, driving the hoop around the can’s wall, pinching the x-ray between the two. You want to get the hoop as far down the can as possible, ideally just behind the rolled steel rim of the can (Figure 10-6).
Once the hoop is in place, keep your weight on the wood scrap and pull down on the edges of the x-ray to get the head as taut as possible (although tension is not a vital issue with this drum). Then start tightening the hose clamps. Do not take any weight off of the wood scrap until the clamps are tightened, as the x-ray and clamps will pop right off. A drum head under symmetrical tension will wear better, so try to tighten both sides of the clamp-hoop equally.
Once you’ve removed the wood scrap, take a second to tug on the edges of the x-ray, then use the screwdriver handle to work the hoop down a little farther. Tighten the clamps again. Use scissors or a utility knife to trim off the excess x-ray, if you like (although it can be handy to keep it intact, so that you can periodically tug the head tighter).
Pop a hole in the center of the drumhead with the thumbtack, making the smallest hole possible. From the outside of the drum, thread the hook on the spring’s tight end into this hole (see Figure 10-7). Twist the spring so that two or three coils are inside the drum and the rest dangles out.
To build the acoustic pickup (Figure 10-8), solder the leads from your piezo element to your jack’s lugs; it doesn’t matter which wire goes to which lug.
To test the pickup, turn the volume all the way down on your amp, connect your pickup, bring the volume up a few notches, and gently tap the brass disk. The piezo element is pretty efficient, so even light prods should produce major thunks and even feedback. Using a scrap of tape, experiment with different placements of the pickup on the inside and outside of the drumhead. You’ll often get more bass boom on the outside and more high-end crackle on the inside. That said, it’s easiest to install the pickup inside the drum—although be aware that drilling the side of the drum will deaden it a little bit. Flip ahead to Playing the Thunderdrum in Playing the Thunderdrum and experiment with the drum a little before proceeding. Installing the pickup at this stage is a little more challenging but gives you an opportunity to weigh your options; if you’re sure you want to add a pickup from the start, then consider doing Step 11—drilling the hole—at Step 4.
Pickup Primer Part One: The Piezo Pickup
All sound amplification works the same: an element picks up vibrations, translates them into a fluctuating electrical current, and sends these to an amplifier that (surprise!) amplifies them. The Thunderdrum uses the acoustic “piezo” pickup (also called a contact mic) shown in Figure 10-8. Piezo pickups are made from a piezoelectric element; piezoelectric substances generate an electric current in response to pressure (usually as the result of the physics of putting mechanical stress on a crystalline structure, like quartz); squeeze the element, get some voltage. Squeeze harder, get more. Most cheap piezo elements take the form of a brass disk coated on one side with a crystalline ceramic compound. Piezo pickups are great for realistically reproducing the sounds of acoustic instruments (like a violin or acoustic guitar), because the pickup directly translates the vibration of the instrument’s body to electrical pulses. It’s popular to crack open piezoelectric buzzers (like RadioShack part #273-059) and use those elements for all sorts of music amplification applications, but that is a bit pricey, risks damaging the element, and doesn’t make the best pickup. Ordering online, you can have a more sensitive pickup at a quarter of the price (using, for example, the 20mm 6.5 kHz piezo buzzer element, Digi-Key part #102-1126-ND).
To install the acoustic pickup, lay the drum on its side, pick a point roughly halfway along the wall, and use the hammer and nail to put a dimple in the metal (the spinning drill bit will want to skate all over the smooth metal, slip off the edge, and bite you; adding the dimple will make it much easier for the drill to bite into the metal). Drill a 3/8″ hole in the can; you can see the results in Figure 10-9.
Unscrew the nut from your jack, pass it through the wall of the drum, and screw the nut back on. Then either tape the pickup to the inside of the head or glue it down with room temperature vulcanizing rubber or any silicone-based household glue.