
Prepare your piece of PVC. If you need to cut it to length yourself, wear a respirator mask and safety goggles; shreds of PVC are very sharp, and the friction from the saw can release toxic fumes (see the first warning in Step 2 for more details). Even if you get your PVC precut, take a moment to clear any sharp burrs off of the cuts, and then clean the PVC with soap and water.
First, you’ll add a bell. Traditional eucalyptus didgeridoos are naturally flared like a trumpet, increasing both volume and clarity. In order to bell the end of your PVC didgeridoo, you’ll need to heat it using a torch.
Warning
Never heat PVC indoors! Always wear a carbon-filter respirator capable of filtering organic chemicals while molding PVC! When heated, PVC releases chlorine and phosgene, a pair of WWI-vintage chemical weapons that are very bad for the lungs. A professional-grade respirator mask can be bought at any hardware store for about $30; don’t end up in an iron lung.
Head outside, don your mask, and spark up your blowtorch. Stand the torch up and hold one end of the PVC over it, rotating the tube in order to heat it evenly.
Warning
Be very careful with the blowtorch; the flame can be almost invisible on a sunny day, and it will give a severe burn in a fraction of a second. Also, a lot of very hot air will be channeled up the pipe, so refrain from pointing the open end into your face.
Slowly heat the bottom lip of your didgeridoo (it will quickly toast and scorch like a marshmallow over a campfire). You’ll find that the PVC is pliable once it’s golden brown and will stay so for 10 or 15 seconds once the heat is removed.
Slide your funnel into the pliable PVC, as shown in Figure 11-4, being careful not to burn yourself (the PVC holds heat well). Press the funnel firmly into place (twisting can help work it back a little further) and hold it for 30 seconds.
Remove the funnel and repeat, this time heating the bottom inch of the tube before sliding in the funnel and letting the PVC cool. Repeat again, until you’ve belled out the bottom 2″ of your didgeridoo. For the final touch, reheat the bottom 1/2″ of the bell and then press it down over the neck and shoulders of a beer bottle, flaring the bell. The inside of the bell should ultimately be just under 2 1/2″ wide (as shown in Figure 11-5).
Back Pressure
It’s much easier to sustain a tone—and thus accentuate overtones and form rhythmic patterns—when you are blowing against something (as every grade-schooler knows: contrast the puny lip-based fart noise to the grandeur of the crook-of-the-elbow butt-trumpet). Horn players sometimes call this back pressure. Straight PVC pipes are engineered to let fluids pass through them as easily as possible, which is great for plumbing a toilet, but terrible for making an instrument. A genuine eucalyptus didgeridoo is the result of the capricious will of tunneling ants, and is thus not at all a uniform tube.
Adding dimples to the PVC didgeridoo increases the back pressure and clarifies the tone, bringing out the characteristic rich overtones. The added dimples decrease the resonance (which is a shame) but in doing so also eliminate the tell-tale rasp of a straight piece of PVC. Figure 11-6 offers a comparison between the interior of a natural didgeridoo and a PVC didgeridoo that’s been dimpled.
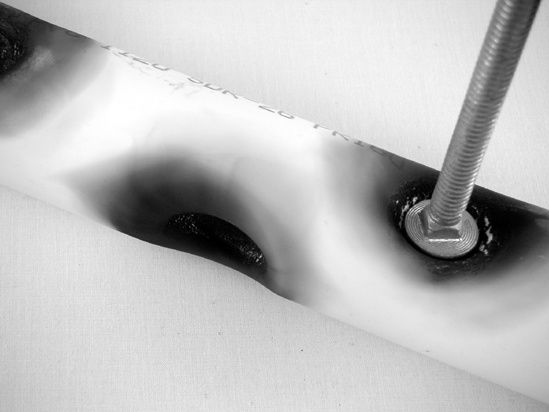
To add a dimple, lay the didge on a fireproof surface (like a concrete driveway), and use the blowtorch to heat a nickel-sized area on the PVC for a few seconds (just until the spot has scorched). Carefully, but firmly, press down on that spot with a round-headed bolt, as in Figure 11-7. Hold for 20 seconds. Remove the bolt and let the PVC cool for another 20 seconds. (Be careful; both the bolt and PVC will retain a lot of heat.) Repeat this at least 30 times, working up and down the pipe on all sides. Be sure to leave the last couple inches of the mouthpiece end unmodified. If you mess up and make a dimple too deep or too close to the end, you can reheat the PVC, slide a broom handle into the tube, and push the dimple back out.
You might also consider adding long dimples, like that shown in Figure 11-8: Use the torch to draw a 4″ or 5″ line running along the length of the didge, working back and forth so that it toasts uniformly. Set the torch safely aside, and quickly roll the sharp edge of the round-headed bolt down the line, pressing it firmly as you roll it. As you work up and down the line, gradually slow to a snail’s pace, lingering for several seconds on each turn. Once the long dimple begins to harden, let it cool for a half minute, then start a new long dimple.
Next, add minor kinks to complete the back pressure improvement regimen. Pick up the PVC by its mouthpiece end and hold it parallel to the ground. Pick a point roughly one third of the way down the length of the pipe. Gradually heat this point, rotating the pipe to heat the entire circumference evenly until the PVC begins to dip under its own weight (Figure 11-9). Keeping the PVC parallel to the ground, lower it until the mouthpiece end is roughly 1″ from the ground, and let the belled end dip down and rest on your fireproof surface. Hold the didgeridoo steady in this position for a minute or two until the kink has fully hardened.
Repeat, this time holding the didgeridoo by its belled end and running the kink the opposite direction (see the results in Figure 11-10).
Leave your finished didgeridoo outside for an hour or so to fully air out. Again, phosgene and chlorine are poisonous gases that could irreparably damage your lungs; minimize your exposure![5]
Since PVC is cheap, consider experimenting with making several didges at once. A good bell is almost mandatory, but there’s a little magic to the dimples and bends; my favorite didge has no real kinks and is almost entirely twisted with long, drastic dimples. I’ve made others with tons of little dimples and very severe bends; all have interesting, distinct sounds.
If you aren’t planning on building a pickup for your didgeridoo, then skip ahead to Step 12, and start preparing the beeswax for the mouthpiece while you wait for the didgeridoo to air out.
To build a pickup for the didgeridoo, start by breaking up your headphones and tearing apart one earpiece, as in Figure 11-11. The goal is to expose the tiny speaker within.
Snip off the speaker wires, keeping as much of the length as you can. Strip these, and solder one wire to each lug on your plug, as in Figure 11-12. It doesn’t matter which wire goes to which lug, although if the speaker has terminals marked + and –, honor that by soldering the + to the tip of the plug and the – to the sleeve (for a full discussion of 1/4″ plugs and jacks, see the appendix).
Glue a straight 6″ length of coat hanger to the edge of your speaker and clamp it in place (Figure 11-13). Allow the glue to set overnight.
Meanwhile, add a beeswax mouthpiece to your didgeridoo. This will give you a better seal, a more comfortable fit, and a subtle hint of honey flavor. Start with a chunk of beeswax roughly half the size of your thumb (this is less than an ounce; beeswax can usually be purchased at health food or craft stores for less than $10 per pound). To soften the wax, place it in a sealable freezer bag and immerse the bag in a bowl of your hottest tap water for 15 minutes. Weigh it down with a rock or coffee mug; you may need to refresh the water several times before the beeswax starts to become malleable.
Go outside and grab your new, freshly aired didgeridoo. A little soap and water will help clear away the grime, grit, and PVC soot. When the beeswax is warm, remove it from the bag and briskly roll it between your palms for a few minutes, making a pliable ball. Roll this into a “snake” roughly 4″ long and half as thick as your pinky.
Curl the snake onto the end of the tube (as in Figure 11-14), then smooth it into place (as on the left of Figure 11-15). Since a traditional wooden didgeridoo generally has a wider internal diameter (around 2″), it’s normal to use more wax, resulting in a bigger mouthpiece, often meticulously sculpted into a flat-topped volcano with an opening around 1 1/4″ in diameter. The PVC didge already has an internal diameter of 1 1/4″, so you’ll only need to add enough beeswax to give a comfortable play and a good seal. Over time the mouthpiece will dry out and begin to flake off, at which time you should peel off the remaining wax and put on a new mouthpiece.
Once the glue has set on the pickup, bend the coat hanger roughly 90 degrees (as in Figure 11-16), so that when the pickup is laid on its back, both the coat hanger and the top of the speaker (the part that used to get pressed against your ear) point up. Knot the wire around the coat hanger; this will act as a strain relief, preventing an inadvertent tug from breaking the delicate connections.
Use the hose clamp to mount the pickup just below the opening of the bell, as in Figure 11-17 (experiment with different positions and orientations to get the sound you like). You are now ready to plug into an amp, PA, soundboard, or any guitar effect; reverb units are neat, and digital delays are awesome—plug in to an old BOSS DD-3 digital delay, crank up the Feedback and Echo, set it to the longest delay, and start jamming out as a one-person didgeridoo orchestra.
While, to some eyes, this finished didgeridoo has a post-industrial Mad Max chic, others might prefer to hide the scorched mess under a coat of paint. Now is the time for that. Most paints will not want to stick to PVC (although the rough treatment it’s gotten from the torch will make it easier); try hearty spray paints like Rust-Oleum, or the all-purpose indoor/outdoor spray paint sold by Krylon.


[5] Flick back to the bold warning at Step 2 for more information about chlorine and phosgene. To learn more about dying in a gas attack, please see Wilfred Owen’s poem “Dulce Et Decorum Est.”