Prepare the surface of the board. First use the medium-grit sandpaper to take the splinters off of the sawed edges and remove any gouges from the surface you are going to burn. Take the time to get your burning surface as smooth as possible, as this will vastly reduce your frustration in Steps 3 and 4. Once the surface is free of ridges, divots, and bumps, use the fine paper to buff out the signs of the heavier sanding.
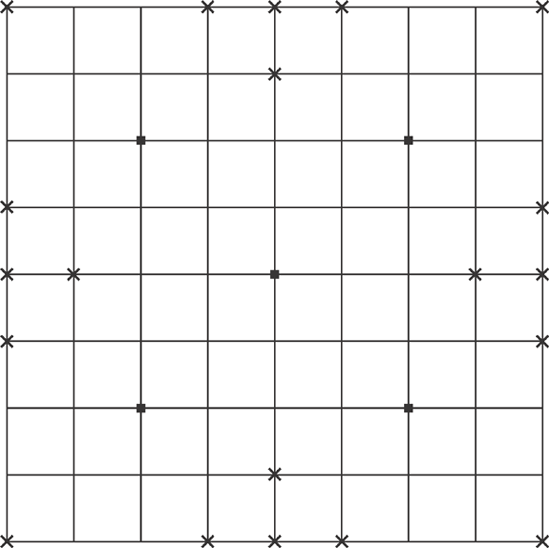
Use your straightedge to lightly pencil in an eight-by-eight grid of 1″ squares, as illustrated in Figure 8-5. After you’ve drawn the grid, add the Go board’s stars (the 5 small, dark boxes) and the Tafl bases (the 20 Xs). Double-check your work against Figure 8-6, since it’s easy to erase pencil and hard to erase charred pine.
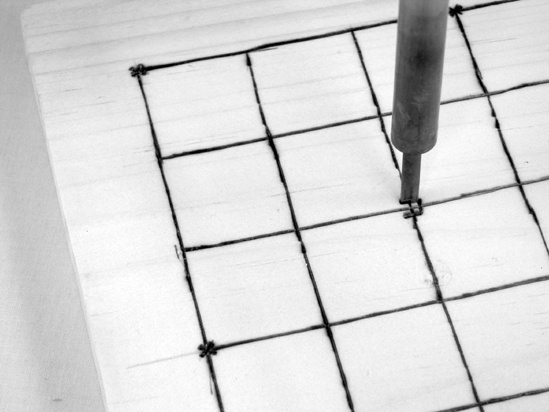
Burn in the lines. The trick to wood burning is that darkness is determined by time, not pressure. Always rest the iron lightly on the wood (it’s very easy to accidentally gouge the soft pine), and slowly work down your line 1″ at a time. It’s often easier for beginners to get a straight line by pulling the iron toward themselves. Although it’s tempting to use the straightedge as a guide, you’ll quickly discover that it’s more of a hindrance than a help. Use the flat tip of the chisel, as shown in Figure 8-7, and feel free to go over the lines several times. Burn the outermost perimeter first, then work through all of the vertical lines, then all of the horizontal lines (or vice versa; if you find it easier to work in one direction, then rotate the board as you work). Take your time; slow and easy wins the race in woodburning.
When the grid is done, burn in the stars and bases. The stars are dark boxes, each one chisel width per side (as in Figure 8-8). To darken the center of the box, take advantage of the chisel tip by laying the iron over 45 degrees and dragging the broad, hot face across the box. Each base is an X made by pressing the chisel tip to the board.
Cunning crafters have already noticed that a nine-line Go board has the same dimensions as a standard chess or checker board. If you want to add checkerboard functionality, you can use the face of the chisel to lightly toast alternating squares, or you can give these a wash with watercolor paints.
(optional) To preserve the surface of the board, consider giving it several coats of spar varnish. Also called marine varnish, this finish is thick, glossy, and waterproof, and it will put up with a lot of abuse.