
Chapter 1
An Introduction to Advanced Facebook Marketing
In This Chapter
![]() Refreshing your knowledge of core marketing principles
Refreshing your knowledge of core marketing principles
![]() Examining advanced marketing techniques
Examining advanced marketing techniques
![]() Targeting market segments with list options
Targeting market segments with list options
![]() Making a Facebook offer they can’t refuse
Making a Facebook offer they can’t refuse
![]() Using new Facebook features for viral exposure
Using new Facebook features for viral exposure
Facebook Pages have become essential parts of many businesses’ marketing strategies, but how can you find ways to stand out from the competition? You have a lot to consider as you go about developing a successful Facebook Page. However, the rewards of brand exposure, loyalty from people who like your Page, and increased revenue are well worth your time and effort. To fast-track your success, consider including some advanced strategies in your Facebook plan.
After you create your Page, optimize it with the essential strategies, such as posting great content regularly, and then build some momentum with your base by engaging with people who have liked it. When you have your basic strategies locked in, explore some advanced Facebook marketing strategies. Advanced strategies take more time and effort than basic marketing efforts, but they produce much bigger returns.
 You don’t have to reinvent the wheel when it comes to Facebook strategies. Instead, take a look at other thriving Facebook business Pages and apply the same success strategies to your own Page. After you give a new strategy enough time to gain momentum, analyze your progress. If what you’re doing is working, keep doing it! After a while, if you’re not happy enough with the results of your efforts, change direction and try a new tactic. (You won’t know if you don’t try!)
In this chapter, we give you a quick refresher on the core rules of Facebook marketing; then we take a look at some advanced marketing strategies that can take your Facebook Page from good to great.
Remembering the Nine Core Facebook Marketing Rules
Before you consider experimenting with a few advanced Facebook marketing strategies, make sure that your Facebook marketing foundation is solid. Consider nine core rules when you create your marketing plan. Following these rules will ensure that you stay on track and focus on the most important marketing elements as you increase your Page engagement and number of Likes — and ultimately turn your Likes into new customers.
Although we also mention these core Facebook rules in Book I, Chapter 2, here’s a synopsis:
- Give your Page a human touch. Communicate with your Likes as though you were talking to your friends. Let your personality come through in each post.
- Create fresh content. Always make sure that your content educates, entertains, and empowers your Likes to keep them engaged and coming back for more.
- Cultivate engagement with two-way dialog. People love to talk about themselves, so craft your posts and questions around them to get them talking.
- Create consistent calls to action. To get your Likes to take action, consider offering discounts and specials or asking them to sign up for your newsletter so that you can actively communicate with them on a consistent basis.
- Make word-of-mouth advocacy easy. Make it easy for your Likes to talk about you by asking them to share your content, getting them to engage in contests, and making the experiences on your Page about them — rather than about you.
- Encourage conversations. Enhance the experience your Likes enjoy by creating a community that encourages them to interact with one another.
- Focus on smart branding. Treat your Facebook Page as a mini version of your own website. The key is to create a Page that sparks familiarity with your brand when your existing customers visit your Page.
- Be deliberate, and manage expectations. Always stay focused on why you want to have a presence on Facebook. When you understand the “why,” your actions are deliberate and have purpose, and your Likes clearly understand what your Page has to offer.
- Monitor, measure, and track. Make sure that you have surefire methods in place that enable you to consistently track your Facebook marketing progress.
Creating a Facebook Experience
Many businesses just getting started on Facebook worry that they’ll be lost in the Facebook abyss. Sure, big brands such as Coca-Cola and Southwest Airlines stand out easily. But what about small and midsize companies? Many of our clients wonder whether they even have a chance.
Here’s the great news: There’s hope for your Page, no matter how small your company may be! You don’t have to be a major brand to gain exposure and build relationships with your clients and customers on Facebook.
 One way to stand out from the masses is to create Facebook experiences — experiences you execute on your Facebook Page that are unique to your brand and of great value to your Likes. No matter how big or small, these experiences can be extremely powerful.
For example, Braxton’s Animal Works (www.facebook.com/BraxtonsAW) offers a “Caption This Photo” competition every week, as shown in Figure 1-1. These contests are a huge hit! For more about Braxton’s successful Facebook marketing, see its case study in Book IX, Chapter 2.

Courtesy of Braxton’s Animal Works.
Figure 1-1: This weekly photo caption contest encourages visitors to participate and then revisit the page the following week to see the winners.
Planning the experience
If you like the concept of an experience and want to create something unique to your brand and your mission, these four steps get you started in the right direction:
- Decide on the overall vibe you want to create with your experience.
Do you want to add value? Perhaps you’re looking to entertain. Is your desired outcome to educate, create excitement among your Likes, or all the above? Determine the kind of experience that will resonate with your base.
- Get clear on what your company does best.
What’s your company known for? What does it do best? What do your clients tell you when they’re singing your praises? Use this insight to fuel your ideas about unique experiences.
When you’re brainstorming, think of experiences you can do multiple times. An experience that you can execute consistently is the key to building momentum with your Facebook community. After you create your list of ideas, choose the experience that your audience will embrace most fully — and one that your team will enjoy delivering! - Map out your execution plan.
You want to document the process of your experience. For a photo contest like Braxton’s (refer to Figure 1-1), for instance, you might collect a set of several dozen photos in advance and carefully track the number of responses for each and the percent of viewers who participate. Over time, you’d develop a sense of which images draw the largest audience and the largest participation rate.
- Commit to your plan.
For some people, this is the toughest step! When you decide on your signature experience, it’s crucial that you deliver. If you say that you intend to do something once a week, do it. If you don’t follow through, you could lose trust with your Likes, and that’s something you don’t want to mess with!
Optimizing the experience
After you create your experience, begin to think about how you might repurpose the content or information that comes from it. If audio is involved, perhaps you can create a podcast. Or if your experience involves video, think about using that video in an opt-in strategy for anyone who might have missed it that week. This could be a great way to build up your list.
You can also take the content from your experience and post it in new ways weeks later for those who may have missed it. Doing so allows you to continually post great content. Repurposing the content or elements of your experience creates multiple touch points throughout your marketing strategy.
Signature experiences and other out-of-the-box ideas are vital to keeping your Facebook community engaged and enthusiastic about your brand. The key is to find something that you can duplicate and build on over time.
Building Social Proof with Facebook Ads
Before most people make a buying decision, they want to know that their choice is smart. To get reassurance, they look to their friends for advice and recommendations. With the rise of social networks, word-of-mouth recommendations are essential for businesses in their efforts to gain popularity and expand the ranks of their clientele. Studies show that when it comes to buying decisions, people trust friends’ recommendations more than they do the actual brand. Facebook now capitalizes on this behavior by including social information, such as “Likes” right within your ads.
This approach takes word-of-mouth recommendations from Friends and promotes them as an integral part of Facebook Ads (see Figure 1-2). The ad now demonstrates social proof!

Figure 1-2: Example of an ad including social information — in this case, the number of Likes.
The term social proof refers to the psychological phenomenon of people being motivated to do things that they see other people doing. Interactions on social media sites, such as Facebook, have increased the influence and reach of social proof because now it’s much easier to instantly see what your friends are doing at any time.
The inclusion of social information reassures viewers that other people have taken action, essentially offering a testimonial, “I bought this!” or “I just ordered the best burger ever at Rocket Burgers!” These viral, instant recommendations may make the 2014 version of Facebook Ads much more powerful than the former version of Facebook Ads. The word-of-mouth add-on is a powerful tool to entice new users to check out your Facebook Page and your business; it may be enough to justify the expense of paid Facebook advertising, as discussed in Book VII.
Experimenting with Custom Apps
Book III, Chapter 2, explores custom apps. In many ways, custom apps (also known as custom pages or tabs) are the most important piece to your Facebook marketing strategy.
You can create multiple pages inside your Facebook Page. One powerful advanced strategy is to create a custom page to promote special products or events. Custom pages can give your product or event extra promotion and give it the push it needs to get even greater exposure.
If you have a physical event coming up, you might consider creating a custom page with a video from past events to showcase the experience. Then you can include the Facebook Comments feature from the social plug-in options to encourage people to talk about the event. This strategy showcases your event via your video, and the Comments section on the tab gets people talking.
Or you can use a custom app to encourage Likes, as the Atlanta History Center does in Figure 1-3, using the TabSite app (www.tabsite.com) from Digital Hill. Users must click the Like button at the top of the page in the first image to gain access to information about Swan House Capitol Tours on the lower image. (The Swan House at the History Center was one of the Georgia set locations used in the movie The Hunger Games: Catching Fire.)
If TabSite doesn’t appeal to you, consider Woobox as an alternative app for creating custom tabs as part of a Like campaign, as described in Book IX, Chapter 2.
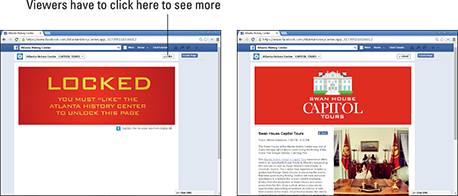
Courtesy of Atlanta History Center.
Figure 1-3: Viewers click the Like button on the custom page to see the information page below.
Targeting Your Audience with Custom Lists
As we discuss in Book II, Chapter 4, you can use your Profile (when appropriate) for business networking. Keeping up with all your Facebook Friends on your Profile can get a bit tricky. If you’re anything like us, you have a mix of family members, friends, acquaintances, potential clients, current clients, and even a few complete strangers as Facebook Friends on your Profile. At times, that volume makes it difficult to decide what you want to share with everyone on your Facebook Timeline.
The good news is that Facebook created a way to segment your Facebook Friends into special lists: smart and custom. The benefit of both types of lists is that they allow you to share your posts with smaller groups of people.
- Smart lists — which Facebook creates for you — stay up to date based on Profile info your Friends have in common with you, such as family, the city where you live, workplaces, or schools. Although Facebook creates these lists automatically, you can edit them at any time. To access your smart lists, look on the left sidebar of your Facebook Profile home page for the Lists section. Depending on the info in your Profile, you might see smart lists of your relatives, Facebook Friends in your town, and Facebook Friends you went to school with.
- Custom lists are what you create as a way to selectively group certain people you’ve added as Friends. Click More next to Friends (see Figure 1-4) to see your custom lists. The name of your custom list and its members are visible only to you. If you send a post to a custom list, those on the list can see whom else that post was sent to, but they won’t see the name of your list. For example, if you name a list Prospects I Plan to Land as Big-Money Clients, the people on that list won’t see what you called it — so get as creative as you like!
A benefit of using both smart lists and custom lists is that they allow you to share your posts with smaller groups of people. If you just had a family reunion and took a bunch of photos, for example, you may choose to share those photos only with those in your Family smart list. Overall, these lists allow you to intelligently choose whom you talk to and what you want to share with them.
Whenever you want to share something with a specific list, you can use the drop-down audience selector in the status update box and pick one of your lists. (For more info on the audience selector, see Book I, Chapter 1.)

Courtesy of Watermelon Mountain Web Marketing (WatermelonWeb.com).
Figure 1-4: To access Custom lists, click More next to Friends in the left sidebar of your Facebook Profile page.
So how does all this relate to your Facebook marketing strategy? We allude to it a bit when we jokingly mention the list Prospects I Plan to Land as Big-Money Clients earlier in this section. Because you likely have potential clients and customers mixed with your Facebook Friends via your Profile, custom lists are a great way to segment your personal friends from current and potential customers. You can communicate with them on a regular basis from your Profile. You can create multiple lists — depending on how you want to communicate with different groups — and then post information, photos, videos, and promotions that you know each group will find valuable. When you laser-focus your communication with custom lists, your marketing messages will pack a bigger punch, and get you even better results.
Creating your custom lists
Here’s how you set up a custom list:
- Point your browser to www.facebook.com and log in to your account.
By default, you land on your home page.
- In the left column, hover your mouse over the word Friends.
- When the word More appears, click it.
- Click Create List (top-right corner of your screen).
A pop-up window appears, prompting you to name your list.
- Type a name for your list.
The name of your list will be visible only to you — not anyone else on Facebook, including those you add to the list.
- In the Members box, below the List Name box, type in the names of the people you want to add to your new list, as shown in Figure 1-5.
Each time you begin to type a new name, a drop-down list appears with potential Friends to add. You will want to know the names of the Friends you want to add in advance, so you can type them in at this time.

Courtesy of Watermelon Mountain Web Marketing (WatermelonWeb.com).
Figure 1-5: Adding members to a new custom list.
Adding custom lists to your Favorites
Custom lists come in handy when you’re posting, but you can also use them to filter which posts you see in your News Feed stream. To see only the updates from people in a specific list, you just click that list; Facebook filters your posts on your News Feed page to show you only status updates from the people in the specific list.
To make things even easier for you, you can add custom lists to your Favorites. The Favorites section appears in the top-left column on your home page as a way to quickly access the links you use most. To add a list to your Favorites, follow these steps:
- Log in to your Facebook account.
By default, you land on your home page.
- In the left column, hover your mouse over your custom list.
A little blue pencil (the icon Facebook uses to indicate an edit opportunity) appears to the left of the list name.
- Click the blue pencil.
A drop-down menu appears, with the option to add this list to Favorites.
- Click Add to Favorites.
Creating Interests Lists to Focus on the People Who Matter Most to Your Business
Because of the sheer number of people on Facebook (more than one billion!), it’s easy to get overwhelmed by all the information users are posting. One smart strategy for staying focused is to customize your News Feed to ensure that you see only the Facebook posts that matter most to you and the success of your business. One way to make this happen is to create Interests lists, as shown in Figure 1-6
Interests lists are different from the custom lists mentioned earlier in this chapter: You can add people you’re subscribed to, people you’re Friends with, and Pages you like to your Interests lists, making them even more useful and interesting.
Advantages of creating Interests lists include
- Not missing out on important updates by your favorite people and Pages
- The ability to share your Interests lists with the world
- The convenience of adding yourself or your Page to your own Interests list so that when others subscribe to it, they subscribe to your updates as well
To see what Interests lists look like, go to www.facebook.com/addlist and check out the Add Interests section.
Alternatively, you can go to your Facebook home page; in the left navigation pane, you see Interests listed near the bottom, below Groups. You may have to click the More link to get specific Interests lists to appear.
To create your own Interests list or subscribe to popular ones created by other Facebook users, click Add Interests, as shown in Figure 1-7. As you can see from the first few suggested Interests lists, the popularity of Interests lists can be great. Some have more than 75,000 subscribers!
To set up an Interests list, follow these steps:
- Point your browser to www.facebook.com/addlist and log in to your account if necessary.

Courtesy of Watermelon Mountain Web Marketing (WatermelonWeb.com).
Figure 1-6: Your existing Facebook Interests lists appear in the left sidebar.
- Click the +Create List button.
The window that pops up allows you to search Pages you like, people you subscribe to, and Friends. You can also browse people and Pages by category.
- Click to select the Pages, Subscriptions, or Friends you want to add to your list.
- Click Next when you finish adding people and Pages.
- Type a name for your list.
- Choose whether you want your list to be seen publicly, by Friends, or only by you.
- Click Done.
You’re taken to that list immediately, and you see the latest updates by the people and Pages you added.

Courtesy of Watermelon Mountain Web Marketing (WatermelonWeb.com).
Figure 1-7: Facebook offers suggestions for your Interests lists.
This feature works only with Profile pages, not from business Pages.
To edit your new Interests listlist, click the Manage List drop-down menu near the top-right corner of the page. There, you see the options to rename your list, edit your list (including the option to add or remove people and Pages), choose update types, set notification settings, or delete the list.
To access your list, find the Interests section in your left sidebar. Your newly created or subscribed-to lists are displayed here, but you may have to click More to find them. If you’d like to get easier access to your list, hover over the list name, click the pencil icon when it appears, and select Add to Favorites. Now your Interests list will be below your Favorites near the top of your left sidebar.
You can add a Profile or Page to your Interests lists (or create new lists) when viewing a person’s Profile or Page by clicking the settings icon (gear) under the Profile’s or Page’s Timeline Cover photo. In the drop-down menu, you see Add to Interests lists, as shown in Figure 1-8.

Courtesy of Mountain Springs Lake Resort & Lodge (MSLresort.com).
Figure 1-8: From a Profile or a Page, you can add people to an Interests list.
Using Facebook Offers for Your Local or Online Business
A Facebook offer (as shown in Figure 1-9) is like a coupon that people claim on Facebook, and then either bring in to your place of business or go online to redeem. When you create and promote your offer, it goes out into News Feeds, and your Likes can click to claim it.
You can use Facebook Offers to create a deal of the day, a promotional coupon, or another incentive to encourage people who like your page to shop your online store or a store at their location.
Fifty people must like your Page before you can create an offer.
Tempting offers can go viral quickly. When people claim your offer, their acceptance posts to their News Feeds for all their Friends to see; if those Friends in turn view and accept the offer, then the Friends of Friends will learn about the offer, and so on.
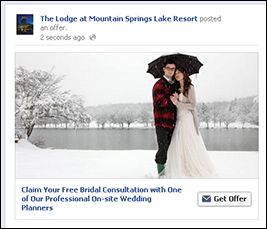
Courtesy of Mountain Springs Lake Resort & Lodge (MSLresort.com).
Figure 1-9: Example of a Facebook offer from Mountain Springs Lake Resort.
Creating and promoting a Facebook offer
This is a two-part process. First you create the Facebook offer. Then you market it (optional) with a Promoted post to your Likes and indirectly to their Friends. (For more information on Promoted Posts, see Book VII, Chapter 2.)
Facebook offers are straightforward to set up, either when you are logged into your Page, or from the Ads Create tool (described in detail in Book VII, Chapter 2).
Here’s how to do it from your Page. (We show you how to start this process from the Ads Create tool later.)
- Log in as the Admin and select the Page you want from the left navigation. Click the Offer, Event + icon that appears in the lower-left section of your Timeline, as shown in Figure 1-10.
A drop-down menu appears.
- Click Offer.
The Create Offer pop-up window (as shown in Figure 1-11) lets you enter the details of your offer.

Courtesy of Mountain Springs Lake Resort & Lodge (MSLresort.com).
Figure 1-10: The Facebook Offer option appears after clicking the Offer, Event + button on your Page.

Courtesy of Mountain Springs Lake Resort & Lodge (MSLresort.com).
Figure 1-11: The Create Offer pop-up.
- Write a title for your offer in the first box.
You have only 25 characters, so make the headline compelling and succinct.
- Write a Description for your offer in the box below the Title.
You have 90 characters to state a concise and tempting benefit.
- Add a photo by clicking the Upload Image link.
A list of files from your computer appears, so you can upload your image choice in the standard manner. The recommended image size is 1200 x 627 pixels, so be sure that your image is large enough.
- Set the expiration date for your offer by clicking on the calendar. Select the date you want your offer to end.
- Under Claims Limit, click No Limit or constrain the number available by entering the number of offers you are willing to honor.
- Within the Location text field, begin typing the geographic location that you wish to target.
A drop-down menu will appear with choices. You can choose more than one location.
- Click See More Audience Options to target your audience by gender and age.
You also have the option to select four to ten interest areas.
- You can choose to Boost Your Offer or select the Not Now box.
Boosting your offer means that you are creating a Promoted post, which costs money! You set the spending limit that you want. Facebook will determine the actual cost of a Promoted post on a CPM (cost per mile) scale based on factors including your location (if you chose to include it), and the demographic targets you chose. The cost will be charged against your limit. The budget you choose applies for the duration of the offer. If you set a larger budget, your reach increases. Select Not Now if you do not wish to create a Promoted post. You can always do this later from the Page, as seen in Figure 1-12, or from the Ads Create tool.
- Another More Options section below the Boost (not visible in Figure 1-12) allows you to enter a Start Date and Online Redemption Link, as well as optional Terms and Conditions specific to your offer.
The Payment Account field automatically selects and displays your existing account.

Courtesy of Mountain Springs Lake Resort & Lodge (MSLresort.com).
Figure 1-12: You always have the option to boost your offer from your Page at a later time.
- Review the Preview of your Offer, which appears in the upper-left corner of the Create Offer pane.
It shows the offer as it will appear on your Timeline.
- Click the Create Offer button in the bottom-right corner of the Create Offer Pane when you are satisfied.
Your offer will run immediately.
- You will receive an e-mail copy of the redemption information that Facebook will send out whenever someone claims an offer, as shown in Figure 1-13.
You can’t customize this e-mail, which generally tells people to bring the offer into your storefront or to go to your website to redeem it.

Figure 1-13: Redemption info sent via e-mail.
Creating and promoting offers from the Ads Create tool
As an alternative, you can create an offer and promote it from the Ads Create tool following these steps:
- Log in and navigate to www.facebook.com/ads/create. Click the Offer Claims button at the bottom of the left column.
- To create a new offer, click the + sign in the right pane, as shown in Figure 1-14.
- Complete the fields in the series of three pop-up windows that appear.
The fields are similar to those that appear when you create an offer starting with your Page. Follow through these step by step.
- Click the Post Offer button when you are done.
Your offer starts to run immediately.
- To promote this or other offers, return to the Ads Create tool at www.facebook.com/ads/create. Click Offer Claims in the left pane and select your offer from the drop-down list in the right pane, as seen in Figure 1-14.
- Click the Continue button.
The next screen provides options for promoting this post. (See Book VII, Chapter 2, for more details.)
- When you’re finished, select the Review Order or Place Order button.
Choices may depend on whether or not you have already selected a payment method. After you’re done here, you’ll be directed to the Ads Manager tool to view reports (see Book VII, Chapter 4).

Courtesy of Mountain Springs Lake Resort & Lodge (www.MSLresort.com).
Figure 1-14: You can create and promote an offer using the Ads Create tool.
When your offer has been published, you can see how many people have claimed your offer, but not who claimed it.
The overall strategy of creating a Facebook offer and using a Promoted post to market that offer is a great way to introduce your Facebook Likes to your special promotions, discounts, and coupons. If you have a local business and are looking to gain even more foot traffic for your business, you definitely want to test this strategy!
Expanding Your Page’s Exposure
The way to get seen on Facebook is to create multiple reasons for people to engage with your Page. Try these tips to increase the chances that your Page will be seen often:
- Set up your vanity URL for your Facebook Page. See Book II, Chapter 3.
- Create a Timeline Cover image that’s the maximum size available to give your Page a professional, well-branded look and feel. See Book II, Chapter 2.
- Create a custom page that makes the incentive available only after someone likes your page (refer to Figure 1-3). This strategy encourages new viewers to like your site to obtain the reward.
- Add a Facebook app to your Page. Consider one that will increase activity and encourage more users to visit your page. See Book V, Chapter 1.
- Run a Facebook Ad campaign for 30 days. See Book VII, Chapter 1.
- Create a special promotion in an ad (see Book VII, Chapter 2), test out Facebook Offers by creating a coupon and post about it on your Page.
- Embed a social plug-in on your website to drive up the number of Likes on your Page. See Book VIII, Chapter 2.
Engaging with Likes
Communicating with your people who like your page helps keep them engaged — and coming back. Here are a few ways to keep the lines of communication wide open:
- Create a Facebook experience to execute on your business Page. Think of what your Likes want most from you, and deliver it as a Facebook experience. See “Creating a Facebook Experience,” earlier in this chapter.
- Ask more questions. The more you make things about people who visit your page and less about you, the more your base of Likes will flourish. Mix up your questions so you have some related to your business and industry, some that get people thinking in new ways, and some that entertain and keep things light. See Book IV, Chapter 2.
- Set up notifications to get continuous alerts when your people post on your Page. See Book II, Chapter 3.
- If you’re having an event online or offline, consider setting up a special custom app to promote the event. (For extra credit, embed a video and a Comments plug-in.) See Book III, Chapter 2.
- Turn your Facebook Page into a lead generator by adding a name and e-mail box to your Facebook Page. This box will help you capture the e-mail addresses of your Facebook Likes. See Book II, Chapter 2.
Getting Viral Exposure
Going viral isn’t so great in the offline world, but it’s the best of all possible worlds online. Here are a few ways to position your Page to get lots of viral exposure:
- Connect your other social media accounts, such as Twitter and LinkedIn, to your Facebook Page to ensure that your posts are getting even better reach and exposure. See Book III, Chapter 4.
- Stream a live video on your Facebook Page by using the Livestream application (www.livestream.com). Live activity will create a buzz! See Book VIII, Chapter 3.
- Create an event by using the Events feature on your Facebook Page. See Book VI, Chapter 1.
- Pull your blog into your Facebook Page by using the Networked Blogs app. When you publish a blog, it automatically gets pulled onto your Facebook Timeline and into the News Feeds of your Likes. See Book III, Chapter 3.
- Run a contest on your Page, and offer an enticing giveaway to help spread the buzz. Try the Wildfire or Offerpop app for contest support. See Book VI, Chapter 2.
Reaching a new audience with hashtags
Hashtags in Facebook, which can be seen in Figure 1-15, are similar to hashtags in Twitter: a way for people to find posts about the same topic. Facebook rolled out hashtags, which are especially valuable for trending topics, in June 2013.
Before using a hashtag for your post, search Facebook for other posts using your desired tag to ensure the content posted for that hashtag is relevant and appropriate. Enter # followed by your search term into the search bar at the top of the page (#Marketing, for example) and press Enter/Return. The results will display recent posts that include that hashtag.
After you confirm which hashtag you want, simply include it somewhere in your post. Facebook, like Twitter, will turn the hashtag into a link to that search term.
For instance, if you write a Facebook post about social media, use or add #socialmedia to your post. Then, when someone searches for #socialmedia, your post will show up along with all other posts on the topic that appeared within the past few weeks or so. Unfortunately, there isn’t a way to filter the results for the most recent.
Hashtags are expected to increase reach because a publicly shared post would be seen not just by your friends or people who like your page, but by everyone searching for #socialmedia or other specified tag.
 Current studies show that hashtags increase reach on Twitter, but not on Facebook; in some cases, they may have a negative effect on Facebook viral exposure. Edgerank, a Facebook analytics company, hypothesizes that this may be left over from hashtags being used in mainly promotional posts.

Courtesy of Lincoln College.
Figure 1-15: Hashtags make it easy for searchers to find recent, related posts on a particular topic.
Watching the future: Autoplay video ads in News Feeds
In December 2013, Facebook cautiously began testing autoplay video ads in News Feeds. The videos begin playing as viewers scroll through the News Feed on their own Pages. Viewers will hear the videos, which are available on desktops or on mobile devices connected to Wi-Fi, only if they tap them. Facebook claims that it has “seen a more than 10% increase in people watching, liking, sharing and commenting on [autoplay] videos.”
 Initially, Facebook opened this option only to select marketers willing to pay $1–$2.5 million dollars for a 15-second video. Facebook has positioned this premium option to attract big brands with deep pockets that wish to “increase awareness and attention over a short period of time… . From launching new products to shifting brand sentiment, this video format is ideal for marketers who are looking to make a large-scale impact,” Facebook claims. If past experience is a guide, eventually Facebook will make this option available to smaller advertisers at a more accessible price. Stay tuned!
Autoplay videos too rich for your blood? You can always embed either streaming or archived videos in your own or your friends’ Timeline and/or News Feeds. See Chapter 3 of this minibook for more information.
Follow your prospects through third-party retargeting services
Facebook Retargeting with FBX (Facebook Exchange) is a third-party, cookie-based technique that displays ads on Facebook related to a user’s web-browsing activity outside of Facebook. Similar to retargeting services available through Google AdWords or other online advertising agencies, Facebook Retargeting reaches only users who have already visited your website.
If someone browses your website without completing a purchase or another desired action, the retargeting service places a cookie (a piece of identifying code) on his or her computer. When those visitors then log into Facebook, they may see an ad for your company or product in the right column of their Facebook Page (as in Figure 1-16) or in their News Feed.
Facebook Exchange is currently limited to desktop ads; retargeting ads aren’t visible on Facebook’s mobile site. Facebook allows marketers to purchase retargeting ads through Custom Audiences in the Facebook Power Editor. For more information about the Power Editor, please see Book VII, Chapter 3.
To use retargeting ads, you must select a Facebook Preferred Marketing Developer like those listed here. Follow the directions on the marketing developer’s website.
- AdRoll: www.adroll.com
- Quantcast: www.quantcast.com/advertise/
- Perfect Audience: www.perfectaudience.com
- Adobe Social: http://www.adobe.com/solutions/social-marketing.html
You’ll find more options for Facebook Preferred Marketing Developers, who have the capability of placing cookies on other people’s websites, at www.facebook-pmdcenter.com/category/fbx.
Prices and ad placement vary depending on which third-party marketing service you choose. However, all these services use a bidding system in which you set the highest price you’re willing to pay per click (PPC) or per impression (CPM). If your bid is high enough, your ad will appear on Facebook Pages seen by users who have already visited your website, as shown in Figure 1-16.

Courtesy of Watermelon Mountain Web Marketing (WatermelonWeb.com).
Figure 1-16: Retargeting ads, like this one from Modcloth, look like other Facebook ads. Users may not realize they’ve been “followed” to Facebook.